2.2 运行脚本
原文链接: https://docs.astral.sh/uv/guides/scripts/
2.2 运行脚本
Python 脚本是用于独立执行的文件,例如通过 python <script>.py 执行。使用 uv 执行脚本可以确保脚本依赖得到妥善管理,而无需手动管理环境。
注意
如果你不熟悉 Python 环境:每个 Python 安装都有一个可以安装包的环境。通常建议创建虚拟环境,以隔离每个脚本所需的包。uv 会自动为你管理虚拟环境,并更倾向于用声明式方式管理依赖。
运行没有依赖的脚本
如果你的脚本没有依赖,可以直接用 uv run 执行:
1
2
| # example.py
print("Hello world")
|
1
2
| $ uv run example.py
Hello world
|
同样,如果你的脚本只依赖标准库中的模块,也无需做其他事情:
1
2
3
4
| # example.py
import os
print(os.path.expanduser("~"))
|
1
2
| $ uv run example.py
/Users/astral
|
可以向脚本传递参数:
1
2
3
4
| # example.py
import sys
print(" ".join(sys.argv[1:]))
|
1
2
3
4
5
| $ uv run example.py test
test
$ uv run example.py hello world!
hello world!
|
此外,你的脚本还可以直接从 stdin 读取:
1
| $ echo 'print("hello world!")' | uv run -
|
或者,如果你的 shell 支持 here-document:
1
2
3
| uv run - <<EOF
print("hello world!")
EOF
|
注意,如果你在项目(即包含 pyproject.toml 的目录)中使用 uv run,它会在运行脚本之前安装当前项目。如果你的脚本不依赖该项目,请使用 --no-project 标志跳过:
1
2
| $ # 注意:`--no-project` 标志必须放在脚本名之前。
$ uv run --no-project example.py
|
关于在项目中工作的更多细节,请参阅项目指南。
运行带有依赖的脚本
当脚本需要其他包时,这些包必须安装到脚本运行所在的环境中。uv 更倾向于按需创建这些环境,而不是使用长期存在、需要手动管理依赖的虚拟环境。这要求显式声明脚本所需的依赖。通常建议使用项目或内联元数据来声明依赖,不过 uv 也支持在每次调用时请求依赖。
例如,下面的脚本需要 rich。
1
2
3
4
5
6
| # example.py
import time
from rich.progress import track
for i in track(range(20), description="For example:"):
time.sleep(0.05)
|
如果没有指定依赖就执行,这个脚本会失败:
1
2
3
4
5
| $ uv run --no-project example.py
Traceback (most recent call last):
File "/Users/astral/example.py", line 2, in <module>
from rich.progress import track
ModuleNotFoundError: No module named 'rich'
|
使用 --with 选项请求该依赖:
1
2
| $ uv run --with rich example.py
For example: ━━━━━━━━━━━━━━━━━━━━━━━━━━━━━━━━━━━━━━━━ 100% 0:00:01
|
如果需要特定版本,可以为请求的依赖添加约束:
1
| $ uv run --with 'rich>12,<13' example.py
|
可以重复使用 --with 选项来请求多个依赖。
注意,如果在项目中使用 uv run,这些依赖会额外包含在项目依赖之外。要退出该行为,请使用 --no-project 标志。
创建 Python 脚本
Python 最近新增了内联脚本元数据的标准格式。它允许选择 Python 版本并定义依赖。使用 uv init --script 可以初始化带有内联元数据的脚本:
1
| $ uv init --script example.py --python 3.12
|
声明脚本依赖
内联元数据格式允许在脚本自身中声明脚本的依赖。
uv 支持为你添加和更新内联脚本元数据。使用 uv add --script 声明脚本依赖:
1
| $ uv add --script example.py 'requests<3' 'rich'
|
这会在脚本顶部添加一个 script 段落,用 TOML 声明依赖:
 1
 2
 3
 4
 5
 6
 7
 8
 9
10
11
12
13
14
| # example.py
# /// script
# dependencies = [
# "requests<3",
# "rich",
# ]
# ///
import requests
from rich.pretty import pprint
resp = requests.get("https://peps.python.org/api/peps.json")
data = resp.json()
pprint([(k, v["title"]) for k, v in data.items()][:10])
|
uv 会自动创建包含运行该脚本所需依赖的环境,例如:
 1
 2
 3
 4
 5
 6
 7
 8
 9
10
11
12
13
| $ uv run example.py
[
│ ('1', 'PEP Purpose and Guidelines'),
│ ('2', 'Procedure for Adding New Modules'),
│ ('3', 'Guidelines for Handling Bug Reports'),
│ ('4', 'Deprecation of Standard Modules'),
│ ('5', 'Guidelines for Language Evolution'),
│ ('6', 'Bug Fix Releases'),
│ ('7', 'Style Guide for C Code'),
│ ('8', 'Style Guide for Python Code'),
│ ('9', 'Sample Plaintext PEP Template'),
│ ('10', 'Voting Guidelines')
]
|
重要
使用内联脚本元数据时,即使 uv run 在项目中使用,项目的依赖也会被忽略。此时无需 --no-project 标志。
uv 同样会遵循 Python 版本要求:
1
2
3
4
5
6
7
8
9
| # example.py
# /// script
# requires-python = ">=3.12"
# dependencies = []
# ///
# 使用 Python 3.12 新增的一些语法
type Point = tuple[float, float]
print(Point)
|
注意
即使 dependencies 字段为空,也必须提供该字段。
uv run 会搜索并使用所需的 Python 版本。如果该 Python 版本尚未安装,它会自动下载 —— 更多细节请参阅 Python 版本文档。
使用 shebang 创建可执行文件
添加 shebang 可以让脚本无需通过 uv run 即可执行 —— 这样就能方便地运行位于 PATH 或当前目录中的脚本。
例如,创建一个名为 greet 的文件,内容如下:
1
2
3
| #!/usr/bin/env -S uv run --script
print("Hello, world!")
|
确保脚本可执行,例如用 chmod +x greet,然后运行它:
1
2
| $ ./greet
Hello, world!
|
在这种场景下同样支持声明依赖,例如:
 1
 2
 3
 4
 5
 6
 7
 8
 9
10
| #!/usr/bin/env -S uv run --script
#
# /// script
# requires-python = ">=3.12"
# dependencies = ["httpx"]
# ///
import httpx
print(httpx.get("https://example.com"))
|
使用替代包索引
如果你希望使用替代的包索引来解析依赖,可以通过 --index 选项提供索引:
1
| $ uv add --index "https://example.com/simple" --script example.py 'requests<3' 'rich'
|
这会把包索引数据写入内联元数据:
1
2
| # [[tool.uv.index]]
# url = "https://example.com/simple"
|
如果访问该包索引需要身份验证,请参阅包索引文档。
锁定依赖
uv 支持使用 uv.lock 文件格式为 PEP 723 脚本锁定依赖。与项目不同,脚本必须通过 uv lock 显式锁定:
1
| $ uv lock --script example.py
|
运行 uv lock --script 会在脚本旁边创建一个 .lock 文件(例如 example.py.lock)。
锁定之后,uv run --script、uv add --script、uv export --script 和 uv tree --script 等后续操作会复用已锁定的依赖,并在必要时更新锁文件。
如果不存在这样的锁文件,uv export --script 等命令仍能正常工作,但不会创建锁文件。
提高可复现性
除了锁定依赖之外,uv 还支持在内联脚本元数据的 tool.uv 段落中使用 exclude-newer 字段,以限制 uv 只考虑在特定日期之前发布的发行版。当你稍后再次运行脚本时,这有助于提高可复现性。
日期应使用 RFC 3339 时间戳格式(例如 2006-12-02T02:07:43Z)。
 1
 2
 3
 4
 5
 6
 7
 8
 9
10
11
12
| # example.py
# /// script
# dependencies = [
# "requests",
# ]
# [tool.uv]
# exclude-newer = "2023-10-16T00:00:00Z"
# ///
import requests
print(requests.__version__)
|
使用不同的 Python 版本
uv 允许在每次调用脚本时请求任意的 Python 版本,例如:
1
2
3
4
| # example.py
import sys
print(".".join(map(str, sys.version_info[:3])))
|
1
2
3
| $ # 使用默认的 Python 版本,在你的机器上可能不同
$ uv run example.py
3.12.6
|
1
2
3
| $ # 使用指定的 Python 版本
$ uv run --python 3.10 example.py
3.10.15
|
关于请求 Python 版本的更多细节,请参阅 Python 版本请求文档。
使用 GUI 脚本
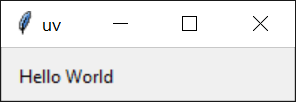
在 Windows 上,uv 会使用 pythonw 运行以 .pyw 结尾的脚本:
1
2
3
4
5
6
7
8
9
| # example.pyw
from tkinter import Tk, ttk
root = Tk()
root.title("uv")
frm = ttk.Frame(root, padding=10)
frm.grid()
ttk.Label(frm, text="Hello World").grid(column=0, row=0)
root.mainloop()
|
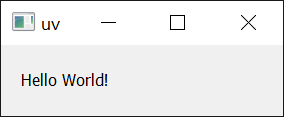
带依赖的脚本同样可以这样运行:
 1
 2
 3
 4
 5
 6
 7
 8
 9
10
11
12
13
14
15
16
17
| # example_pyqt.pyw
import sys
from PyQt5.QtWidgets import QApplication, QWidget, QLabel, QGridLayout
app = QApplication(sys.argv)
widget = QWidget()
grid = QGridLayout()
text_label = QLabel()
text_label.setText("Hello World!")
grid.addWidget(text_label)
widget.setLayout(grid)
widget.setGeometry(100, 100, 200, 50)
widget.setWindowTitle("uv")
widget.show()
sys.exit(app.exec_())
|
1
| PS> uv run --with PyQt5 example_pyqt.pyw
|
后续步骤
要进一步了解 uv run,请参阅命令参考。
或者继续阅读,了解如何用 uv 运行和安装工具。