uv
原文链接: https://docs.astral.sh/uv/
uv
用 Rust 编写的极速 Python 包与项目管理器。
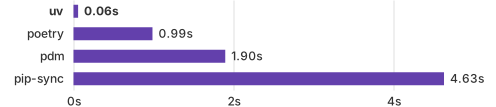
亮点
- 用一款工具替代
pip、pip-tools、pipx、poetry、pyenv、twine、virtualenv 等众多工具。 - 比
pip 快 10-100 倍。 - 提供完善的项目管理能力,并带有通用锁文件。
- 运行脚本,支持内联依赖元数据。
- 安装和管理 Python 版本。
- 运行和安装以 Python 包形式发布的工具。
- 包含一个 pip 兼容接口,让你在熟悉的 CLI 上获得性能提升。
- 支持 Cargo 风格的工作区,适用于可扩展的项目。
- 磁盘空间高效,通过全局缓存对依赖去重。
- 无需 Rust 或 Python 即可通过
curl 或 pip 安装。 - 支持 macOS、Linux 和 Windows。
uv 由 Astral 支持,他们也是 Ruff 的创造者。
安装
使用官方独立安装器安装 uv:
1
| $ curl -LsSf https://astral.sh/uv/install.sh | sh
|
1
| PS> powershell -ExecutionPolicy ByPass -c "irm https://astral.sh/uv/install.ps1 | iex"
|
然后,查看第一步或继续阅读下面的简要概述。
提示
uv 也可以通过 pip、Homebrew 等方式安装。在安装页面上查看所有安装方式。
项目
uv 管理项目依赖和环境,支持锁文件、工作区等,与 rye 或 poetry 类似:
 1
 2
 3
 4
 5
 6
 7
 8
 9
10
11
12
13
14
15
16
17
18
19
20
21
22
23
| $ uv init example
Initialized project `example` at `/home/user/example`
$ cd example
$ uv add ruff
Creating virtual environment at: .venv
Resolved 2 packages in 170ms
Built example @ file:///home/user/example
Prepared 2 packages in 627ms
Installed 2 packages in 1ms
+ example==0.1.0 (from file:///home/user/example)
+ ruff==0.5.4
$ uv run ruff check
All checks passed!
$ uv lock
Resolved 2 packages in 0.33ms
$ uv sync
Resolved 2 packages in 0.70ms
Checked 1 package in 0.02ms
|
参见项目指南开始使用。
uv 也支持构建和发布项目,即使这些项目并非由 uv 管理。参见打包指南了解更多。
脚本
uv 为单文件脚本管理依赖和环境。
创建一个新脚本,并添加声明其依赖的内联元数据:
1
2
3
4
| $ echo 'import requests; print(requests.get("https://astral.sh"))' > example.py
$ uv add --script example.py requests
Updated `example.py`
|
然后,在隔离的虚拟环境中运行该脚本:
1
2
3
4
| $ uv run example.py
Reading inline script metadata from: example.py
Installed 5 packages in 12ms
<Response [200]>
|
参见脚本指南开始使用。
工具
uv 执行和安装由 Python 包提供的命令行工具,与 pipx 类似。
使用 uvx(uv tool run 的别名)在临时环境中运行工具:
 1
 2
 3
 4
 5
 6
 7
 8
 9
10
11
12
13
14
| $ uvx pycowsay 'hello world!'
Resolved 1 package in 167ms
Installed 1 package in 9ms
+ pycowsay==0.0.0.2
"""
------------
< hello world! >
------------
\ ^__^
\ (oo)\_______
(__)\ )\/\
||----w |
|| ||
|
用 uv tool install 安装工具:
1
2
3
4
5
6
7
8
| $ uv tool install ruff
Resolved 1 package in 6ms
Installed 1 package in 2ms
+ ruff==0.5.4
Installed 1 executable: ruff
$ ruff --version
ruff 0.5.4
|
参见工具指南开始使用。
Python 版本
uv 安装 Python,并允许在版本之间快速切换。
安装多个 Python 版本:
1
2
3
4
5
6
7
8
| $ uv python install 3.10 3.11 3.12
Searching for Python versions matching: Python 3.10
Searching for Python versions matching: Python 3.11
Searching for Python versions matching: Python 3.12
Installed 3 versions in 3.42s
+ cpython-3.10.14-macos-aarch64-none
+ cpython-3.11.9-macos-aarch64-none
+ cpython-3.12.4-macos-aarch64-none
|
按需下载 Python 版本:
 1
 2
 3
 4
 5
 6
 7
 8
 9
10
| $ uv venv --python 3.12.0
Using CPython 3.12.0
Creating virtual environment at: .venv
Activate with: source .venv/bin/activate
$ uv run --python pypy@3.8 -- python
Python 3.8.16 (a9dbdca6fc3286b0addd2240f11d97d8e8de187a, Dec 29 2022, 11:45:30)
[PyPy 7.3.11 with GCC Apple LLVM 13.1.6 (clang-1316.0.21.2.5)] on darwin
Type "help", "copyright", "credits" or "license" for more information.
>>>>
|
在当前目录中使用特定的 Python 版本:
1
2
| $ uv python pin 3.11
Pinned `.python-version` to `3.11`
|
参见安装 Python 指南开始使用。
pip 接口
uv 为常用的 pip、pip-tools 和 virtualenv 命令提供了可直接替换的实现。
uv 在它们的接口基础上扩展了高级特性,例如依赖版本覆盖、与平台无关的解析、可复现的解析、替代解析策略等。
使用 uv pip 接口,无需改变现有工作流即可迁移到 uv,并体验 10-100 倍的提速。
将 requirements 编译为与平台无关的 requirements 文件:
1
2
3
4
| $ uv pip compile requirements.in \
--universal \
--output-file requirements.txt
Resolved 43 packages in 12ms
|
创建虚拟环境:
1
2
3
4
| $ uv venv
Using CPython 3.12.3
Creating virtual environment at: .venv
Activate with: source .venv/bin/activate
|
安装已锁定的 requirements:
1
2
3
4
5
6
7
| $ uv pip sync requirements.txt
Resolved 43 packages in 11ms
Installed 43 packages in 208ms
+ babel==2.15.0
+ black==24.4.2
+ certifi==2024.7.4
...
|
参见 pip 接口文档开始使用。
了解更多
参见第一步,或直接跳到指南开始使用 uv。