5.1 创建基于文稿的应用
原文链接: https://developer.apple.com/documentation/swiftui/creating-a-document-based-app
5.1 创建基于文稿的应用
构建让人们能够用协调式文件访问来打开、编辑和存储文件的应用。
概述
借助基于文稿的应用,人们可以创建和管理自己的文件,例如文本文稿、绘图和电子表格。iOS 27、macOS 27 和 visionOS 27 中提供的 Document 协议让你可以直接访问文稿的文件 URL,因此你可以:
- 读写文件
- 把 URL 传给 Core Graphics、AVFoundation 或 PDFKit 等其他框架,以便在长时间操作期间报告进度
- 用 makeFileCoordinator() 提供的
FileCoordinator 安全地访问文件
Document 这个组合协议本身没有要求,但它遵循 ReadableDocument 和 WritableDocument。借助它,你可以很方便地声明类型的遵循性,如下所示:
1
2
| @Observable
final class TextDocument: Document { }
|
由于 Document 是引用类型,SwiftUI 不必在每次变更时重建文稿,而且你可以用 @Observable 宏观察单个属性的变化。
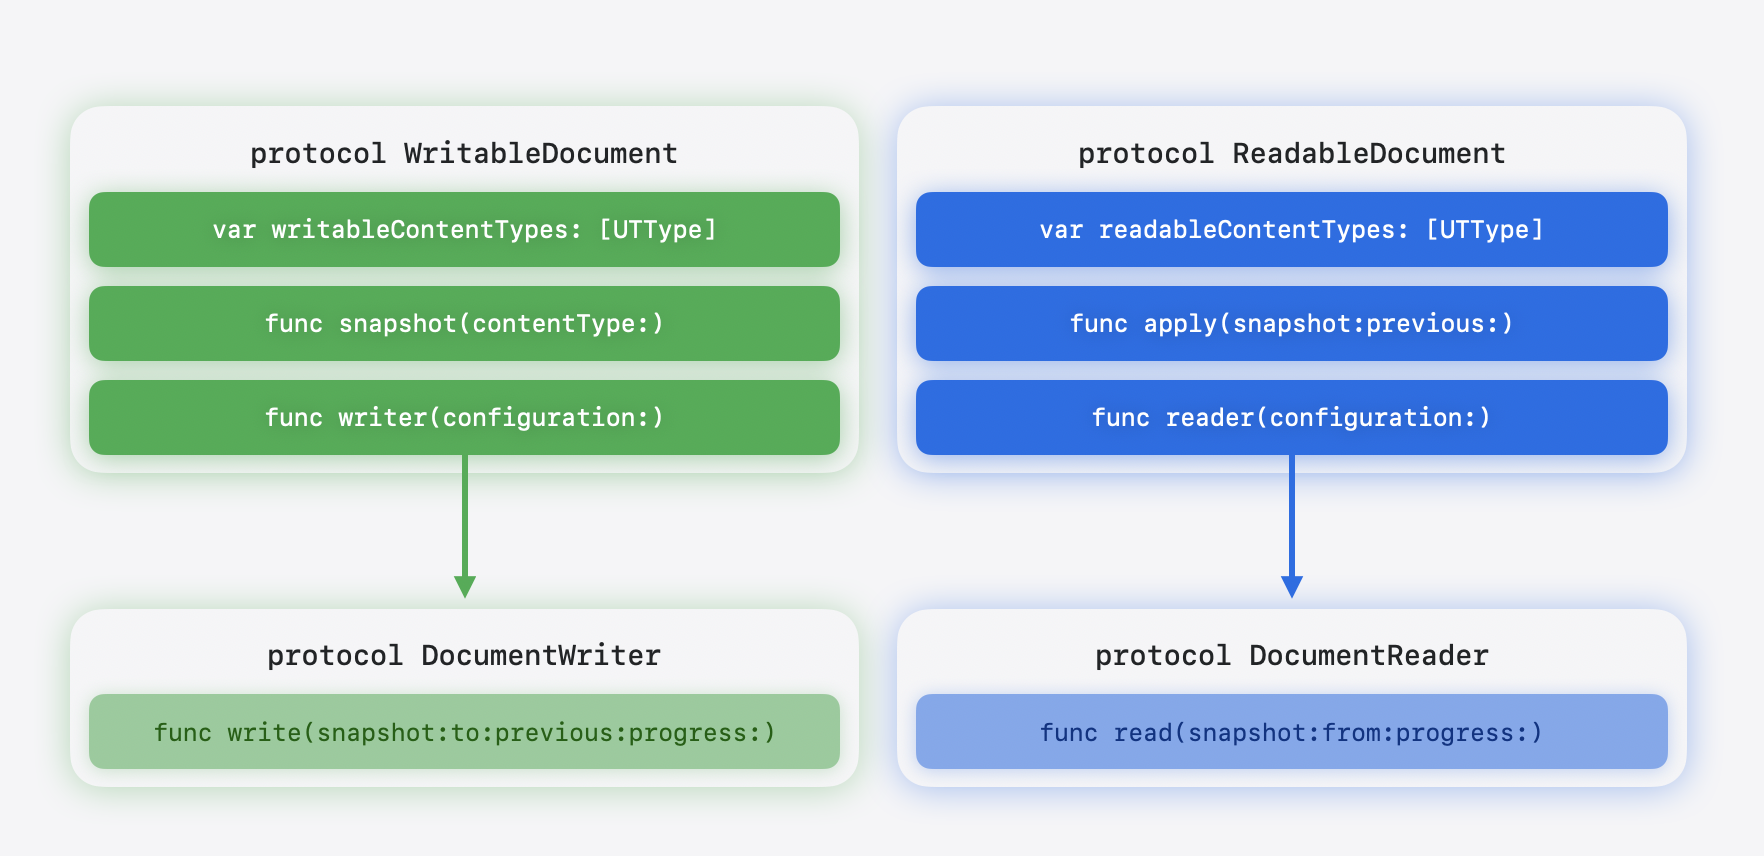
下图展示文稿协议与读取器、写入器协议之间的关系:
搭建基于文稿的应用
要启用文稿基础设施——自动存储、文件协调、文件对话框、键盘快捷键、冲突解决等等——请把 DocumentGroup 或 DocumentGroupLaunchScene 用作应用的第一个场景。在 iOS 上,把信息属性列表中的 UISupportsDocumentBrowser 设为 YES,即可呈现文稿浏览器。
一个最小的基于文稿的应用是这样:
 1
 2
 3
 4
 5
 6
 7
 8
 9
10
| @main
struct NotesApp: App {
var body: some Scene {
DocumentGroup { document in
TextEditorView(document: document)
} makeDocument: { configuration, context in
TextDocument(configuration: configuration, context)
}
}
}
|
DocumentGroup 的各个构造器接收两个闭包:一个 editor 或 viewer 闭包参数,用于为已打开的文稿构建用户界面;一个 makeDocument 或 makeReadableDocument 闭包,返回文稿实例。
SwiftUI 传给文稿构造器的 URLDocumentConfiguration 类公开了文件 URL、lastContentModificationDate,以及 makeFileCoordinator()——后者会创建一个文件协调器,用于在读写之外访问文稿的 URL。此外,它遵循 @Observable,因此你的代码可以响应变化。
在 iOS 上,用 DocumentGroupLaunchScene 可以用自定义背景和多个创建按钮来定制文稿浏览器启动屏幕,如下例所示:
 1
 2
 3
 4
 5
 6
 7
 8
 9
10
11
12
13
14
15
16
17
18
19
20
21
22
23
24
25
26
| @main
struct NotesApp: App {
var body: some Scene {
DocumentGroupLaunchScene("My Notes and Lists") {
NewDocumentButton("New Note", source: .note)
NewDocumentButton("New List", source: .list)
} background: {
LinearGradient(
colors: [.brandColorGradientStart, .brandColorGradientEnd],
startPoint: .top,
endPoint: .bottom
)
}
DocumentGroup { document in
TextEditorView(document: document)
} makeDocument: { configuration, context in
TextDocument(configuration: configuration, context)
}
}
}
extension DocumentCreationSource {
static let note = DocumentCreationSource(id: "note")
static let list = DocumentCreationSource(id: "list")
}
|
在你的 TextDocument 构造器中,检查 creationSource,就能知道人们点击的是哪个按钮,并把文稿设置成列表或笔记。
在呈现文稿之前显示自定义界面
由于 makeDocument 和 makeReadableDocument 闭包是异步的,你也可以在文稿出现之前挂起文稿创建,显示自定义的用户界面——例如模板选择器、配置向导或导入预览。关于用 CheckedContinuation 结构在文稿打开之前呈现模板选择器或其他设置界面的端到端示例,参见 NewDocumentButton。
创建简单文稿
要让你的模型遵循 Document,需要提供遵循 DocumentReader 和 DocumentWriter 协议的值。大多数情况下,使用 SwiftUI 提供的 FileWrapperDocumentReader 和 FileWrapperDocumentWriter 便捷类型来替你处理读写即可。
声明 readableContentTypes 列出文稿可以打开的格式,声明 writableContentTypes 列出它可以存储的格式。文稿浏览器会参考 readableContentTypes 来允许打开受支持类型的文件;存储面板则用 writableContentTypes 来决定格式选项。
DocumentReader 和 DocumentWriter 是两个相互独立的协议。存储时,SwiftUI 调用 snapshot(contentType:) 捕获当前状态,然后在后台把结果传给 DocumentWriter。读取时,DocumentReader 在后台运行并返回快照,SwiftUI 再通过 apply(snapshot:previous:) 把它交给你的文稿。
快照代表文稿在某一时刻的状态。一个文稿类型可以为读取和写入使用不同的快照类型。快照可以是任何东西,包括文稿类型自身。SwiftUI 会自动协调读写的文件访问。
定义一个遵循 Document 的 Observable 类,如下所示:
 1
 2
 3
 4
 5
 6
 7
 8
 9
10
11
12
13
14
15
16
17
18
19
20
21
22
23
24
25
26
27
28
29
30
31
32
33
34
35
36
37
38
39
40
41
42
43
44
45
46
47
48
49
50
| import SwiftUI
import UniformTypeIdentifiers
@Observable
final class TextDocument: Document {
static let readableContentTypes = [UTType.plainText]
var text: String
var configuration: URLDocumentConfiguration
init(configuration: URLDocumentConfiguration) {
self.text = ""
self.configuration = configuration
}
// 返回一个把 `FileWrapper` 转换成快照的读取器。
func reader(
configuration: sending ReadConfiguration
) -> sending FileWrapperDocumentReader<String> {
FileWrapperDocumentReader(configuration) { fileWrapper in
if let data = fileWrapper.regularFileContents,
let text = String(data: data, encoding: .utf8) {
return text
}
return ""
}
}
@MainActor
func apply(snapshot: String, previous: String?) async throws {
self.text = snapshot
}
// 返回一个把快照转换成 `FileWrapper` 的写入器。
func writer(
configuration: sending WriteConfiguration
) -> sending FileWrapperDocumentWriter<String> {
FileWrapperDocumentWriter(configuration) { snapshot, previous in
let data = Data(snapshot.utf8)
return FileWrapper(regularFileWithContents: data)
}
}
@MainActor
func snapshot(contentType: UTType) async throws -> sending String {
text
}
}
|
有了这个文稿模型,再加上上一节的 DocumentGroup 配置,你就得到了一个完整的、支持打开与存储的基于文稿的应用。
当 SwiftUI 自动存储文稿,或者有人按下 Command-S 时,它会在主 actor 上调用 snapshot(contentType:) 捕获当前状态,然后调用 writer(configuration:) 取得 DocumentWriter。随后 SwiftUI 在后台带着协调式文件访问,把快照和目标 URL 传给 write(snapshot:to:previous:progress:)。
读取的流程相同:SwiftUI 调用 reader(configuration:),在后台把文件 URL 传给 read(from:progress:),然后通过 apply(snapshot:previous:) 把快照交给你的文稿。
支持只读文稿
要让应用显示只读文稿,请遵循 ReadableDocument,并使用会产生遵循 ReadableDocument 值的构造器:
1
2
3
4
5
6
7
| DocumentGroup { document in
PDFViewer(document: document)
} makeReadableDocument: { configuration, context in
PDFDocument(configuration: configuration, context: context)
}
@Observable
final class PDFDocument: ReadableDocument { /* ... */}
|
在信息属性列表中把 CFBundleTypeRole 设为 Viewer,表明你的应用不编辑这种文件类型。对于可以编辑文稿的应用,请把角色设为 Editor。
注册撤销操作
SwiftUI 通过撤销操作跟踪未存储的改动,因此每个基于文稿的应用都需要注册它们。从环境中读取当前生效的 UndoManager,并通过会注册撤销操作的方法更新文稿。在撤销闭包中再次调用同一个方法,也会自动注册重做操作,如下所示:
 1
 2
 3
 4
 5
 6
 7
 8
 9
10
11
12
13
| struct TextEditorView: View {
@Bindable var document: TextDocument
@Environment(\.undoManager) private var undoManager
var body: some View {
TextEditor(text: $document.text)
.onChange(of: document.text) { oldValue, _ in
undoManager?.registerUndo(withTarget: document) { document in
document.text = oldValue
}
}
}
}
|
处理包文稿
包是系统以单个条目呈现的目录。人们在「访达」、文件 app 和文稿浏览器中看到的是一个图标,可以拖动、共享、备份和同步。在内部,你的包可以存放任何需要的文件,包括元数据、页面、图层或内嵌媒体。
先从 FileWrapperDocumentReader 和 FileWrapperDocumentWriter 开始。只有当你需要流式传输数据、直接访问 URL,或者想优化磁盘操作时,才改用自定义的 DocumentReader 和 DocumentWriter。
下面的例子展示一个最小的笔记本文稿。它在磁盘上的布局如下:
1
2
3
4
5
| MyNotebook.notebook/
├── metadata.json ← title + ordered page IDs
└── pages/
├── <uuid>.txt ← each page is plain text
└── …
|
 1
 2
 3
 4
 5
 6
 7
 8
 9
10
11
12
13
14
15
16
17
18
19
20
21
22
23
24
25
26
27
28
29
30
31
32
33
34
35
36
37
38
39
40
41
42
43
44
45
46
47
48
49
50
51
52
53
54
55
56
57
58
59
60
61
62
63
64
65
66
67
68
69
70
71
72
73
74
75
76
77
78
79
80
81
82
83
84
85
86
87
88
89
90
91
92
93
94
95
96
97
98
| import UniformTypeIdentifiers
@Observable
final class NotebookDocument: Document {
static let readableContentTypes: [UTType] = [.notebook] // 记得在 Info.plist 中声明
var metadata: NotebookMetadata
var pages: [UUID: String]
init() {
let initialPageID = UUID()
self.metadata = NotebookMetadata(
title: "Untitled", pageOrder: [initialPageID]
)
self.pages = [initialPageID: ""]
}
func reader(
configuration: sending ReadConfiguration
) -> sending FileWrapperDocumentReader<NotebookSnapshot> {
FileWrapperDocumentReader(configuration) { directory in
let children = directory.fileWrappers ?? [:]
guard let metadataData = children["metadata.json"]?.regularFileContents else {
throw CocoaError(.fileReadCorruptFile)
}
let metadata = try JSONDecoder().decode(NotebookMetadata.self, from: metadataData)
guard let pagesDirectory = children["pages"]?.fileWrappers else {
throw CocoaError(.fileReadCorruptFile)
}
var pages: [UUID: String] = [:]
for (filename, wrapper) in pagesDirectory {
guard let data = wrapper.regularFileContents
else { continue }
let withoutExtension = filename.replacingOccurrences(
of: ".txt", with: ""
)
if let id = UUID(uuidString: withoutExtension) {
pages[id] = String(decoding: data, as: UTF8.self)
}
}
return NotebookSnapshot(metadata: metadata, pages: pages)
}
}
func writer(
configuration: sending WriteConfiguration
) -> sending FileWrapperDocumentWriter<NotebookSnapshot> {
FileWrapperDocumentWriter(configuration) { snapshot, _ in
let metadata = try JSONEncoder().encode(snapshot.metadata)
let metadataWrapper = FileWrapper(regularFileWithContents: metadata)
var pageNamesToFileWrappers: [String: FileWrapper] = [:]
for (pageID, content) in snapshot.pages {
pageNamesToFileWrappers["\(pageID.uuidString).txt"] =
FileWrapper(regularFileWithContents: Data(content.utf8))
}
let pagesDirectory = FileWrapper(directoryWithFileWrappers: pageNamesToFileWrappers)
let root = FileWrapper(directoryWithFileWrappers: [
"metadata.json": metadataWrapper,
"pages": pagesDirectory,
])
return root
}
}
@MainActor
func snapshot(contentType: UTType) async throws -> sending NotebookSnapshot {
NotebookSnapshot(metadata: metadata, pages: pages)
}
@MainActor
func apply(
snapshot: sending NotebookSnapshot,
previous: sending NotebookSnapshot?
) async throws {
metadata = snapshot.metadata
pages = snapshot.pages
}
}
struct NotebookMetadata: Codable, Sendable {
var title: String
var pageOrder: [UUID]
}
struct NotebookSnapshot: Sendable {
var metadata: NotebookMetadata
var pages: [UUID: String]
}
extension UTType {
static let notebook = UTType(exportedAs: "com.example.notebook")
}
|
FileWrapper 类按需加载文件内容。当你打开一个包时,FileWrapper 会读取目录结构,但不加载任何文件内容。只有当你访问某个文件的 regularFileContents 时,它才会被加载,这使 FileWrapper 非常适合只需要包中一部分内容的情况。如果你只需要一个元数据文件、一张缩略图或前几页,可以遍历 fileWrappers 找到所需内容,并只对这些文件调用 regularFileContents。
重要:如果应用决定惰性读取文稿——例如只读取某人当下可见的那部分包内容——那么应用需要做好心理准备:后续从文件包装器读取的尝试可能失败,因为文件可能已被删除或移动。从 FileWrapper 读取时请始终处理错误。
实现自定义读取器和写入器
FileWrapperDocumentReader 和 FileWrapperDocumentWriter 都把读写委托给 FileWrapper。对于需要更多控制的文稿,例如流式读取、自定义写入逻辑,或者直接向 Core Graphics、AVFoundation、PDFKit 这类框架提供 URL 访问,请实现自己的、遵循 DocumentReader 和 DocumentWriter 的类型。
下面的例子展示一个图像文稿,它用 Core Graphics 加载和存储 JPEG 文件,并可调整压缩质量:
 1
 2
 3
 4
 5
 6
 7
 8
 9
10
11
12
13
14
15
16
17
18
| import SwiftUI
import CoreGraphics
import UniformTypeIdentifiers
struct ImageSnapshot {
var image: CGImage?
var compressionQuality: Double
}
@Observable
final class ImageDocument: Document {
static let readableContentTypes: [UTType] = [.jpeg]
var displayImage: CGImage?
var compressionQuality: Double = 0.9
init() { }
}
|
ImageDocument.Reader 通过实现 read(from:progress:) 遵循 DocumentReader,它把源 URL 传给 CGImageSourceCreateWithURL(_:_:),从而让 Core Graphics 负责格式检测和解码,如下所示:
 1
 2
 3
 4
 5
 6
 7
 8
 9
10
11
12
13
14
15
16
17
18
19
20
21
22
| extension ImageDocument {
struct Reader: DocumentReader {
@concurrent
func read(from source: URL, progress: consuming Subprogress) async throws -> sending ImageSnapshot {
guard let imageSource = CGImageSourceCreateWithURL(source as CFURL, nil),
let image = CGImageSourceCreateImageAtIndex(imageSource, 0, nil) else {
throw CocoaError(.fileReadCorruptFile)
}
return ImageSnapshot(image: image, compressionQuality: 0.9)
}
}
func reader(configuration: sending ReadConfiguration) -> sending Reader {
Reader()
}
@MainActor
func apply(snapshot: sending ImageSnapshot, previous: sending ImageSnapshot?) async throws {
self.compressionQuality = snapshot.compressionQuality
self.displayImage = snapshot.image
}
}
|
SwiftUI 每次需要读取或重新读取文稿时都会调用 reader(configuration:),例如文稿打开时,或者另一个进程修改了它时。DocumentReadConfiguration 提供内容类型,而文件 URL 会作为 source 参数传给 read(from:progress:)。
接下来的代码示例展示如何用 CGImageDestination 把图像编码为 JPEG,并应用快照中的压缩质量。ImageDocument.Writer 通过实现 write(snapshot:to:previous:progress:) 遵循 DocumentWriter,它把目标 URL 传给 CGImageDestinationCreateWithURL(_:_:_:_:),让 Core Graphics 负责 JPEG 编码与压缩。
 1
 2
 3
 4
 5
 6
 7
 8
 9
10
11
12
13
14
15
16
17
18
19
20
21
22
23
24
25
26
27
28
29
30
31
32
33
34
35
| extension ImageDocument {
struct Writer: DocumentWriter {
@concurrent
func write(
content snapshot: sending ImageSnapshot, to destination: URL,
previous: sending ImageSnapshot?, progress: consuming Subprogress
) async throws {
guard let image = snapshot.image else { return }
guard let imageDestination = CGImageDestinationCreateWithURL(
destination as CFURL, UTType.jpeg.identifier as CFString, 1, nil
) else {
throw CocoaError(.fileWriteUnknown)
}
let options: [CFString: Any] = [
kCGImageDestinationLossyCompressionQuality: snapshot.compressionQuality
]
CGImageDestinationAddImage(imageDestination, image, options as CFDictionary)
guard CGImageDestinationFinalize(imageDestination) else {
throw CocoaError(.fileWriteUnknown)
}
}
}
func writer(configuration: sending WriteConfiguration) -> sending Writer {
Writer()
}
@MainActor
func snapshot(contentType: UTType) async throws -> sending ImageSnapshot {
ImageSnapshot(image: displayImage, compressionQuality: compressionQuality)
}
}
|
previous 参数包含上一次成功写入的快照。对于 JPEG、文本文件或 PDF 这类单文件文稿,你可以忽略 previous,因为通常可以整体重写文件。对于包文稿,你可以把 previous 与当前快照比较,只写入发生变化的文件。
重要:snapshot(contentType:) 方法在主线程上运行。请让它尽可能轻量,而把序列化放到 DocumentWriter 中做,因为写入在后台运行。快照捕获的是要存储什么,写入器负责怎么存储。
同样的做法适用于任何通过 URL 读写文件的框架,包括 AVFoundation 的 AVAssetExportSession、PDFKit 的 PDFDocument(url:),或者任何接受文件路径的 C 库。
导出文稿
要把文稿导出到新位置或新格式,请使用 fileExporter(isPresented:document:contentType:defaultFilename:onCompletion:onCancellation:) 视图修饰符,如下所示:
 1
 2
 3
 4
 5
 6
 7
 8
 9
10
11
12
13
14
15
16
17
18
19
20
21
22
23
24
25
| final class TextDocument: WritableDocument { /* ... */ }
struct TextEditorView: View {
@Bindable var document: TextDocument
@State private var isExporting = false
var body: some View {
TextEditor(text: $document.text)
.toolbar {
Button("Export…") { isExporting = true }
}
.fileExporter(
isPresented: $isExporting, document: document,
contentType: .utf8PlainText, defaultFilename: "Text"
) { result in
switch result {
case .success(let url):
// 生产环境中请使用 os 框架的 Logger,而不是 print。
print("Exported to \(url)")
case .failure(let error):
print("Export failed: \(error)")
}
}
}
}
|
关于声明自定义文件格式、在读写生命周期方法之外访问文件,以及为长时间操作报告进度的信息,参见处理高级文稿场景。