3.3.4 类与接口
原文链接: https://kotlinlang.org/docs/kotlin-tour-intermediate-classes-interfaces.html
3.3.4 类与接口
在入门导览中,你学会了如何使用类和数据类来存储数据,并维护一组可以在代码中共享的特征。最终,你会希望建立一个层级结构,从而在项目中高效地共享代码。本章讲解 Kotlin 提供的代码共享方式,以及它们如何让代码更安全、更易维护。
类继承
在前面的章节中,我们介绍了如何用扩展函数在不修改原始源码的情况下扩展类。但如果你面对的是比较复杂的情况,需要在多个类之间共享代码呢?这种情况下,你可以使用类继承。
默认情况下,Kotlin 中的类不能被继承。Kotlin 这样设计是为了防止意外的继承,并让你的类更易维护。
Kotlin 的类只支持单继承,也就是说一次只能从一个类继承。这个类称为父类。
一个类的父类又可以继承另一个类(祖父类),从而形成层级结构。Kotlin 类层级的最顶端是公共父类:Any。所有类最终都继承自 Any 类:
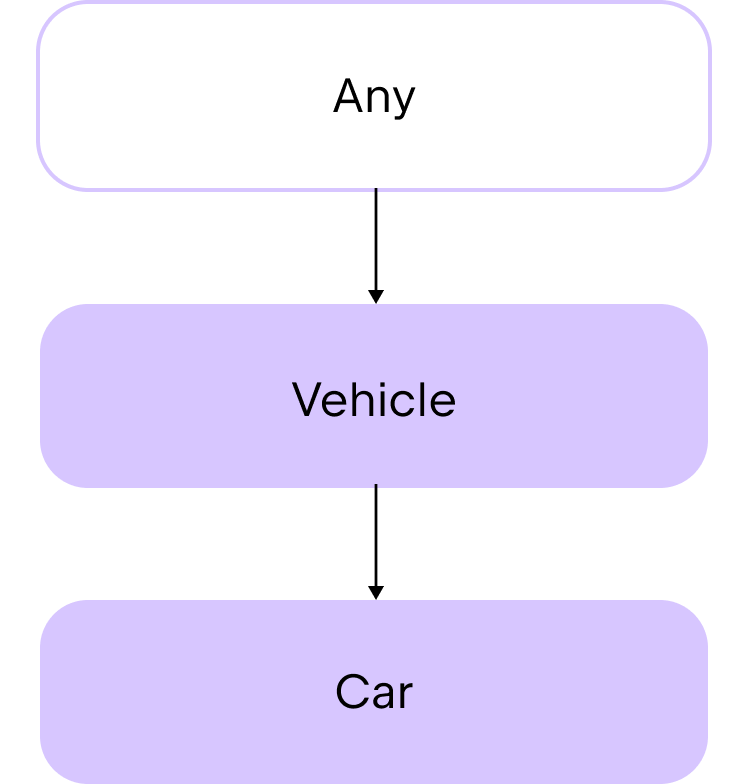
Any 类自动提供了一个成员函数 toString()。因此,你可以在自己的任何类中使用这个继承来的函数。例如:
1
2
3
4
5
6
7
8
9
| class Car(val make: String, val model: String, val numberOfDoors: Int)
fun main() {
val car1 = Car("Toyota", "Corolla", 4)
// Uses the .toString() function via string templates to print class properties
println("Car1: make=${car1.make}, model=${car1.model}, numberOfDoors=${car1.numberOfDoors}")
// Car1: make=Toyota, model=Corolla, numberOfDoors=4
}
|
如果你想用继承在多个类之间共享一些代码,请先考虑使用抽象类。
抽象类
抽象类默认就可以被继承。抽象类的用途是提供供其他类继承或实现的成员。因此,抽象类有构造器,但你不能用它创建实例。在子类中,你用 override 关键字定义父类属性和函数的具体行为。这样,你可以说子类「重写」了父类的成员。
提示: 当你定义继承来的函数或属性的行为时,我们称之为一次实现。
抽象类既可以包含带实现的函数和属性,也可以包含不带实现的函数和属性,后者称为抽象函数和抽象属性。
要创建抽象类,请使用 abstract 关键字:
要声明不带实现的函数或属性,同样使用 abstract 关键字:
1
2
| abstract fun makeSound()
abstract val sound: String
|
例如,假设你想创建一个名为 Product 的抽象类,并从中派生出子类来定义不同的商品类别:
1
2
3
4
5
6
7
8
9
| abstract class Product(val name: String, var price: Double) {
// Abstract property for the product category
abstract val category: String
// A function that can be shared by all products
fun productInfo(): String {
return "Product: $name, Category: $category, Price: $price"
}
}
|
在这个抽象类中:
- 构造器有两个参数,分别表示商品的
name 和 price。 - 有一个抽象属性,用字符串表示商品类别。
- 有一个函数,用于打印商品信息。
接下来为电子产品创建一个子类。在子类中为 category 属性定义实现之前,你必须使用 override 关键字:
1
2
3
| class Electronic(name: String, price: Double, val warranty: Int) : Product(name, price) {
override val category = "Electronic"
}
|
Electronic 类:
- 继承自
Product 抽象类。 - 在构造器中多了一个参数:
warranty,这是电子产品特有的。 - 重写了
category 属性,使其包含字符串 "Electronic"。
现在,你可以这样使用这些类:
1
2
3
4
5
6
7
8
9
10
11
12
13
14
15
16
17
18
19
20
21
| abstract class Product(val name: String, var price: Double) {
// Abstract property for the product category
abstract val category: String
// A function that can be shared by all products
fun productInfo(): String {
return "Product: $name, Category: $category, Price: $price"
}
}
class Electronic(name: String, price: Double, val warranty: Int) : Product(name, price) {
    override val category = "Electronic"
}
fun main() {
// Creates an instance of the Electronic class
val laptop = Electronic(name = "Laptop", price = 1000.0, warranty = 2)
println(laptop.productInfo())
// Product: Laptop, Category: Electronic, Price: 1000.0
}
|
虽然抽象类非常适合同以这种方式共享代码,但它们有局限:Kotlin 的类只支持单继承。如果你需要从多个来源继承,请考虑使用接口。
接口
接口与类相似,但有一些区别:
- 你不能创建接口的实例。接口没有构造器,也没有类头。
- 它们的函数和属性默认隐式可继承。在 Kotlin 中,我们说它们是「开放」的。
- 如果你不给接口中的函数提供实现,也不需要把它们标记为
abstract。
与抽象类类似,你可以用接口定义一组函数和属性,供各个类稍后继承并实现。这种方式帮助你专注于接口所描述的抽象,而不是具体的实现细节。使用接口能让你的代码:
- 更具模块化,因为它把不同部分隔离开来,使它们可以各自独立演进。
- 更易理解,因为相关的函数被归入一个内聚的集合。
- 更易测试,因为你可以快速地把某个实现换成用于测试的模拟实现。
要声明接口,请使用 interface 关键字:
1
| interface PaymentMethod
|
接口实现
接口支持多继承,因此一个类可以同时实现多个接口。我们先看一个类实现一个接口的场景。
要创建一个实现接口的类,请在类头之后加一个冒号,后面跟上你想实现的接口名。接口名之后不用写圆括号 (),因为接口没有构造器:
1
| class CreditCardPayment : PaymentMethod
|
例如:
1
2
3
4
5
6
7
8
9
10
11
12
13
14
15
16
17
| interface PaymentMethod {
// Functions are inheritable by default
fun initiatePayment(amount: Double): String
}
class CreditCardPayment(val cardNumber: String, val cardHolderName: String, val expiryDate: String) : PaymentMethod {
override fun initiatePayment(amount: Double): String {
// Simulate processing payment with credit card
return "Payment of $$amount initiated using Credit Card ending in ${cardNumber.takeLast(4)}."
}
}
fun main() {
val paymentMethod = CreditCardPayment("1234 5678 9012 3456", "John Doe", "12/25")
println(paymentMethod.initiatePayment(100.0))
// Payment of $100.0 initiated using Credit Card ending in 3456.
}
|
在这个示例中:
PaymentMethod 是一个接口,其中有一个没有实现的 initiatePayment() 函数。CreditCardPayment 是一个实现了 PaymentMethod 接口的类。CreditCardPayment 类重写了继承来的 initiatePayment() 函数。paymentMethod 是 CreditCardPayment 类的一个实例。- 在
paymentMethod 实例上调用重写后的 initiatePayment() 函数,参数为 100.0。
要创建一个实现多个接口的类,请在类头之后加一个冒号,后面跟上你想实现的接口名,并用逗号分隔:
1
| class CreditCardPayment : PaymentMethod, PaymentType
|
例如:
 1
 2
 3
 4
 5
 6
 7
 8
 9
10
11
12
13
14
15
16
17
18
19
20
21
22
23
24
25
26
| interface PaymentMethod {
fun initiatePayment(amount: Double): String
}
interface PaymentType {
val paymentType: String
}
class CreditCardPayment(val cardNumber: String, val cardHolderName: String, val expiryDate: String) : PaymentMethod,
PaymentType {
override fun initiatePayment(amount: Double): String {
// Simulate processing payment with credit card
return "Payment of $$amount initiated using Credit Card ending in ${cardNumber.takeLast(4)}."
}
override val paymentType: String = "Credit Card"
}
fun main() {
val paymentMethod = CreditCardPayment("1234 5678 9012 3456", "John Doe", "12/25")
println(paymentMethod.initiatePayment(100.0))
// Payment of $100.0 initiated using Credit Card ending in 3456.
println("Payment is by ${paymentMethod.paymentType}")
// Payment is by Credit Card
}
|
在这个示例中:
PaymentMethod 是一个接口,其中有一个没有实现的 initiatePayment() 函数。PaymentType 是一个接口,其中有一个未初始化的 paymentType 属性。CreditCardPayment 是一个实现了 PaymentMethod 和 PaymentType 接口的类。CreditCardPayment 类重写了继承来的 initiatePayment() 函数和 paymentType 属性。paymentMethod 是 CreditCardPayment 类的一个实例。- 在
paymentMethod 实例上调用重写后的 initiatePayment() 函数,参数为 100.0。 - 在
paymentMethod 实例上访问重写后的 paymentType 属性。
关于接口与接口继承的更多信息,请参阅接口。
委托
接口很有用,但如果你的接口包含很多函数,它的子类最终可能会带有大量样板代码。如果你只想重写类的某一小部分行为,就不得不大量重复自己。
提示: 样板代码是指在软件项目的多个位置被重复使用、几乎没有改动的代码块。
例如,假设你有一个名为 DrawingTool 的接口,其中包含若干函数和一个名为 color 的属性:
1
2
3
4
5
6
| interface DrawingTool {
val color: String
fun draw(shape: String)
fun erase(area: String)
fun getToolInfo(): String
}
|
你创建了一个名为 PenTool 的类来实现 DrawingTool 接口,并为它的所有成员提供了实现:
1
2
3
4
5
6
7
8
9
10
11
12
13
14
15
| class PenTool : DrawingTool {
override val color: String = "black"
override fun draw(shape: String) {
println("Drawing $shape using a pen in $color")
}
override fun erase(area: String) {
println("Erasing $area with pen tool")
}
override fun getToolInfo(): String {
return "PenTool(color=$color)"
}
}
|
你想创建一个行为与 PenTool 相同、但 color 值不同的类。一种做法是创建一个新类,让它接收一个实现了 DrawingTool 接口的对象(例如 PenTool 类的实例)作为参数,然后在类内部重写 color 属性。
但在这种情况下,你需要为 DrawingTool 接口的每个成员都添加实现:
 1
 2
 3
 4
 5
 6
 7
 8
 9
10
11
12
13
14
15
16
17
18
19
20
21
22
23
24
25
26
27
28
29
30
31
32
33
34
35
36
37
38
39
40
41
42
43
44
45
46
47
48
49
50
51
52
53
54
55
56
| interface DrawingTool {
val color: String
fun draw(shape: String)
fun erase(area: String)
fun getToolInfo(): String
}
class PenTool : DrawingTool {
override val color: String = "black"
override fun draw(shape: String) {
println("Drawing $shape using a pen in $color")
}
override fun erase(area: String) {
println("Erasing $area with pen tool")
}
override fun getToolInfo(): String {
return "PenTool(color=$color)"
}
}
class CanvasSession(val tool: DrawingTool) : DrawingTool {
override val color: String = "blue"
override fun draw(shape: String) {
tool.draw(shape)
}
override fun erase(area: String) {
tool.erase(area)
}
override fun getToolInfo(): String {
return tool.getToolInfo()
}
}
fun main() {
val pen = PenTool()
val session = CanvasSession(pen)
println("Pen color: ${pen.color}")
// Pen color: black
println("Session color: ${session.color}")
// Session color: blue
session.draw("circle")
// Drawing circle with pen in black
session.erase("top-left corner")
// Erasing top-left corner with pen tool
println(session.getToolInfo())
// PenTool(color=black)
}
|
你可以看出,如果 DrawingTool 接口中的成员函数很多,CanvasSession 类中的样板代码就会非常庞大。不过,还有另一种办法。
在 Kotlin 中,你可以用 by 关键字把接口的实现委托给某个类实例。例如:
1
| class CanvasSession(val tool: DrawingTool) : DrawingTool by tool
|
这里的 tool 是 PenTool 类实例的名称,成员函数的实现就委托给它。
现在你不必再在 CanvasSession 类中为成员函数添加实现。编译器会自动从 PenTool 类中获取这些实现。这样你就不必编写大量样板代码,而只需为你想要在子类中修改的行为编写代码。
例如,如果你想修改 color 属性的值:
 1
 2
 3
 4
 5
 6
 7
 8
 9
10
11
12
13
14
15
16
17
18
19
20
21
22
23
24
25
26
27
28
29
30
31
32
33
34
35
36
37
38
39
40
41
42
43
44
45
46
| interface DrawingTool {
val color: String
fun draw(shape: String)
fun erase(area: String)
fun getToolInfo(): String
}
class PenTool : DrawingTool {
override val color: String = "black"
override fun draw(shape: String) {
println("Drawing $shape using a pen in $color")
}
override fun erase(area: String) {
println("Erasing $area with pen tool")
}
override fun getToolInfo(): String {
return "PenTool(color=$color)"
}
}
class CanvasSession(val tool: DrawingTool) : DrawingTool by tool {
// No boilerplate code!
override val color: String = "blue"
}
fun main() {
val pen = PenTool()
val session = CanvasSession(pen)
println("Pen color: ${pen.color}")
// Pen color: black
println("Session color: ${session.color}")
// Session color: blue
session.draw("circle")
// Drawing circle with pen in black
session.erase("top-left corner")
// Erasing top-left corner with pen tool
println(session.getToolInfo())
// PenTool(color=black)
}
|
如果你愿意,也可以在 CanvasSession 类中重写某个继承来的成员函数的行为,但现在你不必为每一个继承来的成员函数都添加新的代码行。
更多信息请参阅委托。
练习
习题 1
假设你在开发一套智能家居系统。智能家居通常有不同类型的设备,它们都有一些基本功能,同时也有各自独特的行为。在下面的代码示例中,请补全名为 SmartDevice 的 abstract 类,使子类 SmartLight 能够成功编译。
然后,再创建另一个名为 SmartThermostat 的子类,它继承自 SmartDevice 类,并实现 turnOn() 和 turnOff() 函数,返回描述哪个温控器正在加热或已关闭的打印语句。最后,再添加一个名为 adjustTemperature() 的函数,它接收一个温度值作为输入,并打印:$name thermostat set to $temperature°C.。
提示
在 SmartDevice 类中添加 turnOn() 和 turnOff() 函数,这样你稍后就能在 SmartThermostat 类中重写它们的行为。
1
2
3
4
5
6
7
8
9
10
11
12
13
14
15
16
17
18
19
20
21
22
23
24
25
26
27
28
29
30
31
32
33
34
35
36
| abstract class // Write your code here
class SmartLight(name: String) : SmartDevice(name) {
override fun turnOn() {
println("$name is now ON.")
}
override fun turnOff() {
println("$name is now OFF.")
}
fun adjustBrightness(level: Int) {
println("Adjusting $name brightness to $level%.")
}
}
class SmartThermostat // Write your code here
fun main() {
val livingRoomLight = SmartLight("Living Room Light")
val bedroomThermostat = SmartThermostat("Bedroom Thermostat")
livingRoomLight.turnOn()
// Living Room Light is now ON.
livingRoomLight.adjustBrightness(10)
// Adjusting Living Room Light brightness to 10%.
livingRoomLight.turnOff()
// Living Room Light is now OFF.
bedroomThermostat.turnOn()
// Bedroom Thermostat thermostat is now heating.
bedroomThermostat.adjustTemperature(5)
// Bedroom Thermostat thermostat set to 5°C.
bedroomThermostat.turnOff()
// Bedroom Thermostat thermostat is now off.
}
|
 1
 2
 3
 4
 5
 6
 7
 8
 9
10
11
12
13
14
15
16
17
18
19
20
21
22
23
24
25
26
27
28
29
30
31
32
33
34
35
36
37
38
39
40
41
42
43
44
45
46
47
48
49
50
51
| abstract class SmartDevice(val name: String) {
abstract fun turnOn()
abstract fun turnOff()
}
class SmartLight(name: String) : SmartDevice(name) {
override fun turnOn() {
println("$name is now ON.")
}
override fun turnOff() {
println("$name is now OFF.")
}
fun adjustBrightness(level: Int) {
println("Adjusting $name brightness to $level%.")
}
}
class SmartThermostat(name: String) : SmartDevice(name) {
override fun turnOn() {
println("$name thermostat is now heating.")
}
override fun turnOff() {
println("$name thermostat is now off.")
}
fun adjustTemperature(temperature: Int) {
println("$name thermostat set to $temperature°C.")
}
}
fun main() {
val livingRoomLight = SmartLight("Living Room Light")
val bedroomThermostat = SmartThermostat("Bedroom Thermostat")
livingRoomLight.turnOn()
// Living Room Light is now ON.
livingRoomLight.adjustBrightness(10)
// Adjusting Living Room Light brightness to 10%.
livingRoomLight.turnOff()
// Living Room Light is now OFF.
bedroomThermostat.turnOn()
// Bedroom Thermostat thermostat is now heating.
bedroomThermostat.adjustTemperature(5)
// Bedroom Thermostat thermostat set to 5°C.
bedroomThermostat.turnOff()
// Bedroom Thermostat thermostat is now off.
}
|
示例解答
习题 2
创建一个名为 Media 的接口,用来实现 Audio、Video、Podcast 之类的具体媒体类。你的接口必须包含:
- 一个名为
title 的属性,表示媒体的标题。 - 一个名为
play() 的函数,用于播放媒体。
然后,创建一个名为 Audio 的类来实现 Media 接口。Audio 类必须在构造器中使用 title 属性,并且还要有一个额外的、类型为 String 的 composer 属性。在类中实现 play() 函数,打印:"Playing audio: $title, composed by $composer"。
提示
你可以在类头中使用 override 关键字,在构造器中实现接口的属性。
1
2
3
4
5
6
7
8
9
| interface // Write your code here
class // Write your code here
fun main() {
val audio = Audio("Symphony No. 5", "Beethoven")
audio.play()
// Playing audio: Symphony No. 5, composed by Beethoven
}
|
 1
 2
 3
 4
 5
 6
 7
 8
 9
10
11
12
13
14
15
16
| interface Media {
val title: String
fun play()
}
class Audio(override val title: String, val composer: String) : Media {
override fun play() {
println("Playing audio: $title, composed by $composer")
}
}
fun main() {
val audio = Audio("Symphony No. 5", "Beethoven")
audio.play()
// Playing audio: Symphony No. 5, composed by Beethoven
}
|
示例解答
习题 3
你正在为一个电商应用构建支付处理系统。每种支付方式都需要能够授权支付并处理交易,有些支付还需要能够处理退款。
在 Refundable 接口中,添加一个名为 refund() 的函数来处理退款。
在 PaymentMethod 抽象类中:
- 添加一个名为
authorize() 的函数,它接收一个金额并打印包含该金额的消息。 - 添加一个同样接收金额的抽象函数
processPayment()。
- 创建一个名为
CreditCard 的类,实现 Refundable 接口和 PaymentMethod 抽象类。在这个类中为 refund() 和 processPayment() 函数添加实现,使它们打印以下语句:
"Refunding $amount to the credit card.""Processing credit card payment of $amount."
 1
 2
 3
 4
 5
 6
 7
 8
 9
10
11
12
13
14
15
16
17
18
19
20
| interface Refundable {
// Write your code here
}
abstract class PaymentMethod(val name: String) {
// Write your code here
}
class CreditCard // Write your code here
fun main() {
val visa = CreditCard("Visa")
visa.authorize(100.0)
// Authorizing payment of $100.0.
visa.processPayment(100.0)
// Processing credit card payment of $100.0.
visa.refund(50.0)
// Refunding $50.0 to the credit card.
}
|
 1
 2
 3
 4
 5
 6
 7
 8
 9
10
11
12
13
14
15
16
17
18
19
20
21
22
23
24
25
26
27
28
29
30
31
32
| interface Refundable {
fun refund(amount: Double)
}
abstract class PaymentMethod(val name: String) {
fun authorize(amount: Double) {
println("Authorizing payment of $$amount.")
}
abstract fun processPayment(amount: Double)
}
class CreditCard(name: String) : PaymentMethod(name), Refundable {
override fun processPayment(amount: Double) {
println("Processing credit card payment of $$amount.")
}
override fun refund(amount: Double) {
println("Refunding $$amount to the credit card.")
}
}
fun main() {
val visa = CreditCard("Visa")
visa.authorize(100.0)
// Authorizing payment of $100.0.
visa.processPayment(100.0)
// Processing credit card payment of $100.0.
visa.refund(50.0)
// Refunding $50.0 to the credit card.
}
|
示例解答
习题 4
你有一个具备一些基本功能的简单消息应用,但你希望为智能消息添加一些功能,同时不要大量重复代码。
在下面的代码中,定义一个名为 SmartMessenger 的类,它继承 Messenger 接口,但把实现委托给 BasicMessenger 类的一个实例。
在 SmartMessenger 类中,重写 sendMessage() 函数以发送智能消息。该函数必须接收一个 message 作为输入,并返回一条打印语句:"Sending a smart message: $message"。此外,还要调用 BasicMessenger 类中的 sendMessage() 函数,并在消息前加上 [smart] 前缀。
注意: 你不需要在 SmartMessenger 类中重写 receiveMessage() 函数。
 1
 2
 3
 4
 5
 6
 7
 8
 9
10
11
12
13
14
15
16
17
18
19
20
21
22
23
24
25
26
27
28
29
| interface Messenger {
fun sendMessage(message: String)
fun receiveMessage(): String
}
class BasicMessenger : Messenger {
override fun sendMessage(message: String) {
println("Sending message: $message")
}
override fun receiveMessage(): String {
return "You've got a new message!"
}
}
class SmartMessenger // Write your code here
fun main() {
val basicMessenger = BasicMessenger()
val smartMessenger = SmartMessenger(basicMessenger)
basicMessenger.sendMessage("Hello!")
// Sending message: Hello!
println(smartMessenger.receiveMessage())
// You've got a new message!
smartMessenger.sendMessage("Hello from SmartMessenger!")
// Sending a smart message: Hello from SmartMessenger!
// Sending message: [smart] Hello from SmartMessenger!
}
|
 1
 2
 3
 4
 5
 6
 7
 8
 9
10
11
12
13
14
15
16
17
18
19
20
21
22
23
24
25
26
27
28
29
30
31
32
33
34
| interface Messenger {
fun sendMessage(message: String)
fun receiveMessage(): String
}
class BasicMessenger : Messenger {
override fun sendMessage(message: String) {
println("Sending message: $message")
}
override fun receiveMessage(): String {
return "You've got a new message!"
}
}
class SmartMessenger(val basicMessenger: BasicMessenger) : Messenger by basicMessenger {
override fun sendMessage(message: String) {
println("Sending a smart message: $message")
basicMessenger.sendMessage("[smart] $message")
}
}
fun main() {
val basicMessenger = BasicMessenger()
val smartMessenger = SmartMessenger(basicMessenger)
basicMessenger.sendMessage("Hello!")
// Sending message: Hello!
println(smartMessenger.receiveMessage())
// You've got a new message!
smartMessenger.sendMessage("Hello from SmartMessenger!")
// Sending a smart message: Hello from SmartMessenger!
// Sending message: [smart] Hello from SmartMessenger!
}
|
示例解答
另请参阅
上一步
下一步