6.6 Kotlin 自定义脚本入门 – 教程
原文链接: https://kotlinlang.org/docs/custom-script-deps-tutorial.html
6.6 Kotlin 自定义脚本入门 – 教程
警告: Kotlin 自定义脚本是实验性的。它可能随时被移除或更改。请仅将其用于评估目的。我们非常欢迎你在 YouTrack 上提供反馈。
_Kotlin 脚本_是一种技术,让你无需事先编译或打包成可执行文件就能把 Kotlin 代码作为脚本执行。
关于 Kotlin 脚本的概览和示例,请观看 KotlinConf'19 上 Rodrigo Oliveira 的演讲实现 Gradle Kotlin DSL。
在本教程中,你将创建一个 Kotlin 脚本项目,用来执行带 Maven 依赖的任意 Kotlin 代码。你将能够执行这样的脚本:
 1
 2
 3
 4
 5
 6
 7
 8
 9
10
11
12
13
14
15
16
| @file:Repository("https://maven.pkg.jetbrains.space/public/p/kotlinx-html/maven")
@file:DependsOn("org.jetbrains.kotlinx:kotlinx-html-jvm:0.7.3")
import kotlinx.html.*
import kotlinx.html.stream.*
import kotlinx.html.attributes.*
val addressee = "World"
print(
createHTML().html {
body {
h1 { +"Hello, $addressee!" }
}
}
)
|
指定的 Maven 依赖(本示例中为 kotlinx-html-jvm)会在执行期间从指定的 Maven 仓库或本地缓存解析出来,并在脚本的其余部分中使用。
项目结构
一个最小的 Kotlin 自定义脚本项目包含两部分:
- 脚本定义 —— 一组参数和配置,定义这种脚本类型应如何被识别、处理、编译和执行。
- 脚本宿主 —— 处理脚本编译和执行的应用程序或组件 —— 即实际运行这种类型脚本的东西。
考虑到以上这些,最好把项目拆分成两个模块。
开始之前
下载并安装最新版本的 IntelliJ IDEA。
创建项目
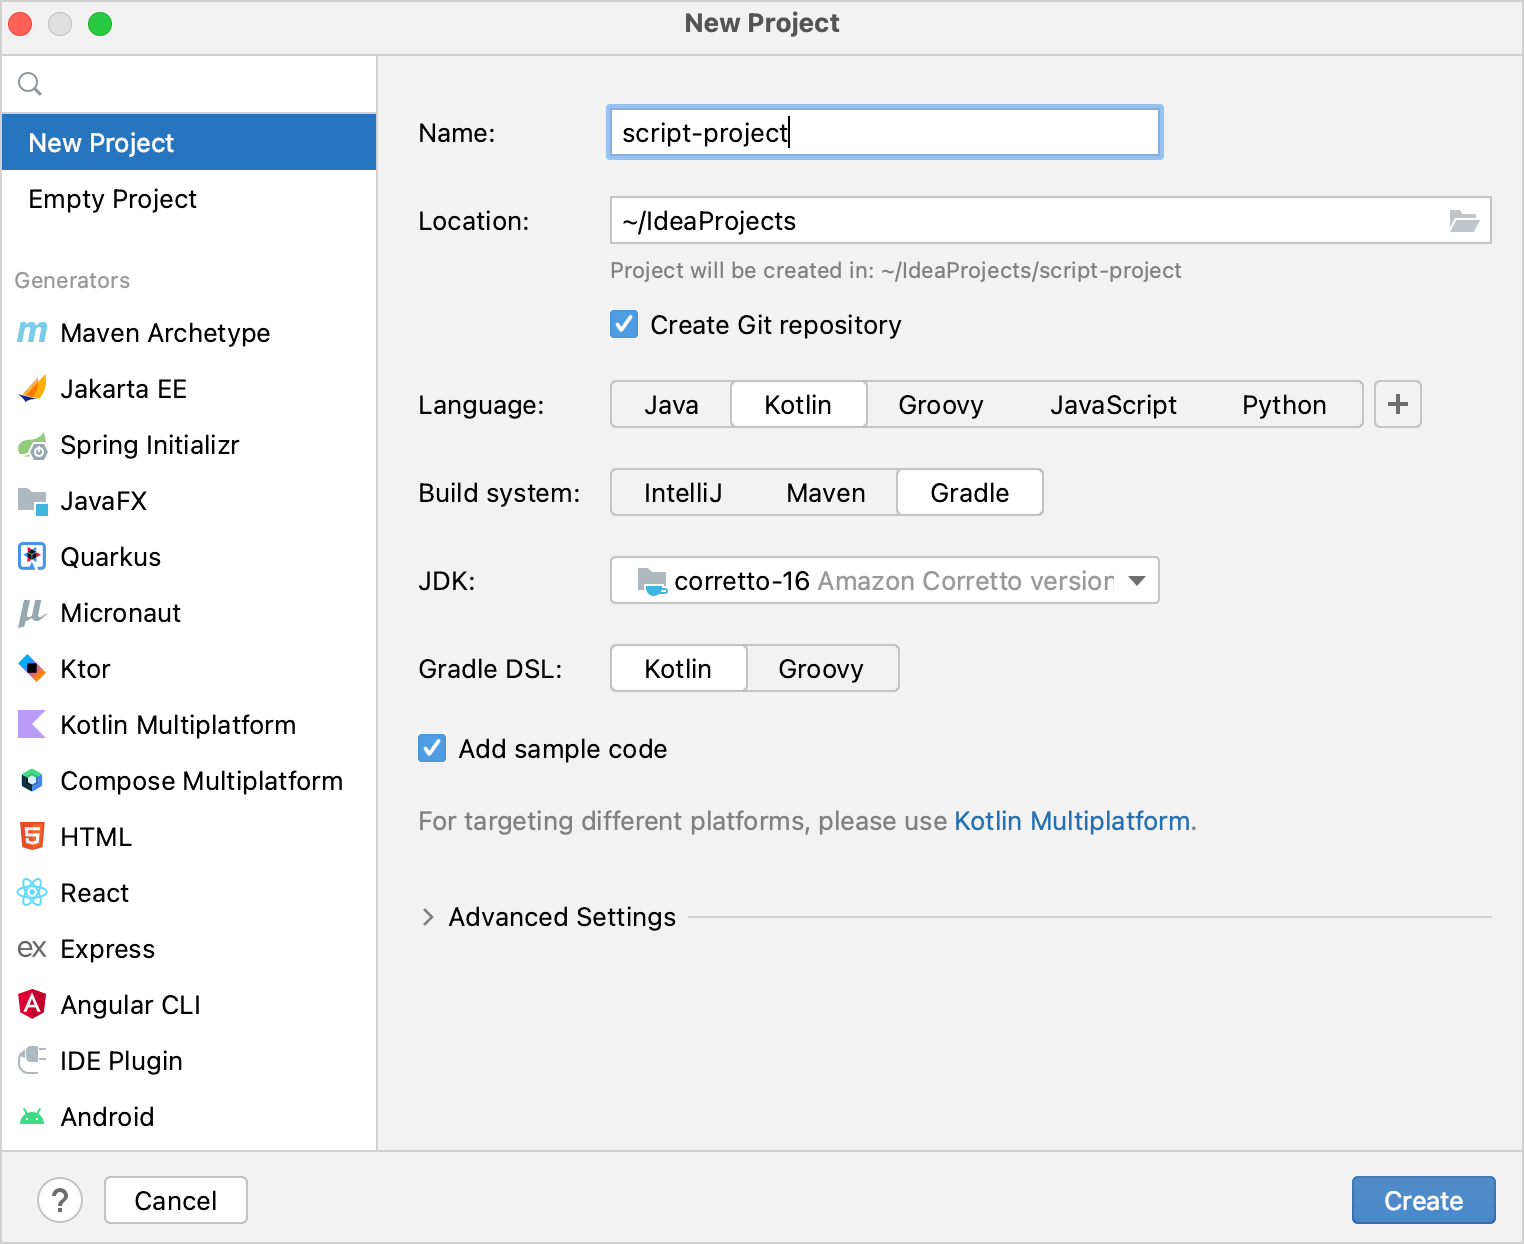
- 在 IntelliJ IDEA 中,选择 File | New | Project。
- 在左侧面板中,选择 New Project。
- 为新项目命名,如有必要可更改其位置。
提示: 勾选 Create Git repository 复选框可以把新项目置于版本控制之下。你以后也可以随时这样做。
- 在 Language 列表中,选择 Kotlin。
- 选择 Gradle 构建系统。
- 在 JDK 列表中,选择你想在项目中使用的 JDK。
- 如果 JDK 已安装在你的计算机上,但未在 IDE 中定义,请选择 Add JDK 并指定 JDK 主目录的路径。
- 如果你的计算机上没有所需的 JDK,请选择 Download JDK。
- 为 Gradle DSL 选择 Kotlin 或 Groovy 语言。
- 点击 Create。
添加脚本模块
现在你有了一个空的 Kotlin/JVM Gradle 项目。添加所需的模块:脚本定义和脚本宿主:
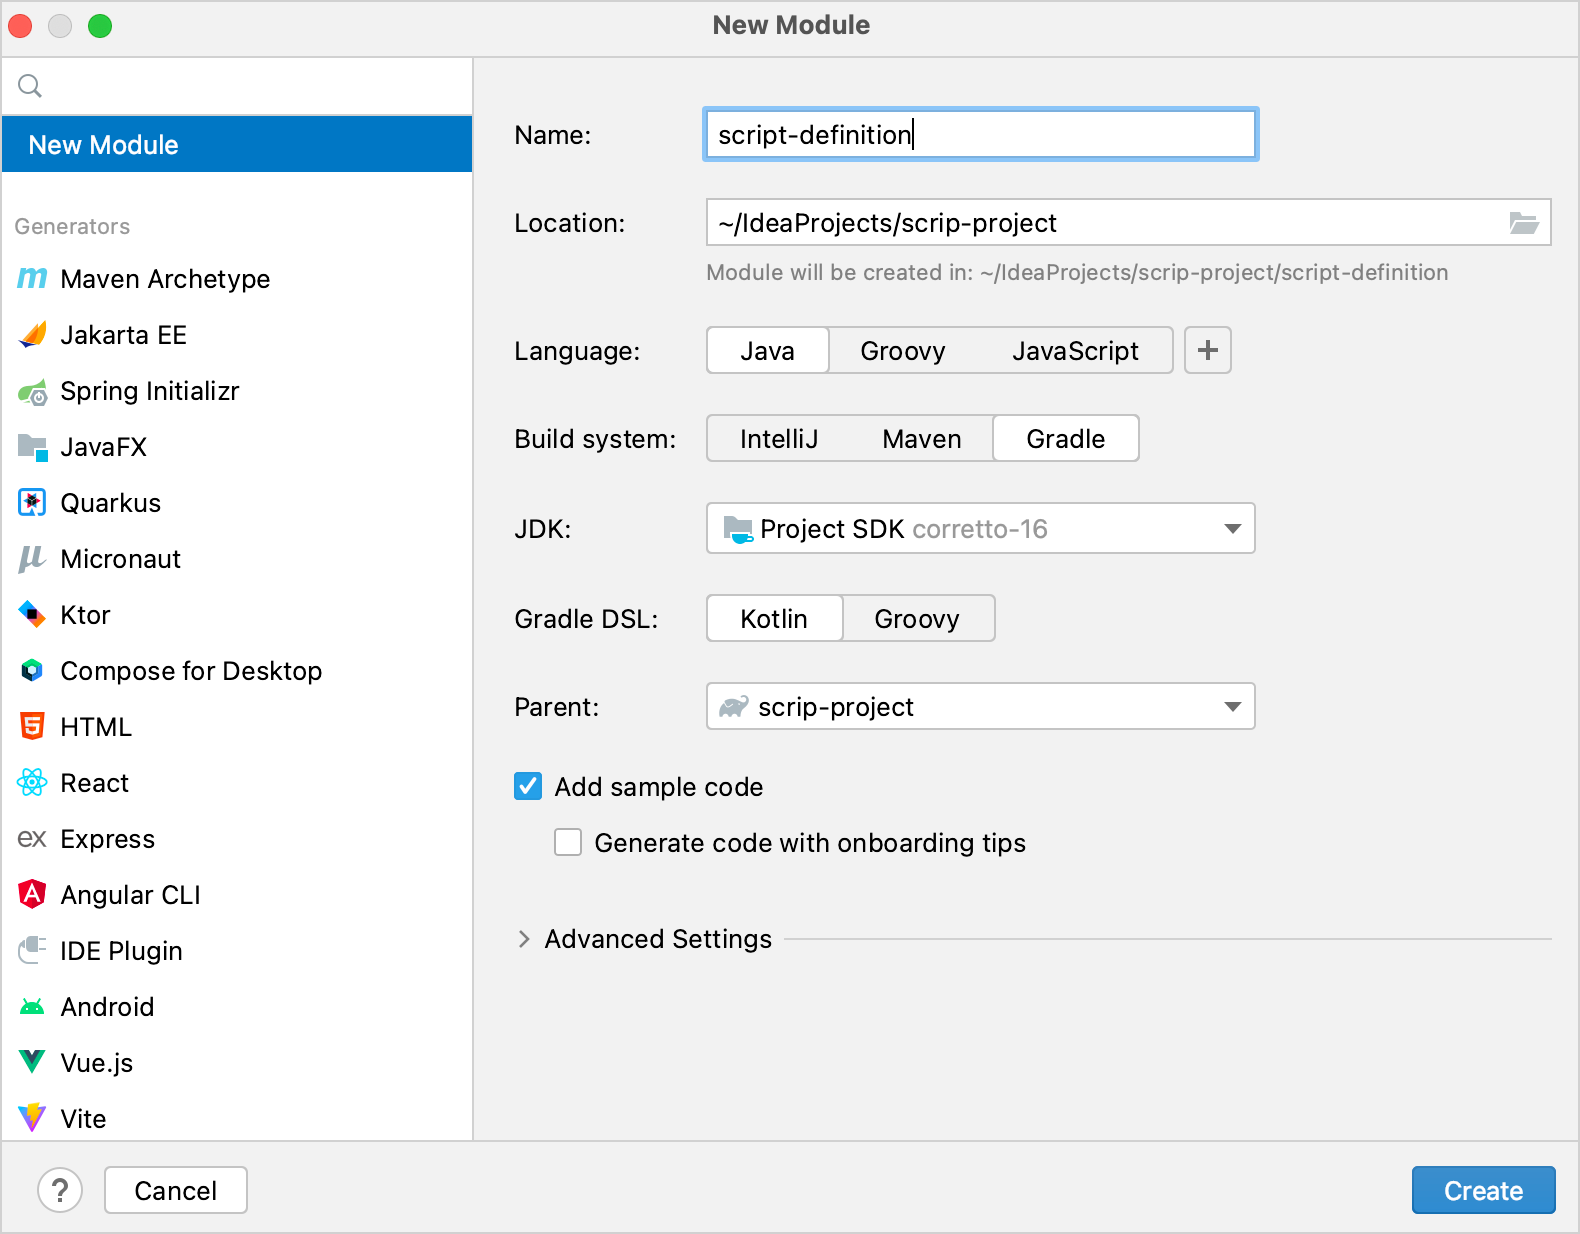
- 在 IntelliJ IDEA 中,选择 File | New | Module。
- 在左侧面板中,选择 New Module。该模块将作为脚本定义。
- 为新模块命名,如有必要可更改其位置。
- 在 Language 列表中,选择 Java。
- 选择 Gradle 构建系统;如果你想用 Kotlin 编写构建脚本,则把 Gradle DSL 设为 Kotlin。
- 作为该模块的父模块,选择根模块。
- 点击 Create。
在该模块的 build.gradle(.kts) 文件中,删除 Kotlin Gradle 插件的 version。它已经在根项目的构建脚本中声明了。
再重复前面的步骤一次,为脚本宿主创建一个模块。
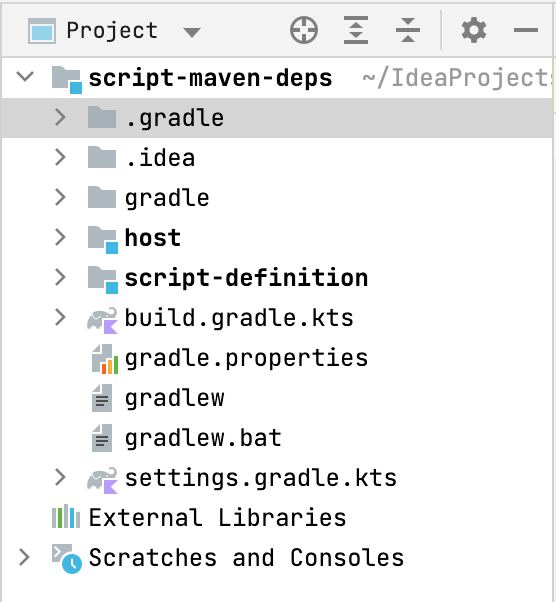
项目应具有以下结构:
你可以在 kotlin-script-examples GitHub 仓库中找到这样一个项目的示例以及更多 Kotlin 脚本示例。
创建脚本定义
首先定义脚本类型:开发者在这种类型的脚本中可以写什么,以及它会如何被处理。在本教程中,这包括在脚本中支持 @Repository 和 @DependsOn 注解。
- 在脚本定义模块中,把对 Kotlin 脚本组件的依赖添加到
build.gradle(.kts) 的 dependencies 块中。这些依赖提供了脚本定义所需的 API:
Kotlin
1
2
3
4
5
6
7
8
| dependencies {
implementation("org.jetbrains.kotlin:kotlin-scripting-common")
implementation("org.jetbrains.kotlin:kotlin-scripting-jvm")
implementation("org.jetbrains.kotlin:kotlin-scripting-dependencies")
implementation("org.jetbrains.kotlin:kotlin-scripting-dependencies-maven")
// 这个特定定义需要 coroutines 依赖
implementation("org.jetbrains.kotlinx:kotlinx-coroutines-core:1.11.0")
}
|
Groovy
1
2
3
4
5
6
7
8
| dependencies {
implementation 'org.jetbrains.kotlin:kotlin-scripting-common'
implementation 'org.jetbrains.kotlin:kotlin-scripting-jvm'
implementation 'org.jetbrains.kotlin:kotlin-scripting-dependencies'
implementation 'org.jetbrains.kotlin:kotlin-scripting-dependencies-maven'
// 这个特定定义需要 coroutines 依赖
implementation 'org.jetbrains.kotlinx:kotlinx-coroutines-core:1.11.0'
}
|
在该模块中创建 src/main/kotlin/ 目录,并添加一个 Kotlin 源文件,例如 scriptDef.kt。
在 scriptDef.kt 中创建一个类。它将成为此类脚本的父类,因此请把它声明为 abstract 或 open。
1
2
| // 此类脚本的抽象(或 open)父类
abstract class ScriptWithMavenDeps
|
这个类稍后也会作为脚本定义的引用。
- 要让该类成为脚本定义,请用
@KotlinScript 注解标记它。向该注解传入两个参数:
fileExtension —— 以 .kts 结尾的字符串,定义此类脚本的文件扩展名。compilationConfiguration —— 一个继承自 ScriptCompilationConfiguration 的 Kotlin 类,定义该脚本定义的编译细节。你将在下一步创建它。
 1
 2
 3
 4
 5
 6
 7
 8
 9
10
| // @KotlinScript 注解标记脚本定义类
@KotlinScript(
// 该脚本类型的文件扩展名
fileExtension = "scriptwithdeps.kts",
// 该脚本类型的编译配置
compilationConfiguration = ScriptWithMavenDepsConfiguration::class
)
abstract class ScriptWithMavenDeps
object ScriptWithMavenDepsConfiguration: ScriptCompilationConfiguration()
|
注意: 在本教程中,我们只提供可运行的代码,而不解释 Kotlin 脚本 API。你可以在 GitHub 上找到带有详细解释的相同代码。
- 按下面的方式定义脚本编译配置。
 1
 2
 3
 4
 5
 6
 7
 8
 9
10
11
12
13
14
15
| object ScriptWithMavenDepsConfiguration : ScriptCompilationConfiguration(
{
// 此类脚本的隐式 import
defaultImports(DependsOn::class, Repository::class)
jvm {
// 从上下文类加载器中提取整个 classpath 并将其用作依赖
dependenciesFromCurrentContext(wholeClasspath = true)
}
// 回调
refineConfiguration {
// 使用提供的处理器处理指定的注解
onAnnotations(DependsOn::class, Repository::class, handler = ::configureMavenDepsOnAnnotations)
}
}
)
|
configureMavenDepsOnAnnotations 函数如下:
 1
 2
 3
 4
 5
 6
 7
 8
 9
10
11
12
13
14
| // 动态重新配置编译的处理器
fun configureMavenDepsOnAnnotations(context: ScriptConfigurationRefinementContext): ResultWithDiagnostics<ScriptCompilationConfiguration> {
val annotations = context.collectedData?.get(ScriptCollectedData.collectedAnnotations)?.takeIf { it.isNotEmpty() }
?: return context.compilationConfiguration.asSuccess()
return runBlocking {
resolver.resolveFromScriptSourceAnnotations(annotations)
}.onSuccess {
context.compilationConfiguration.with {
dependencies.append(JvmDependency(it))
}.asSuccess()
}
}
private val resolver = CompoundDependenciesResolver(FileSystemDependenciesResolver(), MavenDependenciesResolver())
|
你可以在这里找到完整代码。
创建脚本宿主
下一步是创建脚本宿主 —— 即处理脚本执行的组件。
- 在脚本宿主模块中,把依赖添加到
build.gradle(.kts) 的 dependencies 块中:
- 提供脚本宿主所需 API 的 Kotlin 脚本组件
- 你之前创建的脚本定义模块
Kotlin
1
2
3
4
5
6
| dependencies {
implementation("org.jetbrains.kotlin:kotlin-scripting-common")
implementation("org.jetbrains.kotlin:kotlin-scripting-jvm")
implementation("org.jetbrains.kotlin:kotlin-scripting-jvm-host")
implementation(project(":script-definition")) // 脚本定义模块
}
|
Groovy
1
2
3
4
5
6
| dependencies {
implementation 'org.jetbrains.kotlin:kotlin-scripting-common'
implementation 'org.jetbrains.kotlin:kotlin-scripting-jvm'
implementation 'org.jetbrains.kotlin:kotlin-scripting-jvm-host'
implementation project(':script-definition') // 脚本定义模块
}
|
在该模块中创建 src/main/kotlin/ 目录,并添加一个 Kotlin 源文件,例如 host.kt。
为应用定义 main 函数。在其函数体中,检查它有一个参数 —— 脚本文件的路径 —— 并执行该脚本。你将在下一步中用一个单独的函数 evalFile 来定义脚本的执行。现在先把它声明为空。
main 可能看起来像这样:
1
2
3
4
5
6
7
8
9
| fun main(vararg args: String) {
if (args.size != 1) {
println("usage: <app> <script file>")
} else {
val scriptFile = File(args[0])
println("Executing script $scriptFile")
evalFile(scriptFile)
}
}
|
- 定义脚本求值函数。在这里你将使用脚本定义。通过在类型参数中传入脚本定义类来调用
createJvmCompilationConfigurationFromTemplate 获取它。然后调用 BasicJvmScriptingHost().eval,并传入脚本代码及其编译配置。eval 返回 ResultWithDiagnostics 的实例,因此把它设置为该函数的返回类型。
1
2
3
4
| fun evalFile(scriptFile: File): ResultWithDiagnostics<EvaluationResult> {
val compilationConfiguration = createJvmCompilationConfigurationFromTemplate<ScriptWithMavenDeps>()
return BasicJvmScriptingHost().eval(scriptFile.toScriptSource(), compilationConfiguration, null)
}
|
- 调整
main 函数以打印脚本执行的相关信息:
 1
 2
 3
 4
 5
 6
 7
 8
 9
10
11
12
13
14
| fun main(vararg args: String) {
if (args.size != 1) {
println("usage: <app> <script file>")
} else {
val scriptFile = File(args[0])
println("Executing script $scriptFile")
val res = evalFile(scriptFile)
res.reports.forEach {
if (it.severity > ScriptDiagnostic.Severity.DEBUG) {
println(" : ${it.message}" + if (it.exception == null) "" else ": ${it.exception}")
}
}
}
}
|
你可以在这里找到完整代码
运行脚本
要检查你的脚本宿主如何工作,请准备一个要执行的脚本和一个运行配置。
- 在项目根目录中创建包含以下内容的
html.scriptwithdeps.kts 文件:
 1
 2
 3
 4
 5
 6
 7
 8
 9
10
11
12
13
14
| @file:Repository("https://maven.pkg.jetbrains.space/public/p/kotlinx-html/maven")
@file:DependsOn("org.jetbrains.kotlinx:kotlinx-html-jvm:0.7.3")
import kotlinx.html.*; import kotlinx.html.stream.*; import kotlinx.html.attributes.*
val addressee = "World"
print(
createHTML().html {
body {
h1 { +"Hello, $addressee!" }
}
}
)
|
它使用了 kotlinx-html-jvm 库中的函数,该库在 @DependsOn 注解参数中被引用。
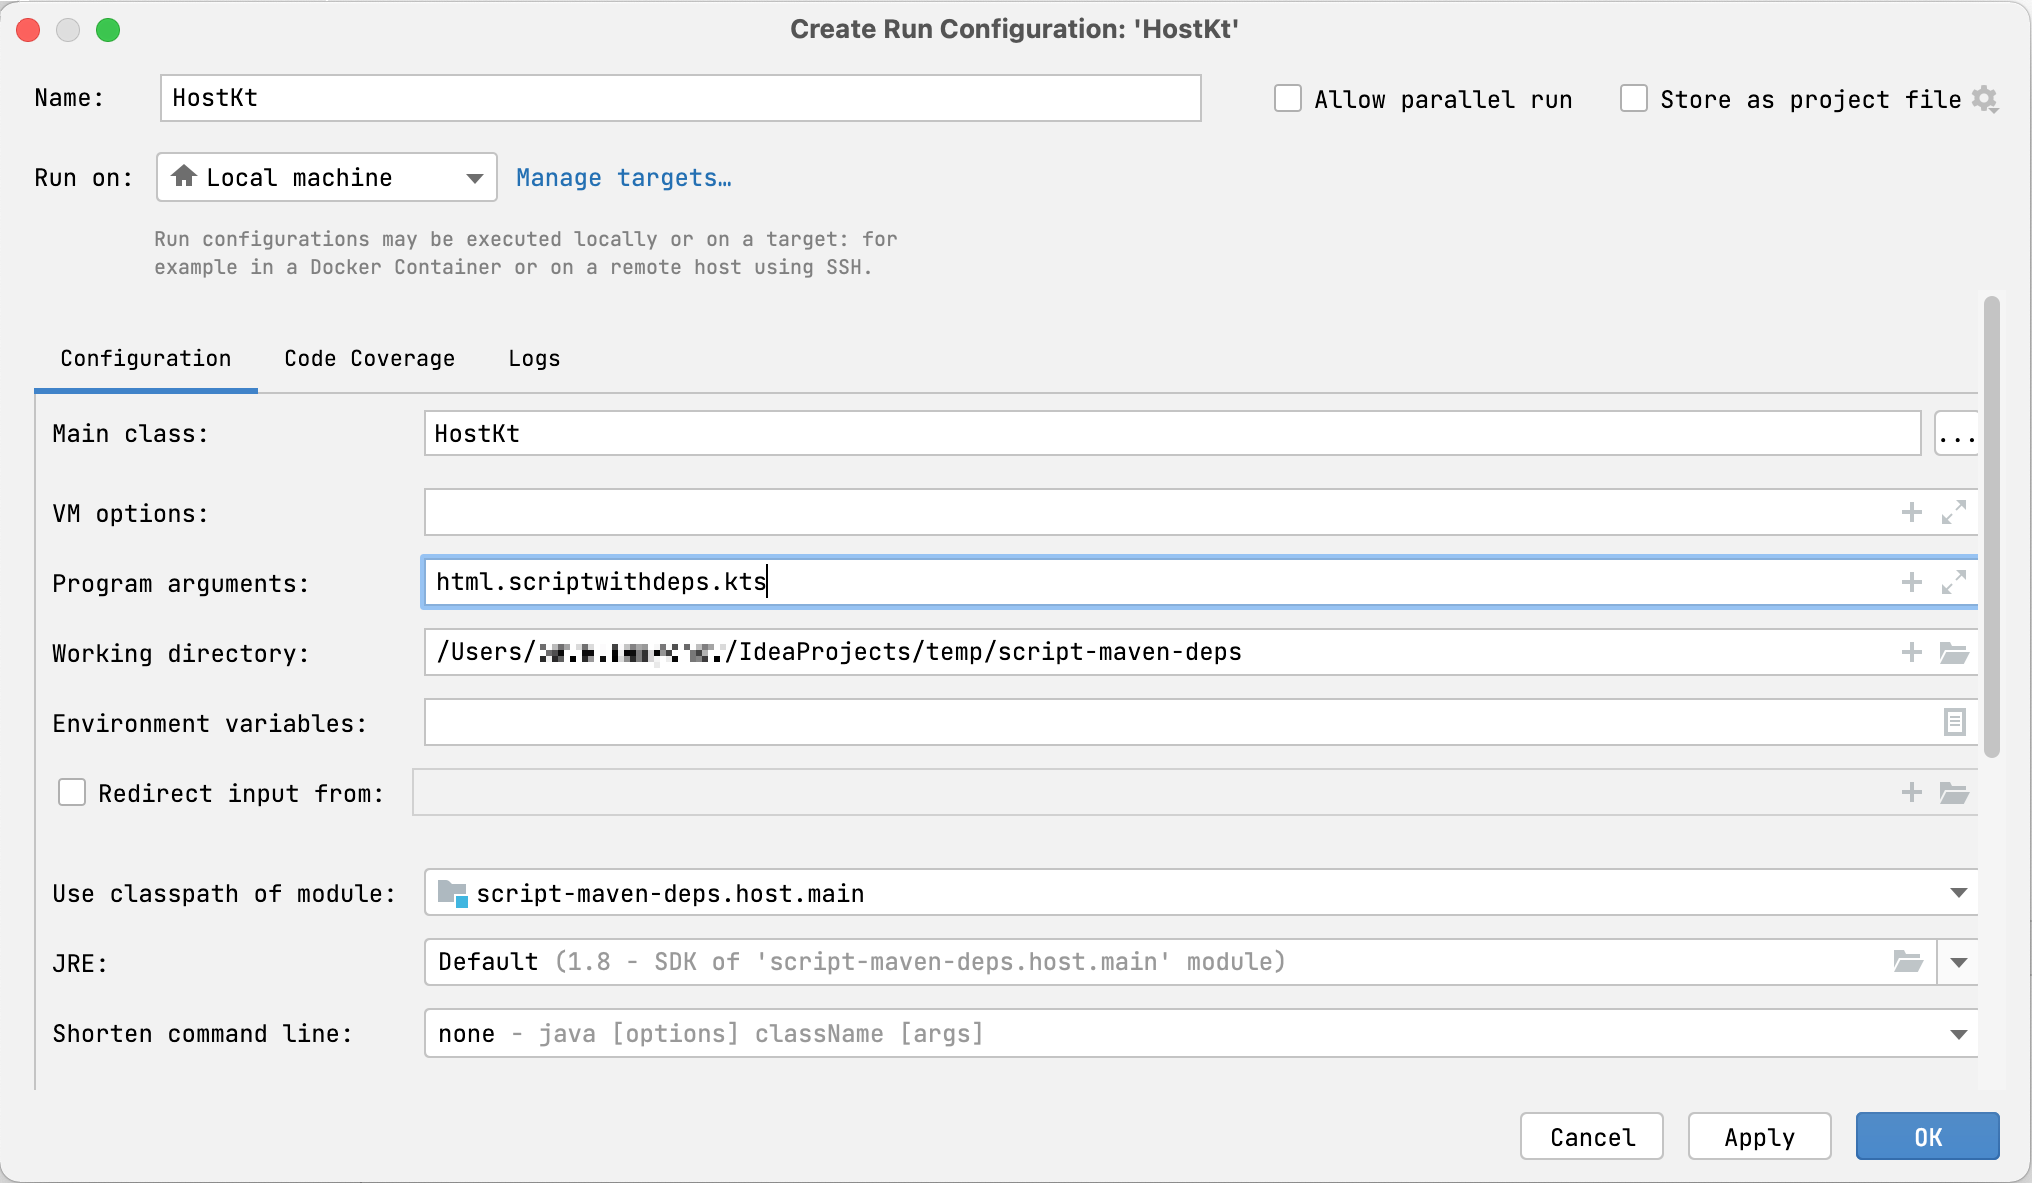
- 创建一个运行配置,用于启动脚本宿主并执行该文件:
- 打开
host.kt 并定位到 main 函数。它的左侧有一个 Run 装订区域图标。 - 右键点击该装订区域图标,选择 Modify Run Configuration。
- 在 Create Run Configuration 对话框中,把脚本文件名添加到 Program arguments,然后点击 OK。
- 运行创建好的配置。
你将看到脚本如何被执行:从指定的仓库解析对 kotlinx-html-jvm 的依赖,并打印调用其函数的结果:
1
2
3
4
5
| <html>
<body>
<h1>Hello, World!</h1>
</body>
</html>
|
首次运行时解析依赖可能需要一些时间。后续运行会快得多,因为它们会使用本地 Maven 仓库中已下载的依赖。
接下来做什么?
创建好一个简单的 Kotlin 脚本项目之后,可以进一步了解这个主题: