6.1.7.4 为 Spring Boot 项目添加数据库支持
原文链接: https://kotlinlang.org/docs/jvm-spring-boot-add-db-support.html
6.1.7.4 为 Spring Boot 项目添加数据库支持
使用 JDBC 模板为用 Kotlin 编写的 Spring Boot 项目添加数据库支持。
在教程的这一部分,你将使用Java 数据库连接(JDBC)向项目添加并配置数据库。在 JVM 应用中,你使用 JDBC 与数据库交互。为方便起见,Spring Framework 提供了 JdbcTemplate 类,它简化了 JDBC 的使用,并帮助避免常见错误。
添加数据库支持
在基于 Spring Framework 的应用中,常见做法是把数据库访问逻辑实现在所谓的服务层中——业务逻辑就位于这里。在 Spring 中,你应该用 @Service 注解标记类,以表明该类属于应用的服务层。在本应用中,你将为此创建 MessageService 类。
在同一个包中,创建 MessageService.kt 文件和 MessageService 类,内容如下:
 1
 2
 3
 4
 5
 6
 7
 8
 9
10
11
12
13
14
15
16
17
18
19
20
| // MessageService.kt
package com.example.demo
import org.springframework.stereotype.Service
import org.springframework.jdbc.core.JdbcTemplate
@Service
class MessageService(private val db: JdbcTemplate) {
fun findMessages(): List<Message> = db.query("select * from messages") { response, _ ->
Message(response.getString("id"), response.getString("text"))
}
fun save(message: Message): Message {
db.update(
"insert into messages values ( ?, ? )",
message.id, message.text
)
return message
}
}
|
构造函数参数与依赖注入 —— (private val db: JdbcTemplate)
Kotlin 中的类有一个主构造函数。它也可以有一个或多个次构造函数。
主构造函数是类头部的一部分,位于类名和可选的类型参数之后。在我们的例子中,构造函数是 (val db: JdbcTemplate)。
val db: JdbcTemplate 是构造函数的参数:
1
2
| @Service
class MessageService(private val db: JdbcTemplate)
|
尾随 lambda 与 SAM 转换
findMessages() 函数调用了 JdbcTemplate 类的 query() 函数。query() 函数接收两个参数:作为 String 实例的 SQL 查询,以及把每一行映射为一个对象的回调:
1
| db.query("...", RowMapper { ... } )
|
RowMapper 接口只声明了一个方法,因此可以通过省略接口名的 lambda 表达式来实现它。Kotlin 编译器知道你希望把该 lambda 表达式转换成哪个接口,因为你把它用作了函数调用的参数。这称为 Kotlin 中的 SAM 转换:
1
| db.query("...", { ... } )
|
SAM 转换之后,query 函数最终有两个参数:第一个位置是 String,最后一个位置是 lambda 表达式。按照 Kotlin 约定,如果函数的最后一个参数是函数,那么作为对应实参传入的 lambda 表达式可以放在圆括号之外。这种语法也称为尾随 lambda:
1
| db.query("...") { ... }
|
用下划线表示未使用的 lambda 参数
对于带多个参数的 lambda,你可以用下划线 _ 字符代替你不使用的参数名。
因此,query 函数调用的最终语法看起来是这样的:
1
2
3
| db.query("select * from messages") { response, _ ->
Message(response.getString("id"), response.getString("text"))
}
|
更新 MessageController 类
更新 MessageController.kt,让它使用新的 MessageService 类:
1
2
3
4
5
6
7
8
9
10
11
12
13
14
15
16
17
18
19
20
21
22
23
| // MessageController.kt
package com.example.demo
import org.springframework.http.ResponseEntity
import org.springframework.web.bind.annotation.GetMapping
import org.springframework.web.bind.annotation.PostMapping
import org.springframework.web.bind.annotation.RequestBody
import org.springframework.web.bind.annotation.RequestMapping
import org.springframework.web.bind.annotation.RestController
import java.net.URI
@RestController
@RequestMapping("/")
class MessageController(private val service: MessageService) {
@GetMapping
fun listMessages() = service.findMessages()
@PostMapping
fun post(@RequestBody message: Message): ResponseEntity<Message> {
val savedMessage = service.save(message)
return ResponseEntity.created(URI("/${savedMessage.id}")).body(savedMessage)
}
}
|
@PostMapping 注解
负责处理 HTTP POST 请求的方法需要用 @PostMapping 注解标记。为了能把作为 HTTP Body 内容发送的 JSON 转换为对象,你需要对方法参数使用 @RequestBody 注解。由于应用的 classpath 中有 Jackson 库,转换会自动完成。
ResponseEntity
ResponseEntity 表示完整的 HTTP 响应:状态码、响应头和响应体。
使用 created() 方法可以配置响应状态码(201),并设置 Location 响应头,指明所创建资源的上下文路径。
更新 MessageService 类
Message 类的 id 被声明为可空 String:
1
| data class Message(val id: String?, val text: String)
|
不过,把 null 作为 id 值存进数据库并不正确:你需要优雅地处理这种情况。
更新 MessageService.kt 文件的代码,在把消息存入数据库时,如果 id 为 null 就生成一个新值:
1
2
3
4
5
6
7
8
9
10
11
12
13
14
15
16
17
18
19
20
21
22
| // MessageService.kt
package com.example.demo
import org.springframework.stereotype.Service
import org.springframework.jdbc.core.JdbcTemplate
import java.util.UUID
@Service
class MessageService(private val db: JdbcTemplate) {
fun findMessages(): List<Message> = db.query("select * from messages") { response, _ ->
Message(response.getString("id"), response.getString("text"))
}
fun save(message: Message): Message {
val id = message.id ?: UUID.randomUUID().toString() // 如果为 null 则生成新的 id
db.update(
"insert into messages values ( ?, ? )",
id, message.text
)
return message.copy(id = id) // 返回带新 id 的消息副本
}
}
|
Elvis 运算符 —— ?:
代码 message.id ?: UUID.randomUUID().toString() 使用了 Elvis 运算符(if-not-null-else 简写)?:。如果 ?: 左侧的表达式不为 null,Elvis 运算符就返回它;否则返回右侧的表达式。注意,只有当左侧为 null 时,右侧表达式才会被求值。
应用代码已经可以与数据库配合工作了。现在需要配置数据源。
在应用中配置数据库:
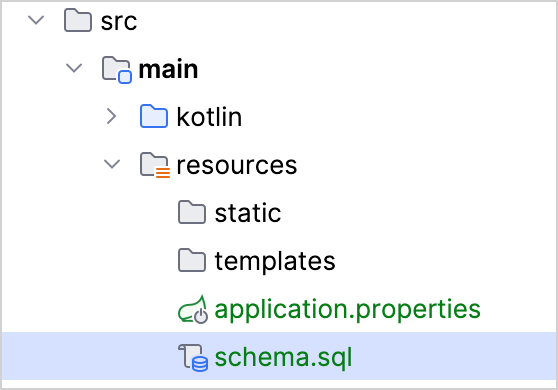
- 在
src/main/resources 目录中创建 schema.sql 文件。它将保存数据库对象定义:
- 用以下代码更新
src/main/resources/schema.sql 文件:
1
2
3
4
5
| -- schema.sql
CREATE TABLE IF NOT EXISTS messages (
id VARCHAR(60) PRIMARY KEY,
text VARCHAR NOT NULL
);
|
它创建了包含 id 和 text 两列的 messages 表。表结构与 Message 类的结构相对应。
- 打开位于
src/main/resources 文件夹中的 application.properties 文件,并添加以下应用属性:
spring.application.name=demo
spring.datasource.driver-class-name=org.h2.Driver
spring.datasource.url=jdbc:h2:file:./data/testdb
spring.datasource.username=name
spring.datasource.password=password
spring.sql.init.schema-locations=classpath:schema.sql
spring.sql.init.mode=always
这些设置会为 Spring Boot 应用启用数据库。常见应用属性的完整列表见 Spring 文档。
通过 HTTP 请求向数据库添加消息
你应该使用 HTTP 客户端来调之前创建的端点。在 IntelliJ IDEA 中,可以使用内置的 HTTP 客户端:
运行应用。应用启动并运行后,你就可以执行 POST 请求把消息存入数据库。
在项目根目录中创建 requests.http 文件,并添加以下 HTTP 请求:
 1
 2
 3
 4
 5
 6
 7
 8
 9
10
11
12
13
14
15
16
17
18
19
20
21
22
23
24
25
26
27
28
| ### Post "Hello!"
POST http: // POST http://localhost:8080/
Content-Type: application/json
{
"text": "Hello!"
}
### Post "Bonjour!"
POST http: // POST http://localhost:8080/
Content-Type: application/json
{
"text": "Bonjour!"
}
### Post "Privet!"
POST http: // POST http://localhost:8080/
Content-Type: application/json
{
"text": "Privet!"
}
### Get all the messages
GET http: // GET http://localhost:8080/
|
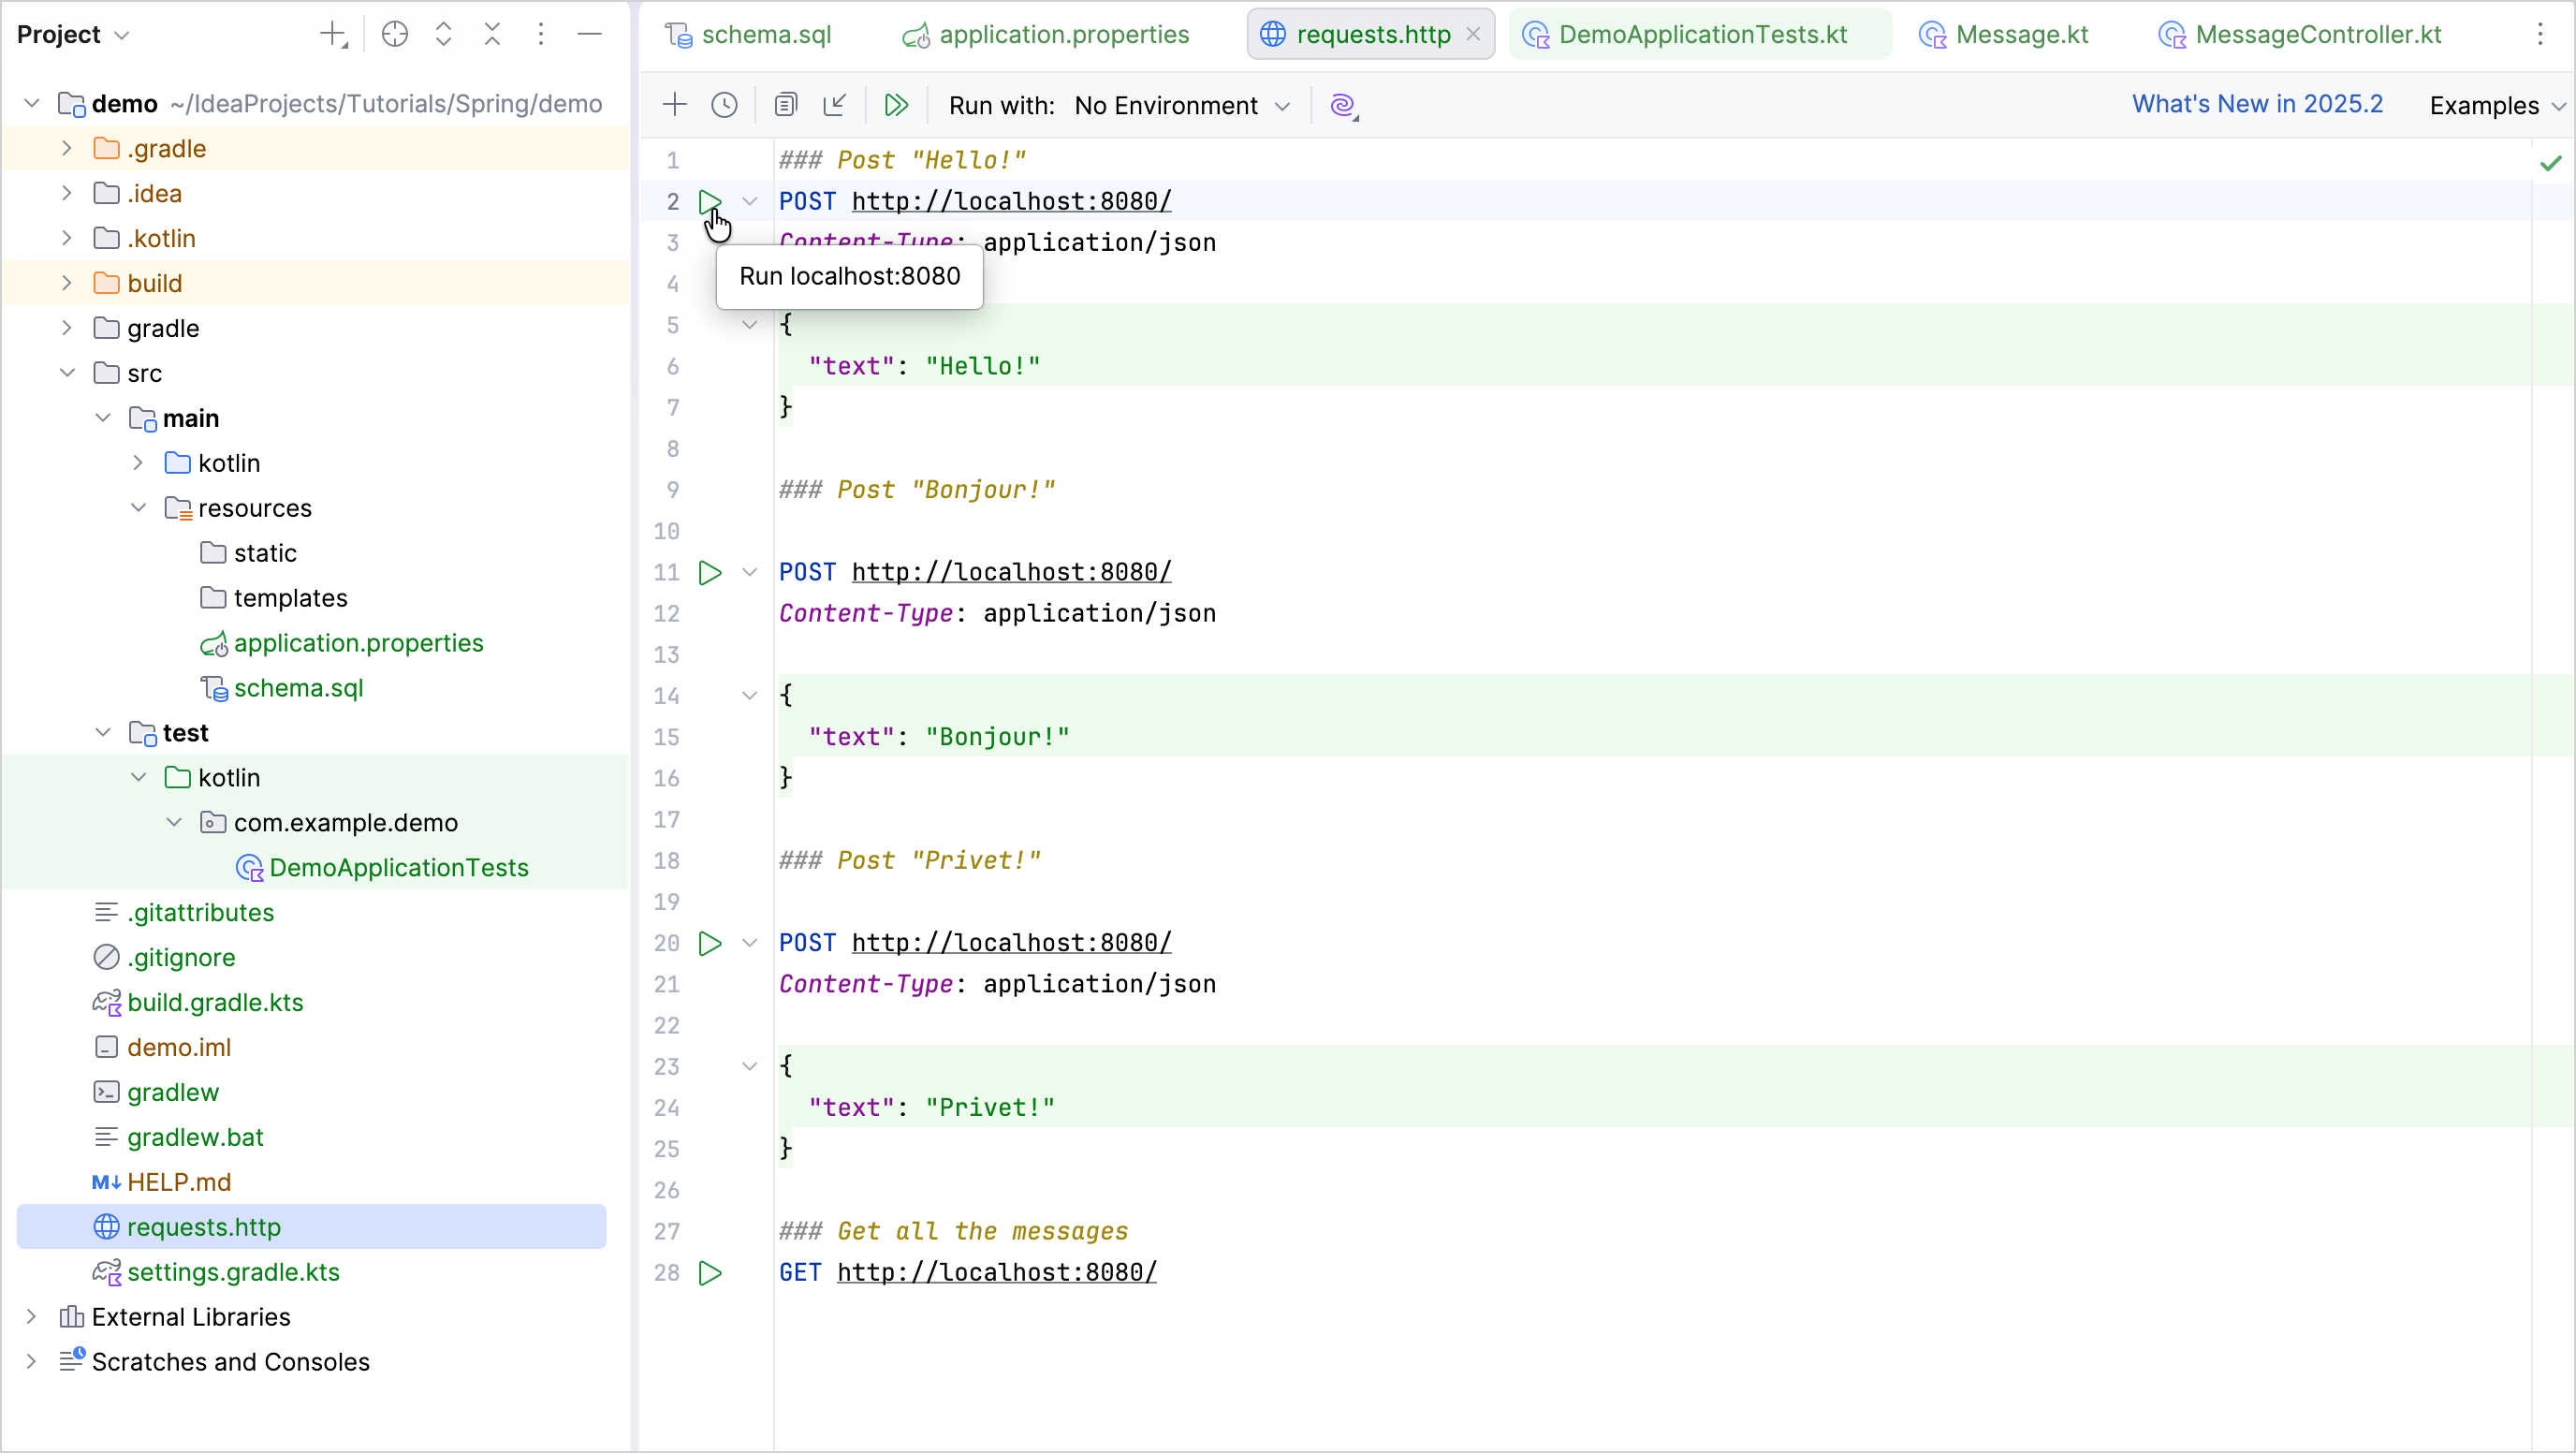
- 执行所有 POST 请求。使用请求声明旁行号处的绿色 Run 图标。这些请求会把文本消息写入数据库:
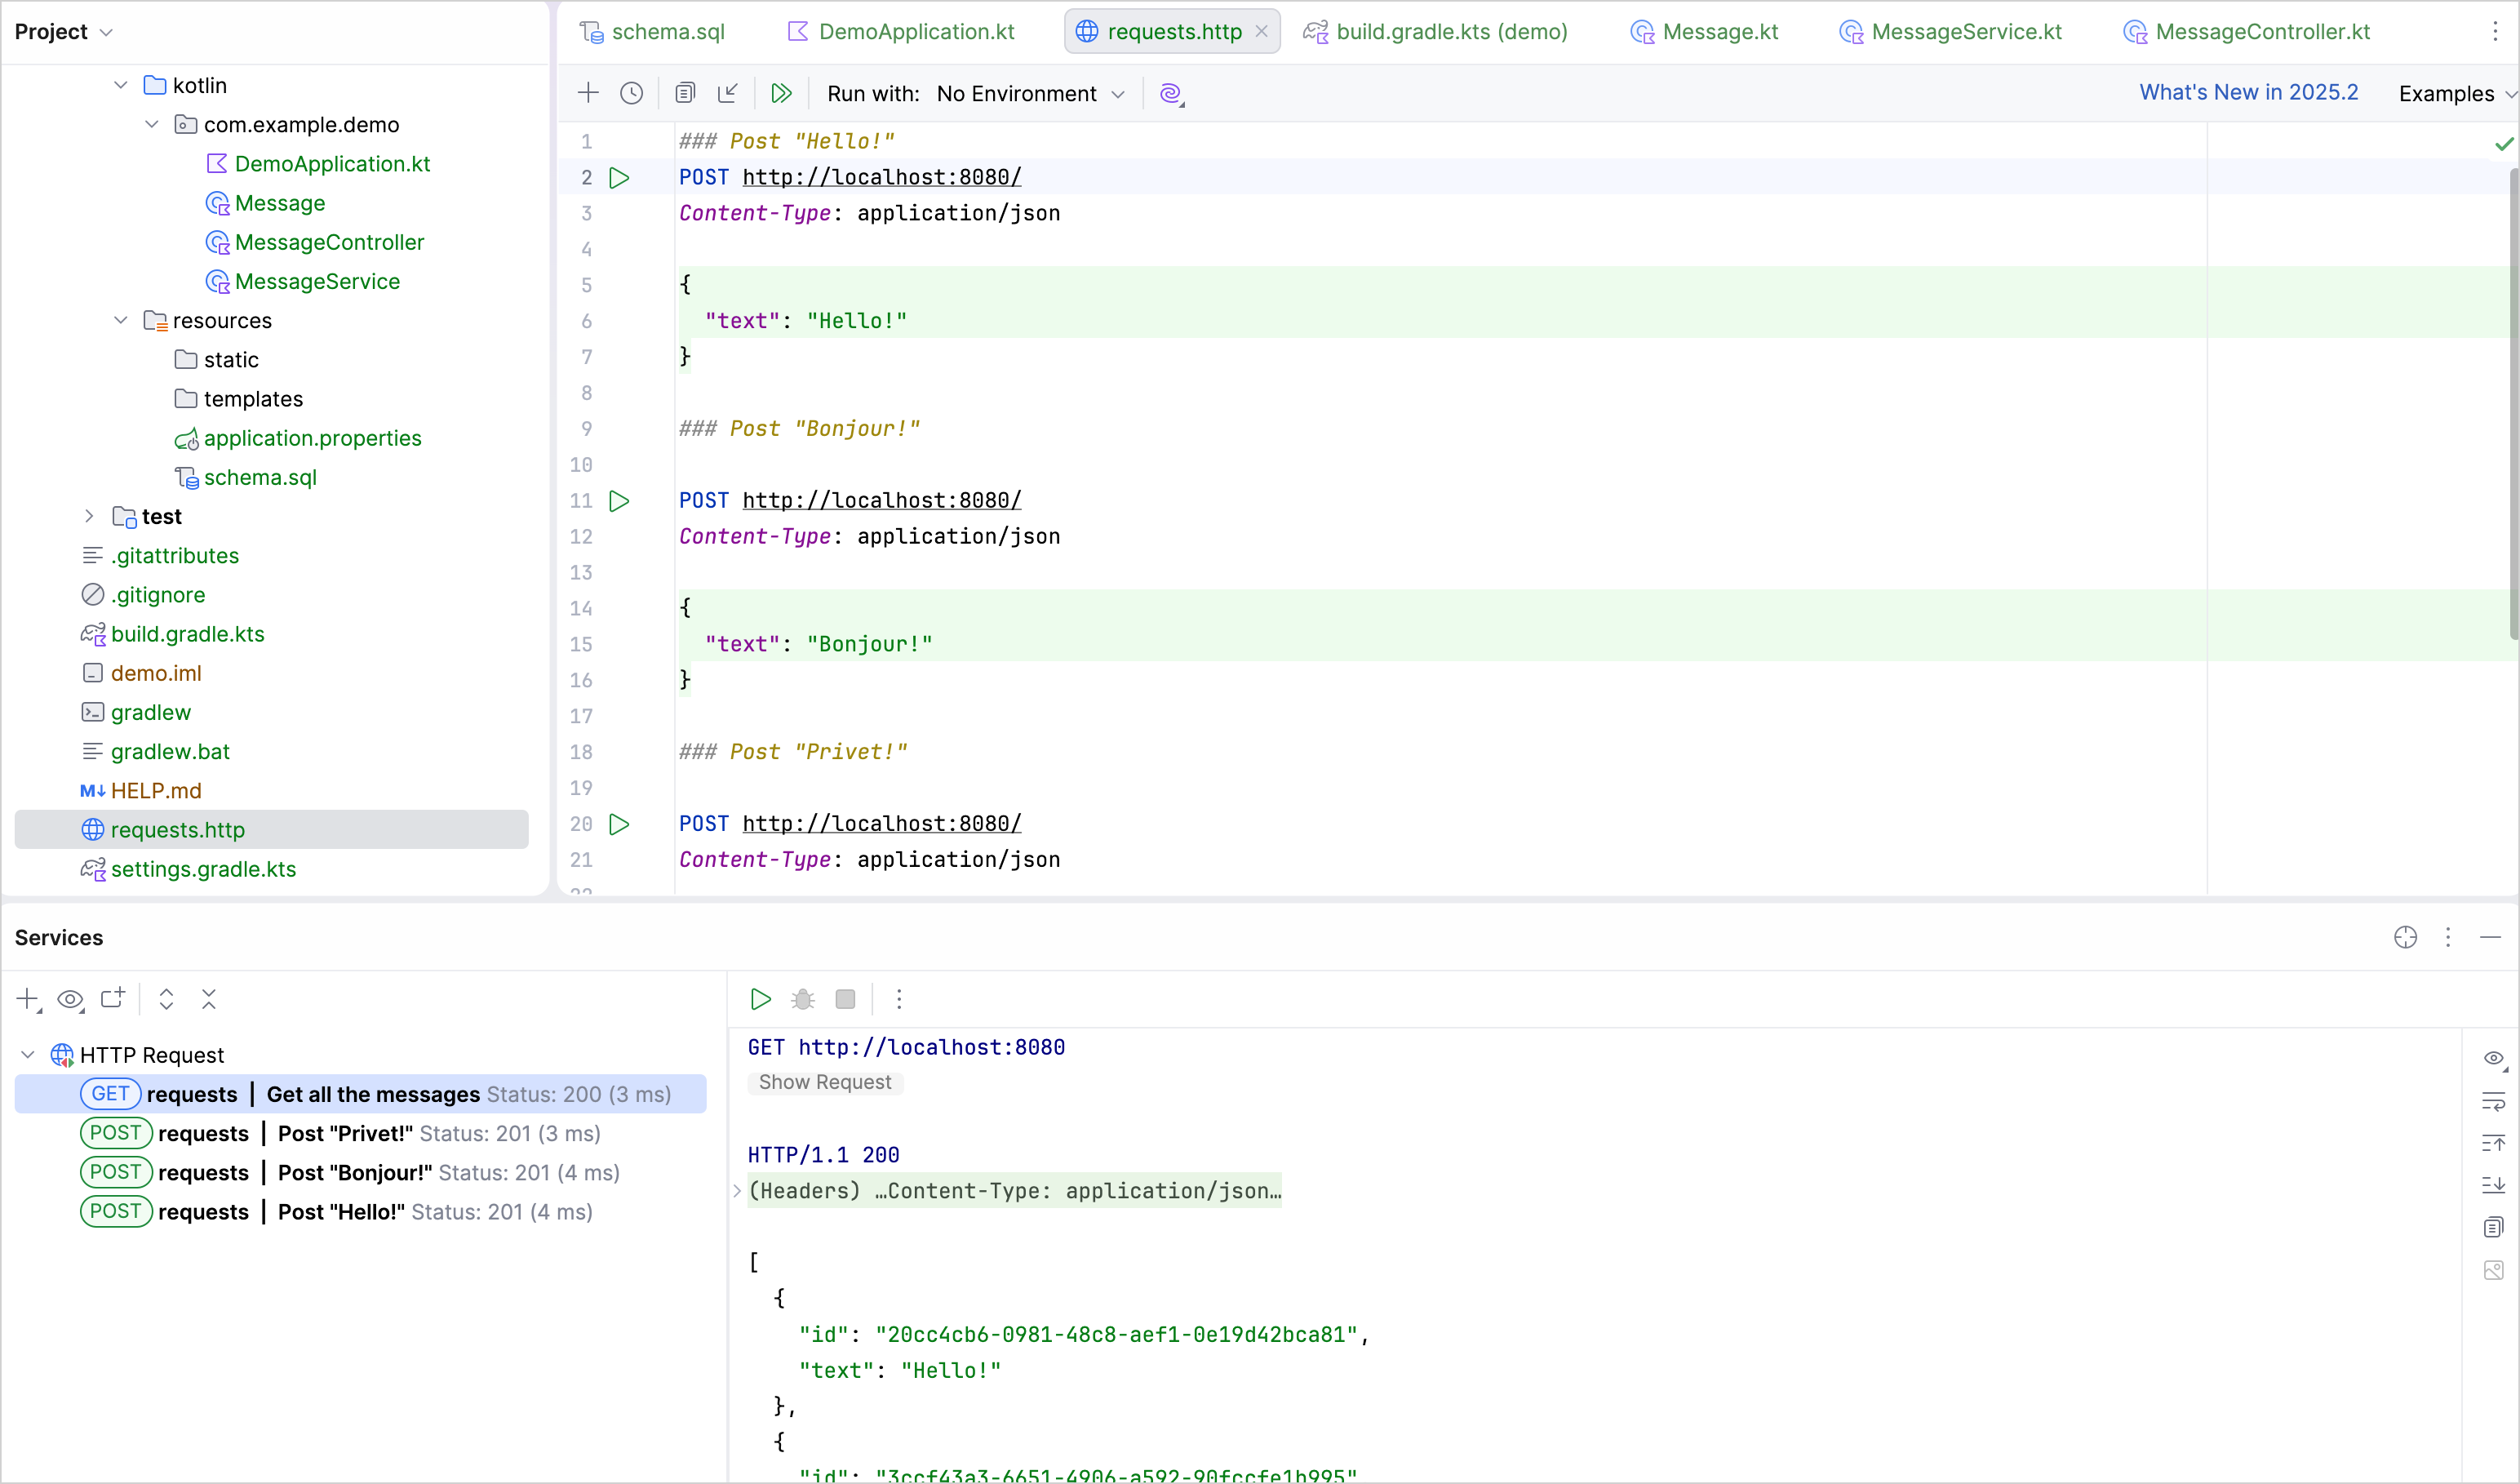
- 执行 GET 请求,并在 Run 工具窗口中查看结果:
执行请求的其他方式
你也可以使用任何其他 HTTP 客户端或 cURL 命令行工具。例如,在终端中运行以下命令可以得到相同结果:
1
2
3
4
5
6
7
| curl -X POST --location "http://localhost:8080" -H "Content-Type: application/json" -d "{ \"text\": \"Hello!\" }"
curl -X POST --location "http://localhost:8080" -H "Content-Type: application/json" -d "{ \"text\": \"Bonjour!\" }"
curl -X POST --location "http://localhost:8080" -H "Content-Type: application/json" -d "{ \"text\": \"Privet!\" }"
curl -X GET --location "http://localhost:8080"
|
按 id 获取消息
扩展应用的功能,以按 id 获取单条消息。
- 在
MessageService 类中,添加新函数 findMessageById(id: String),用于按 id 获取单条消息:
 1
 2
 3
 4
 5
 6
 7
 8
 9
10
11
12
13
14
15
16
17
18
19
20
21
22
23
24
25
26
27
| // MessageService.kt
package com.example.demo
import org.springframework.stereotype.Service
import org.springframework.jdbc.core.JdbcTemplate
import org.springframework.jdbc.core.query
import java.util.*
@Service
class MessageService(private val db: JdbcTemplate) {
fun findMessages(): List<Message> = db.query("select * from messages") { response, _ ->
Message(response.getString("id"), response.getString("text"))
}
fun findMessageById(id: String): Message? = db.query("select * from messages where id = ?", id) { response, _ ->
Message(response.getString("id"), response.getString("text"))
}.singleOrNull()
fun save(message: Message): Message {
val id = message.id ?: UUID.randomUUID().toString() // 如果为 null 则生成新的 id
db.update(
"insert into messages values ( ?, ? )",
id, message.text
)
return message.copy(id = id) // 返回带新 id 的消息副本
}
}
|
vararg 实参在参数列表中的位置
query() 函数接收三个参数:
- 需要参数才能运行的 SQL 查询字符串
id,它是 String 类型的参数RowMapper 实例,由 lambda 表达式实现
query() 函数的第二个参数被声明为可变参数(vararg)。在 Kotlin 中,可变参数的位置不必位于参数列表的最后。
singleOrNull() 函数
singleOrNull() 函数返回单个元素;如果数组为空,或者存在多个值相同的元素,则返回 null。
警告: 用于按 id 获取消息的 .query() 函数是 Spring Framework 提供的 Kotlin 扩展函数。如上面的代码所示,它需要额外的导入 import org.springframework.jdbc.core.query。
- 向
MessageController 类添加带 id 参数的新函数 index(...):
1
2
3
4
5
6
7
8
9
10
11
12
13
14
15
16
17
18
19
20
21
22
23
24
25
26
27
28
29
30
31
32
| // MessageController.kt
package com.example.demo
import org.springframework.http.ResponseEntity
import org.springframework.web.bind.annotation.GetMapping
import org.springframework.web.bind.annotation.PathVariable
import org.springframework.web.bind.annotation.PostMapping
import org.springframework.web.bind.annotation.RequestBody
import org.springframework.web.bind.annotation.RequestMapping
import org.springframework.web.bind.annotation.RestController
import java.net.URI
@RestController
@RequestMapping("/")
class MessageController(private val service: MessageService) {
@GetMapping
fun listMessages() = ResponseEntity.ok(service.findMessages())
@PostMapping
fun post(@RequestBody message: Message): ResponseEntity<Message> {
val savedMessage = service.save(message)
return ResponseEntity.created(URI("/${savedMessage.id}")).body(savedMessage)
}
@GetMapping("/{id}")
fun getMessage(@PathVariable id: String): ResponseEntity<Message> =
service.findMessageById(id).toResponseEntity()
private fun Message?.toResponseEntity(): ResponseEntity<Message> =
// 如果消息为 null(未找到),则把响应码设为 404
this?.let { ResponseEntity.ok(it) } ?: ResponseEntity.notFound().build()
}
|
从上下文路径中获取值
由于你用 @GetMapping("/{id}") 注解了新函数,Spring Framework 会从上下文路径中获取消息 id。通过用 @PathVariable 注解函数参数,你告诉框架把获取到的值作为函数实参使用。这个新函数会调用 MessageService,以按其 id 获取单条消息。
带可空接收者的扩展函数
扩展可以定义在可空接收者类型上。如果接收者为 null,那么 this 也是 null。因此,在定义带可空接收者类型的扩展时,建议在函数体内执行 this == null 检查。
你也可以像上面的 toResponseEntity() 函数那样,使用空安全调用运算符(?.)来执行空检查:
1
| this?.let { ResponseEntity.ok(it) }
|
ResponseEntity
ResponseEntity 表示 HTTP 响应,包括状态码、响应头和响应体。它是一个泛型包装器,让你能把自定义的 HTTP 响应发回客户端,并对内容拥有更多控制权。
以下是应用的完整代码:
1
2
3
4
5
6
7
8
9
10
11
12
| // DemoApplication.kt
package com.example.demo
import org.springframework.boot.autoconfigure.SpringBootApplication
import org.springframework.boot.runApplication
@SpringBootApplication
class DemoApplication
fun main(args: Array<String>) {
runApplication<DemoApplication>(*args)
}
|
1
2
3
4
| // Message.kt
package com.example.demo
data class Message(val id: String?, val text: String)
|
1
2
3
4
5
6
7
8
9
10
11
12
13
14
15
16
17
18
19
20
21
22
23
24
25
26
27
| // MessageService.kt
package com.example.demo
import org.springframework.stereotype.Service
import org.springframework.jdbc.core.JdbcTemplate
import org.springframework.jdbc.core.query
import java.util.*
@Service
class MessageService(private val db: JdbcTemplate) {
fun findMessages(): List<Message> = db.query("select * from messages") { response, _ ->
Message(response.getString("id"), response.getString("text"))
}
fun findMessageById(id: String): Message? = db.query("select * from messages where id = ?", id) { response, _ ->
Message(response.getString("id"), response.getString("text"))
}.singleOrNull()
fun save(message: Message): Message {
val id = message.id ?: UUID.randomUUID().toString()
db.update(
"insert into messages values ( ?, ? )",
id, message.text
)
return message.copy(id = id)
}
}
|
 1
 2
 3
 4
 5
 6
 7
 8
 9
10
11
12
13
14
15
16
17
18
19
20
21
22
23
24
25
26
27
28
29
30
31
| // MessageController.kt
package com.example.demo
import org.springframework.http.ResponseEntity
import org.springframework.web.bind.annotation.GetMapping
import org.springframework.web.bind.annotation.PathVariable
import org.springframework.web.bind.annotation.PostMapping
import org.springframework.web.bind.annotation.RequestBody
import org.springframework.web.bind.annotation.RequestMapping
import org.springframework.web.bind.annotation.RestController
import java.net.URI
@RestController
@RequestMapping("/")
class MessageController(private val service: MessageService) {
@GetMapping
fun listMessages() = ResponseEntity.ok(service.findMessages())
@PostMapping
fun post(@RequestBody message: Message): ResponseEntity<Message> {
val savedMessage = service.save(message)
return ResponseEntity.created(URI("/${savedMessage.id}")).body(savedMessage)
}
@GetMapping("/{id}")
fun getMessage(@PathVariable id: String): ResponseEntity<Message> =
service.findMessageById(id).toResponseEntity()
private fun Message?.toResponseEntity(): ResponseEntity<Message> =
this?.let { ResponseEntity.ok(it) } ?: ResponseEntity.notFound().build()
}
|
运行应用
Spring 应用已经可以运行了:
再次运行应用。
打开 requests.http 文件并添加新的 GET 请求:
1
2
| ### Get the message by its id
GET http://localhost:8080/id
|
执行该 GET 请求,从数据库中获取所有消息。
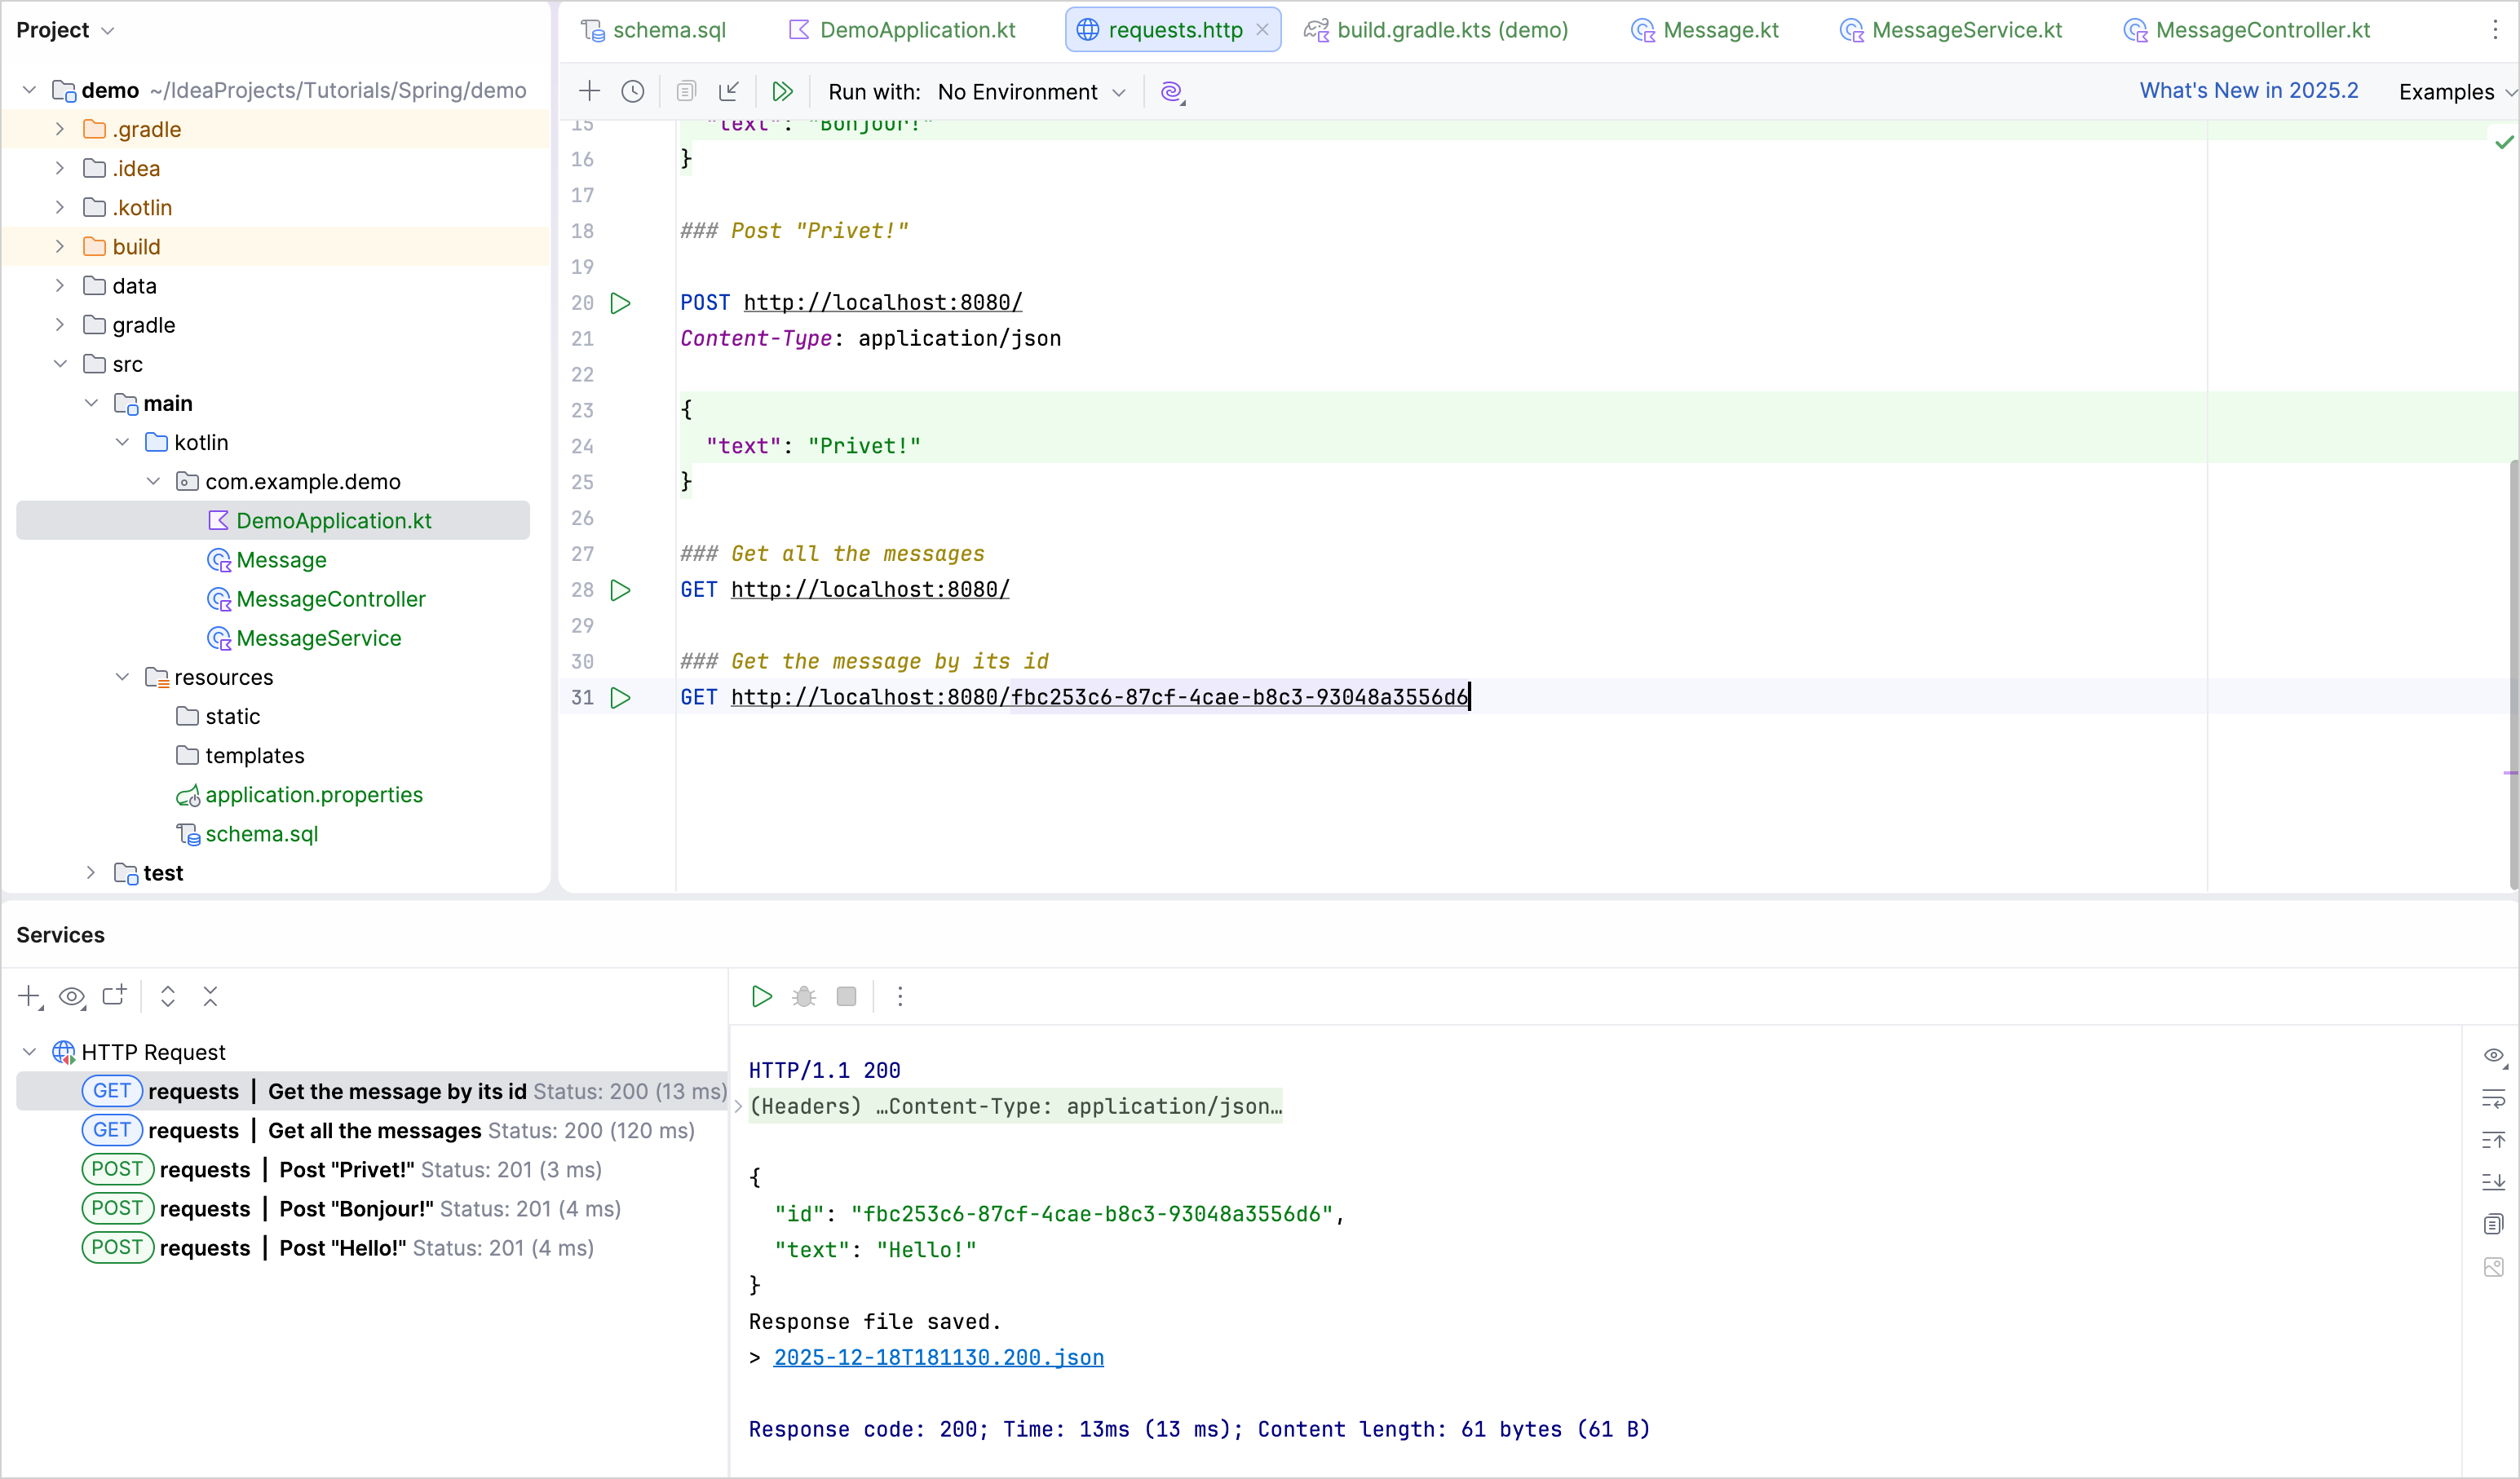
在 Run 工具窗口中复制其中一个 id,并把它加入请求,如下所示:
1
2
| ### Get the message by its id
GET http://localhost:8080/f910aa7e-11ee-4215-93ed-1aeeac822707
|
注意: 请替换成你自己的消息 id,而不是上面这个。
- 执行该 GET 请求,并在 Run 工具窗口中查看结果:
下一步
最后一步将展示如何使用更流行的方式通过 Spring Data 连接数据库。
上一步
下一步