中英对照
- 1: 1 引言
- 2: 2 什么是 shell
- 3: 3 文件系统中跳转
- 4: 4 探究操作系统
- 5: 5 操作文件和目录
- 6: 6 使用命令
- 7: 7 重定向
- 8: 8 从 shell 眼中看世界
- 9: 9 键盘高级操作技巧
- 10: 10 权限
- 11: 11 进程
- 12: 12 shell 环境
- 13: 13 vi 简介
- 14: 14 自定制 shell 提示符
- 15: 15 软件包管理
- 16: 16 存储媒介
- 17: 17 网络系统
- 18: 18 查找文件
- 19: 19 归档和备份
- 20: 20 正则表达式
- 21: 21 文本处理
- 22: 22 格式化输出
- 23: 23 打印
- 24: 24 编译程序
- 25: 25 编写第一个 Shell 脚本
- 26: 26 启动一个项目
- 27: 27 自顶向下设计
- 28: 28 流程控制:if 分支结构
- 29: 29 读取键盘输入
- 30: 30 流程控制:while/until 循环
- 31: 31 疑难排解
- 32: 32 流程控制:case 分支
- 33: 33 位置参数
- 34: 34 流程控制:for 循环
- 35: 35 字符串和数字
- 36: 36 数组
- 37: 37 奇珍异宝
1 - 1 引言
引言
http://billie66.github.io/TLCL/book/chap01.html
I want to tell you a story.
我想给大家讲个故事。
No, not the story of how, in 1991, Linus Torvalds wrote the first version of the Linux kernel. You can read that story in lots of Linux books. Nor am I going to tell you the story of how, some years earlier, Richard Stallman began the GNU Project to create a free Unix-like operating system. That’s an important story too, but most other Linux books have that one, as well.
故事内容不是 Linus Torvalds 在1991年怎样写了 Linux 内核的第一个版本, 因为这些内容你可以在许多 Linux 书籍中读到。我也不是来告诉你,更早之前,Richard Stallman 是如何开始 GNU 项目,设计了一个免费的类 Unix 的操作系统。那也是一个很有意义的故事, 但大多数 Linux 书籍也讲到了它。
No, I want to tell you the story of how you can take back control of your computer.
我想告诉大家一个你如何才能夺回计算机管理权的故事。
When I began working with computers as a college student in the late 1970s, there was a revolution going on. The invention of the microprocessor had made it possible for ordinary people like you and me to actually own a computer. It’s hard for many people today to imagine what the world was like when only big business and big government ran all the computers. Let’s just say, you couldn’t get much done.
在20世纪70年代末,我刚开始和计算机打交道时,正进行着一场革命,那时的我还是一名大学生。 微处理器的发明,使普通老百姓(就如你和我)真正拥有一台计算机成为可能。今天, 人们难以想象,只有大企业和强大的政府才能够拥有计算机的世界,是怎样的一个世界。 简单说,你做不了多少事情。
Today, the world is very different. Computers are everywhere, from tiny wristwatches to giant data centers to everything in between. In addition to ubiquitous computers, we also have a ubiquitous network connecting them together. This has created a wondrous new age of personal empowerment and creative freedom, but over the last couple of decades something else has been happening. A single giant corporation has been imposing its control over most of the world’s computers and deciding what you can and cannot do with them. Fortunately, people from all over the world are doing something about it. They are fighting to maintain control of their computers by writing their own software. They are building Linux.
今天,世界已经截然不同了。计算机遍布各个领域,从小手表到大型数据中心,及大小介于它们之间的每件东西。 除了随处可见的计算机之外,我们还有一个无处不在的连接所有计算机的网络。这已经开创了一个奇妙的, 个人授权和创作自由的新时代,但是在过去的二三十年里,正在发生另一些事情。一个大公司不断地把它的 管理权强加到世界上绝大多数的计算机上,并且决定你对计算机的操作权力。幸运地是,来自世界各地的人们, 正积极努力地做些事情来改变这种境况。通过编写自己的软件,他们一直在为维护电脑的管理权而战斗着。 他们建设着 Linux。
Many people speak of “freedom” with regard to Linux, but I don’t think most people know what this freedom really means. Freedom is the power to decide what your computer does, and the only way to have this freedom is to know what your computer is doing. Freedom is a computer that is without secrets, one where everything can be known if you care enough to find out.
一提到 Linux,许多人都会说到“自由”,但我不认为他们都知道“自由”的真正涵义。“自由”是一种权力, 它决定你的计算机能做什么,同时能够拥有这种“自由”的唯一方式就是知道计算机正在做什么。 “自由”是指一台没有任何秘密的计算机,你可以从它那里了解一切,只要你用心的去寻找。
为什么使用命令行
Have you ever noticed in the movies when the “super hacker,”— you know, the guy who can break into the ultra-secure military computer in under thirty seconds —sits down at the computer, he never touches a mouse? It’s because movie makers realize that we, as human beings, instinctively know the only way to really get anything done on a computer is by typing on a keyboard.
你是否注意到,在电影中一个“超级黑客”坐在电脑前,从不摸一下鼠标, 就能够在30秒内侵入到超安全的军用计算机中。这是因为电影制片人意识到, 作为人类,本能地知道让计算机圆满完成工作的唯一途径,是用键盘来操纵计算机。
Most computer users today are only familiar with the graphical user interface (GUI) and have been taught by vendors and pundits that the command line interface (CLI) is a terrifying thing of the past. This is unfortunate, because a good command line interface is a marvelously expressive way of communicating with a computer in much the same way the written word is for human beings. It’s been said that “graphical user interfaces make easy tasks easy, while command line interfaces make difficult tasks possible” and this is still very true today.
现在,大多数的计算机用户只是熟悉图形用户界面(GUI),并且产品供应商和此领域的学者会灌输给用户这样的思想, 命令行界面(CLI)是过去使用的一种很恐怖的东西。这就很不幸,因为一个好的命令行界面, 是用来和计算机进行交流沟通的非常有效的方式,正像人类社会使用文字互通信息一样。人们说,“图形用户界面让简单的任务更容易完成, 而命令行界面使完成复杂的任务成为可能”,到现在这句话仍然很正确。
Since Linux is modeled after the Unix family of operating systems, it shares the same rich heritage of command line tools as Unix. Unix came into prominence during the early 1980s (although it was first developed a decade earlier), before the widespread adoption of the graphical user interface and, as a result, developed an extensive command line interface instead. In fact, one of the strongest reasons early adopters of Linux chose it over, say, Windows NT was the powerful command line interface which made the “difficult tasks possible.”
因为 Linux 是以 Unix 家族的操作系统为模型写成的,所以它分享了 Unix 丰富的命令行工具。 Unix 在20世纪80年代初显赫一时(虽然,开发它在更早之前),这使得图形界面的流行之前,命令行界面就已被广泛应用。 事实上,很多人选择 Linux(而不是其他的系统,比如说 Windows NT)是因为其可以使“完成复杂的任务成为可能”的强大的命令行界面。
这本书讲什么
This book is a broad overview of “living” on the Linux command line. Unlike some books that concentrate on just a single program, such as the shell program, bash, this book will try to convey how to get along with the command line interface in a larger sense. How does it all work? What can it do? What’s the best way to use it?
这本书介绍如何生存在 Linux 命令行的世界。不像一些书籍仅仅涉及一个程序,比如像 shell 程序,bash。 本书着眼于更宏大的视角,试着向你传授如何与命令行界面友好相处。 它是怎样工作的? 它能做什么? 使用它的最好方法是什么?
This is not a book about Linux system administration. While any serious discussion of the command line will invariably lead to system administration topics, this book only touches on a few administration issues. It will, however, prepare the reader for additional study by providing a solid foundation in the use of the command line, an essential tool for any serious system administration task.
这不是一本关于 Linux 系统管理的书。然而任何一个关于命令行的深入讨论,都一定会牵涉到 系统管理方面的内容,这本书仅仅提到一点儿管理方面的知识。但是这本书为读者准备好了学习更多内容的坚实基础, 毕竟要胜任系统管理工作也需要良好的命令行使用基本功。
This book is very Linux-centric. Many other books try to broaden their appeal by including other platforms such as generic Unix and MacOS X. In doing so, they “water down” their content to feature only general topics. This book, on the other hand, only covers contemporary Linux distributions. Ninety-five percent of the content is useful for users of other Unix-like systems, but this book is highly targeted at the modern Linux command line user.
这本书是围绕 Linux 而写的。许多书籍,为了扩大自身的影响力,会包含一些其它平台的知识, 比如 Unix, MacOS X 等。这样做,很多内容只能比较空泛的去讲了。另一方面, 这本书只研究了当代 Linux 发行版。虽然,对于使用其它类 Unix 系统的用户来说, 书中95%的内容是有用的,但这本书主要面向的对象是现代 Linux 命令行用户。
谁应该读这本书
This book is for new Linux users who have migrated from other platforms. Most likely you are a “power user” of some version of Microsoft Windows. Perhaps your boss has told you to administer a Linux server, or maybe you’re just a desktop user who is tired of all the security problems and want to give Linux a try. That’s fine.here. All are welcome.
这本书是为从其它平台迁移到 Linux 系统的新手而写的。可能你是使用某个版本 Windows 系统的高手, 或许是老板让你去管理一个 Linux 服务器,或许你只是一个桌面用户,厌倦了系统出现的各种 安全问题而想要体验一下 Linux。很好,这里欢迎你们!
That being said, there is no shortcut to Linux enlightenment. Learning the command line is challenging and takes real effort. It’s not that it’s so hard, but rather it’s so vast. The average Linux system has literally thousands of programs you can employ on the command line. Consider yourself warned; learning the command line is not a casual endeavor.
不过一般来说,对于 Linux 的启蒙教育,没有捷径可言。学习命令行富于挑战性,而且很费气力。 这并不是说 Linux 命令行很难学,而是它的知识量很大,不容易掌握。Linux 操作系统 差不多有数以千计的命令可供用户操作。有必要给你提个醒,命令行可不是轻轻松松就能学好的。
On the other hand, learning the Linux command line is extremely rewarding. If you think you’re a “power user” now, just wait. You don’t know what real power is — yet. And, unlike many other computer skills, knowledge of the command line is long lasting. The skills learned today will still be useful ten years from now. The command line has survived the test of time.
另一方面,学习 Linux 命令行会让你受益匪浅,给你极大的回报。如果你认为 现在你已经是高手了。别急,其实你还不知道什么才是真正的高手。不像其他一些计算机技能, 一段时间之后可能就被淘汰了,命令行知识却不会落伍,你今天所学到的,在十年以后 都会有用处。命令行通过了时间的考验。
It is also assumed that you have no programming experience, but not to worry, we’ll start you down that path as well.
如果你没有编程经验,也不要担心,我会带你入门。
这本书的内容
This material is presented in a carefully chosen sequence, much like a tutor sitting next to you guiding you along. Many authors treat this material in a “systematic” fashion, which makes sense from a writer’s perspective, but can be very confusing to new users.
这些材料是经过精心安排的,很像一位老师坐在你身旁,耐心地指导你。 许多作者用系统化的方式讲解这些材料,虽然从一个作者的角度考虑很有道理,但对于 Linux 新手来说, 他们可能会感到非常困惑。
Another goal is to acquaint you with the Unix way of thinking, which is different from the Windows way of thinking. Along the way, we’ll go on a few side trips to help you understand why certain things work the way they do and how they got that way. Linux is not just a piece of software, it’s also a small part of the larger Unix culture, which has its own language and history. I might throw in a rant or two, as well.
另一个目的,是想让读者熟悉 Unix 的思维方式,这种思维方式与 Windows 不同。在学习过程中, 我们会帮助你理解为什么某些命令那样工作,以及它们是如何工作的。 Linux 不仅是一款软件,也是 Unix 文化的一小部分,它有自己的语言和历史。关于这些,书中我会提到一些。
This book is divided into five parts, each covering some aspect of the command line experience. Besides the first part, which you are reading now, this book contains:
这本书共分为五部分,每一部分讲述了不同方面的命令行知识。除了第一部分, 也就是你正在阅读的这一部分,这本书还包括:
- Part 2 – Learning The Shell starts our exploration of the basic language of the command line including such things as the structure of commands, file system navigation, command line editing, and finding help and documentation for commands.
- Part 3 – Configuration And The Environment covers editing configuration files that control the computer’s operation from the command line.
- Part 4 – Common Tasks And Essential Tools explores many of the ordinary tasks that are commonly performed from the command line. Unix-like operating systems, such as Linux, contain many “classic” command line programs that are used to perform powerful operations on data.
- Part 5 – Writing Shell Scripts introduces shell programming, an admittedly rudimentary, but easy to learn, technique for automating many common computing tasks. By learning shell programming, you will become familiar with concepts that can be applied to many other programming languages.
- 第二部分 — 学习 shell 开始探究命令行基本语言,包括命令组成结构, 文件系统浏览,编写命令行,查找命令帮助文档。
- 第三部分 — 配置文件及环境 讲述了如何编写配置文件,通过配置文件,用命令行来 操控计算机。
- 第四部分 — 常见任务及主要工具 探究了许多命令行经常执行的普通任务。类似于 Unix 的操作系统,例如 Linux, 包括许多经典的命令行程序,这些程序可以用来对数据进行 强大的操作。
- 第五部分 — 编写 Shell 脚本 介绍了 shell 编程,一个无可否认的基本技能,能够自动化许多 常见的计算任务,很容易学。通过学习 shell 编程,你会逐渐熟悉一些关于编程语言方面的概念, 这些概念也适用于其他的编程语言。
怎样阅读这本书
Start at the beginning of the book and follow it to the end. It isn’t written as a reference work, it’s really more like a story with a beginning, middle, and an end.
从头到尾的阅读。它并不是一本技术参考手册,实际上它更像一本故事书,有开头,过程,结尾。
前提条件
To use this book, all you will need is a working Linux installation. You can get this in one of two ways:
为了使用这本书,你需要安装 Linux 操作系统。你可以通过两种方式,来完成安装。
- Install Linux on a (not so new) computer. It doesn’t matter which distribution you choose, though most people today start out with either Ubuntu, Fedora, or OpenSUSE. If in doubt, try Ubuntu first. Installing a modern Linux distribution can be ridiculously easy or ridiculously difficult depending on your hardware. I suggest a desktop computer that is a couple of years old and has at least 256 megabytes of RAM and 6 gigabytes of free hard disk space. Avoid laptops and wireless networks if at all possible, as these are often more difficult to get working.
- Use a “Live CD.” One of the cool things you can do with many Linux distributions is run them directly from a CDROM without installing them at all. Just go into your BIOS setup and set your computer to “Boot from CDROM,” insert the live CD, and reboot. Using a live CD is a great way to test a computer for Linux compatibility prior to installation. The disadvantage of using a live CD is that it may be very slow compared to having Linux installed on your hard drive. Both Ubuntu and Fedora (among others) have live CD versions.
- 在一台(不用很新)的电脑上安装 Linux。你选择哪个 Linux 发行版安装,是无关紧要的事。 虽然大多数人一开始选择安装 Ubuntu, Fedora, 或者 OpenSUSE。如果你拿不定主意,那就先试试 Ubuntu。 由于主机硬件配置不同,安装 Linux 时,你可能不费吹灰之力就装上了,也可能费了九牛二虎之力还装不上。 所以我建议,一台使用了几年的台式机,至少要有256M 的内存,6G 的硬盘可用空间。尽可能避免安装时使用 笔记本电脑和无线网络,它们经常不能工作。
- 使用“Live CD.” 许多 Linux 发行版都自带一个比较酷的功能,你可以直接从系统安装盘 CDROM 中运行 Linux, 而不必安装 Linux。开机进入 BIOS 设置界面,更改引导项,设置为“从 CDROM 启动”。插入 live CD,然后重启。 采用 live CD 而非直接安装可以很好的测试你的电脑对 linux 的兼容性。缺点就是相较于在硬盘上安装 linux,这种方式 过程较慢。Ubuntu 和 Fedora 等都有 live CD 的版本。
Regardless of how you install Linux, you will need to have occasional superuser (i.e., administrative) privileges to carry out the lessons in this book.
不管你怎样安装 Linux,为了练习书中介绍的知识,你需要有超级用户(管理员)权限。
After you have a working installation, start reading and follow along with your own computer. Most of the material in this book is “hands on,” so sit down and get typing!
当你在自己的电脑上安装了 Linux 系统之后,就开始一边阅读本书,一边练习吧。本书大部分内容 都可以自己动手练习,坐下来,敲入命令,体验一下吧。
Why I Don’t Call It “GNU/Linux”
In some quarters, it’s politically correct to call the Linux operating system the “GNU/Linux operating system.” The problem with “Linux” is that there is no completely correct way to name it because it was written by many different people in a vast, distributed development effort. Technically speaking, Linux is the name of the operating system’s kernel, nothing more. The kernel is very important of course, since it makes the operating system go, but it’s not enough to form a complete operating system.
Enter Richard Stallman, the genius-philosopher who founded the Free Software movement, started the Free Software Foundation, formed the GNU Project, wrote the first version of the GNU C Compiler (gcc), created the GNU General Public License (the GPL), etc., etc., etc. He insists that you call it “GNU/Linux” to properly reflect the contributions of the GNU Project. While the GNU Project predates the Linux kernel, and the project’s contributions are extremely deserving of recognition, placing them in the name is unfair to everyone else who made significant contributions. Besides, I think “Linux/GNU” would be more technically accurate since the kernel boots first and everything else runs on top of it.
In popular usage, “Linux” refers to the kernel and all the other free and open source software found in the typical Linux distribution; that is, the entire Linux ecosystem, not just the GNU components. The operating system marketplace seems to prefer one-word names such as DOS, Windows, MacOS, Solaris, Irix, AIX. I have chosen to use the popular format. If, however, you prefer to use “GNU/Linux” instead, please perform a mental search and replace while reading this book. I won’t mind.
为什么我不叫它“GNU/Linux”
在某些人眼里,把 Linux 操作系统称为“GNU/Linux 操作系统”,才是政治正确。但“Linux”的问题是, 没有一个完全正确的方式能命名它,因为它是由许许多多,分布在世界各地的贡献者们,合作开发而成的。 从技术层面讲,Linux 只是操作系统的内核名字。当然内核非常重要,因为有它, 操作系统才能运行起来,但它并不能构成一个完备的操作系统。
Richard Stallman 是一个天才的哲学家,自由软件运动创始人,自由软件基金会创办者,他创建了 GNU 项目, 编写了第一版 GNU C 编译器(gcc),创立了 GNU 通用公共协议(the GPL)等等。 他坚持把 Linux 称为“GNU/Linux”,为的是准确地反映 GNU 项目对 Linux 操作系统的贡献。 然而,尽管 GNU 项目早于 Linux 内核,项目的贡献应该得到极高的赞誉,但是把 GNU 用在 Linux 名字里, 这对其他为 Linux 的发展做出重大贡献的程序员来说,就不公平了。而且,我觉得要是叫也要叫 “Linux/GNU” 比较准确一些, 因为内核会先启动,其他一切都运行在内核之上。
在目前流行的用法中,“Linux”指的是内核以及在一个典型的 Linux 发行版中所包含的所有免费及开源软件; 也就是说,整个 Linux 生态系统,不只有 GNU 项目软件。在操作系统商界,好像喜欢使用单个词的名字, 比如说 DOS, Windows, MacOS, Solaris, Irix, AIX. 所以我选择用流行的命名规则。然而, 如果你喜欢用“GNU/Linux”,当你读这本书时,可以在脑子里搜索并替换“Linux”。我不介意。
拓展阅读
Here are some Wikipedia articles on the famous people mentioned in this chapter:
Wikipedia 网站上有些介绍本章提到的名人的文章,以下是链接地址:
The Free Software Foundation and the GNU Project:
介绍自由软件基金会及 GNU 项目的网站和文章:
Richard Stallman has written extensively on the “GNU/Linux” naming issue:
Richard Stallman 用了大量的文字来叙述“GNU/Linux”的命名问题,可以浏览以下网页:
2 - 2 什么是 shell
什么是 shell
http://billie66.github.io/TLCL/book/chap02.html
When we speak of the command line, we are really referring to the shell. The shell is a program that takes keyboard commands and passes them to the operating system to carry out. Almost all Linux distributions supply a shell program from the GNU Project called bash. The name “bash” is an acronym for “Bourne Again SHell”, a reference to the fact bash is an enhanced replacement for sh, the original Unix shell program written by Steve Bourne.
一说到命令行,我们真正指的是 shell。shell 就是一个程序,它接受从键盘输入的命令, 然后把命令传递给操作系统去执行。几乎所有的 Linux 发行版都提供一个名为 bash 的 来自 GNU 项目的 shell 程序。“bash” 是 “Bourne Again SHell” 的首字母缩写, 是最初在 Unix 上由 Steve Bourne 写成 shell 程序 sh 的增强版。
终端仿真器
When using a graphical user interface, we need another program called a terminal emulator to interact with the shell. If we look through our desktop menus, we will probably find one. KDE uses konsole and GNOME uses gnome-terminal, though it’s likely called simply “terminal” on our menu. There are a number of other terminal emulators available for Linux, but they all basically do the same thing; give us access to the shell. You will probably develop a preference for one or another based on the number of bells and whistles it has.
当使用图形用户界面时,我们需要另一个和 shell 交互的叫做终端仿真器的程序。 如果我们浏览一下桌面菜单,可能会找到一个。虽然在菜单里它可能都 被简单地称为 “terminal”。 KDE 用的是 konsole , GNOME 则使用 gnome-terminal。 还有其他一些终端仿真器可供 Linux 使用,但基本上,它们都完成同样的事情, 让我们能访问 shell。也许,你可能会因为它附加的一系列花俏功能而喜欢上某个终端仿真器。
第一次按键
So let’s get started. Launch the terminal emulator! Once it comes up, we should see somehing like this:
好,开始吧。启动终端仿真器!一旦它运行起来,我们应该看到一行像这样的文字:
| |
This is called a shell prompt and it will appear whenever the shell is ready to accept input. While it may vary in appearance somewhat depending on the distribution, it will usually include your username@machinename, followed by the current working directory (more about that in a little bit) and a dollar sign.
这叫做 shell 提示符,当 shell 准备好了去接受输入时,它就会出现。然而, 它可能会以各种各样的面孔显示,这则取决于不同的 Linux 发行版, 它通常包括你的用户名@主机名,紧接着当前工作目录(稍后会有更多介绍)和一个美元符号。
If the last character of the prompt is a pound sign (“#”) rather than a dollar sign, the terminal session has superuser privileges. This means either we are logged in as the root user or we selected a terminal emulator that provides superuser (administrative) privileges.
如果提示符的最后一个字符是“#”, 而不是“$”, 那么这个终端会话就有超级用户权限。 这意味着,我们要么是以 root 用户的身份登录,要么是我们选择的终端仿真器提供超级用户(管理员)权限。
Assuming that things are good so far, let’s try some typing. Type some gibberish at the prompt like so:
假定到目前为止,所有事情都进展顺利,那我们试着键入字符吧。在提示符下敲入 一些像下面一样的乱七八糟的字符:
| |
Since this command makes no sense, the shell will tell us so and give us another chance:
因为这个命令没有任何意义,所以 shell 会提示错误信息,并让我们再试一下:
bash: kaekfjaeifj: command not found
[me@linuxbox ~]$
命令历史
If we press the up-arrow key, we will see that the previous command “kaekfjaeifj” reappears after the prompt. This is called command history. Most Linux distributions remember the last five hundred commands by default. Press the down-arrow key and the previous command disappears.
如果按下上箭头按键,我们会看到刚才输入的命令“kaekfjaeifj”重新出现在提示符之后。 这就叫做命令历史。许多 Linux 发行版默认保存最后输入的500个命令。 按下下箭头按键,先前输入的命令就消失了。
移动光标
Recall the previous command with the up-arrow key again. Now try the left and right-arrow keys. See how we can position the cursor anywhere on the command line? This makes editing commands easy.
可借助上箭头按键,来获得上次输入的命令。现在试着使用左右箭头按键。 看一下怎样把光标定位到命令行的任意位置?使用箭头按键可以使编辑命令变得轻松些。
关于鼠标和光标
While the shell is all about the keyboard, you can also use a mouse with your terminal emulator. There is a mechanism built into the X Window System (the underlying engine that makes the GUI go) that supports a quick copy and paste technique. If you highlight some text by holding down the left mouse button and dragging the mouse over it (or double clicking on a word), it is copied into a buffer maintained by X. Pressing the middle mouse button will cause the text to be pasted at the cursor location. Try it.
虽然,shell 是和键盘打交道的,但你也可以在终端仿真器里使用鼠标。X 窗口系统 (使 GUI 工作的底层引擎)内建了一种机制,支持快速拷贝和粘贴技巧。 如果你按下鼠标左键,沿着文本拖动鼠标(或者双击一个单词)高亮了一些文本, 那么这些高亮的文本就被拷贝到了一个由 X 管理的缓冲区里面。然后按下鼠标中键, 这些文本就被粘贴到光标所在的位置。试试看。
Note: Don’t be tempted to use Ctrl-c and Ctrl-v to perform copy and paste inside a terminal window. They don’t work. These control codes have different meanings to the shell and were assigned many years before Microsoft Windows.
注意: 不要在一个终端窗口里使用 Ctrl-c 和 Ctrl-v 快捷键来执行拷贝和粘贴操作。 它们不起作用。对于 shell 来说,这两个控制代码有着不同的含义,它们在早于 Microsoft Windows (定义复制粘贴的含义)许多年之前就赋予了不同的意义。
Your graphical desktop environment (most likely KDE or GNOME), in an effort to behave like Windows, probably has its focus policy set to “click to focus.” This means for a window to get focus (become active) you need to click on it. This is contrary to the traditional X behavior of “focus follows mouse” which means that a window gets focus by just passing the mouse over it. The window will not come to the foreground until you click on it but it will be able to receive input. Setting the focus policy to “focus follows mouse” will make the copy and paste technique even more useful. Give it a try. I think if you give it a chance you will prefer it. You will find this setting in the configuration program for your window manager.
你的图形桌面环境(像 KDE 或 GNOME),努力想和 Windows 一样,可能会把它的聚焦策略 设置成“单击聚焦”。这意味着,为了让窗口聚焦(变成活动窗口)你需要单击它。 这与“焦点跟随着鼠标”的传统 X 行为不同,传统 X 行为是指只要把鼠标移动到一个窗口的上方。 它能接受输入, 但是直到你单击窗口之前它都不会成为前端窗口。 设置聚焦策略为“聚焦跟随着鼠标”,可以使拷贝和粘贴更方便易用。尝试一下。 我想如果你试了一下你会喜欢上它的。你能在窗口管理器的配置中找到这个设置。
试试运行一些简单命令
Now that we have learned to type, let’s try a few simple commands. The first one is date. This command displays the current time and date.
现在,我们学习了怎样输入命令,那我们执行一些简单的命令吧。第一个命令是 date。 这个命令显示系统当前时间和日期。
| |
A related command is cal which, by default, displays a calendar of the current month.
一个相关联的命令,cal,它默认显示当前月份的日历。
| |
To see the current amount of free space on your disk drives, type df:
查看磁盘剩余空间的数量,输入 df:
| |
Likewise, to display the amount of free memory, type the free command.
同样地,显示空闲内存的数量,输入命令 free 。
| |
结束终端会话
We can end a terminal session by either closing the terminal emulator window, or by entering the exit command at the shell prompt:
我们可以通过关闭终端仿真器窗口,或者是在 shell 提示符下输入 exit 命令来终止一个终端会话:
| |
幕后控制台
Even if we have no terminal emulator running, several terminal sessions continue to run behind the graphical desktop. Called virtual terminals or virtual consoles, these sessions can be accessed on most Linux distributions by pressing Ctrl- Alt-F1 through Ctrl-Alt-F6 on most systems. When a session is accessed, it presents a login prompt into which we can enter our user name and password. To switch from one virtual console to another, press Alt and F1-F6. To return to the graphical desktop, press Alt-F7.
即使终端仿真器没有运行,在后台仍然有几个终端会话运行着。它们叫做虚拟终端 或者是虚拟控制台。在大多数 Linux 发行版中,这些终端会话都可以通过按下 Ctrl-Alt-F1 到 Ctrl-Alt-F6 访问。当一个会话被访问的时候, 它会显示登录提示框,我们需要输入用户名和密码。要从一个虚拟控制台转换到另一个, 按下 Alt 和 F1-F6(中的一个)。返回图形桌面,按下 Alt-F7。
拓展阅读
To learn more about Steve Bourne, father of the Bourne Shell, see this Wikipedia article:
想了解更多关于 Steve Bourne 的故事,Bourne Shell 之父,读一下这篇文章:
http://en.wikipedia.org/wiki/Steve_Bourne
Here is an article about the concept of shells in computing:
这是一篇关于在计算机领域里,shell 概念的文章:
3 - 3 文件系统中跳转
文件系统中跳转
http://billie66.github.io/TLCL/book/chap03.html
The first thing we need to learn to do (besides just typing) is how to navigate the file system on our Linux system. In this chapter we will introduce the following commands:
我们需要学习的第一件事(除了打字之外)是如何在 Linux 文件系统中跳转。 在这部分,我们将介绍以下命令:
- pwd - Print name of current working directory
- cd - Change directory
- ls - List directory contents
- pwd — 打印出当前工作目录名
- cd — 更改目录
- ls — 列出目录内容
理解文件系统树
Like Windows, a Unix-like operating system such as Linux organizes its files in what is called a hierarchical directory structure. This means that they are organized in a tree-like pattern of directories (sometimes called folders in other systems), which may contain files and other directories. The first directory in the file system is called the root directory. The root directory contains files and subdirectories, which contain more files and subdirectories and so on and so on.
类似于 Windows,一个“类 Unix” 的操作系统,比如说 Linux,以分层目录结构来组织所有文件。 这就意味着所有文件组成了一棵树型目录(有时候在其它系统中叫做文件夹), 这个目录树可能包含文件和其它的目录。文件系统中的第一级目录称为根目录。 根目录包含文件和子目录,子目录包含更多的文件和子目录,依此类推。
Note that unlike Windows, which has a separate file system tree for each storage device, Unix-like systems such as Linux always have a single file system tree, regardless of how many drives or storage devices are attached to the computer. Storage devices are attached (or more correctly, mounted) at various points on the tree according to the whims of the system administrator, the person (or persons) responsible for the maintenance of the system.
注意(类 Unix 系统)不像 Windows ,每个存储设备都有一个独自的文件系统树。类 Unix 操作系统, 比如 Linux,总是只有一个单一的文件系统树,不管有多少个磁盘或者存储设备连接到计算机上。 根据负责维护系统安全的系统管理员的兴致,存储设备连接到(或着更精确些,是挂载到)目录树的各个节点上。
当前工作目录
Most of us are probably familiar with a graphical file manager which represents the file system tree as in Figure 1. Notice that the tree is usually shown upended, that is, with the root at the top and the various branches descending below.
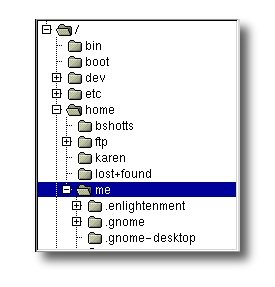 图1: 由图形化文件管理器显示的文件系统树
大多数人都可能熟悉如图1所示描述文件系统树的图形文件管理器。注意, 通常这是一棵 倒置的树,也就是说,树根在最上面,而各个枝干在下面展开。
However, the command line has no pictures, so to navigate the file system tree we need to think of it in a different way.
然而,命令行不能显示图像,所以我们需要把文件系统树想象成别的样子(而不是图片中的这个形象)。
Imagine that the file system is a maze shaped like an upside-down tree and we are able to stand in the middle of it. At any given time, we are inside a single directory and we can see the files contained in the directory and the pathway to the directory above us (called the parent directory) and any subdirectories below us. The directory we are standing in is called the current working directory. To display the current working directory, we use the pwd (print working directory) command.
把文件系统想象成一个迷宫形状,就像一棵倒立的大树,我们站在迷宫的中间位置。 在任意时刻,我们处于一个目录里面,我们能看到这个目录包含的所有文件, 以及通往上面目录(父目录)的路径,和下面的各个子目录。我们所在的目录则称为 当前工作目录。我们使用 pwd(print working directory(的缩写))命令,来显示当前工作目录。
| |
When we first log in to our system (or start a terminal emulator session) our current working directory is set to our home directory. Each user account is given its own home directory and when operating as a regular user, the home directory is the only place the user is allowed to write files.
当我们首次登录系统(或者启动终端仿真器会话)后,当前工作目录是我们的家目录。 每个用户都有他自己的家目录,当用户以普通用户的身份操控系统时,家目录是唯一 允许用户写入文件的地方。
列出目录内容
To list the files and directories in the current working directory, we use the ls command.
列出一个目录包含的文件及子目录,使用 ls 命令。
| |
Actually, we can use the ls command to list the contents of any directory, not just the current working directory, and there are many other fun things it can do as well. We’ll spend more time with ls in the next chapter.
实际上,用 ls 命令可以列出任一个目录的内容,而不只是当前工作目录的内容。 ls 命令还能完成许多有趣的事情。在下一章节,我们将介绍更多关于 ls 的知识。
更改当前工作目录
To change your working directory (where we are standing in our tree-shaped maze) we use the cd command. To do this, type cd followed by the pathname of the desired working directory. A pathname is the route we take along the branches of the tree to get to the directory we want. Pathnames can be specified in one of two different ways; as absolute pathnames or as relative pathnames. Let’s deal with absolute pathnames first.
要更改工作目录(此刻,我们站在树形迷宫里面),我们用 cd 命令。输入 cd, 然后输入你想要去的工作目录的路径名。路径名就是沿着目录树的分支 到达想要的目录期间所经过的路线。路径名可通过两种方式来指定,一种是绝对路径, 另一种是相对路径。我们先来介绍绝对路径。
绝对路径
An absolute pathname begins with the root directory and follows the tree branch by branch until the path to the desired directory or file is completed. For example, there is a directory on your system in which most of your system’s programs are installed. The pathname of the directory is /usr/bin. This means from the root directory (represented by the leading slash in the pathname) there is a directory called “usr” which contains a directory called “bin”.
绝对路径开始于根目录,紧跟着目录树的一个个分支,一直到达所期望的目录或文件。 例如,你的系统中有一个目录,大多数系统程序都安装在这个目录下。这个目录的 路径名是 /usr/bin。它意味着从根目录(用开头的”/”表示)开始,有一个叫 “usr” 的 目录包含了目录 “bin”。
| |
Now we can see that we have changed the current working directory to /usr/bin and that it is full of files. Notice how the shell prompt has changed? As a convenience, it is usually set up to automatically display the name of the working directory.
我们把工作目录转到 /usr/bin 目录下,里面装满了文件。注意 shell 提示符是怎样改变的吗? 为了方便,通常终端提示符自动显示工作目录。
相对路径
Where an absolute pathname starts from the root directory and leads to its destination, a relative pathname starts from the working directory. To do this, it uses a couple of special symbols to represent relative positions in the file system tree. These special symbols are “.” (dot) and “..” (dot dot).
绝对路径从根目录开始,直到它的目的地,而相对路径开始于工作目录。 为了做到这个(用相对路径表示), 我们在文件系统树中用一对特殊符号来表示相对位置。 这对特殊符号是 “.” (点) 和 “..” (点点)。
The “.” symbol refers to the working directory and the “..” symbol refers to the working directory’s parent directory. Here is how it works. Let’s change the working directory to /usr/bin again:
符号 “.” 指的是工作目录,”..” 指的是工作目录的父目录。举个例子, 让我们再次把工作目录切换到 /usr/bin:
| |
Okay, now let’s say that we wanted to change the working directory to the parent of /usr/bin which is /usr. We could do that two different ways. Either with an absolute pathname:
好了,比方说我们想更改工作目录到 /usr/bin 的父目录 /usr。可以通过两种方法来实现。可以使用以下绝对路径名:
| |
Or, with a relative pathname:
或者, 也可以使用相对路径:
| |
Two different methods with identical results. Which one should we use? The one that requires the least typing!
两种不同的方法,一样的结果。我们应该选哪一个呢? 选输入量最少的那个!
Likewise, we can change the working directory from /usr to /usr/bin in two different ways. Either using an absolute pathname:
同样地,从目录 /usr/ 到 /usr/bin 也有两种途径。可以使用绝对路径:
| |
Or, with a relative pathname:
或者,也可以用相对路径:
| |
Now, there is something important that I must point out here. In almost all cases, you can omit the “./”. It is implied. Typing:
有一件很重要的事,我必须指出来。在几乎所有的情况下,你可以省略”./”。它是隐含的。输入:
| |
does the same thing. In general, if you do not specify a pathname to something, the working directory will be assumed.
可以实现相同的效果。总的来说,如果不指定一个文件的路径,那它被默认为在当前工作目录下。
有用的快捷键
In table 3-1 we see some useful ways the current working directory can be quickly changed.
在表3-1中,列举出了一些快速改变当前工作目录的有效方法。
| Shortcut | Result |
|---|---|
| cd | Changes the working directory to your home directory. |
| cd - | Changes the working directory to the previous working directory. |
| cd ~user_name | Changes the working directory to the home directory of user_name. For example, cd ~bob will change the directory to the home directory of user “bob.” |
| 快捷键 | 运行结果 |
|---|---|
| cd | 更改工作目录到你的家目录。 |
| cd - | 更改工作目录到先前的工作目录。 |
| cd ~user_name | 更改工作目录到用户家目录。例如, cd ~bob 会更改工作目录到用户“bob”的家目录。 |
Important Facts About Filenames
- Filenames that begin with a period character are hidden. This only means that ls will not list them unless you say ls -a. When your account was created, several hidden files were placed in your home directory to configure things for your account. Later on we will take a closer look at some of these files to see how you can customize your environment. In addition, some applications place their configuration and settings files in your home directory as hidden files.
- Filenames and commands in Linux, like Unix, are case sensitive. The filenames “File1” and “file1” refer to different files.
- Linux has no concept of a “file extension” like some other operating systems. You may name files any way you like. The contents and/or purpose of a file is determined by other means. Although Unix-like operating system don’t use file extensions to determine the contents/purpose of files, some application programs do.
- Though Linux supports long filenames which may contain embedded spaces and punctuation characters, limit the punctuation characters in the names of files you create to period, dash, and underscore. Most importantly, do not embed spaces in filenames. If you want to represent spaces between words in a filename, use underscore characters. You will thank yourself later.
关于文件名的重要规则
- 以 “.” 字符开头的文件名是隐藏文件。这仅表示,ls 命令不能列出它们, 用 ls -a 命令就可以了。当你创建帐号后,几个配置帐号的隐藏文件被放置在 你的家目录下。稍后,我们会仔细研究一些隐藏文件,来定制你的系统环境。 另外,一些应用程序也会把它们的配置文件以隐藏文件的形式放在你的家目录下面。
- 文件名和命令名是大小写敏感的。文件名 “File1” 和 “file1” 是指两个不同的文件名。
- Linux 没有“文件扩展名”的概念,不像其它一些系统。可以用你喜欢的任何名字 来给文件起名。文件内容或用途由其它方法来决定。虽然类 Unix 的操作系统, 不用文件扩展名来决定文件的内容或用途,但是有些应用程序会。
- 虽然 Linux 支持长文件名,文件名可能包含空格,标点符号,但标点符号仅限 使用 “.”,“-”,下划线。最重要的是,不要在文件名中使用空格。如果你想表示词与 词间的空格,用下划线字符来代替。将来你就会明白这样做的好处。
4 - 4 探究操作系统
探究操作系统
http://billie66.github.io/TLCL/book/chap04.html
Now that we know how to move around the file system, it’s time for a guided tour of our Linux system. Before we start however, we’re going to learn some more commands that will be useful along the way:
既然我们已经知道了如何在文件系统中跳转,是时候开始 Linux 操作系统之旅了。然而在开始之前,我们先学习一些对研究 Linux 系统有帮助的命令。
- ls – List directory contents
- file – Determine file type
- less – View file contents
- ls — 列出目录内容
- file — 确定文件类型
- less — 浏览文件内容
ls 乐趣
The ls command is probably the most used command, and for good reason. With it, we can see directory contents and determine a variety of important file and directory attributes. As we have seen, we can simply type ls to see a list of files and subdirectories contained in the current working directory:
ls 可能是用户最常使用的命令了,这自有它的道理。通过它,我们可以知道目录的内容,以及各种各样重要文件和目录的 属性。正如我们已经见到的,只要简单地输入 ls 就能看到在当前目录下所有文件和子目录的列表。
| |
Besides the current working directory, we can specify the directory to list, like so:
除了当前工作目录以外,也可以指定别的目录,就像这样:
me@linuxbox ~]$ ls /usr
bin games   kerberos    libexec  sbin   src
etc include lib         local    share  tmp
Or even specify multiple directories. In this example we will list both the user’s home directory (symbolized by the “~” character) and the /usr directory:
甚至可以列出多个指定目录的内容。在这个例子中,将会列出用户家目录(用字符“~”代表)和/usr 目录的内容:
| |
We can also change the format of the output to reveal more detail:
我们也可以改变输出格式,来得到更多的细节:
| |
By adding “-l” to the command, we changed the output to the long format.
使用 ls 命令的“-l”选项,则结果以长模式输出。
选项和参数
This brings us to a very important point about how most commands work. Commands are often followed by one or more options that modify their behavior, and further, by one or more arguments, the items upon which the command acts. So most commands look kind of like this:
我们将学习一个非常重要的知识点,看看大多数命令都是如何工作的。命令名经常会带有一个或多个用来改变命令行为的选项, 更进一步,选项后面会带有一个或多个参数,这些参数是命令作用的对象。所以大多数命令看起来像这样:
command -options arguments
Most commands use options consisting of a single character preceded by a dash, for example, “-l”, but many commands, including those from the GNU Project, also support long options, consisting of a word preceded by two dashes. Also, many commands allow multiple short options to be strung together. In this example, the ls command is given two options, the “l” option to produce long format output, and the “t” option to sort the result by the file’s modification time.
大多数命令使用的选项,是由一个中划线加上一个字符组成,例如,“-l”,但是许多命令,包括来自于 GNU 项目的命令,也支持长选项,长选项由两个中划线加上一个字组成。当然, 许多命令也允许把多个短选项串在一起使用。下面这个例子,ls 命令有两个选项, “l” 选项产生长格式输出,“t”选项按文件修改时间的先后来排序。
| |
We’ll add the long option “-–reverse” to reverse the order of the sort:
加上长选项 “-–reverse”,则结果会以相反的顺序输出:
| |
The ls command has a large number of possible options. The most common are listed in the Table 4-1.
ls 命令有大量的选项。表4-1列出了最常使用的选项。
| Option | Long Option | Description |
|---|---|---|
| -a | --all | List all files, even those with names that begin with a period, which are normally not listed(i.e.,hidden). |
| -d | --directory | Ordinaryly,if a directory is specified, ls will list the contents of the directory, not the directory itself. Use this option in conjunction with the -l option to see details about the directory rather than its contents. |
| -F | --classify | This option will append an indicator character to the end of each listed name. For example, a ‘/’ if the name is a directory. |
| -h | --human-readable | In long format listings, display file sizes in human readable format rather than in bytes. |
| -l | Display results in long format. | |
| -r | --reverse | Display the results in reverse order. Normally, ls display its results in ascending alphabetical order. |
| -S | Sort results by file size. | |
| -t | Sort by modification time. |
| 选项 | 长选项 | 描述 |
|---|---|---|
| -a | --all | 列出所有文件,甚至包括文件名以圆点开头的默认会被隐藏的隐藏文件。 |
| -d | --directory | 通常,如果指定了目录名,ls 命令会列出这个目录中的内容,而不是目录本身。 把这个选项与 -l 选项结合使用,可以看到所指定目录的详细信息,而不是目录中的内容。 |
| -F | --classify | 这个选项会在每个所列出的名字后面加上一个指示符。例如,如果名字是 目录名,则会加上一个’/‘字符。 |
| -h | --human-readable | 当以长格式列出时,以人们可读的格式,而不是以字节数来显示文件的大小。 |
| -l | 以长格式显示结果。 | |
| -r | --reverse | 以相反的顺序来显示结果。通常,ls 命令的输出结果按照字母升序排列。 |
| -S | 命令输出结果按照文件大小来排序。 | |
| -t | 按照修改时间来排序。 |
深入研究长格式输出
As we saw before, the “-l” option causes ls to display its results in long format. This format contains a great deal of useful information. Here is the Examples directory from an Ubuntu system:
正如我们先前知道的,“-l”选项导致 ls 的输出结果以长格式输出。这种格式包含大量的有用信息。下面的例子目录来自 于 Ubuntu 系统:
-rw-r--r-- 1 root root 3576296 2007-04-03 11:05 Experience ubuntu.ogg
-rw-r--r-- 1 root root 1186219 2007-04-03 11:05 kubuntu-leaflet.png
-rw-r--r-- 1 root root   47584 2007-04-03 11:05 logo-Edubuntu.png
-rw-r--r-- 1 root root   44355 2007-04-03 11:05 logo-Kubuntu.png
-rw-r--r-- 1 root root   34391 2007-04-03 11:05 logo-Ubuntu.png
-rw-r--r-- 1 root root   32059 2007-04-03 11:05 oo-cd-cover.odf
-rw-r--r-- 1 root root  159744 2007-04-03 11:05 oo-derivatives.doc
-rw-r--r-- 1 root root   27837 2007-04-03 11:05 oo-maxwell.odt
-rw-r--r-- 1 root root   98816 2007-04-03 11:05 oo-trig.xls
-rw-r--r-- 1 root root  453764 2007-04-03 11:05 oo-welcome.odt
-rw-r--r-- 1 root root  358374 2007-04-03 11:05 ubuntu Sax.ogg
Let’s look at the different fields from one of the files and examine their meanings:
选一个文件,来看一下各个输出字段的含义:
| Field | Meaning |
|---|---|
| -rw-r–r– | Access rights to the file. The first character indicates the type of file. Among the different types, a leading dash means a regular file, while a “d” indicates a directory. The next three characters are the access rights for the file’s owner, the next three are for members of the file’s group, and the final three are for everyone else. The full meaning of this is discussed in Chapter 10 – Permissions. |
| 1 | File’s number of hard links. See the discussion of links later in this chapter. |
| root | The user name of the file’s owner. |
| root | The name of the group which owns the file. |
| 32059 | Size of the file in bytes. |
| 2007-04-03 11:05 | Date and time of the file’s last modification. |
| oo-cd-cover.odf | Name of the file. |
| 字段 | 含义 |
|---|---|
| -rw-r–r– | 对于文件的访问权限。第一个字符指明文件类型。在不同类型之间, 开头的“-”说明是一个普通文件,“d”表明是一个目录。其后三个字符是文件所有者的 访问权限,再其后的三个字符是文件所属组中成员的访问权限,最后三个字符是其他所 有人的访问权限。这个字段的完整含义将在第十章讨论。 |
| 1 | 文件的硬链接数目。参考随后讨论的关于链接的内容。 |
| root | 文件所有者的用户名。 |
| root | 文件所属用户组的名字。 |
| 32059 | 以字节数表示的文件大小。 |
| 2007-04-03 11:05 | 上次修改文件的时间和日期。 |
| oo-cd-cover.odf | 文件名。 |
确定文件类型
As we explore the system it will be useful to know what files contain. To do this we will use the file command to determine a file’s type. As we discussed earlier, filenames in Linux are not required to reflect a file’s contents. While a filename like “picture.jpg” would normally be expected to contain a JPEG compressed image, it is not required to in Linux. We can invoke the file command this way:
随着探究操作系统的进行,知道文件包含的内容是很有用的。我们将用 file 命令来确定文件的类型。我们之前讨论过, 在 Linux 系统中,并不要求文件名来反映文件的内容。然而,一个类似 “picture.jpg” 的文件名,我们会期望它包含 JPEG 压缩图像,但 Linux 却不这样要求它。可以这样调用 file 命令:
file filename
When invoked, the file command will print a brief description of the file’s contents. For example:
当调用 file 命令后,file 命令会打印出文件内容的简单描述。例如:
| |
There are many kinds of files. In fact, one of the common ideas in Unix-like operating systems such as Linux is that “everything is a file.” As we proceed with our lessons, we will see just how true that statement is.
有许多种类型的文件。事实上,在类 Unix 操作系统中比如说 Linux 中,有个普遍的观念就是“一切皆文件”。 随着课程的进行,我们将会明白这句话是多么的正确。
While many of the files on your system are familiar, for example MP3 and JPEG, there are many kinds that are a little less obvious and a few that are quite strange.
虽然系统中许多文件格式是熟悉的,例如 MP3和 JPEG 文件,但也有一些文件格式不太常见,极少数文件相当陌生。
用 less 浏览文件内容
The less command is a program to view text files. Throughout our Linux system, there are many files that contain human-readable text. The less program provides a convenient way to examine them.
less 命令是一个用来浏览文本文件的程序。纵观 Linux 系统,有许多人类可读的文本文件。less 程序为我们检查文本文件 提供了方便。
What Is “Text”
什么是“文本”
There are many ways to represent information on a computer. All methods involve defining a relationship between the information and some numbers that will be used to represent it. Computers, after all, only understand numbers and all data is converted to numeric representation.
在计算机中,有许多方法可以表达信息。所有的方法都涉及到,在信息与一些数字之间确立一种关系,而这些数字可以 用来代表信息。毕竟,计算机只能理解数字,这样所有的数据都被转换成数值来表示。
Some of these representation systems are very complex (such as compressed video files), while others are rather simple. One of the earliest and simplest is called ASCII text. ASCII (pronounced “As-Key”) is short for American Standard Code for Information Interchange. This is a simple encoding scheme that was first used on Teletype machines to map keyboard characters to numbers.
有些表达法非常复杂(例如压缩的视频文件),而其它的就相当简单。最早也是最简单的一种表达法,叫做 ASCII 文本。ASCII(发音是”As-Key”)是美国信息交换标准码的简称。这是一个简单的编码方法,它首先 被用在电传打字机上,用来实现键盘字符到数字的映射。
Text is a simple one-to-one mapping of characters to numbers. It is very compact. Fifty characters of text translates to fifty bytes of data. It is important to understand that text only contains a simple mapping of characters to numbers. It is not the same as a word processor document such as one created by Microsoft Word or OpenOffice.org Writer. Those files, in contrast to simple ASCII text, contain many non-text elements that are used to describe its structure and formatting. Plain ASCII text files contain only the characters themselves and a few rudimentary control codes like tabs, carriage returns and line feeds. Throughout a Linux system, many files are stored in text format and there are many Linux tools that work with text files. Even Windows recognizes the importance of this format. The well-known NOTEPAD.EXE program is an editor for plain ASCII text files.
文本是简单的字符与数字之间的一对一映射。它非常紧凑。五十个字符的文本翻译成五十个字节的数据。文本只是包含 简单的字符到数字的映射,理解这点很重要。它和一些常见办公文档编辑软件,比如说由微软 Office 或 OpenOffice.org,创建的文字内容不同。和简单的 ASCII 文件形成鲜明对比,这些文档内容中包含许多非文本元素,来描述它的结构和格式。纯 ASCII 文件只包含字符本身,和一些基本的控制符,像制表符、回车符及换行符。纵观 Linux 系统,许多文件以文本格式存储,也有许多 Linux 工具来处理文本文件。甚至 Windows 也承认这种文件格式的重要性。著名的 NOTEPAD.EXE 程序就是一个纯 ASCII 文本文件编辑器。
Why would we want to examine text files? Because many of the files that contain system settings (called configuration files) are stored in this format, and being able to read them gives us insight about how the system works. In addition, many of the actual programs that the system uses (called scripts) are stored in this format. In later chapters, we will learn how to edit text files in order to modify systems settings and write our own scripts, but for now we will just look at their contents.
为什么我们要查看文本文件呢? 因为许多包含系统设置的文件(叫做配置文件),是以文本格式存储的,阅读它们 可以更深入的了解系统是如何工作的。另外,许多系统所用到的实际程序(叫做脚本)也是以这种格式存储的。 在随后的章节里,我们将要学习怎样编辑文本文件以修改系统设置,还要学习编写自己的脚本文件,但现在我们只是看看它们的内容而已。
The less command is used like this:
less 命令是这样使用的:
less filename
Once started, the less program allows you to scroll forward and backward through a text file. For example, to examine the file that defines all the system’s user accounts, enter the following command:
一旦运行起来,less 程序允许你前后滚动文件。例如,要查看一个定义了系统中全部用户身份的文件,输入以下命令:
| |
Once the less program starts, we may view the contents of the file. If the file is longer than one page, we can scroll up and down. To exit less, press the “q” key. The table below lists the most common keyboard commands used by less.
一旦 less 程序运行起来,我们就能浏览文件内容了。如果文件内容多于一页,那么我们可以上下滚动文件。按下“q”键, 退出 less 程序。
下表列出了 less 程序最常使用的键盘命令。
| Command | Action |
|---|---|
| Page UP or b | Scroll back one page |
| Page Down or space | Scroll forward one page |
| UP Arrow | Scroll Up one line |
| Down Arrow | Scrow Down one line |
| G | Move to the end of the text file |
| 1G or g | Move to the beginning of the text file |
| /charaters | Search forward for the next occurrence of characters |
| n | Search forward for the next occurrence of the previous search |
| h | Display help screen |
| q | Quit less |
| 命令 | 行为 |
|---|---|
| Page UP or b | 向上翻滚一页 |
| Page Down or space | 向下翻滚一页 |
| UP Arrow | 向上翻滚一行 |
| Down Arrow | 向下翻滚一行 |
| G | 移动到最后一行 |
| 1G or g | 移动到开头一行 |
| /charaters | 向前查找指定的字符串 |
| n | 向前查找下一个出现的字符串,这个字符串是之前所指定查找的 |
| h | 显示帮助屏幕 |
| q | 退出 less 程序 |
少就是多
The less program was designed as an improved replacement of an earlier Unix program called more. The name “less” is a play on the phrase “less is more”—a motto of modernist architects and designers.
less 程序是早期 Unix 程序 more 的改进版。“less” 这个名字,套用习语 “less is more” , 这个习语是现代主义建筑师和设计者的座右铭。
less falls into the class of programs called “pagers,” programs that allow the easy viewing of long text documents in a page by page manner. Whereas the more program could only page forward, the less program allows paging both forward and backward and has many other features as well.
less 属于”页面调度器”类程序,这些程序允许以逐页方式轻松浏览长文本文档。 more 程序只能向前翻页,而 less 程序允许前后翻页,此外还有很多其它的特性。
旅行指南
The file system layout on your Linux system is much like that found on other Unix-like systems. The design is actually specified in a published standard called the Linux Filesystem Hierarchy Standard. Not all Linux distributions conform to the standard exactly but most come pretty close.
Linux 系统中,文件系统布局与类 Unix 系统的文件布局很相似。实际上,一个已经发布的标准, 叫做 Linux 文件系统层级标准,详细说明了这种设计模式。不是所有 Linux 发行版都遵守这个标准,但 大多数都是。
Next, we are going to wander around the file system ourselves to see what makes our Linux system tick. This will give you a chance to practice your navigation skills. One of the things we will discover is that many of the interesting files are in plain human- readable text. As we go about our tour, try the following:
下一步,我们将在文件系统中游览,来了解 Linux 系统的工作原理。这会给你一个温习跳转命令的机会。 我们会发现很多有趣的文件都是纯人类可读文本。下面旅行开始,做做以下练习:
cd into a given directory
List the directory contents with ls -l
If you see an interesting file, determine its contents with file
If it looks like it might be text, try viewing it with less
cd 到给定目录
列出目录内容 ls -l
如果看到一个有趣的文件,用 file 命令确定文件内容
如果文件看起来像文本,试着用 less 命令浏览它
Remember the copy and paste trick! If you are using a mouse, you can double click on a filename to copy it and middle click to paste it into commands.
记得复制和粘贴技巧!如果你正在使用鼠标,双击文件名,来复制它,然后按下鼠标中键,粘贴文件名到命令行中。
As we wander around, don’t be afraid to look at stuff. Regular users are largely prohibited from messing things up. That’s the system administrators job! If a command complains about something, just move on to something else. Spend some time looking around. The system is ours to explore. Remember, in Linux, there are no secrets! Table 4-4 lists just a few of the directories we can explore. Feel free to try more!
在系统中游览时,不要害怕四处看看。普通用户是很难把东西弄乱的。那是系统管理员的工作! 如果一个命令抱怨一些事情,不要管它,尝试一下别的东西。花一些时间四处看看。 系统是我们自己的,尽情地探究吧。记住在 Linux 中,没有秘密存在! 表4-4仅仅列出了一些我们可以浏览的目录。随意尝试更多!
| Drectory | Comments |
|---|---|
| / | The root directory.Where everything begins. |
| /bin | Contains binaries (programs) that must be present for the system to boot and run. |
| /boot | Contains the linux kernel, intial RAM disk image (for drivers needed at boot time), and the boot loader.Interesting files:/boot/grub/grub.conf or menu.lst, which are used to configure the boot loader./boot/vmlinuz,the linux kernel. |
| /dev | This is a special directory which contains device nodes. “Everything is a file” also applies to devices. Here is where the kernel maintains a list of all the devices it understands. |
| /etc | The /etc directory contains all of the system-wide configuration files. It also contains a collection of shell scripts which start each of the system services at boot time. Everything in this directory should be readable text.Interesting files:While everything in /etc is interesting, here are some of my all-time favorites:/etc/crontab, a file that defines when automated jobs will run./etc/fstab, a table of storage devices and their associated mount points./etc/passwd, a list of the user accounts. |
| /home | In normal configurations, each user is given a directory in /home. Ordinary users can only write files in their home directories. This limitation protects the system from errant user activity. |
| /lib | Contains shared library files used by the core system programs. These are similar to DLLs in Windows. |
| /lost+found | Each formatted partition or device using a Linux file system, such as ext3, will have this directory. It is used in the case of a partial recovery from a file system corruption event. Unless something really bad has happened to your system, this directory will remain empty. |
| /media | On modern Linux systems the /media directory will contain the mount points for removable media such USB drives, CD-ROMs, etc. that are mounted automatically at insertion. |
| /mnt | On older Linux systems, the /mnt directory contains mount points for removable devices that have been mounted manually. |
| /opt | The /opt directory is used to install “optional” software. This is mainly used to hold commercial software products that may be installed on your system. |
| /proc | The /proc directory is special. It’s not a real file system in the sense of files stored on your hard drive. Rather, it is a virtual file system maintained by the Linux kernel. The “files” it contains are peepholes into the kernel itself. The files are readable and will give you a picture of how the kernel sees your computer. |
| /root | This is the home directory for the root account. |
| /sbin | This directory contains “system” binaries. These are programs that perform vital system tasks that are generally reserved for the superuser. |
| /tmp | The /tmp directory is intended for storage of temporary, transient files created by various programs. Some configurations cause this directory to be emptied each time the system is rebooted. |
| /usr | The /usr directory tree is likely the largest one on a Linux system. It contains all the programs and support files used by regular users. |
| /usr/bin | /usr/bin contains the executable programs installed by your Linux distribution. It is not uncommon for this directory to hold thousands of programs. |
| /usr/lib | The shared libraries for the programs in /usr/bin. |
| /usr/local | The /usr/local tree is where programs that are not included with your distribution but are intended for system- wide use are installed. Programs compiled from source code are normally installed in /usr/local/bin. On a newly installed Linux system, this tree exists, but it will be empty until the system administrator puts something in it. |
| /usr/sbin | Contains more system administration programs. |
| /usr/share | /usr/share contains all the shared data used by programs in /usr/bin. This includes things like default configuration files, icons, screen backgrounds, sound files, etc. |
| /usr/share/doc | Most packages installed on the system will include some kind of documentation. In /usr/share/doc, we will find documentation files organized by package. |
| /var | With the exception of /tmp and /home, the directories we have looked at so far remain relatively static, that is, their contents don’t change. The /var directory tree is where data that is likely to change is stored. Various databases, spool files, user mail, etc. are located here. |
| /var/log | /var/log contains log files, records of various system activity. These are very important and should be monitored from time to time. The most useful one is /var/log/messages. Note that for security reasons on some systems, you must be the superuser to view log files. |
| 目录 | 评论 |
|---|---|
| / | 根目录,万物起源。 |
| /bin | 包含系统启动和运行所必须的二进制程序。 |
| /boot | 包含 Linux 内核、初始 RAM 磁盘映像(用于启动时所需的驱动)和 启动加载程序。有趣的文件:/boot/grub/grub.conf or menu.lst, 被用来配置启动加载程序。/boot/vmlinuz,Linux 内核。 |
| /dev | 这是一个包含设备结点的特殊目录。“一切都是文件”,也适用于设备。 在这个目录里,内核维护着所有设备的列表。 |
| /etc | 这个目录包含所有系统层面的配置文件。它也包含一系列的 shell 脚本, 在系统启动时,这些脚本会开启每个系统服务。这个目录中的任何文件应该是可读的文本文件。有趣的文件:虽然/etc 目录中的任何文件都有趣,但这里只列出了一些我一直喜欢的文件:/etc/crontab, 定义自动运行的任务。/etc/fstab,包含存储设备的列表,以及与他们相关的挂载点。/etc/passwd,包含用户帐号列表。 |
| /home | 在通常的配置环境下,系统会在 /home 下,给每个用户分配一个目录。普通用户只能 在自己的目录下写文件。这个限制保护系统免受错误的用户活动破坏。 |
| /lib | 包含核心系统程序所使用的共享库文件。这些文件与 Windows 中的动态链接库相似。 |
| /lost+found | 每个使用 Linux 文件系统的格式化分区或设备,例如 ext3文件系统, 都会有这个目录。当部分恢复一个损坏的文件系统时,会用到这个目录。这个目录应该是空的,除非文件系统 真正的损坏了。 |
| /media | 在现在的 Linux 系统中,/media 目录会包含可移动介质的挂载点, 例如 USB 驱动器,CD-ROMs 等等。这些介质连接到计算机之后,会自动地挂载到这个目录结点下。 |
| /mnt | 在早些的 Linux 系统中,/mnt 目录包含可移动介质的挂载点。 |
| /opt | 这个/opt 目录被用来安装“可选的”软件。这个主要用来存储可能 安装在系统中的商业软件产品。 |
| /proc | 这个/proc 目录很特殊。从存储在硬盘上的文件的意义上说,它不是真正的文件系统。 相反,它是一个由 Linux 内核维护的虚拟文件系统。它所包含的文件是内核的窥视孔。这些文件是可读的, 它们会告诉你内核是怎样监管计算机的。 |
| /root | root 帐户的家目录。 |
| /sbin | 这个目录包含“系统”二进制文件。它们是完成重大系统任务的程序,通常为超级用户保留。 |
| /tmp | 这个/tmp 目录,是用来存储由各种程序创建的临时文件的地方。系统每次 重新启动时,都会清空这个目录。 |
| /usr | 在 Linux 系统中,/usr 目录可能是最大的一个。它包含普通用户所需要的所有程序和文件。 |
| /usr/bin | /usr/bin 目录包含系统安装的可执行程序。通常,这个目录会包含许多程序。 |
| /usr/lib | 包含由/usr/bin 目录中的程序所用的共享库。 |
| /usr/local | 这个/usr/local 目录,是非系统发行版自带程序的安装目录。 通常,由源码编译的程序会安装在/usr/local/bin 目录下。新安装的 Linux 系统中会存在这个目录, 并且在管理员安装程序之前,这个目录是空的。 |
| /usr/sbin | 包含许多系统管理程序。 |
| /usr/share | /usr/share 目录包含许多由 /usr/bin 目录中的程序使用的共享数据。 其中包括像默认的配置文件、图标、桌面背景、音频文件等等。 |
| /usr/share/doc | 大多数安装在系统中的软件包会包含一些文档。在/usr/share/doc 目录下, 我们可以找到按照软件包分类的文档。 |
| /var | 除了/tmp 和/home 目录之外,相对来说,目前我们看到的目录是静态的,这是说, 它们的内容不会改变。/var 目录存放的是动态文件。各种数据库,假脱机文件, 用户邮件等等,都位于在这里。 |
| /var/log | 这个/var/log 目录包含日志文件、各种系统活动的记录。这些文件非常重要,并且 应该时时监测它们。其中最重要的一个文件是 /var/log/messages。注意,为了系统安全,在一些系统中, 你必须是超级用户才能查看这些日志文件。 |
符号链接
As we look around, we are likely to see a directory listing with an entry like this:
在我们到处查看时,我们可能会看到一个目录,列出像这样的一条信息:
lrwxrwxrwx 1 root root 11 2007-08-11 07:34 libc.so.6 -> libc-2.6.so
Notice how the first letter of the listing is “l” and the entry seems to have two filenames? This is a special kind of a file called a symbolic link (also known as a soft link or symlink.) In most Unix-like systems it is possible to have a file referenced by multiple names. While the value of this may not be obvious, it is really a useful feature.
注意看,为何这条信息第一个字符是“l”,并且有两个文件名呢? 这是一个特殊文件,叫做符号链接(也称为软链接或者 symlink )。 在大多数“类 Unix” 系统中, 有可能一个文件被多个文件名所指向。这个特性实际中真的很有用。
Picture this scenario: a program requires the use of a shared resource of some kind contained in a file named “foo,” but “foo” has frequent version changes. It would be good to include the version number in the filename so the administrator or other interested party could see what version of “foo” is installed. This presents a problem. If we change the name of the shared resource, we have to track down every program that might use it and change it to look for a new resource name every time a new version of the resource is installed. That doesn’t sound like fun at all.
描绘一下这样的情景:一个程序要求使用某个包含在名为“foo”文件中的共享资源,但是“foo”经常改变版本号。 这样,在文件名中包含版本号,会是一个好主意,因此管理员或者其它相关方,会知道安装了哪个“foo”版本。 这会导致另一个问题。如果我们更改了共享资源的名字,那么我们必须跟踪每个可能使用了 这个共享资源的程序,当每次这个资源的新版本被安装后,都要让使用了它的程序去寻找新的资源名。 这听起来很没趣。
Here is where symbolic links save the day. Let’s say we install version 2.6 of “foo,” which has the filename “foo-2.6” and then create a symbolic link simply called “foo” that points to “foo-2.6.” This means that when a program opens the file “foo”, it is actually opening the file “foo-2.6”. Now everybody is happy. The programs that rely on “foo” can find it and we can still see what actual version is installed. When it is time to upgrade to “foo-2.7,” we just add the file to our system, delete the symbolic link “foo” and create a new one that points to the new version. Not only does this solve the problem of the version upgrade, but it also allows us to keep both versions on our machine. Imagine that “foo-2.7” has a bug (damn those developers!) and we need to revert to the old version. Again, we just delete the symbolic link pointing to the new version and create a new symbolic link pointing to the old version.
符号链接避免了这种情况。比方说,我们安装了文件 “foo” 的 2.6 版本,它的 文件名是 “foo-2.6”,然后创建了叫做 “foo” 的符号链接,这个符号链接指向 “foo-2.6”。 这意味着,当一个程序打开文件 “foo” 时,它实际上是打开文件 “foo-2.6”。 现在,每个人都很高兴。依赖于 “foo” 文件的程序能找到这个文件,并且我们能知道安装了哪个文件版本。 当升级到 “foo-2.7” 版本的时候,仅添加这个文件到文件系统中,删除符号链接 “foo”, 创建一个指向新版本的符号链接。这不仅解决了版本升级问题,而且还允许在系统中保存两个不同的文件版本。 假想 “foo-2.7” 有个错误(该死的开发者!),那我们得回到原来的版本。 一样的操作,我们只需要删除指向新版本的符号链接,然后创建指向旧版本的符号链接就可以了。
The directory listing above (from the /lib directory of a Fedora system) shows a symbolic link called “libc.so.6” that points to a shared library file called “libc-2.6.so.” This means that programs looking for “libc.so.6” will actually get the file “libc-2.6.so.” We will learn how to create symbolic links in the next chapter.
在上面列出的目录(来自于 Fedora 的 /lib 目录)展示了一个叫做 “libc.so.6” 的符号链接,这个符号链接指向一个 叫做 “libc-2.6.so” 的共享库文件。这意味着,寻找文件 “libc.so.6” 的程序,实际上得到是文件 “libc-2.6.so”。 在下一章节,我们将学习如何建立符号链接。
硬链接
While we are on the subject of links, we need to mention that there is a second type of link called a hard link. Hard links also allow files to have multiple names, but they do it in a different way. We’ll talk more about the differences between symbolic and hard links in the next chapter.
讨论到链接问题,我们需要提一下,还有一种链接类型,叫做硬链接。硬链接同样允许文件有多个名字, 但是硬链接以不同的方法来创建多个文件名。在下一章中,我们会谈到更多符号链接与硬链接之间的差异问题。
拓展阅读
The full version of the Linux Filesystem Hierarchy Standard can be found here:
完整的 Linux 文件系统层级标准可通过以下链接找到:
5 - 5 操作文件和目录
操作文件和目录
http://billie66.github.io/TLCL/book/chap05.html
At this point, we are ready for some real work! This chapter will introduce the following commands:
此时此刻,我们已经准备好了做些真正的工作!这一章节将会介绍以下命令:
- cp – Copy files and directories
- mv – Move/rename files and directories
- mkdir – Create directories
- rm – Remove files and directories
- ln – Create hard and symbolic links
- cp — 复制文件和目录
- mv — 移动/重命名文件和目录
- mkdir — 创建目录
- rm — 删除文件和目录
- ln — 创建硬链接和符号链接
These five commands are among the most frequently used Linux commands. They are used for manipulating both files and directories.
这五个命令属于最常使用的 Linux 命令之列。它们用来操作文件和目录。
Now, to be frank, some of the tasks performed by these commands are more easily done with a graphical file manager. With a file manager, we can drag and drop a file from one directory to another, cut and paste files, delete files, etc. So why use these old command line programs?
现在,坦诚地说,用图形文件管理器来完成一些由这些命令执行的任务会更容易些。使用文件管理器, 我们可以把文件从一个目录拖放到另一个目录、剪贴和粘贴文件、删除文件等等。那么, 为什么还使用早期的命令行程序呢?
The answer is power and flexibility. While it is easy to perform simple file manipulations with a graphical file manager, complicated tasks can be easier with the command line programs. For example, how could we copy all the HTML files from one directory to another, but only copy files that do not exist in the destination directory or are newer than the versions in the destination directory? Pretty hard with a file manager. Pretty easy with the command line:
答案是命令行程序,功能强大灵活。虽然图形文件管理器能轻松地实现简单的文件操作,但是对于 复杂的文件操作任务,则使用命令行程序比较容易完成。例如,怎样拷贝一个目录下的 HTML 文件到目标目录,同时保证只拷贝目标目录不存在或者版本比目标目录的文件更新的文件? 要完成这个任务,使用文件管理器相当难,使用命令行相当容易:
cp -u *.html destination
通配符
Before we begin using our commands, we need to talk about a shell feature that makes these commands so powerful. Since the shell uses filenames so much, it provides special characters to help you rapidly specify groups of filenames. These special characters are called wildcards. Using wildcards (which is also known as globbing) allow you to select filenames based on patterns of characters. The table below lists the wildcards and what they select:
在开始使用命令之前,我们需要介绍一个使命令行变得非常强大的 shell 特性。因为 shell 频繁地使用 文件名,shell 提供了特殊字符来帮助你快速指定一组文件名。这些特殊字符叫做通配符。 通配符允许你依据字符的组合模式来选择文件名。下表列出这些通配符 以及它们所选择的对象:
| Wildcard | Meaning |
|---|---|
| * | Matches any characters |
| ? | Matches any single character |
| [characters] | Matches any character that is a member of the set characters |
| [!characters] | Matches any character that is not a member of the set characters |
| [[:class:]] | Matches any character that is a member of the specified class |
| 通配符 | 意义 |
|---|---|
| * | 匹配任意多个字符(包括零个或一个) |
| ? | 匹配任意一个字符(不包括零个) |
| [characters] | 匹配任意一个属于字符集(characters)中的字符 |
| [!characters] | 匹配任意一个不是字符集中的字符 |
| [[:class:]] | 匹配任意一个属于指定字符类中的字符 |
Table 5-2 lists the most commonly used character classes:
表5-2列出了最常使用的字符类:
| Character Class | Meaning |
|---|---|
| [:alnum:] | Matches any alphanumeric character |
| [:alpha:] | Matches any alphabetic character |
| [:digit:] | Matches any numeral |
| [:lower:] | Matches any lowercase letter |
| [:upper:] | Matches any uppercase letter |
| 字符类 | 意义 |
|---|---|
| [:alnum:] | 匹配任意一个字母或数字 |
| [:alpha:] | 匹配任意一个字母 |
| [:digit:] | 匹配任意一个数字 |
| [:lower:] | 匹配任意一个小写字母 |
| [:upper:] | 匹配任意一个大写字母 |
Using wildcards makes it possible to construct very sophisticated selection criteria for filenames. Here are some examples of patterns and what they match:
借助通配符,为文件名构建非常复杂的选择标准成为可能。下面是一些类型匹配的范例:
| Pattern | Matches |
|---|---|
| * | All files |
| g* | All file beginning with “g” |
| b*.txt | Any file beginning with “b” followed by any characters and ending with “.txt” |
| Data??? | Any file beginning with “Data” followed by exactly three characters |
| [abc]* | Any file beginning with either an “a”, a “b”, or a “c” |
| BACKUP.[0-9][0-9][0-9] | Any file beginning with “BACKUP.” followed by exactly three numerals |
| [[:upper:]]* | Any file beginning with an uppercase letter |
| [![:digit:]]* | Any file not beginning with a numeral |
| *[[:lower:]123] | Any file ending with a lowercase letter or the numerals “1”, “2”, or “3” |
| 模式 | 匹配对象 |
|---|---|
| * | 所有文件 |
| g* | 文件名以“g”开头的文件 |
| b*.txt | 以"b"开头,中间有零个或任意多个字符,并以".txt"结尾的文件 |
| Data??? | 以“Data”开头,其后紧接着3个字符的文件 |
| [abc]* | 文件名以"a",“b”,或"c"开头的文件 |
| BACKUP.[0-9][0-9][0-9] | 以"BACKUP.“开头,并紧接着3个数字的文件 |
| [[:upper:]]* | 以大写字母开头的文件 |
| [![:digit:]]* | 不以数字开头的文件 |
| *[[:lower:]123] | 文件名以小写字母结尾,或以 “1”,“2”,或 “3” 结尾的文件 |
Wildcards can be used with any command that accepts filenames as arguments, but we’ll talk more about that in Chapter 8.
接受文件名作为参数的任何命令,都可以使用通配符,我们会在第八章更深入地谈到这个知识点。
Character Ranges
字符范围
If you are coming from another Unix-like environment or have been reading some other books on this subject, you may have encountered the [A-Z] or the [a-z] character range notations. These are traditional Unix notations and worked in older versions of Linux as well. They can still work, but you have to be very careful with them because they will not produce the expected results unless properly configured. For now, you should avoid using them and use character classes instead.
如果你用过别的类 Unix 系统的操作环境,或者是读过这方面的书籍,你可能遇到过[A-Z]或 [a-z]形式的字符范围表示法。这些都是传统的 Unix 表示法,并且在早期的 Linux 版本中仍有效。 虽然它们仍然起作用,但是你必须小心地使用它们,因为它们不会产生你期望的输出结果,除非 你合理地配置它们。从现在开始,你应该避免使用它们,并且用字符类来代替它们。
Wildcards Work In The GUI Too
通配符在 GUI 中也有效
Wildcards are especially valuable not only because they are used so frequently on the command line, but are also supported by some graphical file managers.
通配符非常重要,不仅因为它们经常用在命令行中,而且一些图形文件管理器也支持它们。
- In Nautilus (the file manager for GNOME), you can select files using the Edit/Select Pattern menu item. Just enter a file selection pattern with wildcards and the files in the currently viewed directory will be highlighted for selection.
- In Dolphin and Konqueror (the file managers for KDE), you can enter wildcards directly on the location bar. For example, if you want to see all the files starting with a lowercase “u” in the /usr/bin directory, type “/usr/bin/u*” into the location bar and it will display the result.
- 在 Nautilus (GNOME 文件管理器)中,可以通过 Edit/Select 模式菜单项来选择文件。 输入一个用通配符表示的文件选择模式后,那么当前所浏览的目录中,所匹配的文件名就会高亮显示。
- 在 Dolphin 和 Konqueror(KDE 文件管理器)中,可以在地址栏中直接输入通配符。例如, 如果你想查看目录 /usr/bin 中,所有以小写字母 ‘u’ 开头的文件, 在地址栏中敲入 ‘/usr/bin/u*‘,则 文件管理器会显示匹配的结果。
Many ideas originally found in the command line interface make their way into the graphical interface, too. It is one of the many things that make the Linux desktop so powerful.
最初源于命令行界面中的想法,在图形界面中也适用。这就是 Linux 桌面系统 如此强大的众多原因之一。
mkdir - 创建目录
The mkdir command is used to create directories. It works like this:
mkdir 命令是用来创建目录的。它这样工作:
mkdir directory...
A note on notation: When three periods follow an argument in the description of a command (as above), it means that the argument can be repeated, thus:
注意: 在描述一个命令时(如上所示),当有三个圆点跟在一个命令的参数后面, 这意味着那个参数可以跟多个,就像这样:
mkdir dir1
would create a single directory named “dir1”, while
会创建一个名为”dir1”的目录,而
mkdir dir1 dir2 dir3
would create three directokries named “dir1”, “dir2”, “dir3”.
会创建三个目录,名为 dir1, dir2, dir3。
cp - 复制文件和目录
The cp command copies files or directories. It can be used two different ways:
cp 命令,复制文件或者目录。它有两种使用方法:
cp item1 item2
to copy the single file or directory “item1” to file or directory “item2” and:
复制单个文件或目录”item1”到文件或目录”item2”,和:
cp item... directory
to copy multiple items (either files or directories) into a directory.
复制多个项目(文件或目录)到一个目录下。
有用的选项和实例
Here are some of the commonly used options (the short option and the equivalent long option) for cp:
这里列举了 cp 命令一些有用的选项(短选项和等效的长选项):
| Option | Meaning |
|---|---|
-a, --archive | Copy the files and directories and all of their attributes, including ownerships and permissions. Normally, copies take on the default attributes of the user performing the copy |
-i, --interactive | Before overwriting an existing file, prompt the user for confirmation. If this option is not specified, cp will silently overwrite files. |
-r, --recursive | Recursively copy directories and their contents. This option (or the -a option) is required when copying directories. |
-u, --update | When copying files from one directory to another, only copy files that either don’t exist, or are newer than the existing corresponding files, in the destination directory. |
-v, --verbose | Display informative messages as the copy is performed. |
| 选项 | 意义 |
|---|---|
-a, --archive | 复制文件和目录,以及它们的属性,包括拥有者和所有权。 通常情况下,文件拷贝具有执行拷贝操作的用户的默认属性。 |
-i, --interactive | 在覆盖已存在文件之前,提示用户确认。如果这个选项不指定, cp 命令会默认覆盖文件。 |
-r, --recursive | 递归地复制目录及目录中的内容。当复制目录时, 需要这个选项(或者 -a 选项)。 |
-u, --update | 当把文件从一个目录复制到另一个目录时,仅复制 目标目录中不存在的文件,或者是文件内容新于目标目录中已经存在文件的内容的文件。 |
-v, --verbose | 显示翔实的命令操作信息 |
| Command | Results |
|---|---|
| cp file1 file2 | Copy file1 to file2. If file2 exists, it is overwritten with the contents of file1. If file2 does not exist, it is created. |
| cp -i file1 file2 | Same as above, except that if file2 exists, the user is prompted before it is overwritten. |
| cp file1 file2 dir1 | Copy file1 and file2 into directory dir1. dir1 must already exist. |
| cp dir1/* dir2 | Using a wildcard, all the files in dir1 are copied into dir2. dir2 must already exist. |
| cp -r dir1 dir2 | Copy the contents of directory dir1 to directory dir2. If directory dir2 does not exist, it is created and, after the copy, will contain the same contents as directory dir1. If directory dir2 does exist, then directory dir1 (and its contents) will be copied into dir2. |
| 命令 | 运行结果 |
|---|---|
| cp file1 file2 | 复制文件 file1 内容到文件 file2。如果 file2 已经存在, file2 的内容会被 file1 的内容覆盖。如果 file2 不存在,则会创建 file2。 |
| cp -i file1 file2 | 这条命令和上面的命令一样,除了如果文件 file2 存在的话,在文件 file2 被覆盖之前, 会提示用户确认信息。 |
| cp file1 file2 dir1 | 复制文件 file1 和文件 file2 到目录 dir1。目录 dir1 必须存在。 |
| cp dir1/* dir2 | 使用一个通配符,在目录 dir1 中的所有文件都被复制到目录 dir2 中。 dir2 必须已经存在。 |
| cp -r dir1 dir2 | 复制目录 dir1 中的内容到目录 dir2。如果目录 dir2 不存在, 创建目录 dir2,操作完成后,目录 dir2 中的内容和 dir1 中的一样。 如果目录 dir2 存在,则目录 dir1 (和目录中的内容)将会被复制到 dir2 中。 |
mv - 移动和重命名文件
The mv command performs both file moving and file renaming, depending on how it is used. In either case, the original filename no longer exists after the operation. mv is used in much the same way as cp:
mv 命令可以执行文件移动和文件命名任务,这取决于你怎样使用它。任何一种 情况下,完成操作之后,原来的文件名不再存在。mv 使用方法与 cp 很相像:
mv item1 item2
to move or rename file or directory “item1” to “item2” or:
把文件或目录 “item1” 移动或重命名为 “item2”, 或者:
mv item... directory
to move one or more items from one directory to another.
把一个或多个条目从一个目录移动到另一个目录中。
有用的选项和实例
mv shares many of the same options as cp:
mv 与 cp 共享了很多一样的选项:
| Option | Meaning |
|---|---|
-i --interactive | Before overwriting an existing file, prompt the user for confirmation. If this option is not specified, mv command will silently overwrite files |
-u --update | When moving files from one directory to another, only move files that either don’t exist, or are newer than the existing corresponding files in the destination directory. |
-v --verbose | Display informative messages as the move is performed. |
| 选项 | 意义 |
|---|---|
-i --interactive | 在覆盖一个已经存在的文件之前,提示用户确认信息。 如果不指定这个选项,mv 命令会默认覆盖文件内容。 |
-u --update | 当把文件从一个目录移动另一个目录时,只是移动不存在的文件, 或者文件内容新于目标目录相对应文件的内容的文件。 |
-v --verbose | 当操作 mv 命令时,显示翔实的操作信息。 |
| mv file1 file2 | Move file1 to file2. If file2 exists, it is overwritten with the contents of files. If file2 does not exist, it is created. In either case, file1 ceases to exist. |
|---|---|
| mv -i file1 file2 | Same as above, except that if file2 exists, the user is prompted before it is overwritten. |
| mv file1 file2 dir1 | Move file1 and file2 into dirctory dir1. dir1 must already exist. |
| mv dir1 dir2 | if directory dir2 does not exist, create directory dir2 and move the contents of directory dir1 into dir2 and delete directory dir1. if directory dir2 does exist, move directory dir1 (and its contents) into directory dir2. |
| mv file1 file2 | 移动 file1 到 file2。如果 file2 存在,它的内容会被 file1 的内容覆盖。 如果 file2 不存在,则创建 file2。 这两种情况下,file1 都不再存在。 |
|---|---|
| mv -i file1 file2 | 除了如果 file2 存在的话,在 file2 被覆盖之前,用户会得到 提示信息外,这个和上面的选项一样。 |
| mv file1 file2 dir1 | 移动 file1 和 file2 到目录 dir1 中。dir1 必须已经存在。 |
| mv dir1 dir2 | 如果目录 dir2 不存在,创建目录 dir2,并且移动目录 dir1 的内容到 目录 dir2 中,同时删除目录 dir1。如果目录 dir2 存在,移动目录 dir1(及它的内容)到目录 dir2。 |
rm - 删除文件和目录
The rm command is used to remove(delete)files and directories:
rm 命令用来删除文件和目录:
rm item...
where “item” is one or more files or directories.
“item”代表一个或多个文件或目录。
有用的选项和实例
Here are some of the common options for rm:
下表是一些普遍使用的 rm 选项:
| Option | Meaning |
|---|---|
-i, --interactive | Before deleting an existing file, prompt the user for confirmation. If this option is not specified, rm will silently delete files. |
-r, --recursive | Recursively delete directories. This means that if a directory being deleted has subdirectories, delete them too. To delete a directory, this option must be specified. |
-f, --force | Ignore nonexistent files and do not prompt. This overrides the –interactive option. |
-v, --verbose | Display informative messages as the deletion is performed. |
| 选项 | 意义 |
|---|---|
-i, --interactive | 在删除已存在的文件前,提示用户确认信息。 如果不指定这个选项,rm 会默默地删除文件 |
-r, --recursive | 递归地删除文件,这意味着,如果要删除一个目录,而此目录 又包含子目录,那么子目录也会被删除。要删除一个目录,必须指定这个选项。 |
-f, --force | 忽视不存在的文件,不显示提示信息。这选项覆盖了“–interactive”选项。 |
-v, --verbose | 在执行 rm 命令时,显示翔实的操作信息。 |
| Command | Results |
|---|---|
| rm file1 | Delete file1 silently |
| rm -i file1 | Same as above, except that the user is prompted for confirmation before the deletion is performed. |
| rm -r file1 dir1 | Delete file1 and dir1 and its contents. |
| rm -rf file1 dir1 | Same as above, except that if either file1 or dir1 do not exist, rm will continue silently. |
| 命令 | 运行结果 |
|---|---|
| rm file1 | 默默地删除文件 |
| rm -i file1 | 除了在删除文件之前,提示用户确认信息之外,和上面的命令作用一样。 |
| rm -r file1 dir1 | 删除文件 file1, 目录 dir1,及 dir1 中的内容。 |
| rm -rf file1 dir1 | 同上,除了如果文件 file1,或目录 dir1 不存在的话,rm 仍会继续执行。 |
Be Careful With rm!
小心 rm!
Unix-like operating systems such as Linux do not have an undelete command. Once you delete something with rm, it’s gone. Linux assumes you’re smart and you know what you’re doing.
类 Unix 的操作系统,比如说 Linux,没有复原命令。一旦你用 rm 删除了一些东西, 它就消失了。Linux 假定你很聪明,你知道你在做什么。
Be particularly careful with wildcards. Consider this classic example. Let’s say you want to delete just the HTML files in a directory. To do this, you type:
尤其要小心通配符。思考一下这个经典的例子。假如说,你只想删除一个目录中的 HTML 文件。输入:
rm *.html
which is correct, but if you accidentally place a space between the “*” and the “.html” like so:
这是正确的,如果你不小心在 “*” 和 “.html” 之间多输入了一个空格,就像这样:
rm * .html
the rm command will delete all the files in the directory and then complain that there is no file called “.html”.
这个 rm 命令会删除目录中的所有文件,还会抱怨没有文件叫做 “.html”。
Here is a useful tip. Whenever you use wildcards with rm (besides carefully checking your typing!), test the wildcard first with ls. This will let you see the files that will be deleted. Then press the up arrow key to recall the command and replace the ls with rm.
小贴士。 当你使用带有通配符的 rm 命令时(除了仔细检查输入的内容外), 先用 ls 命令来测试通配符。这会让你看到将要被删除的文件是什么。然后按下上箭头按键,重新调用 刚刚执行的命令,用 rm 替换 ls。
ln — 创建链接
The ln command is used to create either hard or symbolic links. It is used in one of two ways:
ln 命令既可创建硬链接,也可以创建符号链接。可以用两者中的任意一种形式来使用它:
ln file link
to create a hard link, and:
创建硬链接,和:
ln -s item link
to create a symbolic link where “item” is either a file or a directory.
创建符号链接,”item” 可以是一个文件或是一个目录。
硬链接
Hard links are the original Unix way of creating links; symbolic links are more modern. By default, every file has a single hard link that gives the file its name. When we create a hard link, we create an additional directory entry for a file. Hard links have two important limitations:
与更加现代的符号链接相比,硬链接是最初 Unix 创建链接的方式。每个文件默认会有一个硬链接, 这个硬链接给予文件名字。我们每创建一个硬链接,就为一个文件创建了一个额外的目录项。 硬链接有两个重要局限性:
A hard link cannot reference a file outside its own file system. This means a link may not reference a file that is not on the same disk partition as the link itself.
A hard link may not reference a directory.
一个硬链接不能关联它所在文件系统之外的文件。这是说一个链接不能关联 与链接本身不在同一个磁盘分区上的文件。
一个硬链接不能关联一个目录。
A hard link is indistinguishable from the file itself. Unlike a symbolic link, when you list a directory containing a hard link you will see no special indication of the link. When a hard link is deleted, the link is removed but the contents of the file itself continue to exist (that is, its space is not deallocated) until all links to the file are deleted. It is important to be aware of hard links because you might encounter them from time to time, but modern practice prefers symbolic links, which we will cover next.
一个硬链接和文件本身表面上看不出什么区别。它跟符号链接很不一样,当你列出一个包含硬链接的目录 内容时,你会看不到有什么特殊说明来表示这是一个链接。当一个硬链接被删除时,这个链接 被删除,但是文件本身的内容仍然存在(这是说,它所占的磁盘空间不会被释放), 直到所有关联这个文件的链接都删除掉。知道硬链接很重要,因为你可能有时 会遇到它们,但现在实际中更喜欢使用符号链接,下一步我们会讨论符号链接。
符号链接
Symbolic links were created to overcome the limitations of hard links. Symbolic links work by creating a special type of file that contains a text pointer to the referenced file or directory. In this regard, they operate in much the same way as a Windows shortcut though of course, they predate the Windows feature by many years ;-)
创建符号链接是为了克服硬链接的局限性。符号链接生效,是通过创建一个 特殊类型的文件,这个文件包含一个关联文件或目录的文本指针。在这一方面, 它们和 Windows 的快捷方式差不多,当然,符号链接早于 Windows 的快捷方式 很多年;-)
A file pointed to by a symbolic link, and the symbolic link itself are largely indistinguishable from one another. For example, if you write some something to the symbolic link, the referenced file is also written to. However when you delete a symbolic link, only the link is deleted, not the file itself. If the file is deleted before the symbolic link, the link will continue to exist, but will point to nothing. In this case, the link is said to be broken. In many implementations, the ls command will display broken links in a distinguishing color, such as red, to reveal their presence.
一个符号链接指向一个文件,而且这个符号链接本身与其它的符号链接几乎没有区别。 例如,如果你往一个符号链接里面写入东西,那么相关联的文件也被写入。然而, 当你删除一个符号链接时,只有这个链接被删除,而不是文件自身。如果先于符号链接 删除文件,这个链接仍然存在,但是不指向任何东西。在这种情况下,这个链接被称为 坏链接。在许多实现中,ls 命令会以不同的颜色展示坏链接,比如说红色,来显示它们 的存在。
The concept of links can seem very confusing, but hang in there. We’re going to try all this stuff and it will, hopefully, become clear.
关于链接的概念,看起来很迷惑,但不要胆怯。我们将要努力地练习 这些命令而且尽可能得使它变得清晰。
创建游戏场(实战演习)
Since we are going to do some real file manipulation, let’s build a safe place to “play” with our file manipulation commands. First we need a directory to work in. We’ll create one in our home directory and call it “playground.”
下面我们将要做些真正的文件操作,让我们先建立一个安全地带, 来玩一下文件操作命令。首先,我们需要一个工作目录。在我们的 家目录下创建一个叫做“playground”的目录。
创建目录
The mkdir command is used to create a directory. To create our playground directory we will first make sure we are in our home directory and will then create the new directory:
mkdir 命令被用来创建目录。首先确定我们在我们的家目录下,然后创建 playground 目录:
| |
To make our playground a little more interesting, let’s create a couple of directories inside it called “dir1” and “dir2”. To do this, we will change our current working directory to playground and execute another mkdir:
为了让我们的游戏场更加有趣,在 playground 目录下创建一对目录 ,分别叫做 “dir1” 和 “dir2”。更改我们的当前工作目录到 playground,然后 执行 mkdir 命令:
| |
Notice that the mkdir command will accept multiple arguments allowing us to create both directories with a single command.
注意到 mkdir 命令可以接受多个参数,它允许我们用一个命令来创建这两个目录。
复制文件
Next, let’s get some data into our playground. We’ll do this by copying a file. Using the cp command, we’ll copy the passwd file from the /etc directory to the current working directory:
下一步,让我们输入一些数据到我们的游戏场中。我们可以通过复制一个文件来实现目的。 我们使用 cp 命令从 /etc 目录复制 passwd 文件到当前工作目录下:
| |
Notice how we used the shorthand for the current working directory, the single trailing period. So now if we perform an ls, we will see our file:
请注意,我们使用命令末尾的一个圆点来简化当前工作目录的写法。如果我们执行 ls 命令, 可以看到我们的文件:
| |
Now, just for fun, let’s repeat the copy using the “-v” option (verbose) to see what it does:
现在,仅仅是为了好玩,重复操作复制命令,使用”-v”选项(详细),看看它做了些什么:
| |
The cp command performed the copy again, but this time displayed a concise message indicating what operation it was performing. Notice that cp overwrote the first copy without any warning. Again this is a case of cp assuming that you know what you’re are doing. To get a warning, we’ll include the “-i” (interactive) option:
cp 命令再一次执行了复制操作,但是这次显示了一条简洁的信息,指明它 进行了什么操作。注意,cp 没有警告,就覆盖了第一次复制的文件。这是一个案例, cp 会假设你知道自己在做什么。如果希望得到警告的话,需要加入“-i”(互动)选项:
| |
Responding to the prompt by entering a “y” will cause the file to be overwritten, any other character (for example, “n”) will cause cp to leave the file alone.
在提示信息后输入”y”,文件就会被覆盖,输入其它的字符(例如,”n”) cp 命令会保留原文件。
移动和重命名文件
Now, the name “passwd” doesn’t seem very playful and this is a playground, so let’s change it to something else:
现在,”passwd” 这个名字,看起来不怎么有趣,这是个游戏场,所以我们给它改个名字:
| |
Let’s pass the fun around a little by moving our renamed file to each of the directories and back again:
让我们来传送 fun 文件,通过移动重命名的文件到各个子目录, 然后再把它移回到当前目录:
| |
to move it first to directory dir1, then:
首先,把 fun 文件移动目录 dir1 中,然后:
| |
to move it from dir1 to dir2, then:
再把 fun 文件从 dir1 移到目录 dir2, 然后:
| |
to finally bringing it back to the current working directory. Next, let’s see the effect of mv on directories. First we will move our data file into dir1 again:
最后,再把 fun 文件带回到当前工作目录。接下来,来看看移动目录的效果。 首先,我们先移动我们的数据文件到 dir1 目录:
| |
then move dir1 into dir2 and confirm it with ls:
然后移动 dir1 到 dir2 目录,用 ls 来确认执行结果:
| |
Note that since dir2 already existed, mv moved dir1 into dir2. If dir2 had not existed, mv would have renamed dir1 to dir2. Lastly, let’s put everything back:
注意:因为目录 dir2 已经存在,mv 命令会把 dir1 移动到 dir2 目录中。如果 dir2 不存在, mv 会把 dir1 重命名为 dir2。最后,让我们把所有的东西放回原处:
| |
创建硬链接
Now we’ll try some links. First the hard links. We’ll create some links to our data file like so:
现在,我们试着创建链接。首先是硬链接。我们创建一些关联我们 数据文件的链接:
| |
So now we have four instances of the file “fun”. Let’s take a look our playground directory:
所以现在,我们有四个文件”fun”的实例。看一下目录 playground 中的内容:
| |
One thing you notice is that the second field in the listing for fun and fun-hard both contain a “4” which is the number of hard links that now exist for the file. You’ll remember that a file will always have at least one because the file’s name is created by a link. So, how do we know that fun and fun-hard are, in fact, the same file? In this case, ls is not very helpful. While we can see that fun and fun-hard are both the same size (field 5), our listing provides no way to be sure. To solve this problem, we’re going to have to dig a little deeper.
注意到一件事,列表中,文件 fun 和 fun-hard 的第二个字段是”4”,这个数字 是文件”fun”的硬链接数目。你要记得一个文件至少有一个硬链接,因为文件 名就是由链接创建的。那么,我们怎样知道实际上 fun 和 fun-hard 是同一个文件呢? 在这个例子里,ls 不是很有用。虽然我们能够看到 fun 和 fun-hard 文件大小一样 (第五字段),但我们的列表没有提供可靠的信息来确定(这两个文件一样)。 为了解决这个问题,我们更深入的研究一下。
When thinking about hard links, it is helpful to imagine that files are made up of two parts: the data part containing the file’s contents and the name part which holds the file’s name. When we create hard links, we are actually creating additional name parts that all refer to the same data part. The system assigns a chain of disk blocks to what is called an inode, which is then associated with the name part. Each hard link therefore refers to a specific inode containing the file’s contents.
当考虑到硬链接的时候,我们可以假设文件由两部分组成:包含文件内容的数据部分和持有文件名的名字部分 ,这将有助于我们理解这个概念。当我们创建文件硬链接的时候,实际上是为文件创建了额外的名字部分, 并且这些名字都关联到相同的数据部分。这时系统会分配一连串的磁盘块给所谓的索引节点,然后索引节点与文 件名字部分相关联。因此每一个硬链接都指向一个包含文件内容的索引节点。
The ls command has a way to reveal this information. It is invoked with the “-i” option:
ls 命令有一种方法,来展示(文件索引节点)的信息。在命令中加上”-i”选项:
| |
In this version of the listing, the first field is the inode number and, as we can see, both fun and fun-hard share the same inode number, which confirms they are the same file.
在这个版本的列表中,第一字段表示文件索引节点号,正如我们所见到的, fun 和 fun-hard 共享一样的索引节点号,这就证实这两个文件是同一个文件。
创建符号链接
Symbolic links were created to overcome the two disadvantages of hard links: hard links cannot span physical devices and hard links cannot reference directories, only files. Symbolic links are a special type of file that contains a text pointer to the target file or directory.
建立符号链接的目的是为了克服硬链接的两个缺点:硬链接不能跨越物理设备, 硬链接不能关联目录,只能是文件。符号链接是文件的特殊类型,它包含一个指向 目标文件或目录的文本指针。
Creating symbolic links is similar to creating hard links:
符号链接的建立过程相似于创建硬链接:
| |
The first example is pretty straightforward, we simply add the “-s” option to create a symbolic link rather than a hard link. But what about the next two? Remember, when we create a symbolic link, we are creating a text description of where the target file is relative to the symbolic link. It’s easier to see if we look at the ls output:
第一个例子相当直接,在 ln 命令中,简单地加上”-s”选项就可以创建一个符号链接, 而不是一个硬链接。下面两个例子又是怎样呢? 记住,当我们创建一个符号链接 的时候,会建立一个文本,其中描述了目标文件的具体位置。如果我们看看 ls 命令的输出结果,比较容易理解。
| |
The listing for fun-sym in dir1 shows that is it a symbolic link by the leading “l” in the first field and that it points to “../fun”, which is correct. Relative to the location of fun-sym, fun is in the directory above it. Notice too, that the length of the symbolic link file is 6, the number of characters in the string “../fun” rather than the length of the file to which it is pointing.
目录 dir1 中,fun-sym 的列表说明了它是一个符号链接,通过在第一字段中的首字符”l” 可知,并且它还指向”../fun”,也是正确的。相对于 fun-sym 的存储位置,fun 在它的 上一个目录。同时注意,符号链接文件的长度是6,这是字符串”../fun”所包含的字符数, 而不是符号链接所指向的文件长度。
When creating symbolic links, you can either use absolute pathnames:
当建立符号链接时,你既可以使用绝对路径名:
ln -s /home/me/playground/fun dir1/fun-sym
or relative pathnames, as we did in our earlier example. Using relative pathnames is more desirable because it allows a directory containing symbolic links to be renamed and/or moved without breaking the links.
也可用相对路径名,正如前面例题所展示的。使用相对路径名更令人满意, 因为它允许一个包含符号链接的目录重命名或移动,而不会破坏链接。
In addition to regular files, symbolic links can also reference directories:
除了普通文件,符号链接也能关联目录:
| |
移动文件和目录
As we covered earlier, the rm command is used to delete files and directories. We are going to use it to clean up our playground a little bit. First, let’s delete one of our hard links:
正如我们之前讨论的,rm 命令被用来删除文件和目录。我们将要使用它 来清理一下我们的游戏场。首先,删除一个硬链接:
| |
That worked as expected. The file fun-hard is gone and the link count shown for fun is reduced from four to three, as indicated in the second field of the directory listing. Next, we’ll delete the file fun, and just for enjoyment, we’ll include the “-i” option to show what that does:
结果不出所料。文件 fun-hard 消失了,文件 fun 的链接数从4减到3,正如 目录列表第二字段所示。下一步,我们会删除文件 fun,仅为了娱乐,我们会加入”-i” 选项,看一看它的作用:
| |
Enter “y” at the prompt and the file is deleted. But let’s look at the output of ls now. Noticed what happened to fun-sym? Since it’s a symbolic link pointing to a now- nonexistent file, the link is broken:
在提示符下输入”y”,删除文件。让我们看一下 ls 的输出结果。注意,fun-sym 发生了 什么事? 因为它是一个符号链接,指向已经不存在的文件,链接已经坏了:
| |
Most Linux distributions configure ls to display broken links. On a Fedora box, broken links are displayed in blinking red text! The presence of a broken link is not, in and of itself dangerous but it is rather messy. If we try to use a broken link we will see this:
大多数 Linux 的发行版本配置 ls 显示损坏的链接。在 Fedora 系统中,坏的链接以闪烁的 红色文本显示!损坏链接的出现,并不危险,但是相当混乱。如果我们试着使用 损坏的链接,会看到以下情况:
| |
Let’s clean up a little. We’ll delete the symbolic links:
稍微清理一下现场。删除符号链接:
| |
One thing to remember about symbolic links is that most file operations are carried out on the link’s target, not the link itself. rm is an exception. When you delete a link, it is the link that is deleted, not the target.
对于符号链接,有一点值得记住,执行的大多数文件操作是针对链接的对象,而不是链接本身。 而 rm 命令是个特例。当你删除链接的时候,删除链接本身,而不是链接的对象。
Finally, we will remove our playground. To do this, we will return to our home directory and use rm with the recursive option (-r) to delete playground and all of its contents, including its subdirectories:
最后,我们将删除我们的游戏场。为了完成这个工作,我们将返回到 我们的家目录,然后用 rm 命令加上选项(-r),来删除目录 playground, 和目录下的所有内容,包括子目录:
| |
Creating Symlinks With The GUI
用 GUI 来创建符号链接
The file managers in both GNOME and KDE provide an easy and automatic method of creating symbolic links. With GNOME, holding the Ctrl+Shift keys while dragging a file will create a link rather than copying (or moving) the file. In KDE, a small menu appears whenever a file is dropped, offering a choice of copying, moving, or linking the file.
文件管理器 GNOME 和 KDE 都提供了一个简单而且自动化的方法来创建符号链接。 在 GNOME 里面,当拖动文件时,同时按下 Ctrl+Shift 按键会创建一个链接,而不是 复制(或移动)文件。在 KDE 中,无论什么时候放下一个文件,会弹出一个小菜单, 这个菜单会提供复制,移动,或创建链接文件选项。
总结
We’ve covered a lot of ground here and it will take a while to fully sink in. Perform the playground exercise over and over until it makes sense. It is important to get a good understanding of basic file manipulation commands and wildcards. Feel free to expand on the playground exercise by adding more files and directories, using wildcards to specify files for various operations. The concept of links is a little confusing at first, but take the time to learn how they work. They can be a real lifesaver.
在这一章中,我们已经研究了许多基础知识。我们得花费一些时间来全面地理解。 反复练习 playground 例题,直到你觉得它有意义。能够良好地理解基本文件操作 命令和通配符,非常重要。随意通过添加文件和目录来拓展 playground 练习, 使用通配符来为各种各样的操作命令指定文件。关于链接的概念,在刚开始接触 时会觉得有点迷惑,值得花些时间来学习它们是怎样工作的,因为它们有时候真的特别有用。
6 - 6 使用命令
使用命令
http://billie66.github.io/TLCL/book/chap06.html
Up to this point, we have seen a series of mysterious commands, each with its own mysterious options and arguments. In this chapter, we will attempt to remove some of that mystery and even create some of our own commands. The commands introduced in this chapter are:
在这之前,我们已经知道了一系列神秘的命令,每个命令都有自己奇妙的 选项和参数。在这一章中,我们将试图去掉一些神秘性,甚至创建我们自己 的命令。这一章将介绍以下命令:
- type – Indicate how a command name is interpreted
- type – 说明一个命令名是如何被解释的(这里的“解释”是一个计算机术语,例如,解释型语言)
- which – Display which executable program will be executed
- which – 显示会执行哪个可执行程序
- man – Display a command’s manual page
- man – 显示命令手册页
- apropos – Display a list of appropriate commands
- apropos – 显示一系列适合的命令
- info – Display a command’s info entry
- info – 显示命令 info
- whatis – Display a very brief description of a command
- whatis – 显示一个命令的简洁描述
- alias – Create an alias for a command
- alias – 创建命令别名
到底什么是命令?
A command can be one of four different things:
命令可以是下面四种形式之一:
An executable program like all those files we saw in /usr/bin. Within this category, programs can be compiled binaries such as programs written in C and C++, or programs written in scripting languages such as the shell, perl, python, ruby, etc.
A command built into the shell itself. bash supports a number of commands internally called shell builtins. The cd command, for example, is a shell builtin.
A shell function. These are miniature shell scripts incorporated into the environment. We will cover configuring the environment and writing shell functions in later chapters, but for now, just be aware that they exist.
An alias. Commands that we can define ourselves, built from other commands.
一个可执行程序,就像我们所看到的位于目录/usr/bin 中的文件一样。 这一类程序可以是用诸如 C 和 C++ 语言写成的程序然后编译得到的二进制文件, 也可以是由诸如 shell,perl,python,ruby 等等脚本语言写成的程序。
一个内建于 shell 自身的命令。bash 支持若干命令,内部叫做 shell 内部命令 (builtins)。例如,cd 命令,就是一个 shell 内部命令。
一个 shell 函数。这些是小规模的 shell 脚本,它们混合到环境变量中。 在后续的章节里,我们将讨论配置环境变量以及书写 shell 函数。但是现在, 仅仅意识到它们的存在就可以了。
一个命令别名。我们可以定义自己的命令,建立在其它命令之上。
识别命令
It is often useful to know exactly which of the four kinds of commands is being used and Linux provides a couple of ways to find out.
准确地知道正在使用的四种命令中的哪一种通常很有用 Linux 提供了几种查找方法。
type - 显示命令的类型
The type command is a shell builtin that displays the kind of command the shell will execute, given a particular command name. It works like this:
type 命令是 shell 内部命令,它会显示命令的类型,给出一个特定的命令名(做为参数)。 它像这样工作:
type command
Where “command” is the name of the command you want to examine. Here are some examples:
command 是你要检测的命令名。这里有些例子:
| |
Here we see the results for three different commands. Notice that the one for ls (taken from a Fedora system) and how the ls command is actually an alias for the ls command with the “--color=tty” option added. Now we know why the output from ls is displayed in color!
我们看到这三个不同命令的检测结果。注意,ls 命令(在 Fedora 系统中)的检查结果,ls 命令实际上 是 ls 命令加上选项”--color=tty”的别名。现在我们知道为什么 ls 的输出结果是有颜色的!
which - 显示一个可执行程序的位置
Sometimes there is more than one version of an executable program installed on a system. While this is not very common on desktop systems, it’s not unusual on large servers. To determine the exact location of a given executable, the which command is used:
有时候在一个操作系统中,不只安装了可执行程序的一个版本。虽然在桌面系统中这并不普遍, 但在大型服务器中却很平常。为了确定所给定的执行程序的准确位置,使用 which 命令:
| |
which only works for executable programs, not builtins nor aliases that are substitutes for actual executable programs. When we try to use which on a shell builtin, for example, cd, we either get no response or an error message:
which 命令只对可执行程序有效,不包括内建命令和命令别名。 当我们试着使用 shell 内建命令时,例如,cd 命令,我们或者得不到回应,或者是个错误信息:
| |
which is a fancy way of saying “command not found.”
这些信息真正的意思就是“命令没有找到”。
得到命令文档
With this knowledge of what a command is, we can now search for the documentation available for each kind of command.
知道了什么是命令,现在我们来查找每一类命令的文档。
help - 得到 shell 内建命令的帮助文档
bash has a built-in help facility available for each of the shell builtins. To use it, type “help” followed by the name of the shell builtin. For example:
bash 有一个内建的 help 命令,可查找每一个 shell 内建命令的文档。输入“help”,接着是 shell 内部命令名。例如:
| |
A note on notation: When square brackets appear in the description of a command’s syntax, they indicate optional items. A vertical bar character indicates mutually exclusive items. In the case of the cd command above:
注意:出现在命令语法说明中的方括号证的内容是可选的项目。一个竖杠字符 表示互斥选项。在上面 cd 命令的例子中:
cd [-L|-P] [dir]
This notation says that the command cd may be followed optionally by either a “-L” or a “-P” and further, optionally followed by the argument “dir”.
这种表示法说明,cd 命令可以跟一个“-L”选项“-P”选项其中之一或者什么都不跟,“dir”也是可选参数。
While the output of help for the cd commands is concise and accurate, it is by no means tutorial and as we can see, it also seems to mention a lot of things we haven’t talked about yet! Don’t worry. We’ll get there.
虽然 cd 命令的帮助文档很简洁准确,但它决不是教程。正如我们所看到的,它似乎提到了许多 我们还没有谈论到的东西!不要担心,我们会学到的。
--help - 显示用法信息
Many executable programs support a “--help” option that displays a description of the command’s supported syntax and options. For example:
许多可执行程序支持一个 --help 选项,这个选项是显示命令所支持的语法和选项说明。例如:
| |
Some programs don’t support the “--help” option, but try it anyway. Often it results in an error message that will reveal the same usage information.
一些程序不支持 --help 选项,但不管怎样试一下。通常输出的错误提示也同样能 揭示命令的用法信息。
man - 显示用户手册
Most executable programs intended for command line use provide a formal piece of documentation called a manual or man page. A special paging program called man is used to view them. It is used like this:
许多希望被命令行使用的可执行程序,提供了一个正式的文档,叫做手册或手册页(man page)。一个特殊的叫做 man 的分页程序,可用来浏览他们。它是这样使用的:
man program
where “program” is the name of the command to view.
“program”是要浏览的命令名。
Man pages vary somewhat in format but generally contain a title, a synopsis of the command’s syntax, a description of the command’s purpose, and a listing and description of each of the command’s options. Man pages, however, do not usually include examples, and are intended as a reference, not a tutorial. As an example, let’s try viewing the man page for the ls command:
手册文档的格式有点不同,一般地包含一个标题、命令语法的纲要、命令用途的说明、 以及每个命令选项的列表和说明。然而,手册文档通常并不包含实例,它打算 作为一本参考手册,而不是教程。作为一个例子,浏览一下 ls 命令的手册文档:
| |
On most Linux systems, man uses less to display the manual page, so all of the familiar less commands work while displaying the page.
在大多数 Linux 系统中,man 使用 less 工具来显示参考手册,所以当浏览文档时,你所熟悉的 less 命令都能有效。
The “manual” that man displays is broken into sections and not only covers user commands but also system administration commands, programming interfaces, file formats and more. The table below describes the layout of the manual:
man 所显示的参考手册,被分成几个章节,它们不仅仅包括用户命令,也包括系统管理员 命令、程序接口、文件格式等等。下表描绘了手册的布局:
| Section | Contents |
|---|---|
| 1 | User commands |
| 2 | Programming interfaces kernel system calls |
| 3 | Programming interfaces to the C library |
| 4 | Special files such as device nodes and drivers |
| 5 | File formats |
| 6 | Games and amusements such as screen savers |
| 7 | Miscellaneous |
| 8 | System administration commands |
| 章节 | 内容 |
|---|---|
| 1 | 用户命令 |
| 2 | 程序接口内核系统调用 |
| 3 | C 库函数程序接口 |
| 4 | 特殊文件,比如说设备结点和驱动程序 |
| 5 | 文件格式 |
| 6 | 游戏娱乐,如屏幕保护程序 |
| 7 | 其他方面 |
| 8 | 系统管理员命令 |
Sometimes we need to look in a specific section of the manual to find what we are looking for. This is particularly true if we are looking for a file format that is also the name of a command. Without specifying a section number, we will always get the first instance of a match, probably in section 1. To specify a section number, we use man like this:
有时候,我们需要查看参考手册的特定章节,从而找到我们需要的信息。 如果我们要查找一种文件格式,而同时它也是一个命令名时,这种情况尤其正确。 没有指定章节号,我们总是得到第一个匹配项,可能在第一章节。我们这样使用 man 命令, 来指定章节号:
man section search_term
For example:
例如:
| |
This will display the man page describing the file format of the /etc/passwd file.
命令运行结果会显示文件 /etc/passwd 的文件格式说明手册。
apropos - 显示适合的命令
It is also possible to search the list of man pages for possible matches based on a search term. It’s very crude but sometimes helpful. Here is an example of a search for man pages using the search term “floppy”:
我们也可以搜索全部参考手册来找到自己需要的命令,这个方法虽然很粗糙但有时很有用。 下面是一个以”floppy”为关键词来搜索参考手册的例子:
| |
The first field in each line of output is the name of the man page, the second field shows the section. Note that the man command with the “-k” option performs the exact same function as apropos.
输出结果每行的第一个字段是手册页的名字,第二个字段展示章节。注意,man 命令加上”-k”选项, 和 apropos 完成一样的功能。
whatis - 显示非常简洁的命令说明
The whatis program displays the name and a one line description of a man page matching a specified keyword:
whatis 程序显示匹配特定关键字的手册页的名字和一行命令说明:
The Most Brutal Man Page Of Them All
最晦涩难懂的手册页
As we have seen, the manual pages supplied with Linux and other Unix-like systems are intended as reference documentation and not as tutorials. Many man pages are hard to read, but I think that the grand prize for difficulty has got to go to the man page for bash. As I was doing my research for this book, I gave it careful review to ensure that I was covering most of its topics. When printed, it’s over eighty pages long and extremely dense, and its structure makes absolutely no sense to a new user.
正如我们所看到的,Linux 和类 Unix 的系统提供的手册页,只是打算作为参考手册使用, 而不是教程。许多手册页都很难阅读,但是我认为由于阅读难度而能拿到特等奖的手册页应该是 bash 手册页。因为我正在为这本书做我的研究,所以我很仔细地浏览了整个 bash 手册,为的是确保我讲述了 大部分的 bash 主题。当把 bash 参考手册整个打印出来,其篇幅有八十多页且内容极其紧密, 但对于初学者来说,其结构安排毫无意义。
On the other hand, it is very accurate and concise, as well as being extremely complete. So check it out if you dare and look forward to the day when you can read it and it all makes sense.
另一方面,bash 参考手册的内容非常简明精确,同时也非常完善。所以,如果你有胆量就查看一下, 并且期望有一天你能读懂它。
info - 显示程序 Info 条目
The GNU Project provides an alternative to man pages for their programs, called “info.” Info pages are displayed with a reader program named, appropriately enough, info. Info pages are hyperlinked much like web pages. Here is a sample:
GNU 项目提供了一个命令程序手册页的替代物,称为”info”。info 内容可通过 info 阅读器 程序读取。info 页是超级链接形式的,和网页很相似。这有个例子:
File: coreutils.info,    Node: ls invocation,    Next: dir invocation,
 Up: Directory listing

10.1 `ls`: List directory contents
==================================
...
The info program reads info files, which are tree structured into individual nodes, each containing a single topic. Info files contain hyperlinks that can move you from node to node. A hyperlink can be identified by its leading asterisk, and is activated by placing the cursor upon it and pressing the enter key.
info 程序读取 info 文件,info 文件是树型结构,分化为各个结点,每一个包含一个题目。 info 文件包含超级链接,它可以让你从一个结点跳到另一个结点。一个超级链接可通过 它开头的星号来辨别出来,把光标放在它上面并按下 enter 键,就可以激活它。
To invoke info, type “info” followed optionally by the name of a program. Below is a table of commands used to control the reader while displaying an info page:
输入”info”,接着输入程序名称,启动 info。当显示一个 info 页面时,下表中的命令 用来控制阅读器。
| Command | Action |
|---|---|
| ? | Display command help |
| PgUp or Backspace | Display privious page |
| PgDn or Space | Display next page |
| n | Next - Display the next node |
| p | Previous - Display the previous node |
| u | Up - Display the parent node of the currently displayed node, usually a menu. |
| Enter | Follow the hyperlink at the cursor location |
| q | Quit |
| 命令 | 行为 |
|---|---|
| ? | 显示命令帮助 |
| PgUp or Backspace | 显示上一页 |
| PgDn or Space | 显示下一页 |
| n | 下一个 - 显示下一个结点 |
| p | 上一个 - 显示上一个结点 |
| u | Up - 显示当前所显示结点的父结点,通常是个菜单 |
| Enter | 激活光标位置下的超级链接 |
| q | 退出 |
Most of the command line programs we have discussed so far are part of the GNU Project’s “coreutils” package, so typing:
到目前为止,我们所讨论的大多数命令行程序,属于 GNU 项目”coreutils”包,所以输入:
| |
will display a menu page with hyperlinks to each program contained in the coreutils package.
将会显示一个包含超级链接的手册页,这些超级链接指向包含在 coreutils 包中的各个程序。
README 和其它程序文档
Many software packages installed on your system have documentation files residing in the /usr/share/doc directory. Most of these are stored in plain text format and can be viewed with less. Some of the files are in HTML format and can be viewed with a web browser. We may encounter some files ending with a “.gz” extension. This indicates that they have been compressed with the gzip compression program. The gzip package includes a special version of less called zless that will display the contents of gzip-compressed text files.
许多安装在你系统中的软件,都有自己的文档文件,这些文件位于/usr/share/doc 目录下。 这些文件大多数是以文本文件的形式存储的,可用 less 阅读器来浏览。一些文件是 HTML 格式, 可用网页浏览器来阅读。我们可能遇到许多以”.gz”结尾的文件。这表示 gzip 压缩程序 已经压缩了这些文件。gzip 软件包包括一个特殊版本的 less ,叫做 zless,zless 可以显示由 gzip 压缩的文本文件的内容。
用别名(alias)创建你自己的命令
Now for our very first experience with programming! We will create a command of our own using the alias command. But before we start, we need to reveal a small command line trick. It’s possible to put more than one command on a line by separating each command with a semicolon character. It works like this:
现在是时候,感受第一次编程经历了!我们将用 alias 命令创建我们自己的命令。但在 开始之前,我们需要展示一个命令行小技巧。可以把多个命令放在同一行上,命令之间 用”;”分开。它像这样工作:
command1; command2; command3...
Here’s the example we will use:
我们会用到下面的例子:
| |
As we can see, we have combined three commands on one line. First we change directory to /usr then list the directory and finally return to the original directory (by using ‘cd -‘) so we end up where we started. Now let’s turn this sequence into a new command using alias. The first thing we have to do is dream up a name for our new command. Let’s try “test”. Before we do that, it would be a good idea to find out if the name “test” is already being used. To find out, we can use the type command again:
正如我们看到的,我们在一行上联合了三个命令。首先更改目录到/usr,然后列出目录 内容,最后回到之前的目录(用命令”cd -“),结束在开始的地方。现在,通过 alias 命令 把这一串命令转变为一个命令。我们要做的第一件事就是为我们的新命令构想一个名字。 比方说”test”。在使用”test”之前,最好先查明”test”命令名是否已经存在于系统中。 为此,可以使用 type 命令:
| |
Oops! The name “test” is already taken. Let’s try “foo”:
哦!”test”名字已经被使用了。试一下”foo”:
| |
Great! “foo” is not taken. So let’s create our alias:
太棒了!”foo”还没被占用。创建命令别名:
| |
Notice the structure of this command:
注意命令结构:
alias name='string'
After the command “alias” we give alias a name followed immediately (no whitespace allowed) by an equals sign, followed immediately by a quoted string containing the meaning to be assigned to the name. After we define our alias, it can be used anywhere the shell would expect a command. Let’s try it:
在命令”alias”之后,输入“name”,紧接着(没有空格)是一个等号,等号之后是 一串用引号引起的字符串,字符串的内容要赋值给 name。我们定义了别名之后, 这个命令别名可以使用在任何地方。试一下:
| |
We can also use the type command again to see our alias:
我们也可以使用 type 命令来查看我们的别名:
| |
To remove an alias, the unalias command is used, like so:
删除别名,使用 unalias 命令,像这样:
| |
While we purposefully avoided naming our alias with an existing command name, it is not uncommon to do so. This is often done to apply a commonly desired option to each invocation of a common command. For instance, we saw earlier how the ls command is often aliased to add color support:
虽然我们有意避免使用已经存在的命令名来命名我们的别名,但有时候也会故意这么做。通常, 会把一个普遍用到的选项加到一个经常使用的命令后面。例如,之前见到的 ls 命令,会 带有色彩支持:
| |
To see all the aliases defined in the environment, use the alias command without arguments. Here are some of the aliases defined by default on a Fedora system. Try and figure out what they all do:
要查看所有定义在系统环境中的别名,可使用不带参数的 alias 命令。下面是 Fedora 系统中 默认定义的别名。试着弄明白它们是做什么的:
| |
There is one tiny problem with defining aliases on the command line. They vanish when your shell session ends. In a later chapter, we will see how to add our own aliases to the files that establish the environment each time we log on, but for now, enjoy the fact that we have taken our first, albeit tiny, step into the world of shell programming!
在命令行中定义别名有点个小问题。当你的 shell 会话结束时,它们会消失。随后的章节里, 我们会了解怎样把自己的别名添加到文件中去,每次我们登录系统,这些文件会建立系统环境。 现在,好好享受我们刚经历过的,步入 shell 编程世界的第一步吧,虽然是小小的一步。
拜访老朋友
Now that we have learned how to find the documentation for commands, go and look up the documentation for all the commands we have encountered so far. Study what additional options are available and try them out!
既然我们已经学习了怎样找到命令的帮助文档,那就试着查阅,到目前为止,我们学到的所有 命令的文档。学习命令其它可用的选项,练习一下!
拓展阅读
There are many online sources of documentation for Linux and the command line. Here are some of the best:
在网上,有许多关于 Linux 和命令行的文档。以下是其中最好的一些:
The Bash Reference Manual is a reference guide to the bash shell. It’s still a reference work but contains examples and is easier to read than the bash man page.
Bash 参考手册是一本 bash shell 的参考指南。它仍然是一本参考书,但是包含了很多 实例,而且它比 bash 手册页容易阅读。
The Bash FAQ contains answers to frequently asked questions regarding bash. This list is aimed at intermediate to advanced users, but contains a lot of good information.
Bash FAQ 包含关于 bash,而经常提到的问题的答案。这个列表面向 bash 的中高级用户, 但它包含了许多有帮助的信息。
The GNU Project provides extensive documentation for its programs, which form the core of the Linux command line experience. You can see a complete list here:
GNU 项目为它的程序提供了大量的文档,这些文档组成了 Linux 命令行实验的核心。 这里你可以看到一个完整的列表:
Wikipedia has an interesting article on man pages:
Wikipedia 有一篇关于手册页的有趣文章:
7 - 7 重定向
重定向
http://billie66.github.io/TLCL/book/chap07.html
In this lesson we are going to unleash what may be the coolest feature of the command line. It’s called I/O redirection. The “I/O” stands for input/output and with this facility you can redirect the input and output of commands to and from files, as well as connect multiple commands together into powerful command pipelines. To show off this facility, we will introduce the following commands:
这堂课,我们来介绍可能是命令行最酷的特性。它叫做 I/O 重定向。”I/O”代表输入/输出, 通过这个机制,你可以将命令的输入来源以及输出地点重定向为文件。也可以把多个命令连接起来组成一个强大的命令管道。为了展示这个工具,我们将用到 以下命令:
- cat - Concatenate files
- sort - Sort lines of text
- uniq - Report or omit repeated lines
- grep - Print lines matching a pattern
- wc - Print newline, word, and byte counts for each file
- head - Output the first part of a file
- tail - Output the last part of a file
- tee - Read from standard input and write to standard output and files
- cat - 连接文件
- sort - 排序文本行
- uniq - 报道或省略重复行
- grep - 打印匹配行
- wc - 打印文件中换行符,字,和字节个数
- head - 输出文件第一部分
- tail - 输出文件最后一部分
- tee - 从标准输入读取数据,并同时写到标准输出和文件
标准输入、标准输出和标准错误输出
Many of the programs that we have used so far produce output of some kind. This output often consists of two types. First, we have the program’s results; that is, the data the program is designed to produce, and second, we have status and error messages that tell us how the program is getting along. If we look at a command like ls, we can see that it displays its results and its error messages on the screen.
到目前为止,我们用到的许多程序都会产生某种输出。这种输出,经常由两种类型组成。 第一,程序运行结果;这是说,程序要完成的功能。第二,我们得到状态和错误信息, 这些告诉我们程序进展。如果我们观察一个命令,例如 ls,会看到它的运行结果和错误信息 显示在屏幕上。
Keeping with the Unix theme of “everything is a file,” programs such as ls actually send their results to a special file called standard output (often expressed as stdout) and their status messages to another file called standard error (stderr). By default, both standard output and standard error are linked to the screen and not saved into a disk file. In addition, many programs take input from a facility called standard input (stdin) which is, by default, attached to the keyboard.
与 Unix 主题“任何东西都是一个文件”保持一致,像 ls这样的程序实际上把他们的运行结果 输送到一个叫做标准输出的特殊文件(经常用 stdout 表示),而它们的状态信息则送到另一个 叫做标准错误输出的文件(stderr)。默认情况下,标准输出和标准错误输出都连接到屏幕,而不是 保存到磁盘文件。除此之外,许多程序从一个叫做标准输入(stdin)的设备得到输入,默认情况下, 标准输入连接到键盘。
I/O redirection allows us to change where output goes and where input comes from. Normally, output goes to the screen and input comes from the keyboard, but with I/O redirection, we can change that.
I/O 重定向允许我们更改输出地点和输入来源。一般来说,输入来自键盘,输出送到屏幕, 但是通过 I/O 重定向,我们可以做出改变。
标准输出重定向
I/O redirection allows us to redefine where standard output goes. To redirect standard output to another file besides the screen, we use the “>” redirection operator followed by the name of the file. Why would we want to do this? It’s often useful to store the output of a command in a file. For example, we could tell the shell to send the output of the ls command to the file ls-output.txt instead of the screen:
I/O 重定向允许我们来重定义标准输出的地点。我们使用 “>” 重定向符后接文件名将标准输出重定向到除屏幕 以外的另一个文件。为什么我们要这样做呢?因为有时候把一个命令的运行结果存储到 一个文件很有用处。例如,我们可以告诉 shell 把 ls 命令的运行结果输送到文件 ls-output.txt 中去, 由文件代替屏幕。
| |
Here, we created a long listing of the /usr/bin directory and sent the results to the file ls-output.txt. Let’s examine the redirected output of the command:
这里,我们创建了一个长长的目录 /usr/bin 列表,并且输送程序运行结果到文件 ls-output.txt 中。 我们检查一下重定向的命令输出结果:
| |
Good; a nice, large, text file. If we look at the file with less, we will see that the file ls-output.txt does indeed contain the results from our ls command:
好;一个不错的大型文本文件。如果我们用 less 阅读器来查看这个文件,我们会看到文件 ls-output.txt 的确包含 ls 命令的执行结果。
| |
Now, let’s repeat our redirection test, but this time with a twist. We’ll change the name of the directory to one that does not exist:
现在,重复我们的重定向测试,但这次有改动。我们把目录换成一个不存在的目录。
| |
We received an error message. This makes sense since we specified the non-existent directory /bin/usr, but why was the error message displayed on the screen rather than being redirected to the file ls-output.txt? The answer is that the ls program does not send its error messages to standard output. Instead, like most well-written Unix programs, it sends its error messages to standard error. Since we only redirected standard output and not standard error, the error message was still sent to the screen. We’ll see how to redirect standard error in just a minute, but first, let’s look at what happened to our output file:
我们收到一个错误信息。这讲得通,因为我们指定了一个不存在的目录 /bin/usr , 但是为什么这条错误信息显示在屏幕上而不是被重定向到文件 ls-output.txt?答案是, ls 程序不把它的错误信息输送到标准输出。像许多写得正规的 Unix 程序,ls 会把 错误信息送到标准错误输出。因为我们只是重定向了标准输出,而没有重定向标准错误输出, 所以错误信息被送到屏幕。马上,我们将知道怎样重定向标准错误输出,但是首先看一下 我们的输出文件发生了什么事情。
me@linuxbox ~]$ ls -l ls-output.txt
-rw-rw-r-- 1 me   me    0 2008-02-01 15:08 ls-output.txt
The file now has zero length! This is because, when we redirect output with the “>” redirection operator, the destination file is always rewritten from the beginning. Since our ls command generated no results and only an error message, the redirection operation started to rewrite the file and then stopped because of the error, resulting in its truncation. In fact, if we ever need to actually truncate a file (or create a new, empty file) we can use a trick like this:
文件长度为零!这是因为,当我们使用 “>” 重定向符来重定向输出结果时,目标文件总是从开头被重写。 因为我们 ls 命令没有产生运行结果,只有错误信息,重定向操作开始重写文件,然后 由于错误而停止,导致文件内容清空。事实上,如果我们需要清空一个文件内容(或者创建一个 新的空文件),可以使用这样的技巧:
| |
Simply using the redirection operator with no command preceding it will truncate an existing file or create a new, empty file.
简单地使用重定向符,没有命令在它之前,这会清空一个已存在文件的内容或是 创建一个新的空文件。
So, how can we append redirected output to a file instead of overwriting the file from the beginning? For that, we use the “»” redirection operator, like so:
所以,怎样才能把重定向结果追加到文件内容后面,而不是从开头重写文件?为了这个目的, 我们使用”»“重定向符,像这样:
| |
Using the “»” operator will result in the output being appended to the file. If the file does not already exist, it is created just as though the “>” operator had been used. Let’s put it to the test:
使用”»“操作符,将导致输出结果添加到文件内容之后。如果文件不存在,文件会 被创建,就如使用了”>”操作符。来试一下:
| |
We repeated the command three times resulting in an output file three times as large.
我们重复执行命令三次,导致输出文件大小是原来的三倍。
标准错误输出重定向
Redirecting standard error lacks the ease of a dedicated redirection operator. To redirect standard error we must refer to its file descriptor. A program can produce output on any of several numbered file streams. While we have referred to the first three of these file streams as standard input, output and error, the shell references them internally as file descriptors zero, one and two, respectively. The shell provides a notation for redirecting files using the file descriptor number. Since standard error is the same as file descriptor number two, we can redirect standard error with this notation:
标准错误输出重定向没有专用的重定向操作符。为了重定向标准错误输出,我们必须用到其文件描述符。 一个程序的输出会流入到几个带编号的文件中。这些文件的前 三个称作标准输入、标准输出和标准错误输出,shell 内部分别将其称为文件描述符0、1和2。shell 使用文件描述符提供 了一种表示法来重定向文件。因为标准错误输出和文件描述符2一样,我们用这种 表示法来重定向标准错误输出:
| |
The file descriptor “2” is placed immediately before the redirection operator to perform the redirection of standard error to the file ls-error.txt.
文件描述符”2”,紧挨着放在重定向操作符之前,来执行重定向标准错误输出到文件 ls-error.txt 任务。
重定向标准输出和错误到同一个文件
There are cases in which we may wish to capture all of the output of a command to a single file. To do this, we must redirect both standard output and standard error at the same time. There are two ways to do this. First, the traditional way, which works with old versions of the shell:
有时我们希望将一个命令的所有输出保存到一个文件。为此,我们 必须同时重定向标准输出和标准错误输出。有两种方法来完成任务。第一个是传统的方法, 在旧版本 shell 中也有效:
| |
Using this method, we perform two redirections. First we redirect standard output to the file ls-output.txt and then we redirect file descriptor two (standard error) to file descriptor one (standard output) using the notation 2>&1.
使用这种方法,我们完成两个重定向。首先重定向标准输出到文件 ls-output.txt,然后 重定向文件描述符2(标准错误输出)到文件描述符1(标准输出)使用表示法2>&1。
Notice that the order of the redirections is significant. The redirection of standard error must always occur after redirecting standard output or it doesn’t work. In the example above,
注意重定向的顺序安排非常重要。标准错误输出的重定向必须总是出现在标准输出 重定向之后,要不然它不起作用。上面的例子,
>ls-output.txt 2>&1
redirects standard error to the file ls-output.txt, but if the order is changed to
重定向标准错误输出到文件 ls-output.txt,但是如果命令顺序改为:
2>&1 >ls-output.txt
standard error is directed to the screen.
则标准错误输出会定向到屏幕。
Recent versions of bash provide a second, more streamlined method for performing this combined redirection:
现在的 bash 版本提供了第二种方法,更精简合理的方法来执行这种联合的重定向。
| |
In this example, we use the single notation &> to redirect both standard output and standard error to the file ls-output.txt.
在这个例子里面,我们使用单单一个表示法 &> 来重定向标准输出和错误到文件 ls-output.txt。
处理不需要的输出
Sometimes “silence is golden,” and we don’t want output from a command, we just want to throw it away. This applies particularly to error and status messages. The system provides a way to do this by redirecting output to a special file called “/dev/null”. This file is a system device called a bit bucket which accepts input and does nothing with it. To suppress error messages from a command, we do this:
有时候“沉默是金”,我们不想要一个命令的输出结果,只想把它们扔掉。这种情况 尤其适用于错误和状态信息。具体做法是重定向输出结果到一个叫做”/dev/null”的特殊文件。这个文件是系统设备,叫做数字存储桶,它可以 接受输入,并且对输入不做任何处理。为了丢掉命令错误信息,我们这样做:
| |
/dev/null in Unix Culture
Unix 文化中的 /dev/null
The bit bucket is an ancient Unix concept and due to its universality, has appeared in many parts of Unix culture. When someone says he/she is sending your comments to /dev/null, now you know what it means. For more examples, see the Wikipedia article on “/dev/null”.
数字存储桶是个古老的 Unix 概念,由于它的普遍性,它的身影出现在 Unix 文化的很多角落。当有人说我把你的评论送到/dev/null 了,现在你应该知道那是 什么意思了。更多的例子,可以阅读 Wikipedia 关于”/dev/null”的文章。
标准输入重定向
Up to now, we haven’t encountered any commands that make use of standard input (actually we have, but we’ll reveal that surprise a little bit later), so we need to introduce one.
到目前为止,我们还没有遇到一个命令是利用标准输入的(实际上我们遇到过了,但是 一会儿再揭晓谜底),所以我们需要介绍一个。
cat - 连接文件
The cat command reads one or more files and copies them to standard output like so:
cat 命令读取一个或多个文件,然后复制它们到标准输出,就像这样:
cat [file]
In most cases, you can think of cat as being analogous to the TYPE command in DOS. You can use it to display files without paging, for example:
在大多数情况下,你可以认为 cat 命令相似于 DOS 中的 TYPE 命令。你可以使用 cat 来显示 文件而没有分页,例如:
| |
will display the contents of the file ls-output.txt. cat is often used to display short text files. Since cat can accept more than one file as an argument, it can also be used to join files together. Say we have downloaded a large file that has been split into multiple parts (multimedia files are often split this way on USENET), and we want to join them back together. If the files were named:
将会显示文件 ls-output.txt 的内容。cat 经常被用来显示简短的文本文件。因为 cat 可以 接受不只一个文件作为参数,所以它也可以用来把文件连接在一起。比方说我们下载了一个 大型文件,这个文件被分离成多个部分(USENET 中的多媒体文件经常以这种方式分离), 我们想把它们连起来。如果文件命名为:
movie.mpeg.001 movie.mpeg.002 … movie.mpeg.099
we could join them back together with this command:
我们能用这个命令把它们连接起来:
cat movie.mpeg.0* > movie.mpeg
Since wildcards always expand in sorted order, the arguments will be arranged in the correct order.
因为通配符总是以有序的方式展开,所以这些参数会以正确顺序安排。
This is all well and good, but what does this have to do with standard input? Nothing yet, but let’s try something else. What happens if we type “cat” with no arguments:
这很好,但是这和标准输入有什么关系呢?没有任何关系,让我们试着做些其他的工作。 如果我们输入不带参数的”cat”命令,会发生什么呢:
| |
Nothing happens, it just sits there like it’s hung. It may seem that way, but it’s really doing exactly what it’s supposed to.
似乎没有发生任何事情,但是它正在做它该做的事情:
If cat is not given any arguments, it reads from standard input and since standard input is, by default, attached to the keyboard, it’s waiting for us to type something! Try this:
如果 cat 没有给出任何参数,它会从标准输入读入数据,又因为标准输入默认情况下连接到键盘, 它正在等待我们输入数据!试试这个:
| |
Next, type a Ctrl-d (i.e., hold down the Ctrl key and press “d”) to tell cat that it has reached end of file (EOF) on standard input:
下一步,输入 Ctrl-d(按住 Ctrl 键同时按下”d”),来告诉 cat,在标准输入中, 它已经到达文件末尾(EOF):
| |
In the absence of filename arguments, cat copies standard input to standard output, so we see our line of text repeated. We can use this behavior to create short text files. Let’s say that we wanted to create a file called “lazy_dog.txt” containing the text in our example. We would do this:
由于没有文件名参数,cat 复制标准输入到标准输出,所以我们看到文本行重复出现。 我们可以使用这种行为来创建简短的文本文件。比方说,我们想创建一个叫做”lazy_dog.txt” 的文件,这个文件包含例子中的文本。我们这样做:
| |
Type the command followed by the text we want in to place in the file. Remember to type Ctrl-d at the end. Using the command line, we have implemented the world’s dumbest word processor! To see our results, we can use cat to copy the file to stdout again:
输入命令,其后输入要放入文件中的文本。记住,最后输入 Ctrl-d。通过使用这个命令,我们 实现了世界上最低能的文字处理器!看一下运行结果,我们使用 cat 来复制文件内容到 标准输出:
| |
Now that we know how cat accepts standard input, in addition to filename arguments, let’s try redirecting standard input:
现在我们知道 cat 怎样接受标准输入,除了文件名参数,让我们试着重定向标准输入:
| |
Using the “<” redirection operator, we change the source of standard input from the keyboard to the file lazy_dog.txt. We see that the result is the same as passing a single filename argument. This is not particularly useful compared to passing a filename argument, but it serves to demonstrate using a file as a source of standard input. Other commands make better use of standard input, as we shall soon see.
使用“<”重定向操作符,我们把标准输入源从键盘改到文件 lazy_dog.txt。我们看到结果 和传递单个文件名作为参数的执行结果一样。把这和传递一个文件名参数作比较,不是特别有意义, 但它是用来说明把一个文件作为标准输入源。有其他的命令更好地利用了标准输入,我们不久将会看到。
Before we move on, check out the man page for cat, as it has several interesting options.
在我们继续之前,请查看 cat 的手册页,因为它有几个有趣的选项。
管道线
The ability of commands to read data from standard input and send to standard output is utilized by a shell feature called pipelines. Using the pipe operator “|” (vertical bar), the standard output of one command can be piped into the standard input of another:
命令从标准输入读取数据并输送到标准输出的能力被一个称为管道线的 shell 功能所利用。 使用管道操作符”|”(竖杠),一个命令的标准输出可以通过管道送至另一个命令的标准输入:
command1 | command2
To fully demonstrate this, we are going to need some commands. Remember how we said there was one we already knew that accepts standard input? It’s less. We can use less to display, page-by-page, the output of any command that sends its results to standard output:
为了全面地说明这个命令,我们需要一些命令。是否记得我们说过,我们已经知道有一个 命令接受标准输入?它是 less 命令。我们用 less 来一页一页地显示任何命令的输出,命令把 它的运行结果输送到标准输出:
| |
This is extremely handy! Using this technique, we can conveniently examine the output of any command that produces standard output.
这极其方便!使用这项技术,我们可以方便地检测会产生标准输出的任一命令的运行结果。
过滤器
Pipelines are often used to perform complex operations on data. It is possible to put several commands together into a pipeline. Frequently, the commands used this way are referred to as filters. Filters take input, change it somehow and then output it. The first one we will try is sort. Imagine we wanted to make a combined list of all of the executable programs in /bin and /usr/bin, put them in sorted order and view it:
管道线经常用来对数据完成复杂的操作。有可能会把几个命令放在一起组成一个管道线。 通常,以这种方式使用的命令被称为过滤器。过滤器接受输入,以某种方式改变它,然后 输出它。第一个我们想试验的过滤器是 sort。想象一下,我们想把目录/bin 和/usr/bin 中 的可执行程序都联合在一起,再把它们排序,然后浏览执行结果:
| |
Since we specified two directories (/bin and /usr/bin), the output of ls would have consisted of two sorted lists, one for each directory. By including sort in our pipeline, we changed the data to produce a single, sorted list.
因为我们指定了两个目录(/bin 和/usr/bin),ls 命令的输出结果由有序列表组成, 各自针对一个目录。通过在管道线中包含 sort,我们改变输出数据,从而产生一个 有序列表。
uniq - 报道或忽略重复行
The uniq command is often used in conjunction with sort. uniq accepts a sorted list of data from either standard input or a single filename argument (see the uniq man page for details) and, by default, removes any duplicates from the list. So, to make sure our list has no duplicates (that is, any programs of the same name that appear in both the /bin and /usr/bin directories) we will add uniq to our pipeline:
uniq 命令经常和 sort 命令结合在一起使用。uniq 从标准输入或单个文件名参数接受数据有序 列表(详情查看 uniq 手册页),默认情况下,从数据列表中删除任何重复行。所以,为了确信 我们的列表中不包含重复句子(这是说,出现在目录/bin 和/usr/bin 中重名的程序),我们添加 uniq 到我们的管道线中:
| |
In this example, we use uniq to remove any duplicates from the output of the sort command. If we want to see the list of duplicates instead, we add the “-d” option to uniq like so:
在这个例子中,我们使用 uniq 从 sort 命令的输出结果中,来删除任何重复行。如果我们想看到 重复内容,让 uniq 命令带上”-d”选项,就像这样:
| |
wc - 打印行数、字数和字节数
The wc (word count) command is used to display the number of lines, words, and bytes contained in files. For example:
wc(字数统计)命令是用来显示文件所包含的行数、字数和字节数。例如:
| |
In this case it prints out three numbers: lines, words, and bytes contained in ls- output.txt. Like our previous commands, if executed without command line arguments, wc accepts standard input. The “-l” option limits its output to only report lines. Adding it to a pipeline is a handy way to count things. To see the number of programs we have in our sorted list, we can do this:
在这个例子中,wc 打印出来三个数字:包含在文件 ls-output.txt 中的行数,单词数和字节数, 正如我们先前的命令,如果 wc 不带命令行参数,它接受标准输入。”-l”选项限制命令输出只能 报道行数。添加 wc 到管道线来统计数据,是个很便利的方法。查看我们的有序列表中程序个数, 我们可以这样做:
| |
grep - 打印匹配行
grep is a powerful program used to find text patterns within files. It’s used like this:
grep 是个很强大的程序,用来找到文件中的匹配文本。这样使用 grep 命令:
grep pattern [file...]
When grep encounters a “pattern” in the file, it prints out the lines containing it. The patterns that grep can match can be very complex, but for now we will concentrate on simple text matches. We’ll cover the advanced patterns, called regular expressions in a later chapter.
当 grep 遇到一个文件中的匹配”模式”,它会打印出包含这个类型的行。grep 能够匹配的模式可以 很复杂,但是现在我们把注意力集中在简单文本匹配上面。在后面的章节中,我们将会研究 高级模式,叫做正则表达式。
Let’s say we want to find all the files in our list of programs that had the word “zip” embedded in the name. Such a search might give us an idea of some of the programs on our system that had something to do with file compression. We would do this:
比如说,我们想在我们的程序列表中,找到文件名中包含单词”zip”的所有文件。这样一个搜索, 可能让我们了解系统中的一些程序与文件压缩有关系。这样做:
| |
There are a couple of handy options for grep: “-i” which causes grep to ignore case when performing the search (normally searches are case sensitive) and “-v” which tells grep to only print lines that do not match the pattern.
grep 有一些方便的选项:”-i”使得 grep 在执行搜索时忽略大小写(通常,搜索是大小写 敏感的),”-v”选项会告诉 grep 只打印不匹配的行。
head / tail - 打印文件开头部分/结尾部分
Sometimes you don’t want all of the output from a command. You may only want the first few lines or the last few lines. The head command prints the first ten lines of a file and the tail command prints the last ten lines. By default, both commands print ten lines of text, but this can be adjusted with the “-n” option:
有时候你不需要一个命令的所有输出。可能你只想要前几行或者后几行的输出内容。 head 命令打印文件的前十行,而 tail 命令打印文件的后十行。默认情况下,两个命令 都打印十行文本,但是可以通过”-n”选项来调整命令打印的行数。
| |
These can be used in pipelines as well:
它们也能用在管道线中:
| |
tail has an option which allows you to view files in real-time. This is useful for watching the progress of log files as they are being written. In the following example, we will look at the messages file in /var/log. Superuser privileges are required to do this on some Linux distributions, since the /var/log/messages file may contain security information:
tail 有一个选项允许你实时地浏览文件。当观察日志文件的进展时,这很有用,因为 它们同时在被写入。在以下的例子里,我们要查看目录/var/log 里面的信息文件。在 一些 Linux 发行版中,要求有超级用户权限才能阅读这些文件,因为文件 /var/log/messages 可能包含安全信息。
| |
Using the “-f” option, tail continues to monitor the file and when new lines are appended, they immediately appear on the display. This continues until you type Ctrl-c.
使用”-f”选项,tail 命令继续监测这个文件,当新的内容添加到文件后,它们会立即 出现在屏幕上。这会一直继续下去直到你输入 Ctrl-c。
tee - 从 Stdin 读取数据,并同时输出到 Stdout 和文件
In keeping with our plumbing metaphor, Linux provides a command called tee which creates a “tee” fitting on our pipe. The tee program reads standard input and copies it to both standard output (allowing the data to continue down the pipeline) and to one or more files. This is useful for capturing a pipeline’s contents at an intermediate stage of processing. Here we repeat one of our earlier examples, this time including tee to capture the entire directory listing to the file ls.txt before grep filters the pipeline’s contents:
为了和我们的管道隐喻保持一致,Linux 提供了一个叫做 tee 的命令,这个命令制造了 一个”tee”(三通管件,做水管工人会对这个非常熟悉),安装到我们的管道上。tee 程序从标准输入读入数据,并且同时复制数据 到标准输出(允许数据继续随着管道线流动)和一个或多个文件。当在某个中间处理 阶段来捕捉一个管道线的内容时,这很有帮助。这里,我们重复执行一个先前的例子, 这次包含 tee 命令,在 grep 过滤管道线的内容之前,来捕捉整个目录列表到文件 ls.txt:
| |
总结归纳
As always, check out the documentation of each of the commands we have covered in this chapter. We have only seen their most basic usage. They all have a number of interesting options. As we gain Linux experience, we will see that the redirection feature of the command line is extremely useful for solving specialized problems. There are many commands that make use of standard input and output, and almost all command line programs use standard error to display their informative messages.
一如既往,查看这章学到的每一个命令的文档。我们已经知道了他们最基本的用法。 它们还有很多有趣的选项。随着我们 Linux 经验的积累,我们会了解命令行重定向特性 在解决特殊问题时非常有用处。有许多命令利用标准输入和标准输出,而几乎所有的命令行 程序都使用标准错误输出来显示特别重要的信息。
Linux Is About Imagination
Linux 可以激发我们的想象
When I am asked to explain the difference between Windows and Linux, I often use a toy analogy.
当我被要求解释 Windows 与 Linux 之间的差异时,我经常拿玩具来作比喻。
Windows is like a Game Boy. You go to the store and buy one all shiny new in the box. You take it home, turn it on and play with it. Pretty graphics, cute sounds. After a while though, you get tired of the game that came with it so you go back to the store and buy another one. This cycle repeats over and over. Finally, you go back to the store and say to the person behind the counter, “I want a game that does this!” only to be told that no such game exists because there is no “market demand” for it. Then you say, “But I only need to change this one thing!” The person behind the counter says you can’t change it. The games are all sealed up in their cartridges. You discover that your toy is limited to the games that others have decided that you need and no more.
Windows 就像一个游戏机。你去商店,买了一个包装在盒子里面的全新的游戏机。 你把它带回家,打开盒子,开始玩游戏。精美的画面,动人的声音。玩了一段时间之后, 你厌倦了它自带的游戏,所以你返回商店,又买了另一个游戏机。这个过程反复重复。 最后,你玩腻了游戏机自带的游戏,你回到商店,告诉售货员,“我想要一个这样的游戏!” 但售货员告诉你没有这样的游戏存在,因为它没有“市场需求”。然后你说,“但是我只 需要修改一下这个游戏!“,售货员又告诉你不能修改它。所有游戏都被封装在它们的 存储器中。到头来,你发现你的玩具只局限于别人为你规定好的游戏。
Linux, on the other hand, is like the world’s largest Erector Set. You open it up and it’s just a huge collection of parts. A lot of steel struts, screws, nuts, gears, pulleys, motors, and a few suggestions on what to build. So you start to play with it. You build one of the suggestions and then another. After a while you discover that you have your own ideas of what to make. You don’t ever have to go back to the store, as you already have everything you need. The Erector Set takes on the shape of your imagination. It does what you want.
另一方面,Linux 就像一个全世界上最大的零件盒子。你打开它,发现它只是一个巨大的 部件集合。有许多钢支柱、螺钉、螺母、齿轮、滑轮、发动机和一些怎样来建造它的说明书。 然后你开始摆弄它。你建造了一个又一个样板模型。过了一会儿,你发现你要建造自己的模型。 你不必返回商店,因为你已经拥有了你需要的一切。建造模型以你构想的形状为模板,搭建 你想要的模型。
Your choice of toys is, of course, a personal thing, so which toy would you find more satisfying?
当然,选择哪一个玩具,是你的事情,那么你觉得哪个玩具更令人满意呢?
8 - 8 从 shell 眼中看世界
从 shell 眼中看世界
http://billie66.github.io/TLCL/book/chap08.html
In this chapter we are going to look at some of the “magic” that occurs on the command line when you press the enter key. While we will examine several interesting and complex features of the shell, we will do it with just one new command:
在这一章我们将看到,当你按下 enter 键后,发生在命令行中的一些“魔法”。我们会 深入研究几个复杂而有趣的 shell 特性,需要使用一个新命令:
- echo - Display a line of text
- echo - 显示一行文本
(字符)展开
Each time you type a command line and press the enter key, bash performs several processes upon the text before it carries out your command. We have seen a couple of cases of how a simple character sequence, for example “*”, can have a lot of meaning to the shell. The process that makes this happen is called expansion. With expansion, you type something and it is expanded into something else before the shell acts upon it. To demonstrate what we mean by this, let’s take a look at the echo command. echo is a shell builtin that performs a very simple task. It prints out its text arguments on standard output:
每当你输入一个命令并按下 enter 键,bash 会在执行你的命令之前对输入 的字符完成几个步骤的处理。我们已经见过几个例子:例如一个简单的字符序列”*”, 对 shell 来说有着多么丰富的涵义。这背后的的过程叫做(字符)展开。通过展开, 你输入的字符,在 shell 对它起作用之前,会展开成为别的字符。为了说明这一点 ,让我们看一看 echo 命令。echo 是一个 shell 内建命令,可以完成非常简单的任务。 它将它的文本参数打印到标准输出中。
| |
That’s pretty straightforward. Any argument passed to echo gets displayed. Let’s try another example:
这个命令的作用相当简单明了。传递到 echo 命令的任一个参数都会在(屏幕上)显示出来。 让我们试试另一个例子:
| |
So what just happened? Why didn’t echo print “”? As you recall from our work with wildcards, the “” character means match any characters in a filename, but what we didn’t see in our original discussion was how the shell does that. The simple answer is that the shell expands the “” into something else (in this instance, the names of the files in the current working directory) before the echo command is executed. When the enter key is pressed, the shell automatically expands any qualifying characters on the command line before the command is carried out, so the echo command never saw the “”, only its expanded result. Knowing this, we can see that echo behaved as expected.
那么刚才发生了什么事情呢? 为什么 echo 不打印”“呢?如果你回忆起我们所学过的 关于通配符的内容,这个”“字符意味着匹配文件名中的任意字符,但在原先的讨论 中我们并不知道 shell 是怎样实现这个功能的。简单的答案就是 shell 在 echo 命 令被执行前把”“展开成了另外的东西(在这里,就是在当前工作目录下的文件名字)。 当回车键被按下时,shell 在命令被执行前在命令行上自动展开任何符合条件的字符, 所以 echo 命令的实际参数并不是”“,而是它展开后的结果。知道了这个以后, 我们就能明白 echo 的行为符合预期。
路径名展开
The mechanism by which wildcards work is called pathname expansion. If we try some of the techniques that we employed in our earlier chapters, we will see that they are really expansions. Given a home directory that looks like this:
通配符所依赖的工作机制叫做路径名展开。如果我们试一下在之前的章节中使用的技巧, 我们会看到它们实际上是展开。给定一个家目录,它看起来像这样:
| |
we could carry out the following expansions:
我们能够执行以下的展开:
| |
and:
和:
| |
or even:
甚至是:
| |
and looking beyond our home directory:
查看家目录之外的目录:
| |
Pathname Expansion Of Hidden Files
隐藏文件路径名展开
As we know, filenames that begin with a period character are hidden. Pathname expansion also respects this behavior. An expansion such as:
正如我们知道的,以圆点字符开头的文件名是隐藏文件。路径名展开也尊重这种 行为。像这样的展开:
*echo **
does not reveal hidden files.
不会显示隐藏文件
It might appear at first glance that we could include hidden files in an expansion by starting the pattern with a leading period, like this:
直觉告诉我们,如果展开模式以一个圆点开头,我们就能够在展开中包含隐藏文件, 就像这样:
echo .*
It almost works. However, if we examine the results closely, we will see that the names “.” and “..” will also appear in the results. Since these names refer to the current working directory and its parent directory, using this pattern will likely produce an incorrect result. We can see this if we try the command:
它几乎要起作用了。然而,如果我们仔细检查一下输出结果,我们会看到名字”.” 和”..”也出现在结果中。由于它们是指当前工作目录和父目录,使用这种 模式可能会产生不正确的结果。我们可以通过这个命令来验证:
ls -d .* | less
To correctly perform pathname expansion in this situation, we have to employ a more specific pattern. This will work correctly:
为了在这种情况下正确地完成路径名展开,我们应该使用一个更精确的模式。 这个模式会正确地工作:
ls -d .[!.]?*
This pattern expands into every filename that begins with a period, does not include a second period, contains at least one additional character and can be followed by any other characters. This will work correctly with most hidden files (though it still won’t include filenames with multiple leading periods). The ls command with the -A option (“almost all”) will provide a correct listing of hidden files:
这种模式展开成所有以圆点开头,第二个字符不包含圆点,再包含至少一个字符, 并且这个字符之后紧接着任意多个字符的文件名。这个命令将正确列出大多数的隐藏文件 (但仍不能包含以多个圆点开头的文件名)。带有 -A 选项(“几乎所有”)的 ls 命令能够提供一份正确的隐藏文件清单:
ls -A
波浪线展开
As you may recall from our introduction to the cd command, the tilde character (“~”) has a special meaning. When used at the beginning of a word, it expands into the name of the home directory of the named user, or if no user is named, the home directory of the current user:
可能你从我们对 cd 命令的介绍中回想起来,波浪线字符(“~”)有特殊的含义。当它用在 一个单词的开头时,它会展开成指定用户的家目录名,如果没有指定用户名,则展开成当前用户的家目录:
| |
If user “foo” has an account, then:
如果有用户”foo”这个帐号,那么:
| |
算术表达式展开
The shell allows arithmetic to be performed by expansion. This allow us to use the shell prompt as a calculator:
shell 在展开中执行算数表达式。这允许我们把 shell 当作计算器来使用:
| |
Arithmetic expansion uses the form:
算术表达式展开使用这种格式:
$((expression))
where expression is an arithmetic expression consisting of values and arithmetic operators.
(以上括号中的)表达式是指算术表达式,它由数值和算术操作符组成。
Arithmetic expansion only supports integers (whole numbers, no decimals), but can perform quite a number of different operations. Here are a few of the supported operators:
算术表达式只支持整数(全部是数字,不带小数点),但是能执行很多不同的操作。这里是 一些它支持的操作符:
| Operator | Description |
|---|---|
| + | Addition |
| - | Subtraction |
| * | Multiplication |
| / | Division(but remember, since expansion only supports integer arithmetic, results are integers.) |
| % | Modulo, which simply means, “remainder”. |
| ** | Exponentiation |
| 操作符 | 说明 |
|---|---|
| + | 加 |
| - | 减 |
| * | 乘 |
| / | 除(但是记住,因为展开只是支持整数除法,所以结果是整数。) |
| % | 取余,只是简单的意味着,“余数” |
| ** | 取幂 |
Spaces are not significant in arithmetic expressions and expressions may be nested. For example, to multiply five squared by three:
在算术表达式中空格并不重要,并且表达式可以嵌套。例如,5的平方乘以3:
| |
Single parentheses may be used to group multiple subexpressions. With this technique, we can rewrite the example above and get the same result using a single expansion instead of two:
一对括号可以用来把多个子表达式括起来。通过这个技术,我们可以重写上面的例子, 同时用一个展开代替两个,来得到一样的结果:
| |
Here is an example using the division and remainder operators. Notice the effect of integer division:
这是一个使用除法和取余操作符的例子。注意整数除法的结果:
| |
Arithmetic expansion is covered in greater detail in Chapter 35.
在35章会更深入地讨论算术表达式的内容。
花括号展开
Perhaps the strangest expansion is called brace expansion. With it, you can create multiple text strings from a pattern containing braces. Here’s an example:
可能最奇怪的展开是花括号展开。通过它,你可以从一个包含花括号的模式中 创建多个文本字符串。这是一个例子:
| |
Patterns to be brace expanded may contain a leading portion called a preamble and a trailing portion called a postscript. The brace expression itself may contain either a comma-separated list of strings, or a range of integers or single characters. The pattern may not contain embedded whitespace. Here is an example using a range of integers:
花括号展开模式可能包含一个开头部分叫做前言,一个结尾部分叫做附言。花括号表达式本身可 能包含一个由逗号分开的字符串列表,或者一个整数区间,或者单个的字符的区间。这种模式不能 嵌入空白字符。这个例子中使用了一个整数区间:
| |
A range of letters in reverse order:
倒序排列的字母区间:
| |
Brace expansions may be nested:
花括号展开可以嵌套:
| |
So what is this good for? The most common application is to make lists of files or directories to be created. For example, if we were photographers and had a large collection of images that we wanted to organize into years and months, the first thing we might do is create a series of directories named in numeric “Year-Month” format. This way, the directory names will sort in chronological order. We could type out a complete list of directories, but that’s a lot of work and it’s error-prone too. Instead, we could do this:
那这个有啥用呢?最常见的应用是,创建一系列的文件或目录列表。例如, 如果我们是摄影师,有大量的相片。我们想把这些相片按年月先后组织起来。首先, 我们要创建一系列以数值”年-月”形式命名的目录。通过这种方式,可以使目录名按照 年代顺序排列。我们可以手动键入整个目录列表,但是工作量太大了,并且易于出错。 反之,我们可以这样做:
| |
Pretty slick!
棒极了!
参数展开
We’re only going to touch briefly on parameter expansion in this chapter, but we’ll be covering it extensively later. It’s a feature that is more useful in shell scripts than directly on the command line. Many of its capabilities have to do with the system’s ability to store small chunks of data and to give each chunk a name. Many such chunks, more properly called variables, are available for your examination. For example, the variable named “USER” contains your user name. To invoke parameter expansion and reveal the contents of USER you would do this:
在这一章我们将会简单介绍参数展开,会在后续章节中进行详细讨论。这个特性在 shell 脚本中比直接在命令行中更有用。 它的许多功能和系统存储小块数据,并给每块数据命名的能力有关系。许多像这样的小块数据, 更恰当的称呼应该是变量,可供你方便地检查它们。例如,叫做”USER”的变量包含你的 用户名。可以这样做来调用参数,并查看 USER 中的内容,:
| |
To see a list of available variables, try this:
要查看有效的变量列表,可以试试这个:
| |
You may have noticed that with other types of expansion, if you mistype a pattern, the expansion will not take place and the echo command will simply display the mistyped pattern. With parameter expansion, if you misspell the name of a variable, the expansion will still take place, but will result in an empty string:
你可能注意到在其它展开类型中,如果你误输入一个字符串,展开就不会发生。这时 echo 命令只简单地显示误键入的字符串。但在参数展开中,如果你拼写错了一个变量名, 展开仍然会进行,只是展开的结果是一个空字符串:
| |
命令替换
Command substitution allows us to use the output of a command as an expansion:
命令替换允许我们把一个命令的输出作为另一个命令的一部分来使用:
| |
One of my favorites goes something like this:
我最喜欢用的一行命令是像这样的:
| |
Here we passed the results of which cp as an argument to the ls command, thereby getting the listing of of the cp program without having to know its full pathname. We are not limited to just simple commands. Entire pipelines can be used (only partial output shown):
这里我们把 which cp 的执行结果作为一个参数传递给 ls 命令,因此可以在不知道 cp 命令 完整路径名的情况下得到它的文件属性列表。我们不只限于简单命令。也可以使用整个管道线 (只展示部分输出):
| |
In this example, the results of the pipeline became the argument list of the file command.
在这个例子中,管道线的输出结果成为 file 命令的参数列表。
There is an alternate syntax for command substitution in older shell programs which is also supported in bash. It uses back-quotes instead of the dollar sign and parentheses:
在旧版 shell 程序中,有另一种语法也支持命令替换,可与刚提到的语法轮换使用。 bash 也支持这种语法。它使用倒引号来代替美元符号和括号:
| |
引用
Now that we’ve seen how many ways the shell can perform expansions, it’s time to learn how we can control it. Take for example:
我们已经知道 shell 有许多方式可以完成展开,现在是时候学习怎样来控制展开了。 以下面例子来说明:
| |
or:
或者:
| |
In the first example, word-splitting by the shell removed extra whitespace from the echo command’s list of arguments. In the second example, parameter expansion substituted an empty string for the value of “$1” because it was an undefined variable. The shell provides a mechanism called quoting to selectively suppress unwanted expansions.
在第一个例子中,shell 利用单词分割删除掉 echo 命令的参数列表中多余的空格。在第二个例子中, 参数展开把 $1 的值替换为一个空字符串,因为 1 是没有定义的变量。shell 提供了一种 叫做引用的机制,来有选择地禁止不需要的展开。
双引号
The first type of quoting we will look at is double quotes. If you place text inside double quotes, all the special characters used by the shell lose their special meaning and are treated as ordinary characters. The exceptions are $, \ (backslash), and ` (back-quote). This means that word-splitting, pathname expansion, tilde expansion, and brace expansion are suppressed, but parameter expansion, arithmetic expansion, and command substitution are still carried out. Using double quotes, we can cope with filenames containing embedded spaces. Say we were the unfortunate victim of a file called two words.txt.If we tried to use this on the command line, word-splitting would cause this to be treated as two separate arguments rather than the desired single argument:
我们将要看一下引用的第一种类型,双引号。如果你把文本放在双引号中, shell 使用的特殊字符,都失去它们的特殊含义,被当作普通字符来看待。 有几个例外: $,\ (反斜杠),和 `(倒引号)。这意味着单词分割、路径名展开、 波浪线展开和花括号展开都将失效,然而参数展开、算术展开和命令替换 仍然执行。使用双引号,我们可以处理包含空格的文件名。比方说 two words.txt 文件,如果我们试图在命令行中使用这个 文件,单词分割机制会导致这个文件名被看作两个独自的参数,而不是所期望 的单个参数:
| |
By using double quotes, we stop the word-splitting and get the desired result; further, we can even repair the damage:
使用双引号,我们可以阻止单词分割,得到期望的结果;进一步,我们甚至可以修复 破损的文件名。
| |
There! Now we don’t have to keep typing those pesky double quotes.
用来下划线,现在我们不必一直输入那些讨厌的双引号了。
Remember, parameter expansion, arithmetic expansion, and command substitution still take place within double quotes:
记住,在双引号中,参数展开、算术表达式展开和命令替换仍然有效:
| |
We should take a moment to look at the effect of double quotes on command substitution. First let’s look a little deeper at how word splitting works. In our earlier example, we saw how word-splitting appears to remove extra spaces in our text:
我们应该花费一点时间来看一下双引号在命令替换中的效果。首先仔细研究一下单词分割 是怎样工作的。在之前的范例中,我们已经看到单词分割机制是怎样来删除文本中额外空格的:
| |
By default, word-splitting looks for the presence of spaces, tabs, and newlines (linefeed characters) and treats them as delimiters between words. This means that unquoted spaces, tabs, and newlines are not considered to be part of the text. They only serve as separators. Since they separate the words into different arguments, our example command line contains a command followed by four distinct arguments. If we add double quotes:
在默认情况下,单词分割机制会在单词中寻找空格,制表符,和换行符,并把它们看作 单词之间的界定符。这意味着无引用的空格,制表符和换行符都不是文本的一部分, 它们只作为分隔符使用。由于它们把单词分为不同的参数,所以在上面的例子中, 命令行包含一个带有四个不同参数的命令。如果我们加上双引号:
| |
word-splitting is suppressed and the embedded spaces are not treated as delimiters, rather they become part of the argument. Once the double quotes are added, our command line contains a command followed by a single argument.
单词分割被禁止,内嵌的空格也不会被当作界定符,它们成为参数的一部分。 一旦加上双引号,我们的命令行就包含一个带有一个参数的命令。
The fact that newlines are considered delimiters by the word-splitting mechanism causes an interesting, albeit subtle, effect on command substitution. Consider the following:
事实上,单词分割机制把换行符看作界定符,对命令替换产生了一个虽然微妙但有趣的影响。 考虑下面的例子:
| |
In the first instance, the unquoted command substitution resulted in a command line containing thirty-eight arguments. In the second, a command line with one argument that includes the embedded spaces and newlines.
在第一个例子,没有引用的命令替换导致命令行包含38个参数。在第二个例子中, 命令行只有一个参数,参数中包括嵌入的空格和换行符。
单引号
If we need to suppress all expansions, we use single quotes. Here is a comparison of unquoted, double quotes, and single quotes:
如果需要禁止所有的展开,我们要使用单引号。以下例子是无引用,双引号,和单引号的比较结果:
| |
As we can see, with each succeeding level of quoting, more and more of the expansions are suppressed.
正如我们所看到的,随着引用程度加强,越来越多的展开被禁止。
转义字符
Sometimes we only want to quote a single character. To do this, we can precede a character with a backslash, which in this context is called the escape character. Often this is done inside double quotes to selectively prevent an expansion:
有时候我们只想引用单个字符。我们可以在字符之前加上一个反斜杠,在这里叫做转义字符。 经常在双引号中使用转义字符,来有选择地阻止展开。
| |
It is also common to use escaping to eliminate the special meaning of a character in a filename. For example, it is possible to use characters in filenames that normally have special meaning to the shell. These would include “$”, “!”, “&”, “ “, and others. To include a special character in a filename you can to this:
使用转义字符来消除文件名中一个字符的特殊含义,是很普遍的。例如,在文件名中可能使用 一些对于 shell 来说有特殊含义的字符。这些字符包括”$”, “!”, “ “等字符。在文件名 中包含特殊字符,你可以这样做:
| |
To allow a backslash character to appear, escape it by typing “\”. Note that within single quotes, the backslash loses its special meaning and is treated as an ordinary character.
为了允许反斜杠字符出现,输入”\“来转义。注意在单引号中,反斜杠失去它的特殊含义,它 被看作普通字符。
Backslash Escape Sequences
反斜杠转义字符序列
In addition to its role as the escape character, the backslash is also used as part of a notation to represent certain special characters called control codes. The first thirty-two characters in the ASCII coding scheme are used to transmit commands to teletype-like devices. Some of these codes are familiar (tab, backspace, linefeed, and carriage return), while others are not (null, end-of-transmission, and acknowledge).
反斜杠除了作为转义字符外,也可以构成一种表示法,来代表某种 特殊字符,这些特殊字符叫做控制码。ASCII 编码表中前32个字符被用来把命令转输到电报机 之类的设备。一些编码是众所周知的(制表符,退格符,换行符,和回车符),而其它 一些编码就不熟悉了(空值,传输结束码,和确认)。
Escape Sequence Meaning \a Bell(“Alert”-causes the computer to beep) \b Backspace \n Newline. On Unix-like systems, this produces a linefeed. \r Carriage return \t Tab
转义序列 含义 \a 响铃(”警告”-导致计算机嘟嘟响) \b 退格符 \n 新的一行。在类 Unix 系统中,产生换行。 \r 回车符 \t 制表符 The table above lists some of the common backslash escape sequences. The idea behind this representation using the backslash originated in the C programming language and has been adopted by many others, including the shell.
上表列出了一些常见的反斜杠转义字符序列。这种利用反斜杠的表示法背后的思想来源于 C 编程语言, 许多其它语言也采用了这种表示方法,包括 shell。
Adding the ‘-e’ option to echo will enable interpretation of escape sequences. You may also place them inside $’ ‘. Here, using the sleep command, a simple program that just waits for the specified number of seconds and then exits, we can create a primitive countdown timer:
echo 命令带上 ‘-e’ 选项,能够解释转义序列。你可以把转义序列放在 $’ ’ 里面。 以下例子中,我们可以使用 sleep 命令创建一个简单的倒数计数器( sleep 是一个简单的程序, 它会等待指定的秒数,然后退出):
sleep 10; echo -e “Time’s up\a”
We could also do this: 我们也可以这样做:
sleep 10; echo “Time’s up” $’\a’
总结归纳
As we move forward with using the shell, we will find that expansions and quoting will be used with increasing frequency, so it makes sense to get a good understanding of the way they works. In fact, it could be argued that they are the most important subjects to learn about the shell. Without a proper understanding of expansion, the shell will always be a source of mystery and confusion, and much of it potential power wasted.
随着我们继续学习 shell,你会发现使用展开和引用的频率逐渐多起来,所以能够很好的 理解它们的工作方式很有意义。事实上,可以这样说,它们是学习 shell 的最重要的主题。 如果没有准确地理解展开模式,shell 总是神秘和混乱的源泉,并且 shell 潜在的能力也 浪费掉了。
拓展阅读
The bash man page has major sections on both expansion and quoting which cover these topics in a more formal manner.
Bash 手册页有主要段落是关于展开和引用的,内容更全面。
The Bash Reference Manual also contains chapters on expansion and quoting:
Bash 参考手册也包含绍展开和引用的相关内容:
9 - 9 键盘高级操作技巧
键盘高级操作技巧
http://billie66.github.io/TLCL/book/chap09.html
I often kiddingly describe Unix as “the operating system for people who like to type.” Of course, the fact that it even has a command line is a testament to that. But command line users don’t like to type that much. Why else would so many commands have such short names like cp, ls, mv, and rm? In fact, one of the most cherished goals of the command line is laziness; doing the most work with the fewest number of keystrokes. Another goal is never having to lift your fingers from the keyboard, never reaching for the mouse. In this chapter, we will look at bash features that make keyboard use faster and more efficient.
开玩笑地说,我经常把 Unix 描述为“这个操作系统是为喜欢敲键盘的人们而生的。” 当然,Unix 有命令行这件事证明了我所说的话。但是命令行用户不喜欢敲入 那么多字。要不为什么会有如此多的命令有这样简短的命令名,像cp、ls、mv和 rm?事实上 ,命令行最为珍视的目标之一就是懒惰;用最少的击键次数来完成最多的工作。另一个 目标是你的手指永远不必离开键盘,永不触摸鼠标。在这一章节,我们将看一下 bash 特性 ,这些特性使键盘使用起来更加迅速,更加高效。
The following commands will make an appearance:
以下命令将会露面:
- clear - Clear the screen
- history - Display the contents of the history list
- clear - 清空屏幕
- history - 显示历史列表内容
命令行编辑
bash uses a library (a shared collection of routines that different programs can use) called Readline to implement command line editing. We have already seen some of this. We know, for example, that the arrow keys move the cursor but there are many more features. Think of these as additional tools that we can employ in our work. It’s not important to learn all of them, but many of them are very useful. Pick and choose as desired.
Bash 使用了一个名为 Readline 的库(一系列功能的集合,可以被不同的程序使用), 来实现命令行编辑。我们已经用过一些这个库所带的功能了。例如,用箭头按键可以移动光标等等。这些功能可以在工作中帮我们提高命令行编辑的效率。不一定要把所有的功能都学会,但会一些是非常有帮助的。选择自己常用的学吧。
Note: Some of the key sequences below (particularly those which use the Alt key) may be intercepted by the GUI for other functions. All of the key sequences should work properly when using a virtual console.
注意:当我们处于图形化环境时,下面一些按键组合(尤其使用 Alt 键的组合),可能会被图形界面拦截来触发其它的功能。 但是当切换到虚拟控制台时,所有的按键组合都会正常工作。
移动光标
The following table lists the keys used to move the cursor:
下表列出了移动光标所使用的按键:
| Key | Action |
|---|---|
| Ctrl-a | Move cursor to the beginning of the line. |
| Ctrl-e | Move cursor to the end of the line. |
| Ctrl-f | Move cursor forward one character;same as the right arrow key. |
| Ctrl-b | Move cursor backward one character;same as the left arrow key. |
| Alt-f | Move cursor forward one word. |
| Alt-b | Move cursor backward one word. |
| Ctrl-l | Clear the screen and move the cursor to the top left corner. The clear command does the same thing. |
| 按键 | 行动 |
|---|---|
| Ctrl-a | 移动光标到行首。 |
| Ctrl-e | 移动光标到行尾。 |
| Ctrl-f | 光标前移一个字符;和右箭头作用一样。 |
| Ctrl-b | 光标后移一个字符;和左箭头作用一样。 |
| Alt-f | 光标前移一个字。 |
| Alt-b | 光标后移一个字。 |
| Ctrl-l | 清空屏幕,移动光标到左上角。clear 命令完成同样的工作。 |
修改文本
Table 9-2 lists keyboard commands that are used to edit characters on the command line.
表9-2列出了键盘命令,这些命令用来在命令行中编辑字符。
| Key | Action |
|---|---|
| Ctrl-d | Delete the character at the cursor location |
| Ctrl-t | Transpose(exchange)the character at the cursor location with the one preceding it. |
| Alt-t | Transpose the word at the cursor location with the one preceding it. |
| Alt-l | Convert the characters from the cursor location to the end of the word to lowercase. |
| Alt-u | Convert the characters from the cursor location to the end of the word to uppercase. |
| 按键 | 行动 |
|---|---|
| Ctrl-d | 删除光标位置的字符。 |
| Ctrl-t | 光标位置的字符和光标前面的字符互换位置。 |
| Alt-t | 光标位置的字和其前面的字互换位置。 |
| Alt-l | 把从光标位置到字尾的字符转换成小写字母。 |
| Alt-u | 把从光标位置到字尾的字符转换成大写字母。 |
剪切和粘贴文本
The Readline documentation uses the terms killing and yanking to refer to what we would commonly call cutting and pasting. Items that are cut are stored in a buffer called the kill-ring.
Readline 的文档使用术语 killing 和 yanking 来指我们平常所说的剪切和粘贴。 剪切下来的本文被存储在一个叫做剪切环(kill-ring)的缓冲区中。
| Key | Action |
|---|---|
| Ctrl-k | Kill text from the cursor location to the end of line. |
| Ctrl-u | Kill text from the cursor location to the beginning of the line. |
| Alt-d | Kill text from the cursor location to the end of the current word. |
| Alt-Backspace | Kill text from the cursor location to the beginning of the word. If the cursor is at the beginning of a word, kill the previous word. |
| Ctrl-y | Yank text from the kill-ring and insert it at the cursor location. |
| 按键 | 行动 |
|---|---|
| Ctrl-k | 剪切从光标位置到行尾的文本。 |
| Ctrl-u | 剪切从光标位置到行首的文本。 |
| Alt-d | 剪切从光标位置到词尾的文本。 |
| Alt-Backspace | 剪切从光标位置到词头的文本。如果光标在一个单词的开头,剪切前一个单词。 |
| Ctrl-y | 把剪切环中的文本粘贴到光标位置。 |
The Meta Key
元键
If you venture into the Readline documentation, which can be found in the READLINE section of the bash man page, you will encounter the term “meta key.” On modern keyboards this maps to the Alt key but it wasn’t always so.
如果你冒险进入到 Readline 的文档中,你会在 bash 手册页的 READLINE 段落, 遇到一个术语”元键”(meta key)。在当今的键盘上,这个元键是指 Alt 键,但 并不总是这样。
Back in the dim times (before PCs but after Unix) not everybody had their own computer. What they might have had was a device called a terminal. A terminal was a communication device that featured a text display screen and a keyboard and just enough electronics inside to display text characters and move the cursor around. It was attached (usually by serial cable) to a larger computer or the communication network of a larger computer. There were many different brands of terminals and they all had different keyboards and display feature sets. Since they all tended to at least understand ASCII, software developers wanting portable applications wrote to the lowest common denominator. Unix systems have a very elaborate way of dealing with terminals and their different display features. Since the developers of Readline could not be sure of the presence of a dedicated extra control key, they invented one and called it “meta.” While the Alt key serves as the meta key on modern keyboards, you can also press and release the Esc key to get the same effect as holding down the Alt key if you’re still using a terminal (which you can still do in Linux!).
回到昏暗的年代(在 PC 之前 Unix 之后),并不是每个人都有他们自己的计算机。 他们可能有一个叫做终端的设备。一个终端是一种通信设备,它以一个文本显示 屏幕和一个键盘作为其特色,它里面有足够的电子器件来显示文本字符和移动光标。 它连接到(通常通过串行电缆)一个更大的计算机或者是一个大型计算机的通信 网络。有许多不同的终端产品商标,它们有着不同的键盘和特征显示集。因为它们 都倾向于至少能理解 ASCII,所以软件开发者想要符合最低标准的可移植的应用程序。 Unix 系统有一个非常精巧的方法来处理各种终端产品和它们不同的显示特征。因为 Readline 程序的开发者们,不能确定一个专用多余的控制键的存在,他们发明了一个 控制键,并把它叫做”元”(”meta”)。然而在现代的键盘上,Alt 键作为元键来服务。 如果你仍然在使用终端(在 Linux 中,你仍然可以得到一个终端),你也可以按下和 释放 Esc 键来得到如控制 Alt 键一样的效果。
自动补全
Another way that the shell can help you is through a mechanism called completion. Completion occurs when you press the tab key while typing a command. Let’s see how this works. Given a home directory that looks like this:
shell 能帮助你的另一种方式是通过一种叫做自动补全的机制。当你敲入一个命令时, 按下 tab 键,自动补全就会发生。让我们看一下这是怎样工作的。给出一个看起来 像这样的家目录:
| |
Try typing the following but don’t press the Enter key:
试着输入下面的命令,但不要按下 Enter 键:
| |
Now press the tab key:
现在按下 tab 键:
| |
See how the shell completed the line for you? Let’s try another one. Again, don’t press Enter:
看一下 shell 是怎样补全这一行的?让我们再试试另一个例子。这回,也 不要按下 Enter:
| |
Press tab:
按下 tab:
| |
No completion, just a beep. This happened because “D” matches more than one entry in the directory. For completion to be successful, the “clue” you give it has to be unambiguous. If we go further:
没有补全,只是嘟嘟响。因为”D”不止匹配目录中的一个条目。为了自动补全执行成功, 你给它的”线索”不能模棱两可。如果我们继续输入:
| |
Then press tab:
然后按下 tab:
| |
The completion is successful.
自动补全成功了。
While this example shows completion of pathnames, which is its most common use, completion will also work on variables (if the beginning of the word is a “$”), user names (if the word begins with “~”), commands (if the word is the first word on the line.) and host names (if the beginning of the word is “@”). Host name completion only works for host names listed in /etc/hosts.
这个实例展示了路径名自动补全,这是最常用的形式。自动补全也能对变量(如果 字的开头是一个”$”)、用户名字(单词以”~”开始)、命令(如果单词是一行的第一个单词) 和主机名(如果单词的开头是”@”)起作用。主机名自动补全只对包含在文件/etc/hosts 中的主机名有效。
There are a number of control and meta key sequences that are associated with completion:
有一系列的控制和元键序列与自动补全相关联:
| Key | Action |
|---|---|
| Alt-? | Display list of possible completions. On most systems you can also do this by pressing the tab key a second time, which is much easier. |
| Alt-* | Insert all possible completions. This is useful when you want to use more than one possible match. |
| 按键 | 行动 |
|---|---|
| Alt-? | 显示可能的自动补全列表。在大多数系统中,你也可以完成这个通过按 两次 tab 键,这会更容易些。 |
| Alt-* | 插入所有可能的自动补全。当你想要使用多个可能的匹配项时,这个很有帮助。 |
Programmable Completion
可编程自动补全
Recent versions of bash have a facility called programmable completion. Programmable completion allows you (or more likely, your distribution provider) to add additional completion rules. Usually this is done to add support for specific applications. For example it is possible to add completions for the option list of a command or match particular file types that an application supports. Ubuntu has a fairly large set defined by default. Programmable completion is implemented by shell functions, a kind of mini shell script that we will cover in later chapters. If you are curious, try:
目前的 bash 版本有一个叫做可编程自动补全工具。可编程自动补全允许你(更可能是,你的 发行版提供商)来加入额外的自动补全规则。通常需要加入对特定应用程序的支持,来完成这个 任务。例如,有可能为一个命令的选项列表,或者一个应用程序支持的特殊文件类型加入自动补全。 默认情况下,Ubuntu 已经定义了一个相当大的规则集合。可编程自动补全是由 shell 函数实现的,shell 函数是一种小巧的 shell 脚本,我们会在后面的章节中讨论到。如果你感到好奇,试一下:
set | less
and see if you can find them. Not all distributions include them by default.
查看一下如果你能找到它们的话。默认情况下,并不是所有的发行版都包括它们。
利用历史命令
As we discovered in Chapter 2, bash maintains a history of commands that have been entered. This list of commands is kept in your home directory in a file called .bash_history. The history facility is a useful resource for reducing the amount of typing you have to do, especially when combined with command line editing.
正如我们在第二章中讨论到的,bash 维护着一个已经执行过的命令的历史列表。这个命令列表 被保存在你家目录下,一个叫做 .bash_history 的文件里。这个 history 工具是个有用资源, 因为它可以减少你敲键盘的次数,尤其当和命令行编辑联系起来时。
搜索历史命令
At any time, we can view the contents of the history list by:
在任何时候,我们都可以浏览历史列表的内容,通过:
| |
By default, bash stores the last five hundred commands you have entered. We will see how to adjust this value in a later chapter. Let’s say we want to find the commands we used to list /usr/bin. One way we could do this:
在默认情况下,bash 会存储你所输入的最后 500 个命令。在随后的章节里,我们会知道 怎样调整这个数值。比方说我们想在自己曾经用过的命令中,找出和/usr/bin这一目录相关的。那么我们就可以这样做:
| |
And let’s say that among our results we got a line containing an interesting command like this:
比方说在我们的搜索结果之中,我们得到一行,包含了有趣的命令,像这样;
88 ls -l /usr/bin > ls-output.txt
The number “88” is the line number of the command in the history list. We could use this immediately using another type of expansion called history expansion. To use our discovered line we could do this:
数字 “88” 是这个命令在历史列表中的行号。我们可以使用另一种叫做 历史命令展开的方式,来调用“88”所代表的这一行命令:
| |
bash will expand “!88” into the contents of the eighty-eighth line in the history list. There are other forms of history expansion that we will cover a little later. bash also provides the ability to search the history list incrementally. This means that we can tell bash to search the history list as we enter characters, with each additional character further refining our search. To start incremental search type Ctrl-r followed by the text you are looking for. When you find it, you can either type Enter to execute the command or type Ctrl-j to copy the line from the history list to the current command line. To find the next occurrence of the text (moving “up” the history list), type Ctrl-r again. To quit searching, type either Ctrl-g or Ctrl-c. Here we see it in action:
bash 会把 “!88” 展开成为历史列表中88行的内容。还有其它的历史命令展开形式,我们一会儿 讨论它们。bash 也具有增量搜索历史列表的能力。意思是在字符输入的同时,bash 会去搜索历史列表(直接出结果,并高亮匹配的第一个字),每多输入一个字符都会使搜索结果更接近目标。输入 Ctrl-r来启动增量搜索, 接着输入你要寻找的字。当你找到它以后,你可以敲入 Enter 来执行命令, 或者输入 Ctrl-j,从历史列表中复制这一行到当前命令行。再次输入 Ctrl-r,来找到下一个 匹配项(历史列表中向上移动)。输入 Ctrl-g 或者 Ctrl-c,退出搜索。现在看看它的实际效果:
| |
First type Ctrl-r:
首先输入 Ctrl-r:
(reverse-i-search)`':
The prompt changes to indicate that we are performing a reverse incremental search. It is “reverse” because we are searching from “now” to some time in the past. Next, we start typing our search text. In this example “/usr/bin”:
提示符改变,显示我们正在执行反向增量搜索。搜索过程是”反向的”,因为我们按照从”现在”到过去 某个时间段的顺序来搜寻。下一步,我们开始输入要查找的文本。在这个例子里是 “/usr/bin”:
(reverse-i-search)`/usr/bin`: ls -l /usr/bin > ls-output.txt
上面这一行冒号后面的第一个”/”会高亮显示。
Immediately, the search returns our result. With our result, we can execute the command by pressing Enter, or we can copy the command to our current command line for further editing by typing Ctrl-j. Let’s copy it. Type Ctrl-j:
即刻,搜索返回我们需要的结果。我们可以按下 Enter 键来执行这个命令,或者我们可以按下Ctrl-j复制 这个命令到我们当前的命令行,来进一步编辑它。好了现在我们复制它,输入 Ctrl-j:
| |
Our shell prompt returns and our command line is loaded and ready for action! The table below lists some of the keystrokes used to manipulate the history list:
我们的 shell 提示符重新出现,命令行加载完毕,准备接受下一命令! 下表列出了一些按键组合, 这些按键可以用来操作历史列表:
| Key | Action |
|---|---|
| Ctrl-p | Move to the previous history entry. Same action as the up arrow. |
| Ctrl-n | Move to the next history entry. Same action as the down arrow. |
| Alt-< | Move to the beginning (top) of the history list. |
| Alt-> | Move to the end (bottom) of the history list, i.e., the current command line. |
| Ctrl-r | Reverse incremental search. Searches incrementally from the current command line up the history list. |
| Alt-p | Reverse search, non-incremental. With this key, type in the search string and press enter before the search is performed. |
| Alt-n | Forward search, non-incremental. |
| Ctrl-o | Execute the current item in the history list and advance to the next one. This is handy if you are trying to re-execute a sequence of commands in the history list. |
| 按键 | 行为 |
|---|---|
| Ctrl-p | 移动到上一个历史条目。类似于上箭头按键。 |
| Ctrl-n | 移动到下一个历史条目。类似于下箭头按键。 |
| Alt-< | 移动到历史列表开头。 |
| Alt-> | 移动到历史列表结尾,即当前命令行。 |
| Ctrl-r | 反向增量搜索。从当前命令行开始,向上增量搜索。 |
| Alt-p | 反向搜索,非增量搜索。(输入要查找的字符串,按下 Enter来执行搜索)。 |
| Alt-n | 向前搜索,非增量。 |
| Ctrl-o | 执行历史列表中的当前项,并移到下一个。如果你想要执行历史列表中一系列的命令,这很方便。 |
历史命令展开
The shell offers a specialized type of expansion for items in the history list by using the “!” character. We have already seen how the exclamation point can be followed by a number to insert an entry from the history list. There are a number of other expansion features:
通过使用 “!” 字符,shell 为历史列表中的命令,提供了一个特殊的展开类型。我们已经知道一个感叹号 ,其后再加上一个数字,可以把来自历史列表中的命令插入到命令行中。这里还有一些其它的展开特性:
| Sequence | Action |
|---|---|
| !! | Repeat the last command. It is probably easier to press up arrow and enter. |
| !number | Repeat history list item number. |
| !string | Repeat last history list item starting with string. |
| !?string | Repeat last history list item containing string. |
| 序列 | 行为 |
|---|---|
| !! | 重复最后一次执行的命令。可能按下上箭头按键和 enter 键更容易些。 |
| !number | 重复历史列表中第 number 行的命令。 |
| !string | 重复最近历史列表中,以这个字符串开头的命令。 |
| !?string | 重复最近历史列表中,包含这个字符串的命令。 |
I would caution against using the “!string” and “!?string” forms unless you are absolutely sure of the contents of the history list items.
应该小心谨慎地使用 “!string” 和 “!?string” 格式,除非你完全确信历史列表条目的内容。
There are many more elements available in the history expansion mechanism, but this subject is already too arcane and our heads may explode if we continue. The HISTORY EXPANSION section of the bash man page goes into all the gory details. Feel free to explore!
在历史展开机制中,还有许多可利用的特点,但是这个题目已经太晦涩难懂了, 如果我们再继续讨论的话,我们的头可能要爆炸了。bash 手册页的 HISTORY EXPANSION 部分详尽地讲述了所有要素。
script
脚本
In addition to the command history feature in bash, most Linux distributions include a program called script that can be used to record an entire shell session and store it in a file. The basic syntax of the command is:
除了 bash 中的命令历史特性,许多 Linux 发行版包括一个叫做 script 的程序, 这个程序可以记录整个 shell 会话,并把 shell 会话存在一个文件里面。这个命令的基本语法是:
script [file]
where file is the name of the file used for storing the recording. If no file is specified, the file typescript is used. See the script man page for a complete list of the program’s options and features.
命令中的 file 是指用来存储 shell 会话记录的文件名。如果没有指定文件名,则使用文件 typescript。查看脚本的手册页,可以得到一个关于 script 程序选项和特点的完整列表。
总结归纳
In this chapter we have covered some of the keyboard tricks that the shell provides to help hardcore typists reduce their workloads. I suspect that as time goes by and you become more involved with the command line, you will refer back to this chapter to pick up more of these tricks. For now, consider them optional and potentially helpful.
在这一章中,我们已经讨论了一些由 shell 提供的键盘操作技巧,这些技巧是来帮助打字员减少工作量的。 随着时光流逝,你和命令行打交道越来越多,我猜想你会重新翻阅这一章的内容,学会更多的技巧。现在不用一下子全记住。
拓展阅读
The Wikipedia has a good article on computer terminals:
Wikipedia 上有一篇关于计算机终端的好文章:
10 - 10 权限
权限
http://billie66.github.io/TLCL/book/chap10.html
Operating systems in the Unix tradition differ from those in the MS-DOS tradition in that they are not only multitasking systems, but also multi-user systems, as well. What exactly does this mean? It means that more than one person can be using the computer at the same time. While a typical computer will likely have only one keyboard and monitor, it can still be used by more than one user. For example, if a computer is attached to a network or the Internet, remote users can log in via ssh (secure shell) and operate the computer. In fact, remote users can execute graphical applications and have the graphical output appear on a remote display. The X Window System supports this as part of its basic design.
Unix 传统中的操作系统不同于那些 MS-DOS 传统中的系统,区别在于它们不仅是多任务系统,而且也是 多用户系统。这到底意味着什么?它意味着多个用户可以在同一时间使用同一台计算机。然而一个 典型的计算机可能只有一个键盘和一个监视器,但是它仍然可以被多个用户使用。例如,如果一台 计算机连接到一个网络或者因特网,那么远程用户通过 ssh(安全 shell)可以登录并操纵这台电脑。 事实上,远程用户也能运行图形界面应用程序,并且图形化的输出结果会出现在远端的显示器上。 X 窗口系统把这个作为基本设计理念的一部分,并支持这种功能。
The multi-user capability of Linux is not a recent “innovation,” but rather a feature that is deeply embedded into the design of the operating system. Considering the environment in which Unix was created, this makes perfect sense. Years ago, before computers were “personal,” they were large, expensive, and centralized. A typical university computer system, for example, consisted of a large central computer located in one building and terminals which were located throughout the campus, each connected to the large central computer. The computer would support many users at the same time.
Linux 系统的多用户性能,不是最近的“创新”,而是一种深深地嵌入到了 Linux 操作系统的 设计中的特性。想想 Unix 系统的诞生环境,这一点就很好理解了。多年前,在个人电脑出现之前,计算机 都是大型、昂贵的、集中化的。例如一个典型的大学计算机系统,是由坐落在一座建筑中的一台 大型中央计算机和许多散布在校园各处的终端机组成,每个终端都连接到这台大型中央计算机。 这台计算机可以同时支持很多用户。
In order to make this practical, a method had to be devised to protect the users from each other. After all, the actions of one user could not be allowed to crash the computer, nor could one user interfere with the files belonging to another user.
为了使多用户特性付诸实践,那么必须发明一种方法来阻止用户彼此之间受到影响。毕竟,一个 用户的行为不能导致计算机崩溃,也不能乱动属于另一个用户的文件。
In this chapter we are going to look at this essential part of system security and introduce the following commands:
在这一章中,我们将看看这一系统安全的本质部分,会介绍以下命令:
- id – Display user identity
- id – 显示用户身份号
- chmod – Change a file’s mode
- chmod – 更改文件模式
- umask – Set the default file permissions
- umask – 设置默认的文件权限
- su – Run a shell as another user
- su – 以另一个用户的身份来运行 shell
- sudo – Execute a command as another user
- sudo – 以另一个用户的身份来执行命令
- chown – Change a file’s owner
- chown – 更改文件所有者
- chgrp – Change a file’s group ownership
- chgrp – 更改文件组所有权
- passwd – Change a user’s password
- passwd – 更改用户密码
拥有者、组成员和其他人
When we were exploring the system back in Chapter 4, we may have encountered a problem when trying to examine a file such as /etc/shadow:
在第四章探究文件系统时,当我们试图查看一个像/etc/shadow 那样的文件的时候,我们会遇到一个问题。
| |
The reason for this error message is that, as regular users, we do not have permission to read this file.
产生这种错误信息的原因是,作为一个普通用户,我们没有权限来读取这个文件。
In the Unix security model, a user may own files and directories. When a user owns a file or directory, the user has control over its access. Users can, in turn, belong to a group consisting of one or more users who are given access to files and directories by their owners. In addition to granting access to a group, an owner may also grant some set of access rights to everybody, which in Unix terms is referred to as the world. To find out information about your identity, use the id command:
在 Unix 安全模型中,一个用户可能拥有文件和目录。当一个用户拥有一个文件或目录时, 用户对这个文件或目录的访问权限拥有控制权。用户反过来又属于一个由一个或多个 用户组成的用户组,用户组成员由文件和目录的所有者授予对文件和目录的访问权限。除了 对一个用户组授予权限之外,文件所有者可能会给所有的人授权,在 Unix 术语中,”所有的人“ 也被称作“整个世界”( world )。可以用 id 命令,来找到关于你自己身份的信息:
| |
Let’s look at the output. When user accounts are created, users are assigned a number called a user ID or uid which is then, for the sake of the humans, mapped to a user name. The user is assigned a primary group ID or gid and may belong to additional groups. The above example is from a Fedora system. On other systems, such as Ubuntu, the output may look a little different:
让我们看一下输出结果。当用户创建帐户之后,系统会给用户分配一个号码,叫做用户 ID 或者 uid,然后,为了符合人类的习惯,这个 ID 映射到一个用户名。系统又会给这个用户 分配一个原始的组 ID(即 gid)。一个用户可以属于多个组。上面的例子来自于 Fedora 系统, 下面 Ubuntu 的输出结果看起来有点儿不同:
| |
As we can see, the uid and gid numbers are different. This is simply because Fedora starts its numbering of regular user accounts at 500, while Ubuntu starts at 1000. We can also see that the Ubuntu user belongs to a lot more groups. This has to do with the way Ubuntu manages privileges for system devices and services.
正如我们能看到的,两个系统中用户的 uid 和 gid 号码是不同的。原因很简单,因为 Fedora 系统 从500开始进行普通用户帐户的编号,而 Ubuntu 从1000开始。我们也能看到 Ubuntu 的用户属于 更多的用户组。这和 Ubuntu 管理系统设备和服务权限的方式有关系。
So where does this information come from? Like so many things in Linux, from a couple of text files. User accounts are defined in the /etc/passwd file and groups are defined in the /etc/group file. When user accounts and groups are created, these files are modified along with /etc/shadow which holds information about the user’s password. For each user account, the /etc/passwd file defines the user (login) name, uid, gid, the account’s real name, home directory, and login shell. If you examine the contents of /etc/passwd and /etc/group, you will notice that besides the regular user accounts, there are accounts for the superuser (uid 0) and various other system users.
那么这些信息存在哪里呢?像 Linux 系统中的许多东西一样,存到了一系列的文本文件。用户帐户 定义在 /etc/passwd 文件里面,用户组定义在 /etc/group 文件里面。当用户帐户和用户组创建以后, 这些文件随着文件 /etc/shadow 的变动而修改,文件 /etc/shadow 包含了关于用户密码的信息。 对于每个用户帐号,文件 /etc/passwd 定义了用户(登录)名、uid、gid、帐号的真实姓名、家目录 和登录 shell。如果你查看一下文件 /etc/passwd 和文件 /etc/group 的内容,你会注意到除了普通 用户帐号之外,还有超级用户(uid 0)帐号,和各种各样的系统用户。
In the next chapter, when we cover processes, you will see that some of these other “users” are, in fact, quite busy.
在下一章中,当我们讨论进程时,你会知道这些其他的“用户”是谁,实际上,他们相当忙碌。
While many Unix-like systems assign regular users to a common group such as “users”, modern Linux practice is to create a unique, single-member group with the same name as the user. This makes certain types of permission assignment easier.
然而许多像 Unix 的系统会把普通用户分配到一个公共的用户组中,例如 users ,现在的 Linux 会创建一个独一无二的,只有一个成员的用户组,这个用户组与用户同名。这样使某种类型的 权限分配更容易些。
读取、写入和执行
Access rights to files and directories are defined in terms of read access, write access, and execution access. If we look at the output of the ls command, we can get some clue as to how this is implemented:
对于文件和目录的访问权力是根据”读权限“、”写权限“和“执行权限“来定义的。如果我们看一下 ls 命令的输出结果,我们能得到一些线索,这是怎样实现的:
| |
The first ten characters of the listing are the file attributes. The first of these characters is the file type. Here are the file types you are most likely to see (there are other, less common types too):
列表的前十个字符是文件的属性。这十个字符的第一个字符表明文件类型。下表是你可能经常看到 的文件类型(还有其它的,不常见类型):
| Attribute | File Type |
|---|---|
| - | a regular file |
| d | A directory |
| l | A symbolic link. Notice that with symbolic links, the remainning file attributes are always “rwxrwxrwx” and are dummy values. The real file attributes are those of the file the symbolic link points to. |
| c | A character special file. This file type refers to a device that handles data as a stream of bytes, such as a terminal or modem. |
| b | A block special file. This file type refers to a device that handles data in blocks, such as a hard drive or CD-ROM drive. |
| 属性 | 文件类型 |
|---|---|
| - | 一个普通文件 |
| d | 一个目录 |
| l | 一个符号链接。注意对于符号链接文件,剩余的文件属性总是"rwxrwxrwx",而且都是 虚拟值。真正的文件属性是指符号链接所指向的文件的属性。 |
| c | 一个字符设备文件。这种文件类型是指按照字节流来处理数据的设备。 比如说终端机或者调制解调器 |
| b | 一个块设备文件。这种文件类型是指按照数据块来处理数据的设备,例如一个硬盘或者 CD-ROM 盘。 |
The remaining nine characters of the file attributes, called the file mode, represent the read, write, and execute permissions for the file’s owner, the file’s group owner, and everybody else:
剩下的九个字符叫做文件模式,代表着文件所有者、文件组所有者和其他人的读、写和执行权限。
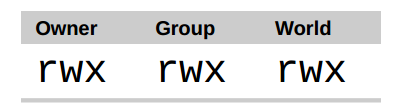 图 1: 权限属性
When set, the r, w, and x mode attributes have the following effect on files and directories:
当设置文件模式后,r、w和x 模式属性对文件和目录会产生以下影响:
| Attribute | Files | Directories |
|---|---|---|
| r | Allows a file to be opened and read. | Allows a directory’s contents to be listed if the execute attribute is also set. |
| w | Allows a file to be written to or truncated, however this attribute does not allow files to be renamed or deleted. The ability to delete or rename files is determined by directory attributes. | Allows files within a directory to be created, deleted, and renamed if the execute attribute is also set. |
| x | Allows a file to be treated as a program and executed. Program files written in scripting languages must also be set as readable to be executed. | Allows a directory to be entered, e.g., cd directory. |
| 属性 | 文件 | 目录 |
|---|---|---|
| r | 允许打开并读取文件内容。 | 允许列出目录中的内容,前提是目录必须设置了可执行属性(x)。 |
| w | 允许写入文件内容或截断文件。但是不允许对文件进行重命名或删除,重命名或删除是由目录的属性决定的。 | 允许在目录下新建、删除或重命名文件,前提是目录必须设置了可执行属性(x)。 |
| x | 允许将文件作为程序来执行,使用脚本语言编写的程序必须设置为可读才能被执行。 | 允许进入目录,例如:cd directory 。 |
Here are some examples of file attribute settings:
下面是权限属性的一些例子:
| File Attributes | Meaning |
|---|---|
| -rwx—— | A regular file that is readable, writable, and executable by the file’s owner. No one else has any access. |
| -rw——- | A regular file that is readable and writable by the file’s owner. No one else has any access. |
| -rw-r–r– | A regular file that is readable and writable by the file’s owner. Members of the file’s owner group may read the file. The file is world-readable. |
| -rwxr-xr-x | A regular file that is readable, writable, and executable by the file’s owner. The file may be read and executed by everybody else. |
| -rw-rw—- | A regular file that is readable and writable by the file’s owner and members of the file’s group owner only. |
| lrwxrwxrwx | A symbolic link. All symbolic links have “dummy” permissions. The real permissions are kept with the actual file pointed to by the symbolic link. |
| drwxrwx— | A directory. The owner and the members of the owner group may enter the directory and, create, rename and remove files within the directory. |
| drwxr-x— | A directory. The owner may enter the directory and create, rename and delete files within the directory. Members of the owner group may enter the directory but cannot create, delete or rename files. |
| 文件属性 | 含义 |
|---|---|
| -rwx—— | 一个普通文件,对文件所有者来说可读、可写、可执行。其他人无法访问。 |
| -rw——- | 一个普通文件,对文件所有者来说可读可写。其他人无法访问。 |
| -rw-r–r– | 一个普通文件,对文件所有者来说可读可写,文件所有者的组成员可以读该文件,其他所有人都可以读该文件。 |
| -rwxr-xr-x | 一个普通文件,对文件所有者来说可读、可写、可执行。也可以被其他的所有人读取和执行。 |
| -rw-rw—- | 一个普通文件,对文件所有者以及文件所有者的组成员来说可读可写。 |
| lrwxrwxrwx | 一个符号链接,符号链接的权限都是虚拟的,真实的权限应该以符号链接指向的文件为准。 |
| drwxrwx— | 一个目录,文件所有者以及文件所有者的组成员可以访问该目录,并且可以在该目录下新建、重命名、删除文件。 |
| drwxr-x— | 一个目录,文件所有者可以访问该目录,并且可以在该目录下新建、重命名、删除文件,文件所有者的组成员可以访问该目录,但是不能新建、重命名、删除文件。 |
chmod - 更改文件模式
To change the mode (permissions) of a file or directory, the chmod command is used. Be aware that only the file’s owner or the superuser can change the mode of a file or directory. chmod supports two distinct ways of specifying mode changes: octal number representation, or symbolic representation. We will cover octal number representation first.
更改文件或目录的模式(权限),可以利用 chmod 命令。注意只有文件的所有者或者超级用户才 能更改文件或目录的模式。chmod 命令支持两种不同的方法来改变文件模式:八进制数字表示法或 符号表示法。首先我们讨论一下八进制数字表示法。
What The Heck Is Octal?
究竟什么是八进制?
Octal (base 8), and its cousin, hexadecimal (base 16) are number systems often used to express numbers on computers. We humans, owing to the fact that we (or at least most of us) were born with ten fingers, count using a base 10 number system. Computers, on the other hand, were born with only one finger and thus do all their counting in binary (base 2). Their number system only has two numerals, zero and one. So in binary, counting looks like this:
八进制(以8为基数)及其亲戚十六进制(以16为基数)都是数字系统,通常 被用来表示计算机中的数字。我们人类,因为(或者至少大多数人)天生有 十个手指的事实,利用以10为基数的数字系统来计数。计算机,从另一方面讲,生来只有一个 手指,因此它以二进制(以2为基数)来计数。它们的数字系统只有两个数值,0和1。 因此在二进制中,计数看起来像这样:
0, 1, 10, 11, 100, 101, 110, 111, 1000, 1001, 1010, 1011…
In octal, counting is done with the numerals zero through seven, like so:
在八进制中,逢八进一,用数字0到7来计数,像这样:
0, 1, 2, 3, 4, 5, 6, 7, 10, 11, 12, 13, 14, 15, 16, 17, 20, 21…
Hexadecimal counting uses the numerals zero through nine plus the letters “A” through “F”:
十六进制中,使用数字0到9,加上大写字母”A”到”F”来计数,逢16进一:
0, 1, 2, 3, 4, 5, 6, 7, 8, 9, A, B, C, D, E, F, 10, 11, 12, 13…
While we can see the sense in binary (since computers only have one finger), what are octal and hexadecimal good for? The answer has to do with human convenience. Many times, small portions of data are represented on computers as bit patterns. Take for example an RGB color. On most computer displays, each pixel is composed of three color components: eight bits of red, eight bits of green, and eight bits of blue. A lovely medium blue would be a twenty-four digit number:
虽然我们能知道二进制的意义(因为计算机只有一个手指),但是八进制和十六进制对什么 有好处呢? 答案是为了人类的便利。许多时候,在计算机中,一小部分数据以二进制的形式表示。 以 RGB 颜色为例来说明。大多数的计算机显示器,每个像素由三种颜色组成:8位红色,8位绿色, 8位蓝色。这样,一种可爱的中蓝色就由24位数字来表示:
010000110110111111001101
How would you like to read and write those kinds of numbers all day? I didn’t think so. Here’s where another number system would help. Each digit in a hexadecimal number represents four digits in binary. In octal, each digit represents three binary digits. So our twenty-four digit medium blue could be condensed down to a six digit hexadecimal number:
我不认为你每天都喜欢读写这类数字。另一种数字系统对我们更有帮助。每个十六进制 数字代表四个二进制。在八进制中,每个数字代表三个二进制数字。那么代表中蓝色的24位 二进制能够压缩成6位十六进制数:
436FCD
Since the digits in the hexadecimal number “line up” with the bits in the binary number we can see that the red component of our color is “43”, the green “6F”, and the blue “CD”.
因为十六进制中的两个数字对应二进制的8位数字,我们可以看到”43“代表红色,“6F” 代表绿色,“CD”代表蓝色。 † These days, hexadecimal notation (often spoken as “hex”) is more common than octal, but as we shall soon see, octal’s ability to express three bits of binary will be very useful…
现在,十六进制表示法(经常叫做“hex”)比八进制更普遍,但是我们很快会看到,用八进制 来表示3个二进制数非常有用处…
With octal notation we use octal numbers to set the pattern of desired permissions. Since each digit in an octal number represents three binary digits, this maps nicely to the scheme used to store the file mode. This table shows what we mean:
通过八进制表示法,我们使用八进制数字来设置所期望的权限模式。因为每个八进制数字代表了 3个二进制数字,这种对应关系,正好映射到用来存储文件模式所使用的方案上。下表展示了 我们所要表达的意思:
| Octal | Binary | File Mode |
|---|---|---|
| 0 | 000 | — |
| 1 | 001 | –x |
| 2 | 010 | -w- |
| 3 | 011 | -wx |
| 4 | 100 | r– |
| 5 | 101 | r-x |
| 6 | 110 | rw- |
| 7 | 111 | rwx |
By using three octal digits, we can set the file mode for the owner, group owner, and world:
通过使用3个八进制数字,我们能够设置文件所有者、用户组和其他人的权限:
| |
By passing the argument “600”, we were able to set the permissions of the owner to read and write while removing all permissions from the group owner and world. Though remembering the octal to binary mapping may seem inconvenient, you will usually only have to use a few common ones: 7 (rwx), 6 (rw-), 5 (r-x), 4 (r–), and 0 (—).
通过传递参数 “600”,我们能够设置文件所有者的权限为读写权限,而删除用户组和其他人的所有 权限。虽然八进制到二进制的映射看起来不方便,但通常只会用到一些常见的映射关系: 7 (rwx),6 (rw-),5 (r-x),4 (r–),和 0 (—)。
chmod also supports a symbolic notation for specifying file modes. Symbolic notation is divided into three parts: who the change will affect, which operation will be performed, and what permission will be set. To specify who is affected, a combination of the characters “u”, “g”, “o”, and “a” is used as follows:
chmod 命令支持一种符号表示法,来指定文件模式。符号表示法分为三部分:更改会影响谁, 要执行哪个操作,要设置哪种权限。通过字符 “u”、“g”、“o”和 “a” 的组合来指定 要影响的对象,如下所示:
| u | Short for “user”, but means the file or directory owner. |
|---|---|
| g | Group owner. |
| o | Short for “others”, but means world. |
| a | Short for “all”, the combination of “u”, “g”, and “o”. |
| u | “user"的简写,意思是文件或目录的所有者。 |
|---|---|
| g | 用户组。 |
| o | “others"的简写,意思是其他所有的人。 |
| a | “all"的简写,是"u”, “g"和“o”三者的联合。 |
If no character is specified, “all” will be assumed. The operation may be a “+” indicating that a permission is to be added, a “-” indicating that a permission is to be taken away, or a “=” indicating that only the specified permissions are to be applied and that all others are to be removed.
如果没有指定字符,则假定使用”all”。执行的操作可能是一个“+”字符,表示加上一个权限, 一个“-”,表示删掉一个权限,或者是一个“=”,表示只有指定的权限可用,其它所有的权限被删除。
Permissions are specified with the “r”, “w”, and “x” characters. Here are some examples of symbolic notation:
权限由 “r”、“w”和 “x” 来指定。这里是一些符号表示法的实例:
| u+x | Add execute permission for the owner. |
|---|---|
| u-x | Remove execute permission from the owner. |
| +x | Add execute permission for the owner, group, and world. Equivalent to a+x. |
| o-rw | Remove the read and write permission from anyone besides the owner and group owner. |
| go=rw | Set the group owner and anyone besides the owner to have read and write permission. If either the group owner or world previously had execute permissions, they are removed. |
| u+x,go=rw | Add execute permission for the owner and set the permissions for the group and others to read and execute. Multiple specifications may be separated by commas. |
| u+x | 为文件所有者添加可执行权限。 |
|---|---|
| u-x | 删除文件所有者的可执行权限。 |
| +x | 为文件所有者,用户组,和其他所有人添加可执行权限。 等价于 a+x。 |
| o-rw | 除了文件所有者和用户组,删除其他人的读权限和写权限。 |
| go=rw | 给文件所属的组和文件所属者/组以外的人读写权限。如果文件所属组或其他人已经拥有执行的权限,执行权限将被移除。 |
| u+x,go=rw | 给文件拥有者执行权限并给组和其他人读和执行的权限。多种设定可以用逗号分开。 |
Some people prefer to use octal notation, some folks really like the symbolic. Symbolic notation does offer the advantage of allowing you to set a single attribute without disturbing any of the others.
一些人喜欢使用八进制表示法,而另一些人则非常喜欢符号表示法。符号表示法的优点是, 允许你设置文件模式的某个属性,而不影响其他的属性。
Take a look at the chmod man page for more details and a list of options. A word of caution regarding the “–recursive” option: it acts on both files and directories, so it’s not as useful as one would hope since, we rarely want files and directories to have the same permissions.
看一下 chmod 命令的手册页,可以得到更详尽的信息和 chmod 命令的各个选项。要注意”--recursive”选项: 它可以同时作用于文件和目录,所以它并不是如我们期望的那么有用处,因为我们很少希望文件和 目录拥有同样的权限。
借助 GUI 来设置文件模式
Now that we have seen how the permissions on files and directories are set, we can better understand the permission dialogs in the GUI. In both Nautilus (GNOME) and Konqueror (KDE), right-clicking a file or directory icon will expose a properties dialog. Here is an example from KDE 3.5:
现在我们已经知道了怎样设置文件和目录的权限,这样我们就可以更好的理解 GUI 中的设置 权限对话框。在 Nautilus (GNOME)和 Konqueror (KDE)中,右击一个文件或目录图标将会弹出一个属性对话框。下面这个例子来自 KDE 3.5:
 图 2: KDE 3.5 文件属性对话框
Here we can see the settings for the owner, group, and world. In KDE, clicking on the “Advanced Permissions” button brings up another dialog that allows you to set each of the mode attributes individually. Another victory for understanding brought to us by the command line!
从这个对话框中,我们看到可以设置文件所有者、用户组和其他人的访问权限。 在 KDE 中,右击”Advanced Permissions”按钮,会打开另一个对话框,这个对话框允许 你单独设置各个模式属性。这也可以通过命令行来理解!
umask - 设置默认权限
The umask command controls the default permissions given to a file when it is created. It uses octal notation to express a mask of bits to be removed from a file’s mode attributes. Let’s take a look:
当创建一个文件时,umask 命令控制着文件的默认权限。umask 命令使用八进制表示法来表达 从文件模式属性中删除一个位掩码。大家看下面的例子:
| |
We first removed any old copy of foo.txt to make sure we were starting fresh. Next, we ran the umask command without an argument to see the current value. It responded with the value 0002 (the value 0022 is another common default value), which is the octal representation of our mask. We next create a new instance of the file foo.txt and observe its permissions.
首先,删除文件 foo.txt,以此确定我们从新开始。下一步,运行不带参数的 umask 命令, 看一下当前的掩码值,数值是0002(0022是另一个常用的默认值),这个数值是掩码的八进制 表示形式。下一步,我们创建文件 foo.txt,看看它的权限。
We can see that both the owner and group both get read and write permission, while everyone else only gets read permission. The reason that world does not have write permission is because of the value of the mask. Let’s repeat our example, this time setting the mask ourselves:
我们可以看到文件所有者和用户组都得到读权限和写权限,而其他人只是得到读权限。 其他人没有得到写权限的原因是由掩码值决定的。重复我们的实验,这次自己设置掩码值:
| |
When we set the mask to 0000 (effectively turning it off), we see that the file is now world writable. To understand how this works, we have to look at octal numbers again. If we take the mask and expand it into binary, then compare it to the attributes we can see what happens:
当掩码设置为0000(实质上是关掉它)之后,我们看到其他人能够读写文件。为了弄明白这是 怎么回事,我们需要看一下掩码的八进制形式。把掩码展开成二进制形式,然后与文件属性 相比较,看看有什么区别:
| Original file mode | — rw- rw- rw- |
|---|---|
| Mask | 000 000 000 010 |
| Result | — rw- rw- r– |
Ignore for the moment the leading zeros (we’ll get to those in a minute) and observe that where the 1 appears in our mask, an attribute was removed—in this case, the world write permission. That’s what the mask does. Everywhere a 1 appears in the binary value of the mask, an attribute is unset. If we look at a mask value of 0022, we can see what it does:
此刻先忽略掉开头的三个零(我们一会儿再讨论),注意掩码中若出现一个数字1,则 删除文件模式中和这个1在相同位置的权限,在这是其他人的写权限。这就是掩码要完成的 任务。掩码的二进制形式中,出现数字1的位置,相应地关掉一个文件模式属性。看一下 掩码0022的作用:
| Original file mode | — rw- rw- rw- |
|---|---|
| Mask | 000 000 010 010 |
| Result | — rw- r– r– |
Again, where a 1 appears in the binary value, the corresponding attribute is unset. Play with some values (try some sevens) to get used to how this works. When you’re done, remember to clean up:
又一次,二进制中数字1出现的位置,相对应的属性被删除。再试一下其它的掩码值(一些带数字7的) ,习惯于掩码的工作原理。当你实验完成之后,要记得清理现场:
| |
Most of the time you won’t have to change the mask; the default provided by your distribution will be fine. In some high-security situations, however, you will want to control it.
大多数情况下,你不必修改掩码值,系统提供的默认掩码值就很好了。然而,在一些高 安全级别下,你要能控制掩码值。
Some Special Permissions
一些特殊权限
Though we usually see an octal permission mask expressed as a three digit number, it is more technically correct to express it in four digits. Why? Because, in addition to read, write, and execute permission, there are some other, less used, permission settings.
虽然我们通常看到一个八进制的权限掩码用三位数字来表示,但是从技术层面上来讲, 用四位数字来表示它更确切些。为什么呢?因为除了读取、写入和执行权限之外,还有 其它较少用到的权限设置。
The first of these is the setuid bit (octal 4000). When applied to an executable file, it sets the effective user ID from that of real user (the user actually running the program) to that of the program’s owner. Most often this is given to a few programs owned by the superuser. When an ordinary user runs a program that is “setuid root” , the program runs with the effective privileges of the superuser. This allows the program to access files and directories that an ordinary user would normally be prohibited from accessing. Clearly, because this raises security concerns, number of setuid programs must be held to an absolute minimum.
其中之一是 setuid 位(八进制4000)。当应用到一个可执行文件时,它把有效用户 ID 从真正的用户(实际运行程序的用户)设置成程序所有者的 ID。这种操作通常会应用到 一些由超级用户所拥有的程序。当一个普通用户运行一个程序,这个程序由根用户(root) 所有,并且设置了 setuid 位,这个程序运行时具有超级用户的特权,这样程序就可以 访问普通用户禁止访问的文件和目录。很明显,因为这会引起安全方面的问题,所有可以 设置 setuid 位的程序个数,必须控制在绝对小的范围内。
The second is the setgid bit (octal 2000) which, like the setuid bit, changes the effective group ID from the real group ID of the user to that of the file owner. If the setgid bit is set on a directory, newly created files in the directory will be given the group ownership of the directory rather the group ownership of the file’s creator. This is useful in a shared directory when members of a common group need access to all the files in the directory, regardless of the file owner’s primary group.
第二个是 setgid 位(八进制2000),这个相似于 setuid 位,把有效用户组 ID 从真正的 用户组 ID 更改为文件所有者的组 ID。如果设置了一个目录的 setgid 位,则目录中新创建的文件 具有这个目录用户组的所有权,而不是文件创建者所属用户组的所有权。对于共享目录来说, 当一个普通用户组中的成员,需要访问共享目录中的所有文件,而不管文件所有者的主用户组时, 那么设置 setgid 位很有用处。
The third is called the sticky bit (octal 1000). This is a holdover from ancient Unix, where it was possible to mark an executable file as “not swappable.” On files, Linux ignores the sticky bit, but if applied to a directory, it prevents users from deleting or renaming files unless the user is either the owner of the directory, the owner of the file, or the superuser. This is often used to control access to a shared directory, such as /tmp.
第三个是 sticky 位(八进制1000)。这个继承于 Unix,在 Unix 中,它可能把一个可执行文件 标志为“不可交换的”。在 Linux 中,会忽略文件的 sticky 位,但是如果一个目录设置了 sticky 位, 那么它能阻止用户删除或重命名文件,除非用户是这个目录的所有者,或者是文件所有者,或是 超级用户。这个经常用来控制访问共享目录,比方说/tmp。
Here are some examples of using chmod with symbolic notation to set these special permissions. First assigning setuid to a program:
这里有一些例子,使用 chmod 命令和符号表示法,来设置这些特殊的权限。首先, 授予一个程序 setuid 权限。
chmod u+s program
Next, assigning setgid to a directory:
下一步,授予一个目录 setgid 权限:
chmod g+s dir
Finally, assigning the sticky bit to a directory:
最后,授予一个目录 sticky 权限:
chmod +t dir
When viewing the output from ls, you can determine the special permissions. Here are some examples. First, a program that is setuid:
当浏览 ls 命令的输出结果时,你可以确认这些特殊权限。这里有一些例子。首先,一个程序被设置为setuid属性:
-rwsr-xr-x
A directory that has the setgid attribute:
具有 setgid 属性的目录:
drwxrwsr-x
A directory with the sticky bit set:
设置了 sticky 位的目录:
drwxrwxrwt
更改身份
At various times, we may find it necessary to take on the identity of another user. Often we want to gain superuser privileges to carry out some administrative task, but it is also possible to “become” another regular user for such things as testing an account. There are three ways to take on an alternate identity:
很多时候,我们会发现很有必要使用另一个用户的身份来执行一些操作。经常地,我们想要得到超级 用户特权,来执行一些管理任务,但是也有可能”变为”另一个普通用户,比如说测试一个帐号。 有三种方式,可以拥有多重身份:
Log out and log back in as the alternate user.
Use the su command.
Use the sudo command.
注销系统并以其他用户身份重新登录系统。
使用 su 命令。
使用 sudo 命令。
We will skip the first technique since we know how to do it and it lacks the convenience of the other two. From within our own shell session, the su command allows you to assume the identity of another user, and either start a new shell session with that user’s IDs, or to issue a single command as that user. The sudo command allows an administrator to set up a configuration file called /etc/sudoers, and define specific commands that particular users are permitted to execute under an assumed identity. The choice of which command to use is largely determined by which Linux distribution you use. Your distribution probably includes both commands, but its configuration will favor either one or the other. We’ll start with su.
我们将跳过第一种方法,因为我们知道怎样使用它,并且它缺乏其它两种方法的方便性。 在我们自己的 shell 会话中,su 命令允许你假定为另一个用户的身份,以这个用户的 ID 启动一个新的 shell 会话,或者是以这个用户的身份来发布一个命令。sudo 命令允许一个管理员 设置一个叫做 /etc/sudoers 的配置文件,并且定义了一些具体命令,允许变身用户 执行这些命令。选择使用哪个命令,很大程度上是由你使用的 Linux 发行版来决定的。 你的发行版可能这两个命令都包含,但系统配置可能会禁用其中一个。我们先介绍 su 命令。
su - 以其他用户身份和组 ID 运行一个 shell
The su command is used to start a shell as another user. The command syntax looks like this:
su 命令用来以另一个用户的身份来启动 shell。这个命令语法看起来像这样:
su [-[l]] [user]
If the “-l” option is included, the resulting shell session is a login shell for the specified user. This means that the user’s environment is loaded and the working directory is changed to the user’s home directory. This is usually what we want. If the user is not specified, the superuser is assumed. Notice that (strangely) the “-l” may be abbreviated “-”, which is how it is most often used. To start a shell for the superuser, we would do this:
如果包含”-l”选项,那么会为指定用户启动一个需要登录的 shell。这意味着会加载此用户的 shell 环境, 并且工作目录会更改到这个用户的家目录。这通常是我们所需要的。如果不指定用户,那么就假定是 超级用户。注意(不可思议地),选项”-l”可以缩写为”-“,这是经常用到的形式。启动超级用户的 shell, 我们可以这样做:
| |
After entering the command, we are prompted for the superuser’s password. If it is successfully entered, a new shell prompt appears indicating that this shell has superuser privileges (the trailing “#” rather than a “$”) and the current working directory is now the home directory for the superuser (normally /root.) Once in the new shell, we can carry out commands as the superuser. When finished, type “exit” to return to the previous shell:
按下回车符之后,shell 提示我们输入超级用户的密码。如果密码输入正确,出现一个新的 shell 提示符, 这表明这个 shell 具有超级用户特权(提示符的末尾字符是”#”而不是”$”),并且当前工作目录是超级用户的家目录 (通常是/root)。一旦进入一个新的 shell,我们能执行超级用户所使用的命令。当工作完成后, 输入”exit”,则返回到原来的 shell:
| |
It is also possible to execute a single command rather than starting a new interactive command by using su this way:
以这样的方式使用 su 命令,也可以只执行单个命令,而不是启动一个新的可交互的 shell:
su -c 'command'
Using this form, a single command line is passed to the new shell for execution. It is important to enclose the command in quotes, as we do not want expansion to occur in our shell, but rather in the new shell:
使用这种模式,命令传递到一个新 shell 中执行。把命令用单引号引起来很重要,因为我们不想 命令在我们的 shell 中展开,但需要在新 shell 中展开。
| |
sudo - 以另一个用户身份执行命令
The sudo command is like su in many ways, but has some important additional capabilities. The administrator can configure sudo to allow an ordinary user to execute commands as a different user (usually the superuser) in a very controlled way. In particular, a user may be restricted to one or more specific commands and no others. Another important difference is that the use of sudo does not require access to the superuser’s password. To authenticate using sudo, the user uses his/her own password. Let’s say, for example, that sudo has been configured to allow us to run a fictitious backup program called “backup_script”, which requires superuser privileges. With sudo it would be done like this:
sudo 命令在很多方面都相似于 su 命令,但是 sudo 还有一些非常重要的功能。管理员能够配置 sudo 命令,从而允许一个普通用户以不同的身份(通常是超级用户),通过一种非常可控的方式 来执行命令。尤其是,只有一个用户可以执行一个或多个特殊命令时,(更体现了 sudo 命令的方便性)。 另一个重要差异是 sudo 命令不要求超级用户的密码。使用 sudo 命令时,用户使用他/她自己的密码 来认证。比如说,例如,sudo 命令经过配置,允许我们运行一个虚构的备份程序,叫做”backup_script”, 这个程序要求超级用户权限。通过 sudo 命令,这个程序会像这样运行:
| |
After entering the command, we are prompted for our password (not the superuser’s) and once the authentication is complete, the specified command is carried out. One important difference between su and sudo is that sudo does not start a new shell, nor does it load another user’s environment. This means that commands do not need to be quoted any differently than they would be without using sudo. Note that this behavior can be overridden by specifying various options. See the sudo man page for details.
按下回车键之后,shell 提示我们输入我们的密码(不是超级用户的)。一旦认证完成,则执行 具体的命令。su 和 sudo 之间的一个重要区别是 sudo 不会重新启动一个 shell,也不会加载另一个 用户的 shell 运行环境。这意味者命令不必用单引号引起来。注意通过指定各种各样的选项,这 种行为可以被推翻。详细信息,阅读 sudo 手册页。
To see what privileges are granted by sudo, use the “-l” option to list them:
想知道 sudo 命令可以授予哪些权限,使用”-l”选项,列出所有权限:
| |
Ubuntu And sudo
Ubuntu 与 sudo
One of the recurrent problems for regular users is how to perform certain tasks that require superuser privileges. These tasks include installing and updating software, editing system configuration files, and accessing devices. In the Windows world, this is often done by giving users administrative privileges. This allows users to perform these tasks. However, it also enables programs executed by the user to have the same abilities. This is desirable in most cases, but it also permits malware (malicious software) such as viruses to have free reign of the computer.
普通用户经常会遇到这样的问题,怎样完成某些需要超级用户权限的任务。这些任务 包括安装和更新软件,编辑系统配置文件,和访问设备。在 Windows 世界里,这些任务是 通过授予用户管理员权限来完成的。这允许用户执行这些任务。然而,这也会导致用户所 执行的程序拥有同样的能力。在大多数情况下,这是我们所期望的,但是它也允许 malware (恶意软件),比方说电脑病毒,自由地支配计算机。
In the Unix world, there has always been a larger division between regular users and administrators, owing to the multi-user heritage of Unix. The approach taken in Unix is to grant superuser privileges only when needed. To do this, the su and sudo commands are commonly used.
在 Unix 世界中,由于 Unix 是多用户系统,所以在普通用户和管理员之间总是存在很大的 差别。Unix 采取的方法是只有在需要的时候,才授予普通用户超级用户权限。这样,普遍会 用到 su 和 sudo 命令。
Up until a couple of years ago, most Linux distributions relied on su for this purpose. su didn’t require the configuration that sudo required, and having a root account is traditional in Unix. This introduced a problem. Users were tempted to operate as root unnecessarily. In fact, some users operated their systems as the root user exclusively, since it does away with all those annoying “permission denied” messages. This is how you reduce the security of a Linux system to that of a Windows system. Not a good idea.
几年前,大多数的 Linux 发行版都依赖于 su 命令,来达到目的。su 命令不需要 sudo 命令 所要求的配置,su 命令拥有一个 root 帐号,是 Unix 中的传统。但这会引起问题。所有用户 会企图以 root 用户帐号来操纵系统。事实上,一些用户专门以 root 用户帐号来操作系统, 因为这样做,的确消除了所有那些讨厌的“权限被拒绝”的消息。你这样做就会使得 Linux 系统的 安全性能被降低到和 Windows 系统相同的级别。不是一个好主意。
When Ubuntu was introduced, its creators took a different tack. By default, Ubuntu disables logins to the root account (by failing to set a password for the account), and instead uses sudo to grant superuser privileges. The initial user account is granted full access to superuser privileges via sudo and may grant similar powers to subsequent user accounts.
当引进 Ubuntu 的时候,它的创作者们采取了不同的策略。默认情况下,Ubuntu 不允许用户登录 到 root 帐号(因为不能为 root 帐号设置密码),而是使用 sudo 命令授予普通用户超级用户权限。 通过 sudo 命令,最初的用户可以拥有超级用户权限,也可以授予随后的用户帐号相似的权力。
chown - 更改文件所有者和用户组
The chown command is used to change the owner and group owner of a file or directory. Superuser privileges are required to use this command. The syntax of chown looks like this:
chown 命令被用来更改文件或目录的所有者和用户组。使用这个命令需要超级用户权限。chown 命令 的语法看起来像这样:
chown [owner][:[group]] file...
chown can change the file owner and/or the file group owner depending on the first argument of the command. Here are some examples:
chown 可以根据这个命令的第一个参数更改文件所有者和/或文件用户组。这里有 一些例子:
| Argument | Results |
|---|---|
| bob | Changes the ownership of the file from its current owner to user bob. |
| bob:users | Changes the ownership of the file from its current owner to user bob and changes the file group owner to group users. |
| :admins | Changes the group owner to the group admins. The file owner is unchanged. |
| bob: | Change the file owner from the current owner to user bob and changes the group owner to the login group of user bob. |
| 参数 | 结果 |
|---|---|
| bob | 把文件所有者从当前属主更改为用户 bob。 |
| bob:users | 把文件所有者改为用户 bob,文件用户组改为用户组 users。 |
| :admins | 把文件用户组改为组 admins,文件所有者不变。 |
| bob: | 文件所有者改为用户 bob,文件用户组改为用户 bob 登录系统时所属的用户组。 |
Let’s say that we have two users; janet, who has access to superuser privileges and tony, who does not. User janet wants to copy a file from her home directory to the home directory of user tony. Since user janet wants tony to be able to edit the file, janet changes the ownership of the copied file from janet to tony:
比方说,我们有两个用户,janet 拥有超级用户访问权限,而 tony 没有。用户 janet 想要从 她的家目录复制一个文件到用户 tony 的家目录。因为用户 janet 想要 tony 能够编辑这个文件, janet 把这个文件的所有者更改为 tony:
[janet@linuxbox ~]$ sudo cp myfile.txt ~tony
Password:
[janet@linuxbox ~]$ sudo ls -l ~tony/myfile.txt
-rw-r--r-- 1 root root 8031 2008-03-20 14:30 /home/tony/myfile.txt
[janet@linuxbox ~]$ sudo chown tony: ~tony/myfile.txt
[janet@linuxbox ~]$ sudo ls -l ~tony/myfile.txt
-rw-r--r-- 1 tony tony 8031 2008-03-20 14:30 /home/tony/myfile.txt
Here we see user janet copy the file from her directory to the home directory of user tony. Next, janet changes the ownership of the file from root (a result of using sudo) to tony. Using the trailing colon in the first argument, janet also changed the group ownership of the file to the login group of tony, which happens to be group tony.
这里,我们看到用户 janet 把文件从她的目录复制到 tony 的家目录。下一步,janet 把文件所有者 从 root(使用 sudo 命令的原因)改到 tony。通过在第一个参数中使用末尾的”:”字符,janet 同时把 文件用户组改为 tony 登录系统时,所属的用户组,碰巧是用户组 tony。
Notice that after the first use of sudo, janet was not prompted for her password? This is because sudo, in most configurations, “trusts” you for several minutes until its timer runs out.
注意,第一次使用 sudo 命令之后,为什么(shell)没有提示 janet 输入她的密码?这是因为,在 大多数的配置中,sudo 命令会相信你几分钟,直到计时结束。
chgrp - 更改用户组所有权
In older versions of Unix, the chown command only changed file ownership, not group ownership. For that purpose, a separate command, chgrp was used. It works much the same way as chown, except for being more limited.
在旧版 Unix 系统中,chown 命令只能更改文件所有权,而不是用户组所有权。为了达到目的, 使用一个独立的命令,chgrp 来完成。除了限制多一点之外,chgrp 命令与 chown 命令使用起来很相似。
练习使用权限
Now that we have learned how this permissions thing works, it’s time to show it off. We are going to demonstrate the solution to a common problem — setting up a shared directory. Let’s imagine that we have two users named “bill” and “karen.” They both have music CD collections and wish to set up a shared directory, where they will each store their music files as Ogg Vorbis or MP3. User bill has access to superuser privileges via sudo.
到目前为止,我们已经知道了权限这类东西是怎样工作的,现在是时候炫耀一下了。我们 将展示一个常见问题的解决方案,这个问题是如何设置一个共享目录。假想我们有两个用户, 他们分别是 “bill” 和 “karen”。他们都有音乐 CD 收藏品,也愿意设置一个共享目录,在这个 共享目录中,他们分别以 Ogg Vorbis 或 MP3 的格式来存储他们的音乐文件。通过 sudo 命令, 用户 bill 具有超级用户访问权限。
The first thing that needs to happen is creating a group that will have both bill and karen as members. Using the graphical user management tool, bill creates a group called music and adds users bill and karen to it:
我们需要做的第一件事,是创建一个以 bill 和 karen 为成员的用户组。使用图形化的用户管理工具, bill 创建了一个叫做 music 的用户组,并且把用户 bill 和 karen 添加到用户组 music 中:
 图 3: 用 GNOME 创建一个新的用户组
Next, bill creates the directory for the music files:
下一步,bill 创建了存储音乐文件的目录:
[bill@linuxbox ~]$ sudo mkdir /usr/local/share/Music
password:
Since bill is manipulating files outside his home directory, superuser privileges are required. After the directory is created, it has the following ownerships and permissions:
因为 bill 正在他的家目录之外操作文件,所以需要超级用户权限。这个目录创建之后,它具有 以下所有权和权限:
[bill@linuxbox ~]$ ls -ld /usr/local/share/Music
drwxr-xr-x 2 root root 4096 2008-03-21 18:05 /usr/local/share/Music
As we can see, the directory is owned by root and has 755 permissions. To make this directory sharable, bill needs to change the group ownership and the group permissions to allow writing:
正如我们所见到的,这个目录由 root 用户拥有,并且具有权限755。为了使这个目录共享,允许(用户 karen)写入,bill 需要更改目录用户组所有权和权限:
[bill@linuxbox ~]$ sudo chown :music /usr/local/share/Music
[bill@linuxbox ~]$ sudo chmod 775 /usr/local/share/Music
[bill@linuxbox ~]$ ls -ld /usr/local/share/Music
drwxrwxr-x 2 root music 4096 2008-03-21 18:05 /usr/local/share/Music
So what does this all mean? It means that we now have a directory, /usr/local/share/Music that is owned by root and allows read and write access to group music. Group music has members bill and karen, thus bill and karen can create files in directory /usr/local/share/Music. Other users can list the contents of the directory but cannot create files there.
那么这是什么意思呢? 它的意思是,现在我们拥有一个目录,/usr/local/share/Music,这个目录由 root 用户拥有,并且 允许用户组 music 读取和写入。用户组 music 有两个成员 bill 和 karen,这样 bill 和 karen 能够在目录 /usr/local/share/Music 中创建文件。其他用户能够列出目录中的内容,但是不能在其中创建文件。
But we still have a problem. With the current permissions, files and directories created within the Music directory will have the normal permissions of the users bill and karen:
但是我们仍然会遇到问题。通过我们目前所拥有的权限,在 Music 目录中创建的文件,只具有用户 bill 和 karen 的普通权限:
[bill@linuxbox ~]$ > /usr/local/share/Music/test_file
[bill@linuxbox ~]$ ls -l /usr/local/share/Music
-rw-r--r-- 1 bill bill 0 2008-03-24 20:03 test_file
Actually there are two problems. First, the default umask on this system is 0022 which prevents group members from writing files belonging to other members of the group. This would not be a problem if the shared directory only contained files, but since this directory will store music, and music is usually organized in a hierarchy of artists and albums, members of the group will need the ability to create files and directories inside directories created by other members. We need to change the umask used by bill and karen to 0002 instead.
实际上,存在两个问题。第一个,系统中默认的掩码值是0022,这会禁止用户组成员编辑属于同 组成员的文件。如果共享目录中只包含文件,这就不是个问题,但是因为这个目录将会存储音乐, 通常音乐会按照艺术家和唱片的层次结构来组织分类。所以用户组成员需要在同组其他成员创建的 目录中创建文件和目录。我们将把用户 bill 和 karen 使用的掩码值改为0002。
Second, each file and directory created by one member will be set to the primary group of the user rather than the group music. This can be fixed by setting the setgid bit on the directory:
第二个问题是,用户组成员创建的文件和目录的用户组,将会设置为用户的主要组,而不是用户组 music。 通过设置此目录的 setgid 位来解决这个问题:
[bill@linuxbox ~]$ sudo chmod g+s /usr/local/share/Music
[bill@linuxbox ~]$ ls -ld /usr/local/share/Music
drwxrwsr-x 2 root music 4096 2008-03-24 20:03 /usr/local/share/Music
Now we test to see if the new permissions fix the problem. bill sets his umask to 0002, removes the previous test file, creates a new test file and directory:
现在测试一下,看看是否新的权限解决了这个问题。bill 把他的掩码值设为0002,删除 先前的测试文件,并创建了一个新的测试文件和目录:
[bill@linuxbox ~]$ umask 0002
[bill@linuxbox ~]$ rm /usr/local/share/Music/test_file
[bill@linuxbox ~]$ > /usr/local/share/Music/test_file
[bill@linuxbox ~]$ mkdir /usr/local/share/Music/test_dir
[bill@linuxbox ~]$ ls -l /usr/local/share/Music
drwxrwsr-x 2 bill music 4096 2008-03-24 20:24 test_dir
-rw-rw-r-- 1 bill music 0 2008-03-24 20:22 test_file
[bill@linuxbox ~]$
Both files and directories are now created with the correct permissions to allow all members of the group music to create files and directories inside the Music directory.
现在,创建的文件和目录都具有正确的权限,允许用户组 music 的所有成员在目录 Music 中创建 文件和目录。
The one remaining issue is umask. The necessary setting only lasts until the end of session and must be reset. In the next part of the book, we’ll look at making the change to umask permanent.
剩下一个问题是关于 umask 命令的。umask 命令设置的掩码值只能在当前 shell 会话中生效,若当前 shell 会话结束后,则必须重新设置。在这本书的第三部分,我们将看一下,怎样使掩码值永久生效。
更改用户密码
The last topic we’ll cover in this chapter is setting passwords for yourself (and for other users if you have access to superuser privileges.) To set or change a password, the passwd command is used. The command syntax looks like this:
这一章最后一个话题,我们将讨论自己帐号的密码(和其他人的密码,如果你具有超级用户权限)。 使用 passwd 命令,来设置或更改用户密码。命令语法如下所示:
passwd [user]
To change your password, just enter the passwd command. You will be prompted for your old password and your new password:
只要输入 passwd 命令,就能更改你的密码。shell 会提示你输入你的旧密码和你的新密码:
| |
The passwd command will try to enforce use of “strong” passwords. This means the it will refuse to accept passwords that are too short, too similar to previous passwords, are dictionary words, or too easily guessed:
passwd 命令将会试着强迫你使用“强”密码。这意味着它会拒绝接受太短的密码、与先前相似的密码、 字典中的单词作为密码或者是太容易猜到的密码:
| |
If you have superuser privileges, you can specify a user name as an argument to the passwd command to set the password for another user. There are other options available to the superuser to allow account locking, password expiration, etc. See the passwd man page for details.
如果你具有超级用户权限,你可以指定一个用户名作为 passwd 命令的参数,这样可以设置另一个 用户的密码。还有其它的 passwd 命令选项对超级用户有效,允许帐号锁定,密码失效,等等。 详细内容,参考 passwd 命令的手册页。
拓展阅读
Wikipedia has a good article on malware:
Wikipedia 上面有一篇关于 malware(恶意软件)好文章:
There are number of command line programs used to create and maintain users and groups. For more information, see the man pages for the following commands:
还有一系列的命令行程序,可以用来创建和维护用户和用户组。更多信息,查看以下命令的手册页:
- adduser
- useradd
- groupadd
11 - 11 进程
进程
http://billie66.github.io/TLCL/book/chap11.html
Modern operating systems are usually multitasking, meaning that they create the illusion of doing more than one thing at once by rapidly switching from one executing program to another. The Linux kernel manages this through the use of processes. Processes are how Linux organizes the different programs waiting for their turn at the CPU.
通常,现在的操作系统都支持多任务,意味着操作系统通过在一个执行中的程序和另一个 程序之间快速地切换造成了一种它同时能够做多件事情的假象。Linux 内核通过使用进程来 管理多任务。进程,就是 Linux 组织安排正在等待使用 CPU 的各种程序的方式。
Sometimes a computer will become sluggish or an application will stop responding. In this chapter, we will look at some of the tools available at the command line that let us examine what programs are doing, and how to terminate processes that are misbehaving.
有时候,计算机变得呆滞,运行缓慢,或者一个应用程序停止响应。在这一章中,我们将看一些 可用的命令行工具,这些工具帮助我们查看程序的执行状态,以及怎样终止行为不当的进程。
This chapter will introduce the following commands:
这一章将介绍以下命令:
- ps– Report a snapshot of current processes
- top – Display tasks
- jobs – List active jobs
- bg – Place a job in the background
- fg – Place a job in the foreground
- kill – Send a signal to a process
- killall – Kill processes by name
- shutdown – Shutdown or reboot the system
- ps – 报告当前进程快照
- top – 显示任务
- jobs – 列出活跃的任务
- bg – 把一个任务放到后台执行
- fg – 把一个任务放到前台执行
- kill – 给一个进程发送信号
- killall – 杀死指定名字的进程
- shutdown – 关机或重启系统
进程是怎样工作的
When a system starts up, the kernel initiates a few of its own activities as processes and launches a program called init. init, in turn, runs a series of shell scripts (located in /etc) called init scripts, which start all the system services. Many of these services are implemented as daemon programs, programs that just sit in the background and do their thing without having any user interface. So even if we are not logged in, the system is at least a little busy performing routine stuff.
当系统启动的时候,内核先把一些它自己的活动初始化为进程,然后运行一个叫做 init 的程序。init, 依次地,再运行一系列的称为 init 脚本的 shell 脚本(位于 /etc ),它们可以启动所有的系统服务。 其中许多系统服务以守护进程(daemon)的形式实现,守护进程仅在后台运行,没有任何用户接口(User Interface)。 即使我们没有登录系统,系统也在执行一些例行事务。
The fact that a program can launch other programs is expressed in the process scheme as a parent process producing a child process.
从进程的角度而言,一个程序启动另一个程序可以被表述为一个父进程可以产生一个子进程。
The kernel maintains information about each process to help keep things organized. For example, each process is assigned a number called a process ID or PID. PIDs are assigned in ascending order, with init always getting PID 1. The kernel also keeps track of the memory assigned to each process, as well as the processes’ readiness to resume execution. Like files, processes also have owners and user IDs, effective user IDs, etc.
内核维护每个进程的信息,以此来保持事情有序。例如,系统分配给每个进程一个数字,这个数字叫做 进程(process) ID 或 PID。PID 号按升序分配,init 进程的 PID 总是1。内核也对分配给每个进程的内存和就绪状态进行跟踪以便继续执行这个进程。 像文件一样,进程也有所有者和用户 ID,有效用户 ID,等等。
查看进程
The most commonly used command to view processes (there are several) is ps. The ps program has a lot of options, but in it simplest form it is used like this:
查看进程,最常使用地命令(有几个命令)是 ps(process status)。ps 程序有许多选项,它最简单地使用形式是这样的:
| |
The result in this example lists two processes, process 5198 and process 10129, which are bash and ps respectively. As we can see, by default, ps doesn’t show us very much, just the processes associated with the current terminal session. To see more, we need to add some options, but before we do that, let’s look at the other fields produced by ps. TTY is short for “Teletype,” and refers to the controlling terminal for the process. Unix is showing its age here. The TIME field is the amount of CPU time consumed by the process. As we can see, neither process makes the computer work very hard.
上例中,列出了两个进程,进程 5198 和进程 10129,各自代表命令 bash 和 ps。正如我们所看到的, 默认情况下,ps 不会显示很多进程信息,只是列出与当前终端会话相关的进程。为了得到更多信息, 我们需要加上一些选项,但是在这样做之前,我们先看一下 ps 命令运行结果的其它字段。 TTY 是 “Teletype”(直译电传打字机) 的简写,是指进程的控制终端。TTY 体现了 Unix 的年代久远。TIME 字段表示 进程所消耗的 CPU 时间数量。正如我们所看到的,这两个进程使计算机工作起来很轻松。
If we add an option, we can get a bigger picture of what the system is doing:
如果给 ps 命令加上选项,我们可以得到更多关于系统运行状态的信息:
| |
Adding the “x” option (note that there is no leading dash) tells ps to show all of our processes regardless of what terminal (if any) they are controlled by. The presence of a “?” in the TTY column indicates no controlling terminal. Using this option, we see a list of every process that we own.
加上 “x” 选项(注意没有开头的 “-“ 字符),告诉 ps 命令,展示所有进程,不管它们由什么 终端(如果有的话)控制。在 TTY 一栏中出现的 “?” ,表示没有控制终端。使用这个 “x” 选项,可以 看到我们所拥有的每个进程的信息。
Since the system is running a lot of processes, ps produces a long list. It is often helpful to pipe the output from ps into less for easier viewing. Some option combinations also produce long lines of output, so maximizing the terminal emulator window may be a good idea, too.
因为系统中正运行着许多进程,所以 ps 命令的输出结果很长。为了方便查看,将 ps 的输出管道 到 less 中通常很有帮助。一些选项组合也会产生很长的输出结果,所以最大化 终端仿真器窗口可能也是一个好主意。
A new column titled STAT has been added to the output. STAT is short for “state” and reveals the current status of the process:
输出结果中,新添加了一栏,标题为 STAT 。STAT 是 “state” 的简写,它揭示了进程当前状态:
| State | Meaning |
|---|---|
| R | Running. This means that the process is running or ready to run. |
| S | Sleeping. A process is not running; rather, it is waiting for an event, such as a keystroke or network packet. |
| D | Uninterruptible Sleep. Process is waiting for I/O such as a disk drive. |
| T | Stopped. Process has been instructed to stop. More on this later. |
| Z | A defunct or “zombie” process. This is a child process that has terminated, but has not been cleaned up by its parent. |
| < | A high priority process. It’s possible to grant more importance to a process, giving it more time on the CPU. This property of a process is called niceness. A process with high priority is said to be less nice because it’s taking more of the CPU’s time, which leaves less for everybody else. |
| N | A low priority process. A process with low priority (a “nice” process) will only get processor time after other processes with higher priority have been serviced. |
| 状态 | 含义 |
|---|---|
| R | 运行中。这意味着,进程正在运行或准备运行。 |
| S | 正在睡眠。进程没有运行,而是,正在等待一个事件, 比如说,一个按键或者网络分组。 |
| D | 不可中断睡眠。进程正在等待 I/O,比方说,一个磁盘驱动器的 I/O。 |
| T | 已停止. 已经指示进程停止运行。稍后介绍更多。 |
| Z | 一个死进程或“僵尸”进程。这是一个已经终止的子进程,但是它的父进程还没有清空它。 (父进程没有把子进程从进程表中删除) |
| < | 一个高优先级进程。这可能会授予一个进程更多重要的资源,给它更多的 CPU 时间。 进程的这种属性叫做 niceness。具有高优先级的进程据说是不好的(less nice), 因为它占用了比较多的 CPU 时间,这样就给其它进程留下很少时间。 |
| N | 低优先级进程。 一个低优先级进程,只有当其它高优先级进程被服务了之后,才会得到处理器时间。 |
The process state may be followed by other characters. These indicate various exotic process characteristics. See the ps man page for more detail.
进程状态信息之后,可能还跟随其他的字符,来表示各种外来进程的特性。详细信息请看 ps 手册页。
Another popular set of options is “aux” (without a leading dash). This gives us even more information:
另一个流行的选项组合是 “aux”(不带开头的”-“字符)。这会给我们更多信息:
| |
This set of options displays the processes belonging to every user. Using the options without the leading dash invokes the command with “BSD style” behavior. The Linux version of ps can emulate the behavior of the ps program found in several different Unix implementations. With these options, we get these additional columns:
这个选项组合,能够显示属于每个用户的进程信息。使用这个选项,可以唤醒 “BSD 风格” 的输出结果。 Linux 版本的 ps 命令,可以模拟几个不同 Unix 版本中的 ps 程序的行为。通过这些选项,我们得到 这些额外的列。
| Header | Meaning |
|---|---|
| USER | User ID. This is the owner of the process. |
| %CPU | CPU usage in percent |
| %MEM | Memory usage in percent |
| VSZ | Virtual memory size |
| RSS | Resident Set Size. The amount of physical memory (RAM) the process is using in kilobytes. |
| START | Time when the process started. For values over twenty four hours, a date is used. |
| 标题 | 含义 |
|---|---|
| USER | 用户 ID. 进程的所有者。 |
| %CPU | 以百分比表示的 CPU 使用率 |
| %MEM | 以百分比表示的内存使用率 |
| VSZ | 虚拟内存大小 |
| RSS | 进程占用的物理内存的大小,以千字节为单位。 |
| START | 进程启动的时间。若它的值超过24小时,则用天表示。 |
用 top 命令动态查看进程
While the ps command can reveal a lot about what the machine is doing, it provides only a snapshot of the machine’s state at the moment the ps command is executed. To see a more dynamic view of the machine’s activity, we use the top command:
虽然 ps 命令能够展示许多计算机运行状态的信息,但是它只是提供 ps 命令执行时刻的机器状态快照。 为了看到更多动态的信息,我们使用 top 命令:
| |
The top program displays a continuously updating (by default, every 3 seconds) display of the system processes listed in order of process activity. The name “top” comes from the fact that the top program is used to see the “top” processes on the system. The top display consists of two parts: a system summary at the top of the display, followed by a table of processes sorted by CPU activity:
top 程序以进程活动顺序显示连续更新的系统进程列表。(默认情况下,每三秒钟更新一次),”top”这个名字 来源于 top 程序是用来查看系统中“顶端”进程的。top 显示结果由两部分组成: 最上面是系统概要,下面是进程列表,以 CPU 的使用率排序。
top - 14:59:20 up 6:30, 2 users, load average: 0.07, 0.02, 0.00
Tasks: 109 total, 1 running, 106 sleeping, 0 stopped, 2 zombie
Cpu(s): 0.7%us, 1.0%sy, 0.0%ni, 98.3%id, 0.0%wa, 0.0%hi, 0.0%si
Mem: 319496k total, 314860k used, 4636k free, 19392k buff
Swap: 875500k total, 149128k used, 726372k free, 114676k cach
PID USER PR NI VIRT RES SHR S %CPU %MEM TIME+ COMMAND
6244 me 39 19 31752 3124 2188 S 6.3 1.0 16:24.42 trackerd
....
The system summary contains a lot of good stuff. Here’s a rundown:
其中系统概要包含许多有用信息。下表是对系统概要的说明:
| Row | Field | Meaning |
|---|---|---|
| 1 | top | Name of the program |
| 14:59:20 | Current time of day. | |
| up 6:30 | This is called uptime. It is the amount of time since the machine was last booted. In this example, the system has been up for six and a half hours. | |
| 2 users | There are two users logged in. | |
| load average: | Load average refers to the number of processes that are waiting to run, that is, the number of processes that are in a runnable state and are sharing the CPU. Three values are shown, each for a different period of time. The first is the average for the last 60 seconds, the next the previous 5 minutes, and finally the previous 15 minutes. Values under 1.0 indicate that the machine is not busy. | |
| 2 | Tasks: | This summarizes the number of processes and their various process states. |
| 3 | Cpu(s): | This row describes the character of the activities that the CPU is performing. |
| 0.7%us | 0.7% of the CPU is being used for user processes. This means processes outside of the kernel itself. | |
| 1.0%sy | 1.0% of the CPU is being used for system (kernel) processes. | |
| 0.0%ni | 0.0% of the CPU is being used by “nice” (low priority) processes. | |
| 98.3%id | 98.3% of the CPU is idle. | |
| 0.0%wa | 0.0% of the CPU is waiting for I/O. | |
| 4 | Mem: | Shows how physical RAM is being used. |
| 5 | Swap: | Shows how swap space (virtual memory) is being used. |
| 行号 | 字段 | 意义 |
|---|---|---|
| 1 | top | 程序名。 |
| 14:59:20 | 当前时间。 | |
| up 6:30 | 这是正常运行时间。它是计算机从上次启动到现在所运行的时间。 在这个例子里,系统已经运行了六个半小时。 | |
| 2 users | 有两个用户登录系统。 | |
| load average: | 加载平均值是指,等待运行的进程数目,也就是说,处于可以运行状态并共享 CPU 的进程个数。 这里展示了三个数值,每个数值对应不同的时间段。第一个是最后60秒的平均值, 下一个是前5分钟的平均值,最后一个是前15分钟的平均值。若平均值低于1.0,则指示计算机 工作不忙碌。 | |
| 2 | Tasks: | 总结了进程数目和这些进程的各种状态。 |
| 3 | Cpu(s): | 这一行描述了 CPU 正在进行的活动的特性。 |
| 0.7%us | 0.7% 的 CPU 被用于用户进程。这意味着进程在内核之外。 | |
| 1.0%sy | 1.0%的 CPU 时间被用于系统(内核)进程。 | |
| 0.0%ni | 0.0%的 CPU 时间被用于低优先级进程。 | |
| 98.3%id | 98.3%的 CPU 时间是空闲的。 | |
| 0.0%wa | 0.0%的 CPU 时间来等待 I/O。 | |
| 4 | Mem: | 展示物理内存的使用情况。 |
| 5 | Swap: | 展示交换分区(虚拟内存)的使用情况。 |
The top program accepts a number of keyboard commands. The two most interesting are h, which displays the program’s help screen, and q, which quits top.
top 程序接受一系列从键盘输入的命令。两个最有趣的命令是 h 和 q。h,显示程序的帮助屏幕,q, 退出 top 程序。
Both major desktop environments provide graphical applications that display information similar to top (in much the same way that Task Manager in Windows works), but I find that top is better than the graphical versions because it is faster and it consumes far fewer system resources. After all, our system monitor program shouldn’t be the source of the system slowdown that we are trying to track.
两个主要的桌面环境都提供了图形化应用程序,来显示与 top 程序相似的信息 (和 Windows 中的任务管理器类似),但是我觉得 top 程序要好于图形化的版本, 因为它运行速度快,并且消费很少的系统资源。总不至于因为启动了监控界面,让那被监控的系统都变慢。
控制进程
Now that we can see and monitor processes, let’s gain some control over them. For our experiments, we’re going to use a little program called xlogo as our guinea pig. The xlogo program is a sample program supplied with the X Window System (the underlying engine that makes the graphics on our display go) which simply displays a re- sizable window containing the X logo. First, we’ll get to know our test subject:
现在我们可以看到和监测进程,让我们得到一些对它们的控制权。为了我们的实验,我们将使用 一个叫做 xlogo 的小程序,作为我们的实验品。这个 xlogo 程序是 X 窗口系统 (使图形界面显示在屏幕上的底层引擎)提供的示例程序,这个程序仅显示一个大小可调的 包含 X 标志的窗口。首先,我们需要知道测试的实验对象:
| |
After entering the command, a small window containing the logo should appear somewhere on the screen. On some systems, xlogo may print a warning message, but it may be safely ignored.
命令执行之后,一个包含 X 标志的小窗口应该出现在屏幕的某个位置上。在一些系统中,xlogo 命令 会打印一条警告信息,但是不用理会它。
Tip: If your system does not include the xlogo program, try using gedit or kwrite instead.
小贴士:如果你的系统不包含 xlogo 程序,试着用 gedit 或者 kwrite 来代替。
We can verify that xlogo is running by resizing its window. If the logo is redrawn in the new size, the program is running.
通过调整它的窗口大小,我们能够证明 xlogo 程序正在运行。如果这个标志以新的尺寸被重画, 则这个程序正在运行。
Notice how our shell prompt has not returned? This is because the shell is waiting for the program to finish, just like all the other programs we have used so far. If we close the xlogo window, the prompt returns.
注意,为什么我们的 shell 提示符还没有返回?这是因为 shell 正在等待这个程序结束, 就像到目前为止我们用过的其它所有程序一样。如果我们关闭 xlogo 窗口,shell 提示符就返回了。
中断一个进程
Let’s observe what happens when we run xlogo again. First, enter the xlogo command and verify that the program is running. Next, return to the terminal window and type Ctrl-c.
我们再运行 xlogo 程序一次,观察一下发生了什么事。首先,执行 xlogo 命令,并且 证实这个程序正在运行。下一步,回到终端窗口,按下 Ctrl-c。
| |
In a terminal, typing Ctrl-c, interrupts a program. This means that we politely asked the program to terminate. After typing Ctrl-c, the xlogo window closed and the shell prompt returned.
在一个终端中,输入 Ctrl-c,中断一个程序。这意味着,我们礼貌地要求终止这个程序。 输入 Ctrl-c 之后,xlogo 窗口关闭,shell 提示符返回。
Many (but not all) command line programs can be interrupted by using this technique.
通过这个技巧,许多(但不是全部)命令行程序可以被中断。
把一个进程放置到后台(执行)
Let’s say we wanted to get the shell prompt back without terminating the xlogo program. We’ll do this by placing the program in the background. Think of the terminal as having a foreground (with stuff visible on the surface like the shell prompt) and a background (with hidden stuff behind the surface.) To launch a program so that it is immediately placed in the background, we follow the command with an- “&” character:
假如说我们想让 shell 提示符返回,却不终止 xlogo 程序。我们可以把 这个程序放到后台(background)执行。把终端想象是一个有前台(包含在表层可见的事物,像 shell 提示符) 和后台(包含表层之下的隐藏的事物)的设备。为了启动一个程序并让它立即在后台 运行,我们在程序命令之后,加上”&”字符:
| |
After entering the command, the xlogo window appeared and the shell prompt returned, but some funny numbers were printed too. This message is part of a shell feature called job control. With this message, the shell is telling us that we have started job number 1 (“[1]”) and that it has PID 28236. If we run ps, we can see our process:
执行命令之后,这个 xlogo 窗口出现,并且 shell 提示符返回,同时打印一些有趣的数字。 这条信息是 shell 特性的一部分,叫做任务控制 (job control)。通过这条信息,shell 告诉我们,已经启动了 任务号(job number)为1(“[1]”),PID 为28236的程序。如果我们运行 ps 命令,可以看到我们的进程:
| |
The shell’s job control facility also gives us a way to list the jobs that are have been launched from our terminal. Using the jobs command, we can see this list:
shell 的任务控制功能给出了一种列出从我们终端中启动了的任务的方法。执行 jobs 命令,我们可以看到这个输出列表:
| |
The results show that we have one job, numbered “1”, that it is running, and that the command was xlogo &.
结果显示我们有一个任务,编号为“1”,它正在运行,并且这个任务的命令是 xlogo &。
进程返回到前台
A process in the background is immune from keyboard input, including any attempt interrupt it with a Ctrl-c. To return a process to the foreground, use the fg command, this way:
一个在后台运行的进程对一切来自键盘的输入都免疫,也不能用 Ctrl-c 来中断它。 为了让一个进程返回前台 (foreground),这样使用 fg 命令:
| |
The command fg followed by a percent sign and the job number (called a jobspec) does the trick. If we only have one background job, the jobspec is optional. To terminate xlogo, type Ctrl-c.
fg 命令之后,跟随着一个百分号和任务序号(叫做 jobspec ,如此处的 %1)就可以了。如果我们只有一个后台任务,那么 jobspec(job specification) 是可有可无的。输入 Ctrl-c 来终止 xlogo 程序。
停止一个进程
Sometimes we’ll want to stop a process without terminating it. This is often done to allow a foreground process to be moved to the background. To stop a foreground process, type Ctrl-z. Let’s try it. At the command prompt, type xlogo, the Enter key, then Ctrl-z:
有时候,我们想要停下一个进程,而不是终止它。我们这么做通常是为了允许前台进程被移动到后台。 输入 Ctrl-z,可以停下一个前台进程。让我们试一下。在命令提示符下,执行 xlogo 命令, 然后输入 Ctrl-z:
| |
After stopping xlogo, we can verify that the program has stopped by attempting to resize the xlogo window. We will see that it appears quite dead. We can either restore the program to the foreground, using the fg command, or move the program to the background with the bg command:
停止 xlogo 程序之后,通过调整 xlogo 的窗口大小,我们可以证实这个程序已经停止了。 它看起来像死掉了一样。使用 fg 命令,可以恢复程序到前台运行,或者用 bg 命令把程序移到后台。
| |
As with the fg command, the jobspec is optional if there is only one job.
和 fg 命令一样,如果只有一个任务的话,jobspec 参数是可选的。
Moving a process from the foreground to the background is handy if we launch a graphical program from the command, but forget to place it in the background by appending the trailing “&”.
如果我们从命令行启动一个图形程序,但是忘了在命令后加字符 “&”, 将一个进程从前台移动到后台也是很方便的。
Why would you want to launch a graphical program from the command line? There are two reasons. First, the program you wish to run might not be listed on the window manager’s menus (such as xlogo). Secondly, by launching a program from the command line, you might be able to see error messages that would otherwise be invisible if the program were launched graphically. Sometimes, a program will fail to start up when launched from the graphical menu. By launching it from the command line instead, we may see an error message that will reveal the problem. Also, some graphical programs have many interesting and useful command line options.
为什么要从命令行启动一个图形界面程序呢?有两个原因。第一个,你想要启动的程序,可能 没有在窗口管理器的菜单中列出来(比方说 xlogo)。第二个,从命令行启动一个程序, 你能够看到一些错误信息,如果从图形界面中运行程序的话,这些信息是不可见的。有时候, 一个程序不能从图形界面菜单中启动。通过从命令行中启动它,我们可能会看到 能揭示问题的错误信息。一些图形界面程序还有许多有意思并且有用的命令行选项。
Signals
The kill command is used to “kill” programs. This allows us to terminate programs that need killing. Here’s an example:
kill 命令被用来“杀死”程序。这样我们就可以终止需要杀死的程序。这里有一个例子:
| |
We first launch xlogo in the background. The shell prints the jobspec and the PID of the background process. Next, we use the kill command and specify the PID of the process we want to terminate. We could have also specified the process using a jobspec (for example, “%1”) instead of a PID.
首先,我们在后台启动 xlogo 程序。shell 打印出这个后台进程的 jobspec 和 PID。下一步,我们使用 kill 命令,并且指定我们想要终止的进程 PID。也可以用 jobspec(例如,“%1”)来代替 PID。
While this is all very straightforward, there is more to it than that. The kill command doesn’t exactly “kill” programs, rather it sends them signals. Signals are one of several ways that the operating system communicates with programs. We have already seen signals in action with the use of Ctrl-c and Ctrl-z. When the terminal receives one of these keystrokes, it sends a signal to the program in the foreground. In the case of Ctrl-c, a signal called INT (Interrupt) is sent; with Ctrl-z, a signal called TSTP (Terminal Stop.) Programs, in turn, “listen” for signals and may act upon them as they are received. The fact that a program can listen and act upon signals allows a program to do things like save work in progress when it is sent a termination signal.
虽然这个命令看上去很直白, 但是它的含义不止于此。这个 kill 命令不是真的“杀死”程序,而是给程序 发送信号。信号是操作系统与程序之间进行通信时所采用的几种方式中的一种。 Ctrl-c 和 Ctrl-z 就是信号的实际例子。当终端接受了其中一个按键组合后,它会给在前端运行 的程序发送一个信号。在使用 Ctrl-c 的情况下,会发送一个叫做 INT(Interrupt ,中断)的信号;当使用 Ctrl-z 时,则发送一个叫做 TSTP(Terminal Stop ,终端停止)的信号。程序,相应地,监听信号的到来,当程序 接到信号之后,则做出响应。一个程序能够监听和响应信号这件事允许一个程序做些事情, 比如,当程序接到一个终止信号时,它可以保存所做的工作。
通过 kill 命令给进程发送信号
The kill command is used to send signals to programs. Its most common syntax looks like this:
kill 命令被用来给程序发送信号。它最常见的语法形式看起来像这样:
kill [-signal] PID...
If no signal is specified on the command line, then the TERM (Terminate) signal is sent by default. The kill command is most often used to send the following signals:
如果在命令行中没有指定信号,那么默认情况下,发送 TERM(Terminate,终止)信号。kill 命令被经常 用来发送以下命令:
| Number | Name | Meaning |
|---|---|---|
| 1 | HUP | Hangup. This is a vestige of the good old days when terminals were attached to remote computers with phone lines and modems. The signal is used to indicate to programs that the controlling terminal has “hung up.” The effect of this signal can be demonstrated by closing a terminal session. The foreground program running on the terminal will be sent the signal and will terminate.This signal is also used by many daemon programs to cause a reinitialization. This means that when a daemon is sent this signal, it will restart and re-read its configuration file. The Apache web server is an example of a daemon that uses the HUP signal in this way. |
| 2 | INT | Interrupt. Performs the same function as the Ctrl-c key sent from the terminal. It will usually terminate a program. |
| 9 | KILL | Kill. This signal is special. Whereas programs may choose to handle signals sent to them in different ways, including ignoring them all together, the KILL signal is never actually sent to the target program. Rather, the kernel immediately terminates the process. When a process is terminated in this manner, it is given no opportunity to “clean up” after itself or save its work. For this reason, the KILL signal should only be used as a last resort when other termination signals fail. |
| 15 | TERM | Terminate. This is the default signal sent by the kill command. If a program is still “alive” enough to receive signals, it will terminate. |
| 18 | CONT | Continue. This will restore a process after a STOP signal. |
| 19 | STOP | Stop. This signal causes a process to pause without terminating. Like the KILL signal, it is not sent to the target process, and thus it cannot be ignored. |
| 编号 | 名字 | 含义 |
|---|---|---|
| 1 | HUP | 挂起(Hangup)。名字来源于很久以前,那时候终端机通过电话线和调制解调器连接到 远端的计算机。这个信号被用来告诉程序,控制的终端机已经“挂断”。 通过关闭一个终端会话,可以展示这个信号的作用。在当前终端运行的前台程序将会收到这个信号并终止。许多守护进程也使用这个信号,来重新初始化。这意味着,当一个守护进程收到这个信号后, 这个进程会重新启动,并且重新读取它的配置文件。Apache 网络服务器守护进程就是一个例子。 |
| 2 | INT | 中断。实现和 Ctrl-c 一样的功能,由终端发送。通常,它会终止一个程序。 |
| 9 | KILL | 杀死。这个信号很特别。尽管程序可能会选择不同的方式来处理发送给它的 信号,其中也包含忽略信号,但是 KILL 信号从不被发送到目标程序。而是内核立即终止 这个进程。当一个进程以这种方式终止的时候,它没有机会去做些“清理”工作,或者是保存工作。 因为这个原因,把 KILL 信号看作最后一招,当其它终止信号失败后,再使用它。 |
| 15 | TERM | 终止。这是 kill 命令发送的默认信号。如果程序仍然“活着”,可以接受信号,那么 这个它会终止。 |
| 18 | CONT | 继续。在一个停止信号后,这个信号会恢复进程的运行。 |
| 19 | STOP | 停止。这个信号导致进程停止运行,而不是终止。像 KILL 信号,它不被 发送到目标进程,因此它不能被忽略。 |
Let’s try out the kill command:
让我们试一下 kill 命令:
| |
In this example, we start the xlogo program in the background and then send it a HUP signal with kill. The xlogo program terminates and the shell indicates that the background process has received a hangup signal. You may need to press the enter key a couple of times before you see the message. Note that signals may be specified either by number or by name, including the name prefixed with the letters “SIG”:
在这个例子里,我们在后台启动 xlogo 程序,然后通过 kill 命令,发送给它一个 HUP 信号。 这个 xlogo 程序终止运行,并且 shell 指示这个后台进程已经接受了一个挂起信号。在看到这条 信息之前,你可能需要多按几次 enter 键。注意,信号既可以用号码,也可以用名字来指定, 包括在前面加上字母 “SIG” 的名字。
| |
Repeat the example above and try out the other signals. Remember, you can also use jobspecs in place of PIDs.
重复上面的例子,试着使用其它的信号。记住,你也可以用 jobspecs 来代替 PID。
Processes, like files, have owners, and you must be the owner of a process (or the superuser) in order to send it signals with kill.
进程,和文件一样,拥有所有者,所以为了能够通过 kill 命令来给进程发送信号, 你必须是进程的所有者(或者是超级用户)。
In addition to the list of signals above, which are most often used with kill, there are other signals frequently used by the system. Here is a list of other common signals:
除了上表列出的 kill 命令最常使用的信号之外,还有一些系统频繁使用的信号。以下是其它一些常用 信号列表:
| Number | Name | Meaning |
|---|---|---|
| 3 | QUIT | Quit |
| 11 | SEGV | Segmentation Violation. This signal is sent if a program makes illegal use of memory, that is, it tried to write somewhere it was not allowed to. |
| 20 | TSTP | Terminal Stop. This is the signal sent by the terminal when the Ctrl-z key is pressed. Unlike the STOP signal, the TSTP signal is received by the process and may be ignored. |
| 28 | WINCH | Window Change. This is a signal sent by the system when a window changes size. Some programs , like top and less will respond to this signal by redrawing themselves to fit the new window dimensions. |
| 编号 | 名字 | 含义 |
|---|---|---|
| 3 | QUIT | 退出 |
| 11 | SEGV | 段错误(Segmentation Violation)。如果一个程序非法使用内存,就会发送这个信号。也就是说, 程序试图写入内存,而这个内存空间是不允许此程序写入的。 |
| 20 | TSTP | 终端停止(Terminal Stop)。当按下 Ctrl-z 组合键后,终端发送这个信号。不像 STOP 信号, TSTP 信号由目标进程接收,且可能被忽略。 |
| 28 | WINCH | 改变窗口大小(Window Change)。当改变窗口大小时,系统会发送这个信号。 一些程序,像 top 和 less 程序会响应这个信号,按照新窗口的尺寸,刷新显示的内容。 |
For the curious, a complete list of signals can be seen with the following command:
为了满足读者的好奇心,通过下面的命令可以得到一个完整的信号列表:
| |
通过 killall 命令给多个进程发送信号
It’s also possible to send signals to multiple processes matching a specified program or user name by using the killall command. Here is the syntax:
也有可能通过 killall 命令,给匹配特定程序或用户名的多个进程发送信号。下面是 killall 命令的语法形式:
killall [-u user] [-signal] name...
To demonstrate, we will start a couple of instances of the xlogo program and then terminate them:
为了说明情况,我们将启动一对 xlogo 程序的实例,然后再终止它们:
| |
Remember, as with kill, you must have superuser privileges to send signals to processes that do not belong to you.
记住,和 kill 命令一样,你必须拥有超级用户权限才能给不属于你的进程发送信号。
更多和进程相关的命令
Since monitoring processes is an important system administration task, there are a lot of commands for it. Here are some to play with:
因为监测进程是一个很重要的系统管理任务,所以有许多命令与它相关。玩玩下面几个命令:
| Command | Description |
|---|---|
| pstree | Outputs a process list arranged in a tree-like pattern showing the parent/child relationships between processes. |
| vmstat | Outputs a snapshot of system resource usage including, memory, swap and disk I/O. To see a continuous display, follow the command with a time delay (in seconds) for updates. For example: vmstat 5. Terminate the output with Ctrl-c. |
| xload | A graphical program that draws a graph showing system load over time |
| tload | Similar to the xload program, but draws the graph in the terminal. Terminate the output with Ctrl-c. |
| 命令名 | 命令描述 |
|---|---|
| pstree | 输出一个树型结构的进程列表(processtree),这个列表展示了进程间父/子关系。 |
| vmstat | 输出一个系统资源使用快照,包括内存,交换分区和磁盘 I/O。 为了看到连续的显示结果,则在命令名后加上更新操作延时的时间(以秒为单位)。例如,“vmstat 5”。 ,按下 Ctrl-c 组合键, 终止输出。 |
| xload | 一个图形界面程序,可以画出系统负载随时间变化的图形。 |
| tload | terminal load 与 xload 程序相似,但是在终端中画出图形。使用 Ctrl-c,来终止输出。 |
12 - 12 shell 环境
shell 环境
http://billie66.github.io/TLCL/book/chap12.html
As we discussed earlier, the shell maintains a body of information during our shell session called the environment. Data stored in the environment is used by programs to determine facts about our configuration. While most programs use configuration files to store program settings, some programs will also look for values stored in the environment to adjust their behavior. Knowing this, we can use the environment to customize our shell experience.
恰如我们之前所讲的,shell 在 shell 会话中保存着大量信息。这些信息被称为 (shell 的) 环境。 程序获取环境中的数据(即环境变量)来了解本机的配置。虽然大多数程序用配置文件来存储程序设置, 一些程序会根据环境变量来调整他们的行为。知道了这些,我们就可以用环境变量来自定制 shell 体验。
In this chapter, we will work with the following commands:
- printenv – Print part or all of the environment
- set – Set shell options
- export – Export environment to subsequently executed programs
- alias – Create an alias for a command
在这一章,我们将用到以下命令:
- printenv - 打印部分或所有的环境变量
- set - 设置 shell 选项
- export — 导出环境变量,让随后执行的程序知道。
- alias - 创建命令别名
什么存储在环境变量中?
The shell stores two basic types of data in the environment, though, with bash, the types are largely indistinguishable. They are environment variables and shell variables. Shell variables are bits of data placed there by bash, and environment variables are basically everything else. In addition to variables, the shell also stores some programmatic data, namely aliases and shell functions. We covered aliases in Chapter 6, and shell functions (which are related to shell scripting) will be covered in Part 5.
shell 在环境中存储了两种基本类型的数据,虽然在 bash 里,我们几乎无法区分它们。 它们是环境变量和 shell 变量。Shell 变量是 bash 存放的少量数据。剩下的都是 环境变量。除了变量,shell 也存储了一些可编程的数据,即别名和 shell 函数。我们 已经在第六章讨论了别名,而 shell 函数(涉及到 shell 脚本)将会在本章第五部分叙述。
检查环境变量
We can use either the set builtin in bash or the printenv program to see what is stored in the environment. The set command will show both the shell and environment variables, while printenv will only display the latter. Since the list of environment contents will be fairly long, it is best to pipe the output of either command into less:
我们可以用 bash 的内建命令 set,或者是 printenv 程序来查看环境变量。set 命令可以 显示 shell 或环境变量,而 printenv 只是显示环境变量。因为环境变量列表比较长,最好 把每个命令的输出通过管道传递给 less 来阅读:
| |
Doing so, we should get something that looks like this:
执行以上命令之后,我们应该能得到类似以下内容:
KDE_MULTIHEAD=false
SSH_AGENT_PID=6666
HOSTNAME=linuxbox
GPG_AGENT_INFO=/tmp/gpg-PdOt7g/S.gpg-agent:6689:1
SHELL=/bin/bash
TERM=xterm
XDG_MENU_PREFIX=kde-
HISTSIZE=1000
XDG_SESSION_COOKIE=6d7b05c65846c3eaf3101b0046bd2b00-1208521990.996705
-1177056199
GTK2_RC_FILES=/etc/gtk-2.0/gtkrc:/home/me/.gtkrc-2.0:/home/me/.kde/sh
are/config/gtkrc-2.0
GTK_RC_FILES=/etc/gtk/gtkrc:/home/me/.gtkrc:/home/me/.kde/share/confi
g/gtkrc
GS_LIB=/home/me/.fonts
WINDOWID=29360136
QTDIR=/usr/lib/qt-3.3
QTINC=/usr/lib/qt-3.3/include
KDE_FULL_SESSION=true
USER=me
LS_COLORS=no=00:fi=00:di=00;34:ln=00;36:pi=40;33:so=00;35:bd=40;33;01
:cd=40;33;01:or=01;05;37;41:mi=01;05;37;41:ex=00;32:\*.cmd=00;32:\*.exe:
What we see is a list of environment variables and their values. For example, we see a variable called USER, which contains the value “me”. The printenv command can also list the value of a specific variable:
我们所看到的是环境变量及其值的列表。例如,我们看到一个叫做 USER 的变量,这个变量值是 “me”。printenv 命令也能够列出特定变量的值:
| |
The set command, when used without options or arguments, will display both the shell and environment variables, as well as any defined shell functions. Unlike printenv, its output is courteously sorted in alphabetical order:
当使用没有带选项和参数的 set 命令时,shell 变量,环境变量,和定义的 shell 函数 都会被显示。不同于 printenv 命令,set 命令的输出很友好地按照首字母顺序排列:
| |
It is also possible to view the contents of a variable using the echo command, like this:
也可以通过 echo 命令来查看一个变量的内容,像这样:
| |
One element of the environment that neither set nor printenv displays is aliases. To see them, enter the alias command without arguments:
别名无法通过使用 set 或 printenv 来查看。 用不带参数的 alias 来查看别名:
| |
一些有趣的环境变量
The environment contains quite a few variables, and though your environment may differ from the one presented here, you will likely see the following variables in your environment:
shell 环境中包含相当多的变量。虽然你的 shell 环境可能与我这里的不同,但也大概率会看到 以下的环境变量:
| Variable | Contents |
|---|---|
| DISPLAY | The name of your display if you are running a graphical environment. Usually this is “:0”, meaning the first display generated by the X server. |
| EDITOR | The name of the program to be used for text editing. |
| SHELL | The name of your shell program. |
| HOME | The pathname of your home directory. |
| LANG | Defines the character set and collation order of your language. |
| OLD_PWD | The previous working directory. |
| PAGER | The name of the program to be used for paging output. This is often set to /usr/bin/less. |
| PATH | A colon-separated list of directories that are searched when you enter the name of a executable program. |
| PS1 | Prompt String 1. This defines the contents of your shell prompt. As we will later see, this can be extensively customized. |
| PWD | The current working directory. |
| TERM | The name of your terminal type. Unix-like systems support many terminal protocols; this variable sets the protocol to be used with your terminal emulator. |
| TZ | Specifies your timezone. Most Unix-like systems maintain the computer’s internal clock in Coordinated Universal Time (UTC) and then displays the local time by applying an offset specified by this variable. |
| USER | Your user name. |
| 变量 | 内容 |
|---|---|
| DISPLAY | 如果你正在运行图形界面环境,那么这个变量就是你显示器的名字。通常,它是 “:0”, 意思是由 X 产生的第一个显示器。 |
| EDITOR | 文本编辑器的名字。 |
| SHELL | shell 程序的名字。 |
| HOME | 用户家目录。 |
| LANG | 定义了字符集以及语言编码方式。 |
| OLD_PWD | 先前的工作目录。 |
| PAGER | 页输出程序的名字。这经常设置为/usr/bin/less。 |
| PATH | 由冒号分开的目录列表,当你输入可执行程序名后,会搜索这个目录列表。 |
| PS1 | Prompt String 1. 这个定义了你的 shell 提示符的内容。随后我们可以看到,这个变量 内容可以全面地定制。 |
| PWD | 当前工作目录。 |
| TERM | 终端类型名。类 Unix 的系统支持许多终端协议;这个变量设置你的终端仿真器所用的协议。 |
| TZ | 指定你所在的时区。大多数类 Unix 的系统按照协调时间时 (UTC) 来维护计算机内部的时钟 ,然后应用一个由这个变量指定的偏差来显示本地时间。 |
| USER | 你的用户名 |
Don’t worry if some of these values are missing. They vary by distribution.
如果缺失了一些变量,不要担心,这些变量会因发行版本的不同而不同。
如何建立 shell 环境?
When we log on to the system, the bash program starts, and reads a series of configuration scripts called startup files, which define the default environment shared by all users. This is followed by more startup files in our home directory that define our personal environment. The exact sequence depends on the type of shell session being started. There are two kinds: a login shell session and a non-login shell session.
当我们登录系统后, bash 程序启动,并且会读取一系列称为启动文件的配置脚本, 这些文件定义了默认的可供所有用户共享的 shell 环境。然后是读取更于当前用户自己家目录中 的启动文件,这些启动文件定义了用户个人的 shell 环境。确切的启动顺序依赖于要运行的 shell 会话 类型。有两种 shell 会话类型:一个是登录 shell 会话,另一个是非登录 shell 会话。
A login shell session is one in which we are prompted for our user name and password; when we start a virtual console session, for example. A non-login shell session typically occurs when we launch a terminal session in the GUI.
登录 shell 会话会在其中提示用户输入用户名和密码;例如,我们启动一个虚拟控制台会话。 非登录 shell 会话通常当我们在 GUI 下启动终端会话时出现。
Login shells read one or more startup files as shown in Table 12-2:
登录 shell 会读取一个或多个启动文件,正如表12-2所示:
| File | Contents |
|---|---|
| /etc/profile | A global configuration script that applies to all users. |
| ~/.bash_profile | A user’s personal startup file. Can be used to extend or override settings in the global configuration script. |
| ~/.bash_login | If ~/.bash_profile is not found, bash attempts to read this script. |
| ~/.profile | If neither ~/.bash_profile nor ~/.bash_login is found, bash attempts to read this file. This is the default in Debian-based distributions, such as Ubuntu. |
| 文件 | 内容 |
|---|---|
| /etc/profile | 应用于所有用户的全局配置脚本。 |
| ~/.bash_profile | 用户个人的启动文件。可以用来扩展或重写全局配置脚本中的设置。 |
| ~/.bash_login | 如果文件 ~/.bash_profile 没有找到,bash 会尝试读取这个脚本。 |
| ~/.profile | 如果文件 ~/.bash_profile 或文件 ~/.bash_login 都没有找到,bash 会试图读取这个文件。 这是基于 Debian 发行版的默认设置,比方说 Ubuntu。 |
Non-login shell sessions read the following startup files:
非登录 shell 会话会读取以下启动文件:
| File | Contents |
|---|---|
| /etc/bash.bashrc | A global configuration script that applies to all users. |
| ~/.bashrc | A user’s personal startup file. Can be used to extend or override settings in the global configuration script. |
| 文件 | 内容 |
|---|---|
| /etc/bash.bashrc | 应用于所有用户的全局配置文件。 |
| ~/.bashrc | 用户个人的启动文件。可以用来扩展或重写全局配置脚本中的设置。 |
In addition to reading the startup files above, non-login shells also inherit the environment from their parent process, usually a login shell.
除了读取以上启动文件之外,非登录 shell 会话也会继承它们父进程的环境设置,通常是一个登录 shell。
Take a look at your system and see which of these startup files you have. Remember— since most of the filenames listed above start with a period (meaning that they are hidden), you will need to use the “-a” option when using ls.
浏览一下你的系统,看一看系统中有哪些启动文件。记住-因为上面列出的大多数文件名都以圆点开头 (意味着它们是隐藏文件),你需要使用带”-a”选项的 ls 命令。
The ~/.bashrc file is probably the most important startup file from the ordinary user’s point of view, since it is almost always read. Non-login shells read it by default and most startup files for login shells are written in such a way as to read the ~/.bashrc file as well.
在普通用户看来,文件 ~/.bashrc 可能是最重要的启动文件,因为它几乎总是被读取。非登录 shell 默认 会读取它,并且大多数登录 shell 的启动文件会以能读取 ~/.bashrc 文件的方式来书写。
一个启动文件的内容
If we take a look inside a typical .bash_profile (taken from a CentOS 4 system), it looks something like this:
如果我们看一下典型的 .bash_profile 文件(来自于 CentOS 4 系统),它看起来像这样:
# .bash_profile
# Get the aliases and functions
if [ -f ~/.bashrc ]; then
. ~/.bashrc
fi
# User specific environment and startup programs
PATH=$PATH:$HOME/bin
export PATH
Lines that begin with a “#” are comments and are not read by the shell. These are there for human readability. The first interesting thing occurs on the fourth line, with the following code:
以”#”开头的行是注释,shell 不会读取它们。它们在那里是为了方便人们阅读。第一件有趣的事情 发生在第四行,伴随着以下代码:
if [ -f ~/.bashrc ]; then
. ~/.bashrc
fi
This is called an if compound command, which we will cover fully when we get to shell scripting in Part 5, but for now we will translate:
这叫做一个 if 复合命令,我们将会在第五部分详细地介绍它,现在我们对它翻译一下:
If the file ~/.bashrc exists, then
read the ~/.bashrc file.
We can see that this bit of code is how a login shell gets the contents of .bashrc. The next thing in our startup file has to do with the PATH variable.
我们可以看到这一小段代码就是一个登录 shell 得到 .bashrc 文件内容的方式。在我们启动文件中, 下一件有趣的事与 PATH 变量有关系。
Ever wonder how the shell knows where to find commands when we enter them on the command line? For example, when we enter ls, the shell does not search the entire computer to find /bin/ls (the full pathname of the ls command), rather, it searches a list of directories that are contained in the PATH variable.
是否曾经对 shell 怎样知道在哪里找到我们在命令行中输入的命令感到迷惑?例如,当我们输入 ls 后, shell 不会查找整个计算机系统来找到 /bin/ls(ls 命令的全路径名),相反,它查找一个目录列表, 这个列表就包含在 PATH 变量中。
The PATH variable is often (but not always, depending on the distribution) set by the /etc/profile startup file and with this code:
PATH 变量经常(但不总是,依赖于发行版)在 /etc/profile 启动文件中设置,通过这些代码:
PATH=$PATH:$HOME/bin
PATH is modified to add the directory $HOME/bin to the end of the list. This is an example of parameter expansion, which we touched on in Chapter 8. To demonstrate how this works, try the following:
修改 PATH 变量,添加目录 $HOME/bin 到目录列表的末尾。这是一个参数展开的实例, 参数展开我们在第八章中提到过。为了说明这是怎样工作的,试试下面的例子:
| |
Using this technique, we can append text to the end of a variable’s contents. By adding the string $HOME/bin to the end of the PATH variable’s contents, the directory $HOME/bin is added to the list of directories searched when a command is entered. This means that when we want to create a directory within our home directory for storing our own private programs, the shell is ready to accommodate us. All we have to do is call it bin, and we’re ready to go.
使用这种技巧,我们可以把文本附加到一个变量值的末尾。通过添加字符串 $HOME/bin 到 PATH 变量值 的末尾,则目录 $HOME/bin 就添加到了命令搜索目录列表中。这意味着当我们想要在自己的家目录下, 创建一个目录来存储我们自己的私人程序时,shell 已经给我们准备好了。我们所要做的事就是 把创建的目录叫做 bin,赶快行动吧。
Note: Many distributions provide this PATH setting by default. Some Debian based distributions, such as Ubuntu, test for the existence of the ~/bin directory at login, and dynamically add it to the PATH variable if the directory is found.
注意:很多发行版默认地提供了这个 PATH 设置。一些基于 Debian 的发行版,例如 Ubuntu,在登录 的时候,会检测目录 ~/bin 是否存在,若找到目录则把它动态地加到 PATH 变量中。
Lastly, we have:
最后,有下面一行代码:
export PATH
The export command tells the shell to make the contents of PATH available to child processes of this shell.
这个 export 命令告诉 shell 让这个 shell 的子进程可以使用 PATH 变量的内容。
修改 shell 环境
Since we know where the startup files are and what they contain, we can modify them to customize our environment.
既然我们知道了启动文件所在的位置和它们所包含的内容,我们就可以修改它们来定制自己的 shell 环境。
我们应该修改哪个文件?
As a general rule, to add directories to your PATH, or define additional environment variables, place those changes in .bash_profile (or equivalent, according to your distribution. For example, Ubuntu uses .profile.) For everything else, place the changes in .bashrc. Unless you are the system administrator and need to change the defaults for all users of the system, restrict your modifications to the files in your home directory. It is certainly possible to change the files in /etc such as profile, and in many cases it would be sensible to do so, but for now, let’s play it safe.
按照通常的规则,添加目录到你的 PATH 变量或者是定义额外的环境变量,要把这些更改放置到 .bash_profile 文件中(或者其替代文件中,根据不同的发行版。例如,Ubuntu 使用 .profile 文件)。 对于其它的更改,要放到 .bashrc 文件中。除非你是系统管理员,需要为系统中的所有用户修改 默认设置,那么则限定你只能对自己家目录下的文件进行修改。当然,有可能会更改 /etc 目录中的 文件,比如说 profile 文件,而且在许多情况下,修改这些文件也是明智的,但是现在,我们要谨慎行事。
文本编辑器
To edit (i.e., modify) the shell’s startup files, as well as most of the other configuration files on the system, we use a program called a text editor. A text editor is a program that is, in some ways, like a word processor in that it allows you to edit the words on the screen with a moving cursor. It differs from a word processor by only supporting pure text, and often contains features designed for writing programs. Text editors are the central tool used by software developers to write code, and by system administrators to manage the configuration files that control the system.
为了编辑(例如,修改)shell 的启动文件以及系统中大多数其它配置文件,我们使用一个叫做文本编辑器的程序。 文本编辑器是一个在某些方面类似于文字处理器的程序,允许你使用移动光标在屏幕上编辑文字。 文本编辑器不同于文字处理器之处在于它只能支持纯文本,并且经常包含为便于写程序而设计的特性。 文本编辑器是软件开发人员用来写代码,以及系统管理员用来管理控制系统的配置文件的重要工具。
There are a lot of different text editors available for Linux; your system probably has several installed. Why so many different ones? Probably because programmers like writing them, and since programmers use them extensively, they write editors to express their own desires as to how they should work.
Linux 系统有许多不同类型的文本编辑器可用;你的系统中可能已经安装了几个。为什么会有这么 多种呢?可能因为程序员喜欢编写它们,又因为程序员们会频繁地使用它们,所以程序员编写编辑器让 它们按照程序员自己的愿望工作。
Text editors fall into two basic categories: graphical and text based. GNOME and KDE both include some popular graphical editors. GNOME ships with an editor called gedit, which is usually called “Text Editor” in the GNOME menu. KDE usually ships with three which are (in order of increasing complexity) kedit, kwrite, and kate.
文本编辑器分为两种基本类型:图形化的和基于文本的编辑器。GNOME 和 KDE 两者都包含一些流行的 图形化编辑器。GNOME 自带了一个叫做 gedit 的编辑器,这个编辑器通常在 GNOME 菜单中称为”文本编辑器”。 KDE 通常自带了三种编辑器,分别是(按照复杂度递增的顺序排列)kedit,kwrite,kate。
There are many text-based editors. The popular ones you will encounter are nano, vi, and emacs. The nano editor is a simple, easy-to-use editor designed as a replacement for the pico editor supplied with the PINE email suite. The vi editor (on most Linux systems replaced by a program named vim, which is short for “Vi IMproved”) is the traditional editor for Unix-like systems. It will be the subject of our next chapter. The emacs editor was originally written by Richard Stallman. It is a gigantic, all-purpose, does-everything programming environment. While readily available, it is seldom installed on most Linux systems by default.
另外,也有许多文本界面(无 GUI )的编辑器。你将会遇到一些流行的编辑器,例如 nano、vi 和 emacs 。 nano 编辑器 是一个简单易用的编辑器,用于替代随 PINE 邮件套件提供的 pico 编辑器。vi 编辑器 (在大多数 Linux 系统中被 vim 替代,vim 是 “Vi IMproved”的简写)是类 Unix 操作系统的传统编辑器。 vim 是我们下一章节的讨论对象。emacs 编辑器最初由 Richard Stallman 写成。它是一个庞大、多用途的, 可做任何事情的编程环境。虽然 emacs 很容易获取,但是大多数 Linux 系统很少默认安装它。
使用文本编辑器
All text editors can be invoked from the command line by typing the name of the editor followed by the name of the file you want to edit. If the file does not already exist, the editor will assume that you want to create a new file. Here is an example using gedit:
所有的文本编辑器都可以通过在命令行中输入编辑器的名字,加上你所想要编辑的文件来唤醒。如果所 输入的文件名不存在,编辑器则会假定你想要创建一个新文件。下面是一个使用 gedit 的例子:
| |
This command will start the gedit text editor and load the file named “some_file”, if it exists.
这条命令将会启动 gedit 文本编辑器,同时加载名为 “some_file” 的文件,如果这个文件存在的话。
All graphical text editors are pretty self-explanatory, so we won’t cover them here. Instead, we will concentrate on our first text-based text editor, nano. Let’s fire up nano and edit the .bashrc file. But before we do that, let’s practice some “safe computing.” Whenever we edit an important configuration file, it is always a good idea to create a backup copy of the file first. This protects us in case we mess the file up while editing. To create a backup of the .bashrc file, do this:
所有的图形文本编辑器很大程度上都是不需要解释的,所以我们在这里不会介绍它们。反之,我们将集中精力在 我们第一个基于文本的文本编辑器,nano。让我们启动 nano,并且编辑文件 .bashrc。但是在我们这样 做之前,先练习一些”安全计算”。当我们编辑一个重要的配置文件时,首先创建一个这个文件的备份 总是一个不错的主意。这样能避免我们在编辑文件时弄乱文件。创建文件 .bashrc 的备份文件,这样做:
| |
It doesn’t matter what you call the backup file, just pick an understandable name. The extensions “.bak”, “.sav”, “.old”, and “.orig” are all popular ways of indicating a backup file. Oh, and remember that cp will overwrite existing files silently.
备份文件的名字无关紧要,只要选择一个容易理解的文件名。扩展名 “.bak”、”.sav”、 “.old”和 “.orig” 都是用来指示备份文件的流行方法。哦,记住 cp 命令会默默地覆盖已经存在的同名文件。
Now that we have a backup file, we’ll start the editor:
现在我们有了一个备份文件,我们启动 nano 编辑器吧:
| |
Once nano starts, we’ll get a screen like this:
一旦 nano 编辑器启动后,我们将会得到一个像下面一样的屏幕:
GNU nano 2.0.3
....
Note: If your system does not have nano installed, you may use a graphical editor instead.
注意:如果你的系统中没有安装 nano 编辑器,你可以用一个图形化的编辑器代替。
The screen consists of a header at the top, the text of the file being edited in the middle and a menu of commands at the bottom. Since nano was designed to replace the text editor supplied with an email client, it is rather short on editing features. The first command you should learn in any text editor is how to exit the program. In the case of nano, you type Ctrl-x to exit. This is indicated in the menu at the bottom of the screen. The notation “^X” means Ctrl-x. This is a common notation for control characters used by many programs.
这个屏幕由上面的标头,中间正在编辑的文件文本和下面的命令菜单组成。因为设计 nano 是为了 代替由电子邮件客户端提供的编辑器的,所以它相当缺乏编辑特性。在任一款编辑器中,你应该 学习的第一个命令是怎样退出程序。以 nano 为例,你输入 Ctrl-x 来退出 nano。在屏幕底层的菜单中 说明了这个命令。”^X” 表示法意思是 Ctrl-x。这是控制字符的常见表示法,许多程序都使用它。
The second command we need to know is how to save our work. With nano it’s Ctrl- o. With this knowledge under our belts, we’re ready to do some editing. Using the down arrow key and / or the PageDown key, move the cursor to the end of the file, then add the following lines to the .bashrc file:
第二个我们需要知道的命令是怎样保存我们的劳动成果。对于 nano 来说是 Ctrl-o。既然我们 已经获得了这些知识,接下来我们准备做些编辑工作。使用下箭头按键和 / 或下翻页按键,移动 鼠标到文件的最后一行,然后添加以下几行到文件 .bashrc 中:
umask 0002
export HISTCONTROL=ignoredups
export HISTSIZE=1000
alias l.='ls -d .* --color=auto'
alias ll='ls -l --color=auto'
Note: Your distribution may already include some of these, but duplicates won’t hurt anything.
注意:你的发行版在这之前可能已经包含其中的一些行,出现重复的代码不会有其他影响。
Here is the meaning of our additions:
下表是所添加行的意义:
| Line | Meaning |
|---|---|
| umask 0002 | Sets the umask to solve the problem with shared directories |
| export HISTCONTROL=ignoredups | Causes the shell’s history recording feature to ignore a command if the same command was just recorded. |
| export HISTSIZE=1000 | Increases the size of the command history from the default of 500 lines to 1000 lines. |
| alias l.=‘ls -d .* –color=auto’ | Creates a new command called “l.” which displays all directory entries that begin with a dot. |
| alias ll=‘ls -l –color=auto’ | Creates a new command called “ll” which displays a long format directory listing. |
| 文本行 | 含义 |
|---|---|
| umask 0002 | 设置掩码来解决共享目录的问题。 |
| export HISTCONTROL=ignoredups | 使得 shell 的历史记录功能忽略一个命令,如果相同的命令已被记录。 |
| export HISTSIZE=1000 | 增加命令历史的大小,从默认的 500 行扩大到 1000 行。 |
| alias l.=‘ls -d .* –color=auto’ | 创建一个新命令,叫做’l.’,这个命令会显示所有以点开头的目录项。 |
| alias ll=‘ls -l –color=auto’ | 创建一个叫做’ll’的命令,这个命令会显示长格式目录列表。 |
As we can see, many of our additions are not intuitively obvious, so it would be a good idea to add some comments to our .bashrc file to help explain things to the humans. Using the editor, change our additions to look like this:
正如我们所看到的,我们添加的许多代码的意思直觉上并不是明显的,所以添加注释到我们的文件 .bashrc 中是 一个好主意,可以帮助人们理解。使用编辑器,更改我们添加的代码,让它们看起来像这样:
# Change umask to make directory sharing easier
umask 0002
# Ignore duplicates in command history and increase
# history size to 1000 lines
export HISTCONTROL=ignoredups
export HISTSIZE=1000
# Add some helpful aliases
alias l.='ls -d .* --color=auto'
alias ll='ls -l --color=auto'
Ah, much better! With our changes complete, type Ctrl-o to save our modified .bashrc file, and Ctrl-x to exit nano.
啊,看起来好多了! 当我们完成修改后,输入 Ctrl-o 来保存我们修改的 .bashrc 文件,输入 Ctrl-x 退出 nano。
Why Comments Are Important
为什么注释很重要?
Whenever you modify configuration files it’s a good idea to add some comments to document your changes. Sure, you will remember what you changed tomorrow, but what about six months from now? Do yourself a favor and add some comments. While you’re at it, it’s not a bad idea to keep a log of what changes you make.
不管什么时候你修改配置文件时,给你所做的更改加上注释都是一个好主意。的确,明天你会 记得你修改了的内容,但是六个月之后会怎样呢?帮自己一个忙,加上一些注释吧。当你意识 到这一点后,对你所做的修改做个日志是个不错的主意。
Shell scripts and bash startup files use a “#” symbol to begin a comment. Other configuration files may use other symbols. Most configuration files will have comments. Use them as a guide.
Shell 脚本和 bash 启动文件都使用 “#” 符号来开始注释。其它配置文件可能使用其它的符号。 大多数配置文件都有注释。把它们作为指南。
You will often see lines in configuration files that are commented out to prevent them from being used by the affected program. This is done to give the reader suggestions for possible configuration choices or examples of correct configuration syntax. For example, the .bashrc file of Ubuntu 8.04 contains these lines:
你会经常看到配置文件中的一些行被注释掉,以此防止它们被受影响的程序使用。这样做 是为了给读者在可能的配置选项方面一些建议,或者给出正确的配置语法实例。例如,Ubuntu 8.04 中的 .bashrc 文件包含这些行:
# some more ls aliases #alias ll='ls -l' #alias la='ls -A' #alias l='ls -CF'The last three lines are valid alias definitions that have been commented out. If you remove the leading “#” symbols from these three lines, a technique called uncommenting, you will activate the aliases. Conversely, if you add a “#” symbol to the beginning of a line, you can deactivate a configuration line while preserving the information it contains.
最后三行是有效的被注释掉的别名定义。如果你删除这三行开头的 “#” 符号,此操作称为 uncommenting (取消注释),这样你就会激活这些别名。相反地,如果你在一行的开头加上 “#” 符号, 你可以注销掉这一行,但会保留它所包含的信息。
激活我们的修改
The changes we have made to our .bashrc will not take affect until we close our terminal session and start a new one, since the .bashrc file is only read at the beginning of a session. However, we can force bash to re-read the modified .bashrc file with the following command:
我们对于文件 .bashrc 的修改不会生效,直到我们关闭终端会话,再重新启动一个新的会话, 因为 .bashrc 文件只是在刚开始启动终端会话时读取。然而,我们可以强迫 bash 重新读取修改过的 .bashrc 文件,使用下面的命令:
| |
After doing this, we should be able to see the effect of our changes. Try out one of the new aliases:
运行上面命令之后,我们就应该能够看到所做修改的效果了。试试其中一个新的别名:
| |
总结
In this chapter we learned an essential skill—editing configuration files with a text editor. Moving forward, as we read man pages for commands, take note of the environment variables that commands support. There may be a gem or two. In later chapters, we will learn about shell functions, a powerful feature that you can also include in the bash startup files to add to your arsenal of custom commands.
在这一章中,我们学到了用文本编辑器来编辑配置文件的基本技巧。随着学习的继续,当我们 浏览命令的手册页时,可以记录下该命令所支持的环境变量。这样或许我们能够收获一到两个特别好用的宝贝命令。 在随后的章节里面,我们将会学习 shell 函数,一个很强大的特性,你可以把它包含在 bash 启动文件里面, 以此来添加你自定制的命令宝库。
拓展阅读
The INVOCATION section of the bash man page covers the bash startup files in gory detail.
bash 手册页的 INVOCATION 部分非常详细地讨论了 bash 启动文件。
13 - 13 vi 简介
vi 简介
http://billie66.github.io/TLCL/book/chap13.html
There is an old joke about a visitor to New York City asking a passerby for directions to the city’s famous classical music venue:
Visitor: Excuse me, how do I get to Carnegie Hall?
Passerby: Practice, practice, practice!
有一个古老的笑话,说是一个在纽约的游客向行人打听这座城市中著名古典音乐场馆的方向:
游客: 请问一下,我怎样去卡内基音乐大厅?
行人: 练习,练习,练习!
Learning the Linux command line, like becoming an accomplished pianist, is not something that we pick up in an afternoon. It takes years of practice. In this chapter, we will introduce the vi (pronounced “vee eye”) text editor, one of the core programs in the Unix tradition. vi is somewhat notorious for its difficult user interface, but when we see a master sit down at the keyboard and begin to “play,” we will indeed be witness to some great art. We won’t become masters in this chapter, but when we are done, we will know how to play “chopsticks” in vi.
学习 Linux 命令行,就像要成为一名造诣很深的钢琴家一样,它不是我们一下午就能学会的技能。这需要 经历多年的勤苦练习。在这一章中,我们将介绍 vi(发音“vee eye”)文本编辑器,它是 Unix 传统中核心程序之一。 vi 因它难用的用户界面而有点声名狼藉,但是一位大师操作它的过程也的确非常具有艺术性。虽然我们在这里不能成为 vi 大师,但是当我们学完这一章后, 我们会知道怎样在 vi 中完成日常任务。
Why We Should Learn vi
为什么我们应该学习 vi
In this modern age of graphical editors and easy-to-use text-based editors such as nano, why should we learn vi? There are three good reasons:
在现在这个图形化编辑器和易于使用的基于文本编辑器的时代,为什么我们还应该学习 vi 呢? 下面有三个充分的理由:
- vi is always available. This can be a lifesaver if we have a system with no graphical interface, such as a remote server or a local system with a broken X configuration. nano, while increasingly popular is still not universal. POSIX, a standard for program compatibility on Unix systems, requires that vi be present.
- vi 很多系统都预装。如果我们的系统没有图形界面,比方说一台远端服务器或者是一个 X 配置损坏了的本地系统,那么 vi 就成了我们的救星。虽然 nano 逐渐流行起来,但是它 还没有普及。POSIX,这套 Unix 系统中程序兼容的标准,就要求系统要预装 vi。
- vi is lightweight and fast. For many tasks, it’s easier to bring up vi than it is to find the graphical text editor in the menus and wait for its multiple megabytes to load. In addition, vi is designed for typing speed. As we shall see, a skilled vi user never has to lift his or her fingers from the keyboard while editing.
- vi 轻量级且执行快。对于许多任务来说,启动 vi 比起在菜单中找到一个图形化文本编辑器, 再等待其数倍兆字节的数据加载而言,要容易的多。另外,vi 是为了加快输入速度而设计的。 我们将会看到,当一名熟练的 vi 用户在编辑文件时,他或她的手从不需要移开键盘。
- We don’t want other Linux and Unix users to think we are sissies.
- 我们不希望其他 Linux 和 Unix 用户把我们看作胆小鬼。
Okay, maybe two good reasons.
好吧,可能只有两个充分的理由。
A Little Background
一点儿背景介绍
The first version of vi was written in 1976 by Bill Joy, a University of California at Berkley student who later went on to co-found Sun Microsystems. vi derives its name from the word “visual,” because it was intended to allow editing on a video terminal with a moving cursor. Previous to visual editors, there were line editors which operated on a single line of text at a time. To specify a change, we tell a line editor to go to a particular line and describe what change to make, such as adding or deleting text. With the advent of video terminals (rather than printer-based terminals like teletypes) visual editing became possible. vi actually incorporates a powerful line editor called ex, and we can use line editing commands while using vi.
第一版 vi 是在1976由 Bill Joy 写成的,当时他是加州大学伯克利分校的学生, 后来他共同创建了 Sun 微系统公司。vi 这个名字 来源于单词“visual”,因为它打算在带有可移动光标的视频终端上编辑文本。在发明可视化编辑器之前, 人们使用的是一次只能操作一行文本的行编辑器。为了编辑,用户需要告诉行编辑器到哪一行并且 说明做什么修改,比方说添加或删除文本。视频终端(而不是基于打印机的终端,像电传打印机)的出现 ,使可视化编辑成为可能。vi 实际上整合了一个强大的行编辑器 ———— ex , 所以我们在使用 vi 时也能运行行编辑命令。
Most Linux distributions don’t include real vi; rather, they ship with an enhanced replacement called vim (which is short for “vi improved”) written by Bram Moolenaar. vim is a substantial improvement over traditional Unix vi and is usually symbolically linked (or aliased) to the name “vi” on Linux systems. In the discussions that follow, we will assume that we have a program called “vi” that is really vim.
大多数 Linux 发行版不包含真正的 vi;而是自带一款高级替代版本,叫做 vim(它是“vi improved”的简写)由 Bram Moolenaar 开发的。vim 相对于传统的 Unix vi 来说,取得了实质性进步。通常,vim 在 Linux 系统中是“vi”的符号链接(或别名)。 后面的内容我们专注 vim ,但我们会把 vim 简称 vi 。
Starting And Stopping vi
启动和退出 vi
To start vi, we simply type the following:
要想启动 vi,只要简单地输入以下命令:
| |
And a screen like this should appear:
一个像这样的屏幕应该出现:
VIM - Vi Improved
....
Just as we did with nano earlier, the first thing to learn is how to exit. To exit, we enter the following command (note that the colon character is part of the command):
首先要学的是怎样退出 vi。要退出 vi,输入下面的命令(注意冒号是命令的一部分):
:q
The shell prompt should return. If, for some reason, vi will not quit (usually because we made a change to a file that has not yet been saved), we can tell vi that we really mean it by adding an exclamation point to the command:
shell 提示符应该重新出现。如果由于某种原因,vi 不能退出(通常因为我们对文件做了修改,却没有保存文件)。 通过给命令加上叹号,我们可以告诉 vi 我们真要退出 vi。(注意感叹号是命令的一部分)
:q!
Tip: If you get “lost” in vi, try pressing the Esc key twice to find your way again.
小贴示:如果你在 vi 中“迷失”了,试着按下 Esc 键两次来回到普通模式。
Compatibility Mode
兼容模式
In the example startup screen above (taken from Ubuntu 8.04), we see the text “Running in Vi compatible mode.” This means that vim will run in a mode that is closer to the normal behavior of vi rather than the enhanced behavior of vim. For purposes of this chapter, we will want to run vim with its enhanced behavior. To do this, you have a few options:
在上面的截屏中(来自于 Ubuntu 8.04),我们看到一行文字 “运行于 Vi 兼容模式。” 这意味着 vim 将以近似于 vi 的普通的模式 运行,而不是以 vim 的高级的模式运行。出于本章的教学目的,我们将使用 vim 和它的的高级模式。 要这样使用vim,可以通过如下方法:
Try running vim instead of vi.
用 vim 来代替 vi。
If that works, consider adding alias vi=’vim’ to your .bashrc file.
如果命令生效,考虑在你的.bashrc 文件中添加 alias vi=’vim’。
Alternately, use this command to add a line to your vim configuration file:
或者,使用以下命令在你的 vim 配置文件中添加一行:
echo “set nocp” » ~/.vimrc
Different Linux distributions package vim in different ways. Some distributions install a minimal version of vim by default that only supports a limiting set of vim features. While preforming the lessons that follow, you may encounter missing features. If this is the case, install the full version of vim.
不同 Linux 发行版自带的 vim 软件包各不相同。一些发行版预装了 vim 的最简版, 其只支持很有限的 vim 特性。在随后练习里,你可能发现你的 vim 缺失一些特性。 若是如此,请安装 vim 的完整版。
Editing Modes
编辑模式
Let’s start up vi again, this time passing to it the name of a nonexistent file. This is how we can create a new file with vi:
再次启动 vi,这次传递给 vi 一个不存在的文件名。这也是用 vi 创建新文件的方法。
| |
If all goes well, we should get a screen like this:
如果一切正常,我们应该获得一个像这样的屏幕:
....
"foo.txt" [New File]
The leading tilde characters (”~”) indicate that no text exists on that line. This shows that we have an empty file. Do not type anything yet!
每行开头的波浪号(”~”)表示那一行没有文本。这里我们有一个空文件。先别进行输入!
The second most important thing to learn about vi (after learning how to exit) is that vi is a modal editor. When vi starts up, it begins in command mode. In this mode, almost every key is a command, so if we were to start typing, vi would basically go crazy and make a big mess.
关于 vi ,第二重要的事是知晓vi 是一个模式编辑器。(第一件事是如何退出 vi )vi 启动后会直接进入 命令模式。这种模式下,几乎每个按键都是一个命令,所以如果我们直接输入文本,vi 会发疯,弄得一团糟。
Entering Insert Mode
插入模式
In order to add some text to our file, we must first enter insert mode. To do this, we press the “i” key. Afterwards, we should see the following at the bottom of the screen if vim is running in its usual enhanced mode (this will not appear in vi compatible mode):
为了在文件中添加文本,我们需要先进入插入模式。按下”i”键进入插入模式。之后,我们应当 在屏幕底部看到如下的信息,如果 vi 运行在高级模式下( vi 在兼容模式下不会显示这行信息):
-- INSERT --
Now we can enter some text. Try this:
现在我们能输入一些文本了。试着输入这些文本:
The quick brown fox jumped over the lazy dog.
To exit insert mode and return to command mode, press the Esc key.
若要退出插入模式返回命令模式,按下 Esc 按键。
Saving Our Work
保存我们的工作
To save the change we just made to our file, we must enter an ex command while in command mode. This is easily done by pressing the “:” key. After doing this, a colon character should appear at the bottom of the screen:
为了保存我们刚才对文件所做的修改,我们必须在命令模式下输入一个 ex 命令。 通过按下”:”键,这很容易完成。按下冒号键之后,一个冒号字符应该出现在屏幕的底部:
:
To write our modified file, we follow the colon with a “w” then Enter:
为了写入我们修改的文件,我们在冒号之后输入”w”字符,然后按下回车键:
:w
The file will be written to the hard drive and we should get a confirmation message at the bottom of the screen, like this:
文件将会写入到硬盘,而且我们会在屏幕底部看到一行确认信息,就像这样:
"foo.txt" [New] 1L, 46C written
Tip: If you read the vim documentation, you will notice that (confusingly) command mode is called normal mode and ex commands are called command mode. Beware.
小贴示:如果你阅读 vim 的文档,你会发现命令模式被(令人困惑地)叫做普通模式,ex 命令 叫做命令模式。当心。
Moving The Cursor Around
移动光标
While in command mode, vi offers a large number of movement commands, some of which it shares with less. Here is a subset:
当在 vi 命令模式下时,vi 提供了大量的移动命令,其中一些与 less 阅读器的相同。这里 列举了一些:
| Key | Move The Cursor |
|---|---|
| l or Right Arrow | Right one character. |
| h or Left Arrow | Left one character |
| j or Down Arrow | Down one line |
| k or Up Arrow | Up one line |
| 0 (zero) | To the beginning of the current line. |
| ^ | To the first non-whitespace character on the current line. |
| $ | To the end of the current line. |
| w | To the beginning of the next word or puntuation character. |
| W | To the beginning of the next word, ignoring puntuation character. |
| b | To the beginning of the previous word or punctuation character. |
| B | To the beginning of the previous word, ignoring punctuation characters. |
| Ctrl-f or Page Down | Down one page. |
| Ctrl-b or Page Up | Up one page. |
| numberG | To line number. For example, 1G moves to the first line of the file. |
| G | To the last line of the file. |
| 按键 | 移动光标 |
|---|---|
| l or 右箭头 | 向右移动一个字符 |
| h or 左箭头 | 向左移动一个字符 |
| j or 下箭头 | 向下移动一行 |
| k or 上箭头 | 向上移动一行 |
| 0 (零按键) | 移动到当前行的行首。 |
| ^ | 移动到当前行的第一个非空字符。 |
| $ | 移动到当前行的末尾。 |
| w | 移动到下一个单词或标点符号的开头。 |
| W | 移动到下一个单词的开头,忽略标点符号。 |
| b | 移动到上一个单词或标点符号的开头。 |
| B | 移动到上一个单词的开头,忽略标点符号。 |
| Ctrl-f or Page Down | 向下翻一页 |
| Ctrl-b or Page Up | 向上翻一页 |
| numberG | 移动到第 number 行。例如,1G 移动到文件的第一行。 |
| G | 移动到文件末尾。 |
Why are the h, j, k, and l keys used for cursor movement? Because when vi was originally written, not all video terminals had arrow keys, and skilled typists could use regular keyboard keys to move the cursor without ever having to lift their fingers from the keyboard.
为什么 h,j,k,和 l 按键被用来移动光标呢?因为在开发 vi 之初,并不是所有的视频终端都有 箭头按键,熟练的打字员可以使用组合键来移动光标,他们的手指从不需要移开键盘。
Many commands in vi can be prefixed with a number, as with the “G” command listed above. By prefixing a command with a number, we may specify the number of times a command is to be carried out. For example, the command “5j” causes vi to move the cursor down five lines.
vi 中的许多命令都可以在前面加上一个数字,比方说上面提到的”G”命令。在命令之前加上一个 数字,我们就可以指定命令执行的次数。例如,命令”5j”将光标下移5行。
Basic Editing
基本编辑
Most editing consists of a few basic operations such as inserting text, deleting text and moving text around by cutting and pasting. vi, of course, supports all of these operations in its own unique way. vi also provides a limited form of undo. If we press the “u” key while in command mode, vi will undo the last change that you made. This will come in handy as we try out some of the basic editing commands.
大多数编辑工作由一些基本的操作组成,比如说插入文本,删除文本和通过剪切和粘贴来移动文本。 vi,当然,有它独特方式来实现所有的操作。vi 也提供了撤销功能,但有些限制。如果我们按下“u” 按键,当在命令模式下,vi 将会撤销你所做的最后一次修改。当我们试着执行一些基本的 编辑命令时,这会很方便。
Appending Text
追加文本
vi has several different ways of entering insert mode. We have already used the i command to insert text.
vi 有几种不同进入插入模式的方法。我们已经使用了 i 命令来插入文本。
Let’s go back to our foo.txt file for a moment:
让我们再次进入到我们的 foo.txt 文件:
The quick brown fox jumped over the lazy dog.
If we wanted to add some text to the end of this sentence, we would discover that the i command will not do it, since we can’t move the cursor beyond the end of the line. vi provides a command to append text, the sensibly named “a” command. If we move the cursor to the end of the line and type “a”, the cursor will move past the end of the line and vi will enter insert mode. This will allow us to add some more text:
如果我们想要在这个句子的末尾添加一些文本,我们会发现 i 命令不能完成任务,因为我们不能把 光标移到行尾。vi 提供了追加文本的命令,根据英文单词命名为”a”。如果我们把光标移动到行尾,输入”a”, 光标就会越过行尾,同时 vi 会进入插入模式。这让我们能添加文本到行末:
The quick brown fox jumped over the lazy dog. It was cool.
Remember to press the Esc key to exit insert mode.
记得按 Esc 键来退出插入模式。
Since we will almost always want to append text to the end of a line, vi offers a shortcut to move to end of the current line and start appending. It’s the “A” command. Let’s try it and add some more lines to our file.
因为我们几乎总是想要在行尾添加文本,所以 vi 提供了一个快捷键。光标将移动到行尾,同时 vi 进入输入模式。 它是”A”命令。试着用一下它,向文件添加更多行。
First, we’ll move the cursor to the beginning of the line using the “0” (zero) command. Now we type “A” and add the following lines of text:
首先,使用”0”(零)命令,将光标移动到行首。现在我们输入”A”,然后输入下面这些文本:
The quick brown fox jumped over the lazy dog. It was cool.
Line 2
Line 3
Line 4
Line 5
Again, press the Esc key to exit insert mode.
再一次,按下 Esc 键退出插入模式。
As we can see, the “A” command is more useful as it moves the cursor to the end of the line before starting insert mode.
正如我们所看到的, “A” 命令非常有用,因为它在进入到插入模式前,先将光标移到了行尾。
Opening A Line
打开一行
Another way we can insert text is by “opening” a line. This inserts a blank line between two existing lines and enters insert mode. This has two variants:
我们插入文本的另一种方式是“另起(open)”一行。这会在两行之间插入一个空白行,并且进入到插入模式。 这种方式有两个变体:
| Command | Opens |
|---|---|
| o | The line below the current line. |
| O | The line above the current line. |
| 命令 | 打开行 |
|---|---|
| o | 当前行的下方另起一行。 |
| O | 当前行的上方另起一行。 |
We can demonstrate this as follows: place the cursor on “Line 3” then press the o key.
我们可以演示一下:把光标移到”Line 3”上,再按下小 o 按键。
The quick brown fox jumped over the lazy dog. It was cool.
Line 2
Line 3
line 4
line 5
A new line was opened below the third line and we entered insert mode. Exit insert mode by pressing the Esc key. Press the u key to undo our change.
在第三行之下另起了新的一行,并且进入插入模式。按下 Esc,退出插入模式。按下 u 按键,撤销我们的修改。
Press the O key to open the line above the cursor:
按下大 O 按键在光标之上另起新的一行:
The quick brown fox jumped over the lazy dog. It was cool.
Line 2
Line 3
Line 4
Line 5
Exit insert mode by pressing the Esc key and undo our change by pressing u.
按下 Esc 按键,退出插入模式,并且按下 u 按键,撤销我们的更改。
Deleting Text
删除文本
As we might expect, vi offers a variety of ways to delete text, all of which contain one of two keystrokes. First, the x key will delete a character at the cursor location. x may be preceded by a number specifying how many characters are to be deleted. The d key is more general purpose. Like x, it may be preceded by a number specifying the number of times the deletion is to be performed. In addition, d is always followed by a movement command that controls the size of the deletion. Here are some examples:
正如我们所愿,vi 提供了各种删除文本的方法,而且只需一或两个按键。首先, x 按键会删除光标位置的一个字符。可以在 x 命令之前带上一个数字,来指明要删除的字符个数。 d 按键更通用一些。跟 x 命令一样,d 命令之前可以带上一个数字,来指定要执行的删除次数。另外, d 命令之后总是带上一个移动命令,用来控制删除的范围。这里有些实例:
| Command | Deletes |
|---|---|
| x | The current character. |
| 3x | The current character and the next two character. |
| dd | The current line. |
| 5dd | The current line and the next four lines. |
| dW | From the cursor position to the beginning of the next word. |
| d$ | From the cursor position to the end of the current line. |
| d0 | From the cursor position to the beginning of the current line. |
| d^ | From the cursor position to the first non-whitespace character of the line. |
| dG | From the current line to the end of the file. |
| d20G | From the current line to the twentieth line of the file. |
| 命令 | 删除的文本 |
|---|---|
| x | 当前字符 |
| 3x | 当前字符及其后的两个字符。 |
| dd | 当前行。 |
| 5dd | 当前行及随后的四行文本。 |
| dW | 从光标位置开始到下一个单词的开头。 |
| d$ | 从光标位置开始到当前行的行尾。 |
| d0 | 从光标位置开始到当前行的行首。 |
| d^ | 从光标位置开始到文本行的第一个非空字符。 |
| dG | 从当前行到文件的末尾。 |
| d20G | 从当前行到文件的第20行。 |
Place the cursor on the word “It” on the first line of our text. Press the x key repeatedly until the rest of the sentence is deleted. Next, press the u key repeatedly until the deletion is undone.
把光标放到第一行单词“It”之上。重复按下 x 按键直到删除剩下的部分。下一步,重复按下 u 按键 直到恢复原貌。
Note: Real vi only supports a single level of undo. vim supports multiple levels.
注意:真正的 vi 只是支持单层的 undo 命令。vim 则支持多层的。
Let’s try the deletion again, this time using the d command. Again, move the cursor to the word “It” and press dW to delete the word:
我们再次执行删除命令,这次使用 d 命令。还是移动光标到单词”It”之上,按下的 dW 来删除单词:
The quick brown fox jumped over the lazy dog. was cool.
Line 2
Line 3
Line 4
Line 5
Press d$ to delete from the cursor position to the end of the line:
按下 d$删除从光标位置到行尾的文本:
The quick brown fox jumped over the lazy dog.
Line 2
Line 3
Line 4
Line 5
Press dG to delete from the current line to the end of the file:
按下 dG 按键删除从当前行到文件末尾的所有行:
~
....
Press u three times to undo the deletion.
连续按下 u 按键三次,来恢复删除部分。
Cutting, Copying And Pasting Text
剪切,复制和粘贴文本
The d command not only deletes text, it also “cuts” text. Each time we use the d command the deletion is copied into a paste buffer (think clipboard) that we can later recall with the p command to paste the contents of the buffer after the cursor or the P command to paste the contents before the cursor.
这个 d 命令不仅删除文本,它还“剪切”文本。每次我们使用 d 命令,删除的部分被复制到一个 粘贴缓冲区中(看作剪切板)。过后我们执行小 p 命令把剪切板中的文本粘贴到光标位置之后, 或者是大 P 命令把文本粘贴到光标之前。
The y command is used to “yank” (copy) text in much the same way the d command is used to cut text. Here are some examples combining the y command with various movement commands:
y 命令用来“拉”(复制)文本,和 d 命令剪切文本的方式差不多。这里有些把 y 命令和各种移动命令 结合起来使用的实例:
| Command | Copies |
|---|---|
| yy | The current line. |
| 5yy | The current line and the next four lines. |
| yW | From the current cursor position to the beginning of the next word. |
| y$ | From the current cursor location to the end of the current line. |
| y0 | From the current cursor location to the beginning of the line. |
| y^ | From the current cursor location to the first non- whitespace character in the line. |
| yG | From the current line to the end of the file. |
| y20G | From the current line to the twentieth line of the file. |
| 命令 | 复制的内容 |
|---|---|
| yy | 当前行。 |
| 5yy | 当前行及随后的四行文本。 |
| yW | 从当前光标位置到下一个单词的开头。 |
| y$ | 从当前光标位置到当前行的末尾。 |
| y0 | 从当前光标位置到行首。 |
| y^ | 从当前光标位置到文本行的第一个非空字符。 |
| yG | 从当前行到文件末尾。 |
| y20G | 从当前行到文件的第20行。 |
Let’s try some copy and paste. Place the cursor on the first line of the text and type yy to copy the current line. Next, move the cursor to the last line (G) and type p to paste the line below the current line:
我们试着做些复制和粘贴工作。把光标放到文本第一行,输入 yy 来复制当前行。下一步,把光标移到 最后一行(G),输入小写的 p 把复制的一行粘贴到当前行的下面:
The quick brown fox jumped over the lazy dog. It was cool.
Line 2
Line 3
Line 4
Line 5
The quick brown fox jumped over the lazy dog. It was cool.
Just as before, the u command will undo our change. With the cursor still positioned on the last line of the file, type P to paste the text above the current line:
和以前一样,u 命令会撤销我们的修改。这时光标仍位于文件的最后一行,输入大写的 P 命令把 所复制的文本粘贴到当前行之上:
The quick brown fox jumped over the lazy dog. It was cool.
Line 2
Line 3
Line 4
The quick brown fox jumped over the lazy dog. It was cool.
Line 5
Try out some of the other y commands in the table above and get to know the behavior of both the p and P commands. When you are done, return the file to its original state.
试着执行上表中其他的一些 y 命令,了解小写 p 和大写 P 命令的行为。当你完成练习之后,把文件 恢复原样。
Joining Lines
连接行
vi is rather strict about its idea of a line. Normally, it is not possible to move the cursor to the end of a line and delete the end-of-line character to join one line with the one below it. Because of this, vi provides a specific command, J (not to be confused with j, which is for cursor movement) to join lines together.
vi 对于行的概念相当严格。通常,用户不可能通过删除“行尾结束符”(end-of-line character)来连接 当前行和它下面的一行。由于这个原因,vi 提供了一个特定的命令,大写的 J(不要与小写的 j 混淆了, j 是用来移动光标的)用于链接行与行。
If we place the cursor on line 3 and type the J command, here’s what happens:
如果我们把光标放到 line 3上,输入大写的 J 命令,看看发生什么情况:
The quick brown fox jumped over the lazy dog. It was cool.
Line 2
Line 3 Line 4
Line 5
Search And Replace
查找和替换
vi has the ability to move the cursor to locations based on searches. It can do this on both a single line or over an entire file. It can also perform text replacements with or without confirmation from the user.
vi 能把光标移到搜索到的匹配项上。vi 不仅能在搜索一特定行,还能进行全文搜索。 它也可以在有或没有用户确认的情况下实现文本替换。
Searching Within A Line
查找一行
The f command searches a line and moves the cursor to the next instance of a specified character. For example, the command fa would move the cursor to the next occurrence of the character “a” within the current line. After performing a character search within a line, the search may be repeated by typing a semicolon.
f 命令能搜索一特定行,并将光标移动到下一个匹配的字符上。例如,命令 fa 会把光标定位到同一行中 下一个出现的”a”字符上。在进行了一次行内搜索后,输入分号能重复这次搜索。
Searching The Entire File
查找整个文件
To move the cursor to the next occurrence of a word or phrase, the / command is used. This works the same way as we learned earlier in the less program. When you type the / command a “/” will appear at the bottom of the screen. Next, type the word or phrase to be searched for, followed by the Enter key. The cursor will move to the next location containing the search string. A search may be repeated using the previous search string with the n command. Here’s an example:
移动光标到下一个出现的单词或短语上,使用 / 命令。这个命令和我们之前在 less 程序中学到 的一样。当你输入/命令后,一个”/”字符会出现在屏幕底部。接下来,输入要查找的单词或短语, 按下回车。光标就会移动到下一个包含所查找字符串的位置。通过 n 命令来重复先前的查找。 这里有个例子:
The quick brown fox jumped over the lazy dog. It was cool.
Line 2
Line 3
Line 4
Line 5
Place the cursor on the first line of the file. Type:
移动光标到文件的第一行。输入:
/Line
followed by the Enter key. The cursor will move to line 2. Next, type n and the cursor will move to line 3. Repeating the n command will move the cursor down the file until it runs out of matches. While we have so far only used words and phrases for our search patterns, vi allows the use of regular expressions, a powerful method of expressing complex text patterns. We will cover regular expressions in some detail in a later chapter.
然后敲回车。光标会移动到第二行。然后输入 n,这时光标移动到第三行。重复键入 n 命令,光标会 继续向下移动直到遍历所有的匹配项。至此我们只是通过输入单词和短语进行搜索,但 vi 支持正则 表达式,一种用于表达复杂文本的方法。我们将会在之后的章节中详细讲解正则表达式。
Global Search And Replace
全局查找和替代
vi uses an ex command to perform search and replace operations (called “substitution” in vi) over a range of lines or the entire file. To change the word “Line” to “line” for the entire file, we would enter the following command:
vi 使用 ex 命令来执行查找和替代操作。将整个文件中的单词“Line”更改为“line”, 输入以下命令:
:%s/Line/line/g
Let’s break this command down into separate items and see what each one does:
我们把这个命令分解为几个单独的部分,看一下每部分的含义:
| Item | Meaning |
|---|---|
| : | The colon character starts an ex command. |
| % | Specifies the range of lines for the operation. % is a shortcut meaning from the first line to the last line. Alternately, the range could have been specified 1,5 (since our file is five lines long), or 1,$ which means “from line 1 to the last line in the file.” If the range of lines is omitted, the operation is only performed on the current line. |
| s | Specifies the operation. In this case, substitution (search and replace). |
| /Line/line | The search pattern and the replacement text. |
| g | This means “global” in the sense that the search and replace is performed on every instance of the search string in the line. If omitted, only the first instance of the search string on each line is replaced. |
| 条目 | 含义 |
|---|---|
| : | 冒号字符运行一个 ex 命令。 |
| % | 指定要操作的行数。% 是一个快捷方式,表示从第一行到最后一行。另外,操作范围也 可以用 1,5 来代替(因为我们的文件只有5行文本),或者用 1,$ 来代替,意思是 “ 从第一行到文件的最后一行。” 如果省略了文本行的范围,那么操作只对当前行生效。 |
| s | 指定操作。在这种情况下是,替换(查找与替代)。 |
| /Line/line | 查找类型与替代文本。 |
| g | 这是“全局”的意思,意味着对文本行中所有匹配的字符串执行查找和替换操作。如果省略 g,则 只替换每个文本行中第一个匹配的字符串。 |
After executing our search and replace command our file looks like this:
执行完查找和替代命令之后,我们的文件看起来像这样:
The quick brown fox jumped over the lazy dog. It was cool.
line 2
line 3
line 4
line 5
We can also specify a substitution command with user confirmation. This is done by adding a “c” to the end of the command. For example:
我们也可以指定一个需要用户确认的替换命令。通过添加一个”c”字符到这个命令的末尾,来完成 这个替换命令。例如:
:%s/line/Line/gc
This command will change our file back to its previous form; however, before each substitution, vi stops and asks us to confirm the substitution with this message:
这个命令会把我们的文件恢复先前的模样;然而,在执行每个替换命令之前,vi 会停下来, 通过下面的信息,来要求我们确认这个替换:
replace with Line (y/n/a/q/l/^E/^Y)?
Each of the characters within the parentheses is a possible choice as follows:
括号中的每个字符都是一个可能的选择,如下所示:
| Key | Action |
|---|---|
| y | Perform the substitution. |
| n | Skip this instance of the pattern. |
| a | Perform the substitution on this and all subsequent instances of the pattern. |
| q or esc | Quit the substitution. |
| l | Perform this substitution and then quit. Short for"last". |
| Ctrl-e, Ctrl-y | Scroll down and scroll up, respectively. Useful for viewing the context of the proposed substitution. |
| 按键 | 行为 |
|---|---|
| y | 执行替换操作 |
| n | 跳过这个匹配的实例 |
| a | 对这个及随后所有匹配的字符串执行替换操作。 |
| q or esc | 退出替换操作。 |
| l | 执行这次替换并退出。l 是 “last” 的简写。 |
| Ctrl-e, Ctrl-y | 分别是向下滚动和向上滚动。用于查看建议替换的上下文。 |
If you type y, the substitution will be performed, n will cause vi to skip this instance and move on to the next one.
如果你输入 y,则执行这个替换,输入 n 则会导致 vi 跳过这个实例,而移到下一个匹配项上。
Editing Multiple Files
编辑多个文件
It’s often useful to edit more than one file at a time. You might need to make changes to multiple files or you may need to copy content from one file into another. With vi we can open multiple files for editing by specifying them on the command line:
同时能够编辑多个文件是很有用的。你可能需要更改多个文件或者从一个文件复制内容到 另一个文件。通过 vi,我们可以打开多个文件来编辑,只要在命令行中指定要编辑的文件名。
vi file1 file2 file3...
Let’s exit our existing vi session and create a new file for editing. Type :wq to exit vi saving our modified text. Next, we’ll create an additional file in our home directory that we can play with. We’ll create the file by capturing some output from the ls command:
我们先退出已经存在的 vi 会话,然后创建一个新文件来编辑。输入:wq 来退出 vi 并且保存了所做的修改。 下一步,我们将在家目录下创建一个额外的用来玩耍的文件。通过获取从 ls 命令的输出,来创建这个文件。
| |
Let’s edit our old file and our new one with vi:
用 vi 来编辑我们的原文件和新创建的文件:
| |
vi will start up and we will see the first file on the screen:
vi 启动,我们会看到第一个文件显示出来:
The quick brown fox jumped over the lazy dog. It was cool.
Line 2
Line 3
Line 4
Line 5
Switching Between Files
文件之间切换
To switch from one file to the next, use this ex command:
从这个文件切换下一个文件,使用这个 ex 命令:
:n
To move back to the previous file use:
回到先前的文件使用:
:N
While we can move from one file to another, vi enforces a policy that prevents us from switching files if the current file has unsaved changes. To force vi to switch files and abandon your changes, add an exclamation point (!) to the command.
当我们从一个文件移到另一个文件时,如果当前文件没有保存修改,vi 会阻止我们切换文件, 这是 vi 强制执行的政策。在命令之后添加感叹号,可以强迫 vi 放弃修改而转换文件。
In addition to the switching method described above, vim (and some versions of vi) also provide some ex commands that make multiple files easier to manage. We can view a list of files being edited with the :buffers command. Doing so will display a list of the files at the bottom of the display:
另外,上面所描述的切换方法,vim(和一些版本的 vi)也提供了一些 ex 命令,这些命令使 多个文件更容易管理。我们可以查看正在编辑的文件列表,使用:buffers 命令。运行这个 命令后,屏幕顶部就会显示出一个文件列表:
:buffers
1 # "foo.txt" line 1
2 %a "ls-output.txt" line 0
Press ENTER or type command to continue
To switch to another buffer (file), type :buffer followed by the number of the buffer you wish to edit. For example, to switch from buffer 1 which contains the file foo.txt to buffer 2 containing the file ls-output.txt we would type this:
要切换到另一个缓冲区(文件),输入 :buffer, 紧跟着你想要编辑的缓冲器编号。比如,要从包含文件 foo.txt 的1号缓冲区切换到包含文件 ls-output.txt 的2号缓冲区,我们会这样输入:
:buffer 2
and our screen now displays the second file.
我们的屏幕现在会显示第二个文件。
Opening Additional Files For Editing
打开另一个文件并编辑
It’s also possible to add files to our current editing session. The ex command :e (short for “edit”) followed by a filename will open an additional file. Let’s end our current editing session and return to the command line.
在我们的当前的编辑会话里也能添加别的文件。ex 命令 :e (编辑(edit) 的简写) 紧跟要打开的文件名将会打开 另外一个文件。 让我们结束当前的会话回到命令行。
Start vi again with just one file:
重新启动vi并只打开一个文件
| |
To add our second file, enter:
要加入我们的第二个文件,输入:
:e ls-output.txt
And it should appear on the screen. The first file is still present as we can verify:
它应该显示在屏幕上。 我们可以这样来确认第一个文件仍然存在:
:buffers
1 # "foo.txt" line 1
2 %a "ls-output.txt" line 0
Press ENTER or type command to continue
Note: You cannot switch to files loaded with the :e command using either the :n or :N command. To switch files, use the :buffer command followed by the buffer number.
注意:当文件由 :e 命令加载,你将无法用 :n 或 :N 命令来切换文件。 这时要使用 :buffer 命令加缓冲区号码,来切换文件。
Copying Content From One File Into Another
跨文件复制黏贴
Often while editing multiple files, we will want to copy a portion of one file into another file that we are editing. This is easily done using the usual yank and paste commands we used earlier. We can demonstrate as follows. First, using our two files, switch to buffer 1 (foo.txt) by entering:
当我们编辑多个文件时,经常地要复制文件的一部分到另一个正在编辑的文件。使用之前我们学到的 拉(yank)和粘贴命令,这很容易完成。说明如下。以打开的两个文件为例,首先转换到缓冲区1(foo.txt) ,输入:
:buffer 1
which should give us this:
我们应该得到如下输出:
The quick brown fox jumped over the lazy dog. It was cool.
Line 2
Line 3
Line 4
Line 5
Next, move the cursor to the first line, and type yy to yank (copy) the line.
下一步,把光标移到第一行,并且输入 yy 来复制这一行。
Switch to the second buffer by entering:
转换到第二个缓冲区,输入:
:buffer 2
The screen will now contain some file listings like this (only a portion is shown here):
现在屏幕会包含一些文件列表(这里只列出了一部分):
total 343700
-rwxr-xr-x 1 root root 31316 2007-12-05 08:58 [
....
Move the cursor to the first line and paste the line we copied from the preceding file by typing the p command:
移动光标到第一行,输入 p 命令把我们从前面文件中复制的一行粘贴到这个文件中:
total 343700
The quick brown fox jumped over the lazy dog. It was cool.
-rwxr-xr-x 1 root root 31316 2007-12-05 08:58 [
....
Inserting An Entire File Into Another
插入整个文件到另一个文件
It’s also possible to insert an entire file into one that we are editing. To see this in action, let’s end our vi session and start a new one with just a single file:
我们也可以把整个文件插入到我们正在编辑的文件中。看一下实际操作,结束 vi 会话,重新 启动一个只打开一个文件的 vi 会话:
| |
We will see our file listing again:
再一次看到我们的文件列表:
total 343700
-rwxr-xr-x 1 root root 31316 2007-12-05 08:58 [
Move the cursor to the third line, then enter the following ex command:
移动光标到第三行,然后输入以下 ex 命令:
:r foo.txt
The :r command (short for “read”) inserts the specified file before the cursor position. Our screen should now look like this:
这个:r 命令(是”read”的简称)把指定的文件插入到光标位置之前。现在屏幕应该看起来像这样:
total 343700
-rwxr-xr-x 1 root root 31316 2007-12-05 08:58 [
....
The quick brown fox jumped over the lazy dog. It was cool.
Line 2
Line 3
Line 4
Line 5
-rwxr-xr-x 1 root root 111276 2008-01-31 13:36 a2p
....
Saving Our Work
保存工作
Like everything else in vi, there are several different ways to save our edited files. We have already covered the ex command :w, but there are some others we may also find helpful.
像 vi 中的其它操作一样,有几种不同的方法来保存我们所修改的文件。我们已经研究了 :w 这个 ex 命令, 但还有几种方法,可能我们也觉得有帮助。
In command mode, typing ZZ will save the current file and exit vi. Likewise, the ex command :wq will combine the :w and :q commands into one that will both save the file and exit.
在命令模式下,输入 ZZ 就会保存并退出当前文件。同样地,ex 命令:wq 把:w 和:q 命令结合到 一起,来完成保存和退出任务。
The :w command may also specify an optional filename. This acts like “Save As…” For example, if we were editing foo.txt and wanted to save an alternate version called foo1.txt, we would enter the following:
这个:w 命令也可以指定可选的文件名。这个的作用就如”Save As…“。例如,如果我们 正在编辑 foo.txt 文件,想要保存一个副本,叫做 foo1.txt,那么我们可以执行以下命令:
:w foo1.txt
Note: While the command above saves the file under a new name, it does not change the name of the file you are editing. As you continue to edit, you will still be editing foo.txt, not foo1.txt.
注意:当上面的命令以一个新名字保存文件时,它并没有更改你正在编辑的文件的名字。 如果你继续编辑,你还是在编辑文件 foo.txt,而不是 foo1.txt。
Further Reading
拓展阅读
Even with all that we have covered in this chapter, we have barely scratched the surface of what vi and vim can do. Here are a couple of on-line resources you can use to continue your journey towards vi mastery:
即使把这章所学的内容都加起来,我们也只是学了 vi 和 vim 的一点儿皮毛而已。这里 有一些在线资料,可以帮助你进一步掌握 vi。
Learning The vi Editor – A Wikibook from Wikipedia that offers a concise guide to vi and several of its work-a-likes including vim. It’s available at:
学习 vi 编辑器-一本来自于 Wikipedia 的 Wikibook,是一本关于 vi 的简要指南,并 介绍了几个类似 vi 的程序,其中包括 vim。它可以在以下链接中得到:
The Vim Book - The vim project has a 570-page book that covers (almost) all of the features in vim. You can find it at:
The Vim Book-vim 项目包括一本书,570页,(几乎)包含了 vim 的全部特性。你能在下面链接中找到它:
A Wikipedia article on Bill Joy, the creator of vi.:
Wikipedia 上关于 Bill Joy(vi 创始人)的文章。
A Wikipedia article on Bram Moolenaar, the author of vim:
Wikipedia 上关于 Bram Moolenaar(vim 作者)的文章:
14 - 14 自定制 shell 提示符
自定制 shell 提示符
http://billie66.github.io/TLCL/book/chap14.html
In this chapter we will look at a seemingly trivial detail — our shell prompt. This examination will reveal some of the inner workings of the shell and the terminal emulator program itself.
在这一章中,我们将关注一个很小的细节-shell 提示符。但这会揭示一些 shell 和 终端仿真器的内部工作方式。
Like so many things in Linux, the shell prompt is highly configurable, and while we have pretty much taken it for granted, the prompt is a really useful device once we learn how to control it.
和 Linux 内的许多程序一样,shell 提示符是可高度配置的,虽然我们把它看作是理所当然, 但是我们一旦学会了怎样控制它,就会发现自定制的 shell 提示符是相当有用的。
Anatomy Of A Prompt
解剖一个提示符
Our default prompt looks something like this:
我们默认的提示符看起来像这样:
| |
Notice that it contains our user name, our host name and our current working directory, but how did it get that way? Very simply, it turns out. The prompt is defined by an environment variable named PS1 (short for “prompt string one”). We can view the contents of PS1 with the echo command:
注意它包含我们的用户名,主机名和当前工作目录,但是它又是怎样得到这些东西的呢? 结果证明非常简单。提示符是由一个环境变量定义的,叫做 PS1(是“prompt string one” 的简写)。我们可以通过 echo 命令来查看 PS1的内容。
| |
Note: Don’t worry if your results are not exactly the same as the example above. Every Linux distribution defines the prompt string a little differently, some quite exotically.
注意:如果你 shell 提示符的内容和上例不是一模一样,也不必担心。每个 Linux 发行版 定义的提示符稍微有点不同,其中一些相当异于寻常。
From the results, we can see that PS1 contains a few of the characters we see in our prompt such as the brackets, the at-sign, and the dollar sign, but the rest are a mystery. The astute among us will recognize these as backslash-escaped special characters like those we saw in Chapter 8. Here is a partial list of the characters that the shell treats specially in the prompt string:
从输出结果中,我们看到那个 PS1 环境变量包含一些这样的字符,比方说中括号,@符号,和美元符号, 但是剩余部分就是个谜。我们中一些机敏的人会把这些看作是由反斜杠转义的特殊字符,就像我们 在第八章中看到的一样。这里是一部分字符列表,在提示符中 shell 会特殊对待这些字符:
| Sequence | Value Displayed |
|---|---|
| \a | ASCII bell. This makes the computer beep when it is encountered. |
| \d | Current date in day, month, date format. For example, “Mon May 26." |
| \h | Host name of the local machine minus the trailing domain name. |
| \H | Full host name. |
| \j | Number of jobs running in the current shell session. |
| \l | Name of the current terminal device. |
| \n | A newline character. |
| \r | A carriage return. |
| \s | Name of the shell program. |
| \t | Current time in 24 hour hours:minutes:seconds format. |
| \T | Current time in 12 hour format. |
| @ | Current time in 12 hour AM/PM format. |
| \A | Current time in 24 hour hours:minutes format. |
| \u | User name of the current user. |
| \v | Version number of the shell. |
| \V | Version and release numbers of the shell. |
| \w | Name of the current working directory. |
| \W | Last part of the current working directory name. |
| ! | History number of the current command. |
| # | Number of commands entered into this shell session. |
| $ | This displays a “$” character unless you have superuser privileges. In that case, it displays a “#” instead. |
| [ | Signals the start of a series of one or more non-printing characters. This is used to embed non-printing control characters which manipulate the terminal emulator in some way, such as moving the cursor or changing text colors. |
| ] | Signals the end of a non-printing character sequence. |
| 序列 | 显示值 |
|---|---|
| \a | 以 ASCII 格式编码的铃声 . 当遇到这个转义序列时,计算机会发出嗡嗡的响声。 |
| \d | 以日,月,天格式来表示当前日期。例如,“Mon May 26.” |
| \h | 本地机的主机名,但不带末尾的域名。 |
| \H | 完整的主机名。 |
| \j | 运行在当前 shell 会话中的工作数。 |
| \l | 当前终端设备名。 |
| \n | 一个换行符。 |
| \r | 一个回车符。 |
| \s | shell 程序名。 |
| \t | 以24小时制,hours:minutes:seconds 的格式表示当前时间. |
| \T | 以12小时制表示当前时间。 |
| @ | 以12小时制,AM/PM 格式来表示当前时间。 |
| \A | 以24小时制,hours:minutes 格式表示当前时间。 |
| \u | 当前用户名。 |
| \v | shell 程序的版本号。 |
| \V | shell 的版本号 |
| \w | 当前工作目录名。 |
| \W | 当前工作目录名的最后部分。 |
| ! | 当前命令的历史号。 |
| # | 当前 shell 会话中的命令数。 |
| $ | 这会显示一个"$“字符,除非你拥有超级用户权限。在那种情况下, 它会显示一个”#“字符。 |
| [ | 标志着一系列一个或多个非打印字符的开始。这被用来嵌入非打印 的控制字符,这些字符以某种方式来操作终端仿真器,比方说移动光标或者是更改文本颜色。 |
| ] | 标志着非打印字符序列结束。 |
Trying Some Alternate Prompt Designs
自定制提示符
With this list of special characters, we can change the prompt to see the effect. First, we’ll back up the existing string so we can restore it later. To do this, we will copy the existing string into another shell variable that we create ourselves:
参照这个特殊字符列表,我们可以更改提示符来看一下效果。首先, 我们把原来提示符字符串的内容备份一下,以备之后恢复原貌。为了完成备份, 我们把已有的字符串复制到另一个 shell 变量中,这个变量是我们自己创造的。
| |
We create a new variable called ps1_old and assign the value of PS1 to it. We can verify that the string has been copied with the echo command:
我们新创建了一个叫做 ps1_old 的变量,并把变量 PS1的值赋 ps1_old。通过 echo 命令可以证明 我们的确复制了 PS1 的值。
| |
We can restore the original prompt at any time during our terminal session by simply reversing the process:
在终端会话中,我们能在任一时间复原提示符,只要简单地反向操作就可以了。
| |
Now that we are ready to proceed, let’s see what happens if we have an empty prompt string:
现在,我们准备开始,让我们看看如果有一个空的字符串会发生什么:
| |
If we assign nothing to the prompt string, we get nothing. No prompt string at all! The prompt is still there, but displays nothing, just as we asked it to. Since this is kind of disconcerting to look at, we’ll replace it with a minimal prompt:
如果我们没有给提示字符串赋值,那么我们什么也看不到。根本没有提示字符串!提示符仍然在那里, 但是什么也不显示,正如我们所要求的那样。我们将用一个最小的提示符来代替它:
PS1="\$ "
That’s better. At least now we can see what we are doing. Notice the trailing space within the double quotes. This provides the space between the dollar sign and the cursor when the prompt is displayed.
这样要好一些。至少能看到我们在做了什么。注意双引号中末尾的空格。当提示符显示的时候, 这个空格把美元符号和光标分离开。
Let’s add a bell to our prompt:
在提示符中添加一个响铃:
$ PS1="\a\$ "
Now we should hear a beep each time the prompt is displayed. This could get annoying, but it might be useful if we needed notification when an especially long-running command has been executed.
现在每次提示符显示的时候,我们应该能听到嗡嗡声。这会变得很烦人,但是它可能会 很有用,特别是当一个需要运行很长时间的命令执行完后,我们要得到通知。
Next, let’s try to make an informative prompt with some host name and time-of-day information:
下一步,让我们试着创建一个信息丰富的提示符,包含主机名和当天时间的信息。
$ PS1="\A \h \$ "
17:33 linuxbox $
Try out the other sequences listed in the table above and see if you can come up with a brilliant new prompt.
试试其他上表中列出的转义序列,看看你能否想出精彩的新提示符。
Adding Color
添加颜色
Most terminal emulator programs respond to certain non-printing character sequences to control such things as character attributes (like color, bold text and the dreaded blinking text) and cursor position. We’ll cover cursor position in a little bit, but first we’ll look at color.
大多数终端仿真器程序支持一定的非打印字符序列来控制,比方说字符属性(像颜色,黑体和可怕的闪烁) 和光标位置。我们后续会更深入地讨论光标位置,但首先我们要看一下字体颜色。
Terminal Confusion
混乱的终端时代
Back in ancient times, when terminals were hooked to remote computers, there were many competing brands of terminals and they all worked differently. They had different keyboards and they all had different ways of interpreting control information. Unix and Unix-like systems have two rather complex subsystems to deal with the babel of terminal control (called termcap and terminfo). If you look in the deepest recesses of your terminal emulator settings you may find a setting for the type of terminal emulation.
回溯到终端连接到远端计算机的时代,有许多竞争的终端品牌,它们各自工作方式都不同。 有着不同的键盘,以不同的方式来解释控制信息。Unix 和类 Unix 的系统有两个 相当复杂的子系统来处理终端控制领域的混乱局面(称为 termcap 和 terminfo)。如果你 查看一下终端仿真器最底层的属性设置,可能会找到一个关于终端仿真器类型的设置。
In an effort to make terminals speak some sort of common language, the American National Standards Institute (ANSI) developed a standard set of character sequences to control video terminals. Old time DOS users will remember the ANSI.SYS file that was used to enable interpretation of these codes.
为了努力使所有的终端都讲某种通用语言,美国国家标准委员会(ANSI)制定了 一套标准的字符序列集合来控制视频终端。原先 DOS 用户会记得 ANSI.SYS 文件, 这是一个用来使这些编码解释生效的文件。
Character color is controlled by sending the terminal emulator an ANSI escape code embedded in the stream of characters to be displayed. The control code does not “print out” on the display, rather it is interpreted by the terminal as an instruction. As we saw in the table above, the [ and ] sequences are used to encapsulate non-printing characters. An ANSI escape code begins with an octal 033 (the code generated by the escape key) followed by an optional character attribute followed by an instruction. For example, the code to set the text color to normal (attribute = 0), black text is:
字符颜色是由发送到终端仿真器的一个嵌入到了要显示的字符流中的 ANSI 转义编码来控制的。 这个控制编码不会“打印”到屏幕上,而是被终端解释为一个指令。正如我们在上表看到的字符序列, 这个 [ 和 ] 序列被用来封装这些非打印字符。一个 ANSI 转义编码以一个八进制033(这个编码是由 退出按键产生的)开头,其后跟着一个可选的字符属性,在之后是一个指令。例如,把文本颜色 设为正常(attribute = 0),黑色文本的编码如下:
\033[0;30m
Here is a table of available text colors. Notice that the colors are divided into two groups, differentiated by the application of the bold character attribute (1) which creates the appearance of “light” colors:
这里是一个可用的文本颜色列表。注意这些颜色被分为两组,由应用程序粗体字符属性(1) 分化开来,这个属性可以描绘出“浅”色文本。
| Sequence | Text Color | Sequence | Text Color |
|---|---|---|---|
| \033[0;30m | Black | \033[1;30m | Dark Gray |
| \033[0;31m | Red | \033[1;31m | Light Red |
| \033[0;32m | Green | \033[1;32m | Light Green |
| \033[0;33m | Brown | \033[1;33m | Yellow |
| \033[0;34m | Blue | \033[1;34m | Light Blue |
| \033[0;35m | Purple | \033[1;35m | Light Purple |
| \033[0;36m | Cyan | \033[1;36m | Light Cyan |
| \033[0;37m | Light Gray | \033[1;37m | White |
| 序列 | 文本颜色 | 序列 | 文本颜色 |
|---|---|---|---|
| \033[0;30m | 黑色 | \033[1;30m | 深灰色 |
| \033[0;31m | 红色 | \033[1;31m | 浅红色 |
| \033[0;32m | 绿色 | \033[1;32m | 浅绿色 |
| \033[0;33m | 棕色 | \033[1;33m | 黄色 |
| \033[0;34m | 蓝色 | \033[1;34m | 浅蓝色 |
| \033[0;35m | 粉红 | \033[1;35m | 浅粉色 |
| \033[0;36m | 青色 | \033[1;36m | 浅青色 |
| \033[0;37m | 浅灰色 | \033[1;37m | 白色 |
Let’s try to make a red prompt. We’ll insert the escape code at the beginning:
让我们试着制作一个红色提示符。我们将在开头加入转义编码:
<me@linuxbox ~>$ PS1='\[\033[0;31m\]<\u@\h \W>\$'
<me@linuxbox ~>$
That works, but notice that all the text that we type after the prompt is also red. To fix this, we will add another escape code to the end of the prompt that tells the terminal emulator to return to the previous color:
我们的提示符生效了,但是注意我们在提示符之后输入的文本也是红色的。为了修改这个问题, 我们将添加另一个转义编码到这个提示符的末尾来告诉终端仿真器恢复到原来的颜色。
<me@linuxbox ~>$ PS1='\[\033[0;31m\]<\u@\h \W>\$\[\033[0m\]'
<me@linuxbox ~>$
That’s better!
这看起来要好些!
It’s also possible to set the text background color using the codes listed below. The background colors do not support the bold attribute.
也有可能要设置文本的背景颜色,使用下面列出的转义编码。这个背景颜色不支持黑体属性。
| \033[0;40m | Blue | \033[1;44m | Black |
|---|---|---|---|
| \033[0;41m | Red | \033[1;45m | Purple |
| \033[0;42m | Green | \033[1;46m | Cyan |
| \033[0;43m | Brown | \033[1;47m | Light Gray |
| \033[0;40m | 蓝色 | \033[1;44m | 黑色 |
|---|---|---|---|
| \033[0;41m | 红色 | \033[1;45m | 紫色 |
| \033[0;42m | 绿色 | \033[1;46m | 青色 |
| \033[0;43m | 棕色 | \033[1;47m | 浅灰色 |
We can create a prompt with a red background by applying a simple change to the first escape code:
我们可以创建一个带有红色背景的提示符,只是对第一个转义编码做个简单的修改。
<me@linuxbox ~>$ PS1='\[\033[0;41m\]<\u@\h \W>\$\[\033[0m\] '
<me@linuxbox ~>$
Try out the color codes and see what you can create!
试试这些颜色编码,看看你能定制出怎样的提示符!
Note: Besides the normal (0) and bold (1) character attributes, text may also be given underscore (4), blinking (5), and inverse (7) attributes as well. In the interests of good taste, many terminal emulators refuse to honor the blinking attribute, however.
注意:除了正常的 (0) 和黑体 (1) 字符属性之外,文本也可以具有下划线 (4),闪烁 (5), 和反向 (7) 属性。为了拥有好品味,然而,许多终端仿真器拒绝使用这个闪烁属性。
Moving The Cursor
移动光标
Escape codes can be used to position the cursor. This is commonly used to provide a clock or some other kind of information at a different location on the screen such as an upper corner each time the prompt is drawn. Here is a list of the escape codes that position the cursor:
转义编码也可以用来定位光标。这些编码被普遍地用来,每次当提示符出现的时候,会在屏幕的不同位置 比如说上面一个角落,显示一个时钟或者其它一些信息。这里是一系列用来定位光标的转义编码:
| Escape Code | Action |
|---|---|
| \033[l;cH | Move the cursor to line l and column c. |
| \033[nA | Move the cursor up n lines. |
| \033[nB | Move the cursor down n lines. |
| \033[nC | Move the cursor forward n characters. |
| \033[nD | Move the cursor backward n characters. |
| \033[2J | Clear the screen and move the cursor to the upper left corner (line 0, column 0). |
| \033[K | Clear from the cursor position to the end of the current line. |
| \033[s | Store the current cursor position. |
| \033[u | Recall the stored cursor position. |
| 转义编码 | 行动 |
|---|---|
| \033[l;cH | 把光标移到第 l 行,第 c 列。 |
| \033[nA | 把光标向上移动 n 行。 |
| \033[nB | 把光标向下移动 n 行。 |
| \033[nC | 把光标向前移动 n 个字符。 |
| \033[nD | 把光标向后移动 n 个字符。 |
| \033[2J | 清空屏幕,把光标移到左上角(第零行,第零列)。 |
| \033[K | 清空从光标位置到当前行末的内容。 |
| \033[s | 存储当前光标位置。 |
| \033[u | 唤醒之前存储的光标位置。 |
Using the codes above, we’ll construct a prompt that draws a red bar at the top of the screen containing a clock (rendered in yellow text) each time the prompt is displayed. The code for the prompt is this formidable looking string:
使用上面的编码,我们将构建一个提示符,每次当这个提示符出现的时候,会在屏幕的上方画出一个 包含时钟(由黄色文本渲染)的红色长条。构建好的提示符的编码就是这串看起来很唬人的字符串:
PS1='\[\033[s\033[0;0H\033[0;41m\033[K\033[1;33m\t\033[0m\033[u\]
<\u@\h \W>\$ '
Let’s take a look at each part of the string to see what it does:
让我们分别看一下这个字符串的每一部分所表示的意思:
| Squence | Action |
|---|---|
| [ | Begins a non-printing character sequence. The real purpose of this is to allow bash to correctly calculate the size of the visible prompt. Without this, command line editing features will improperly position the cursor. |
| \033[s | Store the cursor position. This is needed to return to the prompt location after the bar and clock have been drawn at the top of the screen. Be aware that some terminal emulators do not honor this code. |
| \033[0;0H | Move the cursor to the upper left corner, which is line zero, column zero. |
| \033[0;41m | Set the background color to red. |
| \033[K | Clear from the current cursor location (the top left corner) to the end of the line. Since the background color is now red, the line is cleared to that color creating our bar. Note that clearing to the end of the line does not change the cursor position, which remains at the upper left corner. |
| \033[1;33m | Set the text color to yellow. |
| \t | Display the current time. While this is a “printing” element, we still include it in the non-printing portion of the prompt, since we don’t want bash to include the clock when calculating the true size of the displayed prompt. |
| \033[0m | Turn off color. This affects both the text and background. |
| \033[u | Restore the cursor position saved earlier. |
| ] | End non-printing characters sequence. |
| <\u@\h \W>$ | Prompt string. |
| 序列 | 行动 |
|---|---|
| [ | 开始一个非打印字符序列。其真正的目的是为了让 bash 能够正确地计算提示符的大小。如果没有这个转义字符的话,命令行编辑 功能会弄错光标的位置。 |
| \033[s | 存储光标位置。这个用来使光标能回到原来提示符的位置, 当长条和时钟显示到屏幕上方之后。当心一些 终端仿真器不推崇这个编码。 |
| \033[0;0H | 把光标移到屏幕左上角,也就是第零行,第零列的位置。 |
| \033[0;41m | 把背景设置为红色。 |
| \033[K | 清空从当前光标位置到行末的内容。因为现在 背景颜色是红色,则被清空行背景成为红色,以此来创建长条。注意虽然一直清空到行末, 但是不改变光标位置,它仍然在屏幕左上角。 |
| \033[1;33m | 把文本颜色设为黄色。 |
| \t | 显示当前时间。虽然这是一个可“打印”的元素,但我们仍把它包含在提示符的非打印部分, 因为我们不想 bash 在计算可见提示符的真正大小时包括这个时钟在内。 |
| \033[0m | 关闭颜色设置。这对文本和背景都起作用。 |
| \033[u | 恢复到之前保存过的光标位置处。 |
| ] | 结束非打印字符序列。 |
| <\u@\h \W>$ | 提示符字符串。 |
Saving The Prompt
保存提示符
Obviously, we don’t want to be typing that monster all the time, so we’ll want to store our prompt someplace. We can make the prompt permanent by adding it to our .bashrc file. To do so, add these two lines to the file:
显然地,我们不想总是敲入那个怪物,所以我们将要把这个提示符存储在某个地方。通过把它 添加到我们的.bashrc 文件,可以使这个提示符永久存在。为了达到目的,把下面这两行添加到.bashrc 文件中。
PS1='\[\033[s\033[0;0H\033[0;41m\033[K\033[1;33m\t\033[0m\033[u\]<\u@\h \W>\$ '
export PS1
Summing Up
总结归纳
Believe it or not, there is much more that can be done with prompts involving shell functions and scripts that we haven’t covered here, but this is a good start. Not everyone will care enough to change the prompt, since the default prompt is usually satisfactory. But for those of us who like to tinker, the shell provides the opportunity for many hours of trivial fun.
不管你信不信,如果加上我们在这里没有论及的 shell 函数和脚本,还有许多事情可以由提示符来完成。 但这是一个好的开始。并不是每个人都会花心思来更改提示符,因为通常默认的提示符就很让人满意。 但是对于我们这些喜欢思考的人们来说,shell 却提供了许多制造琐碎乐趣的机会。
Further Reading
拓展阅读
The Bash Prompt HOWTO from the Linux Documentation Project provides a pretty complete discussion of what the shell prompt can be made to do. It is available at:
The Bash Prompt HOWTO 来自于 Linux 文档工程,对 shell 提示符的用途进行了相当 完备的论述。可在以下链接中得到:
Wikipedia has a good article on the ANSI Escape Codes:
Wikipedia 上有一篇关于 ANSI Escape Codes 的好文章:
15 - 15 软件包管理
软件包管理
http://billie66.github.io/TLCL/book/chap15.html
If we spend any time in the Linux community, we hear many opinions as to which of the many Linux distributions is “best.” Often, these discussions get really silly, focusing on such things as the prettiness of the desktop background (some people won’t use Ubuntu because its default color scheme is brown!) and other trivial matters.
如果我们在 Linux 社区里已经混了一段时间了,会看到很多关于哪个 Linux 发行版是“最佳”的争论。 这些争论通常非常幼稚,集中在一些像桌面背景的漂亮程度(一些人不使用 Ubuntu, 只是因为 Ubuntu 默认主题颜色是棕色的!)和其它的琐碎东西上。
The most important determinant of distribution quality is the packaging system and the vitality of the distribution’s support community. As we spend more time with Linux, we see that its software landscape is extremely dynamic. Things are constantly changing. Most of the top-tier Linux distributions release new versions every six months and many individual program updates every day. To keep up with this blizzard of software, we need good tools for package management.
Linux 发行版本质量最重要的决定因素是软件包管理系统和其支持社区的持久性。随着我们 花更多的时间在 Linux 上,我们会发现它的变化是非常快的。大多数一线 Linux 发行版每隔六个月发布一个新版本,并且许多独立的程序每天都会更新。为了能和这些 如暴风雪一般多的软件保持联系,我们需要一些好工具来进行软件包管理。
Package management is a method of installing and maintaining software on the system. Today, most people can satisfy all of their software needs by installing packages from their Linux distributor. This contrasts with the early days of Linux, when one had to download and compile source code in order to install software. Not that there is anything wrong with compiling source code; in fact, having access to source code is the great wonder of Linux. It gives us (and everybody else) the ability to examine and improve the system. It’s just that having a pre-compiled package is faster and easier to deal with. In this chapter, we will look at some of the command line tools used for package management. While all of the major distributions provide powerful and sophisticated graphical programs for maintaining the system, it is important to learn about the command line programs, too. They can perform many tasks that are difficult (or impossible) to do with their graphical counterparts.
软件包管理是指系统中一种安装和维护软件的方法。今天,通过 Linux 发行版中安装的软件包, 已能满足许多人的需求。这不同于早期的 Linux,人们需要下载和编译源码来安装软件。 编译源码没有任何问题,事实上,拥有对源码的访问权限是 Linux 的伟大奇迹。它赋予我们提高系统性能的能力。只是若有一个预先编译好的软件包处理起来要相对 容易快速些。这章中,我们将查看一些用于包管理的命令行工具。虽然所有主流 Linux 发行版都 提供了强大且精致的图形管理程序来维护系统,但是学习命令行程序也非常重要。因为它们 可以完成许多让图形化管理程序处理起来困难(或者不可能)的任务。
包管理系统
Different distributions use different packaging systems and as a general rule, a package intended for one distribution is not compatible with another distribution. Most distributions fall into one of two camps of packaging technologies: the Debian “.deb” camp and the Red Hat “.rpm” camp. There are some important exceptions such as Gentoo, Slackware, and Foresight, but most others use one of these two basic systems.
不同的 Linux 发行版使用不同的包管理系统,一般而言,大多数发行版分别属于两大包管理技术阵营: Debian 的”.deb”,和红帽的”.rpm”。也有一些重要的例外,比方说 Gentoo, Slackware,和 Foresight,但大多数会使用这两个基本系统中的一个。
| Packaging System | Distributions (Partial Listing) |
|---|---|
| Debian Style (.deb) | Debian, Ubuntu, Xandros, Linspire |
| Red Hat Style (.rpm) | Fedora, CentOS, Red Hat Enterprise Linux, OpenSUSE, Mandriva, PCLinuxOS |
| 包管理系统 | 发行版 (部分列表) |
|---|---|
| Debian Style (.deb) | Debian, Ubuntu, Xandros, Linspire |
| Red Hat Style (.rpm) | Fedora, CentOS, Red Hat Enterprise Linux, OpenSUSE, Mandriva, PCLinuxOS |
软件包管理系统是怎样工作的
The method of software distribution found in the proprietary software industry usually entails buying a piece of installation media such as an “install disk” and then running an “installation wizard” to install a new application on the system.
在商业化软件中,获取软件的最新版本通常需要买一张安装媒介,比方说”安装盘”,然后运行 一个”安装向导”,来在系统中安装新的应用程序。
Linux doesn’t work that way. Virtually all software for a Linux system will be found on the Internet. Most of it will be provided by the distribution vendor in the form of package files and the rest will be available in source code form that can be installed manually. We’ll talk a little about how to install software by compiling source code in a later chapter.
Linux 不是这样。Linux 系统中几乎所有的软件都可以在互联网上找到。其中大多数软件由发行商以 包文件的形式提供,剩下的则以源码形式存在,可以手动安装。在后面章节里,我们将会谈谈怎样 通过编译源码来安装软件。
包文件
The basic unit of software in a packaging system is the package file. A package file is a compressed collection of files that comprise the software package. A package may consist of numerous programs and data files that support the programs. In addition to the files to be installed, the package file also includes metadata about the package, such as a text description of the package and its contents. Additionally, many packages contain pre- and post-installation scripts that perform configuration tasks before and after the package installation.
在包管理系统中软件的基本单元是包文件。包文件是一个构成软件包的文件压缩集合。一个软件包 可能由大量程序以及支持这些程序的数据文件组成。除了安装文件之外,软件包文件也包括 这个包的元数据,也就是对软件包的说明。另外,许多软件包还包括预安装和安装后脚本, 这些脚本用来在软件安装之前和之后执行配置任务。
Package files are created by a person known as a package maintainer, often (but not always) an employee of the distribution vendor. The package maintainer gets the software in source code form from the upstream provider (the author of the program), compiles it, and creates the package metadata and any necessary installation scripts. Often, the package maintainer will apply modifications to the original source code to improve the program’s integration with the other parts of the Linux distribution.
软件包文件是由软件包维护者创建的,他通常是(但不总是)一名软件发行商的雇员。软件维护者 从上游提供商(程序作者)那里得到软件源码,然后编译源码,创建软件包元数据以及所需要的 安装脚本。通常,软件包维护者要把所做的修改应用到最初的源码当中,来提高此软件与 Linux 发行版其它部分的融合性。
包仓库
While some software projects choose to perform their own packaging and distribution, most packages today are created by the distribution vendors and interested third parties. Packages are made available to the users of a distribution in central repositories that may contain many thousands of packages, each specially built and maintained for the distribution.
虽然某些软件项目选择执行他们自己的打包和发布策略,但是现在大多数软件包是由发行商和感兴趣 的第三方创建的。系统发行版的用户可以在一个中心包仓库中得到这些软件包,包仓库可能 包含了成千上万个软件包,每一个软件包都是专门为这个系统发行版建立和维护的。
A distribution may maintain several different repositories for different stages of the software development life cycle. For example, there will usually be a “testing” repository that contains packages that have just been built and are intended for use by brave souls who are looking for bugs before they are released for general distribution. A distribution will often have a “development” repository where work-in-progress packages destined for inclusion in the distribution’s next major release are kept.
因软件开发生命周期不同阶段的需要,一个系统发行版可能维护着几个不同的包仓库。例如,通常会 有一个”测试”包仓库,其中包含比较新的软件包,它们想要勇敢的用户来使用, 在这些软件包正式发布之前,让用户查找错误。系统发行版经常会有一个”开发版”包仓库, 这个库中保存着注定要包含到下一个主要版本中的半成品软件包。
A distribution may also have related third-party repositories. These are often needed to supply software that, for legal reasons such as patents or DRM anti-circumvention issues, cannot be included with the distribution. Perhaps the best known case is that of encrypted DVD support, which is not legal in the United States. The third-party repositories operate in countries where software patents and anti-circumvention laws do not apply. These repositories are usually wholly independent of the distribution they support and to use them, one must know about them and manually include them in the configuration files for the package management system.
一个系统发行版可能也会拥有相关第三方的包仓库。这些库需要支持一些因法律原因, 比如说专利或者是 DRM 反规避问题,而不能被包含到发行版中的软件。可能最著名的案例就是 对加密DVD的播放支持,在美国这是不合法的。第三方包仓库在一些软件专利和反规避法案不 生效的国家中设立并分发资源。这些库通常完全地独立于它们所支持的包仓库,要想使用它们, 你必须了解它们,手动地把它们包含到软件包管理系统的配置文件中。
依赖性
Programs seldom stand alone; rather, they rely on the presence of other software components to get their work done. Common activities, such as input/output for example, are handled by routines shared by many programs. These routines are stored in what are called shared libraries, which provide essential services to more than one program. If a package requires a shared resource such as a shared library, it is said to have a dependency. Modern package management systems all provide some method of dependency resolution to ensure that when a package is installed, all of its dependencies are installed, too.
程序很少独立工作;他们需要依靠其他程序的组件来完成他们的工作。程序所共有的活动,如输入/输出, 就是由一个被多个程序调用的子例程处理的。这些子例程存储在动态链接库中。动态链接库为多个程 序提供基本服务。如果一个软件包需要一些共享的资源,如一个动态链接库,它就被称作有一个依赖。 现代的软件包管理系统都提供了一些依赖项解析方法,以确保安装软件包时,其所有的依赖也被安装。
上层和底层软件包工具
Package management systems usually consist of two types of tools: low-level tools which handle tasks such as installing and removing package files, and high-level tools that perform metadata searching and dependency resolution. In this chapter, we will look at the tools supplied with Debian-style systems (such as Ubuntu and many others) and those used by recent Red Hat products. While all Red Hat-style distributions rely on the same low-level program (rpm), they use different high-level tools. For our discussion, we will cover the high-level program yum, used by Fedora, Red Hat Enterprise Linux, and CentOS. Other Red Hat-style distributions provide high-level tools with comparable features.
软件包管理系统通常由两种工具类型组成:底层工具用来处理这些任务,比方说安装和删除软件包文件, 和上层工具,完成元数据搜索和依赖解析。在这一章中,我们将看一下由 Debian 风格的系统 (比如说 Ubuntu,还有许多其它系统)提供的工具,还有那些由 Red Hat 产品使用的工具。虽然所有基于 Red Hat 风格的发行版都依赖于相同的底层程序(rpm), 但是它们却使用不同的上层工具。在我们的讨论中,我们将研究 Fedora, Red Hat 企业版,和 CentOs 所使用的 yum 。其它 Red Hat 风格的发行版提供了带有类似 yum 的其他上层工具。
| Distributions | Low-Level Tools | High-Level Tools |
|---|---|---|
| Debian-Style | dpkg | apt-get, aptitude |
| Fedora, Red Hat Enterprise Linux, CentOS | rpm | yum |
| 发行版 | 底层工具 | 上层工具 |
|---|---|---|
| Debian-Style | dpkg | apt-get, aptitude |
| Fedora, Red Hat Enterprise Linux, CentOS | rpm | yum |
常见软件包管理任务
There are many operations that can be performed with the command line package management tools. We will look at the most common. Be aware that the low-level tools also support creation of package files, an activity outside the scope of this book. In the discussion below, the term “package_name” refers to the actual name of a package rather than the term “package_file,” which is the name of the file that contains the package.
通过命令行软件包管理工具可以完成许多操作。我们将会看一下最常用的工具。注意底层工具也 支持软件包文件的创建,这个话题超出了本书叙述的范围。在以下的讨论中,”package_name” 这个术语是指软件包实际名称,而不是指”package_file”,它是包含在软件包中的文件的名字。
查找包仓库中的软件包
Using the high-level tools to search repository metadata, a package can be located based on its name or description.
使用上层工具来搜索包仓库元数据,可以根据软件包的名字和说明来定位它。
| Style | Command(s) |
|---|---|
| Debian | apt-get update; apt-cache search search_string |
| Red Hat | yum search search_string |
| 风格 | 命令 |
|---|---|
| Debian | apt-get update; apt-cache search search_string |
| Red Hat | yum search search_string |
Example: To search a yum repository for the emacs text editor, this command could be used:
例如:搜索一个 yum 包仓库来查找 emacs 文本编辑器,使用以下命令:
yum search emacs
从包仓库中安装一个软件包
High-level tools permit a package to be downloaded from a repository and installed with full dependency resolution.
上层工具允许从一个资、包仓库中下载一个软件包,并经过完全依赖解析来安装它。
| Style | Command(s) |
|---|---|
| Debian | apt-get update; apt-get install package_name |
| Red Hat | yum install package_name |
| 风格 | 命令 |
|---|---|
| Debian | apt-get update; apt-get install package_name |
| Red Hat | yum install package_name |
Example: To install the emacs text editor from an apt repository:
例如:从一个 apt 包仓库来安装 emacs 文本编辑器:
apt-get update; apt-get install emacs
通过软件包文件来安装软件
If a package file has been downloaded from a source other than a repository, it can be installed directly (though without dependency resolution) using a low-level tool.
如果从某处而不是从包仓库中下载了一个软件包文件,可以使用底层工具来直接(不经过依赖解析)安装它。
| Style | Command(s) |
|---|---|
| Debian | dpkg --install package_file |
| Red Hat | rpm -i package_file |
| 风格 | 命令 |
|---|---|
| Debian | dpkg --install package_file |
| Red Hat | rpm -i package_file |
Example: If the emacs-22.1-7.fc7-i386.rpm package file had been downloaded from a non-repository site, it would be installed this way:
例如:如果已经从一个并非包仓库的网站下载了软件包文件 emacs-22.1-7.fc7-i386.rpm, 则可以通过这种方法来安装它:
rpm -i emacs-22.1-7.fc7-i386.rpm
Note: Since this technique uses the low-level rpm program to perform the installation, no dependency resolution is performed. If rpm discovers a missing dependency, rpm will exit with an error.
注意:因为这项技术使用底层的 rpm 程序来执行安装任务,所以没有运行依赖解析。 如果 rpm 程序发现缺少了一个依赖,则会报错并退出。
卸载软件
Packages can be uninstalled using either the high-level or low-tools. The high-level tools are shown below.
可以使用上层或者底层工具来卸载软件。下面是可用的上层工具。
| Style | Command(s) |
|---|---|
| Debian | apt-get remove package_name |
| Red Hat | yum erase package_name |
| 风格 | 命令 |
|---|---|
| Debian | apt-get remove package_name |
| Red Hat | yum erase package_name |
Example: To uninstall the emacs package from a Debian-style system:
例如:从 Debian 风格的系统中卸载 emacs 软件包:
apt-get remove emacs
经过包仓库来更新软件包
The most common package management task is keeping the system up-to-date with the latest packages. The high-level tools can perform this vital task in one single step.
最常见的软件包管理任务是保持系统中的软件包都是最新的。上层工具仅需一步就能完成 这个至关重要的任务。
| Style | Command(s) |
|---|---|
| Debian | apt-get update; apt-get upgrade |
| Red Hat | yum update |
| 风格 | 命令 |
|---|---|
| Debian | apt-get update; apt-get upgrade |
| Red Hat | yum update |
Example: To apply any available updates to the installed packages on a Debian-style system:
例如:更新安装在 Debian 风格系统中的软件包:
apt-get update; apt-get upgrade
经过软件包文件来升级软件
If an updated version of a package has been downloaded from a non-repository source, it can be installed, replacing the previous version:
如果已经从一个非包仓库网站下载了一个软件包的最新版本,可以安装这个版本,用它来 替代先前的版本:
| Style | Command(s) |
|---|---|
| Debian | dpkg --install package_file |
| Red Hat | rpm -U package_file |
| 风格 | 命令 |
|---|---|
| Debian | dpkg --install package_file |
| Red Hat | rpm -U package_file |
Example: Updating an existing installation of emacs to the version contained in the package file emacs-22.1-7.fc7-i386.rpm on a Red Hat system:
例如:把 Red Hat 系统中所安装的 emacs 的版本更新到软件包文件 emacs-22.1-7.fc7-i386.rpmz 所包含的 emacs 版本。
rpm -U emacs-22.1-7.fc7-i386.rpm
Note: dpkg does not have a specific option for upgrading a package versus installing one as rpm does.
注意:rpm 程序安装一个软件包和升级一个软件包所用的选项是不同的,而 dpkg 程序所用的选项是相同的。
列出所安装的软件包
These commands can be used to display a list of all the packages installed on the system:
下表中的命令可以用来显示安装到系统中的所有软件包列表:
| Style | Command(s) |
|---|---|
| Debian | dpkg --list |
| Red Hat | rpm -qa |
| 风格 | 命令 |
|---|---|
| Debian | dpkg --list |
| Red Hat | rpm -qa |
确定是否安装了一个软件包
These low-level tools can be used to display whether a specified package is installed:
这些底端工具可以用来显示是否安装了一个指定的软件包:
| Style | Command(s) |
|---|---|
| Debian | dpkg --status package_name |
| Red Hat | rpm -q package_name |
| 风格 | 命令 |
|---|---|
| Debian | dpkg --status package_name |
| Red Hat | rpm -q package_name |
Example: To determine if the emacs package is installed on a Debian style system:
例如:确定是否 Debian 风格的系统中安装了这个 emacs 软件包:
dpkg --status emacs
显示所安装软件包的信息
If the name of an installed package is known, the following commands can be used to display a description of the package:
如果知道了所安装软件包的名字,使用以下命令可以显示这个软件包的说明信息:
| Style | Command(s) |
|---|---|
| Debian | apt-cache show package_name |
| Red Hat | yum info package_name |
| 风格 | 命令 |
|---|---|
| Debian | apt-cache show package_name |
| Red Hat | yum info package_name |
Example: To see a description of the emacs package on a Debian-style system:
例如:查看 Debian 风格的系统中 emacs 软件包的说明信息:
apt-cache show emacs
查找安装了某个文件的软件包
To determine what package is responsible for the installation of a particular file, the following commands can be used:
确定哪个软件包对所安装的某个特殊文件负责,使用下表中的命令:
| Style | Command(s) |
|---|---|
| Debian | dpkg --search file_name |
| Red Hat | rpm -qf file_name |
| 风格 | 命令 |
|---|---|
| Debian | dpkg --search file_name |
| Red Hat | rpm -qf file_name |
Example: To see what package installed the /usr/bin/vim file on a Red Hat system:
例如:在 Red Hat 系统中,查看哪个软件包安装了/usr/bin/vim 这个文件
rpm -qf /usr/bin/vim
总结归纳
In the chapters that follow, we will explore many different programs covering a wide range of application areas. While most of these programs are commonly installed by default, we may need to install additional packages if necessary programs are not already installed on our system. With our newfound knowledge (and appreciation) of package management, we should have no problem installing and managing the programs we need.
在随后的章节里面,我们将探讨许多不同的程序,这些程序涵盖了广泛的应用程序领域。虽然 大多数程序一般是默认安装的,但是若所需程序没有安装在系统中,那么我们可能需要安装额外的软件包。 通过我们新学到的(和了解的)软件包管理知识,我们应该能够安装和管理所需程序。
The Linux Software Installation Myth
Linux 软件安装谣言
People migrating from other platforms sometimes fall victim to the myth that software is somehow difficult to install under Linux and that the variety of packaging schemes used by different distributions is a hindrance. Well, it is a hindrance, but only to proprietary software vendors who wish to distribute binary- only versions of their secret software.
从其它平台迁移过来的用户有时会成为谣言的受害者,说是在 Linux 系统中,安装软件有些 困难,并且不同系统发行版所使用的各种各样的打包方案是一个障碍。如果说它是一个障碍, 那只是针对于那些希望把他们的商业软件只以二进制版本发行的专有软件供应商。
The Linux software ecosystem is based on the idea of open source code. If a program developer releases source code for a product, it is likely that a person associated with a distribution will package the product and include it in their repository. This method ensures that the product is well integrated into the distribution and the user is given the convenience of “one-stop shopping” for software, rather than having to search for each product’s web site.
Linux 软件生态系统是基于开放源代码理念。如果一个程序开发人员发布了一款产品的 源码,那么与系统发行版相关联的开发人员可能就会把这款产品打包,并把它包含在 他们的包仓库中。这种方法保证了这款产品能很好地与系统发行版整合在一起,同时为用户 “一站式采购”软件提供了方便,从而用户不必去搜索每个产品的网站。
Device drivers are are handled in much the same way, except that instead of being separate items in a distribution’s repository, they become part of the Linux kernel itself. Generally speaking, there is no such thing as a “driver disk” in Linux. Either the kernel supports a device or it doesn’t, and the Linux kernel supports a lot of devices. Many more, in fact, than Windows does. Of course, this is of no consolation if the particular device you need is not supported. When that happens, you need to look at the cause. A lack of driver support is usually caused by one of three things:
设备驱动差不多也以同样的方式来处理,但它们不是系统发行版包仓库中单独的项目, 它们本身是 Linux 系统内核的一部分。一般来说,在 Linux 当中没有一个类似于“驱动盘”的东西。 Linux 内核要么支持一个设备,要不就不支持。Linux 内核支持很多设备,事实上,Linux 支持的设备数目多于 Windows 所支持的。当然,万一你需要的特定设备不被 Linux 支持,也于事无补。当那种情况 发生时,你需要查找一下原因。缺少驱动程序支持通常是由以下三种情况之一导致:
The device is too new. Since many hardware vendors don’t actively support Linux development, it falls upon a member of the Linux community to write the kernel driver code. This takes time.
The device is too exotic. Not all distributions include every possible device driver. Each distribution builds their own kernels, and since kernels are very configurable (which is what makes it possible to run Linux on everything from wristwatches to mainframes) they may have overlooked a particular device. By locating and downloading the source code for the driver, it is possible for you (yes, you) to compile and install the driver yourself. This process is not overly difficult, but it is rather involved. We’ll talk about compiling software in a later chapter.
The hardware vendor is hiding something. They have neither released source code for a Linux driver, nor have they released the technical documentation for somebody to create one for them. This means that the hardware vendor is trying to keep the programming interfaces to the device a secret. Since we don’t want secret devices in our computers, I suggest that you remove the offending hardware and pitch it into the trash, with your other useless items.
设备太新。 因为许多硬件供应商没有积极地支持 Linux 的发展,那么编写内核 驱动代码的任务就由一些 Linux 社区来承担,而这需要花费时间。
设备太奇异。 不是所有的发行版都包含每个可能的设备驱动。每个发行版会建立 它们自己的内核,因为内核是可以配置的(这使得从手表到主机的每台设备上运行 Linux 成为可能), 这样它们可能会忽略某个特殊设备。通过定位和下载驱动程序的源码,可能需要你自己(是的,由你) 来编译和安装驱动。这个过程不是很难,而是需要参与的。我们将在随后的章节里来讨论编译软件。
硬件供应商隐藏信息。 他们既不发布应用于 Linux 系统的驱动程序代码, 也不发布技术文档来让某人创建它。这意味着硬件供应商试图保密此设备的程序接口。因为我们 不想在计算机中使用保密的设备,所以我建议删除这令人厌恶的硬件, 把它和其它无用的东西都扔到垃圾桶里。
拓展阅读
Spend some time getting to know the package management system for your distribution. Each distribution provides documentation for its package management tools. In addition, here are some more generic sources:
花些时间来了解你所用发行版中的软件包管理系统。每个发行版都提供了关于自带软件包管理工具的 文档。这里有一些资源:
The Debian GNU/Linux FAQ chapter on package management provides an overview of package management on Debian systems :
Debian GNU/Linux FAQ 关于软件包管理一章对软件包管理进行了概述:
The home page for the RPM project:
RPM 工程的主页:
The home page for the YUM project at Duke University:
杜克大学 YUM 工程的主页:
For a little background, the Wikipedia has an article on metadata:
了解一点儿背景知识,Wikipedia 上有一篇关于 metadata 的文章:
16 - 16 存储媒介
存储媒介
http://billie66.github.io/TLCL/book/chap16.html
In previous chapters we’ve looked at manipulating data at the file level. In this chapter, we will consider data at the device level. Linux has amazing capabilities for handling storage devices, whether physical storage, such as hard disks, or network storage, or virtual storage devices like RAID (Redundant Array of Independent Disks) and LVM (Logical Volume Manager).
在前面章节中,我们已经在文件级别上见识了数据的操作。在这章里,我们将从设备级别来考虑数据。 Linux 有着令人惊奇的能力来处理存储设备,不管是物理设备,比如说硬盘,还是网络设备,或者是 虚拟存储设备,像 RAID(独立磁盘冗余阵列)和 LVM(逻辑卷管理器)。
However, since this is not a book about system administration, we will not try to cover this entire topic in depth. What we will try to do is introduce some of the concepts and key commands that are used to manage storage devices.
然而,这不是一本关于系统管理的书籍,我们不会试图深入地覆盖整个主题。我们将努力做的就是 介绍一些概念和用来管理存储设备的重要命令。
To carry out the exercises in this chapter, we will use a USB flash drive, a CD-RW disk (for systems equipped with a CD-ROM burner) and a floppy disk (again, if the system is so equipped.)
为了做这一章的练习,我们将会使用 USB 闪存,CD-RW 光盘(如果系统配备了 CD-ROM 烧录器) 和一张软盘(如果系统有这样配备的话)。
We will look at the following commands:
我们将看看以下命令:
- mount – Mount a file system
- mount – 挂载一个文件系统
- umount – Unmount a file system
- umount – 卸载一个文件系统
- fsck – Check and repair a file system
- fsck – 检查和修复一个文件系统
- fdisk – Partition table manipulator
- fdisk – 分区表控制器
- mkfs – Create a file system
- mkfs – 创建文件系统
- fdformat – Format a floppy disk
- fdformat – 格式化一张软盘
- dd – Write block oriented data directly to a device
- dd — 把块数据直接写入设备
- genisoimage (mkisofs) – Create an ISO 9660 image file
- genisoimage (mkisofs) – 创建一个 ISO 9660的映像文件
- wodim (cdrecord) – Write data to optical storage media
- wodim (cdrecord) – 把数据写入光存储媒介
- md5sum – Calculate an MD5 checksum
- md5sum – 计算 MD5检验码
挂载和卸载存储设备
Recent advances in the Linux desktop have made storage device management extremely easy for desktop users. For the most part, we attach a device to our system and it “just works.” Back in the old days (say, 2004), this stuff had to be done manually. On non- desktop systems (i.e., servers) this is still a largely manual procedure since servers often have extreme storage needs and complex configuration requirements.
Linux 桌面系统的最新进展已经使存储设备管理对于桌面用户来说极其容易。大多数情况下,我们 只要把设备连接到系统中,它就能工作。在过去(比如说,2004年),这个工作必须手动完成。 在非桌面系统中(例如,服务器中),还是挺麻烦的一个过程,因为服务器经常有特有的存储需求 和复杂的配置要求。
The first step in managing a storage device is attaching the device to the file system tree. This process, called mounting, allows the device to participate with the operating system. As we recall from Chapter 3, Unix-like operating systems, like Linux, maintain a single file system tree with devices attached at various points. This contrasts with other operating systems such as MS-DOS and Windows that maintain separate trees for each device (for example C:, D:, etc.).
管理存储设备的第一步是把设备连接到文件系统树中。这个叫做”挂载”的过程允许设备连接到操作系统中。 回想一下第三章,类 Unix 操作系统,比如 Linux ,会在一个文件系统树中挂载各种设备。 这与其它操作系统形成对照,比如说 MS-DOS 和 Windows 系统中,每个设备(例如 C:\,D:\,等) 会拥有自己的文件系统树。
There is a file named /etc/fstab that lists the devices (typically hard disk partitions) that are to be mounted at boot time. Here is an example /etc/fstab file from a Fedora 7 system:
有一个叫做 /etc/fstab 的文件可以列出系统启动时要挂载的设备(典型地,硬盘分区)。下面是 来自于 Fedora 7 系统的/etc/fstab 文件实例:
LABEL=/12 / ext3 defaults 1 1
LABEL=/home /home ext3 defaults 1 2
LABEL=/boot /boot ext3 defaults 1 2
tmpfs /dev/shm tmpfs defaults 0 0
devpts /dev/pts devpts gid=5,mode=620 0 0
sysfs /sys sysfs defaults 0 0
proc /proc proc defaults 0 0
LABEL=SWAP-sda3 /swap swap defaults 0 0
Most of the file systems listed in this example file are virtual and are not applicable to our discussion. For our purposes, the interesting ones are the first three:
在这个实例中所列出的大多数文件系统是虚拟的,并不适用于我们的讨论。就我们的目的而言, 前三个是我们感兴趣的:
LABEL=/12 / ext3 defaults 1 1
LABEL=/home /home ext3 defaults 1 2
LABEL=/boot /boot ext3 defaults 1 2
These are the hard disk partitions. Each line of the file consists of six fields, as follows:
这些是硬盘分区。每行由六个字段组成,如下所示:
| Field | Contents | Description |
|---|---|---|
| 1 | Device | Traditionally, this field contains the actual name of a device file associated with the physical device, such as /dev/hda1 (the first partition of the master device on the first IDE channel). But with today’s computers, which have many devices that are hot pluggable (like USB drives), many modern Linux distributions associate a device with a text label instead. This label (which is added to the storage media when it is formatted) is read by the operating system when the device is attached to the system. That way, no matter which device file is assigned to the actual physical device, it can still be correctly identified. |
| 2 | Mount Point | The directory where the device is attached to the file system tree. |
| 3 | File System Type | Linux allows many file system types to be mounted. Most native Linux file systems are ext3, but many others are supported, such as FAT16 (msdos), FAT32 (vfat), NTFS (ntfs), CD-ROM (iso9660), etc. |
| 4 | Options | File systems can be mounted with various options. It is possible, for example, to mount file systems as read-only, or prevent any programs from being executed from them (a useful security feature for removable media.) |
| 5 | Frequency | A single number that specifies if and when a file system is to be backed up with the dump command. |
| 6 | Order | A single number that specifies in what order file systems should be checked with the fsck command. |
| 字段 | 内容 | 说明 |
|---|---|---|
| 1 | 设备名 | 传统上,这个字段包含与物理设备相关联的设备文件的名字,比如说 /dev/hda1(第一个 IDE 通道上第一个主设备分区)。然而今天的计算机,有很多热插拔设备(像 USB 驱动设备),许多 现代的 Linux 发行版用一个文本标签和设备相关联。当这个设备连接到系统中时, 这个标签(当储存媒介格式化时,这个标签会被添加到存储媒介中)会被操作系统读取。 那样的话,不管赋给实际物理设备哪个设备文件,这个设备仍然能被系统正确地识别。 |
| 2 | 挂载点 | 设备所连接到的文件系统树的目录。 |
| 3 | 文件系统类型 | Linux 允许挂载许多文件系统类型。大多数本地的 Linux 文件系统是 ext3, 但是也支持很多其它的,比方说 FAT16 (msdos), FAT32 (vfat),NTFS (ntfs),CD-ROM (iso9660),等等。 |
| 4 | 选项 | 文件系统可以通过各种各样的选项来挂载。有可能,例如,挂载只读的文件系统, 或者挂载阻止执行任何程序的文件系统(一个有用的安全特性,避免删除媒介。) |
| 5 | 频率 | 一位数字,指定是否和在什么时间用 dump 命令来备份一个文件系统。 |
| 6 | 次序 | 一位数字,指定 fsck 命令按照什么次序来检查文件系统。 |
查看挂载的文件系统列表
The mount command is used to mount file systems. Entering the command without arguments will display a list of the file systems currently mounted:
这个 mount 命令被用来挂载文件系统。执行这个不带参数的命令,将会显示 一系列当前挂载的文件系统:
| |
The format of the listing is: device on mount_point type file_system_type (options). For example, the first line shows that device /dev/sda2 is mounted as the root file system and it is of type ext3 and is both readable and writable (the option “rw”). This listing also has two interesting entries at the bottom of the list. The next to last entry shows a 2 gigabyte SD memory card in a card reader mounted at /media/disk, and the last entry is a network drive mounted at /misc/musicbox.
这个列表的格式是:设备 on 挂载点 type 文件系统类型(选项)。例如,第一行所示设备/dev/sda2 作为根文件系统被挂载,文件系统类型是 ext3,并且可读可写(这个“rw”选项)。在这个列表的底部有 两个有趣的条目。倒数第二行显示了在读卡器中的一张2G 的 SD 内存卡,挂载到了/media/disk 上。最后一行 是一个网络设备,挂载到了/misc/musicbox 上。
For our first experiment, we will work with a CD-ROM. First, let’s look at a system before a CD-ROM is inserted:
第一次实验,我们将使用一张 CD-ROM。首先,在插入 CD-ROM 之前,我们将看一下系统:
| |
This listing is from a CentOS 5 system, which is using LVM (Logical Volume Manager) to create its root file system. Like many modern Linux distributions, this system will attempt to automatically mount the CD-ROM after insertion. After we insert the disk, we see the following:
这个列表来自于 CentOS 5系统,使用 LVM(逻辑卷管理器)来创建它的根文件系统。正如许多现在的 Linux 发行版一样,这个 系统试图自动挂载插入的 CD-ROM。当我们插入光盘后,我们看看下面的输出:
| |
After we insert the disk, we see the same listing as before with one additional entry. At the end of the listing we see that the CD-ROM (which is device /dev/hdc on this system) has been mounted on /media/live-1.0.10-8, and is type iso9660 (a CD- ROM). For purposes of our experiment, we’re interested in the name of the device. When you conduct this experiment yourself, the device name will most likely be different.
当我们插入光盘后,除了额外的一行之外,我们看到和原来一样的列表。在列表的末尾,我们 看到 CD-ROM 已经挂载到了 /media/live-1.0.10-8 上,它的文件类型是 iso9660(CD-ROM)。 就我们的实验目的而言,我们对这个设备的名字感兴趣。当你自己进行这个实验时,这个 设备名字是最有可能不同的。
Warning: In the examples that follow, it is vitally important that you pay close attention to the actual device names in use on your system and do not use the names used in this text!
警告:在随后的实例中,至关重要的是你要密切注意用在你系统中的实际设备名,并且 不要使用此文本中使用的名字!
Also note that audio CDs are not the same as CD-ROMs. Audio CDs do not contain file systems and thus cannot be mounted in the usual sense.
还要注意音频 CD 和 CD-ROM 不一样。音频 CD 不包含文件系统,这样在通常意义上,它就不能被挂载了。
Now that we have the device name of the CD-ROM drive, let’s unmount the disk and remount it another location in the file system tree. To do this, we become the superuser (using the command appropriate for our system) and unmount the disk with the umount (notice the spelling) command:
现在我们拥有 CD-ROM 光盘的设备名字,让我们卸载这张光盘,并把它重新挂载到文件系统树 的另一个位置。我们需要超级用户身份(使用系统相应的命令)来进行操作,并且用 umount(注意这个命令的拼写)来卸载光盘:
| |
The next step is to create a new mount point for the disk. A mount point is simply a directory somewhere on the file system tree. Nothing special about it. It doesn’t even have to be an empty directory, though if you mount a device on a non-empty directory, you will not be able to see the directory’s previous contents until you unmount the device. For our purposes, we will create a new directory:
下一步是创建一个新的光盘挂载点。简单地说,一个挂载点就是文件系统树中的一个目录。它没有 什么特殊的。它甚至不必是一个空目录,如果你把设备挂载到了一个非空目录上,你将不能看到 这个目录中原来的内容,直到你卸载这个设备。就我们的目的而言,我们将创建一个新目录:
| |
Finally, we mount the CD-ROM at the new mount point. The -t option is used to specify the file system type:
最后,我们把这个 CD-ROW 挂载到一个新的挂载点上。这个 -t 选项用来指定文件系统类型:
| |
Afterward, we can examine the contents of the CD-ROM via the new mount point:
之后,我们可以通过这个新挂载点来查看 CD-ROW 的内容:
| |
Notice what happens when we try to unmount the CD-ROM:
注意当我们试图卸载这个 CD-ROW 时,发生了什么事情。
| |
Why is this? The reason is that we cannot unmount a device if the device is being used by someone or some process. In this case, we changed our working directory to the mount point for the CD-ROM, which causes the device to be busy. We can easily remedy the issue by changing the working directory to something other than the mount point:
这是怎么回事呢?原因是我们不能卸载一个设备,如果某个用户或进程正在使用这个设备的话。在这种 情况下,我们把工作目录更改到了 CD-ROW 的挂载点,这个挂载点导致设备忙碌。我们可以很容易地修复这个问题 通过把工作目录改到其它目录而不是这个挂载点。
| |
Now the device unmounts successfully.
现在这个设备成功卸载了。
Why Unmounting Is Important
为什么记得卸载很重要
If you look at the output of the free command, which displays statistics about memory usage, you will see a statistic called “buffers.” Computer systems are designed to go as fast as possible. One of the impediments to system speed is slow devices. Printers are a good example. Even the fastest printer is extremely slow by computer standards. A computer would be very slow indeed if it had to stop and wait for a printer to finish printing a page. In the early days of PCs (before multi-tasking), this was a real problem. If you were working on a spreadsheet or text document, the computer would stop and become unavailable every time you printed. The computer would send the data to the printer as fast as the printer could accept it, but it was very slow since printers don’t print very fast. This problem was solved by the advent of the printer buffer, a device containing some RAM memory that would sit between the computer and the printer. With the printer buffer in place, the computer would send the printer output to the buffer and it would quickly be stored in the fast RAM so the computer could go back to work without waiting. Meanwhile, the printer buffer would slowly spool the data to the printer from the buffer’s memory at the speed at which the printer could accept it.
如果你看一下 free 命令的输出结果,这个命令用来显示关于内存使用情况的统计信息,你 会看到一个统计值叫做”buffers“。计算机系统旨在尽可能快地运行。系统运行速度的 一个阻碍是缓慢的设备。打印机是一个很好的例子。即使最快速的打印机相比于计算机标准也 极其地缓慢。一台计算机如果它要停下来等待一台打印机打印完一页,再去执行其他操作,就会变得很慢。 在早期的个人电脑时代(多任务之前),这真是个问题。如果你正在编辑电子表格 或者是文本文档,每次你要打印文件时,计算机都会停下来而且变得不能使用。 计算机能以打印机可接受的最快速度把数据发送给打印机,但由于打印机不能快速地打印, 这个发送速度会非常慢。由于打印机缓存的出现,这个问题被解决了。打印机缓存是一个包含 RAM 内存 的设备,位于计算机和打印机之间。通过打印机缓存,计算机把要打印的结果发送到这个缓存区, 数据会迅速地存储到这个 RAM 中,这样计算机就能回去工作,而不用等待。与此同时,打印机缓存将会 以打印机可接受的速度把缓存中的数据缓慢地输出给打印机。
This idea of buffering is used extensively in computers to make them faster. Don’t let the need to occasionally read or write data to/from slow devices impede the speed of the system. Operating systems store data read from, and to be written to storage devices in memory for as long as possible before actually having to interact with the slower device. On a Linux system for example, you will notice that the system seems to fill up memory the longer it is used. This does not mean Linux is “using“ all the memory, it means that Linux is taking advantage of all the available memory to do as much buffering as it can.
缓存被广泛地应用于计算机中,使其运行得更快。别让偶尔地的读取或写入慢设备的需求阻碍了 系统的运行速度。在真正与比较慢的设备交互之前,操作系统会尽可能多的读取或写入数据到内存中的 存储设备里。以 Linux 操作系统为例,你会注意到系统看似占用了多于它所需要的内存。 这不意味着 Linux 正在使用这些内存,而是意味着 Linux 正在利用所有可用的内存,来作为缓存区。
This buffering allows writing to storage devices to be done very quickly, because the writing to the physical device is being deferred to a future time. In the meantime, the data destined for the device is piling up in memory. From time to time, the operating system will write this data to the physical device.
这个缓存区允许非常快速地对存储设备进行写入,因为写入物理设备的操作被延迟到后面进行。同时, 这些注定要传送到设备中的数据正在内存中堆积起来。时不时地,操作系统会把这些数据 写入物理设备。
Unmounting a device entails writing all the remaining data to the device so that it can be safely removed. If the device is removed without unmounting it first, the possibility exists that not all the data destined for the device has been transferred. In some cases, this data may include vital directory updates, which will lead to file system corruption, one of the worst things that can happen on a computer.
卸载一个设备需要把所有剩余的数据写入这个设备,所以设备可以被安全地移除。如果 没有卸载设备,就移除了它,就有可能没有把注定要发送到设备中的数据输送完毕。在某些情况下, 这些数据可能包含重要的目录更新信息,这将导致文件系统损坏,这是发生在计算机中的最坏的事情之一。
确定设备名称
It’s sometimes difficult to determine the name of a device. Back in the old days, it wasn’t very hard. A device was always in the same place and it didn’t change. Unix-like systems like it that way. Back when Unix was developed, “changing a disk drive” involved using a forklift to remove a washing machine-sized device from the computer room. In recent years, the typical desktop hardware configuration has become quite dynamic and Linux has evolved to become more flexible than its ancestors. In the examples above we took advantage of the modern Linux desktop’s ability to “automagically” mount the device and then determine the name after the fact. But what if we are managing a server or some other environment where this does not occur? How can we figure it out?
有时很难来给设备起名字。在以前,这并不是很难。一台设备总是在某个固定的位置,也不会 挪动它。类 Unix 的系统也喜欢这样。退回到 Unix 系统的时代,“更改一个磁盘驱动器”是要用一辆 叉车从机房中移除一台如洗衣机大小的设备。最近几年,典型的桌面硬件配置已经变得相当动态,并且 Linux 已经发展地比其祖先更加灵活。在以上事例中,我们利用现代 Linux 桌面系统的功能来“自动地”挂载 设备,然后再确定设备名称。但是如果我们正在管理一台服务器或者是其它一些这种自动挂载功能不会 发生的环境,我们又如何能确定设备名呢?
First, let’s look at how the system names devices. If we list the contents of the /dev directory (where all devices live), we can see that there are lots and lots of devices:
首先,让我们看一下系统怎样来命名设备。如果我们列出目录/dev(所有设备的住所)的内容,我们 会看到许许多多的设备:
| |
The contents of this listing reveal some patterns of device naming. Here are a few:
这个列表的内容揭示了一些设备命名的模式。这里有几个:
| Pattern | Device |
|---|---|
| /dev/fd* | Floppy disk drives |
| /dev/hd* | IDE (PATA) disks on older systems. Typical motherboards contain two IDE connectors or channels, each with a cable with two attachment points for drives. The first drive on the cable is called the master device and the second is called the slave device. The device names are ordered such that /dev/hda refers to the master device on the first channel, /dev/hdb is the slave device on the first channel; /dev/hdc, the master device on the second channel, and so on. A trailing digit indicates the partition number on the device. For example, /dev/hda1 refers to the first partition on the first hard drive on the system while / dev/hda refers to the entire drive. |
| /dev/lp* | Printers |
| /dev/sd* | SCSI disks. On recent Linux systems, the kernel treats all disk- like devices (including PATA/SATA hard disks, flash drives, and USB mass storage devices, such as portable music players and digital cameras) as SCSI disks. The rest of the naming system is similar to the older /dev/hd* naming scheme described above. |
| /dev/sr* | Optical drives (CD/DVD readers and burners) |
| 模式 | 设备 |
|---|---|
| /dev/fd* | 软盘驱动器 |
| /dev/hd* | 老系统中的 IDE(PATA)磁盘。典型的主板包含两个 IDE 连接器或者是通道,每个连接器 带有一根缆线,每根缆线上有两个硬盘驱动器连接点。缆线上的第一个驱动器叫做主设备, 第二个叫做从设备。设备名称这样安排,/dev/hda 是指第一通道上的主设备名;/dev/hdb 是第一通道上的从设备名;/dev/hdc 是第二通道上的主设备名,等等。末尾的数字表示 硬盘驱动器上的分区。例如,/dev/hda1是指系统中第一硬盘驱动器上的第一个分区,而 /dev/hda 则是指整个硬盘驱动器。 |
| /dev/lp* | 打印机 |
| /dev/sd* | SCSI 磁盘。在最近的 Linux 系统中,内核把所有类似于磁盘的设备(包括 PATA/SATA 硬盘, 闪存,和 USB 存储设备,比如说可移动的音乐播放器和数码相机)看作 SCSI 磁盘。 剩下的命名系统类似于上述所描述的旧的/dev/hd*命名方案。 |
| /dev/sr* | 光盘(CD/DVD 读取器和烧写器) |
In addition, we often see symbolic links such as /dev/cdrom, /dev/dvd and /dev/ floppy, which point to the actual device files, provided as a convenience. If you are working on a system that does not automatically mount removable devices, you can use the following technique to determine how the removable device is named when it is attached. First, start a real-time view of the /var/log/messages file (you may require superuser privileges for this):
另外,我们经常看到符号链接比如说 /dev/cdrom,/dev/dvd 和/dev/floppy,它们指向实际的 设备文件,提供这些链接是为了方便使用。如果你工作的系统不能自动挂载可移动的设备,你可以使用 下面的技巧来决定当可移动设备连接后,它是怎样被命名的。首先,启动一个实时查看文件 /var/log/messages (你可能需要超级用户权限):
| |
The last few lines of the file will be displayed and then pause. Next, plug in the removable device. In this example, we will use a 16 MB flash drive. Almost immediately, the kernel will notice the device and probe it:
这个文件的最后几行会被显示,然后停止。下一步,插入这个可移动的设备。在 这个例子里,我们将使用一个16MB 闪存。瞬间,内核就会发现这个设备, 并且探测它:
Jul 23 10:07:53 linuxbox kernel: usb 3-2: new full speed USB device
using uhci_hcd and address 2
Jul 23 10:07:53 linuxbox kernel: usb 3-2: configuration #1 chosen
from 1 choice
Jul 23 10:07:53 linuxbox kernel: scsi3 : SCSI emulation for USB Mass
Storage devices
Jul 23 10:07:58 linuxbox kernel: scsi scan: INQUIRY result too short
(5), using 36
Jul 23 10:07:58 linuxbox kernel: scsi 3:0:0:0: Direct-Access Easy
Disk 1.00 PQ: 0 ANSI: 2
Jul 23 10:07:59 linuxbox kernel: sd 3:0:0:0: [sdb] 31263 512-byte
hardware sectors (16 MB)
Jul 23 10:07:59 linuxbox kernel: sd 3:0:0:0: [sdb] Write Protect is
off
Jul 23 10:07:59 linuxbox kernel: sd 3:0:0:0: [sdb] Assuming drive
cache: write through
Jul 23 10:07:59 linuxbox kernel: sd 3:0:0:0: [sdb] 31263 512-byte
hardware sectors (16 MB)
Jul 23 10:07:59 linuxbox kernel: sd 3:0:0:0: [sdb] Write Protect is
off
Jul 23 10:07:59 linuxbox kernel: sd 3:0:0:0: [sdb] Assuming drive
cache: write through
Jul 23 10:07:59 linuxbox kernel: sdb: sdb1
Jul 23 10:07:59 linuxbox kernel: sd 3:0:0:0: [sdb] Attached SCSI
removable disk
Jul 23 10:07:59 linuxbox kernel: sd 3:0:0:0: Attached scsi generic
sg3 type 0
After the display pauses again, type Ctrl-c to get the prompt back. The interesting parts of the output are the repeated references to “[sdb]” which matches our expectation of a SCSI disk device name. Knowing this, two lines become particularly illuminating:
显示再次停止之后,输入 Ctrl-c,重新得到提示符。输出结果的有趣部分是一再提及“[sdb]”, 这正好符和我们期望的 SCSI 磁盘设备名称。知道这一点后,有两行输出变得颇具启发性:
Jul 23 10:07:59 linuxbox kernel: sdb: sdb1
Jul 23 10:07:59 linuxbox kernel: sd 3:0:0:0: [sdb] Attached SCSI
removable disk
This tells us the device name is /dev/sdb for the entire device and /dev/sdb1 for the first partition on the device. As we have seen, working with Linux is full of interesting detective work!
这告诉我们这个设备名称是/dev/sdb 指整个设备,/dev/sdb1 是这个设备的第一分区。 正如我们所看到的,使用 Linux 系统充满了有趣的侦探工作。
Tip: Using the tail -f /var/log/messages technique is a great way to watch what the system is doing in near real-time.
小贴士:使用这个 tail -f /var/log/messages 技巧是一个很不错的方法,可以实时 观察系统的一举一动。
With our device name in hand, we can now mount the flash drive:
既然知道了设备名称,我们就可以挂载这个闪存驱动器了:
| |
The device name will remain the same as long as it remains physically attached to the computer and the computer is not rebooted.
这个设备名称会保持不变只要设备与计算机保持连接并且计算机不会重新启动。
创建新的文件系统
Let’s say that we want to reformat the flash drive with a Linux native file system, rather than the FAT32 system it has now. This involves two steps: 1. (optional) create a new partition layout if the existing one is not to our liking, and 2. create a new, empty file system on the drive.
假若我们想要用 Linux 本地文件系统来重新格式化这个闪存驱动器,而不是它现用的 FAT32 系统。 这涉及到两个步骤:1.(可选的)创建一个新的分区布局,如果已存在的分区不是我们喜欢的。2. 在这个闪存上创建一个新的空的文件系统。
Warning! In the following exercise, we are going to format a flash drive. Use a drive that contains nothing you care about because it will be erased! Again, make absolutely sure you are specifying the correct device name for your system, not the one shown in the text. Failure to heed this warning could result in you formatting (i.e., erasing) the wrong drive!
注意!在下面的练习中,我们将要格式化一个闪存驱动器。拿一个不包含有用数据的驱动器 作为实验品,因为它将会被擦除!再次,请确定你指定了正确的系统设备名称。未能注意此 警告可能导致你格式化(即擦除)错误的驱动器!
用 fdisk 命令操作分区
The fdisk program allows us to interact directly with disk-like devices (such as hard disk drives and flash drives) at a very low level. With this tool we can edit, delete, and create partitions on the device. To work with our flash drive, we must first unmount it (if needed) and then invoke the fdisk program as follows:
这个 fdisk 程序允许我们直接在底层与类似磁盘的设备(比如说硬盘驱动器和闪存驱动器)进行交互。 使用这个工具可以在设备上编辑,删除,和创建分区。以我们的闪存驱动器为例, 首先我们必须卸载它(如果需要的话),然后调用 fdisk 程序,如下所示:
| |
Notice that we must specify the device in terms of the entire device, not by partition number. After the program starts up, we will see the following prompt:
注意我们必须指定设备名称,就整个设备而言,而不是通过分区号。这个程序启动后,我们 将看到以下提示:
Command (m for help):
Entering an “m” will display the program menu:
输入”m”会显示程序菜单:
Command action
a toggle a bootable flag
....
The first thing we want to do is examine the existing partition layout. We do this by entering “p” to print the partition table for the device:
我们想要做的第一件事情是检查已存在的分区布局。输入”p”会打印出这个设备的分区表:
Command (m for help): p
Disk /dev/sdb: 16 MB, 16006656 bytes
1 heads, 31 sectors/track, 1008 cylinders
Units = cylinders of 31 * 512 = 15872 bytes
Device Boot Start End Blocks Id System
/dev/sdb1 2 1008 15608+ b w95 FAT32
In this example, we see a 16 MB device with a single partition (1) that uses 1006 of the available 1008 cylinders on the device. The partition is identified as Windows 95 FAT32 partition. Some programs will use this identifier to limit the kinds of operation that can be done to the disk, but most of the time it is not critical to change it. However, in the interest of demonstration, we will change it to indicate a Linux partition. To do this, we must first find out what ID is used to identify a Linux partition. In the listing above, we see that the ID “b” is used to specify the exiting partition. To see a list of the available partition types, we refer back to the program menu. There we can see the following choice:
在此例中,我们看到一个16MB 的设备只有一个分区(1),此分区占用了可用的1008个柱面中的1006个, 并被标识为 Windows 95 FAT32分区。有些程序会使用这个标志符来限制一些可以对磁盘所做的操作, 但大多数情况下更改这个标志符没有危害。为了叙述方便,我们将会更改它, 以此来表明是个 Linux 分区。在更改之前,首先我们必须找到被用来识别一个 Linux 分区的 ID 号码。 在上面列表中,我们看到 ID 号码“b”被用来指定这个已存在的分区。要查看可用的分区类型列表, 参考之前的程序菜单。我们会看到以下选项:
l list known partition types
If we enter “l” at the prompt, a large list of possible types is displayed. Among them we see “b” for our existing partition type and “83” for Linux.
如果我们在提示符下输入“l”,就会显示一个很长的可能类型列表。在它们之中会看到“b”为已存在分区 类型的 ID 号,而“83”是针对 Linux 系统的 ID 号。
Going back to the menu, we see this choice to change a partition ID:
回到之前的菜单,看到这个选项来更改分区 ID 号:
t change a partition's system id
We enter “t” at the prompt enter the new ID:
我们先输入“t”,再输入新的 ID 号:
Command (m for help): t
Selected partition 1
Hex code (type L to list codes): 83
Changed system type of partition 1 to 83 (Linux)
This completes all the changes that we need to make. Up to this point, the device has been untouched (all the changes have been stored in memory, not on the physical device), so we will write the modified partition table to the device and exit. To do this, we enter “w” at the prompt:
这就完成了我们需要做得所有修改。到目前为止,还没有接触这个设备(所有修改都存储在内存中, 而不是在此物理设备中),所以我们将会把修改过的分区表写入此设备,再退出。为此,我们输入 在提示符下输入”w”:
Command (m for help): w
The partition table has been altered!
Calling ioctl() to re-read partition table.
WARNING: If you have created or modified any DOS 6.x
partitions, please see the fdisk manual page for additional
information.
Syncing disks.
[me@linuxbox ~]$
If we had decided to leave the device unaltered, we could have entered “q” at the prompt, which would have exited the program without writing the changes. We can safely ignore the ominous sounding warning message.
如果我们已经决定保持设备不变,可在提示符下输入”q”,这将退出程序而没有写更改。我们 可以安全地忽略这些警告信息。
用 mkfs 命令创建一个新的文件系统
With our partition editing done (lightweight though it might have been) it’s time to create a new file system on our flash drive. To do this, we will use mkfs (short for “make file system”), which can create file systems in a variety of formats. To create an ext3 file system on the device, we use the “-t” option to specify the “ext3” system type, followed by the name of device containing the partition we wish to format:
完成了分区编辑工作(它或许是轻量级的),是时候在我们的闪存驱动器上创建一个新的文件系统了。 为此,我们会使用 mkfs(”make file system”的简写),它能创建各种格式的文件系统。 在此设备上创建一个 ext3文件系统,我们使用”-t” 选项来指定这个”ext3”系统类型,随后是我们要格式化的设备分区名称:
| |
The program will display a lot of information when ext3 is the chosen file system type. To re-format the device to its original FAT32 file system, specify “vfat” as the file system type:
当 ext3 被选为文件系统类型时,这个程序会显示许多信息。若把这个设备重新格式化为它最初的 FAT32 文件 系统,指定”vfat”作为文件系统类型:
| |
This process of partitioning and formatting can be used anytime additional storage devices are added to the system. While we worked with a tiny flash drive, the same process can be applied to internal hard disks and other removable storage devices like USB hard drives.
任何时候添加额外的存储设备到系统中时,都可以使用这个分区和格式化的过程。虽然我们 只以一个小小的闪存驱动器为例,同样的操作可以被应用到内部硬盘和其它可移动的存储设备上, 例如 USB 硬盘驱动器。
测试和修复文件系统
In our earlier discussion of the /etc/fstab file, we saw some mysterious digits at the end of each line. Each time the system boots, it routinely checks the integrity of the file systems before mounting them. This is done by the fsck program (short for “file system check”). The last number in each fstab entry specifies the order the devices are to be checked. In our example above, we see that the root file system is checked first, followed by the home and boot file systems. Devices with a zero as the last digit are not routinely checked.
在之前讨论文件 /etc/fstab 时,我们会在每行的末尾看到一些神秘的数字。每次系统启动时, 在挂载系统之前,都会按照惯例检查文件系统的完整性。这个任务由 fsck 程序(是”file system check”的简写)完成。每个 fstab 项中的最后一个数字指定了设备的检查顺序。 在上面的实例中,我们看到首先检查根文件系统,然后是 home 和 boot 文件系统。若最后一个数字 是零则相应设备不会被检查。
In addition to checking the integrity of file systems, fsck can also repair corrupt file systems with varying degrees of success, depending on the amount of damage. On Unix- like file systems, recovered portions of files are placed in the lost+found directory, located in the root of each file system.
除了检查文件系统的完整性之外,fsck 还能修复受损的文件系统,其成功度依赖于损坏的数量。 在类 Unix 的文件系统中,文件恢复的部分被放置于 lost+found 目录里面,位于每个文件 系统的根目录下面。
To check our flash drive (which should be unmounted first), we could do the following:
检查我们的闪存驱动器(首先应该卸载),我们能执行下面的操作:
| |
In my experience, file system corruption is quite rare unless there is a hardware problem, such as a failing disk drive. On most systems, file system corruption detected at boot time will cause the system to stop and direct you to run fsck before continuing.
以我的经验,文件系统损坏情况相当罕见,除非硬件存在问题,如磁盘驱动器故障。 在大多数系统中,系统启动阶段若探测到文件系统已经损坏了,则会导致系统停止下来, 在系统继续执行之前,会指导你运行 fsck 程序。
What The fsck?
什么是 fsck?
In Unix culture, the word “fsck” is often used in place of a popular word with which it shares three letters. This is especially appropriate, given that you will probably be uttering the aforementioned word if you find yourself in a situation where you are forced to run fsck.
在 Unix 文化中,”fsck”这个单词往往会被用来指代另一个和它仅有一个字母差别的常用词。 因为如果你遇到了迫不得已需要运行 fsck 命令的糟糕境遇时,这个词经常会脱口而出。
格式化软盘
For those of us still using computers old enough to be equipped with floppy diskette drives, we can manage those devices, too. Preparing a blank floppy for use is a two step process. First, we perform a low-format on the diskette, then create a file system. To accomplish the formatting, we use the fdformat program specifying the name of the floppy device (usually /dev/fd0):
对于那些还在使用配备了软盘驱动器的计算机的用户,我们也能管理这些设备。准备一 张可用的空白软盘要分两个步骤。首先,对这张软盘执行低级格式化,然后创建一个文件系统。 为了完成格式化,我们使用 fdformat 程序,同时指定软盘设备名称(通常为/dev/fd0):
| |
Next, we apply a FAT file system to the diskette with mkfs:
接下来,通过 mkfs 命令,给这个软盘创建一个 FAT 文件系统:
| |
Notice that we use the “msdos” file system type to get the older (and smaller) style file allocation tables. After a diskette is prepared, it may be mounted like other devices.
注意我们使用这个“msdos”文件系统类型来得到旧(小的)风格的文件分配表。当一个软磁盘 被准备好之后,则可能像其它设备一样挂载它。
直接把数据移入/出设备
While we usually think of data on our computers as being organized into files, it is also possible to think of the data in “raw” form. If we look at a disk drive, for example, we see that it consists of a large number of “blocks” of data that the operating system sees as directories and files. However, if we could treat a disk drive as simply a large collection of data blocks, we could perform useful tasks, such as cloning devices.
虽然我们通常认为计算机中的数据以文件形式来组织数据,也可以“原始的”形式来考虑数据。 如果我们看一下磁盘驱动器,例如, 我们看到它由大量的数据“块”组成,而操作系统却把这些数据块看作目录和文件。然而,如果 把磁盘驱动器简单地看成一个数据块大集合,我们就能执行有用的任务,如克隆设备。
The dd program performs this task. It copies blocks of data from one place to another. It uses a unique syntax (for historical reasons) and is usually used this way:
这个 dd 程序能执行此任务。它可以把数据块从一个地方复制到另一个地方。它使用独特的语法(由于历史原因) ,经常它被这样使用:
dd if=input_file of=output_file [bs=block_size [count=blocks]]
Let’s say we had two USB flash drives of the same size and we wanted to exactly copy the first drive to the second. If we attached both drives to the computer and they are assigned to devices /dev/sdb and /dev/sdc respectively, we could copy everything on the first drive to the second drive with the following:
比方说我们有两个相同容量的 USB 闪存驱动器,并且要精确地把第一个驱动器(中的内容) 复制给第二个。如果连接两个设备到计算机上,它们各自被分配到设备/dev/sdb 和 /dev/sdc 上,这样我们就能通过下面的命令把第一个驱动器中的所有数据复制到第二个 驱动器中。
dd if=/dev/sdb of=/dev/sdc
Alternately, if only the first device were attached to the computer, we could copy its contents to an ordinary file for later restoration or copying:
或者,如果只有第一个驱动器被连接到计算机上,我们可以把它的内容复制到一个普通文件中供 以后恢复或复制数据:
dd if=/dev/sdb of=flash_drive.img
Warning! The dd command is very powerful. Though its name derives from “data definition,” it is sometimes called “destroy disk” because users often mistype either the if or of specifications. Always double check your input and output specifications before pressing enter!
警告!这个 dd 命令非常强大。虽然它的名字来自于“数据定义”,有时候也把它叫做“清除磁盘” 因为用户经常会误输入 if 或 of 的规范。在按下回车键之前,要再三检查输入与输出规范!
创建 CD-ROM 映像
Writing a recordable CD-ROM (either a CD-R or CD-RW) consists of two steps; first, constructing an iso image file that is the exact file system image of the CD-ROM and second, writing the image file onto the CD-ROM media.
写入一个可记录的 CD-ROM(一个 CD-R 或者是 CD-RW)由两步组成;首先,构建一个 iso 映像文件, 这就是一个 CD-ROM 的文件系统映像,第二步,把这个映像文件写入到 CD-ROM 媒介中。
创建一个 CD-ROM 的映像拷贝
If we want to make an iso image of an existing CD-ROM, we can use dd to read all the data blocks off the CD-ROM and copy them to a local file. Say we had an Ubuntu CD and we wanted to make an iso file that we could later use to make more copies. After inserting the CD and determining its device name (we’ll assume /dev/cdrom), we can make the iso file like so:
如果想要制作一张现有 CD-ROM 的 iso 映像,我们可以使用 dd 命令来读取 CD-ROW 中的所有数据块, 并把它们复制到本地文件中。比如说我们有一张 Ubuntu CD,用它来制作一个 iso 文件,以后我们可以用它来制作更多的拷贝。插入这张 CD 之后,确定 它的设备名称(假定是/dev/cdrom),然后像这样来制作 iso 文件:
dd if=/dev/cdrom of=ubuntu.iso
This technique works for data DVDs as well, but will not work for audio CDs, as they do not use a file system for storage. For audio CDs, look at the cdrdao command.
这项技术也适用于 DVD 光盘,但是不能用于音频 CD,因为它们不使用文件系统来存储数据。 对于音频 CD,看一下 cdrdao 命令。
从文件集合中创建一个映像
To create an iso image file containing the contents of a directory, we use the genisoimage program. To do this, we first create a directory containing all the files we wish to include in the image and then execute the genisoimage command to create the image file. For example, if we had created a directory called ~/cd-rom-files and filled it with files for our CD-ROM, we could create an image file named cd- rom.iso with the following command:
创建一个包含目录内容的 iso 映像文件,我们使用 genisoimage 程序。为此,我们首先创建 一个目录,这个目录中包含了要包括到此映像中的所有文件,然后执行这个 genisoimage 命令 来创建映像文件。例如,如果我们已经创建一个叫做 ~/cd-rom-files 的目录,然后用文件 填充此目录,再通过下面的命令来创建一个叫做 cd-rom.iso 映像文件:
genisoimage -o cd-rom.iso -R -J ~/cd-rom-files
The “-R” option adds metadata for the Rock Ridge extensions, which allows the use of long filenames and POSIX style file permissions. Likewise, the “-J” option enables the Joliet extensions, which permit long filenames for Windows.
“-R”选项添加元数据为 Rock Ridge 扩展,这允许使用长文件名和 POSIX 风格的文件权限。 同样地,这个”-J”选项使 Joliet 扩展生效,这样 Windows 中就支持长文件名了。
A Program By Any Other Name…
一个有着其它名字的程序。。。
If you look at on-line tutorials for creating and burning optical media like CD- ROMs and DVDs, you will frequently encounter two programs called mkisofs and cdrecord. These programs were part of a popular package called “cdrtools” authored by Jorg Schilling. In the summer of 2006, Mr. Schilling made a license change to a portion of the cdrtools package which, in the opinion of many in the Linux community, created a license incompatibility with the GNU GPL. As a result, a fork of the cdrtools project was started that now includes replacement programs for cdrecord and mkisofs named wodim and genisoimage, respectively.
如果你看一下关于创建和烧写光介质如 CD-ROMs 和 DVD 的在线文档,你会经常碰到两个程序 叫做 mkisofs 和 cdrecord。这些程序是流行软件包”cdrtools”的一部分,”cdrtools”由 Jorg Schilling 编写成。在2006年春天,Schilling 先生更改了部分 cdrtools 软件包的协议,Linux 社区许多人的看法是, 这创建了一个与 GNU GPL 不相兼容的协议。结果,就 fork 了这个 cdrtools 项目, 目前新项目里面包含了 cdrecord 和 mkisofs 的替代程序,分别是 wodim 和 genisoimage。
写入 CD-ROM 镜像
After we have an image file, we can burn it onto our optical media. Most of the commands we will discuss below can be applied to both recordable CD-ROM and DVD media.
有了一个映像文件之后,我们可以把它烧写到光盘中。下面讨论的大多数命令对可 记录的 CD-ROW 和 DVD 媒介都适用。
直接挂载一个 ISO 镜像
There is a trick that we can use to mount an iso image while it is still on our hard disk and treat it as though it was already on optical media. By adding the “-o loop” option to mount (along with the required “-t iso9660” file system type), we can mount the image file as though it were a device and attach it to the file system tree:
有一个诀窍,我们可以用它来挂载 iso 映像文件,虽然此文件仍然在我们的硬盘中,但我们 当作它已经在光盘中了。添加 “-o loop” 选项来挂载(同时带有必需的 “-t iso9660” 文件系统类型), 挂载这个映像文件就好像它是一台设备,把它连接到文件系统树上:
mkdir /mnt/iso_image
mount -t iso9660 -o loop image.iso /mnt/iso_image
In the example above, we created a mount point named /mnt/iso_image and then mounted the image file image.iso at that mount point. After the image is mounted, it can be treated just as though it were a real CD-ROM or DVD. Remember to unmount the image when it is no longer needed.
上面的示例中,我们创建了一个挂载点叫做 /mnt/iso_image,然后把此映像文件 image.iso 挂载到挂载点上。映像文件被挂载之后,可以把它当作是一张 真正的 CD-ROM 或者 DVD。当不再需要此映像文件后,记得卸载它。
清除一张可重写入的 CD-ROM
Rewritable CD-RW media needs to be erased or blanked before it can be reused. To do this, we can use wodim, specifying the device name for the CD writer and the type of blanking to be performed. The wodim program offers several types. The most minimal (and fastest) is the “fast” type:
可重写入的 CD-RW 媒介在被重使用之前需要擦除或清空。为此,我们可以用 wodim 命令,指定 设备名称和清空的类型。此 wodim 程序提供了几种清空类型。最小(且最快)的是 “fast” 类型:
wodim dev=/dev/cdrw blank=fast
写入镜像
To write an image, we again use wodim, specifying the name of the optical media writer device and the name of the image file:
写入一个映像文件,我们再次使用 wodim 命令,指定光盘设备名称和映像文件名:
wodim dev=/dev/cdrw image.iso
In addition to the device name and image file, wodim supports a very large set of options. Two common ones are “-v” for verbose output, and “-dao” which writes the disk in disk-at-once mode. This mode should be used if you are preparing a disk for commercial reproduction. The default mode for wodim is track-at-once, which is useful for recording music tracks.
除了设备名称和映像文件之外,wodim 命令还支持非常多的选项。常见的两个选项是,”-v” 可详细输出, 和 “-dao” 以 disk-at-once 模式写入光盘。如果你正在准备一张光盘为的是商业复制,那么应该使用这种模式。 wodim 命令的默认模式是 track-at-once,这对于录制音乐很有用。
拓展阅读
We have just touched on the many ways that the command line can be used to manage storage media. Take a look at the man pages of the commands we have covered. Some of them support huge numbers of options and operations. Also, look for on-line tutorials for adding hard drives to your Linux system (there are many) and working with optical media.
我们刚才谈到了很多方法,可以使用命令行管理存储介质。看看我们所讲过命令的手册页。 一些命令支持大量的选项和操作。此外,寻找一些如何添加硬盘驱动器到 Linux 系统(有许多)的在线教程, 这些教程也要适用于光介质存储设备。
友情提示
It’s often useful to verify the integrity of an iso image that we have downloaded. In most cases, a distributor of an iso image will also supply a checksum file. A checksum is the result of an exotic mathematical calculation resulting in a number that represents the content of the target file. If the contents of the file change by even one bit, the resulting checksum will be much different. The most common method of checksum generation uses the md5sum program. When you use md5sum, it produces a unique hexadecimal number:
通常验证一下我们已经下载的 iso 映像文件的完整性很有用处。在大多数情况下,iso 映像文件的贡献者也会提供 一个 checksum 文件。一个 checksum 是一个神奇的数学运算的计算结果,这个数学计算会产生一个能表示目标文件内容的数字。 如果目标文件的内容即使更改一个二进制位,checksum 的结果将会非常不一样。 生成 checksum 数字的最常见方法是使用 md5sum 程序。当你使用 md5sum 程序的时候, 它会产生一个独一无二的十六进制数字:
md5sum image.iso
34e354760f9bb7fbf85c96f6a3f94ece image.iso
After you download an image, you should run md5sum against it and compare the results with the md5sum value supplied by the publisher.
当你下载完映像文件之后,你应该对映像文件执行 md5sum 命令,然后把运行结果与发行商提供的 md5sum 数值作比较。
In addition to checking the integrity of a downloaded file, we can use md5sum to verify newly written optical media. To do this, we first calculate the checksum of the image file and then calculate a checksum for the media. The trick to verifying the media is to limit the calculation to only the portion of the optical media that contains the image. We do this by determining the number of 2048 byte blocks the image contains (optical media is always written in 2048 byte blocks) and reading that many blocks from the media. On some types of media, this is not required. A CD-R written in disk-at-once mode can be checked this way:
除了检查下载文件的完整性之外,我们也可以使用 md5sum 程序验证新写入的光学存储介质。 为此,首先我们计算映像文件的 checksum 数值,然后计算此光学存储介质的 checksum 数值。 这种验证光学介质的技巧是限定只对光学存储介质中包含映像文件的部分计算 checksum 数值。 通过确定映像文件所包含的 2048 个字节块的数目(光学存储介质总是以 2048 个字节块的方式写入) 并从存储介质中读取那么多的字节块,我们就可以完成操作。 某些类型的存储介质,并不需要这样做。一个以 disk-at-once 模式写入的 CD-R ,可以用下面的方式检验:
md5sum /dev/cdrom
34e354760f9bb7fbf85c96f6a3f94ece /dev/cdrom
Many types of media, such as DVDs require a precise calculation of the number of blocks. In the example below, we check the integrity of the image file dvd-image.iso and the disk in the DVD reader /dev/dvd. Can you figure out how this works?
许多存储介质类型,如 DVD 需要精确地计算字节块的数目。在下面的例子中,我们检验了映像文件 dvd-image.iso 以及 DVD 光驱中磁盘 /dev/dvd 文件的完整性。你能弄明白这是怎么回事吗?
md5sum dvd-image.iso; dd if=/dev/dvd bs=2048 count=$(( $(stat -c "%s" dvd-image.iso) / 2048 )) | md5sum
17 - 17 网络系统
网络系统
http://billie66.github.io/TLCL/book/chap17.html
When it comes to networking, there is probably nothing that cannot be done with Linux. Linux is used to build all sorts of networking systems and appliances, including firewalls, routers, name servers, NAS (Network Attached Storage) boxes and on and on.
当谈及到网络系统层面,几乎任何东西都能由 Linux 来实现。Linux 被用来创建各式各样的网络系统和装置, 包括防火墙,路由器,名称服务器,网络连接式存储设备等等。
Just as the subject of networking is vast, so are the number of commands that can be used to configure and control it. We will focus our attention on just a few of the most frequently used ones. The commands chosen for examination include those used to monitor networks and those used to transfer files. In addition, we are going to explore the ssh program that is used to perform remote logins. This chapter will cover:
被用来配置和操作网络系统的命令数目,就如网络系统一样巨大。我们仅仅会关注一些最经常 使用到的命令。我们要研究的命令包括那些被用来监测网络和传输文件的命令。另外,我们 还会探讨用来远端登录的 ssh 程序。这章会介绍:
- ping - Send an ICMP ECHO_REQUEST to network hosts
- ping - 发送 ICMP ECHO_REQUEST 数据包到网络主机
- traceroute - Print the route packets trace to a network host
- traceroute - 打印到一台网络主机的路由数据包
- netstat - Print network connections, routing tables, interface statistics, masquerade connections, and multicast memberships
- netstat - 打印网络连接,路由表,接口统计数据,伪装连接,和多路广播成员
- ftp - Internet file transfer program
- ftp - 因特网文件传输程序
- wget - Non-interactive network downloader
- wget - 非交互式网络下载器
- ssh - OpenSSH SSH client (remote login program)
- ssh - OpenSSH SSH 客户端(远程登录程序)
We’re going to assume a little background in networking. In this, the Internet age, everyone using a computer needs a basic understanding of networking concepts. To make full use of this chapter we should be familiar with the following terms:
我们假定你已经知道了一点网络系统背景知识。在这个因特网时代,每个计算机用户需要理解基本的网络 系统概念。为了能够充分利用这一章节的内容,我们应该熟悉以下术语:
- IP (Internet Protocol) address
- IP (网络协议)地址
- Host and domain name
- 主机和域名
- URI (Uniform Resource Identifier)
- URI(统一资源标识符)
Please see the “Further Reading” section below for some useful articles regarding these terms.
请查看下面的“拓展阅读”部分,有几篇关于这些术语的有用文章。
Note: Some of the commands we will cover may (depending on your distribution) require the installation of additional packages from your distribution’s repositories, and some may require superuser privileges to execute.
注意:一些将要讲到的命令可能(取决于系统发行版)需要从系统发行版的仓库中安装额外的软件包, 并且一些命令可能需要超级用户权限才能执行。
检查和监测网络
Even if you’re not the system administrator, it’s often helpful to examine the performance and operation of a network.
即使你不是一名系统管理员,检查一个网络的性能和运作情况也是经常有帮助的。
ping
The most basic network command is ping. The ping command sends a special network packet called an ICMP ECHO_REQUEST to a specified host. Most network devices receiving this packet will reply to it, allowing the network connection to be verified.
最基本的网络命令是 ping。这个 ping 命令发送一个特殊的网络数据包,叫做 ICMP ECHO_REQUEST,到 一台指定的主机。大多数接收这个包的网络设备将会回复它,来允许网络连接验证。
Note: It is possible to configure most network devices (including Linux hosts) to ignore these packets. This is usually done for security reasons, to partially obscure a host from a potential attacker. It is also common for firewalls to be configured to block IMCP traffic.
注意:大多数网络设备(包括 Linux 主机)都可以被配置为忽略这些数据包。通常,这样做是出于网络安全 原因,部分地遮蔽一台主机免受一个潜在攻击者地侵袭。配置防火墙来阻塞 IMCP 流量也很普遍。
For example, to see if we can reach linuxcommand.org (one of our favorite sites ;-), we can use use ping like this:
例如,看看我们能否连接到网站 linuxcommand.org(我们最喜欢的网站之一 ;-), 我们可以这样使用 ping 命令:
| |
Once started, ping continues to send packets at a specified interval (default is one second) until it is interrupted:
一旦启动,ping 命令会持续在特定的时间间隔内(默认是一秒)发送数据包,直到它被中断:
| |
After it is interrupted (in this case after the sixth packet) by pressing Ctrl-c, ping prints performance statistics. A properly performing network will exhibit zero percent packet loss. A successful “ping” will indicate that the elements of the network (its interface cards, cabling, routing and gateways) are in generally good working order.
按下组合键 Ctrl-c,中断这个命令之后,ping 打印出运行统计信息。一个正常工作的网络会报告 零个数据包丢失。一个成功执行的“ping”命令会意味着网络的各个部件(网卡,电缆,路由,网关) 都处于正常的工作状态。
traceroute
The traceroute program (some systems use the similar tracepath program instead) displays a listing of all the “hops” network traffic takes to get from the local system to a specified host. For example, to see the route taken to reach slashdot.org, we would do this:
这个 traceroute 程序(一些系统使用相似的 tracepath 程序来代替)会显示从本地到指定主机 要经过的所有“跳数”的网络流量列表。例如,看一下到达 slashdot.org 需要经过的路由, 我们将这样做:
| |
The output looks like this:
命令输出看起来像这样:
traceroute to slashdot.org (216.34.181.45), 30 hops max, 40 byte
packets
1 ipcop.localdomain (192.168.1.1) 1.066 ms 1.366 ms 1.720 ms
2 * * *
3 ge-4-13-ur01.rockville.md.bad.comcast.net (68.87.130.9) 14.622
ms 14.885 ms 15.169 ms
4 po-30-ur02.rockville.md.bad.comcast.net (68.87.129.154) 17.634
ms 17.626 ms 17.899 ms
5 po-60-ur03.rockville.md.bad.comcast.net (68.87.129.158) 15.992
ms 15.983 ms 16.256 ms
6 po-30-ar01.howardcounty.md.bad.comcast.net (68.87.136.5) 22.835
...
In the output, we can see that connecting from our test system to slashdot.org requires traversing sixteen routers. For routers that provided identifying information, we see their host names, IP addresses and performance data, which includes three samples of round-trip time from the local system to the router. For routers that do not provide identifying information (because of router configuration, network congestion, firewalls, etc.), we see asterisks as in the line for hop number two.
从输出结果中,我们可以看到连接测试系统到 slashdot.org 网站需要经由16个路由器。对于那些 提供标识信息的路由器,我们能看到它们的主机名,IP 地址和性能数据,这些数据包括三次从本地到 此路由器的往返时间样本。对于那些没有提供标识信息的路由器(由于路由器配置,网络拥塞,防火墙等 方面的原因),我们会看到几个星号,正如行中所示。
netstat
The netstat program is used to examine various network settings and statistics. Through the use of its many options, we can look at a variety of features in our network setup. Using the “-ie” option, we can examine the network interfaces in our system:
netstat 程序被用来检查各种各样的网络设置和统计数据。通过此命令的许多选项,我们 可以看看网络设置中的各种特性。使用“-ie”选项,我们能够查看系统中的网络接口:
| |
In the example above, we see that our test system has two network interfaces. The first, called eth0, is the Ethernet interface and the second, called lo, is the loopback interface, a virtual interface that the system uses to “talk to itself.”
在上述实例中,我们看到我们的测试系统有两个网络接口。第一个,叫做 eth0,是 以太网接口,和第二个,叫做 lo,是内部回环网络接口,它是一个虚拟接口,系统用它来 “自言自语”。
When performing causal network diagnostics, the important things to look for are the presence of the word “UP” at the beginning of the fourth line for each interface, indicating that the network interface is enabled, and the presence of a valid IP address in the inet addr field on the second line. For systems using DHCP (Dynamic Host Configuration Protocol), a valid IP address in this field will verify that the DHCP is working.
当执行日常网络诊断时,要查看的重要信息是每个网络接口第四行开头出现的单词 “UP”,说明这个网络接口已经生效,还要查看第二行中 inet addr 字段出现的有效 IP 地址。对于使用 DHCP(动态主机配置协议)的系统,在 这个字段中的一个有效 IP 地址则证明了 DHCP 工作正常。
Using the “-r” option will display the kernel’s network routing table. This shows how the network is configured to send packets from network to network:
使用这个“-r”选项会显示内核的网络路由表。这展示了系统是如何配置网络之间发送数据包的。
| |
In this simple example, we see a typical routing table for a client machine on a LAN (Local Area Network) behind a firewall/router. The first line of the listing shows the destination 192.168.1.0. IP addresses that end in zero refer to networks rather than individual hosts, so this destination means any host on the LAN. The next field, Gateway, is the name or IP address of the gateway (router) used to go from the current host to the destination network. An asterisk in this field indicates that no gateway is needed.
在这个简单的例子里面,我们看到了,位于防火墙之内的局域网中,一台客户端计算机的典型路由表。 第一行显示了目的地 192.168.1.0。IP 地址以零结尾是指网络,而不是独立主机, 所以这个目的地意味着局域网中的任何一台主机。下一个字段,Gateway, 是网关(路由器)的名字或 IP 地址,用它来连接当前的主机和目的地的网络。 若这个字段显示一个星号,则表明不需要网关。
The last line contains the destination default. This means any traffic destined for a network that is not otherwise listed in the table. In our example, we see that the gateway is defined as a router with the address of 192.168.1.1, which presumably knows what to do with the destination traffic.
最后一行包含目的地 default。指的是发往任何表上没有列出的目的地网络的流量。 在我们的实例中,我们看到网关被定义为地址 192.168.1.1 的路由器,它应该能 知道怎样来处理目的地流量。
The netstat program has many options and we have only looked at a couple. Check out the netstat man page for a complete list.
netstat 程序有许多选项,我们仅仅讨论了几个。查看 netstat 命令的手册,可以 得到所有选项的完整列表。
网络中传输文件
What good is a network unless we know how to move files across it? There are many programs that move data over networks. We will cover two of them now and several more in later sections.
如果不能通过网络来传输文件,那么要网络有什么用呢?有许多程序可以用来在网络中 传送数据。我们先讨论两个,随后的章节里再介绍几个。
ftp
One of the true “classic” programs, ftp gets it name from the protocol it uses, the File Transfer Protocol. FTP is used widely on the Internet for file downloads. Most, if not all, web browsers support it and you often see URIs starting with the protocol ftp://. Before there were web browsers, there was the ftp program. ftp is used to communicate with FTP servers, machines that contain files that can be uploaded and downloaded over a network.
ftp 命令属于真正的“经典”程序之一,它的名字来源于其所使用的协议,就是文件传输协议。 FTP 被广泛地用来从因特网上下载文件。大多数,并不是所有的,网络浏览器都支持 FTP, 你经常可以看到它们的 URI 以协议 ftp://开头。在出现网络浏览器之前,ftp 程序已经存在了。 ftp 程序可用来与 FTP 服务器进行通信,FTP 服务器就是存储文件的计算机,这些文件能够通过 网络下载和上传。
FTP (in its original form) is not secure, because it sends account names and passwords in cleartext. This means that they are not encrypted and anyone sniffing the network can see them. Because of this, almost all FTP done over the Internet is done by anonymous FTP servers. An anonymous server allows anyone to login using the login name “anonymous” and a meaningless password.
FTP(它的原始版本)并不是安全的,因为它会以明码形式发送帐号的姓名和密码。这就意味着 这些数据没有加密,任何嗅探网络的人都能看到。由于此种原因,几乎因特网中所有 FTP 服务器 都是匿名的。一个匿名服务器能允许任何人使用注册名“anonymous”和无意义的密码登录系统。
In the example below, we show a typical session with the ftp program downloading an Ubuntu iso image located in the /pub/cd_images/Ubuntu-8.04 directory of the anonymous FTP server fileserver:
在下面的例子中,我们将展示一个典型的会话,从匿名 FTP 服务器,其名字是 fileserver, 的/pub/_images/Ubuntu-8.04的目录下,使用 ftp 程序下载一个 Ubuntu 系统映像文件。
| |
Here is an explanation of the commands entered during this session:
这里是对会话期间所输入命令的解释说明:
| Command | Meaning |
|---|---|
| ftp fileserver | Invoke the ftp program and have it connect to FTP server fileserver. |
| anonymous | Login name. After the login prompt, a password prompt will appear. Some servers will accept a blank password, others will require a password in the form of a email address. In that case, try something like “user@example.com”. |
| cd pub/cd_images/Ubuntu-8.04 | Change to the directory on the remote system containing the desired file. Note that on most anonymous FTP servers, the files for public downloading are found somewhere under the pub directory. |
| ls | List the directory on the remote system. |
| lcd Desktop | Change the directory on the local system to ~/Desktop. In the example, the ftp program was invoked when the working directory was ~. This command changes the working directory to ~/Desktop. |
| get ubuntu-8.04-desktop- i386.iso | Tell the remote system to transfer the file ubuntu-8.04-desktop- i386.iso to the local system. Since the working directory on the local system was changed to ~/Desktop, the file will be downloaded there. |
| bye | Log off the remote server and end the ftp program session. The commands quit and exit may also be used. |
| 命令 | 意思 |
|---|---|
| ftp fileserver | 唤醒 ftp 程序,让它连接到 FTP 服务器,fileserver。 |
| anonymous | 登录名。输入登录名后,将出现一个密码提示。一些服务器将会接受空密码, 其它一些则会要求一个邮件地址形式的密码。如果是这种情况,试着输入 “user@example.com”。 |
| cd pub/cd_images/Ubuntu-8.04 | 跳转到远端系统中,要下载文件所在的目录下, 注意在大多数匿名的 FTP 服务器中,支持公共下载的文件都能在目录 pub 下找到 |
| ls | 列出远端系统中的目录。 |
| lcd Desktop | 跳转到本地系统中的 ~/Desktop 目录下。在实例中,ftp 程序在工作目录 ~ 下被唤醒。 这个命令把工作目录改为 ~/Desktop |
| get ubuntu-8.04-desktop-i386.iso | 告诉远端系统传送文件到本地。因为本地系统的工作目录 已经更改到了 ~/Desktop,所以文件会被下载到此目录。 |
| bye | 退出远端服务器,结束 ftp 程序会话。也可以使用命令 quit 和 exit。 |
Typing “help” at the “ftp>” prompt will display a list of the supported commands. Using ftp on a server where sufficient permissions have been granted, it is possible to perform many ordinary file management tasks. It’s clumsy, but it does work.
在 “ftp>” 提示符下,输入 “help”,会显示所支持命令的列表。使用 ftp 登录到一台 授予了用户足够权限的服务器中,则可以执行很多普通的文件管理任务。虽然很笨拙, 但它真能工作。
lftp - 更好的 ftp
ftp is not the only command line FTP client. In fact, there are many. One of better (and more popular) ones is lftp by Alexander Lukyanov. It works much like the traditional ftp program, but has many additional convenience features including multiple protocol support (including HTTP), automatic re-try on failed downloads, background processes, tab completion of path names, and many more.
ftp 并不是唯一的命令行形式的 FTP 客户端。实际上,还有很多。其中比较好(也更流行的)是 lftp 程序, 由 Alexander Lukyanov 编写完成。虽然 lftp 工作起来与传统的 ftp 程序很相似,但是它带有额外的便捷特性,包括 多协议支持(包括 HTTP),若下载失败会自动地重新下载,后台处理,用 tab 按键来补全路径名,还有很多。
wget
Another popular command line program for file downloading is wget. It is useful for downloading content from both web and FTP sites. Single files, multiple files, and even entire sites can be downloaded. To download the first page of linuxcommand.org we could do this:
另一个流行的用来下载文件的命令行程序是 wget。若想从网络和 FTP 网站两者上都能下载数据,wget 是很有用处的。 不只能下载单个文件,多个文件,甚至整个网站都能下载。下载 linuxcommand.org 网站的首页, 我们可以这样做:
| |
The program’s many options allow wget to recursively download, download files in the background (allowing you to log off but continue downloading), and complete the download of a partially downloaded file. These features are well documented in its better-than-average man page.
这个程序的许多选项允许 wget 递归地下载,在后台下载文件(你退出后仍在下载),能完成未下载 全的文件。这些特性在其优秀的命令手册中有着详尽地说明。
与远程主机安全通信
For many years, Unix-like operating systems have had the ability to be administered remotely via a network. In the early days, before the general adoption of the Internet, there were a couple of popular programs used to log in to remote hosts. These were the rlogin and telnet programs. These programs, however, suffer from the same fatal flaw that the ftp program does; they transmit all their communications (including login names and passwords) in cleartext. This makes them wholly inappropriate for use in the Internet age.
通过网络来远程操控类 Unix 的操作系统已经有很多年了。早些年,在因特网普遍推广之前,有 一些受欢迎的程序被用来登录远程主机。它们是 rlogin 和 telnet 程序。然而这些程序,拥有和 ftp 程序 一样的致命缺点;它们以明码形式来传输所有的交流信息(包括登录命令和密码)。这使它们完全不 适合使用在因特网时代。
ssh
To address this problem, a new protocol called SSH (Secure Shell) was developed. SSH solves the two basic problems of secure communication with a remote host. First, it authenticates that the remote host is who it says it is (thus preventing so-called “man in the middle” attacks), and second, it encrypts all of the communications between the local and remote hosts.
为了解决这个问题,开发了一款新的协议,叫做 SSH(Secure Shell)。 SSH 解决了这两个基本的和远端主机安全交流的问题。首先,它要认证远端主机是否为它 所知道的那台主机(这样就阻止了所谓的“中间人”的攻击),其次,它加密了本地与远程主机之间 所有的通讯信息。
SSH consists of two parts. An SSH server runs on the remote host, listening for incoming connections on port twenty-two, while an SSH client is used on the local system to communicate with the remote server.
SSH 由两部分组成。SSH 服务端运行在远端主机上,在端口 22 上监听收到的外部连接,而 SSH 客户端用在本地系统中,用来和远端服务器通信。
Most Linux distributions ship an implementation of SSH called OpenSSH from the BSD project. Some distributions include both the client and the server packages by default (for example, Red Hat), while others (such as Ubuntu) only supply the client. To enable a system to receive remote connections, it must have the OpenSSH-server package installed, configured and running, and (if the system is either running or is behind a firewall) it must allow incoming network connections on TCP port 22.
大多数 Linux 发行版自带一个提供 SSH 功能的软件包,叫做 OpenSSH,来自于 BSD 项目。一些发行版 默认包含客户端和服务端两个软件包(例如 Red Hat),而另一些(比方说 Ubuntu)则只提供客户端。 为了能让系统接受远端的连接,它必须安装 OpenSSH-server 软件包,配置,运行它, 并且(如果系统正在运行,或者系统在防火墙之后)它必须允许在 TCP 端口 22 上接收网络连接。
Tip: If you don’t have a remote system to connect to but want to try these examples, make sure the OpenSSH-server package is installed on your system and use localhost as the name of the remote host. That way, your machine will create network connections with itself.
小贴示:如果你没有远端系统去连接,但还想试试这些实例,则确认安装了 OpenSSH-server 软件包 ,则可使用 localhost 作为远端主机的名字。这种情况下,计算机会和它自己创建网络连接。
The SSH client program used to connect to remote SSH servers is called, appropriately enough, ssh. To connect to a remote host named remote-sys, we would use the ssh client program like so:
用来与远端 SSH 服务器相连接的 SSH 客户端程序,顺理成章,叫做 ssh。想要连接到名叫 remote-sys 的远端主机,我们可以这样使用 ssh 客户端程序:
| |
The first time the connection is attempted, a message is displayed indicating that the authenticity of the remote host cannot be established. This is because the client program has never seen this remote host before. To accept the credentials of the remote host, enter “yes” when prompted. Once the connection is established, the user is prompted for his/her password:
第一次尝试连接,提示信息表明远端主机的真实性不能确立。这是因为客户端程序以前从没有 看到过这个远端主机。为了接受远端主机的身份验证凭据,输入“yes”。一旦建立了连接,会提示 用户输入他或她的密码:
Warning: Permanently added 'remote-sys,192.168.1.4' (RSA) to the list
of known hosts.
me@remote-sys's password:
After the password is successfully entered, we receive the shell prompt from the remote system:
成功地输入密码之后,我们会接收到远端系统的 shell 提示符:
Last login: Sat Aug 30 13:00:48 2008
[me@remote-sys ~]$
The remote shell session continues until the user enters the exit command at the remote shell prompt, thereby closing the remote connection. At this point, the local shell session resumes and the local shell prompt reappears.
远端 shell 会话一直存在,直到用户输入 exit 命令后,则关闭了远程连接。这时候,本地的 shell 会话 恢复,本地 shell 提示符重新出现。
It is also possible to connect to remote systems using a different user name. For example, if the local user “me” had an account named “bob” on a remote system, user me could log in to the account bob on the remote system as follows:
也有可能使用不同的用户名连接到远程系统。例如,如果本地用户“me”,在远端系统中有一个帐号名 “bob”,则用户 me 能够用 bob 帐号登录到远端系统,如下所示:
| |
As stated before, ssh verifies the authenticity of the remote host. If the remote host does not successfully authenticate, the following message appears:
正如之前所讲到的,ssh 验证远端主机的真实性。如果远端主机不能成功地通过验证,则会提示以下信息:
| |
This message is caused by one of two possible situations. First, an attacker may be attempting a “man-in-the-middle” attack. This is rare, since everybody knows that ssh alerts the user to this. The more likely culprit is that the remote system has been changed somehow; for example, its operating system or SSH server has been reinstalled. In the interests of security and safety however, the first possibility should not be dismissed out of hand. Always check with the administrator of the remote system when this message occurs.
有两种可能的情形会提示这些信息。第一,某个攻击者企图制造“中间人”袭击。这很少见, 因为每个人都知道 ssh 会针对这种状况发出警告。最有可能的罪魁祸首是远端系统已经改变了; 例如,它的操作系统或者是 SSH 服务器重新安装了。然而,为了安全起见,第一个可能性不应该 被轻易否定。当这条消息出现时,总要与远端系统的管理员查对一下。
After it has been determined that the message is due to a benign cause, it is safe to correct the problem on the client side. This is done by using a text editor (vim perhaps) to remove the obsolete key from the ~/.ssh/known_hosts file. In the example message above, we see this:
当确定了这条消息归结为一个良性的原因之后,那么在客户端更正问题就很安全了。 使用文本编辑器(可能是 vim)从文件~/.ssh/known_hosts 中删除废弃的钥匙, 就解决了问题。在上面的例子里,我们看到这样一句话:
Offending key in /home/me/.ssh/known_hosts:1
This means that line one of the known_hosts file contains the offending key. Delete this line from the file, and the ssh program will be able to accept new authentication credentials from the remote system.
这意味着 known_hosts 文件的第一行包含那个冲突的钥匙。从文件中删除这一行,则 ssh 程序 就能够从远端系统接受新的身份验证凭据。
Besides opening a shell session on a remote system, ssh also allows us to execute a single command on a remote system. For example, to execute the free command on a remote host named remote-sys and have the results displayed on the local system:
除了能够在远端系统中打开一个 shell 会话,ssh 程序也允许我们在远端系统中执行单个命令。 例如,在名为 remote-sys 的远端主机上,执行 free 命令,并把输出结果显示到本地系统 shell 会话中。
| |
It’s possible to use this technique in more interesting ways, such as this example in which we perform an ls on the remote system and redirect the output to a file on the local system:
有可能以更有趣的方式来利用这项技术,比方说下面的例子,我们在远端系统中执行 ls 命令, 并把命令输出重定向到本地系统中的一个文件里面。
| |
Notice the use of the single quotes in the command above. This is done because we do not want the pathname expansion performed on the local machine; rather, we want it to be performed on the remote system. Likewise, if we had wanted the output redirected to a file on the remote machine, we could have placed the redirection operator and the filename within the single quotes:
注意,上面的例子中使用了单引号。这样做是因为我们不想路径名展开操作在本地执行,而希望 它在远端系统中被执行。同样地,如果我们想要把输出结果重定向到远端主机的文件中,我们可以 把重定向操作符和文件名都放到单引号里面。
| |
Tunneling With SSH
SSH 通道
Part of what happens when you establish a connection with a remote host via SSH is that an encrypted tunnel is created between the local and remote systems. Normally, this tunnel is used to allow commands typed at the local system to be transmitted safely to the remote system, and for the results to be transmitted safely back. In addition to this basic function, the SSH protocol allows most types of network traffic to be sent through the encrypted tunnel, creating a sort of VPN (Virtual Private Network) between the local and remote systems.
当你通过 SSH 协议与远端主机建立连接的时候,其中发生的事就是在本地与远端系统之间 创建了一条加密通道。通常,这条通道被用来把在本地系统中输入的命令安全地传输到远端系统, 同样地,再把执行结果安全地发送回来。除了这个基本功能之外,SSH 协议允许大多数 网络流量类型通过这条加密通道来被传送,在本地与远端系统之间创建一种 VPN(虚拟专用网络)。
Perhaps the most common use of this feature is to allow X Window system traffic to be transmitted. On a system running an X server (that is, a machine displaying a GUI), it is possible to launch and run an X client program (a graphical application) on a remote system and have its display appear on the local system. It’s easy to do, here’s an example: let’s say we are sitting at a Linux system called linuxbox which is running an X server, and we want to run the xload program on a remote system named remote-sys and see the program’s graphical output on our local system. We could do this:
可能这个特性的最普遍的用法是允许传递 X 窗口系统流量。在运行着 X 服务端的系统(也就是, 能显示 GUI 的机器)上,能登录远端系统并运行一个 X 客户端程序(一个图形化应用), 而应用程序的显示结果出现在本地。这很容易完成,这里有个例子:假设我们正坐在一台名为 linuxbox 的 Linux 系统前,且系统中运行着 X 服务端,现在我们想要在名为 remote-sys 的远端系统中 运行 xload 程序,但是要在我们的本地系统中看到这个程序的图形化输出。我们可以这样做:
[me@linuxbox ~]$ ssh -X remote-sys me@remote-sys's password: Last login: Mon Sep 08 13:23:11 2008 [me@remote-sys ~]$ xloadAfter the xload command is executed on the remote system, its window appears on the local system. On some systems, you may need to use the “-Y” option rather than the “-X” option to do this.
这个 xload 命令在远端执行之后,它的窗口就会出现在本地。在某些系统中,你可能需要 使用 “-Y” 选项,而不是 “-X” 选项来完成这个操作。
scp 和 sftp
The OpenSSH package also includes two programs that can make use of an SSH encrypted tunnel to copy files across the network. The first, scp (secure copy) is used much like the familiar cp program to copy files. The most notable difference is that the source or destination pathnames may be preceded with the name of a remote host, followed by a colon character. For example, if we wanted to copy a document named document.txt from our home directory on the remote system, remote-sys, to the current working directory on our local system, we could do this:
OpenSSH 软件包也包含两个程序,它们可以利用 SSH 加密通道在网络间复制文件。 第一个,scp(安全复制)被用来复制文件,与熟悉的 cp 程序非常相似。最显著的区别就是 源或者目标路径名要以远端主机的名字,后跟一个冒号字符开头。例如,如果我们想要 从 remote-sys 远端系统的家目录下复制文档 document.txt,到我们本地系统的当前工作目录下, 可以这样操作:
| |
As with ssh, you may apply a user name to the beginning of the remote host’s name if the desired remote host account name does not match that of the local system:
和 ssh 命令一样,如果所需的远端主机帐户名与本地系统中的不一致, 那么你可以把用户名添加到远端主机名的开头:
| |
The second SSH file copying program is sftp which, as its name implies, is a secure replacement for the ftp program. sftp works much like the original ftp program that we used earlier; however, instead of transmitting everything in cleartext, it uses an SSH encrypted tunnel. sftp has an important advantage over conventional ftp in that it does not require an FTP server to be running on the remote host. It only requires the SSH server. This means that any remote machine that can connect with the SSH client can also be used as a FTP-like server. Here is a sample session:
第二个 SSH 文件复制程序是 sftp,顾名思义,它是 ftp 程序的安全替代品。sftp 工作起来与我们 之前使用的 ftp 程序很相似;然而,它不用明码形式来传递数据,它使用加密的 SSH 通道。sftp 有一个 重要特性强于传统的 ftp 命令,就是 sftp 不需要远端系统中运行 FTP 服务端。它仅仅需要 SSH 服务端。 这意味着任何一台能用 SSH 客户端连接的远端机器,也可当作类似于 FTP 的服务器来使用。 这里是一个样本会话:
| |
Tip: The SFTP protocol is supported by many of the graphical file managers found in Linux distributions. Using either Nautilus (GNOME) or Konqueror (KDE), we can enter a URI beginning with sftp:// into the location bar and operate on files stored on a remote system running an SSH server.
小贴示:SFTP 协议被许多 Linux 发行版中的图形化文件管理器支持。使用 Nautilus (GNOME), 或者是 Konqueror (KDE),我们都能在位置栏中输入以 sftp:// 开头的 URI,来操作存储在运行着 SSH 服务端的远端系统中的文件。
An SSH Client For Windows?
Windows 中的 SSH 客户端
Let’s say you are sitting at a Windows machine but you need to log in to your Linux server and get some real work done, what do you do? Get an SSH client program for your Windows box, of course! There are a number of these. The most popular one is probably PuTTY by Simon Tatham and his team. The PuTTY program displays a terminal window and allow a Windows user to open an SSH (or telnet) session on a remote host. The program also provides analogs for the scp and sftp programs.
比方说你正坐在一台 Windows 机器前面,但是你需要登录到你的 Linux 服务器中,去完成 一些实际的工作,那该怎么办呢?当然是找一个 Windows 平台下的 SSH 客户端!有很多这样 的工具。最流行的可能就是由 Simon Tatham 和他的团队开发的 PuTTY 了。PuTTY 程序 能够显示一个终端窗口,而且允许 Windows 用户在远端主机中打开一个 SSH(或者 telnet)会话。 这个程序也提供了 scp 和 sftp 程序的类似物。
PuTTY is available at http://www.chiark.greenend.org.uk/~sgtatham/putty/
PuTTY 可在链接 http://www.chiark.greenend.org.uk/~sgtatham/putty/ 处得到。
拓展阅读
For a broad (albeit dated) look at network administration, the Linux Documentation Project provides the Linux Network Administrator’s Guide:
Linux 文档项目提供了 Linux 网络管理指南,可以广泛地(虽然有点过时的)了解网络管理方面的知识。
Wikipedia contains many good networking articles. Here are some of the basics:
Wikipedia 上包含了许多网络方面的优秀文章。这里有一些基础的:
http://en.wikipedia.org/wiki/Internet_protocol_address
18 - 18 查找文件
查找文件
http://billie66.github.io/TLCL/book/chap18.html
As we have wandered around our Linux system, one thing has become abundantly clear: a typical Linux system has a lot of files! This begs the question, “how do we find things?” We already know that the Linux file system is well organized according to conventions that have been passed down from one generation of Unix-like system to the next, but the sheer number of files can present a daunting problem. In this chapter, we will look at two tools that are used to find files on a system. These tools are:
随着我们在 Linux 系统中的不断探索,会逐渐发觉:一个典型的 Linux 系统包含很多文件! 这就引发了一个问题,“我们怎样查找东西?”。虽然我们已经知道 Linux 文件系统已经根据类 Unix 系统的 代代相传的惯例而被良好地组织起来了。但是海量的文件也真是可怕的。在这一章中,我们将察看 两个用来在系统中查找文件的工具。这些工具是:
- locate – Find files by name
- locate – 通过名字来查找文件
- find – Search for files in a directory hierarchy
- find – 在一个目录层次结构中搜索文件
We will also look at a command that is often used with file search commands to process the resulting list of files:
我们也将看一个经常与文件搜索命令一起使用的命令,它用来处理搜索到的文件列表:
- xargs – Build and execute command lines from standard input
- xargs – 从标准输入生成和执行命令行
In addition, we will introduce a couple of commands to assist us in our exploration:
另外,我们将介绍两个命令以便在我们探索的过程中协助我们:
- touch – Change file times
- touch – 更改文件时间
- stat – Display file or file system status
- stat – 显示文件或文件系统状态
locate - 查找文件的简单方法
The locate program performs a rapid database search of pathnames and outputs every name that matches a given substring. Say, for example, we want to find all the programs with names that begin with “zip.” Since we are looking for programs, we can assume that the directory containing the programs would end with “bin/”. Therefore, we could try to use locate this way to find our files:
这个 locate 程序会执行一次快速的路径名数据库搜索,并且输出每个与给定子字符串相匹配的路径名。比如说,我们想要找到所有名字以“zip”开头的程序。因为我们正在查找程序,可以假定包含 程序的目录以”bin/”结尾。因此,我们试着以这种方式使用 locate 命令,来找到我们的文件:
| |
locate will search its database of pathnames and output any that contain the string “bin/zip”:
locate 命令将会搜索它的路径名数据库,输出任一个包含字符串“bin/zip”的路径名:
/usr/bin/zip
/usr/bin/zipcloak
/usr/bin/zipgrep
/usr/bin/zipinfo
/usr/bin/zipnote
/usr/bin/zipsplit
If the search requirement is not so simple, locate can be combined with other tools such as grep to design more interesting searches:
如果搜索要求没有这么简单,locate 可以结合其它工具,比如说 grep 命令,来设计更加 有趣的搜索:
| |
The locate program has been around for a number of years, and there are several different variants in common use. The two most common ones found in modern Linux distributions are slocate and mlocate, though they are usually accessed by a symbolic link named locate. The different versions of locate have overlapping options sets. Some versions include regular expression matching (which we’ll cover in an upcoming chapter) and wild card support. Check the man page for locate to determine which version of locate is installed.
这个 locate 程序已经存在了很多年了,它有几个不同的变体被普遍使用着。在现在 Linux 发行版中两个最常见的变体是 slocate 和 mlocate,尽管它们通常被名为 locate 的 符号链接访问。不同版本的 locate 命令拥有重叠的选项集合。一些版本包括正则表达式 匹配(我们会在下一章中讨论)和通配符支持。可以查看 locate 命令的手册来确定安装了 哪个版本的 locate 程序。
Where Does The locate Database Come From?
locate 数据库来自何方?
You may notice that, on some distributions, locate fails to work just after the system is installed, but if you try again the next day, it works fine. What gives? The locate database is created by another program named updatedb. Usually, it is run periodically as a cron job; that is, a task performed at regular intervals by the cron daemon. Most systems equipped with locate run updatedb once a day. Since the database is not updated continuously, you will notice that very recent files do not show up when using locate. To overcome this, it’s possible to run the updatedb program manually by becoming the superuser and running updatedb at the prompt.
你可能注意到了,在一些发行版中,在系统安装之后,locate 开始是不能正常工作的, 但是如果你第二天再试一下,它就正常工作了。怎么回事呢?locate 数据库由另一个叫做 updatedb 的程序创建。通常,这个程序作为一个定时任务(jobs)周期性运转;也就是说,一个任务 在特定的时间间隔内被 cron 守护进程执行。大多数装有 locate 的系统会每隔一天运行一回 updatedb 程序。因为数据库不能被持续地更新,所以当使用 locate 时,你会发现 目前最新的文件不会出现。为了克服这个问题,通过更改为超级用户身份,在提示符下运行 updatedb 命令, 可以手动运行 updatedb 程序。
find - 查找文件的复杂方式
While the locate program can find a file based solely on its name, the find program searches a given directory (and its subdirectories) for files based on a variety of attributes. We’re going to spend a lot of time with find because it has a lot of interesting features that we will see again and again when we start to cover programming concepts in later chapters.
locate 程序只能依据文件名来查找文件,而 find 程序能基于各种各样的属性 搜索一个给定目录(以及它的子目录),来查找文件。我们将要花费大量的时间学习 find 命令,因为 它有许多有趣的特性,当我们开始在随后的章节里面讨论编程概念的时候,我们将会重复看到这些特性。
In its simplest use, find is given one or more names of directories to search. For example, to produce a list of our home directory:
在它的最简单的使用方式中,find 命令接收一个或多个目录名来执行搜索。例如,输出我们的家目录的路径名列表(包括文件及目录,译者注)。
| |
On most active user accounts, this will produce a large list. Since the list is sent to standard output, we can pipe the list into other programs. Let’s use wc to count the number of files:
对于活跃的用户帐号,这将产生一张很大的列表。因为这张列表被发送到标准输出, 我们可以把这个列表管道到其它的程序中。让我们使用 wc 程序来计算出文件的数量:
| |
Wow, we’ve been busy! The beauty of find is that it can be used to identify files that meet specific criteria. It does this through the (slightly strange) application of options, tests, and actions. We’ll look at the tests first.
哇,我们一直很忙(在 home 路径下执行了很多操作,译者注)!find 命令的魅力所在就是它能够被用来找到符合特定标准的文件。它通过 (有点奇怪)应用选项,测试条件,和操作来做到这一点。我们先看一下测试条件:
Tests
Let’s say that we want a list of directories from our search. To do this, we could add the following test:
比如说我们想在我们的搜索中得到目录列表。我们可以添加以下测试条件:
| |
Adding the test -type d limited the search to directories. Conversely, we could have limited the search to regular files with this test:
添加测试条件 -type d 限制了只搜索目录。相反地,我们可以使用这个测试条件来限定搜索普通文件:
| |
Here are the common file type tests supported by find:
这里是 find 命令支持的常见文件类型测试条件:
| File Type | Description |
|---|---|
| b | Block special device file |
| c | Character special device file |
| d | Directory |
| f | Regular file |
| l | Symbolic link |
| 文件类型 | 描述 |
|---|---|
| b | 块特殊设备文件 |
| c | 字符特殊设备文件 |
| d | 目录 |
| f | 普通文件 |
| l | 符号链接 |
We can also search by file size and filename by adding some additional tests: Let’s look for all the regular files that match the wild card pattern “*.JPG” and are larger than one megabyte:
我们也可以通过加入一些额外的测试条件,根据文件大小和文件名来搜索:让我们查找所有文件名匹配 通配符模式“*.JPG”和文件大小大于 1M 的普通文件:
| |
In this example, we add the -name test followed by the wild card pattern. Notice how we enclose it in quotes to prevent pathname expansion by the shell. Next, we add the -size test followed by the string “+1M”. The leading plus sign indicates that we are looking for files larger than the specified number. A leading minus sign would change the meaning of the string to be smaller than the specified number. No sign means, “match the value exactly.” The trailing letter “M” indicates that the unit of measurement is megabytes. The following characters may be used to specify units:
在这个例子里面,我们加入了 -name 测试条件,后面跟通配符模式。注意,我们把它用双引号引起来, 从而阻止 shell 展开路径名。紧接着,我们加入 -size 测试条件,后跟字符串“+1M”。开头的加号表明 我们正在寻找文件大小大于指定数的文件。若字符串以减号开头,则意味着查找小于指定数的文件。 若没有符号意味着“精确匹配这个数”。结尾字母“M”表明测量单位是兆字节。下面的字符可以 被用来指定测量单位:
| Character | Unit |
|---|---|
| b | 512 byte blocks. This is the default if no unit is specified. |
| c | Bytes |
| w | Two byte words |
| k | Kilobytes (Units of 1024 bytes) |
| M | Megabytes (Units of 1048576 bytes) |
| G | Gigabytes (Units of 1073741824 bytes) |
| 字符 | 单位 |
|---|---|
| b | 512 个字节块。如果没有指定单位,则这是默认值。 |
| c | 字节 |
| w | 两个字节的字 |
| k | 千字节(1024个字节单位) |
| M | 兆字节(1048576个字节单位) |
| G | 千兆字节(1073741824个字节单位) |
find supports a large number of different tests. Below is a rundown of the common ones. Note that in cases where a numeric argument is required, the same “+” and “-” notation discussed above can be applied:
find 命令支持大量不同的测试条件。下表是列出了一些常见的测试条件。请注意,在需要数值参数的 情况下,可以应用以上讨论的“+”和“-”符号表示法:
| Test | Description |
|---|---|
| -cmin n | Match files or directories whose content or attributes were last modified exactly n minutes ago. To specify less than n minutes ago, use -n and to specify more than n minutes ago, use +n. |
| -cnewer file | Match files or directories whose contents or attributes were last modified more recently than those of file. |
| -ctime n | Match files or directories whose contents or attributes were last modified n*24 hours ago. |
| -empty | Match empty files and directories. |
| -group name | Match file or directories belonging to group. group may be expressed as either a group name or as a numeric group ID. |
| -iname pattern | Like the -name test but case insensitive. |
| -inum n | Match files with inode number n. This is helpful for finding all the hard links to a particular inode. |
| -mmin n | Match files or directories whose contents were modified n minutes ago. |
| -mtime n | Match files or directories whose contents were modified n*24 hours ago. |
| -name pattern | Match files and directories with the specified wild card pattern. |
| -newer file | Match files and directories whose contents were modified more recently than the specified file. This is very useful when writing shell scripts that perform file backups. Each time you make a backup, update a file (such as a log), then use find to determine which files that have changed since the last update. |
| -nouser | Match file and directories that do not belong to a valid user. This can be used to find files belonging to deleted accounts or to detect activity by attackers. |
| -nogroup | Match files and directories that do not belong to a valid group. |
| -perm mode | Match files or directories that have permissions set to the specified mode. mode may be expressed by either octal or symbolic notation. |
| -samefile name | Similar to the -inum test. Matches files that share the same inode number as file name. |
| -size n | Match files of size n. |
| -type c | Match files of type c. |
| -user name | Match files or directories belonging to user name. The user may be expressed by a user name or by a numeric user ID. |
| 测试条件 | 描述 |
|---|---|
| -cmin n | 匹配内容或属性最后修改时间正好在 n 分钟之前的文件或目录。 指定少于 n 分钟之前,使用 -n,指定多于 n 分钟之前,使用 +n。 |
| -cnewer file | 匹配内容或属性最后修改时间晚于 file 的文件或目录。 |
| -ctime n | 匹配内容和属性最后修改时间在 n*24小时之前的文件和目录。 |
| -empty | 匹配空文件和目录。 |
| -group name | 匹配属于一个组的文件或目录。组可以用组名或组 ID 来表示。 |
| -iname pattern | 就像-name 测试条件,但是不区分大小写。 |
| -inum n | 匹配 inode 号是 n的文件。这对于找到某个特殊 inode 的所有硬链接很有帮助。 |
| -mmin n | 匹配内容被修改于 n 分钟之前的文件或目录。 |
| -mtime n | 匹配的文件或目录的内容被修改于 n*24小时之前。 |
| -name pattern | 用指定的通配符模式匹配的文件和目录。 |
| -newer file | 匹配内容晚于指定的文件的文件和目录。这在编写执行备份的 shell 脚本的时候很有帮。 每次你制作一个备份,更新文件(比如说日志),然后使用 find 命令来判断哪些文件自从上一次更新之后被更改了。 |
| -nouser | 匹配不属于一个有效用户的文件和目录。这可以用来查找 属于被删除的帐户的文件或监测攻击行为。 |
| -nogroup | 匹配不属于一个有效的组的文件和目录。 |
| -perm mode | 匹配权限已经设置为指定的 mode的文件或目录。mode 可以用 八进制或符号表示法。 |
| -samefile name | 类似于-inum 测试条件。匹配和文件 name 享有同样 inode 号的文件。 |
| -size n | 匹配大小为 n 的文件 |
| -type c | 匹配文件类型是 c 的文件。 |
| -user name | 匹配属于某个用户的文件或目录。这个用户可以通过用户名或用户 ID 来表示。 |
This is not a complete list. The find man page has all the details.
这不是一个完整的列表。find 命令手册有更详细的说明。
操作符
Even with all the tests that find provides, we may still need a better way to describe the logical relationships between the tests. For example, what if we needed to determine if all the files and subdirectories in a directory had secure permissions? We would look for all the files with permissions that are not 0600 and the directories with permissions that are not 0700. Fortunately, find provides a way to combine tests using logical operators to create more complex logical relationships. To express the aforementioned test, we could do this:
即使拥有了 find 命令提供的所有测试条件,我们还需要一个更好的方式来描述测试条件之间的逻辑关系。例如, 如果我们需要确定是否一个目录中的所有的文件和子目录拥有安全权限,怎么办呢? 我们可以查找权限不是0600的文件和权限不是0700的目录。幸运地是,find 命令提供了 一种方法来结合测试条件,通过使用逻辑操作符来创建更复杂的逻辑关系。 为了表达上述的测试条件,我们可以这样做:
| |
Yikes! That sure looks weird. What is all this stuff? Actually, the operators are not that complicated once you get to know them. Here is the list:
呀!这的确看起来很奇怪。这些是什么东西?实际上,这些操作符没有那么复杂,一旦你知道了它们的原理。 这里是操作符列表:
| Operator | Description |
|---|---|
| -and | Match if the tests on both sides of the operator are true. May be shortened to -a. Note that when no operator is present, -and is implied by default. |
| -or | Match if a test on either side of the operator is true. May be shortened to -o. |
| -not | Match if the test following the operator is false. May be abbreviated with an exclamation point (!). |
| () | Groups tests and operators together to form larger expressions. This is used to control the precedence of the logical evaluations. By default, find evaluates from left to right. It is often necessary to override the default evaluation order to obtain the desired result. Even if not needed, it is helpful sometimes to include the grouping characters to improve readability of the command. Note that since the parentheses characters have special meaning to the shell, they must be quoted when using them on the command line to allow them to be passed as arguments to find. Usually the backslash character is used to escape them. |
| 操作符 | 描述 |
|---|---|
| -and | 如果操作符两边的测试条件都是真,则匹配。可以简写为 -a。 注意若没有使用操作符,则默认使用 -and。 |
| -or | 若操作符两边的任一个测试条件为真,则匹配。可以简写为 -o。 |
| -not | 若操作符后面的测试条件是假,则匹配。可以简写为一个感叹号(!)。 |
| () | 把测试条件和操作符组合起来形成更大的表达式。这用来控制逻辑计算的优先级。 默认情况下,find 命令按照从左到右的顺序计算。经常有必要重写默认的求值顺序,以得到期望的结果。 即使没有必要,有时候包括组合起来的字符,对提高命令的可读性是很有帮助的。注意 因为圆括号字符对于 shell 来说有特殊含义,所以在命令行中使用它们的时候,它们必须 用引号引起来,才能作为实参传递给 find 命令。通常反斜杠字符被用来转义圆括号字符。 |
With this list of operators in hand, let’s deconstruct our find command. When viewed from the uppermost level, we see that our tests are arranged as two groupings separated by an -or operator:
通过这张操作符列表,我们重建 find 命令。从最外层看,我们看到测试条件被分为两组,由一个 -or 操作符分开:
( expression 1 ) -or ( expression 2 )
This makes sense, since we are searching for files with a certain set of permissions and for directories with a different set. If we are looking for both files and directories, why do we use -or instead of -and? Because as find scans through the files and directories, each one is evaluated to see if it matches the specified tests. We want to know if it is either a file with bad permissions or a directory with bad permissions. It can’t be both at the same time. So if we expand the grouped expressions, we can see it this way:
这看起来合理,因为我们正在搜索具有不同权限集合的文件和目录。如果我们文件和目录两者都查找, 那为什么要用 -or 来代替 -and 呢?因为 find 命令扫描文件和目录时,会计算每一个对象,看看它是否 匹配指定的测试条件。我们想要知道它是具有错误权限的文件还是有错误权限的目录。它不可能同时符合这 两个条件。所以如果展开组合起来的表达式,我们能这样解释它:
( file with bad perms ) -or ( directory with bad perms )
Our next challenge is how to test for “bad permissions.” How do we do that? Actually we don’t. What we will test for is “not good permissions,” since we know what “good permissions” are. In the case of files, we define good as 0600 and for directories, as
- The expression that will test files for “not good” permissions is:
下一个挑战是怎样来检查“错误权限”,这个怎样做呢?事实上我们不从这个角度入手。我们将测试 “不是正确权限”,因为我们知道什么是“正确权限”。对于文件,我们定义正确权限为0600, 目录则为0700。测试具有“不正确”权限的文件表达式为:
-type f -and -not -perms 0600
and for directories:
对于目录,表达式为:
-type d -and -not -perms 0700
As noted in the table of operators above, the -and operator can be safely removed, since it is implied by default. So if we put this all back together, we get our final command:
正如上述操作符列表中提到的,这个-and 操作符能够被安全地删除,因为它是默认使用的操作符。 所以如果我们把这两个表达式连起来,就得到最终的命令:
find ~ ( -type f -not -perms 0600 ) -or ( -type d -not -perms 0700 )
However, since the parentheses have special meaning to the shell, we must escape them to prevent the shell from trying to interpret them. Preceding each one with a backslash character does the trick.
然而,因为圆括号对于 shell 有特殊含义,我们必须转义它们,来阻止 shell 解释它们。在圆括号字符 之前加上一个反斜杠字符来转义它们。
There is another feature of logical operators that is important to understand. Let’s say that we have two expressions separated by a logical operator:
逻辑操作符还有另外一个特性要重点理解。比方说我们有两个由逻辑操作符分开的表达式:
expr1 -operator expr2
In all cases, expr1 will always be performed; however the operator will determine if expr2 is performed. Here’s how it works:
在所有情况下,总会执行表达式 expr1;然而操作符将决定是否执行表达式 expr2。这里 列出了它是怎样工作的:
| Results of expr1 | Operator | expr2 is… |
|---|---|---|
| True | -and | Always performed |
| False | -and | Never performed |
| Ture | -or | Never performed |
| False | -or | Always performed |
| expr1 的结果 | 操作符 | expr2 is… |
|---|---|---|
| 真 | -and | 总要执行 |
| 假 | -and | 从不执行 |
| 真 | -or | 从不执行 |
| 假 | -or | 总要执行 |
Why does this happen? It’s done to improve performance. Take -and, for example. We know that the expression expr1 -and expr2 cannot be true if the result of expr1 is false, so there is no point in performing expr2. Likewise, if we have the expression expr1 -or expr2 and the result of expr1 is true, there is no point in performing expr2, as we already know that the expression expr1 -or expr2 is true. OK, so it helps it go faster. Why is this important? It’s important because we can rely on this behavior to control how actions are performed, as we shall soon see..
为什么这会发生呢?这样做是为了提高性能。以 -and 为例,我们知道如果表达式 expr1 的结果为假, 表达式 expr1 -and expr2 不能为真,所以没有必要执行 expr2。同样地,如果我们有表达式 expr1 -or expr2,并且表达式 expr1 的结果为真,那么就没有必要执行 expr2,因为我们已经知道 表达式 expr1 -or expr2 为真。好,这样会执行快一些。为什么这个很重要? 它很重要是因为我们能依靠这种行为来控制怎样来执行操作。我们会很快看到…
预定义的操作
Let’s get some work done! Having a list of results from our find command is useful, but what we really want to do is act on the items on the list. Fortunately, find allows actions to be performed based on the search results. There are a set of predefined actions and several ways to apply user-defined actions. First let’s look at a few of the predefined actions:
让我们做一些工作吧!执行 find 命令得到结果列表很有用处,但是我们真正想要做的事情是操作列表 中的某些条目。幸运地是,find 命令允许基于搜索结果来执行操作。有许多预定义的操作和几种方式来 应用用户定义的操作。首先,让我们看一下几个预定义的操作:
| Action | Description |
|---|---|
| -delete | Delete the currently matching file. |
| -ls | Perform the equivalent of ls -dils on the matching file. Output is sent to standard output. |
| Output the full pathname of the matching file to standard output. This is the default action if no other action is specified. | |
| -quit | Quit once a match has been made. |
| 操作 | 描述 |
|---|---|
| -delete | 删除当前匹配的文件。 |
| -ls | 对匹配的文件执行等同的 ls -dils 命令。并将结果发送到标准输出。 |
| 把匹配文件的全路径名输送到标准输出。如果没有指定其它操作,这是 默认操作。 | |
| -quit | 一旦找到一个匹配,退出。 |
As with the tests, there are many more actions. See the find man page for full details. In our very first example, we did this:
和测试条件一样,还有更多的操作。查看 find 命令手册得到更多细节。在第一个例子里, 我们这样做:
find ~
which produced a list of every file and subdirectory contained within our home directory. It produced a list because the -print action is implied if no other action is specified. Thus our command could also be expressed as:
这个命令输出了我们家目录中包含的每个文件和子目录。它会输出一个列表,因为会默认使用 -print 操作 ,如果没有指定其它操作的话。因此我们的命令也可以这样表述:
find ~ -print
We can use find to delete files that meet certain criteria. For example, to delete files that have the file extension “.BAK” (which is often used to designate backup files), we could use this command:
我们可以使用 find 命令来删除符合一定条件的文件。例如,来删除扩展名为“.BAK”(这通常用来指定备份文件) 的文件,我们可以使用这个命令:
find ~ -type f -name '*.BAK' -delete
In this example, every file in the user’s home directory (and its subdirectories) is searched for filenames ending in .BAK. When they are found, they are deleted.
在这个例子里面,用户家目录(和它的子目录)下的每个文件中搜索以 .BAK 结尾的文件名。当找到后,就删除它们。
Warning: It should go without saying that you should use extreme caution when using the -delete action. Always test the command first by substituting the -print action for -delete to confirm the search results.
警告:当使用 -delete 操作时,不用说,你应该格外小心。每次都应该首先用 -print 操作代替 -delete 测试一下命令,来确认搜索结果。
Before we go on, let’s take another look at how the logical operators affect actions. Consider the following command:
在我们继续之前,让我们看一下逻辑运算符是怎样影响操作的。考虑以下命令:
find ~ -type f -name '*.BAK' -print
As we have seen, this command will look for every regular file (-type f) whose name ends with .BAK (-name ‘*.BAK’) and will output the relative pathname of each matching file to standard output (-print). However, the reason the command performs the way it does is determined by the logical relationships between each of the tests and actions. Remember, there is, by default, an implied -and relationship between each test and action. We could also express the command this way to make the logical relationships easier to see:
正如我们所见到的,这个命令会查找每个文件名以 .BAK (-name ‘*.BAK’) 结尾的普通文件 (-type f), 并把每个匹配文件的相对路径名输出到标准输出 (-print)。然而,此命令按这个方式执行的原因,是 由每个测试和操作之间的逻辑关系决定的。记住,在每个测试和操作之间会默认应用 -and 逻辑运算符。 我们也可以这样表达这个命令,使逻辑关系更容易看出:
find ~ -type f -and -name '*.BAK' -and -print
With our command fully expressed, let’s look at how the logical operators affect its execution:
当命令被充分表达之后,让我们看看逻辑运算符是如何影响其执行的:
| Test/Action | Is Performed Only If… |
|---|---|
| -type f and -name ‘*.BAK’ are true | |
| -name ‘*.BAK’ | -type f is true |
| -type f | Is always performed, since it is the first test/action in an -and relationship. |
| 测试/行为 | 只有…的时候,才被执行 |
|---|---|
| 只有 -type f and -name ‘*.BAK’为真的时候 | |
| -name ‘*.BAK’ | 只有 -type f 为真的时候 |
| -type f | 总是被执行,因为它是与 -and 关系中的第一个测试/行为。 |
Since the logical relationship between the tests and actions determines which of them are performed, we can see that the order of the tests and actions is important. For instance, if we were to reorder the tests and actions so that the -print action was the first one, the command would behave much differently:
因为测试和行为之间的逻辑关系决定了哪一个会被执行,我们可以看出知道测试和行为的顺序很重要。例如, 如果我们重新安排测试和行为之间的顺序,让 -print 行为是第一个,那么这个命令执行起来会截然不同:
find ~ -print -and -type f -and -name '*.BAK'
This version of the command will print each file (the -print action always evaluates to true) and then test for file type and the specified file extension.
这个版本的命令会打印出每个文件(-print 行为总是为真),然后测试文件类型和指定的文件扩展名。
用户定义的行为
In addition to the predefined actions, we can also invoke arbitrary commands. The traditional way of doing this is with the -exec action. This action works like this:
除了预定义的行为之外,我们也可以调用任意的命令。传统方式是通过 -exec 行为。这个 行为像这样工作:
-exec command {} ;
where command is the name of a command, {} is a symbolic representation of the current pathname and the semicolon is a required delimiter indicating the end of the command. Here’s an example of using -exec to act like the -delete action discussed earlier:
这里的 command 就是指一个命令的名字,{} 是当前路径名的符号表示,分号是必要的分隔符 表明命令的结束。这里是一个使用 -exec 行为的例子,其作用如之前讨论的 -delete 行为:
-exec rm '{}' ';'
Again, since the brace and semicolon characters have special meaning to the shell, they must be quoted or escaped.
重述一遍,因为花括号和分号对于 shell 有特殊含义,所以它们必须被引起来或被转义。
It’s also possible to execute a user defined action interactively. By using the -ok action in place of -exec, the user is prompted before execution of each specified command:
我们也可以交互式地执行一个用户定义的行为。通过使用 -ok 行为来代替 -exec,在执行每个指定的命令之前, 会提示用户:
find ~ -type f -name 'foo*' -ok ls -l '{}' ';'
< ls ... /home/me/bin/foo > ? y
-rwxr-xr-x 1 me me 224 2007-10-29 18:44 /home/me/bin/foo
< ls ... /home/me/foo.txt > ? y
-rw-r--r-- 1 me me 0 2008-09-19 12:53 /home/me/foo.txt
In this example, we search for files with names starting with the string “foo” and execute the command ls -l each time one is found. Using the -ok action prompts the user before the ls command is executed.
在这个例子里面,我们搜索以字符串“foo”开头的文件名,并且对每个匹配的文件执行 ls -l 命令。 使用 -ok 行为,会在 ls 命令执行之前提示用户。
提高效率
When the -exec action is used, it launches a new instance of the specified command each time a matching file is found. There are times when we might prefer to combine all of the search results and launch a single instance of the command. For example, rather than executing the commands like this:
当 -exec 行为被使用的时候,若每次找到一个匹配的文件,它会启动一个新的指定命令的实例。 我们可能更愿意把所有的搜索结果结合起来,再运行一个命令的实例。例如,与其像这样执行命令:
ls -l file1
ls -l file2
we may prefer to execute it this way:
我们更喜欢这样执行命令:
ls -l file1 file2
thus causing the command to be executed only one time rather than multiple times. There are two ways we can do this. The traditional way, using the external command xargs and the alternate way, using a new feature in find itself. We’ll talk about the alternate way first.
这样就导致命令只被执行一次而不是多次。有两种方法可以这样做。传统方式是使用外部命令 xargs,另一种方法是,使用 find 命令自己的一个新功能。我们先讨论第二种方法。
By changing the trailing semicolon character to a plus sign, we activate the ability of find to combine the results of the search into an argument list for a single execution of the desired command. Going back to our example, this:
通过把末尾的分号改为加号,就激活了 find 命令的一个功能,把搜索结果结合为一个参数列表, 然后用于所期望的命令的一次执行。再看一下之前的例子,这个例子中:
find ~ -type f -name 'foo*' -exec ls -l '{}' ';'
-rwxr-xr-x 1 me me 224 2007-10-29 18:44 /home/me/bin/foo
-rw-r--r-- 1 me me 0 2008-09-19 12:53 /home/me/foo.txt
will execute ls each time a matching file is found. By changing the command to:
每次找到一个匹配的文件, 就会执行一次 ls 命令。通过把命令改为:
find ~ -type f -name 'foo*' -exec ls -l '{}' +
-rwxr-xr-x 1 me me 224 2007-10-29 18:44 /home/me/bin/foo
-rw-r--r-- 1 me me 0 2008-09-19 12:53 /home/me/foo.txt
we get the same results, but the system only has to execute the ls command once.
虽然我们得到一样的结果,但是系统只需要执行一次 ls 命令。
xargs
The xargs command performs an interesting function. It accepts input from standard input and converts it into an argument list for a specified command. With our example, we would use it like this:
这个 xargs 命令会执行一个有趣的函数。它从标准输入接受输入,并把输入转换为一个特定命令的 参数列表。对于我们的例子,我们可以这样使用它:
find ~ -type f -name 'foo*' -print | xargs ls -l
-rwxr-xr-x 1 me me 224 2007-10-29 18:44 /home/me/bin/foo
-rw-r--r-- 1 me me 0 2008-09-19 12:53 /home/me/foo.txt
Here we see the output of the find command piped into xargs which, in turn, constructs an argument list for ls command and then executes it.
这里我们看到 find 命令的输出被管道到 xargs 命令,之后,xargs 会为 ls 命令构建 参数列表,然后执行 ls 命令。
Note: While the number of arguments that can be placed into a command line is quite large, it’s not unlimited. It is possible to create commands that are too long for the shell to accept. When a command line exceeds the maximum length supported by the system, xargs executes the specified command with the maximum number of arguments possible and then repeats this process until standard input is exhausted. To see the maximum size of the command line, execute xargs with the –show-limits option.
注意:当被放置到命令行中的参数个数相当大时,参数个数是有限制的。有可能创建的命令 太长以至于 shell 不能接受。当命令行超过系统支持的最大长度时,xargs 会执行带有最大 参数个数的指定命令,然后重复这个过程直到耗尽标准输入。执行带有 –show–limits 选项 的 xargs 命令,来查看命令行的最大值。
Dealing With Funny Filenames
处理古怪的文件名
Unix-like systems allow embedded spaces (and even newlines!) in filenames. This causes problems for programs like xargs that construct argument lists for other programs. An embedded space will be treated as a delimiter and the resulting command will interpret each space-separated word as a separate argument. To overcome this, find and xarg allow the optional use of a null character as argument separator. A null character is defined in ASCII as the character represented by the number zero (as opposed to, for example, the space character, which is defined in ASCII as the character represented by the number 32). The find command provides the action -print0, which produces null separated output, and the xargs command has the –null option, which accepts null separated input. Here’s an example:
类 Unix 的系统允许在文件名中嵌入空格(甚至换行符)。这就给一些程序,如为其它 程序构建参数列表的 xargs 程序,造成了问题。一个嵌入的空格会被看作是一个分隔符,生成的 命令会把每个空格分离的单词解释为单独的参数。为了解决这个问题,find 命令和 xarg 程序 允许使用一个可选的 null 字符作为参数分隔符。一个 null 字符被定义在 ASCII 码中,由数字 零来表示(相反的,例如,空格字符在 ASCII 码中由数字32表示)。find 命令提供的 -print0 行为, 则会产生由 null 字符分离的输出,并且 xargs 命令有一个 –null 选项,这个选项会接受由 null 字符 分离的输入。这里有一个例子:
find ~ -iname ‘*.jpg’ -print0 xargs –null ls -l Using this technique, we can ensure that all files, even those containing embedded spaces in their names, are handled correctly.
使用这项技术,我们可以保证所有文件,甚至那些文件名中包含空格的文件,都能被正确地处理。
返回操练场
It’s time to put find to some (almost) practical use. We’ll create a playground and try out some of what we have learned.
到实际使用 find 命令的时候了。我们将会创建一个操练场,来实践一些我们所学到的知识。
First, let’s create a playground with lots of subdirectories and files:
首先,让我们创建一个包含许多子目录和文件的操练场:
| |
Marvel in the power of the command line! With these two lines, we created a playground directory containing one hundred subdirectories each containing twenty-six empty files. Try that with the GUI!
惊叹于命令行的强大功能!只用这两行,我们就创建了一个包含一百个子目录,每个子目录中 包含了26个空文件的操练场。试试用 GUI 来创建它!
The method we employed to accomplish this magic involved a familiar command (mkdir), an exotic shell expansion (braces) and a new command, touch. By combining mkdir with the -p option (which causes mkdir to create the parent directories of the specified paths) with brace expansion, we were able to create one hundred directories.
我们用来创造这个奇迹的方法中包含一个熟悉的命令(mkdir),一个奇异的 shell 扩展(花括号) 和一个新命令,touch。通过结合 mkdir 命令和 -p 选项(导致 mkdir 命令创建指定路径的父目录),以及 花括号展开,我们能够创建一百个目录。
The touch command is usually used to set or update the access, change, and modify times of files. However, if a filename argument is that of a nonexistent file, an empty file is created.
这个 touch 命令通常被用来设置或更新文件的访问,更改,和修改时间。然而,如果一个文件名参数是一个 不存在的文件,则会创建一个空文件。
In our playground, we created one hundred instances of a file named file-A. Let’s find them:
在我们的操练场中,我们创建了一百个名为 file-A 的文件实例。让我们找到它们:
| |
Note that unlike ls, find does not produce results in sorted order. Its order is determined by the layout of the storage device. To confirm that we actually have one hundred instances of the file we can confirm it this way:
注意不同于 ls 命令,find 命令的输出结果是无序的。其顺序由存储设备的布局决定。为了确定实际上 我们拥有一百个此文件的实例,我们可以用这种方式来确认:
| |
Next, let’s look at finding files based on their modification times. This will be helpful when creating backups or organizing files in chronological order. To do this, we will first create a reference file against which we will compare modification time:
下一步,让我们看一下基于文件的修改时间来查找文件。当创建备份文件或者以年代顺序来 组织文件的时候,这会很有帮助。为此,首先我们将创建一个参考文件,我们将与其比较修改时间:
| |
This creates an empty file named timestamp and sets its modification time to the current time. We can verify this by using another handy command, stat, which is a kind of souped-up version of ls. The stat command reveals all that the system understands about a file and its attributes:
这个创建了一个空文件,名为 timestamp,并且把它的修改时间设置为当前时间。我们能够验证 它通过使用另一个方便的命令,stat,是一款加大马力的 ls 命令版本。这个 stat 命令会展示系统对 某个文件及其属性所知道的所有信息:
| |
If we touch the file again and then examine it with stat, we will see that the file’s times have been updated.
如果我们再次 touch 这个文件,然后用 stat 命令检测它,我们会发现所有文件的时间已经更新了。
| |
Next, let’s use find to update some of our playground files:
下一步,让我们使用 find 命令来更新一些操练场中的文件:
| |
This updates all files in the playground named file-B. Next we’ll use find to identify the updated files by comparing all the files to the reference file timestamp:
这会更新操练场中所有名为 file-B 的文件。接下来我们会使用 find 命令 通过把所有文件与参考文件 timestamp 做比较,来找到已更新的文件:
| |
The results contain all one hundred instances of file-B. Since we performed a touch on all the files in the playground named file-B after we updated timestamp, they are now “newer” than timestamp and thus can be identified with the -newer test.
搜索结果包含所有一百个文件 file-B 的实例。因为我们在更新了文件 timestamp 之后, touch 了操练场中名为 file-B 的所有文件,所以现在它们“新于”timestamp 文件,因此能被用 -newer 测试条件找到。
Finally, let’s go back to the bad permissions test we performed earlier and apply it to playground:
最后,让我们回到之前那个错误权限的例子中,把它应用于操练场里:
| |
This command lists all one hundred directories and twenty-six hundred files in playground (as well as timestamp and playground itself, for a total of 2702) because none of them meets our definition of “good permissions.” With our knowledge of operators and actions, we can add actions to this command to apply new permissions to the files and directories in our playground:
这个命令列出了操练场中所有一百个目录和二百六十个文件(还有 timestamp 和操练场本身,共 2702 个) ,因为没有一个符合我们“正确权限”的定义。通过对运算符和行为知识的了解,我们可以给这个命令 添加行为,对实战场中的文件和目录应用新的权限。
| |
On a day-to-day basis, we might find it easier to issue two commands, one for the directories and one for the files, rather than this one large compound command, but it’s nice to know that we can do it this way. The important point here is to understand how the operators and actions can be used together to perform useful tasks.
在日常的基础上,我们可能发现运行两个命令会比较容易一些,一个操作目录,另一个操作文件, 而不是这一个长长的复合命令,但是很高兴知道,我们能这样执行命令。这里最重要的一点是要 理解怎样把操作符和行为结合起来使用,来执行有用的任务。
选项
Finally, we have the options. The options are used to control the scope of a find search. They may be included with other tests and actions when constructing find expressions. Here is a list of the most commonly used ones:
最后,我们有这些选项。这些选项被用来控制 find 命令的搜索范围。当构建 find 表达式的时候, 它们可能被其它的测试条件和行为包含,这里有一个最常被使用的选项的列表:
| Option | Description |
|---|---|
| -depth | Direct find to process a directory’s files before the directory itself. This option is automatically applied when the -delete action is specified. |
| -maxdepth levels | Set the maximum number of levels that find will descend into a directory tree when performing tests and actions. |
| -mindepth levels | Set the minimum number of levels that find will descend into a directory tree before applying tests and actions. |
| -mount | Direct find not to traverse directories that are mounted on other file systems. |
| -noleaf | Direct find not to optimize its search based on the assumption that it is searching a Unix-like file system. This is needed when scanning DOS/Windows file systems and CD-ROMs. |
| 选项 | 描述 |
|---|---|
| -depth | 指示 find 程序先处理目录中的文件,再处理目录自身。当指定-delete 行为时,会自动 应用这个选项。 |
| -maxdepth levels | 当执行测试条件和行为的时候,设置 find 程序陷入目录树的最大级别数 |
| -mindepth levels | 在应用测试条件和行为之前,设置 find 程序陷入目录数的最小级别数。 |
| -mount | 指示 find 程序不要搜索挂载到其它文件系统上的目录。 |
| -noleaf | 指示 find 程序不要基于自己在搜索 Unix 的文件系统的假设,来优化它的搜索。 在搜索DOS/Windows 文件系统和CD/ROMS的时候,我们需要这个选项 |
拓展阅读
The locate, updatedb, find, and xargs programs are all part the GNU Project’s findutils package. The GNU Project provides a website with extensive on-line documentation, which is quite good and should be read if you are using these programs in high security environments:
程序 locate,updatedb,find 和 xargs 都是 GNU 项目 findutils 软件包的一部分。 这个 GUN 项目提供了大量的在线文档,这些文档相当出色,如果你在高安全性的 环境中使用这些程序,你应该读读这些文档。
19 - 19 归档和备份
归档和备份
http://billie66.github.io/TLCL/book/chap19.html
One of the primary tasks of a computer system’s administrator is keeping the system’s data secure. One way this is done is by performing timely backups of the system’s files. Even if you’re not system administrators, it is often useful to make copies of things and to move large collections of files from place to place and from device to device. In this chapter, we will look at several common programs that are used to manage collections of files. There are the file compression programs:
计算机系统管理员的一个主要任务就是保护系统的数据安全,其中一种方法是通过时时备份系统文件,来保护 数据。即使你不是一名系统管理员,像做做拷贝或者在各个位置和设备之间移动大量的文件,通常也是很有帮助的。 在这一章中,我们将会看看几个经常用来管理文件集合的程序。它们就是文件压缩程序:
- gzip – Compress or expand files
- gzip – 压缩或者展开文件
- bzip2 – A block sorting file compressor
- bzip2 – 块排序文件压缩器
The archiving programs:
归档程序:
- tar – Tape archiving utility
- tar – 磁带打包工具
- zip – Package and compress files
- zip – 打包和压缩文件
And the file synchronization program:
还有文件同步程序:
- rsync – Remote file and directory synchronization
- rsync – 同步远端文件和目录
压缩文件
Throughout the history of computing, there has been a struggle to get the most data into the smallest available space, whether that space be memory, storage devices or network bandwidth. Many of the data services that we take for granted today, such as portable music players, high definition television, or broadband Internet, owe their existence to effective data compression techniques.
纵观计算领域的发展历史,人们努力想把最多的数据存放到到最小的可用空间中,不管是内存,存储设备 还是网络带宽。今天我们把许多数据服务都看作是理所当然的事情,但是诸如便携式音乐播放器, 高清电视,或宽带网络之类的存在都应归功于高效的数据压缩技术。
Data compression is the process of removing redundancy from data. Let’s consider an imaginary example. Say we had an entirely black picture file with the dimensions of one hundred pixels by one hundred pixels. In terms of data storage (assuming twenty-four bits, or three bytes per pixel), the image will occupy thirty thousand bytes of storage:
数据压缩就是一个删除冗余数据的过程。让我们考虑一个假想的例子,比方说我们有一张100*100像素的 纯黑的图片文件。根据数据存储方案(假定每个像素占24位,或者3个字节),那么这张图像将会占用 30,000个字节的存储空间:
100 * 100 * 3 = 30,000
An image that is all one color contains entirely redundant data. If we were clever, we could encode the data in such a way that we simply describe the fact that we have a block of thirty thousand black pixels. So, instead of storing a block of data containing thirty thousand zeros (black is usually represented in image files as zero), we could compress the data into the number 30,000, followed by a zero to represent our data. Such a data compression scheme is called run-length encoding and is one of the most rudimentary compression techniques. Today’s techniques are much more advanced and complex but the basic goal remains the same—get rid of redundant data.
一张单色图像包含的数据全是多余的。我们要是聪明的话,可以用这种方法来编码这些数据, 我们只要简单地描述这个事实,我们有3万个黑色的像素数据块。所以,我们不存储包含3万个0 (通常在图像文件中,黑色由0来表示)的数据块,取而代之,我们把这些数据压缩为数字30,000, 后跟一个0,来表示我们的数据。这种数据压缩方案被称为游程编码,是一种最基本的压缩技术。今天的技术更加先进和复杂,但是基本目标依然不变——避免多余数据。
Compression algorithms (the mathematical techniques used to carry out the compression) fall into two general categories, lossless and lossy. Lossless compression preserves all the data contained in the original. This means that when a file is restored from a compressed version, the restored file is exactly the same as the original, uncompressed version. Lossy compression, on the other hand, removes data as the compression is performed, to allow more compression to be applied. When a lossy file is restored, it does not match the original version; rather, it is a close approximation. Examples of lossy compression are JPEG (for images) and MP3 (for music.) In our discussion, we will look exclusively at lossless compression, since most data on computers cannot tolerate any data loss.
压缩算法(数学技巧被用来执行压缩任务)分为两大类,无损压缩和有损压缩。无损压缩保留了 原始文件的所有数据。这意味着,当还原一个压缩文件的时候,还原的文件与原文件一模一样。 而另一方面,有损压缩,执行压缩操作时会删除数据,允许更大的压缩。当一个有损文件被还原的时候, 它与原文件不相匹配; 相反,它是一个近似值。有损压缩的例子有 JPEG(图像)文件和 MP3(音频)文件。 在我们的讨论中,我们将看看完全无损压缩,因为计算机中的大多数数据是不能容忍丢失任何数据的。
gzip
The gzip program is used to compress one or more files. When executed, it replaces the original file with a compressed version of the original. The corresponding gunzip program is used to restore compressed files to their original, uncompressed form. Here is an example:
这个 gzip 程序被用来压缩一个或多个文件。当执行 gzip 命令时,则原始文件的压缩版会替代原始文件。 相对应的 gunzip 程序被用来把压缩文件复原为没有被压缩的版本。这里有个例子:
| |
In this example, we create a text file named foo.txt from a directory listing. Next, we run gzip, which replaces the original file with a compressed version named foo.txt.gz. In the directory listing of foo.*, we see that the original file has been replaced with the compressed version, and that the compressed version about one-fifth the size of the original. We can also see that the compressed file has the same permissions and time stamp as the original.
在这个例子里,我们创建了一个名为 foo.txt 的文本文件,其内容包含一个目录的列表清单。 接下来,我们运行 gzip 命令,它会把原始文件替换为一个叫做 foo.txt.gz 的压缩文件。在 foo.* 文件列表中,我们看到原始文件已经被压缩文件替代了,并将这个压缩文件大约是原始 文件的五分之一。我们也能看到压缩文件与原始文件有着相同的权限和时间戳。
Next, we run the gunzip program to uncompress the file. Afterward, we can see that the compressed version of the file has been replaced with the original, again with the permissions and time stamp preserved.
接下来,我们运行 gunzip 程序来解压缩文件。随后,我们能见到压缩文件已经被原始文件替代了, 同样地保留了相同的权限和时间戳。
gzip has many options. Here are a few:
gzip 命令有许多选项。这里列出了一些:
| Option | Description |
|---|---|
| -c | Write output to standard output and keep original files. May also be specified with --stdout and --to-stdout. |
| -d | Decompress. This causes gzip to act like gunzip. May also be specified with --decompress or --uncompress. |
| -f | Force compression even if compressed version of the original file already exists. May also be specified with --force. |
| -h | Display usage information. May also be specified with --help. |
| -l | List compression statistics for each file compressed. May also be specified with --list. |
| -r | If one or more arguments on the command line are directories, recursively compress files contained within them. May also be specified with --recursive. |
| -t | Test the integrity of a compressed file. May also be specified with --test. |
| -v | Display verbose messages while compressing. May also be specified with --verbose. |
| -number | Set amount of compression. number is an integer in the range of 1 (fastest, least compression) to 9 (slowest, most compression). The values 1 and 9 may also be expressed as --fast and --best, respectively. The default value is 6. |
| 选项 | 说明 |
|---|---|
| -c | 把输出写入到标准输出,并且保留原始文件。也有可能用--stdout 和--to-stdout 选项来指定。 |
| -d | 解压缩。正如 gunzip 命令一样。也可以用--decompress 或者--uncompress 选项来指定. |
| -f | 强制压缩,即使原始文件的压缩文件已经存在了,也要执行。也可以用--force 选项来指定。 |
| -h | 显示用法信息。也可用--help 选项来指定。 |
| -l | 列出每个被压缩文件的压缩数据。也可用--list 选项。 |
| -r | 若命令的一个或多个参数是目录,则递归地压缩目录中的文件。也可用--recursive 选项来指定。 |
| -t | 测试压缩文件的完整性。也可用--test 选项来指定。 |
| -v | 显示压缩过程中的信息。也可用--verbose 选项来指定。 |
| -number | 设置压缩指数。number 是一个在1(最快,最小压缩)到9(最慢,最大压缩)之间的整数。 数值1和9也可以各自用--fast 和--best 选项来表示。默认值是整数6。 |
Going back to our earlier example:
返回到我们之前的例子中:
| |
Here, we replaced the file foo.txt with a compressed version, named foo.txt.gz. Next, we tested the integrity of the compressed version, using the -t and -v options. Finally, we decompressed the file back to its original form. gzip can also be used in interesting ways via standard input and output:
这里,我们用压缩文件来替代文件 foo.txt,压缩文件名为 foo.txt.gz。下一步,我们测试了压缩文件 的完整性,使用了-t 和-v 选项。
| |
This command creates a compressed version of a directory listing.
这个命令创建了一个目录列表的压缩文件。
The gunzip program, which uncompresses gzip files, assumes that filenames end in the extension .gz, so it’s not necessary to specify it, as long as the specified name is not in conflict with an existing uncompressed file:
这个 gunzip 程序,会解压缩 gzip 文件,假定那些文件名的扩展名是.gz,所以没有必要指定它, 只要指定的名字与现有的未压缩文件不冲突就可以:
| |
If our goal were only to view the contents of a compressed text file, we can do this:
如果我们的目标只是为了浏览一下压缩文本文件的内容,我们可以这样做:
| |
Alternately, there is a program supplied with gzip, called zcat, that is equivalent to gunzip with the -c option. It can be used like the cat command on gzip compressed files:
另外,对应于 gzip 还有一个程序,叫做 zcat,它等同于带有-c 选项的 gunzip 命令。 它可以被用来如 cat 命令作用于 gzip 压缩文件:
| |
Tip: There is a zless program, too. It performs the same function as the pipeline above.
小贴士: 还有一个 zless 程序。它与上面的管道线有相同的功能。
bzip2
The bzip2 program, by Julian Seward, is similar to gzip, but uses a different compression algorithm that achieves higher levels of compression at the cost of compression speed. In most regards, it works in the same fashion as gzip. A file compressed with bzip2 is denoted with the extension .bz2:
这个 bzip2 程序,由 Julian Seward 开发,与 gzip 程序相似,但是使用了不同的压缩算法, 舍弃了压缩速度,而实现了更高的压缩级别。在大多数情况下,它的工作模式等同于 gzip。 由 bzip2 压缩的文件,用扩展名 .bz2 来表示:
| |
As we can see, bzip2 can be used the same way as gzip. All the options (except for -r) that we discussed for gzip are also supported in bzip2. Note, however, that the compression level option (-number) has a somewhat different meaning to bzip2. bzip2 comes with bunzip2 and bzcat for decompressing files. bzip2 also comes with the bzip2recover program, which will try to recover damaged .bz2 files.
正如我们所看到的,bzip2 程序使用起来和 gzip 程序一样。我们之前讨论的 gzip 程序的所有选项(除了-r) ,bzip2 程序同样也支持。注意,然而,压缩级别选项(-number)对于 bzip2 程序来说,有少许不同的含义。 伴随着 bzip2 程序,有 bunzip2 和 bzcat 程序来解压缩文件。bzip2 文件也带有 bzip2recover 程序,其会 试图恢复受损的 .bz2 文件。
Don’t Be Compressive Compulsive
不要强迫性压缩
I occasionally see people attempting to compress a file, which has been already compressed with an effective compression algorithm, by doing something like this:
我偶然见到人们试图用高效的压缩算法,来压缩一个已经被压缩过的文件,通过这样做:
$ gzip picture.jpg
Don’t do it. You’re probably just wasting time and space! If you apply compression to a file that is already compressed, you will actually end up a larger file. This is because all compression techniques involve some overhead that is added to the file to describe the compression. If you try to compress a file that already contains no redundant information, the compression will not result in any savings to offset the additional overhead.
不要这样。你可能只是在浪费时间和空间!如果你再次压缩已经压缩过的文件,实际上你 会得到一个更大的文件。这是因为所有的压缩技术都会涉及一些开销,文件中会被添加描述 此次压缩过程的信息。如果你试图压缩一个已经不包含多余信息的文件,那么再次压缩不会节省 空间,以抵消额外的花费。
归档文件
A common file management task used in conjunction with compression is archiving. Archiving is the process of gathering up many files and bundling them together into a single large file. Archiving is often done as a part of system backups. It is also used when old data is moved from a system to some type of long-term storage.
一个常见的,与文件压缩结合一块使用的文件管理任务是归档。归档就是收集许多文件,并把它们 捆绑成一个大文件的过程。归档经常作为系统备份的一部分来使用。当把旧数据从一个系统移到某 种类型的长期存储设备中时,也会用到归档程序。
tar
In the Unix-like world of software, the tar program is the classic tool for archiving files. Its name, short for tape archive, reveals its roots as a tool for making backup tapes. While it is still used for that traditional task, it is equally adept on other storage devices as well. We often see filenames that end with the extension .tar or .tgz which indicate a “plain” tar archive and a gzipped archive, respectively. A tar archive can consist of a group of separate files, one or more directory hierarchies, or a mixture of both. The command syntax works like this:
在类 Unix 的软件世界中,这个 tar 程序是用来归档文件的经典工具。它的名字,是 tape archive 的简称,揭示了它的根源,它是一款制作磁带备份的工具。而它仍然被用来完成传统任务, 它也同样适用于其它的存储设备。我们经常看到扩展名为 .tar 或者 .tgz 的文件,它们各自表示“普通” 的 tar 包和被 gzip 程序压缩过的 tar 包。一个 tar 包可以由一组独立的文件,一个或者多个目录,或者 两者混合体组成。命令语法如下:
tar mode[options] pathname...
where mode is one of the following operating modes (only a partial list is shown here; see the tar man page for a complete list):
这里的 mode 是指以下操作模式(这里只展示了一部分,查看 tar 的手册来得到完整列表)之一:
| Mode | Description |
|---|---|
| c | Create an archive from a list of files and/or directories. |
| x | Extract an archive. |
| r | Append specified pathnames to the end of an archive. |
| t | List the contents of an archive. |
| 模式 | 说明 |
|---|---|
| c | 为文件和/或目录列表创建归档文件。 |
| x | 抽取归档文件。 |
| r | 追加具体的路径到归档文件的末尾。 |
| t | 列出归档文件的内容。 |
tar uses a slightly odd way of expressing options, so we’ll need some examples to show how it works. First, let’s re-create our playground from the previous chapter:
tar 命令使用了稍微有点奇怪的方式来表达它的选项,所以我们需要一些例子来展示它是 怎样工作的。首先,让我们重新创建之前我们用过的操练场:
| |
Next, let’s create a tar archive of the entire playground:
下一步,让我们创建整个操练场的 tar 包:
| |
This command creates a tar archive named playground.tar that contains the entire playground directory hierarchy. We can see that the mode and the f option, which is used to specify the name of the tar archive, may be joined together, and do not require a leading dash. Note, however, that the mode must always be specified first, before any other option.
这个命令创建了一个名为 playground.tar 的 tar 包,其包含整个 playground 目录层次结果。我们 可以看到模式 c 和选项 f,其被用来指定这个 tar 包的名字,模式和选项可以写在一起,而且不 需要开头的短横线。注意,然而,必须首先指定模式,然后才是其它的选项。
To list the contents of the archive, we can do this:
要想列出归档文件的内容,我们可以这样做:
| |
For a more detailed listing, we can add the v (verbose) option:
为了得到更详细的列表信息,我们可以添加选项 v:
| |
Now, let’s extract the playground in a new location. We will do this by creating a new directory named foo, and changing the directory and extracting the tar archive:
现在,抽取 tar 包 playground 到一个新位置。我们先创建一个名为 foo 的新目录,更改目录, 然后抽取 tar 包中的文件:
| |
If we examine the contents of ~/foo/playground, we see that the archive was successfully installed, creating a precise reproduction of the original files. There is one caveat, however: unless you are operating as the superuser, files and directories extracted from archives take on the ownership of the user performing the restoration, rather than the original owner.
如果我们检查 ~/foo/playground 目录中的内容,会看到这个归档文件已经被成功地安装了,也即创建了 一个精确的原始文件的副本。然而,这里有一个警告:除非你是超级用户,要不然从归档文件中抽取的文件 和目录的所有权由执行此复原操作的用户所拥有,而不属于原始所有者。
Another interesting behavior of tar is the way it handles pathnames in archives. The default for pathnames is relative, rather than absolute. tar does this by simply removing any leading slash from the pathname when creating the archive. To demonstrate, we will recreate our archive, this time specifying an absolute pathname:
tar 命令另一个有趣的行为是它处理归档文件路径名的方式。默认情况下,路径名是相对的,而不是绝对 路径。当以相对路径创建归档文件的时候,tar 命令会简单地删除路径名开头的斜杠。为了说明问题,我们将会 重新创建我们的归档文件,但是这次指定用绝对路径创建:
| |
Remember, ~/playground will expand into /home/me/playground when we press the enter key, so we will get an absolute pathname for our demonstration. Next, we will extract the archive as before and watch what happens:
记住,当按下回车键后,~/playground 会展开成 /home/me/playground,所以我们将会得到一个 绝对路径名。接下来,和之前一样我们会抽取归档文件,观察发生什么事情:
| |
Here we can see that when we extracted our second archive, it recreated the directory home/me/playground relative to our current working directory, ~/foo, not relative to the root directory, as would have been the case with an absolute pathname. This may seem like an odd way for it to work, but it’s actually more useful this way, as it allows us to extract archives to any location rather than being forced to extract them to their original locations. Repeating the exercise with the inclusion of the verbose option (v) will give a clearer picture of what’s going on.
这里我们看到当我们抽取第二个归档文件时,它重新创建了 home/me/playground 目录, 相对于我们当前的工作目录,~/foo,而不是相对于 root 目录,作为带有绝对路径名的案例。 这看起来似乎是一种奇怪的工作方式,但事实上这种方式很有用,因为这样就允许我们抽取文件 到任意位置,而不是强制地把抽取的文件放置到原始目录下。加上 verbose(v)选项,重做 这个练习,将会展现更加详细的信息。
Let’s consider a hypothetical, yet practical example, of tar in action. Imagine we want to copy the home directory and its contents from one system to another and we have a large USB hard drive that we can use for the transfer. On our modern Linux system, the drive is “automagically” mounted in the /media directory. Let’s also imagine that the disk has a volume name of BigDisk when we attach it. To make the tar archive, we can do the following:
让我们考虑一个假设,tar 命令的实际应用。假定我们想要复制家目录及其内容到另一个系统中, 并且有一个大容量的 USB 硬盘,可以把它作为传输工具。在现代 Linux 系统中, 这个硬盘会被“自动地”挂载到 /media 目录下。我们也假定硬盘中有一个名为 BigDisk 的逻辑卷。 为了制作 tar 包,我们可以这样做:
| |
After the tar file is written, we unmount the drive and attach it to the second computer. Again, it is mounted at /media/BigDisk. To extract the archive, we do this:
tar 包制作完成之后,我们卸载硬盘,然后把它连接到第二个计算机上。再一次,此硬盘被 挂载到 /media/BigDisk 目录下。为了抽取归档文件,我们这样做:
| |
What’s important to see here is that we must first change directory to /, so that the extraction is relative to the root directory, since all pathnames within the archive are relative.
值得注意的一点是,因为归档文件中的所有路径名都是相对的,所以首先我们必须更改目录到根目录下, 这样抽取的文件路径就相对于根目录了。
When extracting an archive, it’s possible to limit what is extracted from the archive. For example, if we wanted to extract a single file from an archive, it could be done like this:
当抽取一个归档文件时,有可能限制从归档文件中抽取什么内容。例如,如果我们想要抽取单个文件, 可以这样实现:
tar xf archive.tar pathname
By adding the trailing pathname to the command, tar will only restore the specified file. Multiple pathnames may be specified. Note that the pathname must be the full, exact relative pathname as stored in the archive. When specifying pathnames, wildcards are not normally supported; however, the GNU version of tar (which is the version most often found in Linux distributions) supports them with the –wildcards option. Here is an example using our previous playground.tar file:
通过给命令添加末尾的路径名,tar 命令就只会恢复指定的文件。可以指定多个路径名。注意 路径名必须是完全的,精准的相对路径名,就如存储在归档文件中的一样。当指定路径名的时候, 通常不支持通配符;然而,GNU 版本的 tar 命令(在 Linux 发行版中最常出现)通过 –wildcards 选项来 支持通配符。这个例子使用了之前 playground.tar 文件:
| |
This command will extract only files matching the specified pathname including the wildcard dir-*.
这个命令将只会抽取匹配特定路径名的文件,路径名中包含了通配符 dir-*。
tar is often used in conjunction with find to produce archives. In this example, we will use find to produce a set of files to include in an archive:
tar 命令经常结合 find 命令一起来制作归档文件。在这个例子里,我们将会使用 find 命令来 产生一个文件集合,然后这些文件被包含到归档文件中。
| |
Here we use find to match all the files in playground named file-A and then, using the -exec action, we invoke tar in the append mode (r) to add the matching files to the archive playground.tar.
这里我们使用 find 命令来匹配 playground 目录中所有名为 file-A 的文件,然后使用-exec 行为,来 唤醒带有追加模式(r)的 tar 命令,把匹配的文件添加到归档文件 playground.tar 里面。
Using tar with find is a good way of creating incremental backups of a directory tree or an entire system. By using find to match files newer than a timestamp file, we could create an archive that only contains files newer than the last archive, assuming that the timestamp file is updated right after each archive is created.
使用 tar 和 find 命令,来创建逐渐增加的目录树或者整个系统的备份,是个不错的方法。通过 find 命令匹配新于某个时间戳的文件,我们就能够创建一个归档文件,其只包含新于上一个 tar 包的文件, 假定这个时间戳文件恰好在每个归档文件创建之后被更新了。
tar can also make use of both standard input and output. Here is a comprehensive example:
tar 命令也可以利用标准输出和输入。这里是一个完整的例子:
| |
In this example, we used the find program to produce a list of matching files and piped them into tar. If the filename “-” is specified, it is taken to mean standard input or output, as needed (by the way, this convention of using “-” to represent standard input/output is used by a number of other programs, too.) The –files-from option (which may be also be specified as -T) causes tar to read its list of pathnames from a file rather than the command line. Lastly, the archive produced by tar is piped into gzip to create the compressed archive playground.tgz. The .tgz extension is the conventional extension given to gzip-compressed tar files. The extension .tar.gz is also used sometimes.
在这个例子里面,我们使用 find 程序产生了一个匹配文件列表,然后把它们管道到 tar 命令中。 如果指定了文件名“-”,则其被看作是标准输入或输出,正是所需(顺便说一下,使用“-”来表示 标准输入/输出的惯例,也被大量的其它程序使用)。这个 –file-from 选项(也可以用 -T 来指定) 导致 tar 命令从一个文件而不是命令行来读入它的路径名列表。最后,这个由 tar 命令产生的归档 文件被管道到 gzip 命令中,然后创建了压缩归档文件 playground.tgz。此 .tgz 扩展名是命名 由 gzip 压缩的 tar 文件的常规扩展名。有时候也会使用 .tar.gz 这个扩展名。
While we used the gzip program externally to produced our compressed archive, modern versions of GNU tar support both gzip and bzip2 compression directly, with the use of the z and j options, respectively. Using our previous example as a base, we can simplify it this way:
虽然我们使用 gzip 程序来制作我们的压缩归档文件,但是现在的 GUN 版本的 tar 命令 ,gzip 和 bzip2 压缩两者都直接支持,各自使用 z 和 j 选项。以我们之前的例子为基础, 我们可以这样简化它:
| |
If we had wanted to create a bzip2 compressed archive instead, we could have done this:
如果我们本要创建一个由 bzip2 压缩的归档文件,我们可以这样做:
| |
By simply changing the compression option from z to j (and changing the output file’s extension to .tbz to indicate a bzip2 compressed file) we enabled bzip2 compression. Another interesting use of standard input and output with the tar command involves transferring files between systems over a network. Imagine that we had two machines running a Unix-like system equipped with tar and ssh. In such a scenario, we could transfer a directory from a remote system (named remote-sys for this example) to our local system:
通过简单地修改压缩选项,把 z 改为 j(并且把输出文件的扩展名改为 .tbz,来指示一个 bzip2 压缩文件), 就使 bzip2 命令压缩生效了。另一个 tar 命令与标准输入和输出的有趣使用,涉及到在系统之间经过 网络传输文件。假定我们有两台机器,每台都运行着类 Unix,且装备着 tar 和 ssh 工具的操作系统。 在这种情景下,我们可以把一个目录从远端系统(名为 remote-sys)传输到我们的本地系统中:
| |
Here we were able to copy a directory named Documents from the remote system remote-sys to a directory within the directory named remote-stuff on the local system. How did we do this? First, we launched the tar program on the remote system using ssh. You will recall that ssh allows us to execute a program remotely on a networked computer and “see” the results on the local system—the standard output produced on the remote system is sent to the local system for viewing. We can take advantage of this by having tar create an archive (the c mode) and send it to standard output, rather than a file (the f option with the dash argument), thereby transporting the archive over the encrypted tunnel provided by ssh to the local system. On the local system, we execute tar and have it expand an archive (the x mode) supplied from standard input (again, the f option with the dash argument).
这里我们能够从远端系统 remote-sys 中复制目录 Documents 到本地系统名为 remote-stuff 目录中。 我们怎样做的呢?首先,通过使用 ssh 命令在远端系统中启动 tar 程序。你可记得 ssh 允许我们 在远程联网的计算机上执行程序,并且在本地系统中看到执行结果——远端系统中产生的输出结果 被发送到本地系统中查看。我们可以利用tar创建一个归档(c模式)并通过ssh提供的加密通道把它 发送到本地系统的标准输出(通过f选项和“-”)。在本地系统中,我们执行 tar 命令抽取(x模式) 标准输入提供的归档文件(再次的,通过f选项和“-”)。
zip
The zip program is both a compression tool and an archiver. The file format used by the program is familiar to Windows users, as it reads and writes .zip files. In Linux, however, gzip is the predominant compression program with bzip2 being a close second.
这个 zip 程序既是压缩工具,也是一个打包工具。这程序使用的文件格式,Windows 用户比较熟悉, 因为它读取和写入.zip 文件。然而,在 Linux 中 gzip 是主要的压缩程序,而 bzip2则位居第二。
In its most basic usage, zip is invoked like this:
在 zip 命令最基本的使用中,可以这样唤醒 zip 命令:
zip options zipfile file...
For example, to make a zip archive of our playground, we would do this:
例如,制作一个 playground 的 zip 版本的文件包,这样做:
| |
Unless we include the -r option for recursion, only the playground directory (but none of its contents) is stored. Although the addition of the extension .zip is automatic a, we will include the file extension for clarity.
除非我们包含-r 选项,要不然只有 playground 目录(没有任何它的内容)被存储。虽然会自动添加 .zip 扩展名,但为了清晰起见,我们还是包含文件扩展名。
During the creation of the zip archive, zip will normally display a series of messages like this:
在创建 zip 版本的文件包时,zip 命令通常会显示一系列的信息:
adding: playground/dir-020/file-Z (stored 0%)
adding: playground/dir-020/file-Y (stored 0%)
adding: playground/dir-020/file-X (stored 0%)
adding: playground/dir-087/ (stored 0%)
adding: playground/dir-087/file-S (stored 0%)
These messages show the status of each file added to the archive. zip will add files to the archive using one of two storage methods: either it will “store” a file without compression, as shown here, or it will “deflate” the file which performs compression. The numeric value displayed after the storage method indicates the amount of compression achieved. Since our playground only contains empty files, no compression is performed on its contents.
这些信息显示了添加到文件包中每个文件的状态。zip 命令会使用两种存储方法之一,来添加 文件到文件包中:要不它会“store”没有压缩的文件,正如这里所示,或者它会“deflate”文件, 执行压缩操作。在存储方法之后显示的数值表明了压缩量。因为我们的 playground 目录 只是包含空文件,没有对它的内容执行压缩操作。
Extracting the contents of a zip file is straightforward when using the unzip program:
使用 unzip 程序,来直接抽取一个 zip 文件的内容。
| |
One thing to note about zip (as opposed to tar) is that if an existing archive is specified, it is updated rather than replaced. This means that the existing archive is preserved, but new files are added and matching files are replaced. Files may be listed and extracted selectively from a zip archive by specifying them to unzip:
对于 zip 命令(与 tar 命令相反)要注意一点,就是如果指定了一个已经存在的文件包,其被更新 而不是被替代。这意味着会保留此文件包,但是会添加新文件,同时替换匹配的文件。可以列出 文件或者有选择地从一个 zip 文件包中抽取文件,只要给 unzip 命令指定文件名:
| |
Using the -l option causes unzip to merely list the contents of the archive without extracting the file. If no file(s) are specified, unzip will list all files in the archive. The -v option can be added to increase the verbosity of the listing. Note that when the archive extraction conflicts with an existing file, the user is prompted before the file is replaced.
使用-l 选项,导致 unzip 命令只是列出文件包中的内容而没有抽取文件。如果没有指定文件, unzip 程序将会列出文件包中的所有文件。添加这个-v 选项会增加列表的冗余信息。注意当抽取的 文件与已经存在的文件冲突时,会在替代此文件之前提醒用户。
Like tar, zip can make use of standard input and output, though its implementation is somewhat less useful. It is possible to pipe a list of filenames to zip via the -@ option:
像 tar 命令一样,zip 命令能够利用标准输入和输出,虽然它的实施不大有用。通过-@选项,有可能把一系列的 文件名管道到 zip 命令。
| |
Here we use find to generate a list of files matching the test -name “file-A”, and pipe the list into zip, which creates the archive file-A.zip containing the selected files.
这里我们使用 find 命令产生一系列与“file-A”相匹配的文件列表,并且把此列表管道到 zip 命令, 然后创建包含所选文件的文件包 file-A.zip。
zip also supports writing its output to standard output, but its use is limited because very few programs can make use of the output. Unfortunately, the unzip program, does not accept standard input. This prevents zip and unzip from being used together to perform network file copying like tar.
zip 命令也支持把它的输出写入到标准输出,但是它的使用是有限的,因为很少的程序能利用输出。 不幸地是,这个 unzip 程序,不接受标准输入。这就阻止了 zip 和 unzip 一块使用,像 tar 命令那样, 来复制网络上的文件。
zip can, however, accept standard input, so it can be used to compress the output of other programs:
然而,zip 命令可以接受标准输入,所以它可以被用来压缩其它程序的输出:
| |
In this example we pipe the output of ls into zip. Like tar, zip interprets the trailing dash as “use standard input for the input file.”
在这个例子里,我们把 ls 命令的输出管道到 zip 命令。像 tar 命令,zip 命令把末尾的横杠解释为 “使用标准输入作为输入文件。”
The unzip program allows its output to be sent to standard output when the -p (for pipe) option is specified:
这个 unzip 程序允许它的输出发送到标准输出,当指定了-p 选项之后:
| |
We touched on some of the basic things that zip/unzip can do. They both have a lot of options that add to their flexibility, though some are platform specific to other systems. The man pages for both zip and unzip are pretty good and contain useful examples. However, the main use of these programs is for exchanging files with Windows systems, rather than performing compression and archiving on Linux, where tar and gzip are greatly preferred.
我们讨论了一些 zip/unzip 可以完成的基本操作。它们两个都有许多选项,其增加了 命令的灵活性,虽然一些选项只针对于特定的平台。zip 和 unzip 命令的说明手册都相当不错, 并且包含了有用的实例。然而,这些程序的主要用途是为了和 Windows 系统交换文件, 而不是在 Linux 系统中执行压缩和打包操作,tar 和 gzip 程序在 Linux 系统中更受欢迎。
同步文件和目录
A common strategy for maintaining a backup copy of a system involves keeping one or more directories synchronized with another directory (or directories) located on either the local system (usually a removable storage device of some kind) or with a remote system. We might, for example, have a local copy of a web site under development and synchronize it from time to time with the “live” copy on a remote web server. In the Unix-like world, the preferred tool for this task is rsync. This program can synchronize both local and remote directories by using the rsync remote-update protocol, which allows rsync to quickly detect the differences between two directories and perform the minimum amount of copying required to bring them into sync. This makes rsync very fast and economical to use, compared to other kinds of copy programs.
维护系统备份的常见策略是保持一个或多个目录与另一个本地系统(通常是某种可移动的存储设备) 或者远端系统中的目录(或多个目录)同步。我们可能,例如有一个正在开发的网站的本地备份, 需要时不时的与远端网络服务器中的文件备份保持同步。在类 Unix 系统的世界里,能完成此任务且 备受人们喜爱的工具是 rsync。这个程序能同步本地与远端的目录,通过使用 rsync 远端更新协议,此协议 允许 rsync 快速地检测两个目录的差异,执行最小量的复制来达到目录间的同步。比起其它种类的复制程序, 这就使 rsync 命令非常快速和高效。
rsync is invoked like this:
rsync 被这样唤醒:
rsync options source destination
where source and destination are one of the following:
这里 source 和 destination 是下列选项之一:
A local file or directory
A remote file or directory in the form of [user@]host:path
A remote rsync server specified with a URI of rsync://[user@]host[:port]/path
一个本地文件或目录
一个远端文件或目录,以[user@]host:path 的形式存在
一个远端 rsync 服务器,由 rsync://[user@]host[:port]/path 指定
Note that either the source or destination must be a local file. Remote to remote copying is not supported.
注意 source 和 destination 两者之一必须是本地文件。rsync 不支持远端到远端的复制
Let’s try rsync out on some local files. First, let’s clean out our foo directory:
让我们试着对一些本地文件使用 rsync 命令。首先,清空我们的 foo 目录:
| |
Next, we’ll synchronize the playground directory with a corresponding copy in foo:
下一步,我们将同步 playground 目录和它在 foo 目录中相对应的副本
| |
We’ve included both the -a option (for archiving—causes recursion and preservation of file attributes) and the -v option (verbose output) to make a mirror of the playground directory within foo. While the command runs, we will see a list of the files and directories being copied. At the end, we will see a summary message like this:
我们包括了-a 选项(递归和保护文件属性)和-v 选项(冗余输出), 来在 foo 目录中制作一个 playground 目录的镜像。当这个命令执行的时候, 我们将会看到一系列的文件和目录被复制。在最后,我们将看到一条像这样的总结信息:
sent 135759 bytes received 57870 bytes 387258.00 bytes/sec
total size is 3230 speedup is 0.02
indicating the amount of copying performed. If we run the command again, we will see a different result:
说明复制的数量。如果我们再次运行这个命令,我们将会看到不同的结果:
| |
Notice that there was no listing of files. This is because rsync detected that there were no differences between ~/playground and ~/foo/playground, and therefore it didn’t need to copy anything. If we modify a file in playground and run rsync again:
注意到没有文件列表。这是因为 rsync 程序检测到在目录~/playground 和 ~/foo/playground 之间 不存在差异,因此它不需要复制任何数据。如果我们在 playground 目录中修改一个文件,然后 再次运行 rsync 命令:
| |
we see that rsync detected the change and copied only the updated file. As a practical example, let’s consider the imaginary external hard drive that we used earlier with tar. If we attach the drive to our system and, once again, it is mounted at / media/BigDisk, we can perform a useful system backup by first creating a directory, named /backup on the external drive and then using rsync to copy the most important stuff from our system to the external drive:
我们看到 rsync 命令检测到更改,并且只是复制了更新的文件。作为一个实际的例子, 让我们考虑一个假想的外部硬盘,之前我们在 tar 命令中用到过的。如果我们再次把此 硬盘连接到我们的系统中,它被挂载到/media/BigDisk 目录下,我们可以执行一个有 用的系统备份了,首先在外部硬盘上创建一个目录,名为/backup,然后使用 rsync 程序 从我们的系统中复制最重要的数据到此外部硬盘上:
| |
In this example, we copied the /etc, /home, and /usr/local directories from our system to our imaginary storage device. We included the –delete option to remove files that may have existed on the backup device that no longer existed on the source device (this is irrelevant the first time we make a backup, but will be useful on subsequent copies.) Repeating the procedure of attaching the external drive and running this rsync command would be a useful (though not ideal) way of keeping a small system backed up. Of course, an alias would be helpful here, too. We could create an alias and add it to our .bashrc file to provide this feature:
在这个例子里,我们把/etc,/home,和/usr/local 目录从我们的系统中复制到假想的存储设备中。 我们包含了–delete 这个选项,来删除可能在备份设备中已经存在但却不再存在于源设备中的文件, (这与我们第一次创建备份无关,但是会在随后的复制操作中有用途)。挂载外部驱动器,运行 rsync 命令,不断重复这个过程,是一个不错的(虽然不理想)方式来保存少量的系统备份文件。 当然,别名会对这个操作更有帮助些。我们将会创建一个别名,并把它添加到.bashrc 文件中, 来提供这个特性:
alias backup='sudo rsync -av --delete /etc /home /usr/local /media/BigDisk/backup'
Now all we have to do is attach our external drive and run the backup command to do the job.
现在我们所做的事情就是连接外部驱动器,然后运行 backup 命令来完成工作。
在网络间使用 rsync 命令
One of the real beauties of rsync is that it can be used to copy files over a network. After all, the “r” in rsync stands for “remote.” Remote copying can be done in one of two ways. The first way is with another system that has rsync installed, along with a remote shell program such as ssh. Let’s say we had another system on our local network with a lot of available hard drive space and we wanted to perform our backup operation using the remote system instead of an external drive. Assuming that it already had a directory named /backup where we could deliver our files, we could do this:
rsync 程序的真正好处之一,是它可以被用来在网络间复制文件。毕竟,rsync 中的“r”象征着“remote”。 远程复制可以通过两种方法完成。第一个方法要求另一个系统已经安装了 rsync 程序,还安装了 远程 shell 程序,比如 ssh。比方说我们本地网络中的一个系统有大量可用的硬盘空间,我们想要 用远程系统来代替一个外部驱动器,来执行文件备份操作。假定远程系统中有一个名为/backup 的目录, 其用来存放我们传送的文件,我们这样做:
| |
We made two changes to our command to facilitate the network copy. First, we added the –rsh=ssh option, which instructs rsync to use the ssh program as its remote shell. In this way, we were able to use an ssh encrypted tunnel to securely transfer the data from the local system to the remote host. Second, we specified the remote host by prefixing its name (in this case the remote host is named remote-sys) to the destination path name.
我们对命令做了两处修改,来方便网络间文件复制。首先,我们添加了–rsh=ssh 选项,其指示 rsync 使用 ssh 程序作为它的远程 shell。以这种方式,我们就能够使用一个 ssh 加密通道,把数据 安全地传送到远程主机中。其次,通过在目标路径名前加上远端主机的名字(在这种情况下, 远端主机名为 remote-sys),来指定远端主机。
The second way that rsync can be used to synchronize files over a network is by using an rysnc server. rsync can be configured to run as a daemon and listen to incoming requests for synchronization. This is often done to allow mirroring of a remote system. For example, Red Hat Software maintains a large repository of software packages under development for its Fedora distribution. It is useful for software testers to mirror this collection during the testing phase of the distribution release cycle. Since files in the repository change frequently (often more than once a day), it is desirable to maintain a local mirror by periodic synchronization, rather than by bulk copying of the repository. One of these repositories is kept at Georgia Tech; we could mirror it using our local copy of rsync and their rsync server like this:
rsync 可以被用来在网络间同步文件的第二种方式是通过使用 rsync 服务器。rsync 可以被配置为一个 守护进程,监听即将到来的同步请求。这样做经常是为了进行一个远程系统的镜像操作。例如,Red Hat 软件中心为它的 Fedora 发行版,维护着一个巨大的正在开发中的软件包的仓库。对于软件测试人员, 在发行周期的测试阶段,定期镜像这些软件集合是非常有帮助的。因为仓库中的这些文件会频繁地 (通常每天不止一次)改动,定期同步本地镜像而不是大量地拷贝软件仓库,这是更为明智的。 这些软件库之一被维护在乔治亚理工大学;我们可以使用本地 rsync 程序和它们的 rsync 服务器来镜像它。
| |
In this example, we use the URI of the remote rsync server, which consists of a protocol (rsync://), followed by the remote host name (rsync.gtlib.gatech.edu), followed by the pathname of the repository.
在这个例子里,我们使用了远端 rsync 服务器的 URI,其由协议(rsync://),远端主机名 (rsync.gtlib.gatech.edu),和软件仓库的路径名组成。
拓展阅读
The man pages for all of the commands discussed here are pretty clear and contain useful examples. In addition, the GNU Project has a good online manual for its version of tar. It can be found here:
在这里讨论的所有命令的手册文档都相当清楚明白,并且包含了有用的例子。另外, GNU 版本的 tar 命令有一个不错的在线文档。可以在下面链接处找到:
20 - 20 正则表达式
正则表达式
http://billie66.github.io/TLCL/book/chap20.html
In the next few chapters, we are going to look at tools used to manipulate text. As we have seen, text data plays an important role on all Unix-like systems, such as Linux. But before we can fully appreciate all of the features offered by these tools, we have to first examine a technology that is frequently associated with the most sophisticated uses of these tools — regular expressions.
接下来的几章中,我们将会看一下一些用来操作文本的工具。正如我们所见到的,在类 Unix 的 操作系统中,比如 Linux 中,文本数据起着举足轻重的作用。但是在我们能完全理解这些工具提供的 所有功能之前,我们不得不先看看,经常与这些工具的高级使用相关联的一门技术——正则表达式。
As we have navigated the many features and facilities offered by the command line, we have encountered some truly arcane shell features and commands, such as shell expansion and quoting, keyboard shortcuts, and command history, not to mention the vi editor. Regular expressions continue this “tradition” and may be (arguably) the most arcane feature of them all. This is not to suggest that the time it takes to learn about them is not worth the effort. Quite the contrary. A good understanding will enable us to perform amazing feats, though their full value may not be immediately apparent. What Are Regular Expressions?
我们已经浏览了许多由命令行提供的功能和工具,我们遇到了一些真正神秘的 shell 功能和命令, 比如 shell 展开和引用、键盘快捷键和命令历史,更不用说 vi 编辑器了。正则表达式延续了 这种“传统”,而且有可能(备受争议地)是这些‘神秘功能’中最神秘的那个。这并不是说花费时间来学习它们 是不值得的,而是恰恰相反。虽然它们的全部价值可能不能立即显现,但是较强理解这些功能 使我们能够表演令人惊奇的技艺。什么是正则表达式?
Simply put, regular expressions are symbolic notations used to identify patterns in text. In some ways, they resemble the shell’s wildcard method of matching file and pathnames, but on a much grander scale. Regular expressions are supported by many command line tools and by most programming languages to facilitate the solution of text manipulation problems. However, to further confuse things, not all regular expressions are the same; they vary slightly from tool to tool and from programming language to language. For our discussion, we will limit ourselves to regular expressions as described in the POSIX standard (which will cover most of the command line tools), as opposed to many programming languages (most notably Perl), which use slightly larger and richer sets of notations.
简而言之,正则表达式是一种符号表示法,被用来识别文本模式。在某种程度上,它们与匹配 文件和路径名的 shell 通配符比较相似,但其规模更庞大。许多命令行工具和大多数的编程语言 都支持正则表达式,以此来帮助解决文本操作问题。然而,并不是所有的正则表达式都是一样的, 这就进一步混淆了事情;不同工具以及不同语言之间的正则表达式都略有差异。我们将会限定 POSIX 标准中描述的正则表达式(其包括了大多数的命令行工具),供我们讨论, 与许多编程语言(最著名的 Perl 语言)相反,它们使用了更多和更丰富的符号集。
grep
The main program we will use to work with regular expressions is our old pal, grep. The name “grep” is actually derived from the phrase “global regular expression print,” so we can see that grep has something to do with regular expressions. In essence, grep searches text files for the occurrence of a specified regular expression and outputs any line containing a match to standard output.
我们将使用的主要程序是我们的老朋友,grep 程序,它会用到正则表达式。实际上,“grep”这个名字 来自于短语“global regular expression print”,所以我们能看出 grep 程序和正则表达式有关联。 本质上,grep 程序会在文本文件中查找一个指定的正则表达式,并把匹配行输出到标准输出。
So far, we have used grep with fixed strings, like so:
到目前为止,我们已经使用 grep 程序查找了固定的字符串,就像这样:
| |
This will list all the files in the /usr/bin directory whose names contain the substring “zip”.
这个命令会列出,位于目录 /usr/bin 中,文件名中包含子字符串“zip”的所有文件。
The grep program accepts options and arguments this way:
grep 程序以这样的方式来接受选项和参数:
grep [options] regex [file...]
where regex is a regular expression.
这里的 regex 是指一个正则表达式。
Here is a list of the commonly used grep options:
这是一个常用的 grep 选项列表:
| Option | Description |
|---|---|
| -i | Ignore case. Do not distinguish between upper and lower case characters. May also be specified –ignore-case. |
| -v | Invert match. Normally, grep prints lines that contain a match. This option causes grep to print every line that does not contain a match. May also be specified –invert-match. |
| -c | Print the number of matches (or non-matches if the -v option is also specified) instead of the lines themselves. May also be specified –count. |
| -l | Print the name of each file that contains a match instead of the lines themselves. May also be specified –files-with-matches. |
| -L | Like the -l option, but print only the names of files that do not contain matches. May also be specified –files-without-match. |
| -n | Prefix each matching line with the number of the line within the file. May also be specified –line-number. |
| -h | For multi-file searches, suppress the output of filenames. May also be specified –no-filename. |
| 选项 | 描述 |
|---|---|
| -i | 忽略大小写。不会区分大小写字符。也可用–ignore-case 来指定。 |
| -v | 不匹配。通常,grep 程序会打印包含匹配项的文本行。这个选项导致 grep 程序只会打印不包含匹配项的文本行。也可用–invert-match 来指定。 |
| -c | 打印匹配的数量(或者是不匹配的数目,若指定了-v 选项),而不是文本行本身。 也可用–count 选项来指定。 |
| -l | 打印包含匹配项的文件名,而不是文本行本身,也可用–files-with-matches 选项来指定。 |
| -L | 相似于-l 选项,但是只是打印不包含匹配项的文件名。也可用–files-without-match 来指定。 |
| -n | 在每个匹配行之前打印出其位于文件中的相应行号。也可用–line-number 选项来指定。 |
| -h | 应用于多文件搜索,不输出文件名。也可用–no-filename 选项来指定。 |
In order to more fully explore grep, let’s create some text files to search:
为了更好的探究 grep 程序,让我们创建一些文本文件来搜寻:
| |
We can perform a simple search of our list of files like this:
我们能够对我们的文件列表执行简单的搜索,像这样:
| |
In this example, grep searches all of the listed files for the string bzip and finds two matches, both in the file dirlist-bin.txt. If we were only interested in the list of files that contained matches rather than the matches themselves, we could specify the -l option:
在这个例子里,grep 程序在所有列出的文件中搜索字符串 bzip,然后找到两个匹配项,其都在 文件 dirlist-bin.txt 中。如果我们只是对包含匹配项的文件列表,而不是对匹配项本身感兴趣 的话,我们可以指定-l 选项:
| |
Conversely, if we wanted only to see a list of the files that did not contain a match, we could do this:
相反地,如果我们只想查看不包含匹配项的文件列表,我们可以这样操作:
| |
元字符和原义字符(Metacharacters And Literals)
While it may not seem apparent, our grep searches have been using regular expressions all along, albeit very simple ones. The regular expression “bzip” is taken to mean that a match will occur only if the line in the file contains at least four characters and that somewhere in the line the characters “b”, “z”, “i”, and “p” are found in that order, with no other characters in between. The characters in the string “bzip” are all literal characters, in that they match themselves. In addition to literals, regular expressions may also include metacharacters that are used to specify more complex matches. Regular expression metacharacters consist of the following:
它可能看起来不明显,但是我们的 grep 程序一直使用了正则表达式,虽然是非常简单的例子。 这个正则表达式“bzip”意味着,匹配项所在行至少包含4个字符,并且按照字符 “b”、“z”、 “i” 和 “p”的顺序 出现在匹配行的某处,字符之间没有其它的字符。字符串“bzip”中的所有字符都是原义字符,因此 它们匹配本身。除了原义字符之外,正则表达式也可能包含元字符,其被用来指定更复杂的匹配项。 正则表达式元字符由以下字符组成:
^ $ . [ ] { } - ? * + ( ) | \
All other characters are considered literals, though the backslash character is used in a few cases to create meta sequences, as well as allowing the metacharacters to be escaped and treated as literals instead of being interpreted as metacharacters.
其它所有字符都被认为是原义字符。在个别情况下,反斜杠会被用来创建元序列, 元字符也可以被转义为原义字符,而不是被解释为元字符。
Note: As we can see, many of the regular expression metacharacters are also characters that have meaning to the shell when expansion is performed. When we pass regular expressions containing metacharacters on the command line, it is vital that they be enclosed in quotes to prevent the shell from attempting to expand them.
注意:正如我们所见到的,当 shell 执行展开的时候,许多正则表达式元字符,也是对 shell 有特殊 含义的字符。当我们在命令行中传递包含元字符的正则表达式的时候,把元字符用引号引起来至关重要, 这样可以阻止 shell 试图展开它们。
任何字符
The first metacharacter we will look at is the dot or period character, which is used to match any character. If we include it in a regular expression, it will match any character in that character position. Here’s an example:
我们将要查看的第一个元字符是圆点字符,其被用来匹配任意字符。如果我们在正则表达式中包含它, 它将会匹配在此位置的任意一个字符。这里有个例子:
| |
We searched for any line in our files that matches the regular expression “.zip”. There are a couple of interesting things to note about the results. Notice that the zip program was not found. This is because the inclusion of the dot metacharacter in our regular expression increased the length of the required match to four characters, and because the name “zip” only contains three, it does not match. Also, if there had been any files in our lists that contained the file extension .zip, they would have also been matched as well, because the period character in the file extension is treated as “any character,” too.
我们在文件中查找包含正则表达式“.zip”的文本行。对于搜索结果,有几点需要注意一下。 注意没有找到这个 zip 程序。这是因为在我们的正则表达式中包含的圆点字符把所要求的匹配项的长度 增加到四个字符,并且因为字符串“zip”只包含三个字符,所以这个 zip 程序不匹配。另外,如果我们的文件列表 中有一些文件的扩展名是.zip,则它们也会成为匹配项,因为文件扩展名中的圆点符号也会被看作是 “任意字符”。
锚点
The caret and dollar sign characters are treated as anchors in regular expressions. This means that they cause the match to occur only if the regular expression is found at the beginning of the line or at the end of the line:
在正则表达式中,插入符号和美元符号被看作是锚点。这意味着正则表达式 只有在文本行的开头或末尾被找到时,才算发生一次匹配。
| |
Here we searched the list of files for the string “zip” located at the beginning of the line, the end of the line, and on a line where it is at both the beginning and the end of the line (i.e., by itself on the line.) Note that the regular expression ‘^$’ (a beginning and an end with nothing in between) will match blank lines.
这里我们分别在文件列表中搜索行首、行尾以及行首和行尾同时包含字符串“zip”(例如,zip 独占一行)的匹配行。 注意正则表达式‘^$’(行首和行尾之间没有字符)会匹配空行。
A Crossword Puzzle Helper
字谜助手
Even with our limited knowledge of regular expressions at this point, we can do something useful.
到目前为止,甚至凭借我们有限的正则表达式知识,我们已经能做些有意义的事情了。
My wife loves crossword puzzles and she will sometimes ask me for help with a particular question. Something like, “what’s a five letter word whose third letter is ‘j’ and last letter is ‘r’ that means…?” This kind of question got me thinking.
我妻子喜欢玩字谜游戏,有时候她会因为一个特殊的问题,而向我求助。类似这样的问题,“一个 有五个字母的单词,它的第三个字母是‘j’,最后一个字母是‘r’,是哪个单词?”这类问题会 让我动脑筋想想。
Did you know that your Linux system contains a dictionary? It does. Take a look in the /usr/share/dict directory and you might find one, or several. The dictionary files located there are just long lists of words, one per line, arranged in alphabetical order. On my system, the words file contains just over 98,500 words. To find possible answers to the crossword puzzle question above, we could do this:
你知道你的 Linux 系统中带有一本英文字典吗?千真万确。看一下 /usr/share/dict 目录,你就能找到一本, 或几本。存储在此目录下的字典文件,其内容仅仅是一个长长的单词列表,每行一个单词,按照字母顺序排列。在我的 系统中,这个文件仅包含98,000个单词。为了找到可能的上述字谜的答案,我们可以这样做:
[me@linuxbox ~]$ grep -i '^..j.r$' /usr/share/dict/words Major majorUsing this regular expression, we can find all the words in our dictionary file that are five letters long and have a “j” in the third position and an “r” in the last position.
使用这个正则表达式,我们能在我们的字典文件中查找到包含五个字母,且第三个字母 是“j”,最后一个字母是“r”的所有单词。
中括号表达式和字符类
In addition to matching any character at a given position in our regular expression, we can also match a single character from a specified set of characters by using bracket expressions. With bracket expressions, we can specify a set of characters (including characters that would otherwise be interpreted as metacharacters) to be matched. In this example, using a two character set:
除了能够在正则表达式中的给定位置匹配任意字符之外,通过使用中括号表达式, 我们也能够从一个指定的字符集合中匹配单个字符。通过中括号表达式,我们能够指定 一个待匹配字符集合(包含在不加中括号的情况下会被解释为元字符的字符)。在这个例子里,使用了一个两个字符的集合:
| |
we match any line that contains the string “bzip” or “gzip”.
我们匹配包含字符串“bzip”或者“gzip”的任意行。
A set may contain any number of characters, and metacharacters lose their special meaning when placed within brackets. However, there are two cases in which metacharacters are used within bracket expressions, and have different meanings. The first is the caret (^), which is used to indicate negation; the second is the dash (-), which is used to indicate a character range.
一个字符集合可能包含任意多个字符,并且元字符被放置到中括号里面后会失去了它们的特殊含义。 然而,在两种情况下,会在中括号表达式中使用元字符,并且有着不同的含义。第一个元字符 是插入字符(^),其被用来表示否定;第二个是连字符字符(-),其被用来表示一个字符范围。
否定
If the first character in a bracket expression is a caret (^), the remaining characters are taken to be a set of characters that must not be present at the given character position. We do this by modifying our previous example:
如果在中括号表示式中的第一个字符是一个插入字符(^),则剩余的字符被看作是不会在给定的字符位置出现的 字符集合。通过修改之前的例子,我们试验一下:
| |
With negation activated, we get a list of files that contain the string “zip” preceded by any character except “b” or “g”. Notice that the file zip was not found. A negated character set still requires a character at the given position, but the character must not be a member of the negated set.
通过激活否定操作,我们得到一个文件列表,它们的文件名都包含字符串“zip”,并且“zip”的前一个字符 是除了“b”和“g”之外的任意字符。注意文件 zip 没有被发现。一个否定的字符集仍然在给定位置要求一个字符, 但是这个字符必须不是否定字符集的成员。
The caret character only invokes negation if it is the first character within a bracket expression; otherwise, it loses its special meaning and becomes an ordinary character in the set.
插入字符如果是中括号表达式中的第一个字符的时候,才会唤醒否定功能;否则,它会失去 它的特殊含义,变成字符集中的一个普通字符。
传统的字符区域
If we wanted to construct a regular expression that would find every file in our lists beginning with an upper case letter, we could do this:
如果我们想要构建一个正则表达式,它可以在我们的列表中找到每个以大写字母开头的文件,我们 可以这样做:
| |
It’s just a matter of putting all twenty-six upper case letters in a bracket expression. But the idea of all that typing is deeply troubling, so there is another way:
这只是一个在正则表达式中输入26个大写字母的问题。但是输入所有字母非常令人烦恼,所以有另外一种方式:
| |
By using a three character range, we can abbreviate the twenty-six letters. Any range of characters can be expressed this way including multiple ranges, such as this expression that matches all filenames starting with letters and numbers:
通过使用一个三个符区域,我们能够缩写26个字母。任意字符的区域都能按照这种方式表达,包括多个区域, 比如下面这个表达式就匹配了所有以字母和数字开头的文件名:
| |
In character ranges, we see that the dash character is treated specially, so how do we actually include a dash character in a bracket expression? By making it the first character in the expression. Consider these two examples:
在字符区域中,我们看到这个连字符被特殊对待,所以我们怎样在一个正则表达式中包含一个连字符呢? 方法就是使连字符成为表达式中的第一个字符。考虑一下这两个例子:
| |
This will match every filename containing an upper case letter. While:
这会匹配包含一个大写字母的文件名。然而:
| |
will match every filename containing a dash, or a upper case “A” or an uppercase “Z”.
上面的表达式会匹配包含一个连字符,或一个大写字母“A”,或一个大写字母“Z”的文件名。
POSIX 字符集
The traditional character ranges are an easily understood and effective way to handle the problem of quickly specifying sets of characters. Unfortunately, they don’t always work. While we have not encountered any problems with our use of grep so far, we might run into problems using other programs.
传统的字符区域是一个易于理解和有效的方法,用来处理快速指定字符集合的问题。 不幸的是,它们不总是工作。到目前为止,虽然我们在使用 grep 程序的时候没有遇到任何问题, 但是我们可能在使用其它程序的时候会遭遇困难。
Back in Chapter 5, we looked at how wildcards are used to perform pathname expansion. In that discussion, we said that character ranges could be used in a manner almost identical to the way they are used in regular expressions, but here’s the problem:
回到第5章,我们看看通配符怎样被用来完成路径名展开操作。在那次讨论中,我们说过在 某种程度上,那个字符区域被使用的方式几乎与在正则表达式中的用法一样,但是有一个问题:
| |
(Depending on the Linux distribution, we will get a different list of files, possibly an empty list. This example is from Ubuntu) This command produces the expected result — a list of only the files whose names begin with an uppercase letter, but:
(依赖于不同的 Linux 发行版,我们将得到不同的文件列表,有可能是一个空列表。这个例子来自于 Ubuntu) 这个命令产生了期望的结果——只有以大写字母开头的文件名,但是:
| |
with this command we get an entirely different result (only a partial listing of the results is shown). Why is that? It’s a long story, but here’s the short version:
通过这个命令我们得到完全不同的结果(只列出了部分结果)。原因说来话长,简单来说就是:
Back when Unix was first developed, it only knew about ASCII characters, and this feature reflects that fact. In ASCII, the first thirty-two characters (numbers 0-31) are control codes (things like tabs, backspaces, and carriage returns). The next thirty-two (32-63) contain printable characters, including most punctuation characters and the numerals zero through nine. The next thirty-two (numbers 64-95) contain the uppercase letters and a few more punctuation symbols. The final thirty-one (numbers 96-127) contain the lowercase letters and yet more punctuation symbols. Based on this arrangement, systems using ASCII used a collation order that looked like this:
追溯到 Unix 刚刚开发的时候,它只知道 ASCII 字符,并且Unix特性也如实反映了这一事实。在 ASCII 中,前32个字符(数字0-31)都是控制码(如 tabs、backspaces和回车)。随后的32个字符(32-63)包含可打印的字符,包括大多数的标点符号和数字0到9。再随后的32个字符(64-95)包含大写字符和一些更多的标点符号。最后的31个字符(96-127)包含小写字母和更多的标点符号。基于这种安排方式,使用ASCII的系统的排序规则像下面这样:
ABCDEFGHIJKLMNOPQRSTUVWXYZabcdefghijklmnopqrstuvwxyz
This differs from proper dictionary order, which is like this:
这个不同于正常的字典顺序,其像这样:
aAbBcCdDeEfFgGhHiIjJkKlLmMnNoOpPqQrRsStTuUvVwWxXyYzZ
As the popularity of Unix spread beyond the United States, there grew a need to support characters not found in U.S. English. The ASCII table was expanded to use a full eight bits, adding characters numbers 128-255, which accommodated many more languages.
随着 Unix 系统的知名度在美国之外的国家传播开来,就需要支持不在 U.S.英语范围内的字符。于是就扩展了这个 ASCII 字符表,使用了整个8位,添加了字符(数字128-255),这样就容纳了更多的语言。
To support this ability, the POSIX standards introduced a concept called a locale, which could be adjusted to select the character set needed for a particular location. We can see the language setting of our system using this command:
为了支持这种功能,posix标准引入了”locale”概念,它能针对不同地区选择合适的字符集。:
| |
With this setting, POSIX compliant applications will use a dictionary collation order rather than ASCII order. This explains the behavior of the commands above. A character range of [A-Z] when interpreted in dictionary order includes all of the alphabetic characters except the lowercase “a”, hence our results.
通过这个设置,POSIX 相容的应用程序将会使用字典排列顺序而不是 ASCII 顺序。这就解释了上述命令的行为。当[A-Z]字符区域按照字典顺序解释的时候,包含除了小写字母“a”之外的所有字母,因此得到这样的结果。
To partially work around this problem, the POSIX standard includes a number of character classes which provide useful ranges of characters. They are described in the table below:
为了部分地解决这个问题,POSIX 标准包含了大量的字符集,其提供了有用的字符区域。如下表中所示:
| Character Class | Description |
|---|---|
| [:alnum:] | The alphanumeric characters. In ASCII, equivalent to: [A-Za-z0-9] |
| [:word:] | The same as [:alnum:], with the addition of the underscore (_) character. |
| [:alpha:] | The alphabetic characters. In ASCII, equivalent to: [A-Za-z] |
| [:blank:] | Includes the space and tab characters. |
| [:cntrl:] | The ASCII control codes. Includes the ASCII characters zero through thirty-one and 127. |
| [:digit:] | The numerals zero through nine. |
| [:graph:] | The visible characters. In ASCII, it includes characters 33 through 126. |
| [:lower:] | The lowercase letters. |
| [:punct:] | The punctuation characters. In ASCII, equivalent to:[-!"#$%&’()*+,./:;<=>?@[\]_`{|}~] |
| [:print:] | The printable characters. All the characters in [:graph:] plus the space character. |
| [:space:] | The whitespace characters including space, tab, carriage return, newline, vertical tab, and form feed. In ASCII, equivalent to: [ \t\r\n\v\f] |
| [:upper:] | The upper case characters. |
| [:xdigit:] | Characters used to express hexadecimal numbers. In ASCII, equivalent to: [0-9A-Fa-f] |
| 字符集 | 说明 |
|---|---|
| [:alnum:] | 字母数字字符。在 ASCII 中,等价于:[A-Za-z0-9] |
| [:word:] | 与[:alnum:]相同, 但增加了下划线字符。 |
| [:alpha:] | 字母字符。在 ASCII 中,等价于:[A-Za-z] |
| [:blank:] | 包含空格和 tab 字符。 |
| [:cntrl:] | ASCII 的控制码。包含了0到31,和127的 ASCII 字符。 |
| [:digit:] | 数字0到9 |
| [:graph:] | 可视字符。在 ASCII 中,它包含33到126的字符。 |
| [:lower:] | 小写字母。 |
| [:punct:] | 标点符号字符。在 ASCII 中,等价于:[-!"#$%&’()*+,./:;<=>?@[\]_`{|}~] |
| [:print:] | 可打印的字符。在[:graph:]中的所有字符,再加上空格字符。 |
| [:space:] | 空白字符,包括空格、tab、回车、换行、vertical tab 和 form feed.在 ASCII 中, 等价于:[ \t\r\n\v\f] |
| [:upper:] | 大写字母。 |
| [:xdigit:] | 用来表示十六进制数字的字符。在 ASCII 中,等价于:[0-9A-Fa-f] |
Even with the character classes, there is still no convenient way to express partial ranges, such as [A-M].
甚至通过字符集,仍然没有便捷的方法来表达部分区域,比如[A-M]。
Using character classes, we can repeat our directory listing and see an improved result:
通过使用字符集,我们重做上述的例题,看到一个改进的结果:
| |
Remember, however, that this is not an example of a regular expression, rather it is the shell performing pathname expansion. We show it here because POSIX character classes can be used for both.
记住,然而,这不是一个正则表达式的例子,而是 shell 正在执行路径名展开操作。我们在这里展示这个例子, 是因为 POSIX 规范的字符集适用于二者。
Reverting To Traditional Collation Order
恢复到传统的排列顺序
You can opt to have your system use the traditional (ASCII) collation order by changing the value of the LANG environment variable. As we saw above, the LANG variable contains the name of the language and character set used in your locale. This value was originally determined when you selected an installation language as your Linux was installed.
通过改变环境变量 LANG 的值,你可以选择让你的系统使用传统的(ASCII)排列规则。如上所示,这个 LANG 变量包含了语种和字符集。这个值最初由你安装 Linux 系统时所选择的安装语言决定。
To see the locale settings, use the locale command:
使用 locale 命令,来查看 locale 的设置。
[me@linuxbox ~]$ locale LANG=en_US.UTF-8 LC_CTYPE="en_US.UTF-8" LC_NUMERIC="en_US.UTF-8" LC_TIME="en_US.UTF-8" LC_COLLATE="en_US.UTF-8" LC_MONETARY="en_US.UTF-8" LC_MESSAGES="en_US.UTF-8" LC_PAPER="en_US.UTF-8" LC_NAME="en_US.UTF-8" LC_ADDRESS="en_US.UTF-8" LC_TELEPHONE="en_US.UTF-8" LC_MEASUREMENT="en_US.UTF-8" LC_IDENTIFICATION="en_US.UTF-8" LC_ALL=To change the locale to use the traditional Unix behaviors, set the LANG variable to POSIX:
把这个 LANG 变量设置为 POSIX,来更改 locale,使其使用传统的 Unix 行为。
[me@linuxbox ~]$ export LANG=POSIX
Note that this change converts the system to use U.S. English (more specifically, ASCII) for its character set, so be sure if this is really what you want.
You can make this change permanent by adding this line to you your .bashrc file:
注意这个改动使系统为它的字符集使用 U.S.英语(更准确地说,ASCII),所以要确认一下这 是否是你真正想要的效果。通过把这条语句添加到你的.bashrc 文件中,你可以使这个更改永久有效。
export LANG=POSIX
POSIX基本正则表达式 与 POSIX扩展正则表达式
Just when we thought this couldn’t get any more confusing, we discover that POSIX also splits regular expression implementations into two kinds: basic regular expressions (BRE) and extended regular expressions (ERE). The features we have covered so far are supported by any application that is POSIX-compliant and implements BRE. Our grep program is one such program.
就在我们认为这已经非常令人困惑了,我们却发现 POSIX 把正则表达式的实现分成了两类: 基本正则表达式(BRE)和扩展的正则表达式(ERE)。既服从 POSIX 规范又实现了 BRE 的任意应用程序,都支持我们目前研究的所有正则表达式特性。我们的 grep 程序就是其中一个。
What’s the difference between BRE and ERE? It’s a matter of metacharacters. With BRE, the following metacharacters are recognized:
BRE 和 ERE 之间有什么区别呢?这是关于元字符的问题。BRE 可以辨别以下元字符:
^ $ . [ ] *
All other characters are considered literals. With ERE, the following metacharacters (and their associated functions) are added:
其它的所有字符被认为是文本字符。ERE 添加了以下元字符(以及与其相关的功能):
( ) { } ? + |
However (and this is the fun part), the “(”, “)”, “{”, and “}” characters are treated as metacharacters in BRE if they are escaped with a backslash, whereas with ERE, preceding any metacharacter with a backslash causes it to be treated as a literal. Any weirdness that comes along will be covered in the discussions that follow.
然而(这也是有趣的地方),在 BRE 中,字符“(”,“)”,“{”,和 “}”用反斜杠转义后,被看作是元字符, 相反在 ERE 中,在任意元字符之前加上反斜杠会导致其被看作是一个文本字符。在随后的讨论中将会涵盖 很多奇异的特性。
Since the features we are going to discuss next are part of ERE, we are going to need to use a different grep. Traditionally, this has been performed by the egrep program, but the GNU version of grep also supports extended regular expressions when the -E option is used.
因为我们将要讨论的下一个特性是 ERE 的一部分,我们将要使用一个不同的 grep 程序。照惯例, 一直由 egrep 程序来执行这项操作,但是 GNU 版本的 grep 程序在使用了-E 选项之后也支持扩展的正则表达式。
POSIX
During the 1980’s, Unix became a very popular commercial operating system, but by 1988, the Unix world was in turmoil. Many computer manufacturers had licensed the Unix source code from its creators, AT&T, and were supplying various versions of the operating system with their systems. However, in their efforts to create product differentiation, each manufacturer added proprietary changes and extensions. This started to limit the compatibility of the software.
在 20 世纪 80 年代,Unix 成为一款非常流行的商业操作系统,但是到了1988年,Unix 世界 一片混乱。许多计算机制造商从 Unix 的创建者 AT&T 那里得到了许可的 Unix 源码,并且 供应各种版本的操作系统。然而,在他们努力创造产品差异化的同时,每个制造商都增加了 专用的更改和扩展。这就开始限制了软件的兼容性。
As always with proprietary vendors, each was trying to play a winning game of “lock-in” with their customers. This dark time in the history of Unix is known today as “the Balkanization.”
专有软件供应商一如既往,每个供应商都试图玩嬴游戏“锁定”他们的客户。这个 Unix 历史上 的黑暗时代,就是今天众所周知的 “the Balkanization”。
Enter the IEEE (Institute of Electrical and Electronics Engineers). In the mid-1980s, the IEEE began developing a set of standards that would define how Unix (and Unix-like) systems would perform. These standards, formally known as IEEE 1003, define the application programming interfaces (APIs), shell and utilities that are to be found on a standard Unix-like system. The name “POSIX,” which stands for Portable Operating System Interface (with the “X” added to the end for extra snappiness), was suggested by Richard Stallman (yes, that Richard Stallman), and was adopted by the IEEE.
然后进入 IEEE( 电气与电子工程师协会 )时代。在上世纪 80 年代中叶,IEEE 开始制定一套标准, 其将会定义 Unix 系统( 以及类 Unix 的系统 )如何执行。这些标准,正式成为 IEEE 1003, 定义了应用程序编程接口( APIs ),shell 和一些实用程序,其将会在标准的类 Unix 操作系统中找到。“POSIX” 这个名字,象征着可移植的操作系统接口(为了时髦一点,添加了末尾的 “X” ), 是由 Richard Stallman 建议的( 是的,的确是 Richard Stallman ),后来被 IEEE 采纳。
交替
The first of the extended regular expression features we will discuss is called alternation, which is the facility that allows a match to occur from among a set of expressions. Just as a bracket expression allows a single character to match from a set of specified characters, alternation allows matches from a set of strings or other regular expressions. To demonstrate, we’ll use grep in conjunction with echo. First, let’s try a plain old string match:
我们将要讨论的扩展表达式的第一个特性叫做 alternation(交替),其是一款允许从一系列表达式 之间选择匹配项的实用程序。就像中括号表达式允许从一系列指定的字符之间匹配单个字符那样, alternation 允许从一系列字符串或者是其它的正则表达式中选择匹配项。为了说明问题, 我们将会结合 echo 程序来使用 grep 命令。首先,让我们试一个普通的字符串匹配:
| |
A pretty straightforward example, in which we pipe the output of echo into grep and see the results. When a match occurs, we see it printed out; when no match occurs, we see no results.
一个相当直截了当的例子,我们把 echo 的输出管道给 grep,然后看到输出结果。当出现 一个匹配项时,我们看到它会打印出来;当没有匹配项时,我们看到没有输出结果。
Now we’ll add alternation, signified by the vertical bar metacharacter:
现在我们将添加 alternation,以竖杠线元字符为标记:
| |
Here we see the regular expression ‘AAA|BBB’ which means “match either the string AAA or the string BBB.” Notice that since this is an extended feature, we added the -E option to grep (though we could have just used the egrep program instead), and we enclosed the regular expression in quotes to prevent the shell from interpreting the vertical bar metacharacter as a pipe operator. Alternation is not limited to two choices:
这里我们看到正则表达式’AAA|BBB’,这意味着“匹配字符串 AAA 或者是字符串 BBB”。注意因为这是 一个扩展的特性,我们给 grep 命令(虽然我们能以 egrep 程序来代替)添加了-E 选项,并且我们 把这个正则表达式用单引号引起来,为的是阻止 shell 把竖杠线元字符解释为一个 pipe 操作符。 Alternation 并不局限于两种选择:
| |
To combine alternation with other regular expression elements, we can use () to separate the alternation:
为了把 alternation 和其它正则表达式元素结合起来,我们可以使用()来分离 alternation。
| |
This expression will match the filenames in our lists that start with either “bz”, “gz”, or “zip”. Had we left off the parentheses, the meaning of this regular expression :
这个表达式将会在我们的列表中匹配以“bz”,或“gz”,或“zip”开头的文件名。如果我们删除了圆括号, 这个表达式的意思:
| |
changes to match any filename that begins with “bz” or contains “gz” or contains “zip”.
会变成匹配任意以“bz”开头,或包含“gz”,或包含“zip”的文件名。
限定符
Extended regular expressions support several ways to specify the number of times an element is matched.
扩展的正则表达式支持几种方法,来指定一个元素被匹配的次数。
? - 匹配零个或一个元素
This quantifier means, in effect, “make the preceding element optional.” Let’s say we wanted to check a phone number for validity and we considered a phone number to be valid if it matched either of these two forms:
这个限定符意味着,实际上,“使前面的元素可有可无。”比方说我们想要查看一个电话号码的真实性, 如果它匹配下面两种格式的任意一种,我们就认为这个电话号码是真实的:
(nnn) nnn-nnnn
nnn nnn-nnnn
where “n” is a numeral. We could construct a regular expression like this:
这里的“n”是一个数字。我们可以构建一个像这样的正则表达式:
^\(?[0-9][0-9][0-9]\)? [0-9][0-9][0-9]-[0-9][0-9][0-9][0-9]$
In this expression, we follow the parentheses characters with question marks to indicate that they are to be matched zero or one time. Again, since the parentheses are normally metacharacters (in ERE), we precede them with backslashes to cause them to be treated as literals instead.
在这个表达式中,我们在圆括号之后加上一个问号,来表示它们将被匹配零次或一次。再一次,因为 通常圆括号都是元字符(在 ERE 中),所以我们在圆括号之前加上了反斜杠,使它们成为文本字符。
Let’s try it:
让我们试一下:
| |
Here we see that the expression matches both forms of the phone number, but does not match one containing non-numeric characters.
这里我们看到这个表达式匹配这个电话号码的两种形式,但是不匹配包含非数字字符的号码。
* - 匹配零个或多个元素
Like the ? metacharacter, the * is used to denote an optional item; however, unlike the ?, the item may occur any number of times, not just once. Let’s say we wanted to see if a string was a sentence; that is, it starts with an uppercase letter, then contains any number of upper and lowercase letters and spaces, and ends with a period. To match this (very crude) definition of a sentence, we could use a regular expression like this:
像 ? 元字符一样,这个 * 被用来表示一个可选的字符;然而,又与 ? 不同,匹配的字符可以出现 任意多次,不仅是一次。比方说我们想要知道是否一个字符串是一句话;也就是说,字符串开始于 一个大写字母,然后包含任意多个大写和小写的字母和空格,最后以句号收尾。为了匹配这个(非常粗略的) 语句的定义,我们能够使用一个像这样的正则表达式:
[[:upper:]][[:upper:][:lower:] ]*.
The expression consists of three items: a bracket expression containing the [:upper:] character class, a bracket expression containing both the [:upper:] and [:lower:] character classes and a space, and a period escaped with a backslash. The second element is trailed with an * metacharacter, so that after the leading uppercase letter in our sentence, any number of upper and lowercase letters and spaces may follow it and still match:
这个表达式由三个元素组成:一个包含[:upper:]字符集的中括号表达式,一个包含[:upper:]和[:lower:] 两个字符集以及一个空格的中括号表达式,和一个被反斜杠字符转义过的圆点。第二个元素末尾带有一个 *元字符,所以在开头的大写字母之后,可能会跟随着任意数目的大写和小写字母和空格,并且匹配:
| |
The expression matches the first two tests, but not the third, since it lacks the required leading uppercase character and trailing period.
这个表达式匹配前两个测试语句,但不匹配第三个,因为第三个句子缺少开头的大写字母和末尾的句号。
+ - 匹配一个或多个元素
The + metacharacter works much like the *, except it requires at least one instance of the preceding element to cause a match. Here is a regular expression that will only match lines consisting of groups of one or more alphabetic characters separated by single spaces:
+ 元字符的作用与 * 非常相似,除了它要求前面的元素至少出现一次匹配。这个正则表达式只匹配 那些由一个或多个字母字符组构成的文本行,字母字符之间由单个空格分开:
^([[:alpha:]]+ ?)+$
[me@linuxbox ~]$ echo "This that" | grep -E '^([[:alpha:]]+ ?)+$'
This that
[me@linuxbox ~]$ echo "a b c" | grep -E '^([[:alpha:]]+ ?)+$'
a b c
[me@linuxbox ~]$ echo "a b 9" | grep -E '^([[:alpha:]]+ ?)+$'
[me@linuxbox ~]$ echo "abc d" | grep -E '^([[:alpha:]]+ ?)+$'
[me@linuxbox ~]$
We see that this expression does not match the line “a b 9” because it contains a non- alphabetic character; nor does it match “abc d” because more than one space character separates the characters “c” and “d”.
我们看到这个正则表达式不匹配“a b 9”这一行,因为它包含了一个非字母的字符;它也不匹配 “abc d” ,因为在字符“c”和“d”之间不止一个空格。
{ } - 匹配特定个数的元素
The { and } metacharacters are used to express minimum and maximum numbers of required matches. They may be specified in four possible ways:
{ 和 } 元字符都被用来表达要求匹配的最小和最大数目。它们可以通过四种方法来指定:
| Specifier | Meaning |
|---|---|
| {n} | Match the preceding element if it occurs exactly n times. |
| {n,m} | Match the preceding element if it occurs at least n times, but no more than m times. |
| {n,} | Match the preceding element if it occurs n or more times. |
| {,m} | Match the preceding element if it occurs no more than m times. |
| 限定符 | 意思 |
|---|---|
| {n} | 匹配前面的元素,如果它确切地出现了 n 次。 |
| {n,m} | 匹配前面的元素,如果它至少出现了 n 次,但是不多于 m 次。 |
| {n,} | 匹配前面的元素,如果它出现了 n 次或多于 n 次。 |
| {,m} | 匹配前面的元素,如果它出现的次数不多于 m 次。 |
Going back to our earlier example with the phone numbers, we can use this method of specifying repetitions to simplify our original regular expression from:
回到之前处理电话号码的例子,我们能够使用这种指定重复次数的方法来简化我们最初的正则表达式:
^\(?[0-9][0-9][0-9]\)? [0-9][0-9][0-9]-[0-9][0-9][0-9][0-9]$
简化为:
^\(?[0-9]{3}\)? [0-9]{3}-[0-9]{4}$
Let’s try it:
让我们试一下:
| |
As we can see, our revised expression can successfully validate numbers both with and without the parentheses, while rejecting those numbers that are not properly formatted.
我们可以看到,修改后的表达式能成功地匹配带有和不带有圆括号的号码,而不匹配那些格式不正确的号码。
让正则表达式工作起来
Let’s look at some of the commands we already know and see how they can be used with regular expressions.
让我们看看一些我们已经知道的命令,然后看一下它们怎样使用正则表达式。
通过 grep 命令来验证一个电话簿
In our earlier example, we looked at single phone numbers and checked them for proper formatting. A more realistic scenario would be checking a list of numbers instead, so let’s make a list. We’ll do this by reciting a magical incantation to the command line. It will be magic because we have not covered most of the commands involved, but worry not. We will get there in future chapters. Here is the incantation:
在我们先前的例子中,我们查看过单个电话号码,并且检查了它们的格式。一个更现实的 情形是检查一个数字列表,所以我们先创建一个列表。我们将念一个神奇的咒语到命令行中。 它会很神奇,因为我们还没有涵盖所涉及的大部分命令,但是不要担心。我们将在后面的章节里面 讨论那些命令。这就是那个咒语:
| |
This command will produce a file named phonelist.txt containing ten phone numbers. Each time the command is repeated, another ten numbers are added to the list. We can also change the value 10 near the beginning of the command to produce more or fewer phone numbers. If we examine the contents of the file, however, we see we have a problem:
这个命令会创建一个包含10个电话号码的名为 phonelist.txt 的文件。每次重复这个命令的时候,另外10个号码会被添加到这个列表中。我们也能够更改命令开头附近的数值10,来生成或多或少的电话号码。如果我们查看这个文件的内容,然而我们会发现一个问题:
| |
Some of the numbers are malformed, which is perfect for our purposes, since we will use grep to validate them.
一些号码是残缺不全的,这正是我们想要的,因为我们将使用 grep 命令来验证电话号码的正确性。
One useful method of validation would be to scan the file for invalid numbers and display the resulting list on the display:
一个有用的验证方法是扫描这个文件,查找无效的号码,并把搜索结果显示到屏幕上:
| |
Here we use the -v option to produce an inverse match so that we will only output the lines in the list that do not match the specified expression. The expression itself includes the anchor metacharacters at each end to ensure that the number has no extra characters at either end. This expression also requires that the parentheses be present in a valid number, unlike our earlier phone number example.
这里我们使用-v 选项来产生相反的匹配,因此我们将只输出不匹配指定表达式的文本行。这个 表达式自身的两端都包含定位点(锚)元字符,是为了确保这个号码的两端没有多余的字符。 这个表达式也要求圆括号出现在一个有效的号码中,不同于我们先前电话号码的实例。
用 find 查找丑陋的文件名
The find command supports a test based on a regular expression. There is an important consideration to keep in mind when using regular expressions in find versus grep. Whereas grep will print a line when the line contains a string that matches an expression, find requires that the pathname exactly match the regular expression. In the following example, we will use find with a regular expression to find every pathname that contains any character that is not a member of the following set:
这个 find 命令支持一个基于正则表达式的测试。当在使用正则表达式方面比较 find 和 grep 命令的时候, 还有一个重要问题要牢记在心。当某一行包含的字符串匹配上了一个表达式的时候,grep 命令会打印出这一行, 然而 find 命令要求路径名精确地匹配这个正则表达式。在下面的例子里面,我们将使用带有一个正则 表达式的 find 命令,来查找每个路径名,其包含的任意字符都不是以下字符集中的一员。
[-\_./0-9a-zA-Z]
Such a scan would reveal pathnames that contain embedded spaces and other potentially offensive characters:
这样一种扫描会发现包含空格和其它潜在不规范字符的路径名:
| |
Due to the requirement for an exact match of the entire pathname, we use .* at both ends of the expression to match zero or more instances of any character. In the middle of the expression, we use a negated bracket expression containing our set of acceptable pathname characters.
由于要精确地匹配整个路径名,所以我们在表达式的两端使用了.*,来匹配零个或多个字符。 在表达式中间,我们使用了否定的中括号表达式,其包含了我们一系列可接受的路径名字符。
用 locate 查找文件
The locate program supports both basic (the –regexp option) and extended (the – regex option) regular expressions. With it, we can perform many of the same operations that we performed earlier with our dirlist files:
这个 locate 程序支持基本的(–regexp 选项)和扩展的(–regex 选项)正则表达式。通过 locate 命令,我们能够执行许多与先前操作 dirlist 文件时相同的操作:
| |
Using alternation, we perform a search for pathnames that contain either bin/bz, bin/gz, or /bin/zip.
通过使用 alternation,我们搜索包含 bin/bz,bin/gz,或/bin/zip 字符串的路径名。
在 less 和 vim 中查找文本
less and vim both share the same method of searching for text. Pressing the / key followed by a regular expression will perform a search. If we use less to view our phonelist.txt file:
less 和 vim 两者享有相同的文本查找方法。按下/按键,然后输入正则表达式,来执行搜索任务。 如果我们使用 less 程序来浏览我们的 phonelist.txt 文件:
| |
Then search for our validation expression:
然后查找我们有效的表达式:
(232) 298-2265
(624) 381-1078
(540) 126-1980
(874) 163-2885
(286) 254-2860
(292) 108-518
(129) 44-1379
(458) 273-1642
(686) 299-8268
(198) 307-2440
~
~
~
/^\([0-9]{3}\) [0-9]{3}-[0-9]{4}$
less will highlight the strings that match, leaving the invalid ones easy to spot:
less 将会高亮匹配到的字符串,这样就很容易看到无效的电话号码:
(232) 298-2265
(624) 381-1078
(540) 126-1980
(874) 163-2885
(286) 254-2860
(292) 108-518
(129) 44-1379
(458) 273-1642
(686) 299-8268
(198) 307-2440
~
~
~
(END)
vim, on the other hand, supports basic regular expressions, so our search expression would look like this:
另一方面,vim 支持基本的正则表达式,所以我们用于搜索的表达式看起来像这样:
/([0-9]\{3\}) [0-9]\{3\}-[0-9]\{4\}
We can see that the expression is mostly the same; however, many of the characters that are considered metacharacters in extended expressions are considered literals in basic expressions. They are only treated as metacharacters when escaped with a backslash.
我们看到表达式几乎一样;然而,在扩展表达式中,许多被认为是元字符的字符在基本的表达式 中被看作是文本字符。只有用反斜杠把它们转义之后,它们才被看作是元字符。
Depending on the particular configuration of vim on our system, the matching will be highlighted. If not, try this command mode command:
依赖于系统中 vim 的特殊配置,匹配项将会被高亮。如若不是,试试这个命令模式:
:hlsearch
to activate search highlighting.
来激活搜索高亮功能。
Note: Depending on your distribution, vim may or may not support text search highlighting. Ubuntu, in particular, supplies a very stripped-down version of vim by default. On such systems, you may want to use your package manager to install a more complete version of vim.
注意:依赖于你的发行版,vim 有可能支持或不支持文本搜索高亮功能。尤其是 Ubuntu 自带了 一款非常简化的 vim 版本。在这样的系统中,你可能要使用你的软件包管理器来安装一个功能 更完备的 vim 版本。
总结归纳
In this chapter, we’ve seen a few of the many uses of regular expressions. We can find even more if we use regular expressions to search for additional applications that use them. We can do that by searching the man pages:
在这章中,我们已经看到几个使用正则表达式例子。如果我们使用正则表达式来搜索那些使用正则表达式的应用程序, 我们可以找到更多的使用实例。通过查找手册页,我们就能找到:
| |
The zgrep program provides a front end for grep, allowing it to read compressed files. In our example, we search the compressed section one man page files located in their usual location. The result of this command is a list of files containing either the string “regex” or “regular expression”. As we can see, regular expressions show up in a lot of programs.
这个 zgrep 程序是 grep 的前端,允许 grep 来读取压缩文件。在我们的例子中,我们在手册文件所在的 目录中,搜索压缩文件中的内容。这个命令的结果是一个包含字符串“regex”或者“regular expression”的文件列表。正如我们所看到的,正则表达式会出现在大量程序中。
There is one feature found in basic regular expressions that we did not cover. Called back references, this feature will be discussed in the next chapter.
基本正则表达式中有一个特性,我们没有涵盖。叫做反引用,这个特性在下一章中会被讨论到。
拓展阅读
There are many online resources for learning regular expressions, including various tutorials and cheat sheets.
有许多在线学习正则表达式的资源,包括各种各样的教材和速记表。
In addition, the Wikipedia has good articles on the following background topics:
另外,关于下面的背景话题,Wikipedia 有不错的文章。
21 - 21 文本处理
文本处理
http://billie66.github.io/TLCL/book/chap21.html
All Unix-like operating systems rely heavily on text files for several types of data storage. So it makes sense that there are many tools for manipulating text. In this chapter, we will look at programs that are used to “slice and dice” text. In the next chapter, we will look at more text processing, focusing on programs that are used to format text for printing and other kinds of human consumption.
所有类 Unix 的操作系统都严重依赖于几种数据存储类型的文本文件。所以, 有许多用于处理文本的工具就说的通了。在这一章中,我们将看一些被用来“切割”文本的程序。在下一章中, 我们将查看更多的文本处理程序,但主要集中于文本格式化输出程序和其它一些人们需要的工具。
This chapter will revisit some old friends and introduce us to some new ones:
这一章会重新拜访一些老朋友,并且会给我们介绍一些新朋友:
- cat – Concatenate files and print on the standard output
- cat – 连接文件并且打印到标准输出
- sort – Sort lines of text files
- sort – 给文本行排序
- uniq – Report or omit repeated lines
- uniq – 报告或者省略重复行
- cut – Remove sections from each line of files
- cut – 从每行中删除文本区域
- paste – Merge lines of files
- paste – 合并文件文本行
- join – Join lines of two files on a common field
- join – 基于某个共享字段来联合两个文件的文本行
- comm – Compare two sorted files line by line
- comm – 逐行比较两个有序的文件
- diff – Compare files line by line
- diff – 逐行比较文件
- patch – Apply a diff file to an original
- patch – 给原始文件打补丁
- tr – Translate or delete characters
- tr – 翻译或删除字符
- sed – Stream editor for filtering and transforming text
- sed – 用于筛选和转换文本的流编辑器
- aspell – Interactive spell checker
- aspell – 交互式拼写检查器
文本应用程序
So far, we have learned a couple of text editors (nano and vim), looked a bunch of configuration files, and have witnessed the output of dozens of commands, all in text. But what else is text used for? For many things, it turns out.
到目前为止,我们已经知道了一对文本编辑器(nano 和 vim),看过一堆配置文件,并且目睹了 许多命令的输出都是文本格式。但是文本还被用来做什么? 它可以做很多事情。
文档
Many people write documents using plain text formats. While it is easy to see how a small text file could be useful for keeping simple notes, it is also possible to write large documents in text format, as well. One popular approach is to write a large document in a text format and then use a markup language to describe the formatting of the finished document. Many scientific papers are written using this method, as Unix-based text processing systems were among the first systems that supported the advanced typographical layout needed by writers in technical disciplines.
许多人使用纯文本格式来编写文档。虽然很容易看到一个小的文本文件对于保存简单的笔记会 很有帮助,但是也有可能用文本格式来编写大的文档。一个流行的方法是先用文本格式来编写一个 大的文档,然后使用一种标记语言来描述已完成文档的格式。许多科学论文就是用这种方法编写的, 因为基于 Unix 的文本处理系统位于支持技术学科作家所需要的高级排版布局的一流系统之列。
网页
The world’s most popular type of electronic document is probably the web page. Web pages are text documents that use either HTML (Hypertext Markup Language) or XML (Extensible Markup Language) as markup languages to describe the document’s visual format.
世界上最流行的电子文档类型可能就是网页了。网页是文本文档,它们使用 HTML(超文本标记语言)或者是 XML (可扩展的标记语言)作为标记语言来描述文档的可视格式。
电子邮件
Email is an intrinsically text-based medium. Even non-text attachments are converted into a text representation for transmission. We can see this for ourselves by downloading an email message and then viewing it in less. We will see that the message begins with a header that describes the source of the message and the processing it received during its journey, followed by the body of the message with its content.
从本质上来说,email 是一个基于文本的媒介。为了传输,甚至非文本的附件也被转换成文本表示形式。 我们能看到这些,通过下载一个 email 信息,然后用 less 来浏览它。我们将会看到这条信息开始于一个标题, 其描述了信息的来源以及在传输过程中它接受到的处理,然后是信息的正文内容。
打印输出
On Unix-like systems, output destined for a printer is sent as plain text or, if the page contains graphics, is converted into a text format page description language known as PostScript, which is then sent to a program that generates the graphic dots to be printed.
在类 Unix 的系统中,输出会以纯文本格式发送到打印机,或者如果页面包含图形,其会被转换成 一种文本格式的页面描述语言,以 PostScript 著称,然后再被发送给一款能产生图形点阵的程序, 最后被打印出来。
程序源码
Many of the command line programs found on Unix-like systems were created to support system administration and software development, and text processing programs are no exception. Many of them are designed to solve software development problems. The reason text processing is important to software developers is that all software starts out as text. Source code, the part of the program the programmer actually writes, is always in text format.
在类 Unix 系统中会发现许多命令行程序被用来支持系统管理和软件开发,并且文本处理程序也不例外。 许多文本处理程序被设计用来解决软件开发问题。文本处理对于软件开发者而言至关重要是因为所有的软件 都起始于文本格式。源代码,程序员实际编写的一部分程序,总是文本格式。
回顾一些老朋友
Back in Chapter 7 (Redirection), we learned about some commands that are able to accept standard input in addition to command line arguments. We only touched on them briefly then, but now we will take a closer look at how they can be used to perform text processing.
回到第7章(重定向),我们已经知道一些命令除了接受命令行参数之外,还能够接受标准输入。 那时候我们只是简单地介绍了它们,但是现在我们将仔细地看一下它们是怎样被用来执行文本处理的。
cat
The cat program has a number of interesting options. Many of them are used to help better visualize text content. One example is the -A option, which is used to display non- printing characters in the text. There are times when we want to know if control characters are embedded in our otherwise visible text. The most common of these are tab characters (as opposed to spaces) and carriage returns, often present as end-of-line characters in MS-DOS style text files. Another common situation is a file containing lines of text with trailing spaces.
这个 cat 程序具有许多有趣的选项。其中许多选项用来帮助更好的可视化文本内容。一个例子是-A 选项, 其用来在文本中显示非打印字符。有些时候我们想知道是否控制字符嵌入到了我们的可见文本中。 最常用的控制字符是 tab 字符(而不是空格)和回车字符,在 MS-DOS 风格的文本文件中回车符经常作为 结束符出现。另一种常见情况是文件中包含末尾带有空格的文本行。
Let’s create a test file using cat as a primitive word processor. To do this, we’ll just enter the command cat (along with specifying a file for redirected output) and type our text, followed by Enter to properly end the line, then Ctrl-d, to indicate to cat that we have reached end-of-file. In this example, we enter a leading tab character and follow the line with some trailing spaces:
让我们创建一个测试文件,用 cat 程序作为一个简单的文字处理器。为此,我们将键入 cat 命令(随后指定了 用于重定向输出的文件),然后输入我们的文本,最后按下 Enter 键来结束这一行,然后按下组合键 Ctrl-d, 来指示 cat 程序,我们已经到达文件末尾了。在这个例子中,我们文本行的开头和末尾分别键入了一个 tab 字符以及一些空格。
| |
Next, we will use cat with the -A option to display the text:
下一步,我们将使用带有-A 选项的 cat 命令来显示这个文本:
| |
As we can see in the results, the tab character in our text is represented by ^I. This is a common notation that means “Control-I” which, as it turns out, is the same as a tab character. We also see that a $ appears at the true end of the line, indicating that our text contains trailing spaces.
在输出结果中我们看到,这个 tab 字符在我们的文本中由^I 字符来表示。这是一种常见的表示方法,意思是 “Control-I”,结果证明,它和 tab 字符是一样的。我们也看到一个$字符出现在文本行真正的结尾处, 表明我们的文本包含末尾的空格。
MS-DOS Text Vs. Unix Text
MS-DOS 文本 Vs. Unix 文本
One of the reasons you may want to use cat to look for non-printing characters in text is to spot hidden carriage returns. Where do hidden carriage returns come from? DOS and Windows! Unix and DOS don’t define the end of a line the same way in text files. Unix ends a line with a linefeed character (ASCII 10) while MS-DOS and its derivatives use the sequence carriage return (ASCII 13) and linefeed to terminate each line of text.
可能你想用 cat 程序在文本中查看非打印字符的一个原因是发现隐藏的回车符。那么 隐藏的回车符来自于哪里呢?它们来自于 DOS 和 Windows!Unix 和 DOS 在文本文件中定义每行 结束的方式不相同。Unix 通过一个换行符(ASCII 10)来结束一行,然而 MS-DOS 和它的 衍生品使用回车(ASCII 13)和换行字符序列来终止每个文本行。
There are a several ways to convert files from DOS to Unix format. On many Linux systems, there are programs called dos2unix and unix2dos, which can convert text files to and from DOS format. However, if you don’t have dos2unix on your system, don’t worry. The process of converting text from DOS to Unix format is very simple; it simply involves the removal of the offending carriage returns. That is easily accomplished by a couple of the programs discussed later in this chapter.
有几种方法能够把文件从 DOS 格式转变为 Unix 格式。在许多 Linux 系统中,有两个 程序叫做 dos2unix 和 unix2dos,它们能在两种格式之间转变文本文件。然而,如果你 的系统中没有安装 dos2unix 程序,也不要担心。文件从 DOS 格式转变为 Unix 格式的过程非常 简单;它只简单地涉及到删除违规的回车符。通过随后本章中讨论的一些程序,这个工作很容易 完成。
cat also has options that are used to modify text. The two most prominent are -n, which numbers lines, and -s, which suppresses the output of multiple blank lines. We can demonstrate thusly:
cat 程序也包含用来修改文本的选项。最著名的两个选项是-n,其给文本行添加行号和-s, 禁止输出多个空白行。我们这样来说明:
| |
In this example, we create a new version of our foo.txt test file, which contains two lines of text separated by two blank lines. After processing by cat with the -ns options, the extra blank line is removed and the remaining lines are numbered. While this is not much of a process to perform on text, it is a process.
在这个例子里,我们创建了一个测试文件 foo.txt 的新版本,其包含两行文本,由两个空白行分开。 经由带有-ns 选项的 cat 程序处理之后,多余的空白行被删除,并且对保留的文本行进行编号。 然而这并不是多个进程在操作这个文本,只有一个进程。
sort
The sort program sorts the contents of standard input, or one or more files specified on the command line, and sends the results to standard output. Using the same technique that we used with cat, we can demonstrate processing of standard input directly from the keyboard:
这个 sort 程序对标准输入的内容,或命令行中指定的一个或多个文件进行排序,然后把排序 结果发送到标准输出。使用与 cat 命令相同的技巧,我们能够演示如何用 sort 程序来处理标准输入:
| |
After entering the command, we type the letters “c”, “b”, and “a”, followed once again by Ctrl-d to indicate end-of-file. We then view the resulting file and see that the lines now appear in sorted order.
输入命令之后,我们键入字母“c”,“b”,和“a”,然后再按下 Ctrl-d 组合键来表示文件的结尾。 随后我们查看生成的文件,看到文本行有序地显示。
Since sort can accept multiple files on the command line as arguments, it is possible to merge multiple files into a single sorted whole. For example, if we had three text files and wanted to combine them into a single sorted file, we could do something like this:
因为 sort 程序能接受命令行中的多个文件作为参数,所以有可能把多个文件合并成一个有序的文件。例如, 如果我们有三个文本文件,想要把它们合并为一个有序的文件,我们可以这样做:
sort file1.txt file2.txt file3.txt > final_sorted_list.txt
sort has several interesting options. Here is a partial list:
sort 程序有几个有趣的选项。这里只是一部分列表:
| Option | Long Option | Description |
|---|---|---|
| -b | –ignore-leading-blanks | By default, sorting is performed on the entire line, starting with the first character in the line. This option causes sort to ignore leading spaces in lines and calculates sorting based on the first non-whitespace character on the line. |
| -f | –ignore-case | Makes sorting case insensitive. |
| -n | –numeric-sort | Performs sorting based on the numeric evaluation of a string. Using this option allows sorting to be performed on numeric values rather than alphabetic values. |
| -r | –reverse | Sort in reverse order. Results are in descending rather than ascending order. |
| -k | –key=field1[,field2] | Sort based on a key field located from field1 to field2 rather than the entire line. See discussion below. |
| -m | –merge | Treat each argument as the name of a presorted file. Merge multiple files into a single sorted result without performing any additional sorting. |
| -o | –output=file | Send sorted output to file rather than standard output. |
| -t | –field-separator=char | Define the field separator character. By default fields are separated by spaces or tabs. |
| 选项 | 长选项 | 描述 |
|---|---|---|
| -b | –ignore-leading-blanks | 默认情况下,对整行进行排序,从每行的第一个字符开始。这个选项导致 sort 程序忽略 每行开头的空格,从第一个非空白字符开始排序。 |
| -f | –ignore-case | 让排序不区分大小写。 |
| -n | –numeric-sort | 基于字符串的数值来排序。使用此选项允许根据数字值执行排序,而不是字母值。 |
| -r | –reverse | 按相反顺序排序。结果按照降序排列,而不是升序。 |
| -k | –key=field1[,field2] | 对从 field1到 field2之间的字符排序,而不是整个文本行。看下面的讨论。 |
| -m | –merge | 把每个参数看作是一个预先排好序的文件。把多个文件合并成一个排好序的文件,而没有执行额外的排序。 |
| -o | –output=file | 把排好序的输出结果发送到文件,而不是标准输出。 |
| -t | –field-separator=char | 定义域分隔字符。默认情况下,域由空格或制表符分隔。 |
Although most of the options above are pretty self-explanatory, some are not. First, let’s look at the -n option, used for numeric sorting. With this option, it is possible to sort values based on numeric values. We can demonstrate this by sorting the results of the du command to determine the largest users of disk space. Normally, the du command lists the results of a summary in pathname order:
虽然以上大多数选项的含义是不言自喻的,但是有些也不是。首先,让我们看一下 -n 选项,被用做数值排序。 通过这个选项,有可能基于数值进行排序。我们通过对 du 命令的输出结果排序来说明这个选项,du 命令可以 确定最大的磁盘空间用户。通常,这个 du 命令列出的输出结果按照路径名来排序:
| |
In this example, we pipe the results into head to limit the results to the first ten lines. We can produce a numerically sorted list to show the ten largest consumers of space this way:
在这个例子里面,我们把结果管道到 head 命令,把输出结果限制为前 10 行。我们能够产生一个按数值排序的 列表,来显示 10 个最大的空间消费者:
| |
By using the -nr options, we produce a reverse numerical sort, with the largest values appearing first in the results. This sort works because the numerical values occur at the beginning of each line. But what if we want to sort a list based on some value found within the line? For example, the results of an ls -l:
通过使用此 -nr 选项,我们产生了一个反向的数值排序,最大数值排列在第一位。这种排序起作用是 因为数值出现在每行的开头。但是如果我们想要基于文件行中的某个数值排序,又会怎样呢? 例如,命令 ls -l 的输出结果:
| |
Ignoring, for the moment, that ls can sort its results by size, we could use sort to sort this list by file size, as well:
此刻,忽略 ls 程序能按照文件大小对输出结果进行排序,我们也能够使用 sort 程序来完成此任务:
| |
Many uses of sort involve the processing of tabular data, such as the results of the ls command above. If we apply database terminology to the table above, we would say that each row is a record and that each record consists of multiple fields, such as the file attributes, link count, filename, file size and so on. sort is able to process individual fields. In database terms, we are able to specify one or more key fields to use as sort keys. In the example above, we specify the n and r options to perform a reverse numerical sort and specify -k 5 to make sort use the fifth field as the key for sorting.
sort 程序的许多用法都涉及到处理表格数据,例如上面 ls 命令的输出结果。如果我们 把数据库这个术语应用到上面的表格中,我们会说每行是一条记录,并且每条记录由多个字段组成, 例如文件属性,链接数,文件名,文件大小等等。sort 程序能够处理独立的字段。在数据库术语中, 我们能够指定一个或者多个关键字段,来作为排序的关键值。在上面的例子中,我们指定 n 和 r 选项来执行相反的数值排序,并且指定 -k 5,让 sort 程序使用第五字段作为排序的关键值。
The k option is very interesting and has many features, but first we need to talk about how sort defines fields. Let’s consider a very simple text file consisting of a single line containing the author’s name:
这个 k 选项非常有趣,而且还有很多特点,但是首先我们需要讲讲 sort 程序怎样来定义字段。 让我们考虑一个非常简单的文本文件,只有一行包含作者名字的文本。
William Shotts
By default, sort sees this line as having two fields. The first field contains the characters:
默认情况下,sort 程序把此行看作有两个字段。第一个字段包含字符:
“William”
and the second field contains the characters:
和第二个字段包含字符:
“ Shotts”
meaning that whitespace characters (spaces and tabs) are used as delimiters between fields and that the delimiters are included in the field when sorting is performed. Looking again at a line from our ls output, we can see that a line contains eight fields and that the fifth field is the file size:
意味着空白字符(空格和制表符)被当作是字段间的界定符,当执行排序时,界定符会被 包含在字段当中。再看一下 ls 命令的输出,我们看到每行包含八个字段,并且第五个字段是文件大小:
-rwxr-xr-x 1 root root 8234216 2008-04-07 17:42 inkscape
For our next series of experiments, let’s consider the following file containing the history of three popular Linux distributions released from 2006 to 2008. Each line in the file has three fields: the distribution name, version number, and date of release in MM/DD/YYYY format:
让我们考虑用下面的文件,其包含从 2006 年到 2008 年三款流行的 Linux 发行版的发行历史,来做一系列实验。 文件中的每一行都有三个字段:发行版的名称,版本号,和 MM/DD/YYYY 格式的发行日期:
SUSE 10.2 12/07/2006
Fedora 10 11/25/2008
SUSE 11.04 06/19/2008
Ubuntu 8.04 04/24/2008
Fedora 8 11/08/2007
SUSE 10.3 10/04/2007
...
Using a text editor (perhaps vim), we’ll enter this data and name the resulting file distros.txt.
使用一个文本编辑器(可能是 vim),我们将输入这些数据,并把产生的文件命名为 distros.txt。
Next, we’ll try sorting the file and observe the results:
下一步,我们将试着对这个文件进行排序,并观察输出结果:
| |
Well, it mostly worked. The problem occurs in the sorting of the Fedora version numbers. Since a “1” comes before a “5” in the character set, version “10” ends up at the top while version “9” falls to the bottom.
恩,大部分正确。问题出现在 Fedora 的版本号上。因为在字符集中 “1” 出现在 “5” 之前,版本号 “10” 在 最顶端,然而版本号 “9” 却掉到底端。
To fix this problem we are going to have to sort on multiple keys. We want to perform an alphabetic sort on the first field and then a numeric sort on the third field. sort allows multiple instances of the -k option so that multiple sort keys can be specified. In fact, a key may include a range of fields. If no range is specified (as has been the case with our previous examples), sort uses a key that begins with the specified field and extends to the end of the line. Here is the syntax for our multi-key sort:
为了解决这个问题,我们必须依赖多个键值来排序。我们想要对第一个字段执行字母排序,然后对 第三个字段执行数值排序。sort 程序允许多个 -k 选项的实例,所以可以指定多个排序关键值。事实上, 一个关键值可能包括一个字段区域。如果没有指定区域(如同之前的例子),sort 程序会使用一个键值, 其始于指定的字段,一直扩展到行尾。下面是多键值排序的语法:
| |
Though we used the long form of the option for clarity, -k 1,1 -k 2n would be exactly equivalent. In the first instance of the key option, we specified a range of fields to include in the first key. Since we wanted to limit the sort to just the first field, we specified 1,1 which means “start at field one and end at field one.” In the second instance, we specified 2n, which means that field two is the sort key and that the sort should be numeric. An option letter may be included at the end of a key specifier to indicate the type of sort to be performed. These option letters are the same as the global options for the sort program: b (ignore leading blanks), n (numeric sort), r (reverse sort), and so on.
虽然为了清晰,我们使用了选项的长格式,但是 -k 1,1 -k 2n 格式是等价的。在第一个 key 选项的实例中, 我们指定了一个字段区域。因为我们只想对第一个字段排序,我们指定了 1,1, 意味着“始于并且结束于第一个字段。”在第二个实例中,我们指定了 2n,意味着第二个字段是排序的键值, 并且按照数值排序。一个选项字母可能被包含在一个键值说明符的末尾,其用来指定排序的种类。这些 选项字母和 sort 程序的全局选项一样:b(忽略开头的空格),n(数值排序),r(逆向排序),等等。
The third field in our list contains a date in an inconvenient format for sorting. On computers, dates are usually formatted in YYYY-MM-DD order to make chronological sorting easy, but ours are in the American format of MM/DD/YYYY. How can we sort this list in chronological order?
我们列表中第三个字段包含的日期格式不利于排序。在计算机中,日期通常设置为 YYYY-MM-DD 格式, 这样使按时间顺序排序变得容易,但是我们的日期为美国格式 MM/DD/YYYY。那么我们怎样能按照 时间顺序来排列这个列表呢?
Fortunately, sort provides a way. The key option allows specification of offsets within fields, so we can define keys within fields:
幸运地是,sort 程序提供了一种方式。这个 key 选项允许在字段中指定偏移量,所以我们能在字段中 定义键值。
| |
By specifying -k 3.7 we instruct sort to use a sort key that begins at the seventh character within the third field, which corresponds to the start of the year. Likewise, we specify -k 3.1 and -k 3.4 to isolate the month and day portions of the date. We also add the n and r options to achieve a reverse numeric sort. The b option is included to suppress the leading spaces (whose numbers vary from line to line, thereby affecting the outcome of the sort) in the date field.
通过指定 -k 3.7,我们指示 sort 程序使用一个排序键值,其始于第三个字段中的第七个字符,对应于 年的开头。同样地,我们指定 -k 3.1和 -k 3.4来分离日期中的月和日。 我们也添加了 n 和 r 选项来实现一个逆向的数值排序。这个 b 选项用来删除日期字段中开头的空格( 行与行之间的空格数迥异,因此会影响 sort 程序的输出结果)。
Some files don’t use tabs and spaces as field delimiters; for example, the /etc/passwd file:
一些文件不会使用 tabs 和空格做为字段界定符;例如,这个 /etc/passwd 文件:
| |
The fields in this file are delimited with colons (:), so how would we sort this file using a key field? sort provides the -t option to define the field separator character. To sort the passwd file on the seventh field (the account’s default shell), we could do this:
这个文件的字段之间通过冒号分隔开,所以我们怎样使用一个 key 字段来排序这个文件?sort 程序提供 了一个 -t 选项来定义分隔符。按照第七个字段(帐户的默认 shell)来排序此 passwd 文件,我们可以这样做:
| |
By specifying the colon character as the field separator, we can sort on the seventh field.
通过指定冒号字符做为字段分隔符,我们能按照第七个字段来排序。
uniq
Compared to sort, the uniq program is a lightweight. uniq performs a seemingly trivial task. When given a sorted file (including standard input), it removes any duplicate lines and sends the results to standard output. It is often used in conjunction with sort to clean the output of duplicates.
与 sort 程序相比,这个 uniq 程序是个轻量级程序。uniq 执行一个看似琐碎的行为。当给定一个 排好序的文件(包括标准输出),uniq 会删除任意重复行,并且把结果发送到标准输出。 它常常和 sort 程序一块使用,来清理重复的输出。
Tip: While uniq is a traditional Unix tool often used with sort, the GNU version of sort supports a -u option, which removes duplicates from the sorted output.
uniq 程序是一个传统的 Unix 工具,经常与 sort 程序一块使用,但是这个 GNU 版本的 sort 程序支持一个 -u 选项,其可以从排好序的输出结果中删除重复行。
Let’s make a text file to try this out:
让我们创建一个文本文件,来实验一下:
| |
Remember to type Ctrl-d to terminate standard input. Now, if we run uniq on our text file:
记住输入 Ctrl-d 来终止标准输入。现在,如果我们对文本文件执行 uniq 命令:
| |
the results are no different from our original file; the duplicates were not removed. For uniq to actually do its job, the input must be sorted first:
输出结果与原始文件没有差异;重复行没有被删除。实际上,uniq 程序能完成任务,其输入必须是排好序的数据,
| |
This is because uniq only removes duplicate lines which are adjacent to each other. uniq has several options. Here are the common ones:
这是因为 uniq 只会删除相邻的重复行。uniq 程序有几个选项。这里是一些常用选项:
| Option | Description |
|---|---|
| -c | Output a list of duplicate lines preceded by the number of times the line occurs. |
| -d | Only output repeated lines, rather than unique lines. |
| -f n | Ignore n leading fields in each line. Fields are separated by whitespace as they are in sort; however, unlike sort, uniq has no option for setting an alternate field separator. |
| -i | Ignore case during the line comparisons. |
| -s n | Skip (ignore) the leading n characters of each line. |
| -u | Only output unique lines. This is the default. |
| 选项 | 说明 |
|---|---|
| -c | 输出所有的重复行,并且每行开头显示重复的次数。 |
| -d | 只输出重复行,而不是特有的文本行。 |
| -f n | 忽略每行开头的 n 个字段,字段之间由空格分隔,正如 sort 程序中的空格分隔符;然而, 不同于 sort 程序,uniq 没有选项来设置备用的字段分隔符。 |
| -i | 在比较文本行的时候忽略大小写。 |
| -s n | 跳过(忽略)每行开头的 n 个字符。 |
| -u | 只输出独有的文本行。这是默认的。 |
Here we see uniq used to report the number of duplicates found in our text file, using the -c option:
这里我们看到 uniq 被用来报告文本文件中重复行的次数,使用这个-c 选项:
| |
切片和切块
The next three programs we will discuss are used to peel columns of text out of files and recombine them in useful ways.
下面我们将要讨论的三个程序用来从文件中获得文本列,并且以有用的方式重组它们。
cut
The cut program is used to extract a section of text from a line and output the extracted section to standard output. It can accept multiple file arguments or input from standard input.
这个 cut 程序被用来从文本行中抽取文本,并把其输出到标准输出。它能够接受多个文件参数或者 标准输入。
Specifying the section of the line to be extracted is somewhat awkward and is specified using the following options:
从文本行中指定要抽取的文本有些麻烦,使用以下选项:
| Option | Description |
|---|---|
| -c char_list | Extract the portion of the line defined by char_list. The list may consist of one or more comma-separated numerical ranges. |
| -f field_list | Extract one or more fields from the line as defined by field_list. The list may contain one or more fields or field ranges separated by commas. |
| -d delim_char | When -f is specified, use delim_char as the field delimiting character. By default, fields must be separated by a single tab character. |
| –complement | Extract the entire line of text, except for those portions specified by -c and/or -f. |
| 选项 | 说明 |
|---|---|
| -c char_list | 从文本行中抽取由 char_list 定义的文本。这个列表可能由一个或多个逗号 分隔开的数值区间组成。 |
| -f field_list | 从文本行中抽取一个或多个由 field_list 定义的字段。这个列表可能 包括一个或多个字段,或由逗号分隔开的字段区间。 |
| -d delim_char | 当指定-f 选项之后,使用 delim_char 做为字段分隔符。默认情况下, 字段之间必须由单个 tab 字符分隔开。 |
| –complement | 抽取整个文本行,除了那些由-c 和/或-f 选项指定的文本。 |
As we can see, the way cut extracts text is rather inflexible. cut is best used to extract text from files that are produced by other programs, rather than text directly typed by humans. We’ll take a look at our distros.txt file to see if it is “clean” enough to be a good specimen for our cut examples. If we use cat with the -A option, we can see if the file meets our requirements of tab separated fields:
正如我们所看到的,cut 程序抽取文本的方式相当不灵活。cut 命令最好用来从其它程序产生的文件中 抽取文本,而不是从人们直接输入的文本中抽取。我们将会看一下我们的 distros.txt 文件,看看 是否它足够 “整齐” 成为 cut 实例的一个好样本。如果我们使用带有 -A 选项的 cat 命令,我们能查看是否这个 文件符号由 tab 字符分离字段的要求。
| |
It looks good. No embedded spaces, just single tab characters between the fields. Since the file uses tabs rather than spaces, we’ll use the -f option to extract a field:
看起来不错。字段之间仅仅是单个 tab 字符,没有嵌入空格。因为这个文件使用了 tab 而不是空格, 我们将使用 -f 选项来抽取一个字段:
| |
Because our distros file is tab-delimited, it is best to use cut to extract fields rather than characters. This is because when a file is tab-delimited, it is unlikely that each line will contain the same number of characters, which makes calculating character positions within the line difficult or impossible. In our example above, however, we now have extracted a field that luckily contains data of identical length, so we can show how character extraction works by extracting the year from each line:
因为我们的 distros 文件是由 tab 分隔开的,最好用 cut 来抽取字段而不是字符。这是因为一个由 tab 分离的文件, 每行不太可能包含相同的字符数,这就使计算每行中字符的位置变得困难或者是不可能。在以上事例中,然而, 我们已经抽取了一个字段,幸运地是其包含地日期长度相同,所以通过从每行中抽取年份,我们能展示怎样 来抽取字符:
| |
By running cut a second time on our list, we are able to extract character positions 7 through 10, which corresponds to the year in our date field. The 7-10 notation is an example of a range. The cut man page contains a complete description of how ranges can be specified.
通过对我们的列表再次运行 cut 命令,我们能够抽取从位置7到10的字符,其对应于日期字段的年份。 这个 7-10 表示法是一个区间的例子。cut 命令手册包含了一个如何指定区间的完整描述。
Expanding Tabs
展开 Tabs
Our distros.txt file is ideally formatted for extracting fields using cut. But what if we wanted a file that could be fully manipulated with cut by characters, rather than fields? This would require us to replace the tab characters within the file with the corresponding number of spaces. Fortunately, the GNU Coreutils package includes a tool for that. Named expand, this program accepts either one or more file arguments or standard input, and outputs the modified text to standard output.
distros.txt 的文件格式很适合使用 cut 程序来抽取字段。但是如果我们想要 cut 程序 按照字符,而不是字段来操作一个文件,那又怎样呢?这要求我们用相应数目的空格来 代替 tab 字符。幸运地是,GNU 的 Coreutils 软件包有一个工具来解决这个问题。这个 程序名为 expand,它既可以接受一个或多个文件参数,也可以接受标准输入,并且把 修改过的文本送到标准输出。
If we process our distros.txt file with expand, we can use the cut -c to extract any range of characters from the file. For example, we could use the following command to extract the year of release from our list, by expanding the file and using cut to extract every character from the twenty-third position to the end of the line:
如果我们通过 expand 来处理 distros.txt 文件,我们能够使用 cut -c 命令来从文件中抽取 任意区间内的字符。例如,我们能够使用以下命令来从列表中抽取发行年份,通过展开 此文件,再使用 cut 命令,来抽取从位置 23 开始到行尾的每一个字符:
[me@linuxbox ~]$ expand distros.txt | cut -c 23-
Coreutils also provides the unexpand program to substitute tabs for spaces.
Coreutils 软件包也提供了 unexpand 程序,用 tab 来代替空格。
When working with fields, it is possible to specify a different field delimiter rather than the tab character. Here we will extract the first field from the /etc/passwd file:
当操作字段的时候,有可能指定不同的字段分隔符,而不是 tab 字符。这里我们将会从/etc/passwd 文件中 抽取第一个字段:
| |
Using the -d option, we are able to specify the colon character as the field delimiter.
使用-d 选项,我们能够指定冒号做为字段分隔符。
paste
The paste command does the opposite of cut. Rather than extracting a column of text from a file, it adds one or more columns of text to a file. It does this by reading multiple files and combining the fields found in each file into a single stream on standard output. Like cut, paste accepts multiple file arguments and/or standard input. To demonstrate how paste operates, we will perform some surgery on our distros.txt file to produce a chronological list of releases.
这个 paste 命令的功能正好与 cut 相反。它会添加一个或多个文本列到文件中,而不是从文件中抽取文本列。 它通过读取多个文件,然后把每个文件中的字段整合成单个文本流,输入到标准输出。类似于 cut 命令, paste 接受多个文件参数和 / 或标准输入。为了说明 paste 是怎样工作的,我们将会对 distros.txt 文件 动手术,来产生发行版的年代表。
From our earlier work with sort, we will first produce a list of distros sorted by date and store the result in a file called distros-by-date.txt:
从我们之前使用 sort 的工作中,首先我们将产生一个按照日期排序的发行版列表,并把结果 存储在一个叫做 distros-by-date.txt 的文件中:
| |
Next, we will use cut to extract the first two fields from the file (the distro name and version), and store that result in a file named distro-versions.txt:
下一步,我们将会使用 cut 命令从文件中抽取前两个字段(发行版名字和版本号),并把结果存储到 一个名为 distro-versions.txt 的文件中:
| |
The final piece of preparation is to extract the release dates and store them a file named distro-dates.txt:
最后的准备步骤是抽取发行日期,并把它们存储到一个名为 distro-dates.txt 文件中:
| |
We now have the parts we need. To complete the process, use paste to put the column of dates ahead of the distro names and versions, thus creating a chronological list. This is done simply by using paste and ordering its arguments in the desired arrangement:
现在我们拥有了我们所需要的文本了。为了完成这个过程,使用 paste 命令来把日期列放到发行版名字 和版本号的前面,这样就创建了一个年代列表。通过使用 paste 命令,然后按照期望的顺序来安排它的 参数,就能很容易完成这个任务。
| |
join
In some ways, join is like paste in that it adds columns to a file, but it uses a unique way to do it. A join is an operation usually associated with relational databases where data from multiple tables with a shared key field is combined to form a desired result. The join program performs the same operation. It joins data from multiple files based on a shared key field.
在某些方面,join 命令类似于 paste,它会往文件中添加列,但是它使用了独特的方法来完成。 一个 join 操作通常与关系型数据库有关联,在关系型数据库中来自多个享有共同关键域的表格的 数据结合起来,得到一个期望的结果。这个 join 程序执行相同的操作。它把来自于多个基于共享 关键域的文件的数据结合起来。
To see how a join operation is used in a relational database, let’s imagine a very small database consisting of two tables each containing a single record. The first table, called CUSTOMERS, has three fields: a customer number (CUSTNUM), the customer’s first name (FNAME) and the customer’s last name (LNAME):
为了知道在关系数据库中是怎样使用 join 操作的,让我们想象一个很小的数据库,这个数据库由两个 表格组成,每个表格包含一条记录。第一个表格,叫做 CUSTOMERS,有三个数据域:一个客户号(CUSTNUM), 客户的名字(FNAME)和客户的姓(LNAME):
CUSTNUM FNAME ME
======== ===== ======
4681934 John Smith
The second table is called ORDERS and contains four fields: an order number (ORDERNUM), the customer number (CUSTNUM), the quantity (QUAN), and the item ordered (ITEM).
第二个表格叫做 ORDERS,其包含四个数据域:订单号(ORDERNUM),客户号(CUSTNUM),数量(QUAN), 和订购的货品(ITEM)。
ORDERNUM CUSTNUM QUAN ITEM
======== ======= ==== ====
3014953305 4681934 1 Blue Widget
Note that both tables share the field CUSTNUM. This is important, as it allows a relationship between the tables.
注意两个表格共享数据域 CUSTNUM。这很重要,因为它使表格之间建立了联系。
Performing a join operation would allow us to combine the fields in the two tables to achieve a useful result, such as preparing an invoice. Using the matching values in the CUSTNUM fields of both tables, a join operation could produce the following:
执行一个 join 操作将允许我们把两个表格中的数据域结合起来,得到一个有用的结果,例如准备 一张发货单。通过使用两个表格 CUSTNUM 数字域中匹配的数值,一个 join 操作会产生以下结果:
FNAME LNAME QUAN ITEM
===== ===== ==== ====
John Smith 1 Blue Widget
To demonstrate the join program, we’ll need to make a couple of files with a shared key. To do this, we will use our distros-by-date.txt file. From this file, we will construct two additional files, one containing the release date (which will be our shared key for this demonstration) and the release name:
为了说明 join 程序,我们需要创建一对包含共享键值的文件。为此,我们将使用我们的 distros.txt 文件。 从这个文件中,我们将构建额外两个文件,一个包含发行日期(其会成为共享键值)和发行版名称:
| |
and the second file, which contains the release dates and the version numbers:
第二个文件包含发行日期和版本号:
| |
We now have two files with a shared key (the “release date” field). It is important to point out that the files must be sorted on the key field for join to work properly.
现在我们有两个具有共享键值( “发行日期” 数据域 )的文件。有必要指出,为了使 join 命令 能正常工作,所有文件必须按照关键数据域排序。
| |
Note also that, by default, join uses whitespace as the input field delimiter and a single space as the output field delimiter. This behavior can be modified by specifying options. See the join man page for details.
也要注意,默认情况下,join 命令使用空白字符做为输入字段的界定符,一个空格作为输出字段 的界定符。这种行为可以通过指定的选项来修改。详细信息,参考 join 命令手册。
比较文本
It is often useful to compare versions of text files. For system administrators and software developers, this is particularly important. A system administrator may, for example, need to compare an existing configuration file to a previous version to diagnose a system problem. Likewise, a programmer frequently needs to see what changes have been made to programs over time.
通常比较文本文件的版本很有帮助。对于系统管理员和软件开发者来说,这个尤为重要。 一名系统管理员可能,例如,需要拿现有的配置文件与先前的版本做比较,来诊断一个系统错误。 同样的,一名程序员经常需要查看程序的修改。
comm
The comm program compares two text files and displays the lines that are unique to each one and the lines they have in common. To demonstrate, we will create two nearly identical text files using cat:
这个 comm 程序会比较两个文本文件,并且会显示每个文件特有的文本行和共有的文把行。 为了说明问题,通过使用 cat 命令,我们将会创建两个内容几乎相同的文本文件:
| |
Next, we will compare the two files using comm:
下一步,我们将使用 comm 命令来比较这两个文件:
| |
As we can see, comm produces three columns of output. The first column contains lines unique to the first file argument; the second column, the lines unique to the second file argument; the third column contains the lines shared by both files. comm supports options in the form -n where n is either 1, 2 or 3. When used, these options specify which column(s) to suppress. For example, if we only wanted to output the lines shared by both files, we would suppress the output of columns one and two:
正如我们所见到的,comm 命令产生了三列输出。第一列包含第一个文件独有的文本行;第二列, 文本行是第二个文件独有的;第三列包含两个文件共有的文本行。comm 支持 -n 形式的选项,这里 n 代表 1,2 或 3。这些选项使用的时候,指定了要隐藏的列。例如,如果我们只想输出两个文件共享的文本行, 我们将隐藏第一列和第二列的输出结果:
| |
diff
Like the comm program, diff is used to detect the differences between files. However, diff is a much more complex tool, supporting many output formats and the ability to process large collections of text files at once. diff is often used by software developers to examine changes between different versions of program source code, and thus has the ability to recursively examine directories of source code often referred to as source trees. One common use for diff is the creation of diff files or patches that are used by programs such as patch (which we’ll discuss shortly) to convert one version of a file (or files) to another version.
类似于 comm 程序,diff 程序被用来监测文件之间的差异。然而,diff 是一款更加复杂的工具,它支持 许多输出格式,并且一次能处理许多文本文件。软件开发员经常使用 diff 程序来检查不同程序源码 版本之间的更改,diff 能够递归地检查源码目录,经常称之为源码树。diff 程序的一个常见用例是 创建 diff 文件或者补丁,它会被其它程序使用,例如 patch 程序(我们一会儿讨论),来把文件 从一个版本转换为另一个版本。
If we use diff to look at our previous example files:
如果我们使用 diff 程序,来查看我们之前的文件实例:
| |
we see its default style of output: a terse description of the differences between the two files. In the default format, each group of changes is preceded by a change command in the form of range operation range to describe the positions and type of changes required to convert the first file to the second file:
我们看到 diff 程序的默认输出风格:对两个文件之间差异的简短描述。在默认格式中, 每组的更改之前都是一个更改命令,其形式为 range operation range , 用来描述要求更改的位置和类型,从而把第一个文件转变为第二个文件:
| Change | Description |
|---|---|
| r1ar2 | Append the lines at the position r2 in the second file to the position r1 in the first file. |
| r1cr2 | Change (replace) the lines at position r1 with the lines at the position r2 in the second file. |
| r1dr2 | Delete the lines in the first file at position r1, which would have appeared at range r2 in the second file. |
| 改变 | 说明 |
|---|---|
| r1ar2 | 把第二个文件中位置 r2 处的文件行添加到第一个文件中的 r1 处。 |
| r1cr2 | 用第二个文件中位置 r2 处的文本行更改(替代)位置 r1 处的文本行。 |
| r1dr2 | 删除第一个文件中位置 r1 处的文本行,这些文本行将会出现在第二个文件中位置 r2 处。 |
In this format, a range is a comma separated list of the starting line and the ending line. While this format is the default (mostly for POSIX compliance and backward compatibility with traditional Unix versions of diff), it is not as widely used as other, optional formats. Two of the more popular formats are the context format and the unified format.
在这种格式中,一个范围就是由逗号分隔开的开头行和结束行的列表。虽然这种格式是默认情况(主要是 为了服从 POSIX 标准且向后与传统的 Unix diff 命令兼容), 但是它并不像其它可选格式一样被广泛地使用。最流行的两种格式是上下文模式和统一模式。
When viewed using the context format (the -c option), we will see this:
当使用上下文模式(带上 -c 选项),我们将看到这些:
| |
The output begins with the names of the two files and their timestamps. The first file is marked with asterisks and the second file is marked with dashes. Throughout the remainder of the listing, these markers will signify their respective files. Next, we see groups of changes, including the default number of surrounding context lines. In the first group, we see:
这个输出结果以两个文件名和它们的时间戳开头。第一个文件用星号做标记,第二个文件用短横线做标记。 纵观列表的其它部分,这些标记将象征它们各自代表的文件。下一步,我们看到几组修改, 包括默认的周围上下文行数。在第一组中,我们看到:
*** 1,4 ***
which indicates lines one through four in the first file. Later we see:
其表示第一个文件中从第一行到第四行的文本行。随后我们看到:
--- 1,4 ---
which indicates lines one through four in the second file. Within a change group, lines begin with one of four indicators:
这表示第二个文件中从第一行到第四行的文本行。在更改组内,文本行以四个指示符之一开头:
| Indicator | Meaning |
|---|---|
| blank | A line shown for context. It does not indicate a difference between the two files. |
| - | A line deleted. This line will appear in the first file but not in the second file. |
| + | A line added. This line will appear in the second file but not in the first file. |
| ! | A line changed. The two versions of the line will be displayed, each in its respective section of the change group. |
| 指示符 | 意思 |
|---|---|
| blank | 上下文显示行。它并不表示两个文件之间的差异。 |
| - | 删除行。这一行将会出现在第一个文件中,而不是第二个文件内。 |
| + | 添加行。这一行将会出现在第二个文件内,而不是第一个文件中。 |
| ! | 更改行。将会显示某个文本行的两个版本,每个版本会出现在更改组的各自部分。 |
The unified format is similar to the context format, but is more concise. It is specified with the -u option:
这个统一模式相似于上下文模式,但是更加简洁。通过 -u 选项来指定它:
| |
The most notable difference between the context and unified formats is the elimination of the duplicated lines of context, making the results of the unified format shorter than the context format. In our example above, we see file timestamps like those of the context format, followed by the string @@ -1,4 +1,4 @@. This indicates the lines in the first file and the lines in the second file described in the change group. Following this are the lines themselves, with the default three lines of context. Each line starts with one of three possible characters:
上下文模式和统一模式之间最显著的差异就是重复上下文的消除,这就使得统一模式的输出结果要比上下文 模式的输出结果简短。在我们上述实例中,我们看到类似于上下文模式中的文件时间戳,其紧紧跟随字符串 @@ -1,4 +1,4 @@。这行字符串表示了在更改组中描述的第一个文件中的文本行和第二个文件中的文本行。 这行字符串之后就是文本行本身,与三行默认的上下文。每行以可能的三个字符中的一个开头:
| Character | Meaning |
|---|---|
| blank | This line is shared by both files. |
| - | This line was removed from the first file. |
| + | This line was added to the first file. |
| 字符 | 意思 |
|---|---|
| 空格 | 两个文件都包含这一行。 |
| - | 在第一个文件中删除这一行。 |
| + | 添加这一行到第一个文件中。 |
patch
The patch program is used to apply changes to text files. It accepts output from diff and is generally used to convert older version of files into newer versions. Let’s consider a famous example. The Linux kernel is developed by a large, loosely organized team of contributors who submit a constant stream of small changes to the source code. The Linux kernel consists of several million lines of code, while the changes that are made by one contributor at one time are quite small. It makes no sense for a contributor to send each developer an entire kernel source tree each time a small change is made. Instead, a diff file is submitted. The diff file contains the change from the previous version of the kernel to the new version with the contributor’s changes. The receiver then uses the patch program to apply the change to his own source tree. Using diff/patch offers two significant advantages:
这个 patch 程序被用来把更改应用到文本文件中。它接受从 diff 程序的输出,并且通常被用来 把较老的文件版本转变为较新的文件版本。让我们考虑一个著名的例子。Linux 内核是由一个 大型的,组织松散的贡献者团队开发而成,这些贡献者会提交固定的少量更改到源码包中。 这个 Linux 内核由几百万行代码组成,虽然每个贡献者每次所做的修改相当少。对于一个贡献者 来说,每做一个修改就给每个开发者发送整个的内核源码树,这是没有任何意义的。相反, 提交一个 diff 文件。一个 diff 文件包含先前的内核版本与带有贡献者修改的新版本之间的差异。 然后一个接受者使用 patch 程序,把这些更改应用到他自己的源码树中。使用 diff/patch 组合提供了 两个重大优点:
The diff file is very small, compared to the full size of the source tree.
The diff file concisely shows the change being made, allowing reviewers of the patch to quickly evaluate it.
一个 diff 文件非常小,与整个源码树的大小相比较而言。
一个 diff 文件简洁地显示了所做的修改,从而允许程序补丁的审阅者能快速地评估它。
Of course, diff/patch will work on any text file, not just source code. It would be equally applicable to configuration files or any other text.
当然,diff/patch 能工作于任何文本文件,不仅仅是源码文件。它同样适用于配置文件或任意其它文本。
To prepare a diff file for use with patch, the GNU documentation (see Further Reading below) suggests using diff as follows:
准备一个 diff 文件供 patch 程序使用,GNU 文档(查看下面的拓展阅读部分)建议这样使用 diff 命令:
diff -Naur old_file new_file > diff_file
Where old_file and new_file are either single files or directories containing files. The r option supports recursion of a directory tree.
old_file 和 new_file 部分不是单个文件就是包含文件的目录。这个 r 选项支持递归目录树。
Once the diff file has been created, we can apply it to patch the old file into the new file:
一旦创建了 diff 文件,我们就能应用它,把旧文件修补成新文件。
patch < diff_file
We’ll demonstrate with our test file:
我们将使用测试文件来说明:
| |
In this example, we created a diff file named patchfile.txt and then used the patch program to apply the patch. Note that we did not have to specify a target file to patch, as the diff file (in unified format) already contains the filenames in the header. Once the patch is applied, we can see that file1.txt now matches file2.txt.
在这个例子中,我们创建了一个名为 patchfile.txt 的 diff 文件,然后使用 patch 程序, 来应用这个补丁。注意我们没有必要指定一个要修补的目标文件,因为 diff 文件(在统一模式中)已经 在标题行中包含了文件名。一旦应用了补丁,我们能看到,现在 file1.txt 与 file2.txt 文件相匹配了。
patch has a large number of options, and there are additional utility programs that can be used to analyze and edit patches.
patch 程序有大量的选项,而且还有额外的实用程序可以被用来分析和编辑补丁。
运行时编辑
Our experience with text editors has been largely interactive, meaning that we manually move a cursor around, then type our changes. However, there are non-interactive ways to edit text as well. It’s possible, for example, to apply a set of changes to multiple files with a single command.
我们对于文本编辑器的经验是它们主要是交互式的,意思是我们手动移动光标,然后输入我们的修改。 然而,也有非交互式的方法来编辑文本。有可能,例如,通过单个命令把一系列修改应用到多个文件中。
tr
The tr program is used to transliterate characters. We can think of this as a sort of character-based search-and-replace operation. Transliteration is the process of changing characters from one alphabet to another. For example, converting characters from lowercase to uppercase is transliteration. We can perform such a conversion with tr as follows:
这个 tr 程序被用来更改字符。我们可以把它看作是一种基于字符的查找和替换操作。 换字是一种把字符从一个字母转换为另一个字母的过程。例如,把小写字母转换成大写字母就是 换字。我们可以通过 tr 命令来执行这样的转换,如下所示:
| |
As we can see, tr operates on standard input, and outputs its results on standard output. tr accepts two arguments: a set of characters to convert from and a corresponding set of characters to convert to. Character sets may be expressed in one of three ways:
正如我们所见,tr 命令操作标准输入,并把结果输出到标准输出。tr 命令接受两个参数:要被转换的字符集以及 相对应的转换后的字符集。字符集可以用三种方式来表示:
An enumerated list. For example, ABCDEFGHIJKLMNOPQRSTUVWXYZ
A character range. For example, A-Z. Note that this method is sometimes subject to the same issues as other commands, due to the locale collation order, and thus should be used with caution.
POSIX character classes. For example, [:upper:].
一个枚举列表。例如, ABCDEFGHIJKLMNOPQRSTUVWXYZ
一个字符域。例如,A-Z 。注意这种方法有时候面临与其它命令相同的问题,归因于 语系的排序规则,因此应该谨慎使用。
POSIX 字符类。例如,[:upper:]
In most cases, both character sets should be of equal length; however, it is possible for the first set to be larger than the second, particularly if we wish to convert multiple characters to a single character:
大多数情况下,两个字符集应该长度相同;然而,有可能第一个集合大于第二个,尤其如果我们 想要把多个字符转换为单个字符:
| |
In addition to transliteration, tr allows characters to simply be deleted from the input stream. Earlier in this chapter, we discussed the problem of converting MS-DOS text files to Unix style text. To perform this conversion, carriage return characters need to be removed from the end of each line. This can be performed with tr as follows:
除了换字之外,tr 命令能允许字符从输入流中简单地被删除。在之前的章节中,我们讨论了转换 MS-DOS 文本文件为 Unix 风格文本的问题。为了执行这个转换,每行末尾的回车符需要被删除。 这个可以通过 tr 命令来执行,如下所示:
tr -d '\r' < dos_file > unix_file
where dos_file is the file to be converted and unix_file is the result. This form of the command uses the escape sequence \r to represent the carriage return character. To see a complete list of the sequences and character classes tr supports, try:
这里的 dos_file 是需要被转换的文件,unix_file 是转换后的结果。这种形式的命令使用转义序列 \r 来代表回车符。查看 tr 命令所支持地完整的转义序列和字符类别列表,试试下面的命令:
| |
ROT13: The Not-So-Secret Decoder Ring
ROT13: 不那么秘密的编码环
One amusing use of tr is to perform ROT13 encoding of text. ROT13 is a trivial type of encryption based on a simple substitution cipher. Calling ROT13 “encryption” is being generous; “text obfuscation” is more accurate. It is used sometimes on text to obscure potentially offensive content. The method simply moves each character thirteen places up the alphabet. Since this is half way up the possible twenty-six characters, performing the algorithm a second time on the text restores it to its original form. To perform this encoding with tr:
tr 命令的一个有趣的用法是执行 ROT13文本编码。ROT13是一款微不足道的基于一种简易的替换暗码的 加密类型。把 ROT13称为“加密”是过誉了;称其为“文本模糊处理”则更准确些。有时候它被用来隐藏文本中潜在的攻击内容。 这个方法就是简单地把每个字符在字母表中向前移动13位。因为移动的位数是可能的26个字符的一半, 所以对文本再次执行这个算法,就恢复到了它最初的形式。通过 tr 命令来执行这种编码:
echo “secret text” tr a-zA-Z n-za-mN-ZA-M frperg grkg
Performing the same procedure a second time results in the translation:
再次执行相同的过程,得到翻译结果:
echo “frperg grkg” tr a-zA-Z n-za-mN-ZA-M secret text
A number of email programs and USENET news readers support ROT13 encoding. Wikipedia contains a good article on the subject:
大量的 email 程序和 USENET 新闻读者都支持 ROT13 编码。Wikipedia 上面有一篇关于这个主题的好文章:
tr can perform another trick, too. Using the -s option, tr can “squeeze” (delete) repeated instances of a character:
tr 也可以完成另一个技巧。使用-s 选项,tr 命令能“挤压”(删除)重复的字符实例:
| |
Here we have a string containing repeated characters. By specifying the set “ab” to tr, we eliminate the repeated instances of the letters in the set, while leaving the character that is missing from the set (“c”) unchanged. Note that the repeating characters must be adjoining. If they are not:
这里我们有一个包含重复字符的字符串。通过给 tr 命令指定字符集“ab”,我们能够消除字符集中 字母的重复实例,然而会留下不属于字符集的字符(“c”)无更改。注意重复的字符必须是相邻的。 如果它们不相邻:
| |
the squeezing will have no effect.
那么挤压会没有效果。
sed
The name sed is short for stream editor. It performs text editing on a stream of text, either a set of specified files or standard input. sed is a powerful and somewhat complex program (there are entire books about it), so we will not cover it completely here.
名字 sed 是 stream editor(流编辑器)的简称。它对文本流,即一系列指定的文件或标准输入进行编辑。sed 是一款强大的,并且有些复杂的程序(有整本内容都是关于 sed 程序的书籍),所以在这里我们不会详尽的讨论它。
In general, the way that sed works is that it is given either a single editing command (on the command line) or the name of a script file containing multiple commands, and it then performs these commands upon each line in the stream of text. Here is a very simple example of sed in action:
总之,sed 的工作方式是要不给出单个编辑命令(在命令行中)要不就是包含多个命令的脚本文件名, 然后它就按行来执行这些命令。这里有一个非常简单的 sed 实例:
| |
In this example, we produce a one word stream of text using echo and pipe it into sed. sed, in turn, carries out the instruction s/front/back/ upon the text in the stream and produces the output “back” as a result. We can also recognize this command as resembling the “substitution” (search and replace) command in vi.
在这个例子中,我们使用 echo 命令产生了一个单词的文本流,然后把它管道给 sed 命令。sed,依次, 对流文本执行指令 s/front/back/,随后输出“back”。我们也能够把这个命令认为是相似于 vi 中的“替换” (查找和替代)命令。
Commands in sed begin with a single letter. In the example above, the substitution command is represented by the letter s and is followed by the search and replace strings, separated by the slash character as a delimiter. The choice of the delimiter character is arbitrary. By convention, the slash character is often used, but sed will accept any character that immediately follows the command as the delimiter. We could perform the same command this way:
sed 中的命令开始于单个字符。在上面的例子中,这个替换命令由字母 s 来代表,其后跟着查找 和替代字符串,斜杠字符做为分隔符。分隔符的选择是随意的。按照惯例,经常使用斜杠字符, 但是 sed 将会接受紧随命令之后的任意字符做为分隔符。我们可以按照这种方式来执行相同的命令:
| |
By using the underscore character immediately after the command, it becomes the delimiter. The ability to set the delimiter can be used to make commands more readable, as we shall see.
通过紧跟命令之后使用下划线字符,则它变成界定符。sed 可以设置界定符的能力,使命令的可读性更强, 正如我们将看到的.
Most commands in sed may be preceded by an address, which specifies which line(s) of the input stream will be edited. If the address is omitted, then the editing command is carried out on every line in the input stream. The simplest form of address is a line number. We can add one to our example:
sed 中的大多数命令之前都会带有一个地址,其指定了输入流中要被编辑的文本行。如果省略了地址, 然后会对输入流的每一行执行编辑命令。最简单的地址形式是一个行号。我们能够添加一个地址 到我们例子中:
| |
Adding the address 1 to our command causes our substitution to be performed on the first line of our one-line input stream. If we specify another number:
给我们的命令添加地址 1,就导致只对仅有一行文本的输入流的第一行执行替换操作。如果我们指定另一 个数字:
| |
we see that the editing is not carried out, since our input stream does not have a line two. Addresses may be expressed in many ways. Here are the most common:
我们看到没有执行这个编辑命令,因为我们的输入流没有第二行。地址可以用许多方式来表达。这里是 最常用的:
a range of line numbers
| Address | Description |
|---|---|
| n | A line number where n is a positive integer. |
| $ | The last line. |
| /regexp/ | Lines matching a POSIX basic regular expression. Note that the regular expression is delimited by slash characters. Optionally, the regular expression may be delimited by an alternate character, by specifying the expression with \cregexpc, where c is the alternate character. |
| addr1,addr2 | A range of lines from addr1 to addr2, inclusive. Addresses may be any of the single address forms above. |
| first~step | Match the line represented by the number first, then each subsequent line at step intervals. For example 1~2 refers to each odd numbered line, 5~5 refers to the fifth line and every fifth line thereafter. |
| addr1,+n | Match addr1 and the following n lines. |
| addr! | Match all lines except addr, which may be any of the forms above. |
| 地址 | 说明 |
|---|---|
| n | 行号,n 是一个正整数。 |
| $ | 最后一行。 |
| /regexp/ | 所有匹配一个 POSIX 基本正则表达式的文本行。注意正则表达式通过 斜杠字符界定。选择性地,这个正则表达式可能由一个备用字符界定,通过\cregexpc 来 指定表达式,这里 c 就是一个备用的字符。 |
| addr1,addr2 | 从 addr1 到 addr2 范围内的文本行,包含地址 addr2 在内。地址可能是上述任意 单独的地址形式。 |
| first~step | 匹配由数字 first 代表的文本行,然后随后的每个在 step 间隔处的文本行。例如 1~2 是指每个位于奇数行号的文本行,5~5 则指第五行和之后每五行位置的文本行。 |
| addr1,+n | 匹配地址 addr1 和随后的 n 个文本行。 |
| addr! | 匹配所有的文本行,除了 addr 之外,addr 可能是上述任意的地址形式。 |
We’ll demonstrate different kinds of addresses using the distros.txt file from earlier in this chapter. First, a range of line numbers:
通过使用这一章中早前的 distros.txt 文件,我们将演示不同种类的地址表示法。首先,一系列行号:
| |
In this example, we print a range of lines, starting with line one and continuing to line five. To do this, we use the p command, which simply causes a matched line to be printed. For this to be effective however, we must include the option -n (the no auto- print option) to cause sed not to print every line by default.
在这个例子中,我们打印出一系列的文本行,开始于第一行,直到第五行。为此,我们使用 p 命令, 其就是简单地把匹配的文本行打印出来。然而为了高效,我们必须包含选项 -n(不自动打印选项), 让 sed 不要默认地打印每一行。
Next, we’ll try a regular expression:
下一步,我们将试用一下正则表达式:
| |
By including the slash-delimited regular expression /SUSE/, we are able to isolate the lines containing it in much the same manner as grep.
通过包含由斜杠界定的正则表达式 /SUSE/,我们能够孤立出包含它的文本行,和 grep 程序的功能 是相同的。
Finally, we’ll try negation by adding an ! to the address:
最后,我们将试着否定上面的操作,通过给这个地址添加一个感叹号:
| |
Here we see the expected result: all of the lines in the file except the ones matched by the regular expression.
这里我们看到期望的结果:输出了文件中所有的文本行,除了那些匹配这个正则表达式的文本行。
So far, we’ve looked at two of the sed editing commands, s and p. Here is a more complete list of the basic editing commands:
目前为止,我们已经知道了两个 sed 的编辑命令,s 和 p。这里是一个更加全面的基本编辑命令列表:
| Command | Description |
|---|---|
| = | Output current line number. |
| a | Append text after the current line. |
| d | Delete the current line. |
| i | Insert text in front of the current line. |
| p | Print the current line. By default, sed prints every line and only edits lines that match a specified address within the file. The default behavior can be overridden by specifying the -n option. |
| q | Exit sed without processing any more lines. If the -n option is not specified, output the current line. |
| Q | Exit sed without processing any more lines. |
| s/regexp/replacement/ | Substitute the contents of replacement wherever regexp is found. replacement may include the special character &, which is equivalent to the text matched by regexp. In addition, replacement may include the sequences \1 through \9, which are the contents of the corresponding subexpressions in regexp. For more about this, see the discussion of back references below. After the trailing slash following replacement, an optional flag may be specified to modify the s command’s behavior. |
| y/set1/set2 | Perform transliteration by converting characters from set1 to the corresponding characters in set2. Note that unlike tr, sed requires that both sets be of the same length. |
| 命令 | 说明 |
|---|---|
| = | 输出当前的行号。 |
| a | 在当前行之后追加文本。 |
| d | 删除当前行。 |
| i | 在当前行之前插入文本。 |
| p | 打印当前行。默认情况下,sed 程序打印每一行,并且只是编辑文件中匹配 指定地址的文本行。通过指定-n 选项,这个默认的行为能够被忽略。 |
| q | 退出 sed,不再处理更多的文本行。如果不指定-n 选项,输出当前行。 |
| Q | 退出 sed,不再处理更多的文本行。 |
| s/regexp/replacement/ | 只要找到一个 regexp 匹配项,就替换为 replacement 的内容。 replacement 可能包括特殊字符 &,其等价于由 regexp 匹配的文本。另外, replacement 可能包含序列 \1到 \9,其是 regexp 中相对应的子表达式的内容。更多信息,查看 下面 back references 部分的讨论。在 replacement 末尾的斜杠之后,可以指定一个 可选的标志,来修改 s 命令的行为。 |
| y/set1/set2 | 执行字符转写操作,通过把 set1 中的字符转变为相对应的 set2 中的字符。 注意不同于 tr 程序,sed 要求两个字符集合具有相同的长度。 |
The s command is by far the most commonly used editing command. We will demonstrate just some of its power by performing an edit on our distros.txt file. We discussed before how the date field in distros.txt was not in a “computer- friendly” format. While the date is formatted MM/DD/YYYY, it would be better (for ease of sorting) if the format were YYYY-MM-DD. To perform this change on the file by hand would be both time-consuming and error prone, but with sed, this change can be performed in one step:
到目前为止,这个 s 命令是最常使用的编辑命令。我们将仅仅演示一些它的功能,通过编辑我们的 distros.txt 文件。我们以前讨论过 distros.txt 文件中的日期字段不是“友好地计算机”模式。 文件中的日期格式是 MM/DD/YYYY,但如果格式是 YYYY-MM-DD 会更好一些(利于排序)。手动修改 日期格式不仅浪费时间而且易出错,但是有了 sed,只需一步就能完成修改:
| |
Wow! Now that is an ugly looking command. But it works. In just one step, we have changed the date format in our file. It is also a perfect example of why regular expressions are sometimes jokingly referred to as a “write-only” medium. We can write them, but we sometimes cannot read them. Before we are tempted to run away in terror from this command, let’s look at how it was constructed. First, we know that the command will have this basic structure:
哇!这个命令看起来很丑陋。但是它起作用了。仅用一步,我们就更改了文件中的日期格式。 它也是一个关于为什么有时候会开玩笑地把正则表达式称为是“只写”媒介的完美的例子。我们 能写正则表达式,但是有时候我们不能读它们。在我们恐惧地忍不住要逃离此命令之前,让我们看一下 怎样来构建它。首先,我们知道此命令有这样一个基本的结构:
sed 's/regexp/replacement/' distros.txt
Our next step is to figure out a regular expression that will isolate the date. Since it is in MM/DD/YYYY format and appears at the end of the line, we can use an expression like this:
我们下一步是要弄明白一个正则表达式将要孤立出日期。因为日期是 MM/DD/YYYY 格式,并且 出现在文本行的末尾,我们可以使用这样的表达式:
[0-9]{2}/[0-9]{2}/[0-9]{4}$
which matches two digits, a slash, two digits, a slash, four digits, and the end of line. So that takes care of regexp, but what about replacement? To handle that, we must introduce a new regular expression feature that appears in some applications which use BRE. This feature is called back references and works like this: if the sequence \n appears in replacement where n is a number from one to nine, the sequence will refer to the corresponding subexpression in the preceding regular expression. To create the subexpressions, we simply enclose them in parentheses like so:
此表达式匹配两位数字,一个斜杠,两位数字,一个斜杠,四位数字,以及行尾。如此关心 regexp, 那么 replacement 又怎样呢?为了解决此问题,我们必须介绍一个正则表达式的新功能,它出现 在一些使用 BRE 的应用程序中。这个功能叫做 逆参照 ,像这样工作:如果序列 \n 出现在 replacement 中 ,这里 n 是指从 1 到 9 的数字,则这个序列指的是在前面正则表达式中相对应的子表达式。为了 创建这个子表达式,我们简单地把它们用圆括号括起来,像这样:
([0-9]{2})/([0-9]{2})/([0-9]{4})$
We now have three subexpressions. The first contains the month, the second contains the day of the month, and the third contains the year. Now we can construct replacement as follows:
现在我们有了三个子表达式。第一个表达式包含月份,第二个包含某月中的某天,以及第三个包含年份。 现在我们就可以构建 replacement ,如下所示:
\3-\1-\2
which gives us the year, a dash, the month, a dash, and the day.
此表达式给出了年份,一个短划线,月份,一个短划线,和某天。
Now, our command looks like this: 现在我们的命令看起来像下面这样:
sed 's/([0-9]{2})/([0-9]{2})/([0-9]{4})$/\3-\1-\2/' distros.txt
We have two remaining problems. The first is that the extra slashes in our regular expression will confuse sed when it tries to interpret the s command. The second is that since sed, by default, accepts only basic regular expressions, several of the characters in our regular expression will be taken as literals, rather than as metacharacters. We can solve both these problems with a liberal application of backslashes to escape the offending characters:
我们还有两个问题。第一个是当 sed 试图解释这个 s 命令的时候在我们表达式中额外的斜杠将会使 sed 迷惑。 第二个是由于sed默认情况下只接受基本的正则表达式,在表达式中的几个字符会 被当作文字字面值,而不是元字符。我们能够通过反斜杠的自由应用来转义令人不快的字符解决这两个问题,:
sed 's/\([0-9]\{2\}\)\/\([0-9]\{2\}\)\/\([0-9]\{4\}\)$/\3-\1-\2/' distros.txt
And there you have it!
你掌握了吧!
Another feature of the s command is the use of optional flags that may follow the replacement string. The most important of these is the g flag, which instructs sed to apply the search and replace globally to a line, not just to the first instance, which is the default. Here is an example:
s 命令的另一个功能是使用可选标志,其跟随替代字符串。一个最重要的可选标志是 g 标志,其 指示 sed 对某个文本行全范围地执行查找和替代操作,不仅仅是对第一个实例,这是默认行为。 这里有个例子:
| |
We see that the replacement was performed, but only to the first instance of the letter “b,” while the remaining instances were left unchanged. By adding the g flag, we are able to change all the instances:
我们看到虽然执行了替换操作,但是只针对第一个字母 “b” 实例,然而剩余的实例没有更改。通过添加 g 标志, 我们能够更改所有的实例:
| |
So far, we have only given sed single commands via the command line. It is also possible to construct more complex commands in a script file using the -f option. To demonstrate, we will use sed with our distros.txt file to build a report. Our report will feature a title at the top, our modified dates, and all the distribution names converted to upper case. To do this, we will need to write a script, so we’ll fire up our text editor and enter the following:
目前为止,通过命令行我们只让 sed 执行单个命令。使用-f 选项,也有可能在一个脚本文件中构建更加复杂的命令。 为了演示,我们将使用 sed 和 distros.txt 文件来生成一个报告。我们的报告以开头标题,修改过的日期,以及 大写的发行版名称为特征。为此,我们需要编写一个脚本,所以我们将打开文本编辑器,然后输入以下文字:
# sed script to produce Linux distributions report
1 i\
\
Linux Distributions Report\
s/\([0-9]\{2\}\)\/\([0-9]\{2\}\)\/\([0-9]\{4\}\)$/\3-\1-\2/
y/abcdefghijklmnopqrstuvwxyz/ABCDEFGHIJKLMNOPQRSTUVWXYZ/
We will save our sed script as distros.sed and run it like this:
我们将把 sed 脚本保存为 distros.sed 文件,然后像这样运行它:
| |
As we can see, our script produces the desired results, but how does is do it? Let’s take another look at our script. We’ll use cat to number the lines:
正如我们所见,我们的脚本文件产生了期望的结果,但是它是如何做到的呢?让我们再看一下我们的脚本文件。 我们将使用 cat 来给每行文本编号:
| |
Line one of our script is a comment. Like many configuration files and programming languages on Linux systems, comments begin with the # character and are followed by human-readable text. Comments can be placed anywhere in the script (though not within commands themselves) and are helpful to any humans who might need to identify and/or maintain the script.
我们脚本文件的第一行是一条注释。如同 Linux 系统中的许多配置文件和编程语言一样,注释以#字符开始, 然后是人类可读的文本。注释可以被放到脚本中的任意地方(虽然不在命令本身之中),且对任何 可能需要理解和/或维护脚本的人们都很有帮助。
Line two is a blank line. Like comments, blank lines may be added to improve readability.
第二行是一个空行。正如注释一样,添加空白行是为了提高程序的可读性。
Many sed commands support line addresses. These are used to specify which lines of the input are to be acted upon. Line addresses may be expressed as single line numbers, line number ranges, and the special line number “$” which indicates the last line of input.
许多 sed 命令支持行地址。这些行地址被用来指定对输入文本的哪一行执行操作。行地址可能被 表示为单独的行号,行号范围,以及特殊的行号“$”,它表示输入文本的最后一行。
Lines three through six contain text to be inserted at the address 1, the first line of the input. The i command is followed by the sequence backslash-carriage return to produce an escaped carriage return, or what is called a line continuation character. This sequence, which can be used in many circumstances including shell scripts, allows a carriage return to be embedded in a stream of text without signaling the interpreter (in this case sed) that the end of the line has been reached. The i, and likewise, the a (which appends text, rather than inserting it) and c (which replaces text) commands, allow multiple lines of text as long as each line, except the last, ends with a line continuation character. The sixth line of our script is actually the end of our inserted text and ends with a plain carriage return rather than a line continuation character, signaling the end of the i command.
从第三行到第六行所包含地文本要被插入到地址 1 处,也就是输入文本的第一行中。这个 i 命令 之后是反斜杠回车符,来产生一个转义的回车符,或者就是所谓的连行符。这个序列能够 被用在许多环境下,包括 shell 脚本,从而允许把回车符嵌入到文本流中,而没有通知 解释器(在这是指 sed 解释器)已经到达了文本行的末尾。这个 i 命令,同样地,命令 a(追加文本, 而不是插入文本)和 c(取代文本)命令都允许多个文本行,只要每个文本行,除了最后一行,以一个 连行符结束。实际上,脚本的第六行是插入文本的末尾,它以一个普通的回车符结尾,而不是一个 连行符,通知解释器 i 命令结束了。
Note: A line continuation character is formed by a backslash followed immediately by a carriage return. No intermediary spaces are permitted.
注意:一个连行符由一个反斜杠字符其后紧跟一个回车符组成。它们之间不允许有空白字符。
Line seven is our search and replace command. Since it is not preceded by an address, each line in the input stream is subject to its action.
第七行是我们的查找和替代命令。因为命令之前没有添加地址,所以输入流中的每一行文本 都得服从它的操作。
Line eight performs transliteration of the lowercase letters into uppercase letters. Note that unlike tr, the y command in sed does not support character ranges (for example, [a-z]), nor does it support POSIX character classes. Again, since the y command is not preceded by an address, it applies to every line in the input stream.
第八行执行小写字母到大写字母的字符替换操作。注意不同于 tr 命令,这个 sed 中的 y 命令不 支持字符区域(例如,[a-z]),也不支持 POSIX 字符集。再说一次,因为 y 命令之前不带地址, 所以它会操作输入流的每一行。
People Who Like sed Also Like…
喜欢 sed 的人们也会喜欢。。。
sed is a very capable program, able to perform fairly complex editing tasks to streams of text. It is most often used for simple one line tasks rather than long scripts. Many users prefer other tools for larger tasks. The most popular of these are awk and perl. These go beyond mere tools, like the programs covered here, and extend into the realm of complete programming languages. perl, in particular, is often used in place of shell scripts for many system management and administration tasks, as well as being a very popular medium for web development. awk is a little more specialized. Its specific strength is its ability to manipulate tabular data. It resembles sed in that awk programs normally process text files line-by-line, using a scheme similar to the sed concept of an address followed by an action. While both awk and perl are outside the scope of this book, they are very good skills for the Linux command line user.
sed 是一款非常强大的程序,它能够针对文本流完成相当复杂的编辑任务。它最常 用于简单的行任务,而不是长长的脚本。许多用户喜欢使用其它工具,来执行较大的工作。 在这些工具中最著名的是 awk 和 perl。它们不仅仅是工具,像这里介绍的程序,且延伸到 完整的编程语言领域。特别是 perl,经常被用来代替 shell 脚本,来完成许多系统管理任务, 同时它也是一款非常流行网络开发语言。awk 更专用一些。其具体优点是其操作表格数据的能力。 awk 程序通常逐行处理文本文件,这点类似于 sed,awk 使用了一种方案,其与 sed 中地址 之后跟随编辑命令的概念相似。虽然关于 awk 和 perl 的内容都超出了本书所讨论的范围, 但是对于 Linux 命令行用户来说,它们都是非常好的技能。
aspell
The last tool we will look at is aspell, an interactive spelling checker. The aspell program is the successor to an earlier program named ispell, and can be used, for the most part, as a drop-in replacement. While the aspell program is mostly used by other programs that require spell checking capability, it can also be used very effectively as a stand-alone tool from the command line. It has the ability to intelligently check various type of text files, including HTML documents, C/C++ programs, email messages and other kinds of specialized texts.
我们要查看的最后一个工具是 aspell,一款交互式的拼写检查器。这个 aspell 程序是早先 ispell 程序 的继承者,大多数情况下,它可以被用做一个替代品。虽然 aspell 程序大多被其它需要拼写检查能力的 程序使用,但它也可以作为一个独立的命令行工具使用。它能够智能地检查各种类型的文本文件, 包括 HTML 文件,C/C++ 程序,电子邮件和其它种类的专业文本。
To spell check a text file containing simple prose, it could be used like this:
拼写检查一个包含简单的文本文件,可以这样使用 aspell:
aspell check textfile
where textfile is the name of the file to check. As a practical example, let’s create a simple text file named foo.txt containing some deliberate spelling errors:
这里的 textfile 是要检查的文件名。作为一个实际例子,让我们创建一个简单的文本文件,叫做 foo.txt, 包含一些故意的拼写错误:
| |
Next we’ll check the file using aspell:
下一步我们将使用 aspell 来检查文件:
| |
As aspell is interactive in the check mode, we will see a screen like this:
因为 aspell 在检查模式下是交互的,我们将看到像这样的一个屏幕:
The quick brown fox jimped over the laxy dog.
1)jumped 6)wimped
2)gimped 7)camped
3)comped 8)humped
4)limped 9)impede
5)pimped 0)umped
i)Ignore I)Ignore all
r)Replace R)Replace all
a)Add l)Add Lower
b)Abort x)Exit
?
At the top of the display, we see our text with a suspiciously spelled word highlighted. In the middle, we see ten spelling suggestions numbered zero through nine, followed by a list of other possible actions. Finally, at the very bottom, we see a prompt ready to accept our choice.
在显示屏的顶部,我们看到我们的文本中有一个拼写可疑且高亮显示的单词。在中间部分,我们看到 十个拼写建议,序号从 0 到 9,然后是一系列其它可能的操作。最后,在最底部,我们看到一个提示符, 准备接受我们的选择。
If we press the 1 key, aspell replaces the offending word with the word “jumped” and moves on to the next misspelled word which is “laxy.” If we select the replacement “lazy,” aspell replaces it and terminates. Once aspell has finished, we can examine our file and see that the misspellings have been corrected:
如果我们按下 1 按键,aspell 会用单词 “jumped” 代替错误单词,然后移动到下一个拼写错的单词,就是 “laxy”。如果我们选择替代物 “lazy”,aspell 会替换 “laxy” 并且终止。一旦 aspell 结束操作,我们 可以检查我们的文件,会看到拼写错误的单词已经更正了。
| |
Unless told otherwise via the command line option –dont-backup, aspell creates a backup file containing the original text by appending the extension .bak to the filename.
除非由命令行选项 –dont-backup 告诉 aspell,否则通过追加扩展名.bak 到文件名中, aspell 会创建一个包含原始文本的备份文件。
Showing off our sed editing prowess, we’ll put our spelling mistakes back in so we can reuse our file:
为了炫耀 sed 的编辑本领,我们将还原拼写错误,从而能够重用我们的文件:
| |
The sed option -i tells sed to edit the file “in-place,” meaning that rather than sending the edited output to standard output, it will re-write the file with the changes applied. We also see the ability to place more than one editing command on the line by separating them with a semicolon.
这个 sed 选项-i,告诉 sed 在适当位置编辑文件,意思是不要把编辑结果发送到标准输出中。sed 会把更改应用到文件中, 以此重新编写文件。我们也看到可以把多个 sed 编辑命令放在同一行,编辑命令之间由分号分隔开来。
Next, we’ll look at how aspell can handle different kinds of text files. Using a text editor such as vim (the adventurous may want to try sed), we will add some HTML markup to our file:
下一步,我们将看一下 aspell 怎样来解决不同种类的文本文件。使用一个文本编辑器,例如 vim(胆大的人可能想用 sed), 我们将添加一些 HTML 标志到文件中:
<html>
<head>
<title>Mispelled HTML file</title>
</head>
<body>
<p>The quick brown fox jimped over the laxy dog.</p>
</body>
</html>
Now, if we try to spell check our modified file, we run into a problem. If we do it this way:
现在,如果我们试图拼写检查我们修改的文件,我们会遇到一个问题。如果我们这样做:
| |
we’ll get this:
我们会得到这些:
<html>
<head>
<title>Mispelled HTML file</title>
</head>
<body>
<p>The quick brown fox jimped over the laxy dog.</p>
</body>
</html>
1) HTML 4) Hamel
2) ht ml 5) Hamil
3) ht-ml 6) hotel
i) Ignore I) Ignore all
r) Replace R) Replace all
a) Add l) Add Lower
b) Abort x) Exit
?
aspell will see the contents of the HTML tags as misspelled. This problem can be overcome by including the -H (HTML) checking mode option, like this:
aspell 会认为 HTML 标志的内容是拼写错误。通过包含-H(HTML)检查模式选项,这个问题能够 解决,像这样:
| |
which will result in this:
这会导致这样的结果:
<html>
<head>
<title><b>Mispelled</b> HTML file</title>
</head>
<body>
<p>The quick brown fox jimped over the laxy dog.</p>
</body>
</html>
1) Mi spelled 6) Misapplied
2) Mi-spelled 7) Miscalled
3) Misspelled 8) Respelled
4) Dispelled 9) Misspell
5) Spelled 0) Misled
i) Ignore I) Ignore all
r) Replace R) Replace all
a) Add l) Add Lower
b) Abort x) Exit
?
The HTML is ignored and only the non-markup portions of the file are checked. In this mode, the contents of HTML tags are ignored and not checked for spelling. However, the contents of ALT tags, which benefit from checking, are checked in this mode.
这个 HTML 标志被忽略了,并且只会检查文件中非标志部分的内容。在这种模式下,HTML 标志的 内容被忽略了,不会进行拼写检查。然而,ALT 标志的内容,会被检查。
Note: By default, aspell will ignore URLs and email addresses in text. This behavior can be overridden with command line options. It is also possible to specify which markup tags are checked and skipped. See the aspell man page for details.
注意:默认情况下,aspell 会忽略文本中的 URL 和电子邮件地址。通过命令行选项,可以重写此行为。 也有可能指定哪些标志进行检查及跳过。详细内容查看 aspell 命令手册。
总结归纳
In this chapter, we have looked at a few of the many command line tools that operate on text. In the next chapter, we will look at several more. Admittedly, it may not seem immediately obvious how or why you might use some of these tools on a day-to-day basis, though we have tried to show some semi-practical examples of their use. We will find in later chapters that these tools form the basis of a tool set that is used to solve a host of practical problems. This will be particularly true when we get into shell scripting, where these tools will really show their worth.
在这一章中,我们已经查看了一些操作文本的命令行工具。在下一章中,我们会再看几个命令行工具。 诚然,看起来不能立即显现出怎样或为什么你可能使用这些工具为日常的基本工具, 虽然我们已经展示了一些半实际的命令用法的例子。我们将在随后的章节中发现这些工具组成 了解决实际问题的基本工具箱。这将是确定无疑的,当我们学习 shell 脚本的时候, 到时候这些工具将真正体现出它们的价值。
拓展阅读
The GNU Project website contains many online guides to the tools discussed in this chapter.
GNU 项目网站包含了本章中所讨论工具的许多在线指南。
From the Coreutils package:
来自 Coreutils 软件包:
http://www.gnu.org/software/coreutils/manual/coreutils.html#Output-of-entire-files
http://www.gnu.org/software/coreutils/manual/coreutils.html#Operating-on-sorted-files
http://www.gnu.org/software/coreutils/manual/coreutils.html#Operating-on-fields-within-a-line
http://www.gnu.org/software/coreutils/manual/coreutils.html#Operating-on-characters
From the Diffutils package:
来自 Diffutils 软件包:
http://www.gnu.org/software/diffutils/manual/html_mono/diff.html
sed 工具
aspell 工具
There are many other online resources for sed, in particular:
尤其对于 sed 工具,还有很多其它的在线资源:
Also try googling “sed one liners”, “sed cheat sheets”
试试用 google 搜索 “sed one liners”, “sed cheat sheets” 关键字
友情提示
There are a few more interesting text manipulation commands worth investigating. Among these are: split (split files into pieces), csplit (split files into pieces based on context), and sdiff (side-by-side merge of file differences.)
有一些更有趣的文本操作命令值得。在它们之间有:split(把文件分割成碎片), csplit(基于上下文把文件分割成碎片),和 sdiff(并排合并文件差异)。
22 - 22 格式化输出
格式化输出
http://billie66.github.io/TLCL/book/chap22.html
In this chapter, we continue our look at text related tools, focusing on programs that are used to format text output, rather than changing the text itself. These tools are often used to prepare text for eventual printing, a subject that we will cover in the next chapter. The programs that we will cover in this chapter include:
在这章中,我们继续着手于文本相关的工具,关注那些用来格式化输出的程序,而不是改变文本自身。 这些工具通常让文本准备就绪打印,这是我们在下一章会提到的。我们在这章中会提到的工具有以下这些:
- nl – Number lines
- nl – 添加行号
- fold – Wrap each line to a specified length
- fold – 限制文件列宽
- fmt – A simple text formatter
- fmt – 一个简单的文本格式转换器
- pr – Prepare text for printing
- pr – 让文本为打印做好准备
- printf – Format and print data
- printf – 格式化数据并打印出来
- groff – A document formatting system
- groff – 一个文件格式化系统
简单的格式化工具
We’ll look at some of the simple formatting tools first. These are mostly single purpose programs, and a bit unsophisticated in what they do, but they can be used for small tasks and as parts of pipelines and scripts.
我们将先着眼于一些简单的格式工具。他们都是功能单一的程序,并且做法有一点单纯, 但是他们能被用于小任务并且作为脚本和管道的一部分 。
nl - 添加行号
The nl program is a rather arcane tool used to perform a simple task. It numbers lines. In its simplest use, it resembles cat -n:
nl 程序是一个相当神秘的工具,用作一个简单的任务。它添加文件的行数。在它最简单的用途中,它相当于 cat -n:
| |
Like cat, nl can accept either multiple files as command line arguments, or standard input. However, nl has a number of options and supports a primitive form of markup to allow more complex kinds of numbering.
像 cat,nl 既能接受多个文件作为命令行参数,也能接受标准输入。然而,nl 有一个相当数量的选项并支持一个简单的标记方式去允许更多复杂的方式的计算。
nl supports a concept called “logical pages” when numbering. This allows nl to reset (start over) the numerical sequence when numbering. Using options, it is possible to set the starting number to a specific value and, to a limited extent, its format. A logical page is further broken down into a header, body, and footer. Within each of these sections, line numbering may be reset and/or be assigned a different style. If nl is given multiple files, it treats them as a single stream of text. Sections in the text stream are indicated by the presence of some rather odd-looking markup added to the text:
nl 在计算文件行数的时候支持一个叫“逻辑页面”的概念 。这允许nl在计算的时候去重设(再一次开始)可数的序列。用到那些选项 的时候,可以设置一个特殊的开始值,并且在某个可限定的程度上还能设置它的格式。一个逻辑页面被进一步分为 header,body 和 footer 这样的元素。在每一个部分中,数行数可以被重设,并且/或被设置成另外一个格式。如果nl同时处理多个文件,它会把他们当成一个单一的 文本流。文本流中的部分被一些相当古怪的标记的存在加进了文本:
| MarkUp | Meaning |
|---|---|
| ::: | Start of logical page header |
| :: | Start of logical page body |
| : | Start of logical page footer |
| 标记 | 含义 |
|---|---|
| ::: | 逻辑页页眉开始处 |
| :: | 逻辑页主体开始处 |
| : | 逻辑页页脚开始处 |
Each of the above markup elements must appear alone on its own line. After processing a markup element, nl deletes it from the text stream.
每一个上述的标记元素肯定在自己的行中独自出现。在处理完一个标记元素之后,nl 把它从文本流中删除。
Here are the common options for nl:
这里有一些常用的 nl 选项:
| Option | Meaning |
|---|---|
| -b style | Set body numbering to style, where style is one of the following:a = number all linest = number only non-blank lines. This is the default.n = nonepregexp = number only lines matching basic regular expression regexp. |
| -f style | Set footer numbering to style. Default is n (none). |
| -h style | Set header numbering to style. Default is n (none). |
| -i number | Set page numbering increment to number. Default is one. |
| -n format | Sets numbering format to format, where format is:ln = left justified, without leading zeros.rn = right justified, without leading zeros. This is the default.rz = right justified, with leading zeros. |
| -p | Do not reset page numbering at the beginning of each logical page. |
| -s string | Add string to the end of each line number to create a separator.Default is a single tab character. |
| -v number | Set first line number of each logical page to number. Default is one. |
| -w width | Set width of the line number field to width. Default is six. |
| 选项 | 含义 |
|---|---|
| -b style | 把 body 按被要求方式数行,可以是以下方式:a = 数所有行t = 数非空行。这是默认设置。n = 无pregexp = 只数那些匹配了正则表达式的行 |
| -f style | 将 footer 按被要求设置数。默认是无 |
| -h style | 将 header 按被要求设置数。默认是无 |
| -i number | 将页面增加量设置为数字。默认是一。 |
| -n format | 设置数数的格式,格式可以是:ln = 左偏,没有前导零。rn = 右偏,没有前导零。rz = 右偏,有前导零。 |
| -p | 不要在没一个逻辑页面的开始重设页面数。 |
| -s string | 在没一个行的末尾加字符作分割符号。默认是单个的 tab。 |
| -v number | 将每一个逻辑页面的第一行设置成数字。默认是一。 |
| -w width | 将行数的宽度设置,默认是六。 |
Admittedly, we probably won’t be numbering lines that often, but we can use nl to look at how we can combine multiple tools to perform more complex tasks. We will build on our work in the previous chapter to produce a Linux distributions report. Since we will be using nl, it will be useful to include its header/body/footer markup. To do this, we will add it to the sed script from the last chapter. Using our text editor, we will change the script as follows and save it as distros-nl.sed:
坦诚的说,我们大概不会那么频繁地去数行数,但是我们能用 nl 去查看我们怎么将多个工具结合在一个去完成更复杂的任务。 我们将在之前章节的基础上做一个 Linux 发行版的报告。因为我们将使用 nl,包含它的 header/body/footer 标记将会十分有用。 我们将把它加到上一章的 sed 脚本来做这个。使用我们的文本编辑器,我们将脚本改成一下并且把它保存成 distros-nl.sed:
# sed script to produce Linux distributions report
1 i\
\\:\\:\\:\
\
Linux Distributions Report\
\
Name
Ver. Released\
----
---- --------\
\\:\\:
s/\([0-9]\{2\}\)\/\([0-9]\{2\}\)\/\([0-9]\{4\}\)$/\3-\1-\2/
$ i\
\\:\
\
End Of Report
The script now inserts the nl logical page markup and adds a footer at the end of the report. Note that we had to double up the backslashes in our markup, because they are normally interpreted as an escape character by sed.
这个脚本现在加入了 nl 的逻辑页面标记并且在报告的最后加了一个 footer。记得我们在我们的标记中必须两次使用反斜杠, 因为他们通常被 sed 解释成一个转义字符。
Next, we’ll produce our enhanced report by combining sort, sed, and nl:
下一步,我们将结合 sort, sed, nl 来生成我们改进的报告:
| |
Our report is the result of our pipeline of commands. First, we sort the list by distribution name and version (fields one and two), then we process the results with sed, adding the report header (including the logical page markup for nl) and footer. Finally, we process the result with nl, which, by default, only numbers the lines of the text stream that belong to the body section of the logical page.
我们的报告是一串命令的结果,首先,我们给名单按发行版本和版本号(表格1和2处)进行排序,然后我们用 sed 生产结果, 增加了 header(包括了为 nl 增加的逻辑页面标记)和 footer。最后,我们按默认用 nl 生成了结果,只数了属于逻辑页面的 body 部分的 文本流的行数。
We can repeat the command and experiment with different options for nl. Some interesting ones are:
我们能够重复命令并且实验不同的 nl 选项。一些有趣的方式:
nl -n rz
and
和
nl -w 3 -s ' '
fold - 限制文件行宽
Folding is the process of breaking lines of text at a specified width. Like our other commands, fold accepts either one or more text files or standard input. If we send fold a simple stream of text, we can see how it works:
折叠是将文本的行限制到特定的宽的过程。像我们的其他命令,fold 接受一个或多个文件及标准输入。如果我们将 一个简单的文本流 fold,我们可以看到它工作的方式:
| |
Here we see fold in action. The text sent by the echo command is broken into segments specified by the -w option. In this example, we specify a line width of twelve characters. If no width is specified, the default is eighty characters. Notice how the lines are broken regardless of word boundaries. The addition of the -s option will cause fold to break the line at the last available space before the line width is reached:
这里我们看到了 fold 的行为。这个用 echo 命令发送的文本用 -w 选项分解成块。在这个例子中,我们设定了行宽为12个字符。 如果没有字符设置,默认是80。注意到文本行不会因为单词边界而不会被分解。增加的 -s 选项将让 fold 分解到最后可用的空白 字符,即会考虑单词边界。
| |
fmt - 一个简单的文本格式器
The fmt program also folds text, plus a lot more. It accepts either files or standard input and performs paragraph formatting on the text stream. Basically, it fills and joins lines in text while preserving blank lines and indentation.
fmt 程序同样折叠文本,外加很多功能。它接受文本或标准输入并且在文本流上格式化段落。它主要是填充和连接文本行,同时保留空白符和缩进。
To demonstrate, we’ll need some text. Let’s lift some from the fmt info page:
为了解释,我们将需要一些文本。让我们抄一些 fmt 主页上的东西吧:
‘fmt’ reads from the specified FILE arguments (or standard input if
none are given), and writes to standard output.
By default, blank lines, spaces between words, and indentation are
preserved in the output; successive input lines with different
indentation are not joined; tabs are expanded on input and introduced on
output.
‘fmt’ prefers breaking lines at the end of a sentence, and tries to
avoid line breaks after the first word of a sentence or before the last
word of a sentence. A "sentence break" is defined as either the end of
a paragraph or a word ending in any of ‘.?!’, followed by two spaces or
end of line, ignoring any intervening parentheses or quotes. Like TeX,
‘fmt’ reads entire “paragraphs” before choosing line breaks; the
algorithm is a variant of that given by Donald E. Knuth and Michael F.
Plass in “Breaking Paragraphs Into Lines”, ‘Software—Practice &
Experience’ 11, 11 (November 1981), 1119–1184.
We’ll copy this text into our text editor and save the file as fmt-info.txt. Now, let’s say we wanted to reformat this text to fit a fifty character wide column. We could do this by processing the file with fmt and the -w option:
我们将把这段文本复制进我们的文本编辑器并且保存文件名为 fmt-info.txt。现在,让我们重新格式这个文本并且让它成为一个50 个字符宽的项目。我们能用 -w 选项对文件进行处理:
| |
Well, that’s an awkward result. Perhaps we should actually read this text, since it explains what’s going on:
好,这真是一个奇怪的结果。大概我们应该认真的阅读这段文本,因为它恰好解释了发生了什么:
“By default, blank lines, spaces between words, and indentation are preserved in the output; successive input lines with different indentation are not joined; tabs are expanded on input and introduced on output.”
默认情况下,输出会保留空行,单词之间的空格,和缩进;持续输入的具有不同缩进的文本行不会连接在一起;tab 字符在输入时会展开,输出时复原 。
So, fmt is preserving the indentation of the first line. Fortunately, fmt provides an option to correct this:
所以,fmt 会保留第一行的缩进。幸运的是,fmt 提供了一个选项来更正这种行为:
Much better. By adding the -c option, we now have the desired result.
好多了。通过添加 -c 选项,现在我们得到了所期望的结果。
fmt has some interesting options:
fmt 有一些有意思的选项:
The -p option is particularly interesting. With it, we can format selected portions of a file, provided that the lines to be formatted all begin with the same sequence of characters. Many programming languages use the pound sign (#) to indicate the beginning of a comment and thus can be formatted using this option. Let’s create a file that simulates a program that uses comments:
这个 -p 选项尤为有趣。通过它,我们可以格式文件选中的部分,通过在开头使用一样的符号。 很多编程语言使用锚标记(#)去提醒注释的开始,而且它可以通过这个选项来被格式。让我们创建一个有用到注释的程序。
| |
Our sample file contains comments which begin the string “# “ (a # followed by a space) and lines of “code” which do not. Now, using fmt, we can format the comments and leave the code untouched:
我们的示例文件包含了用 “#” 开始的注释(一个 # 后跟着一个空白符)和代码。现在,使用 fmt,我们能格式注释并且 不让代码被触及。
| |
Notice that the adjoining comment lines are joined, while the blank lines and the lines that do not begin with the specified prefix are preserved.
注意相邻的注释行被合并了,空行和非注释行被保留了。
pr – 格式化打印文本
The pr program is used to paginate text. When printing text, it is often desirable to separate the pages of output with several lines of whitespace, to provide a top and bottom margin for each page. Further, this whitespace can be used to insert a header and footer on each page.
pr 程序用来把文本分页。当打印文本的时候,经常希望用几个空行在输出的页面的顶部或底部添加空白。此外,这些空行能够用来插入到每个页面的页眉或页脚。
We’ll demonstrate pr by formatting our distros.txt file into a series of very short pages (only the first two pages are shown):
下面我们将演示 pr 的用法。我们准备将 distros.txt 这个文件分成若干张很短的页面(仅展示前两张页面):
| |
In this example, we employ the -l option (for page length) and the -w option (page width) to define a “page” that is 65 columns wide and 15 lines long. pr paginates the contents of the distros.txt file, separates each page with several lines of whitespace and creates a default header containing the file modification time, filename, and page number. The pr program provides many options to control page layout. We’ll take a look at more of them in the next chapter.
在上面的例子中,我们用 -l 选项(页长)和 -w 选项(页宽)定义了宽65列,长15行的一个“页面”。 pr 为 distros.txt 中的内容编订页码,用空行分开各页面,生成了包含文件修改时间、文件名、页码的默认页眉。 pr 指令拥有很多调整页面布局的选项,我们将在下一章中进一步探讨。
printf – Format And Print Data
Unlike the other commands in this chapter, the printf command is not used for pipelines (it does not accept standard input) nor does it find frequent application directly on the command line (it’s mostly used in scripts). So why is it important? Because it is so widely used.
与本章中的其他指令不同, printf 并不用于流水线执行(不接受标准输入)。在命令行中,它也鲜有运用(它通常被用于自动执行指令中)。所以为什么它如此重要?因为它被广泛使用。
printf (from the phrase “print formatted”) was originally developed for the C programming language and has been implemented in many programming languages including the shell. In fact, in bash, printf is a builtin. printf works like this:
printf (来自短语“格式化打印” “print formatted”) 最初为 C 语言设计,后来在包括 shell 的多种语言中运用。事实上,在 bash 中, printf 是内置的。 printf 这样工作:
printf “format” arguments
The command is given a string containing a format description which is then applied to a list of arguments. The formatted result is sent to standard output. Here is a trivial example:
首先,发送包含有格式化描述的字符串的指令,接着,这些描述被应用于参数列表上。格式化的结果在标准输出中显示。下面是一个小例子:
| |
The format string may contain literal text (like “I formatted the string:”), escape sequences (such as \n, a newline character), and sequences beginning with the % character, which are called conversion specifications. In the example above, the conversion specification %s is used to format the string “foo” and place it in the command’s output. Here it is again:
格式字符串可能包含文字文本(如“我格式化了这个字符串:” “I formatted the string:”),转义序列(例如\n,换行符)和以%字符开头的序列,这被称为转换规范。在上面的例子中,转换规范 %s 用于格式化字符串 “foo” 并将其输出在命令行中。我们再来看一遍:
| |
As we can see, the %s conversion specification is replaced by the string “foo” in the command’s output. The s conversion is used to format string data. There are other specifiers for other kinds of data. This table lists the commonly used data types:
我们可以看到,在命令行输出中,转换规范 %s 被字符串 “foo” 所替代。s 转换用于格式化字符串数据。还有其他转换符用于其他类型的数据。此表列出了常用的数据类型:
| Component | Description |
|---|---|
| d | Format a number as a signed decimal integer. |
| f | Format and output a floating point number. |
| o | Format an integer as an octal number. |
| s | Format a string. |
| x | Format an integer as a hexadecimal number using lowercase a-f where needed. |
| X | Same as x but use uppercase letters. |
| % | Print a literal % symbol (i.e., specify “%%”) |
| 组件 | 描述 |
|---|---|
| d | 将数字格式化为带符号的十进制整数 |
| f | 格式化并输出浮点数 |
| o | 将整数格式化为八进制数 |
| s | 将字符串格式化 |
| x | 将整数格式化为十六进制数,必要时使用小写a-f |
| X | 与 x 相同,但变为大写 |
| % | 打印 % 符号 (比如,指定 “%%”) |
We’ll demonstrate the effect each of the conversion specifiers on the string “380”:
下面我们以字符串 “380” 为例,展示每种转换符的效果。
| |
Since we specified six conversion specifiers, we must also supply six arguments for printf to process. The six results show the effect of each specifier. Several optional components may be added to the conversion specifier to adjust its output. A complete conversion specification may consist of the following:
由于我们指定了六个转换符,我们还必须为 printf 提供六个参数进行处理。下面六个结果展示了每个转换符的效果。 可将可选组件添加到转换符以调整输出。 完整的转换规范包含以下内容:
%[flags][width][.precision]conversion_specification
Multiple optional components, when used, must appear in the order specified above to be properly interpreted. Here is a description of each:
使用多个可选组件时,必须按照上面指定的顺序,以便准确编译。以下是每个可选组件的描述:
| Component | Description |
|---|---|
| flags | There are five different flags:# – Use the “alternate format” for output. This varies by data type. For o (octal number) conversion, the output is prefixed with 0. For x and X (hexadecimal number) conversions, the output is prefixed with 0x or 0X respectively.0–(zero) Pad the output with zeros. This means that the field will be filled with leading zeros, as in “000380”.- – (dash) Left-align the output. By default, printf right-aligns output.‘ ’ – (space) Produce a leading space for positive numbers.+ – (plus sign) Sign positive numbers. By default, printf only signs negative numbers. |
| width | A number specifying the minimum field width. |
| .precision | For floating point numbers, specify the number of digits of precision to be output after the decimal point. For string conversion, precision specifies the number of characters to output. |
| 组件 | 描述 |
|---|---|
| flags | 有5种不同的标志:# – 使用“备用格式”输出。这取决于数据类型。对于o(八进制数)转换,输出以0为前缀.对于x和X(十六进制数)转换,输出分别以0x或0X为前缀。0–(零) 用零填充输出。这意味着该字段将填充前导零,比如“000380”。- – (破折号) 左对齐输出。默认情况下,printf右对齐输出。‘ ’ – (空格) 在正数前空一格。+ – (加号) 在正数前添加加号。默认情况下,printf 只在负数前添加符号。 |
| width | 指定最小字段宽度的数。 |
| .precision | 对于浮点数,指定小数点后的精度位数。对于字符串转换,指定要输出的字符数。 |
Here are some examples of different formats in action:
以下是不同格式的一些示例:
| Argument | Format | Result | Notes |
|---|---|---|---|
| 380 | “%d” | 380 | Simple formatting of an integer. |
| 380 | “%#x” | 0x17c | Integer formatted as a hexadecimal number using the “alternate format” flag. |
| 380 | “%05d” | 00380 | Integer formatted with leading zeros (padding) and a minimum field width of five characters. |
| 380 | “%05.5f” | 380.00000 | Number formatted as a floating point number with padding and five decimal places of precision. Since the specified minimum field width (5) is less than the actual width of the formatted number, the padding has no effect. |
| 380 | “%010.5f” | 0380.00000 | By increasing the minimum field width to 10 the padding is now visible. |
| 380 | “%+d” | +380 | The + flag signs a positive number. |
| 380 | “%-d” | 380 | The - flag left aligns the formatting. |
| abcdefghijk | “%5s” | abcedfghijk | A string formatted with a minimum field width. |
| abcdefghijk | “%d” | abcde | By applying precision to a string, it is truncated. |
| 自变量 | 格式 | 结果 | 备注 |
|---|---|---|---|
| 380 | “%d” | 380 | 简单格式化整数。 |
| 380 | “%#x” | 0x17c | 使用“替代格式”标志将整数格式化为十六进制数。 |
| 380 | “%05d” | 00380 | 用前导零(padding)格式化整数,且最小字段宽度为五个字符。 |
| 380 | “%05.5f” | 380.00000 | 使用前导零和五位小数位精度格式化数字为浮点数。由于指定的最小字段宽度(5)小于格式化后数字的实际宽度,因此前导零这一命令实际上没有起到作用。 |
| 380 | “%010.5f” | 0380.00000 | 将最小字段宽度增加到10,前导零现在变得可见。 |
| 380 | “%+d” | +380 | 使用+标志标记正数。 |
| 380 | “%-d” | 380 | 使用-标志左对齐 |
| abcdefghijk | “%5s” | abcedfghijk | 用最小字段宽度格式化字符串。 |
| abcdefghijk | “%d” | abcde | 对字符串应用精度,它被从中截断。 |
Again, printf is used mostly in scripts where it is employed to format tabular data, rather than on the command line directly. But we can still show how it can be used to solve various formatting problems. First, let’s output some fields separated by tab characters:
再次强调,printf 主要用在脚本中,用于格式化表格数据,而不是直接用于命令行。但是我们仍然可以展示如何使用它来解决各种格式化问题。 首先,我们输出一些由制表符分隔的字段:
| |
By inserting \t (the escape sequence for a tab), we achieve the desired effect. Next, some numbers with neat formatting:
通过插入\t(tab 的转义序列),我们实现了所需的效果。接下来,我们让一些数字的格式变得整齐:
| |
This shows the effect of minimum field width on the spacing of the fields. Or how about formatting a tiny web page:
这显示了最小字符宽度对字符间距的影响。或者,让我们看看如何格式化一个小网页:
| |
Document Formatting Systems
文件格式化系统
So far, we have examined the simple text-formatting tools. These are good for small, simple tasks, but what about larger jobs? One of the reasons that Unix became a popular operating system among technical and scientific users (aside from providing a powerful multitasking, multiuser environment for all kinds of software development) is that it offered tools that could be used to produce many types of documents, particularly scientific and academic publications. In fact, as the GNU documentation describes, document preparation was instrumental to the development of Unix:
到目前为止,我们已经查看了简单的文本格式化工具。这些对于小而简单的任务是有好处的,但更大的工作呢? Unix在技术和科学用户中流行的原因之一(除了为各种软件开发提供强大的多任务多用户环境之外), 是它提供了可用于生成许多类型文档的工具,特别是科学和学术出版物。事实上,正如GNU文档所描述的那样,文档准备对于Unix的开发起到了促进作用:
The first version of UNIX was developed on a PDP-7 which was sitting around Bell Labs. In 1971 the developers wanted to get a PDP-11 for further work on the operating system. In order to justify the cost for this system, they proposed that they would implement a document formatting system for the AT&T patents division. This first formatting program was a reimplementation of McIllroy’s `roff’, written by J. F. Ossanna.
UNIX 的第一个版本是在位于贝尔实验室的 PDP-7 上开发的。在1971年,开发人员想要获得 PDP-11 进一步开发操作系统。 为了证明这个系统的成本是合理的,他们建议为 AT&T 专利部门创建文件格式化系统。 第一个格式化程序是由 J. F. Ossanna 撰写的,重新实现了 McIllroy 的 “roff” 的。
Two main families of document formatters dominate the field: those descended from the original roff program, including nroff and troff, and those based on Donald Knuth’s TEX (pronounced “tek”) typesetting system. And yes, the dropped “E” in the middle is part of its name.
两个文件格式化程序的主要家族占据了该领域:继承自原始 roff 程序的,包括 nroff 和 troff;以及 基于 Donald Knuth 的 TEX(发音“tek”)排版系统。是的,中间那个掉下来的“E”是其名称的一部分。
The name “roff” is derived from the term “run off” as in, “I’ll run off a copy for you.” The nroff program is used to format documents for output to devices that use monospaced fonts, such as character terminals and typewriter-style printers. At the time of its introduction, this included nearly all printing devices attached to computers. The later troff program formats documents for output on typesetters, devices used to produce “camera-ready” type for commercial printing. Most computer printers today are able to simulate the output of typesetters. The roff family also includes some other programs that are used to prepare portions of documents. These include eqn (for mathematical equations) and tbl (for tables).
名称 “roff” 源于术语 “run off” ,如“I’ll run off a copy for you.”(“我将为您运行副本”)。 nroff 程序用于格式化文档以输出到使用等宽字体的设备,如字符终端和打字机式打印机。 在它刚面世时,这几乎包括了所有连接在计算机上的打印设备。 稍后的 troff 程序格式化用于排版机输出的文档,也就是“camera-ready”(可供拍摄成印刷版的)类型的用于商业打印的设备。 今天的大多数电脑打印机都能够模拟排版机的输出。roff 家族还包括一些用于准备文档部分的程序。这些包括 eqn(用于数学方程)和 tbl(用于表)。
The TEX system (in stable form) first appeared in 1989 and has, to some degree, displaced troff as the tool of choice for typesetter output. We won’t be covering TEX here, due both to its complexity (there are entire books about it) and to the fact that it is not installed by default on most modern Linux systems.
TEX 系统(稳定形式)首先在1989年出现,并在某种程度上取代了 troff 作为排版机输出的首选工具。 由于其复杂性(整本书都讲不完)以及在大多数现代 Linux 系统上默认情况下不安装的事实,我们不会在此讨论 TEX。
Tip: For those interested in installing TEX, check out the texlive package which can be found in most distribution repositories, and the LyX graphical content editor.
提示:对于有兴趣安装 TEX 的用户,请查看大多数分发版本中可以找到的 texlive 软件包,以及 LyX 图形内容编辑器。
groff
groff is a suite of programs containing the GNU implementation of troff. It also includes a script that is used to emulate nroff and the rest of the roff family as well.
groff 是一套用GNU实现 troff 的程序。它还包括一个脚本,用来模仿 nroff 和其他 roff 家族。
While roff and its descendants are used to make formatted documents, they do it in a way that is rather foreign to modern users. Most documents today are produced using word processors that are able to perform both the composition and layout of a document in a single step. Prior to the advent of the graphical word processor, documents were often produced in a two-step process involving the use of a text editor to perform composition, and a processor, such as troff, to apply the formatting. Instructions for the formatting program were embedded into the composed text through the use of a markup language. The modern analog for such a process is the web page, which is composed using a text editor of some kind and then rendered by a web browser using HTML as the markup language to describe the final page layout.
roff 及其后继制作格式化文档的方式对现代用户来说是相当陌生的。今天的大部分文件都是由能够一次性完成排字和布局的文字处理器生成的。 在图形文字处理器出现之前,需要两步来生成文档。首先用文本编辑器排字,接着用诸如 troff 之类的处理器来格式化。 格式化程序的说明通过标记语言的形式插入到已排好字的文本当中。 类似这种过程的现代例子是网页。它首先由某种文本编辑器排好字,然后由使用 HTML 作为标记语言的 Web 浏览器渲染出最终的页面布局。
We’re not going to cover groff in its entirety, as many elements of its markup language deal with rather arcane details of typography. Instead we will concentrate on one of its macro packages that remains in wide use. These macro packages condense many of its low-level commands into a smaller set of high-level commands that make using groff much easier.
我们不会讲解 groff 的全部内容,因为它的标记语言被用来处理少有人懂的排字细节。我们将专注于其中的一个仍然广泛使用的宏包。这些宏包将 低级命令转换少量高级命令,从而简化 groff 的使用。
For a moment, let’s consider the humble man page. It lives in the /usr/share/man directory as a gzip compressed text file. If we were to examine its uncompressed contents, we would see the following (the man page for ls in section 1 is shown):
现在,我们来看一下这个简单的手册页。它位于/usr/share/man目录,是一个gzip压缩文本文件。解压后,我们将看到以下内容(显示了 ls 手册的第1节):
| |
Compared to the man page in its normal presentation, we can begin to see a correlation between the markup language and its results:
与默认手册页进行比较,我们可以开始看到标记语言与其结果之间的相关性:
| |
The reason this is of interest is that man pages are rendered by groff, using the mandoc macro package. In fact, we can simulate the man command with the following pipeline:
令人感兴趣的原因是手册页由 groff 渲染,使用 mandoc 宏包。事实上,我们可以用以下流水线来模拟 man 命令:
| |
Here we use the groff program with the options set to specify the mandoc macro package and the output driver for ASCII. groff can produce output in several formats. If no format is specified, PostScript is output by default:
在这里,我们使用 groff 程序和选项集来指定 mandoc 宏程序包和 ASCII 的输出驱动程序。groff 可以产生多种格式的输出。 如果没有指定格式,默认情况下会输出 PostScript格式:
| |
We briefly mentioned PostScript in the previous chapter, and will again in the next chapter. PostScript is a page description language that is used to describe the contents of a printed page to a typesetter-like device. If we take the output of our command and store it to a file (assuming that we are using a graphical desktop with a Desktop directory):
我们在前一章中简要介绍了PostScript,并将在下一章中再次介绍。 PostScript 是一种页面描述语言,用于将打印页面的内容描述给类似排字机的设备。 如果我们输出命令并将其存储到一个文件中(假设我们正在使用带有 Desktop 目录的图形桌面):
| |
An icon for the output file should appear on the desktop. By double-clicking the icon, a page viewer should start up and reveal the file in its rendered form:
输出文件的图标应该出现在桌面上。双击图标,页面查看器将启动,并显示渲染后的文件:
Figure 4: Viewing PostScript Output With A Page Viewer In GNOME
图4:在GNOME中使用页面查看器查看 PostScript 输出
What we see is a nicely typeset man page for ls! In fact, it’s possible to convert the Post- Script file into a PDF (Portable Document Format) file with this command:
我们看到的是一个排版很好的 ls 手册页面!事实上,可以使用以下命令将 PostScript 输出的文件转换为PDF(便携式文档格式)文件:
| |
The ps2pdf program is part of the ghostscript package, which is installed on most Linux systems that support printing.
ps2pdf 程序是 ghostscript 包的一部分,它安装在大多数支持打印的 Linux 系统上。
Tip: Linux systems often include many command line programs for file format conversion. They are often named using the convention of format2format. Try using the command
提示:Linux 系统通常包含许多用于文件格式转换的命令行程序。它们通常以 format2format 命名。尝试使用该命令
ls /usr/bin/*[[:alpha:]]2[[:alpha:]]*
to identify them. Also try searching for programs named formattoformat.
去识别它们。同样也可以尝试搜索 formattoformat 程序。
For our last exercise with groff, we will revisit our old friend distros.txt once more. This time, we will use the tbl program which is used to format tables to typeset our list of Linux distributions. To do this, we are going to use our earlier sed script to add markup to a text stream that we will feed to groff.
groff 的最后一个练习,将再次访问我们的老朋友 distros.txt。这一次,我们将使用能够将表格格式化的 tbl 程序,来输出 Linux 发行版本列表。为此,我们将使用早期的 sed 脚本添加一个文本流的标记,提供给 groff。
First, we need to modify our sed script to add the necessary requests that tbl requires. Using a text editor, we will change distros.sed to the following:
首先,我们需要修改我们的 sed 脚本来添加 tbl 所需的请求。 使用文本编辑器,我们将将 distros.sed 更改为以下内容:
# sed script to produce Linux distributions report
1 i\
.TS\
center box;\
cb s s\
cb cb cb\
l n c.\
Linux Distributions Report\
=\
Name Version Released\
_
s/\([0-9]\{2\}\)\/\([0-9]\{2\}\)\/\([0-9]\{4\}\)$/\3-\1-\2/
$ a\
.TE
Note that for the script to work properly, care must been taken to see that the words “Name Version Released” are separated by tabs, not spaces. We’ll save the resulting file as distros-tbl.sed. tbl uses the .TS and .TE requests to start and end the table. The rows following the .TS request define global properties of the table which, for our example, are centered horizontally on the page and surrounded by a box. The remaining lines of the definition describe the layout of each table row. Now, if we run our reportgenerating pipeline again with the new sed script, we’ll get the following :
请注意,为使脚本正常工作,必须注意单词“Name Version Released”由 tab 分隔,而不是空格。 我们将生成的文件保存为 distros-tbl.sed. tbl 使用 .TS 和 .TE 请求来启动和结束表格。 .TS 请求后面的行定义了表格的全局属性,就我们的示例而言,它在页面上水平居中并含外边框。 定义的其余行描述每行的布局。现在,如果我们再次使用新的 sed 脚本运行我们新的报告生成流水线,我们将得到以下内容:
| |
Adding the -t option to groff instructs it to pre-process the text stream with tbl. Likewise, the -T option is used to output to ASCII rather than the default output medium, PostScript.
将 -t 选项添加到 groff 指示它用 tbl 预处理文本流。同样地,-T 选项用于输出到 ASCII ,而不是默认的输出介质 PostScript。
The format of the output is the best we can expect if we are limited to the capabilities of a terminal screen or typewriter-style printer. If we specify PostScript output and graphically view the resulting output, we get a much more satisfying result:
如果仅限于终端屏幕或打字机式打印机,这样的输出格式是我们能期望的最好的。 如果我们指定 PostScript 输出并以图形方式查看生成的输出,我们将得到一个更加满意的结果:
| |
Figure 5: Viewing The Finished Table 图5:查看生成的表格
Summing Up
Given that text is so central to the character of Unix-like operating systems, it makes sense that there would be many tools that are used to manipulate and format text. As we have seen, there are! The simple formatting tools like fmt and pr will find many uses in scripts that produce short documents, while groff (and friends) can be used to write books. We may never write a technical paper using command line tools (though there are many people who do!), but it’s good to know that we could.
小节
文本是 类 Unix 系统的核心特性,一定会有许多修改和格式化文本的工具。正如我们所看到的那样,的确很多!像 fmt 和 pr 这种比较简单的格式化工具会在 生成比较短的文件时发挥很多用途,而 groff 和其他工具则会在写书的时候用上。我们也许永远不会用命令行工具来写一篇技术文章(尽管有很多人在这么做!), 但是知道我们可以这么做也是极好的。
Further Reading
groff User’s Guide
Writing Papers With nroff Using -me:
-me Reference Manual:
Tbl – A Program To Format Tables:
And, of course, try the following articles at Wikipedia:
http://en.wikipedia.org/wiki/TeX
阅读更多
groff 用户指南
运用 nroff 指令中的 -me 选项写论文:
-me 参考手册:
Tbl – 一个格式化表格的指令:
当然,你也可以试试下面列出的维基百科中的内容:
http://en.wikipedia.org/wiki/TeX
23 - 23 打印
打印
http://billie66.github.io/TLCL/book/chap23.html
After spending the last couple of chapters manipulating text, it’s time to put that text on paper. In this chapter, we’ll look at the command-line tools that are used to print files and control printer operation. We won’t be looking at how to configure printing, as that varies from distribution to distribution and is usually set up automatically during installation. Note that we will need a working printer configuration to perform the exercises in this chapter.
前几章我们学习了如何操控文本,下面要做的是将文本呈于纸上。在这章中,我们将会着手用于打印文件和控制打印选项的命令行工具。通常不同发行版的打印配置各有不同且都会在其安装时自动完成,因此这里我们不讨论打印的配置过程。本章的练习需要一台正确配置的打印机来完成。
We will discuss the following commands:
我们将讨论一下命令:
- pr——Convert text files for printing.
- pr —— 转换需要打印的文本文件
- lpr——Print files.
- lpr —— 打印文件
- lp——Print files (System V).
- lp —— 打印文件(System V)
- a2ps——Format files for printing on a PostScript printer.
- a2ps —— 为 PostScript 打印机格式化文件
- lpstat——Show printer status information.
- lpstat —— 显示打印机状态信息
- lpq——Show printer queue status.
- lpq —— 显示打印机队列状态
- lprm——Cancel print jobs.
- lprm —— 取消打印任务
- cancel——Cancel print jobs (System V).
- cancel —— 取消打印任务(System V)
打印简史
To fully understand the printing features found in Unix-like operating systems, we must first learn some history. Printing on Unix-like systems goes way back to the beginning of the operating system itself. In those days, printers and how they were used were much different from how they are today.
为了较好的理解类 Unix 操作系统中的打印功能,我们必须先了解一些历史。类 Unix 系统中的打印可追溯到操作系统本身的起源,那时候打印机和它的用法与今天截然不同。
早期的打印
Like the computers themselves, printers in the pre-PC era tended to be large, expensive, and centralized. The typical computer user of 1980 worked at a terminal connected to a computer some distance away. The printer was located near the computer and was under the watchful eyes of the computer’s operators.
和计算机一样,前 PC 时代的打印机都很大、很贵,并且很集中。1980年的计算机用户都是在离电脑很远的地方用一个连接电脑的终端来工作的,而打印机就放在电脑旁并受到计算机管理员的全方位监视。
When printers were expensive and centralized, as they often were in the early days of Unix, it was common practice for many users to share a printer. To identify print jobs belonging to a particular user, a banner page displaying the name of the user was often printed at the beginning of each print job. The computer support staff would then load up a cart containing the day’s print jobs and deliver them to the individual users.
由于当时打印机既昂贵又集中,而且都工作在早期的 Unix 环境下,人们从实际考虑通常都会多人共享一台打印机。为了区别不同用户的打印任务,每个打印任务的开头都会打印一张写着用户名字的标题页,然后计算机工作人员会用推车装好当天的打印任务并分发给每个用户。
基于字符的打印机
The printer technology of the ’80s was very different in two respects. First, printers of that period were almost always impact printers. Impact printers use a mechanical mechanism that strikes a ribbon against the paper to form character impressions on the page. Two of the popular technologies of that time were daisy-wheel printing and dot-matrix printing.
80年代的打印机技术有两方面的不同。首先,那时的打印机基本上都是打击式打印机。打击式打印机使用撞针打击色带的机械结构在纸上形成字符。这种流行的技术造就了当时的菊轮式打印和点阵式打印。
The second, and more important, characteristic of early printers was that they used a fixed set of characters that were intrinsic to the device itself. For example, a daisy-wheel printer could print only the characters actually molded into the petals of the daisy wheel. This made the printers much like high-speed typewriters. As with most typewriters, they printed using monospaced (fixed-width) fonts. This means that each character has the same width. Printing was done at fixed positions on the page, and the printable area of a page contained a fixed number of characters. Most printers printed 10 characters per inch (CPI) horizontally and 6 lines per inch (LPI) vertically. Using this scheme, a US-letter sheet of paper is 85 characters wide and 66 lines high. Taking into account a small margin on each side, 80 characters was considered the maximum width of a print line. This explains why terminal displays (and our terminal emulators) are normally 80 characters wide. It provides a WYSIWYG (What You See Is What You Get) view of printed output, using a monospaced font.
其次,更重要的是,早期打印机的特点是它使用设备内部固定的一组字符集。比如,一台菊轮式打印机只能打印固定在其菊花轮花瓣上的字符,就这点而言打印机更像是高速打字机。大部分打字机都使用等宽字体,意思是说每个字符的宽度相等,页面上只有固定的区域可供打印,而这些区域只能容纳固定的字符数。大部分打印机采用横向10字符每英寸(CPI)和纵向6行每英寸(LPI)的规格打印,这样一张美式信片纸就有横向85字符宽纵向66行高,加上两侧的页边距,一行的最大宽度可达80字符。据此,使用等宽字体就能提供所见即所得(WYSIWYG,What You See Is What You Get)的打印预览。
Data is sent to a typewriter-like printer in a simple stream of bytes containing the characters to be printed. For example, to print an a, the ASCII character code 97 is sent. In addition, the low-numbered ASCII control codes provided a means of moving the printer’s carriage and paper, using codes 286 Chapter 22 for carriage return, line feed, form feed, and so on. Using the control codes, it’s possible to achieve some limited font effects, such as boldface, by having the printer print a character, backspace, and print the character again to get a darker print impression on the page. We can actually witness this if we use nroff to render a man page and examine the output using cat -A:
接着,一台类打字机的打印机会收到以简单字节流的形式传送来的数据,其中就包含要打印的字符。例如要打印一个字母a,计算机就会发送 ASCII 码97,如果要移动打印机的滑动架和纸张,就需要使用回车、换行、换页等的小编号 ASCII 控制码。使用控制码,还能实现一些之前受限制的字体效果,比如粗体,就是让打印机先打印一个字符,然后退格再打印一遍来得到颜色较深的效果的。用 nroff 来产生一个手册页然后用 cat -A 检查输出,我们就能亲眼看看这种效果了:
| |
^H (CTRL-H) characters are the backspaces used to create the boldface effect. Likewise, we can also see a backspace/underscore sequence used to produce underlining.
^H(ctrl-H)字符是用于打印粗体效果的退格符。同样,我们还可以看到用于打印下划线效果的[退格/下划线]序列。
图形化打印机
The development of GUIs led to major changes in printer technology. As computers moved to more picture-based displays, printing moved from character-based to graphical techniques. This was facilitated by the advent of the low-cost laser printer, which, instead of printing fixed characters, could print tiny dots anywhere in the printable area of the page. This made printing proportional fonts (like those used by typesetters), and even photographs and high-quality diagrams, possible.
图形用户界面(GUI)的发展催生了打印机技术中主要的变革。随着计算机的展现步入更多以图形为基础的方式,打印技术也从基于字符走向图形化技术,这一切都是源于激光打印机的到来,它不仅廉价,还可以在打印区域的任意位置打印微小的墨点,而不是使用固定的字符集。这让打印机能够打印成比例的字体(像用排字机那样),甚至是图片和高质量图表。
However, moving from a character-based scheme to a graphical scheme presented a formidable technical challenge. Here’s why: The number of bytes needed to fill a page using a character-based printer can be calculated this way (assuming 60 lines per page, each containing 80 characters): 60 x 80 = 4,800 bytes.
然而,从基于字符的方式到转移到图形化的方式提出了一个严峻的技术挑战。原因如下:使用基于字符的打印机时,填满一张纸所用的字节数可以这样计算出来(假设一张纸有60行,每行80个字符):60 × 80 = 4800字节。
In comparison, a 300-dot-per-inch (DPI) laser printer (assuming an 8-by-10-inch print area per page) requires (8 x 300) x (10 x 300) / 8 = 900,000 bytes.
相比之下,用一台300点每英寸(DPI)分辨率的激光打印机(假设一张纸有8乘10英寸的打印区域)打印则需要 (8 × 300) × (10 × 300) / 8 = 900,000字节。
Many of the slow PC networks simply could not handle the nearly 1 megabyte of data required to print a full page on a laser printer, so it was clear that a clever invention was needed.
当时许多慢速的个人电脑网络无法接受激光打印机打印一页需要传输将近1兆的数据这一点,因此,很有必要发明一种更聪明的方法。
That invention turned out to be the page-description language. A page-description language (PDL) is a programming language that describes the contents of a page. Basically it says, “Go to this position, draw the character a in 10-point Helvetica, go to this position….” until everything on the page is described. The first major PDL was PostScript from Adobe Systems, which is still in wide use today. The PostScript language is a complete programming language tailored for typography and other kinds of graphics and imaging. It includes built-in support for 35 standard, high-quality fonts, plus the ability Printing 287 to accept additional font definitions at runtime. At first, support for Post- Script was built into the printers themselves. This solved the data transmission problem. While the typical PostScript program was verbose in comparison to the simple byte stream of character-based printers, it was much smaller than the number of bytes required to represent the entire printed page.
这种发明便是页面描述语言(PDL)。PDL 是一种描述页面内容的编程语言。简单的说就是,“到这个地方,印一个10点大小的黑体字符 a ,到这个地方。。。” 这样直到页面上的所有内容都描述完了。第一种主要的 PDL 是 Adobe 系统开发的 PostScript,直到今天,这种语言仍被广泛使用。PostScript 是专为印刷各类图形和图像设计的完整的编程语言,它内建支持35种标准的高质量字体,在工作时还能够接受其他的字体定义。最早,对 PostScript 的支持是打印机本身内建的。这样传输数据的问题就解决了。相比基于字符打印机的简单字节流,典型的 PostScript 程序更为详细,而且比表示整个页面的字节数要小很多。
A PostScript printer accepted a PostScript program as input. The printer contained its own processor and memory (oftentimes making the printer a more powerful computer than the computer to which it was attached) and executed a special program called a PostScript interpreter, which read the incoming PostScript program and rendered the results into the printer’s internal memory, thus forming the pattern of bits (dots) that would be transferred to the paper. The generic name for this process of rendering something into a large bit pattern (called a bitmap) is raster image processor, or RIP.
一台 PostScript 打印机接受 PostScript 程序作为输入。打印机有自己的处理器和内存(通常这让打印机比连接它的计算机更为强大),能执行一种叫做 PostScript 解析器的特殊程序用于读取输入的 PostScript 程序并生成结果导入打印机的内存,这样就形成了要转移到纸上的位(点)图。这种将页面渲染成大型位图(bitmap)的过程有个通用名称作光栅图像处理器(raster image processor),又叫 RIP。
As the years went by, both computers and networks became much faster. This allowed the RIP to move from the printer to the host computer, which, in turn, permitted high-quality printers to be much less expensive.
多年之后,电脑和网络都变得更快了。这使得 RIP 技术从打印机转移到了主机上,还让高品质打印机变得更便宜了。
Many printers today still accept character-based streams, but many low-cost printers do not. They rely on the host computer’s RIP to provide a stream of bits to print as dots. There are still some PostScript printers, too.
现在的许多打印机仍能接受基于字符的字节流,但很多廉价的打印机却不支持,因为它们依赖于主机的 RIP 提供的比特流来作为点阵打印。当然也有不少仍旧是 PostScript 打印机。
在 Linux 下打印
Modern Linux systems employ two software suites to perform and manage printing. The first, CUPS (Common Unix Printing System), provides print drivers and print-job management; the second, Ghostscript, a PostScript interpreter, acts as a RIP.
当前 Linux 系统采用两套软件配合显示和管理打印。第一,CUPS(Common Unix Printing System,一般 Unix 打印系统),用于提供打印驱动和打印任务管理;第二,Ghostscript,一种 PostScript 解析器,作为 RIP 使用。
CUPS manages printers by creating and maintaining print queues. As we discussed in our brief history lesson, Unix printing was originally designed to manage a centralized printer shared by multiple users. Since printers are slow by nature, compared to the computers that are feeding them, printing systems need a way to schedule multiple print jobs and keep things organized. CUPS also has the ability to recognize different types of data (within reason) and can convert files to a printable form.
CUPS 通过创建并维护打印队列来管理打印机。如前所述,Unix 下的打印原本是设计成多用户共享中央打印机的管理模式的。由于打印机本身比连接到它的电脑要慢,打印系统就需要对打印任务进行调度使其保持顺序。CUPS 还能识别出不同类型的数据(在合理范围内)并转换文件为可打印的格式。
为打印准备文件
As command line users, we are mostly interested in printing text, though it is certainly possible to print other data formats as well.
作为命令行用户,尽管打印各种格式的文本都能实现,不过打印最多的,还是文本。
pr - 转换需要打印的文本文件
We looked at pr a little in the previous chapter. Now we will examine some of its many options used in conjunction with printing. In our history of printing, we saw that character-based printers use monospaced fonts, resulting in 288 Chapter 22 fixed numbers of characters per line and lines per page. pr is used to adjust text to fit on a specific page size, with optional page headers and margins. Table 23-1 summarizes the most commonly used options.
前面的章节我们也有提到过 pr 命令,现在我们来探讨一下这条命令结合打印使用的一些选项。我们知道,在打印的历史上,基于字符的打印机曾经用过等宽字体,致使每页只能打印固定的行数和字符数,而 pr 命令则能够根据不同的页眉和页边距排列文本使其适应指定的纸张。表23-1总结了最常用的选项。
| Option | Description |
|---|---|
| +first[:last] | Output a range of pages starting with first and, optionally, ending with last. |
| -columns | Organize the content of the page into the number of columns specified by columns. |
| -a | By default, multicolumn output is listed vertically. By adding the -a (across) option, content is listed horizontally. |
| -d | Double-space output. |
| -D format | Format the date displayed in page headers using format. See the man page for the date command for a description of the format string. |
| -f | Use form feeds rather than carriage returns to separate pages. |
| -h header | In the center portion of the page header, use header rather the name of the file being processed. |
| -l length | Set page length to length. Default is 66 lines (US letter at 6 lines per inch). |
| -n | Number lines. |
| -o offset | Create a left margin offset characters wide. |
| -w width | Set page width to width. Default is 72 characters. |
| 选项 | 描述 |
|---|---|
| +first[:last] | 输出从 first 到 last(默认为最后)范围内的页面。 |
| -columns | 根据 columns 指定的列数排版页面内容。 |
| -a | 默认多列输出为垂直,用 -a (across)可使其水平输出。 |
| -d | 双空格输出。 |
| -D format | 用 format 指定的格式修改页眉中显示的日期,日期命令中 format 字符串的描述详见参考手册。 |
| -f | 改用换页替换默认的回车来分割页面。 |
| -h header | 在页眉中部用 header 参数替换打印文件的名字。 |
| -l length | 设置页长为 length,默认为66行(每英寸6行的美国信纸)。 |
| -n | 输出行号。 |
| -o offset | 创建一个宽 offset 字符的左页边。 |
| -w width | 设置页宽为 width,默认为72字符。 |
pr is often used in pipelines as a filter. In this example, we will produce a directory listing of /usr/bin and format it into paginated, three-column output using pr:
我们通常用管道配合 pr 命令来做筛选。下面的例子中我们会列出目录 /usr/bin 并用 pr 将其格式化为3列输出的标题页:
| |
将打印任务送至打印机
The CUPS printing suite supports two methods of printing historically used on Unix-like systems. One method, called Berkeley or LPD (used in the Berkeley Software Distribution version of Unix), uses the lpr program; the other method, called SysV (from the System V version of Unix), uses the lp program. Both programs do roughly the same thing. Choosing one over the other is a matter of personal taste.
CUPS 打印体系支持两种曾用于类 Unix 系统的打印方式。一种,叫 Berkeley 或 LPD(用于 Unix 的 Berkeley 软件发行版),使用 lpr 程序;另一种,叫 SysV(源自 System V 版本的 Unix),使用 lp 程序。这两个程序的功能大致相同。具体使用哪个完全根据个人喜好。
lpr - 打印文件(Berkeley 风格)
The lpr program can be used to send files to the printer. It may also be used in pipelines, as it accepts standard input. For example, to print the results of our multicolumn directory listing above, we could do this:
lpr 程序可以用来把文件传送给打印机。由于它能接收标准输入,所以能用管道来协同工作。例如,要打印刚才多列目录列表的结果,我们只需这样:
| |
The report would be sent to the system’s default printer. To send the file to a different printer, the -P option can used like this: lpr -P printer_name where printer_name is the name of the desired printer. To see a list of printers known to the system:
报告会送到系统默认的打印机,如果要送到别的打印机,可以使用 -P 参数:
lpr -P printer_name
printer_name 表示这台打印机的名称。若要查看系统已知的打印机列表:
| |
Note: Many Linux distributions allow you to define a “printer” that outputs files in PDF, rather than printing on the physical printer. This is very handy for experimenting with printing commands. Check your printer configuration program to see if it supports this configuration. On some distributions, you may need to install additional packages (such as cups-pdf) to enable this capability.
注意:许多 Linux 发行版允许你定义一个输出 PDF 文件但不执行实体打印的“打印机”,这可以用来很方便的检验你的打印命令。看看你的打印机配置程序是否支持这项配置。在某些发行版中,你可能要自己安装额外的软件包(如 cups-pdf)来使用这项功能。
Table 23-2 shows some of the common options for lpr.
表23-2显示了 lpr 的一些常用选项
| Option | Description |
|---|---|
| -# number | Set number of copies to number. |
| -p | Print each page with a shaded header with the date, time, job name, and page number. This so-called “pretty print” option can be used when printing text files. |
| -P printer | Specify the name of the printer used for output. If no printer is specified, the system’s default printer is used. |
| -r | Delete files after printing. This would be useful for programs that produce temporary printer-output files. |
| 选项 | 描述 |
|---|---|
| -# number | 设定打印份数为 number。 |
| -p | 使每页页眉标题中带有日期、时间、工作名称和页码。这种所谓的“美化打印”选项可用于打印文本文件。 |
| -P printer | 指定输出打印机的名称。未指定则使用系统默认打印机。 |
| -r | 打印后删除文件。对程序产生的临时打印文件较为有用。 |
lp - 打印文件(System V 风格)
Like lpr, lp accepts either files or standard input for printing. It differs from lpr in that it supports a different (and slightly more sophisticated) option set. Table 23-3 lists the common options.
和 lpr 一样,lp 可以接收文件或标准输入为打印内容。与 lpr 不同的是 lp 支持不同的选项(略为复杂),表23-3列出了其常用选项。
| Option | Description |
|---|---|
| -d printer | Set the destination (printer) to printer. If no d option is specified, the system default printer is used. |
| -n number | Set the number of copies to number. |
| -o landscape | Set output to landscape orientation. |
| -o fitplot | Scale the file to fit the page. This is useful when printing images, such as JPEG files. |
| -o scaling=number | Scale file to number. The value of 100 fills the page. Values less than 100 are reduced, while values greater than 100 cause the file to be printed across multiple pages. |
| -o cpi=number | Set the output characters per inch to number. Default is 10. |
| -o lpi=number | Set the output lines per inch to number. Default is 6. |
| -o page-bottom=points -o page-left=points -o page-right=points -o page-top=points | Set the page margins. Values are expressed in points, a unit of typographic measurement. There are 72 points to an inch. |
| -P pages | Specify the list of pages. pages may be expressed as a comma-separated list and/or a range—for example 1,3,5,7-10. |
| 选项 | 描述 |
|---|---|
| -d printer | 设定目标(打印机)为 printer。若d 选项未指定,则使用系统默认打印机。 |
| -n number | 设定的打印份数为 number。 |
| -o landscape | 设置输出为横向。 |
| -o fitplot | 缩放文件以适应页面。打印图像时较为有用,如 JPEG 文件。 |
| -o scaling=number | 缩放文件至 number。100表示填满页面,小于100表示缩小,大于100则会打印在多页上。 |
| -o cpi=number | 设定输出为 number 字符每英寸。默认为10。 |
| -o lpi=number | 设定输出为 number 行每英寸,默认为6。 |
| -o page-bottom=points -o page-left=points -o page-right=points -o page-top=points | 设置页边距,单位为点,一种印刷上的单位。一英寸 =72点。 |
| -P pages | 指定打印的页面。pages 可以是逗号分隔的列表或范围——例如 1,3,5,7-10。 |
We’ll produce our directory listing again, this time printing 12 CPI and 8 LPI with a left margin of one-half inch. Note that we have to adjust the pr options to account for the new page size:
再次打印我们的目录列表,这次我们设置12 CPI、8 LPI 和一个半英寸的左边距。注意这里我必须调整 pr 选项来适应新的页面大小:
| |
This pipeline produces a four-column listing using smaller type than the default. The increased number of characters per inch allows us to fit more columns on the page.
这条命令用小于默认的格式产生了一个四列的列表。增加 CPI 可以让我们在页面上打印更多列。
另一种选择:a2ps
The a2ps program is interesting. As we can surmise from its name, it’s a format conversion program, but it’s also much more. Its name originally meant ASCII to PostScript, and it was used to prepare text files for printing on PostScript printers. Over the years, however, the capabilities of the program have grown, and now its name means Anything to PostScript. While its name suggests a format-conversion program, it is actually a printing program. It sends its default output, rather than standard output, to the system’s default printer. The program’s default behavior is that of a “pretty printer,” meaning that it improves the appearance of output. We can use the program to create a PostScript file on our desktop:
a2ps 程序很有趣。单从名字上看,这是个格式转换程序,但它的功能不止于此。程序名字的本意为 ASCII to PostScript,它是用来为 PostScript 打印机准备要打印的文本文件的。多年后,程序的功能得到了提升,名字的含义也变成了 Anything to PostScript。尽管名为格式转换程序,但它实际的功能却是打印。它的默认输出不是标准输出,而是系统的默认打印机。程序的默认行为被称为“漂亮的打印机”,这意味着它可以改善输出的外观。我们能用程序在桌面上创建一个 PostScript 文件:
| |
Here we filter the stream with pr, using the -t option (omit headers and footers) and then, with a2ps, specifying an output file (-o option) and 66 lines per page (-L option) to match the output pagination of pr. If we view the resulting file with a suitable file viewer, we will see the output shown in Figure 23-1.
这里我们用带 -t 参数(忽略页眉和页脚)的 pr 命令过滤数据流,然后用 a2ps 指定一个输出文件(-o 参数),并设定每页66行(-L 参数)来匹配 pr 的输出分页。用合适的文件查看器查看我们的输出文件,我们就会看到图23-1中显示的结果。
 图 23-1: 浏览 a2ps 的输出结果
As we can see, the default output layout is “two up” format. This causes the contents of two pages to be printed on each sheet of paper. a2ps applies nice page headers and footers, too.
可以看到,默认的输出布局是一面两页的,这将导致两页的内容被打印到一张纸上。a2ps 还能利用页眉和页脚。
a2ps has a lot of options. Table 23-4 summarizes them.
a2ps 有很多选项,总结在表23-4中。
| Option | Description |
|---|---|
| –center-title text | Set center page title to text. |
| –columns number | Arrange pages into number columns. Default is 2. |
| –footer text | Set page footer to text. |
| –guess | Report the types of files given as arguments. Since a2ps tries to convert and format all types of data, this option can be useful for predicting what a2ps will do when given a particular file. |
| –left-footer text | Set left-page footer to text. |
| –left-title text | Set left-page title to text. |
| –line-numbers=interval | Number lines of output every interval lines. |
| –list=defauls | Display default settings. |
| –list=topic | Display settings for topic, where topic is one of the following: delegations (external programs that will be used to convert data), encodings, features, variables, media (paper sizes and the like), ppd (PostScript printer descriptions), printers, prologues (portions of code that are prefixed to normal output), stylesheets, or user options. |
| –pages range | Print pages in range. |
| –right-footer text | Set right-page footer to text. |
| –right-title text | Set right-page title to text. |
| –rows number | Arrange pages into number rows. Default is 1. |
| -B | No page headers. |
| -b text | Set page header to text. |
| -f size | Use size point font. |
| -l number | Set characters per line to number. This and the -L option (below) can be used to make files paginated with other programs, such as pr, fit correctly on the page. |
| -L number | Set lines per page to number. |
| -M name | Use media name—for example, A4. |
| -n number | Output number copies of each page. |
| -o file | Send output to file. If file is specified as -, use standard output. |
| -P printer | Use printer. If a printer is not specified, the system default printer is used. |
| -R | Portrait orientation |
| -r | Landscape orientation |
| -T number | Set tab stops to every number characters. |
| -u text | Underlay (watermark) pages with text. |
| 选项 | 描述 |
|---|---|
| –center-title text | 设置中心页标题为 text。 |
| –columns number | 将所有页面排列成 number 列。默认为2。 |
| –footer text | 设置页脚为 text。 |
| –guess | 报告参数中文件的类型。由于 a2ps 会转换并格式化所有类型的数据,所以当给定文件类型后,这个选项可以很好的用来判断 a2ps 应该做什么。 |
| –left-footer text | 设置左页脚为 text。 |
| –left-title text | 设置页面左标题为 text。 |
| –line-numbers=interval | 每隔 interval 行输出行号。 |
| –list=defauls | 显示默认设置。 |
| –list=topic | 显示 topic 设置,topic 表示下列之一:代理程序(用来转换数据的外部程序),编码,特征,变量,媒介(页面大小等),ppd(PostScript 打印机描述信息),打印机,起始程序(为常规输出添加前缀的代码部分),样式表,或用户选项。 |
| –pages range | 打印 range 范围内的页面。 |
| –right-footer text | 设置右页脚为 text。 |
| –right-title text | 设置页面右标题为 text。 |
| –rows number | 将所有页面排列成 number 排。默认为1。 |
| -B | 没有页眉。 |
| -b text | 设置页眉为 text。 |
| -f size | 使用字体大小为 size 号。 |
| -l number | 设置每行字符数为 number。此项和 -L 选项(见下方)可以给文件用其他程序来更准确的分页,如 pr。 |
| -L number | 设置每页行数为 number。 |
| -M name | 使用打印媒介的名称——例如,A4。 |
| -n number | 每页输出 number 份。 |
| -o file | 输出到文件 file。如果指定为 - ,则输出到标准输出。 |
| -P printer | 使用打印机 printer。如果未指定,则使用系统默认打印机。 |
| -R | 纵向打印。 |
| -r | 横向打印。 |
| -T number | 设置制表位为每 number 字符。 |
| -u text | 用 text 作为页面底图(水印)。 |
This is just a summary. a2ps has several more options.
以上只是对 a2ps 的总结,更多的选项尚未列出。
Note: a2ps is still in active development. During my testing, I noticed different behavior on various distributions. On CentOS 4, output always went to standard output by default. On CentOS 4 and Fedora 10, output defaulted to A4 media, despite the program being configured to use letter-size media by default. I could overcome these issues by explicitly specifying the desired option. On Ubuntu 8.04, a2ps performed as documented. Also note that there is another output formatter that is useful for converting text into PostScript. Called enscript, it can perform many of the same kinds of formatting and printing tricks, but unlike a2ps, it accepts only text input.
注意:a2ps 目前仍在不断的开发中。就我的测试而言,不同版本之间都多少有所变化。CentOS 4 中输出总是默认为标准输出。在 CentOS 4 和 Fedora 10 中,尽管程序配置信纸为默认媒介,输出还是默认为 A4纸。我可以明确的指定需要的选项来解决这些问题。Ubuntu 8.04 中,a2ps 表现的正如参考文档中所述。 另外,我们也要注意到另一个转换文本为 PostScript 的输出格式化工具,名叫 enscript。它具有许多相同的格式化和打印功能,但和 a2ps 唯一的不同在于,它只能处理纯文本的输入。
监视和控制打印任务
As Unix printing systems are designed to handle multiple print jobs from multiple users, CUPS is designed to do the same. Each printer is given a print queue, where jobs are parked until they can be spooled to the printer. CUPS supplies several command-line programs that are used to manage printer status and print queues. Like the lpr and lp programs, these management programs are modeled after the corresponding programs from the Berkeley and System V printing systems.
由于 Unix 打印系统的设计是能够处理多用户的多重打印任务,CUPS 也是如此设计的。每台打印机都有一个打印队列,其中的任务直到传送到打印机才停下并进行打印。CUPS 支持一些命令行程序来管理打印机状态和打印队列。想 lpr 和 lp 这样的管理程序都是以 Berkeley 和 System V 打印系统的相应程序为依据进行排列的。
lpstat - 显示打印系统状态
The lpstat program is useful for determining the names and availability of printers on the system. For example, if we had a system with both a physical printer (named printer) and a PDF virtual printer (named PDF ), we could check their status like this:
lpstat 程序可用于确定系统中打印机的名字和有效性。例如,我们系统中有一台实体打印机(名叫 printer)和一台 PDF 虚拟打印机(名叫 PDF),我们可以像这样查看打印机状态:
| |
Further, we could determine a more detailed description of the print system configuration this way:
接着,我们可以查看打印系统更具体的配置信息:
| |
In this example, we see that printer is the system’s default printer and that it is a network printer using Internet Printing Protocol (ipp:// ) attached to a system named print-server.
上例中,我们看到 printer 是系统默认的打印机,其本身是一台网络打印机,使用网络打印协议(ipp://)通过网络连接到名为 print-server 的系统。
The commonly used options are described in Table 23-5.
lpstat 的常用选项列于表23-5。
| Option | Description |
|---|---|
| -a [printer…] | Display the state of the printer queue for printer. Note that this is the status of the printer queue’s ability to accept jobs, not the status of the physical printers. If no printers are specified, all print queues are shown. |
| -d | Display the name of the system’s default printer. |
| -p [printer…] | Display the status of the specified printer. If no printers are specified, all printers are shown. |
| -r | Display the status of the print server. |
| -s | Display a status summary. |
| -t | Display a complete status report. |
| 选项 | 描述 |
|---|---|
| -a [printer…] | 显示 printer 打印机的队列。这里显示的状态是打印机队列承受任务的能力,而不是实体打印机的状态。若未指定打印机,则显示所有打印队列。 |
| -d | 显示系统默认打印机的名称。 |
| -p [printer…] | 显示 printer 指定的打印机的状态。若未指定打印机,则显示所有打印机状态。 |
| -r | 显示打印系统的状态。 |
| -s | 显示汇总状态。 |
| -t | 显示完整状态报告。 |
lpq - 显示打印机队列状态
To see the status of a printer queue, the lpq program is used. This allows us to view the status of the queue and the print jobs it contains. Here is an example of an empty queue for a system default printer named printer :
使用 lpq 程序可以查看打印机队列的状态,从中我们可以看到队列的状态和所包含的打印任务。下面的例子显示了一台名叫 printer 的系统默认打印机包含一个空队列的情况:
| |
If we do not specify a printer (using the -P option), the system’s default printer is shown. If we send a job to the printer and then look at the queue, we will see it listed:
如果我们不指定打印机(用 -P 参数),就会显示系统默认打印机。如果给打印机添加一项任务再查看队列,我们就会看到下列结果:
| |
lprm 和 cancel - 取消打印任务
CUPS supplies two programs used to terminate print jobs and remove them from the print queue. One is Berkeley style (lprm), and the other is System V (cancel). They differ slightly in the options they support but do basically the same thing. Using our print job above as an example, we could stop the job and remove it this way:
CUPS 提供两个程序来从打印队列中终止并移除打印任务。一个是 Berkeley 风格的(lprm),另一个是 System V 的(cancel)。在支持的选项上两者有较小的区别但是功能却几乎相同。以上面的打印任务为例,我们可以像这样终止并移除任务:
| |
Each command has options for removing all the jobs belonging to a particular user, particular printer, and multiple job numbers. Their respective man pages have all the details.
每个命令都有选项可用于移除某用户、某打印机或多个任务号的所有任务,相应的参考手册中都有详细的介绍。
24 - 24 编译程序
编译程序
http://billie66.github.io/TLCL/book/chap24.html
In this chapter, we will look at how to build programs by compiling source code. The availability of source code is the essential freedom that makes Linux possible. The entire ecosystem of Linux development relies on free exchange between developers. For many desktop users, compiling is a lost art. It used to be quite common, but today, distribution providers maintain huge repositories of precompiled binaries, ready to download and use. At the time of this writing, the Debian repository (one of the largest of any of the distributions) contains almost 23,000 packages.
在这一章中,我们将看一下如何通过编译源代码来创建程序。源代码的可用性是至关重要的自由,从而使得 Linux 成为可能。 整个 Linux 开发生态圈就是依赖于开发者之间的自由交流。对于许多桌面用户来说,编译是一种失传的艺术。以前很常见, 但现在,由系统发行版提供商维护巨大的预编译的二进制仓库,准备供用户下载和使用。在写这篇文章的时候, Debian 仓库(最大的发行版之一)包含了几乎23,000个预编译的包。
So why compile software? There are two reasons:
那么为什么要编译软件呢? 有两个原因:
Availability. Despite the number of precompiled programs in distribution repositories, some distributions may not include all the desired applications. In this case, the only way to get the desired program is to compile it from source.
Timeliness. While some distributions specialize in cutting edge versions of programs, many do not. This means that in order to have the very latest version of a program, compiling is necessary.
可用性。尽管系统发行版仓库中已经包含了大量的预编译程序,但是一些发行版本不可能包含所有期望的应用。 在这种情况下,得到所期望程序的唯一方式是编译程序源码。
及时性。虽然一些系统发行版专门打包前沿版本的应用程序,但是很多不是。这意味着, 为了拥有一个最新版本的程序,编译是必需的。
Compiling software from source code can become very complex and technical; well beyond the reach of many users. However, many compiling tasks are quite easy and involve only a few steps. It all depends on the package. We will look at a very simple case in order to provide an overview of the process and as a starting point for those who wish to undertake further study.
从源码编译软件可以变得非常复杂且具有技术性;许多用户难以企及。然而,许多编译任务是 相当简单的,只涉及到几个步骤。这都取决于程序包。我们将看一个非常简单的案例, 为的是给大家提供一个对编译过程的整体认识,并为那些愿意进一步学习的人们构筑一个起点。
We will introduce one new command:
我们将介绍一个新命令:
- make – Utility to maintain programs
- make - 维护程序的工具
什么是编译?
Simply put, compiling is the process of translating source code (the human-readable description of a program written by a programmer) into the native language of the computer’s processor.
简而言之,编译就是把源码(一个由程序员编写的人类可读的程序的说明)翻译成计算机处理器的语言的过程。
The computer’s processor (or CPU) works at a very elemental level, executing programs in what is called machine language. This is a numeric code that describes very small operations, such as “add this byte,” “point to this location in memory,” or “copy this byte.”
计算机处理器(或 CPU)工作在一个非常基本的水平,执行用机器语言编写的程序。这是一种数值编码,描述非常小的操作, 比如“加这个字节”、“指向内存中的这个位置”或者“复制这个字节”。
Each of these instructions is expressed in binary (ones and zeros). The earliest computer programs were written using this numeric code, which may explain why programmers who wrote it were said to smoke a lot, drink gallons of coffee, and wear thick glasses.This problem was overcome by the advent of assembly language, which replaced the numeric codes with (slightly) easier to use character mnemonics such as CPY (for copy) and MOV (for move). Programs written in assembly language are processed into machine language by a program called an assembler. Assembly language is still used today for certain specialized programming tasks, such as device drivers and embedded systems.
这些指令中的每一条都是用二进制表示的(1和0)。最早的计算机程序就是用这种数值编码写成的,这可能就 解释了为什么编写它们的程序员据说吸很多烟,喝大量咖啡,并带着厚厚的眼镜。随着汇编语言的出现,这个问题得到克服。 汇编语言使用诸如CPY(复制)和 MOV(移动)之类(略微)易用的字符助记符代替了数值编码 。用汇编语言编写的程序通过 汇编器处理为机器语言。今天为了完成某些特定的程序任务,汇编语言仍在被使用,例如设备驱动和嵌入式系统。
We next come to what are called high-level programming languages. They are called this because they allow the programmer to be less concerned with the details of what the processor is doing and more with solving the problem at hand. The early ones (developed during the 1950s) included FORTRAN (designed for scientific and technical tasks) and COBOL (designed for business applications). Both are still in limited use today.
下一步我们谈论一下什么是所谓的高级编程语言。之所以这样称呼它们,是因为它们可以让程序员少操心处理器的 一举一动,而更多关心如何解决手头的问题。早期的高级语言(二十世纪50年代期间研发的)包括 FORTRAN(为科学和技术任务而设计)和 COBOL(为商业应用而设计)。今天这两种语言仍在有限的使用。
While there are many popular programming languages, two predominate. Most programs written for modern systems are written in either C or C++. In the examples to follow, we will be compiling a C program.
虽然有许多流行的编程语言,两个占主导地位。大多数为现代系统编写的程序,要么用 C 编写,要么是用 C++ 编写。 在随后的例子中,我们将编写一个 C 程序。
Programs written in high-level programming languages are converted into machine language by processing them with another program, called a compiler. Some compilers translate high-level instructions into assembly language and then use an assembler to perform the final stage of translation into machine language.
用高级语言编写的程序,经过另一个称为编译器的程序的处理,会转换成机器语言。一些编译器把 高级指令翻译成汇编语言,然后使用一个汇编器完成翻译成机器语言的最后阶段。
A process often used in conjunction with compiling is called linking. There are many common tasks performed by programs. Take, for instance, opening a file. Many programs perform this task, but it would be wasteful to have each program implement its own routine to open files. It makes more sense to have a single piece of programming that knows how to open files and to allow all programs that need it to share it. Providing support for common tasks is accomplished by what are called libraries. They contain multiple routines, each performing some common task that multiple programs can share. If we look in the /lib and /usr/lib directories, we can see where many of them live. A program called a linker is used to form the connections between the output of the compiler and the libraries that the compiled program requires. The final result of this process is the executable program file, ready for use.
一个称为链接的过程经常与编译结合在一起。有许多常见的由程序执行的任务。以打开文件为例。许多程序执行这个任务, 但是让每个程序实现它自己的打开文件功能,是很浪费资源的。更有意义的是,拥有单独的一段知道如何打开文件的程序, 并允许所有需要它的程序共享它。对常见任务提供支持由所谓的库完成。这些库包含多个程序,每个程序执行 一些可以由多个程序共享的常见任务。如果我们看一下 /lib 和 /usr/lib 目录,我们可以看到许多库定居在那里。 一个叫做链接器的程序用来在编译器的输出结果和要编译的程序所需的库之间建立连接。这个过程的最终结果是 一个可执行程序文件,准备使用。
所有的程序都是可编译的吗?
No. As we have seen, there are programs such as shell scripts that do not require compiling. They are executed directly. These are written in what are known as scripting or interpreted languages. These languages have grown in popularity in recent years and include Perl, Python, PHP, Ruby, and many others.
不是。正如我们所看到的,有些程序比如 shell 脚本就不需要编译。它们直接执行。 这些程序是用所谓的脚本或解释型语言编写的。近年来,这些语言变得越来越流行,包括 Perl、 Python、PHP、Ruby和许多其它语言。
Scripted languages are executed by a special program called an interpreter. An interpreter inputs the program file and reads and executes each instruction contained within it. Ingeneral, interpreted programs execute much more slowly than compiled programs. This is because that each source code instruction in an interpreted program is translated every time it is carried out, whereas with a compiled program, a source code instruction is only translated once, and this translation is permanently recorded in the final executable file.
脚本语言由一个叫做解释器的特殊程序执行。一个解释器输入程序文件,读取并执行程序中包含的每一条指令。 通常来说,解释型程序执行起来要比编译程序慢很多。这是因为每次解释型程序执行时,程序中每一条源码指令都需要翻译, 而一个已经编译好的程序,一条源码指令只翻译了一次,翻译后的指令会永久地记录到最终的执行文件中。
So why are interpreted languages so popular? For many programming chores, the results are “fast enough,” but the real advantage is that it is generally faster and easier to develop interpreted programs than compiled programs. Programs are usually developed in a repeating cycle of code, compile, test. As a program grows in size, the compilation phase of the cycle can become quite long. Interpreted languages remove the compilation step and thus speed up program development.
那么为什么解释型程序这样流行呢?对于许多编程任务来说,原因是“足够快”,但是真正的优势是一般来说开发解释型程序 要比编译程序快速且容易。通常程序开发需要经历一个不断重复的写码、编译和测试周期。随着程序变得越来越大, 编译阶段会变得相当耗时。解释型语言删除了编译步骤,这样就加快了程序开发。
编译一个 C 语言
Let’s compile something. Before we do that however, we’re going to need some tools like the compiler, the linker, and make. The C compiler used almost universally in the Linux environment is called gcc (GNU C Compiler), originally written by Richard Stallman. Most distributions do not install gcc by default. We can check to see if the compiler is present like this:
让我们编译一些东西。在我们编译之前,然而我们需要一些工具,像编译器、链接器以及 make。 在 Linux 环境中,普遍使用的 C 编译器叫做 gcc(GNU C 编译器),最初由 Richard Stallman 写出来的。 大多数 Linux 系统发行版默认不安装 gcc。我们可以这样查看该编译器是否存在:
| |
The results in this example indicate that the compiler is installed.
在这个例子中的输出结果表明安装了 gcc 编译器。
Tip: Your distribution may have a meta-package (a collection of packages) for soft- ware development. If so, consider installing it if you intend to compile programs on your system. If your system does not provide a meta-package, try installing the gcc and make packages. On many distributions, this is sufficient to carry out the exercise below.
小提示: 你的系统发行版可能有一个用于软件开发的 meta-package(软件包的集合)。如果是这样的话, 若你打算在你的系统中编译程序就考虑安装它。若你的系统没有提供一个 meta-package,试着安装 gcc 和 make 工具包。 在许多发行版中,这就足够完成下面的练习了
得到源码
For our compiling exercise, we are going to compile a program from the GNU Project called diction. This is a handy little program that checks text files for writing quality and style. As programs go, it is fairly small and easy to build.
为了我们的编译练习,我们将编译一个叫做 diction 的程序,来自 GNU 项目。这是一个小巧方便的程序, 检查文本文件的书写质量和样式。就程序而言,它相当小,且容易创建。
Following convention, we’re first going to create a directory for our source code named src and then download the source code into it using ftp:
遵照惯例,首先我们要创建一个名为 src 的目录来存放我们的源码,然后使用 ftp 协议把源码下载下来。
| |
Note: Since we are the “maintainer” of this source code while we compile it, we will keep it in ~/src. Source code installed by your distribution will be installed in /usr/src, while source code intended for use by multiple users is usually installed in /usr/local/src.
注意:因为我们是这个源码的“维护者”,当我们编译它的时候,我们把它保存在 ~/src 目录下。 由你的系统发行版源码会把源码安装在 /usr/src 目录下,而供多个用户使用的源码,通常安装在 /usr/local/src 目录下。
As we can see, source code is usually supplied in the form of a compressed tar file. Sometimes called a tarball, this file contains the source tree, or hierarchy of directories and files that comprise the source code. After arriving at the ftp site, we examine the list of tar files available and select the newest version for download. Using the get command within ftp, we copy the file from the ftp server to the local machine.
正如我们所看到的,通常提供的源码形式是一个压缩的 tar 文件。有时候称为 tarball,这个文件包含源码树, 或者是组成源码的目录和文件的层次结构。当到达 ftp 站点之后,我们检查可用的 tar 文件列表,然后选择最新版本,下载。 使用 ftp 中的 get 命令,我们把文件从 ftp 服务器复制到本地机器。
Once the tar file is downloaded, it must be unpacked. This is done with the tar program:
一旦 tar 文件下载下来之后,必须解包。通过 tar 程序可以完成:
| |
Tip: The diction program, like all GNU Project software, follows certain stan- dards for source code packaging. Most other source code available in the Linux ecosystem also follows this standard. One element of the standard is that when the source code tar file is unpacked, a directory will be created which contains the source tree, and that this directory will be named project-x.xx, thus containing both the project’s name and its version number. This scheme allows easy installation of multiple versions of the same program. However, it is often a good idea to examine the layout of the tree before unpacking it. Some projects will not create the directory, but instead will deliver the files directly into the current directory. This will make a mess in your otherwise well-organized src directory. To avoid this, use the following command to examine the contents of the tar file:
小提示:该 diction 程序,像所有的 GNU 项目软件,遵循着一定的源码打包标准。其它大多数在 Linux 生态系统中 可用的源码也遵循这个标准。该标准的一个条目是,当源码 tar 文件打开的时候,会创建一个目录,该目录包含了源码树, 并且这个目录将会命名为 project-x.xx,其包含了项目名称和它的版本号两项内容。这种方案能在系统中方便安装同一程序的多个版本。 然而,通常在打开 tarball 之前检验源码树的布局是个不错的主意。一些项目不会创建该目录,反而,会把文件直接传递给当前目录。 这会把你的(除非组织良好的)src 目录弄得一片狼藉。为了避免这个,使用下面的命令,检查 tar 文件的内容:
tar tzvf tarfile | head ---
检查源码树
Unpacking the tar file results in the creation of a new directory, named diction-1.11. This directory contains the source tree. Let’s look inside:
打开该 tar 文件,会创建一个新的目录,名为 diction-1.11。这个目录包含了源码树。让我们看一下里面的内容:
| |
In it, we see a number of files. Programs belonging to the GNU Project, as well as many others, will supply the documentation files README, INSTALL, NEWS, and COPYING.
在源码树中,我们看到大量的文件。属于 GNU 项目的程序,还有其它许多程序都会,提供文档文件 README,INSTALL,NEWS,和 COPYING。
These files contain the description of the program, information on how to build and in- stall it, and its licensing terms. It is always a good idea to carefully read the README and INSTALL files before attempting to build the program.
这些文件包含了程序描述,如何建立和安装它的信息,还有其它许可条款。在试图建立程序之前,仔细阅读 README 和 INSTALL 文件,总是一个不错的主意。
The other interesting files in this directory are the ones ending with .c and .h:
在这个目录中,其它有趣的文件是那些以 .c 和 .h 为后缀的文件:
| |
The .c files contain the two C programs supplied by the package (style and diction), divided into modules. It is common practice for large programs to be broken into smaller, easier to manage pieces. The source code files are ordinary text and can be examined with less:
这些 .c 文件包含了由该软件包提供的两个 C 程序(style 和 diction),被分割成模块。这是一种常见做法,把大型程序 分解成更小,更容易管理的代码块。源码文件都是普通文本,可以用 less 命令查看:
| |
The .h files are known as header files. These, too, are ordinary text. Header files contain descriptions of the routines included in a source code file or library. In order for the com- piler to connect the modules, it must receive a description of all the modules needed to complete the entire program. Near the beginning of the diction.c file, we see this line:
这些 .h 文件被称为头文件。它们也是普通文件。头文件包含了程序的描述,这些程序被包括在源码文件或库中。 为了让编译器链接到模块,编译器必须接受所需的所有模块的描述,来完成整个程序。在 diction.c 文件的开头附近, 我们看到这行代码:
#include "getopt.h"
This instructs the compiler to read the file getopt.h as it reads the source code in diction.c in order to “know” what’s in getopt.c. The getopt.c file supplies routines that are shared by both the style and diction programs.
当它读取 diction.c 中的源码的时候,这行代码指示编译器去读取文件 getopt.h, 为的是“知道” getopt.c 中的内容。 getopt.c 文件提供由 style 和 diction 两个程序共享的例行程序。
Above the include statement for getopt.h, we see some other include statements such as these:
在 getopt.h 的 include 语句上面,我们看到一些其它的 include 语句,比如这些:
#include <regex.h>
#include <stdio.h>
#include <stdlib.h>
#include <string.h>
#include <unistd.h>
These also refer to header files, but they refer to header files that live outside the current source tree. They are supplied by the system to support the compilation of every program. If we look in /usr/include, we can see them:
这些文件也是头文件,但是这些头文件在当前源码树的外面。它们由操作系统供给,来支持每个程序的编译。 如果我们看一下 /usr/include 目录,能看到它们:
| |
The header files in this directory were installed when we installed the compiler.
当我们安装编译器的时候,这个目录中的头文件会被安装。
构建程序
Most programs build with a simple, two-command sequence:
大多数程序通过一个简单的,两个命令的序列构建:
./configure
make
The configure program is a shell script which is supplied with the source tree. Its job is to analyze the build environment. Most source code is designed to be portable. That is, it is designed to build on more than one kind of Unix-like system. But in order to do that, the source code may need to undergo slight adjustments during the build to accommodate differences between systems. configure also checks to see that necessary external tools and components are installed. Let’s run configure. Since configure is not located where the shell normally expects programs to be located, we must explicitly tell the shell its location by prefixing the command with ./ to indicate that the program is located in the current working directory:
这个 configure 程序是一个 shell 脚本,由源码树提供。它的工作是分析程序构建环境。大多数源码会设计为可移植的。 也就是说,它被设计成能够在不止一种类 Unix 系统中进行构建。但是为了做到这一点,在建立程序期间,为了适应系统之间的差异, 源码可能需要经过轻微的调整。configure 也会检查是否安装了必要的外部工具和组件。让我们运行 configure 命令。 因为 configure 命令所在的位置不是位于 shell 通常期望程序所呆的地方,我们必须明确地告诉 shell 它的位置,通过 在命令之前加上 ./ 字符,来表明程序位于当前工作目录:
| |
configure will output a lot of messages as it tests and configures the build. When it finishes, it will look something like this:
configure 将会输出许多信息,随着它测试和配置整个构建过程。当结束后,输出结果看起来像这样:
checking libintl.h presence... yes
checking for libintl.h... yes
checking for library containing gettext... none required
configure: creating ./config.status
config.status: creating Makefile
config.status: creating diction.1
config.status: creating diction.texi
config.status: creating diction.spec
config.status: creating style.1
config.status: creating test/rundiction
config.status: creating config.h
[me@linuxbox diction-1.11]$
What’s important here is that there are no error messages. If there were, the configuration failed, and the program will not build until the errors are corrected.
这里最重要的事情是没有错误信息。如果有错误信息,整个配置过程失败,然后程序不能构建直到修正了错误。
We see configure created several new files in our source directory. The most impor- tant one is Makefile. Makefile is a configuration file that instructs the make pro- gram exactly how to build the program. Without it, make will refuse to run. Makefile is an ordinary text file, so we can view it:
我们看到在我们的源码目录中 configure 命令创建了几个新文件。最重要一个是 Makefile。Makefile 是一个配置文件, 指示 make 程序究竟如何构建程序。没有它,make 程序就不能运行。Makefile 是一个普通文本文件,所以我们能查看它:
| |
The make program takes as input a makefile (which is normally named Makefile), that describes the relationships and dependencies among the components that comprise the finished program.
这个 make 程序把一个 makefile 文件作为输入(通常命名为 Makefile),makefile 文件 描述了包括最终完成的程序的各组件之间的关系和依赖性。
The first part of the makefile defines variables that are substituted in later sections of the makefile. For example we see the line:
makefile 文件的第一部分定义了变量,这些变量在该 makefile 后续章节中会被替换掉。例如我们看看这一行代码:
CC= gcc
which defines the C compiler to be gcc. Later in the makefile, we see one instance where it gets used:
其定义了所用的 C 编译器是 gcc。文件后面部分,我们看到一个使用该变量的实例:
diction: diction.o sentence.o misc.o getopt.o getopt1.o
$(CC) -o $@ $(LDFLAGS) diction.o sentence.o misc.o \
getopt.o getopt1.o $(LIBS)
A substitution is performed here, and the value $(CC) is replaced by gcc at run time. Most of the makefile consists of lines, which define a target, in this case the executable file diction, and the files on which it is dependent. The remaining lines describe the command(s) needed to create the target from its components. We see in this example that the executable file diction (one of the final end products) depends on the existence of diction.o, sentence.o, misc.o, getopt.o, and getopt1.o. Later on, in the makefile, we see definitions of each of these as targets:
这里完成了一个替换操作,在程序运行时,$(CC) 的值会被替换成 gcc。大多数 makefile 文件由行组成,每行定义一个目标文件, 在这种情况下,目标文件是指可执行文件 diction,还有目标文件所依赖的文件。剩下的行描述了从目标文件的依赖组件中 创建目标文件所需的命令。在这个例子中,我们看到可执行文件 diction(最终的成品之一)依赖于文件 diction.o,sentence.o,misc.o,getopt.o,和 getopt1.o都存在。在 makefile 文件后面部分,我们看到 diction 文件所依赖的每一个文件做为目标文件的定义:
diction.o: diction.c config.h getopt.h misc.h sentence.h
getopt.o: getopt.c getopt.h getopt_int.h
getopt1.o: getopt1.c getopt.h getopt_int.h
misc.o: misc.c config.h misc.h
sentence.o: sentence.c config.h misc.h sentence.h
style.o: style.c config.h getopt.h misc.h sentence.h
However, we don’t see any command specified for them. This is handled by a general target, earlier in the file, that describes the command used to compile any .c file into a .o file:
然而,我们不会看到针对它们的任何命令。这个由一个通用目标解决,在文件的前面,描述了这个命令,用来把任意的 .c 文件编译成 .o 文件:
.c.o:
$(CC) -c $(CPPFLAGS) $(CFLAGS) $<
This all seems very complicated. Why not simply list all the steps to compile the parts and be done with it? The answer to this will become clear in a moment. In the meantime, let’s run make and build our programs:
这些看起来非常复杂。为什么不简单地列出编译每个部分的步骤,那样不就行了?一会儿就知道答案了。同时, 让我们运行 make 命令并构建我们的程序:
| |
The make program will run, using the contents of Makefile to guide its actions. It will produce a lot of messages.
这个 make 程序将会运行,使用 Makefile 文件的内容来指导它的行为。它会产生很多信息。
When it finishes, we will see that all the targets are now present in our directory:
当 make 程序运行结束后,现在我们将看到所有的目标文件出现在我们的目录中。
| |
Among the files, we see diction and style, the programs that we set out to build. Congratulations are in order! We just compiled our first programs from source code! But just out of curiosity, let’s run make again:
在这些文件之中,我们看到 diction 和 style,我们开始要构建的程序。恭喜一切正常!我们刚才源码编译了 我们的第一个程序。但是出于好奇,让我们再运行一次 make 程序:
| |
It only produces this strange message. What’s going on? Why didn’t it build the program again? Ah, this is the magic of make. Rather than simply building everything again, make only builds what needs building. With all of the targets present, make determined that there was nothing to do. We can demonstrate this by deleting one of the targets and running make again to see what it does. Let’s get rid of one of the intermediate targets:
它只是产生这样一条奇怪的信息。怎么了?为什么它没有重新构建程序呢?啊,这就是 make 奇妙之处了。make 只是构建 需要构建的部分,而不是简单地重新构建所有的内容。由于所有的目标文件都存在,make 确定没有任何事情需要做。 我们可以证明这一点,通过删除一个目标文件,然后再次运行 make 程序,看看它做些什么。让我们去掉一个中间目标文件:
| |
We see that make rebuilds it and re-links the diction and style programs, since they depend on the missing module. This behavior also points out another important feature of make: it keeps targets up to date. make insists that targets be newer than their dependencies. This makes perfect sense, as a programmer will often update a bit of source code and then use make to build a new version of the finished product. make ensures that everything that needs building based on the updated code is built. If we use the touch program to “update” one of the source code files, we can see this happen:
我们看到 make 重新构建了 getopt.o 文件,并重新链接了 diction 和 style 程序,因为它们依赖于丢失的模块。 这种行为也指出了 make 程序的另一个重要特征:它保持目标文件是最新的。make 坚持目标文件要新于它们的依赖文件。 这个非常有意义,做为一名程序员,经常会更新一点儿源码,然后使用 make 来构建一个新版本的成品。make 确保 基于更新的代码构建了需要构建的内容。如果我们使用 touch 程序,来“更新”其中一个源码文件,我们看到发生了这样的事情:
| |
After make runs, we see that it has restored the target to being newer than the dependency:
运行 make 之后,我们看到目标文件已经更新于它的依赖文件:
| |
The ability of make to intelligently build only what needs building is a great benefit to programmers. While the time savings may not be very apparent with our small project, it is very significant with larger projects. Remember, the Linux kernel (a program that undergoes continuous modification and improvement) contains several million lines of code.
make 程序这种智能地只构建所需要构建的内容的特性,对程序来说,是巨大的福利。虽然在我们的小项目中,节省的时间可能 不是非常明显,在庞大的工程中,它具有非常重大的意义。记住,Linux 内核(一个经历着不断修改和改进的程序)包含了几百万行代码。
安装程序
Well-packaged source code will often include a special make target called install. This target will install the final product in a system directory for use. Usually, this directory is /usr/local/bin, the traditional location for locally built software. However, this directory is not normally writable by ordinary users, so we must become the superuser to perform the installation:
打包良好的源码经常包括一个特别的 make 目标文件,叫做 install。这个目标文件将在系统目录中安装最终的产品,以供使用。 通常,这个目录是 /usr/local/bin,为在本地所构建软件的传统安装位置。然而,通常普通用户不能写入该目录,所以我们必须变成超级用户, 来执行安装操作:
| |
After we perform the installation, we can check that the program is ready to go:
执行了安装后,我们可以检查下程序是否已经可用:
| |
And there we have it!
完美!
总结
In this chapter, we have seen how three simple commands:
在这一章中,我们已经知道了三个简单命令:
./configure
make
make install
can be used to build many source code packages. We have also seen the important role that make plays in the maintenance of programs. The make program can be used for any task that needs to maintain a target/dependency relationship, not just for compiling source code.
可以用来构建许多源码包。我们也知道了在程序维护过程中,make 程序起到了举足轻重的作用。make 程序可以用到 任何需要维护一个目标/依赖关系的任务中,不仅仅为了编译源代码。
拓展阅读
The Wikipedia has good articles on compilers and the make program:
Wikipedia 上面有关于编译器和 make 程序的好文章:
The GNU Make Manual:
GNU Make 手册
http://www.gnu.org/software/make/manual/html_node/index.html
25 - 25 编写第一个 Shell 脚本
编写第一个 Shell 脚本
http://billie66.github.io/TLCL/book/chap25.html
In the preceding chapters, we have assembled an arsenal of command line tools. While these tools can solve many kinds of computing problems, we are still limited to manually using them one by one on the command line. Wouldn’t it be great if we could get the shell to do more of the work? We can. By joining our tools together into programs of our own design, the shell can carry out complex sequences of tasks all by itself. We can enable it to do this by writing shell scripts.
在前面的章节中,我们已经装备了一个命令行工具的武器库。虽然这些工具能够解决许多种计算问题, 但是我们仍然局限于在命令行中手动地一个一个使用它们。如果我们能够让 shell 来完成更多的工作, 岂不是更好? 我们可以的。通过把我们的工具一起放置到我们自己设计的程序中, shell 就会自己来执行这些复杂的任务序列。 通过编写 shell 脚本,我们可以让 shell 来做这些事情。
什么是 Shell 脚本?
In the simplest terms, a shell script is a file containing a series of commands. The shell reads this file and carries out the commands as though they have been entered directly on the command line.
最简单的解释,一个 shell 脚本就是一个包含一系列命令的文件。shell 读取这个文件,然后执行 文件中的所有命令,就好像这些命令已经直接被输入到了命令行中一样。
The shell is somewhat unique, in that it is both a powerful command line interface to the system and a scripting language interpreter. As we will see, most of the things that can be done on the command line can be done in scripts, and most of the things that can be done in scripts can be done on the command line.
Shell 有些独特,因为它不仅是一个功能强大的命令行接口,也是一个脚本语言解释器。我们将会看到, 大多数能够在命令行中完成的任务也能够用脚本来实现,同样地,大多数能用脚本实现的操作也能够 在命令行中完成。
We have covered many shell features, but we have focused on those features most often used directly on the command line. The shell also provides a set of features usually (but not always) used when writing programs.
虽然我们已经介绍了许多 shell 功能,但只是集中于那些经常直接在命令行中使用的功能。 Shell 也提供了一些通常(但不总是)在编写程序时才使用的功能。
怎样编写一个 Shell 脚本
To successfully create and run a shell script, we need to do three things:
为了成功地创建和运行一个 shell 脚本,我们需要做三件事情:
Write a script. Shell scripts are ordinary text files. So we need a text editor to write them. The best text editors will provide syntax highlighting, allowing us to see a color-coded view of the elements of the script. Syntax highlighting will help us spot certain kinds of common errors. vim, gedit, kate, and many other editors are good candidates for writing scripts.
Make the script executable. The system is rather fussy about not letting any old text file be treated as a program, and for good reason! We need to set the script file’s permissions to allow execution.
Put the script somewhere the shell can find it. The shell automatically searches certain directories for executable files when no explicit pathname is specified. For maximum convenience, we will place our scripts in these directories.
编写一个脚本。 Shell 脚本就是普通的文本文件。所以我们需要一个文本编辑器来书写它们。最好的文本 编辑器都会支持语法高亮,这样我们就能够看到一个脚本关键字的彩色编码视图。语法高亮会帮助我们查看某种常见 错误。为了编写脚本文件,vim,gedit,kate,和许多其它编辑器都是不错的候选者。
使脚本文件可执行。 系统会相当挑剔不允许任何旧的文本文件被看作是一个程序,并且有充分的理由! 所以我们需要设置脚本文件的权限来允许其可执行。
把脚本放置到 shell 能够找到的地方。 当没有指定可执行文件明确的路径名时,shell 会自动地搜索某些目录, 来查找此可执行文件。为了最大程度的方便,我们会把脚本放到这些目录当中。
脚本文件格式
In keeping with programming tradition, we’ll create a “hello world” program to demonstrate an extremely simple script. So let’s fire up our text editors and enter the following script:
为了保持编程传统,我们将创建一个 “hello world” 程序来说明一个极端简单的脚本。所以让我们启动 我们的文本编辑器,然后输入以下脚本:
| |
The last line of our script is pretty familiar, just an echo command with a string argument. The second line is also familiar. It looks like a comment that we have seen used in many of the configuration files we have examined and edited. One thing about comments in shell scripts is that they may also appear at the end of lines, like so:
对于脚本中的最后一行,我们应该是相当的熟悉,仅仅是一个带有一个字符串参数的 echo 命令。 对于第二行也很熟悉。它看起来像一个注释,我们已经在许多我们检查和编辑过的配置文件中 看到过。关于 shell 脚本中的注释,它们也可以出现在文本行的末尾,像这样:
echo 'Hello World!' # This is a comment too
Everything from the # symbol onward on the line is ignored.
文本行中,# 符号之后的所有字符都会被忽略。
Like many things, this works on the command line, too:
类似于许多命令,这也在命令行中起作用:
| |
Though comments are of little use on the command line, they will work.
虽然很少在命令行中使用注释,但它们也能起作用。
The first line of our script is a little mysterious. It looks like it should be a comment, since it starts with #, but it looks too purposeful to be just that. The #! character sequence is, in fact, a special construct called a shebang. The shebang is used to tell the system the name of the interpreter that should be used to execute the script that follows. Every shell script should include this as its first line.
我们脚本中的第一行文本有点儿神秘。它看起来它应该是一条注释,因为它起始于一个#符号,但是 它看起来太有意义,以至于不仅仅是注释。事实上,这个#!字符序列是一种特殊的结构叫做 shebang。 这个 shebang 被用来告诉操作系统将执行此脚本所用的解释器的名字。每个 shell 脚本都应该把这一文本行 作为它的第一行。
Let’s save our script file as hello_world.
让我们把此脚本文件保存为 hello_world。
可执行权限
The next thing we have to do is make our script executable. This is easily done using chmod:
下一步我们要做的事情是让我们的脚本可执行。使用 chmod 命令,这很容易做到:
| |
There are two common permission settings for scripts; 755 for scripts that everyone can execute, and 700 for scripts that only the owner can execute. Note that scripts must be readable in order to be executed.
对于脚本文件,有两个常见的权限设置;权限为755的脚本,则每个人都能执行,和权限为700的 脚本,只有文件所有者能够执行。注意为了能够执行脚本,脚本必须是可读的。
脚本文件位置
With the permissions set, we can now execute our script:
当设置了脚本权限之后,我们就能执行我们的脚本了:
| |
In order for the script to run, we must precede the script name with an explicit path. If we don’t, we get this:
为了能够运行此脚本,我们必须指定脚本文件明确的路径。如果我们没有那样做,我们会得到这样的提示:
| |
Why is this? What makes our script different from other programs? As it turns out, nothing. Our script is fine. Its location is the problem. Back in Chapter 12, we discussed the PATH environment variable and its effect on how the system searches for executable programs. To recap, the system searches a list of directories each time it needs to find an executable program, if no explicit path is specified. This is how the system knows to execute /bin/ls when we type ls at the command line. The /bin directory is one of the directories that the system automatically searches. The list of directories is held within an environment variable named PATH. The PATH variable contains a colon- separated list of directories to be searched. We can view the contents of PATH:
为什么会这样呢?什么使我们的脚本不同于其它的程序?结果证明,什么也没有。我们的 脚本没有问题。是脚本存储位置的问题。回到第12章,我们讨论了 PATH 环境变量及其在系统 查找可执行程序方面的作用。回顾一下,如果没有给出可执行程序的明确路径名,那么系统每次都会 搜索一系列的目录,来查找此可执行程序。这个/bin 目录就是其中一个系统会自动搜索的目录。 这个目录列表被存储在一个名为 PATH 的环境变量中。这个 PATH 变量包含一个由冒号分隔开的目录列表。 我们可以查看 PATH 的内容:
| |
Here we see our list of directories. If our script were located in any of the directories in the list, our problem would be solved. Notice the first directory in the list, /home/me/bin. Most Linux distributions configure the PATH variable to contain a bin directory in the user’s home directory, to allow users to execute their own programs. So if we create the bin directory and place our script within it, it should start to work like other programs:
这里我们看到了我们的目录列表。如果我们的脚本位于此列表中任意目录下,那么我们的问题将 会被解决。注意列表中的第一个目录/home/me/bin。大多数的 Linux 发行版会配置 PATH 变量,让其包含 一个位于用户家目录下的 bin 目录,从而允许用户能够执行他们自己的程序。所以如果我们创建了 一个 bin 目录,并把我们的脚本放在这个目录下,那么这个脚本就应该像其它程序一样开始工作了:
| |
And so it does.
它的确工作了。
If the PATH variable does not contain the directory, we can easily add it by including this line in our .bashrc file:
如果这个 PATH 变量不包含这个目录,我们能够轻松地添加它,通过在我们的.bashrc 文件中包含下面 这一行文本:
export PATH=~/bin:"$PATH"
After this change is made, it will take effect in each new terminal session. To apply the change to the current terminal session, we must have the shell re-read the .bashrc file. This can be done by “sourcing” it:
当做了这个修改之后,它会在每个新的终端会话中生效。为了把这个修改应用到当前的终端会话中, 我们必须让 shell 重新读取这个 .bashrc 文件。这可以通过 “sourcing”.bashrc 文件来完成:
| |
The dot (.) command is a synonym for the source command, a shell builtin which reads a specified file of shell commands and treats it like input from the keyboard.
这个点(.)命令是 source 命令的同义词,一个 shell 内建命令,用来读取一个指定的 shell 命令文件, 并把它看作是从键盘中输入的一样。
Note: Ubuntu automatically adds the ~/bin directory to the PATH variable if the ~/bin directory exists when the user’s .bashrc file is executed. So, on Ubuntu systems, if we create the ~/bin directory and then log out and log in again, everything works.
注意:在 Ubuntu 系统中,如果存在 ~/bin 目录,当执行用户的 .bashrc 文件时, Ubuntu 会自动地添加这个 ~/bin 目录到 PATH 变量中。所以在 Ubuntu 系统中,如果我们创建 了这个 ~/bin 目录,随后退出,然后再登录,一切会正常运行。
脚本文件的好去处
The ~/bin directory is a good place to put scripts intended for personal use. If we write a script that everyone on a system is allowed to use, the traditional location is /usr/local/bin. Scripts intended for use by the system administrator are often located in /usr/local/sbin. In most cases, locally supplied software, whether scripts or compiled programs, should be placed in the /usr/local hierarchy and not in /bin or /usr/bin. These directories are specified by the Linux Filesystem Hierarchy Standard to contain only files supplied and maintained by the Linux distributor.
这个 ~/bin 目录是存放为个人所用脚本的好地方。如果我们编写了一个脚本,系统中的每个用户都可以使用它, 那么这个脚本的传统位置是 /usr/local/bin。系统管理员使用的脚本经常放到 /usr/local/sbin 目录下。 大多数情况下,本地支持的软件,不管是脚本还是编译过的程序,都应该放到 /usr/local 目录下, 而不是在 /bin 或 /usr/bin 目录下。这些目录都是由 Linux 文件系统层次结构标准指定,只包含由 Linux 发行商 所提供和维护的文件。
更多的格式技巧
One of the key goals of serious script writing is ease of maintenance; that is, the ease with which a script may be modified by its author or others to adapt it to changing needs. Making a script easy to read and understand is one way to facilitate easy maintenance.
严肃认真的脚本书写的关键目标之一是为了易于维护;也就是说,一个脚本可以轻松地被作者或其它 用户修改,使它适应变化的需求。使脚本容易阅读和理解是一种方便维护的方法。
长选项名称
Many of the commands we have studied feature both short and long option names. For instance, the ls command has many options that can be expressed in either short or long form. For example:
我们学过的许多命令都以长短两种选项名称为特征。例如,这个 ls 命令有许多选项既可以用短形式也 可以用长形式来表示。例如:
| |
and:
和:
| |
are equivalent commands. In the interests of reduced typing, short options are preferred when entering options on the command line, but when writing scripts, long options can provide improved readability.
是等价的命令。为了减少输入,当在命令行中输入选项的时候,短选项更受欢迎,但是当书写脚本的时候, 长选项能提供可读性。
缩进和行继续符
When employing long commands, readability can be enhanced by spreading the command over several lines. In Chapter 18, we looked at a particularly long example of the find command:
当使用长命令的时候,通过把命令在几个文本行中展开,可以提高命令的可读性。 在第十八章中,我们看到了一个特别长的 find 命令实例:
| |
Obviously, this command is a little hard to figure out at first glance. In a script, this command might be easier to understand if written this way:
显然,这个命令有点儿难理解,当第一眼看到它的时候。在脚本中,这个命令可能会比较容易 理解,如果这样书写它:
find playground \
\( \
-type f \
-not -perm 0600 \
-exec chmod 0600 ‘{}’ ‘;’ \
\) \
-or \
\( \
-type d \
-not -perm 0711 \
-exec chmod 0711 ‘{}’ ‘;’ \
\)
By using line continuations (backslash-linefeed sequences) and indentation, the logic of this complex command is more clearly described to the reader. This technique works on the command line, too, though it is seldom used, as it is very awkward to type and edit. One difference between a script and the command line is that the script may employ tab characters to achieve indentation, whereas the command line cannot, since tabs are used to activate completion.
通过使用行继续符(反斜杠-回车符序列)和缩进,这个复杂命令的逻辑会被更清楚地描述给读者。 这个技巧在命令行中同样有效,虽然很少使用它,因为输入和编辑这个命令非常麻烦。脚本和 命令行的一个区别是,脚本可能使用 tab 字符来实现缩进,然而命令行却不能,因为 tab 字符被用来 激活自动补全功能。
Configuring vim For Script Writing
为书写脚本配置 vim
The vim text editor has many, many configuration settings. There are several common options that can facilitate script writing:
这个 vim 文本编辑器有许多许多的配置设置。有几个常见的选项能够有助于脚本书写:
:syntax on
turns on syntax highlighting. With this setting, different elements of shell syntax will be displayed in different colors when viewing a script. This is helpful for identifying certain kinds of programming errors. It looks cool, too. Note that for this feature to work, you must have a complete version of vim installed, and the file you are editing must have a shebang indicating the file is a shell script. If you have difficulty with the command above, try :set syntax=sh instead.
打开语法高亮。通过这个设置,当查看脚本的时候,不同的 shell 语法元素会以不同的颜色 显示。这对于识别某些编程错误很有帮助。并且它看起来也很酷。注意为了这个功能起作用,你 必须安装了一个完整的 vim 版本,并且你编辑的文件必须有一个 shebang,来说明这个文件是 一个 shell 脚本。如果对于上面的命令,你遇到了困难,试试 :set syntax=sh。
:set hlsearch
turns on the option to highlight search results. Say we search for the word “echo.” With this option on, each instance of the word will be highlighted.
打开这个选项是为了高亮查找结果。比如说我们查找单词“echo”。通过设置这个选项,这个 单词的每个实例会高亮显示。
:set tabstop=4
sets the number of columns occupied by a tab character. The default is eight columns. Setting the value to four (which is a common practice) allows long lines to fit more easily on the screen.
设置一个 tab 字符所占据的列数。默认是8列。把这个值设置为4(一种常见做法), 从而让长文本行更容易适应屏幕。
:set autoindent
turns on the “auto indent” feature. This causes vim to indent a new line the same amount as the line just typed. This speeds up typing on many kinds of programming constructs. To stop indentation, type Ctrl-d.
打开 “auto indent” 功能。这导致 vim 能对新的文本行缩进与刚输入的文本行相同的列数。 对于许多编程结构来说,这就加速了输入。停止缩进,输入 Ctrl-d。
These changes can be made permanent by adding these commands (without the leading colon characters) to your ~/.vimrc file.
通过把这些命令(没有开头的冒号字符)添加到你的 ~/.vimrc 文件中,这些改动会永久生效。
总结归纳
In this first chapter of scripting, we have looked at how scripts are written and made to easily execute on our system. We also saw how we may use various formatting techniques to improve the readability (and thus, the maintainability) of our scripts. In future chapters, ease of maintenance will come up again and again as a central principle in good script writing.
在这脚本编写的第一章中,我们已经看过怎样编写脚本,怎样让它们在我们的系统中轻松地执行。 我们也知道了怎样使用各种格式技巧来提高脚本的可读性(可维护性)。在以后的各章中,轻松维护 会作为编写好脚本的中心法则一次又一次地出现。
拓展阅读
For “Hello World” programs and examples in various programming languages, see:
查看各种各样编程语言的“Hello World”程序和实例:
This Wikipedia article talks more about the shebang mechanism:
这篇 Wikipedia 文章讨论了更多关于 shebang 机制的内容:
26 - 26 启动一个项目
启动一个项目
http://billie66.github.io/TLCL/book/chap26.html
Starting with this chapter, we will begin to build a program. The purpose of this project is to see how various shell features are used to create programs and, more importantly, create good programs.
从这一章开始,我们将建设一个项目。这个项目的目的是为了了解怎样使用各种各样的 shell 功能来 创建程序,更重要的是,创建好程序。
The program we will write is a report generator. It will present various statistics about our system and its status, and will produce this report in HTML format, so we can view it with a web browser such as Firefox or Konqueror.
我们将要编写的程序是一个报告生成器。它会显示系统的各种统计数据和它的状态,并将产生 HTML 格式的报告, 所以我们能通过网络浏览器,比如说 Firefox 或者 Konqueror,来查看这个报告。
Programs are usually built up in a series of stages, with each stage adding features and capabilities. The first stage of our program will produce a very minimal HTML page that contains no system information. That will come later.
通常,创建程序要经过一系列阶段,每个阶段会添加新的特性和功能。我们程序的第一个阶段将会 产生一个非常小的 HTML 网页,其不包含系统信息。随后我们会添加这些信息。
第一阶段:最小的文档
The first thing we need to know is the format of a well-formed HTML document. It looks like this:
首先我们需要知道的事是一个规则的 HTML 文档的格式。它看起来像这样:
<HTML>
<HEAD>
<TITLE>Page Title</TITLE>
</HEAD>
<BODY>
Page body.
</BODY>
</HTML>
If we enter this into our text editor and save the file as foo.html, we can use the following URL in Firefox to view the file:
如果我们将这些内容输入到文本编辑器中,并把文件保存为 foo.html,然后我们就能在 Firefox 中 使用下面的 URL 来查看文件内容:
file:///home/username/foo.html
The first stage of our program will be able to output this HTML file to standard output. We can write a program to do this pretty easily. Let’s start our text editor and create a new file named ~/bin/sys_info_page:
程序的第一个阶段将这个 HTML 文件输出到标准输出。我们可以编写一个程序,相当容易地完成这个任务。 启动我们的文本编辑器,然后创建一个名为 ~/bin/sys_info_page 的新文件:
| |
and enter the following program:
随后输入下面的程序:
| |
Our first attempt at this problem contains a shebang, a comment (always a good idea) and a sequence of echo commands, one for each line of output. After saving the file, we’ll make it executable and attempt to run it:
我们第一次尝试解决这个问题,程序包含了一个 shebang,一条注释(总是一个好主意)和一系列的 echo 命令,每个命令负责输出一行文本。保存文件之后,我们将让它成为可执行文件,再尝试运行它:
| |
When the program runs, we should see the text of the HTML document displayed on the screen, since the echo commands in the script send their output to standard output. We’ll run the program again and redirect the output of the program to the file sys_info_page.html, so that we can view the result with a web browser:
当程序运行的时候,我们应该看到 HTML 文本在屏幕上显示出来,因为脚本中的 echo 命令会将输出 发送到标准输出。我们再次运行这个程序,把程序的输出重定向到文件 sys_info_page.html 中, 从而我们可以通过网络浏览器来查看输出结果:
| |
So far, so good.
到目前为止,一切顺利。
When writing programs, it’s always a good idea to strive for simplicity and clarity. Maintenance is easier when a program is easy to read and understand, not to mention, it can make the program easier to write by reducing the amount of typing. Our current version of the program works fine, but it could be simpler. We could actually combine all the echo commands into one, which will certainly make it easier to add more lines to the program’s output. So, let’s change our program to this:
在编写程序的时候,尽量做到简单明了,这总是一个好主意。当一个程序易于阅读和理解的时候, 维护它也就更容易,更不用说,通过减少键入量,可以使程序更容易书写了。我们当前的程序版本 工作正常,但是它可以更简单些。实际上,我们可以把所有的 echo 命令结合成一个 echo 命令,当然 这样能更容易地添加更多的文本行到程序的输出中。那么,把我们的程序修改为:
| |
A quoted string may include newlines, and therefore contain multiple lines of text. The shell will keep reading the text until it encounters the closing quotation mark. It works this way on the command line, too:
一个带引号的字符串可能包含换行符,因此可以包含多个文本行。Shell 会持续读取文本直到它遇到 右引号。它在命令行中也是这样工作的:
| |
The leading “>” character is the shell prompt contained in the PS2 shell variable. It appears whenever we type a multi-line statement into the shell. This feature is a little obscure right now, but later, when we cover multi-line programming statements, it will turn out to be quite handy.
开头的 “>” 字符是包含在 PS2shell 变量中的 shell 提示符。每当我们在 shell 中键入多行语句的时候, 这个提示符就会出现。现在这个功能有点儿晦涩,但随后,当我们介绍多行编程语句时,它会派上大用场。
第二阶段:添加一点儿数据
Now that our program can generate a minimal document, let’s put some data in the report. To do this, we will make the following changes:
现在我们的程序能生成一个最小的文档,让我们给报告添加些数据吧。为此,我们将做 以下修改:
| |
We added a page title and a heading to the body of the report.
我们增加了一个网页标题,并且在报告正文部分加了一个标题。
变量和常量
There is an issue with our script, however. Notice how the string “System Information Report” is repeated? With our tiny script it’s not a problem, but let’s imagine that our script was really long and we had multiple instances of this string. If we wanted to change the title to something else, we would have to change it in multiple places, which could be a lot of work. What if we could arrange the script so that the string only appeared once and not multiple times? That would make future maintenance of the script much easier. Here’s how we could do that:
然而,我们的脚本存在一个问题。请注意字符串 “System Information Report” 是怎样被重复使用的?对于这个微小的脚本而言,它不是一个问题,但是让我们设想一下, 我们的脚本非常冗长,并且我们有许多这个字符串的实例。如果我们想要更换一个标题,我们必须 对脚本中的许多地方做修改,这会是很大的工作量。如果我们能整理一下脚本,让这个字符串只 出现一次而不是多次,会怎样呢?这样会使今后的脚本维护工作更加轻松。我们可以这样做:
| |
By creating a variable named title and assigning it the value “System Information Report,” we can take advantage of parameter expansion and place the string in multiple locations.
通过创建一个名为 title 的变量,并把 “System Information Report” 字符串赋值给它,我们就可以利用参数展开功能,把这个字符串放到文件中的多个位置。
So, how do we create a variable? Simple, we just use it. When the shell encounters a variable, it automatically creates it. This differs from many programming languages in which variables must be explicitly declared or defined before use. The shell is very lax about this, which can lead to some problems. For example, consider this scenario played out on the command line:
那么,我们怎样来创建一个变量呢?很简单,我们只管使用它。当 shell 碰到一个变量的时候,它会 自动地创建它。这不同于许多编程语言,它们中的变量在使用之前,必须显式的声明或是定义。关于 这个问题,shell 要求非常宽松,这可能会导致一些问题。例如,考虑一下在命令行中发生的这种情形:
| |
We first assign the value “yes” to the variable foo, then display its value with echo. Next we display the value of the variable name misspelled as “fool” and get a blank result. This is because the shell happily created the variable fool when it encountered it, and gave it the default value of nothing, or empty. From this, we learn that we must pay close attention to our spelling! It’s also important to understand what really happened in this example. From our previous look at how the shell performs expansions, we know that the command:
首先我们把 “yes” 赋给变量 foo,然后用 echo 命令来显示变量值。接下来,我们显示拼写错误的变量名 “fool” 的变量值,然后得到一个空值。这是因为 当 shell 遇到 fool 的时候, 它很高兴地创建了变量 fool 并且赋给 fool 一个空的默认值。因此,我们必须小心谨慎地拼写!同样理解实例中究竟发生了什么事情也 很重要。从我们以前学习 shell 执行展开操作,我们知道这个命令:
| |
undergoes parameter expansion and results in:
经历了参数展开操作,然后得到:
| |
Whereas the command:
然而这个命令:
| |
expands into:
展开为:
| |
The empty variable expands into nothing! This can play havoc with commands that require arguments. Here’s an example:
这个空变量展开值为空!对于需要参数的命令来说,这会引起混乱。下面是一个例子:
| |
We assign values to two variables, foo and foo1. We then perform a cp, but misspell the name of the second argument. After expansion, the cp command is only sent one argument, though it requires two.
我们给两个变量赋值,foo 和 foo1。然后我们执行 cp 操作,但是拼写错了第二个参数的名字。 参数展开之后,这个 cp 命令只接受到一个参数,虽然它需要两个。
There are some rules about variable names:
有一些关于变量名的规则:
Variable names may consist of alphanumeric characters (letters and numbers) and underscore characters.
The first character of a variable name must be either a letter or an underscore.
Spaces and punctuation symbols are not allowed.
变量名可由字母数字字符(字母和数字)和下划线字符组成。
变量名的第一个字符必须是一个字母或一个下划线。
变量名中不允许出现空格和标点符号。
The word “variable” implies a value that changes, and in many applications, variables are used this way. However, the variable in our application, title, is used as a constant. A constant is just like a variable in that it has a name and contains a value. The difference is that the value of a constant does not change. In an application that performs geometric calculations, we might define PI as a constant, and assign it the value of 3.1415, instead of using the number literally throughout our program. The shell makes no distinction between variables and constants; they are mostly for the programmer’s convenience. A common convention is to use upper case letters to designate constants and lower case letters for true variables. We will modify our script to comply with this convention:
单词 “variable” 意味着可变的值,并且在许多应用程序当中,都是以这种方式来使用变量的。然而, 我们应用程序中的变量,title,被用作一个常量。常量有一个名字且包含一个值,在这方面就 像是变量。不同之处是常量的值是不能改变的。在执行几何运算的应用程序中,我们可以把 PI 定义为 一个常量,并把 3.1415 赋值给它,用它来代替数字字面值。shell 不能辨别变量和常量;它们大多数情况下 是为了方便程序员。一个常用惯例是指定大写字母来表示常量,小写字母表示真正的变量。我们 将修改我们的脚本来遵从这个惯例:
| |
We also took the opportunity to jazz up our title by adding the value of the shell variable HOSTNAME. This is the network name of the machine.
我们亦借此机会,通过在标题中添加 shell 变量名 HOSTNAME,让标题变得活泼有趣些。 这个变量名是这台机器的网络名称。
Note: The shell actually does provide a way to enforce the immutability of constants, through the use of the declare builtin command with the -r (read- only) option. Had we assigned TITLE this way:
注意:实际上,shell 确实提供了一种方法,通过使用带有-r(只读)选项的内部命令 declare, 来强制常量的不变性。如果我们给 TITLE 这样赋值:
declare -r TITLE=”Page Title”
the shell would prevent any subsequent assignment to TITLE. This feature is rarely used, but it exists for very formal scripts.
那么随后所有给 TITLE 的赋值都会被 shell 阻止。这个功能极少被使用,但为了很早之前的脚本, 它仍然存在。
给变量和常量赋值
Here is where our knowledge of expansion really starts to pay off. As we have seen, variables are assigned values this way:
这里是我们真正开始使用参数扩展知识的地方。正如我们所知道的,这样给变量赋值:
variable=value
where variable is the name of the variable and value is a string. Unlike some other programming languages, the shell does not care about the type of data assigned to a variable; it treats them all as strings. You can force the shell to restrict the assignment to integers by using the declare command with the -i option, but, like setting variables as read-only, this is rarely done.
这里的variable是变量的名字,value是一个字符串。不同于一些其它的编程语言,shell 不会 在乎变量值的类型;它把它们都看作是字符串。通过使用带有-i 选项的 declare 命令,你可以强制 shell 把 赋值限制为整数,但是,正如像设置变量为只读一样,极少这样做。
Note that in an assignment, there must be no spaces between the variable name, the equals sign, and the value. So what can the value consist of? Anything that we can expand into a string:
注意在赋值过程中,变量名、等号和变量值之间必须没有空格。那么,这些值由什么组成呢? 可以展开成字符串的任意值:
a=z # Assign the string "z" to variable a.
b="a string" # Embedded spaces must be within quotes.
c="a string and $b" # Other expansions such as variables can be
# expanded into the assignment.
d=$(ls -l foo.txt) # Results of a command.
e=$((5 * 7)) # Arithmetic expansion.
f="\t\ta string\n" # Escape sequences such as tabs and newlines.
Multiple variable assignments may be done on a single line:
可以在同一行中对多个变量赋值:
a=5 b="a string"
During expansion, variable names may be surrounded by optional curly braces “{}”. This is useful in cases where a variable name becomes ambiguous due to its surrounding context. Here, we try to change the name of a file from myfile to myfile1, using a variable:
在参数展开过程中,变量名可能被花括号 “{}” 包围着。由于变量名周围的上下文,其变得不明确的情况下, 这会很有帮助。这里,我们试图把一个文件名从 myfile 改为 myfile1,使用一个变量:
| |
This attempt fails because the shell interprets the second argument of the mv command as a new (and empty) variable. The problem can be overcome this way:
这种尝试失败了,因为 shell 把 mv 命令的第二个参数解释为一个新的(并且空的)变量。通过这种方法 可以解决这个问题:
| |
By adding the surrounding braces, the shell no longer interprets the trailing 1 as part of the variable name.
通过添加花括号,shell 不再把末尾的1解释为变量名的一部分。
We’ll take this opportunity to add some data to our report, namely the date and time the report was created and the user name of the creator:
我们将利用这个机会来添加一些数据到我们的报告中,即创建包括的日期和时间,以及创建者的用户名:
| |
Here Documents
We’ve looked at two different methods of outputting our text, both using the echo command. There is a third way called a here document or here script. A here document is an additional form of I/O redirection in which we embed a body of text into our script and feed it into the standard input of a command. It works like this:
我们已经知道了两种不同的文本输出方法,两种方法都使用了 echo 命令。还有第三种方法,叫做 here document 或者 here script。一个 here document 是另外一种 I/O 重定向形式,我们 在脚本文件中嵌入正文文本,然后把它发送给一个命令的标准输入。它这样工作:
command << token
text
token
where command is the name of command that accepts standard input and token is a string used to indicate the end of the embedded text. We’ll modify our script to use a here document:
这里的 command 是一个可以接受标准输入的命令名,token 是一个用来指示嵌入文本结束的字符串。 我们将修改我们的脚本,来使用一个 here document:
| |
Instead of using echo, our script now uses cat and a here document. The string EOF (meaning “End Of File,” a common convention) was selected as the token, and marks the end of the embedded text. Note that the token must appear alone and that there must not be trailing spaces on the line.
取代 echo 命令,现在我们的脚本使用 cat 命令和一个 here document。这个字符串_EOF_(意思是“文件结尾”, 一个常见用法)被选作为 token,并标志着嵌入文本的结尾。注意这个 token 必须在一行中单独出现,并且文本行中 没有末尾的空格。
So what’s the advantage of using a here document? It’s mostly the same as echo, except that, by default, single and double quotes within here documents lose their special meaning to the shell. Here is a command line example:
那么使用一个 here document 的优点是什么呢?它很大程度上和 echo 一样,除了默认情况下,here documents 中的单引号和双引号会失去它们在 shell 中的特殊含义。这里有一个命令中的例子:
| |
As we can see, the shell pays no attention to the quotation marks. It treats them as ordinary characters. This allows us to embed quotes freely within a here document. This could turn out to be handy for our report program.
正如我们所见到的,shell 根本没有注意到引号。它把它们看作是普通的字符。这就允许我们 在一个 here document 中可以随意的嵌入引号。对于我们的报告程序来说,这将是非常方便的。
Here documents can be used with any command that accepts standard input. In this example, we use a here document to pass a series of commands to the ftp program in order to retrieve a file from a remote FTP server:
Here documents 可以和任意能接受标准输入的命令一块使用。在这个例子中,我们使用了 一个 here document 将一系列的命令传递到这个 ftp 程序中,为的是从一个远端 FTP 服务器中得到一个文件:
| |
If we change the redirection operator from “«” to “«-“, the shell will ignore leading tab characters in the here document. This allows a here document to be indented, which can improve readability:
如果我们把重定向操作符从 “«” 改为 “«-”,shell 会忽略在此 here document 中开头的 tab 字符。 这就能缩进一个 here document,从而提高脚本的可读性:
| |
总结归纳
In this chapter, we started a project that will carry us through the process of building a successful script. We introduced the concept of variables and constants and how they can be employed. They are the first of many applications we will find for parameter expansion. We also looked at how to produce output from our script, and various methods for embedding blocks of text.
在这一章中,我们启动了一个项目,其带领我们领略了创建一个成功脚本的整个过程。 同时我们介绍了变量和常量的概念,以及怎样使用它们。它们是我们将找到的众多参数展开应用程序中的第一批实例。 我们也知道了怎样从我们的脚本文件中产生输出,及其各种各样嵌入文本块的方法。
拓展阅读
For more information about HTML, see the following articles and tutorials:
关于 HTML 的更多信息,查看下面的文章和教材:
http://en.wikipedia.org/wiki/Html
The bash man page includes a section entitled “HERE DOCUMENTS,” which has a full description of this feature.
Bash 手册包括一节“HERE DOCUMENTS”的内容,其详细的讲述了这个功能。
27 - 27 自顶向下设计
自顶向下设计
http://billie66.github.io/TLCL/book/chap27.html
As programs get larger and more complex, they become more difficult to design, code and maintain. As with any large project, it is often a good idea to break large, complex tasks into a series of small, simple tasks. Let’s imagine that we are trying to describe a common, everyday task, going to the market to buy food, to a person from Mars. We might describe the overall process as the following series of steps:
随着程序变得更加庞大和复杂,设计、编码和维护它们也变得更加困难。对于任意一个大项目而言, 把繁重、复杂的任务分割为细小且简单的任务,往往是一个好主意。想象一下,我们试图描述 一个平凡无奇的工作,一位火星人要去市场买食物。我们可能通过下面一系列步骤来形容整个过程:
- Get in car.
- Drive to market.
- Park car.
- Enter market.
- Purchase food.
- Return to car.
- Drive home.
- Park car.
- Enter house.
- 上车
- 开车到市场
- 停车
- 买食物
- 回到车中
- 开车回家
- 回到家中
However, a person from Mars is likely to need more detail. We could further break down the subtask “Park car” into this series of steps:
然而,火星人可能需要更详细的信息。我们可以进一步细化子任务“停车”为这些步骤:
- Find parking space.
- Drive car into space.
- Turn off motor.
- Set parking brake.
- Exit car.
- Lock car.
- 找到停车位
- 开车到停车位
- 关闭引擎
- 拉紧手刹
- 下车
- 锁车
The “Turn off motor” subtask could further be broken down into steps including “Turn off ignition,” “Remove ignition key” and so on, until every step of the entire process of going to the market has been fully defined.
这个“关闭引擎”子任务可以进一步细化为这些步骤,包括“关闭点火装置”,“移开点火匙”等等,直到 已经完整定义了要去市场买食物整个过程的每一个步骤。
This process of identifying the top-level steps and developing increasingly detailed views of those steps is called top-down design. This technique allows us to break large complex tasks into many small, simple tasks. Top-down design is a common method of designing programs and one that is well suited to shell programming in particular.
这种先确定上层步骤,然后再逐步细化这些步骤的过程被称为自顶向下设计。这种技巧允许我们 把庞大而复杂的任务分割为许多小而简单的任务。自顶向下设计是一种常见的程序设计方法, 尤其适合 shell 编程。
In this chapter, we will use top-down design to further develop our report generator script.
在这一章中,我们将使用自顶向下的设计方法来进一步开发我们的报告产生器脚本。
Shell 函数
Our script currently performs the following steps to generate the HTML document:
目前我们的脚本执行以下步骤来产生这个 HTML 文档:
- Open page.
- Open page header.
- Set page title.
- Close page header.
- Open page body.
- Output page heading.
- Output time stamp.
- Close page body.
- Close page.
- 打开网页
- 打开网页标头
- 设置网页标题
- 关闭网页标头
- 打开网页主体部分
- 输出网页标头
- 输出时间戳
- 关闭网页主体
- 关闭网页
For our next stage of development, we will add some additional tasks between steps 7 and 8. These will include:
为了下一阶段的开发,我们将在步骤7和8之间添加一些额外的任务。这些将包括:
- System uptime and load. This is the amount of time since the last shutdown or reboot and the average number of tasks currently running on the processor over several time intervals.
- Disk space. The overall use of space on the system’s storage devices.
- Home space. The amount of storage space being used by each user.
- 系统正常运行时间和负载。这是自上次关机或重启之后系统的运行时间,以及在几个时间间隔内当前运行在处理 中的平均任务量。
- 磁盘空间。系统中存储设备的总使用量。
- 家目录空间。每个用户所使用的存储空间使用量。
If we had a command for each of these tasks, we could add them to our script simply through command substitution:
如果对于每一个任务,我们都有相应的命令,那么通过命令替换,我们就能很容易地把它们添加到我们的脚本中:
| |
We could create these additional commands two ways. We could write three separate scripts and place them in a directory listed in our PATH, or we could embed the scripts within our program as shell functions. As we have mentioned before, shell functions are “mini-scripts” that are located inside other scripts and can act as autonomous programs. Shell functions have two syntactic forms:
我们能够用两种方法来创建这些额外的命令。我们可以分别编写三个脚本,并把它们放置到 环境变量 PATH 所列出的目录下,或者我们也可以把这些脚本作为 shell 函数嵌入到我们的程序中。 我们之前已经提到过,shell 函数是位于其它脚本中的“微脚本”,作为自主程序。Shell 函数有两种语法形式:
function name {
commands
return
}
and
name () {
commands
return
}
where name is the name of the function and commands are a series of commands contained within the function.
这里的 name 是函数名,commands 是一系列包含在函数中的命令。
Both forms are equivalent and may be used interchangeably. Below we see a script that demonstrates the use of a shell function:
两种形式是等价的,可以交替使用。下面我们将查看一个说明 shell 函数使用方法的脚本:
1 #!/bin/bash
2
3 # Shell function demo
4
5 function funct {
6 echo "Step 2"
7 return
8 }
9
10 # Main program starts here
11
12 echo "Step 1"
13 funct
14 echo "Step 3"
As the shell reads the script, it passes over lines 1 through 11, as those lines consist of comments and the function definition. Execution begins at line 12, with an echo command. Line 13 calls the shell function funct and the shell executes the function just as it would any other command. Program control then moves to line 6, and the second echo command is executed. Line 7 is executed next. Its return command terminates the function and returns control to the program at the line following the function call (line 14), and the final echo command is executed. Note that in order for function calls to be recognized as shell functions and not interpreted as the names of external programs, shell function definitions must appear in the script before they are called.
随着 shell 读取这个脚本,它会跳过第1行到第11行的代码,因为这些文本行由注释和函数定义组成。 从第12行代码开始执行,有一个 echo 命令。第13行会调用 shell 函数 funct,然后 shell 会执行这个函数, 就如执行其它命令一样。这样程序控制权会转移到第六行,执行第二个 echo 命令。然后再执行第7行。 这个 return 命令终止这个函数,并把控制权交给函数调用之后的代码(第14行),从而执行最后一个 echo 命令。注意为了使函数调用被识别出是 shell 函数,而不是被解释为外部程序的名字,在脚本中 shell 函数定义必须出现在函数调用之前。
We’ll add minimal shell function definitions to our script:
我们将给脚本添加最小的 shell 函数定义:
| |
Shell function names follow the same rules as variables. A function must contain at least one command. The return command (which is optional) satisfies the requirement.
Shell 函数的命名规则和变量一样。一个函数必须至少包含一条命令。这条 return 命令(是可选的)满足要求。
局部变量
In the scripts we have written so far, all the variables (including constants) have been global variables. Global variables maintain their existence throughout the program. This is fine for many things, but it can sometimes complicate the use of shell functions. Inside shell functions, it is often desirable to have local variables. Local variables are only accessible within the shell function in which they are defined and cease to exist once the shell function terminates.
目前我们所写的脚本中,所有的变量(包括常量)都是全局变量。全局变量在整个程序中保持存在。 对于许多事情来说,这很好,但是有时候它会使 shell 函数的使用变得复杂。在 shell 函数中,经常期望 会有局部变量。局部变量只能在定义它们的 shell 函数中使用,并且一旦 shell 函数执行完毕,它们就不存在了。
Having local variables allows the programmer to use variables with names that may already exist, either in the script globally or in other shell functions, without having to worry about potential name conflicts.
局部变量的存在使得程序员可以使用可能已存在的变量,这些变量可以是全局变量, 或者是其它 shell 函数中的局部变量,却不必担心潜在的名字冲突。
Here is an example script that demonstrates how local variables are defined and used:
这里有一个实例脚本,其说明了怎样来定义和使用局部变量:
| |
As we can see, local variables are defined by preceding the variable name with the word local. This creates a variable that is local to the shell function in which it is defined. Once outside the shell function, the variable no longer exists. When we run this script, we see the results:
正如我们所看到的,通过在变量名之前加上单词 local,来定义局部变量。这就创建了一个只对其所在的 shell 函数起作用的变量。在这个 shell 函数之外,这个变量不再存在。当我们运行这个脚本的时候, 我们会看到这样的结果:
| |
We see that the assignment of values to the local variable foo within both shell functions has no effect on the value of foo defined outside the functions.
我们看到对两个 shell 函数中的局部变量 foo 赋值,不会影响到在函数之外定义的变量 foo 的值。
This feature allows shell functions to be written so that they remain independent of each other and of the script in which they appear. This is very valuable, as it helps prevent one part of a program from interfering with another. It also allows shell functions to be written so that they can be portable. That is, they may be cut and pasted from script to script, as needed.
这个功能就允许 shell 函数能保持各自以及与它们所在脚本之间的独立性。这个非常有价值,因为它帮忙 阻止了程序各部分之间的相互干涉。这样 shell 函数也可以移植。也就是说,按照需求, shell 函数可以在脚本之间进行剪切和粘贴。
保持脚本运行
While developing our program, it is useful to keep the program in a runnable state. By doing this, and testing frequently, we can detect errors early in the development process. This will make debugging problems much easier. For example, if we run the program, make a small change, then run the program again and find a problem, it’s very likely that the most recent change is the source of the problem. By adding the empty functions, called stubs in programmer-speak, we can verify the logical flow of our program at an early stage. When constructing a stub, it’s a good idea to include something that provides feedback to the programmer, which shows the logical flow is being carried out. If we look at the output of our script now:
当开发程序的时候,保持程序的可执行状态非常有用。这样做,并且经常测试,我们就可以在程序 开发过程的早期检测到错误。这将使调试问题容易多了。例如,如果我们运行这个程序,做一个小的修改, 然后再次执行这个程序,最后发现一个问题,非常有可能这个最新的修改就是问题的来源。通过添加空函数, 程序员称之为 stub,我们可以在早期阶段证明程序的逻辑流程。当构建一个 stub 的时候, 能够包含一些为程序员提供反馈信息的代码是一个不错的主意,这些信息展示了正在执行的逻辑流程。 现在看一下我们脚本的输出结果:
| |
we see that there are some blank lines in our output after the time stamp, but we can’t be sure of the cause. If we change the functions to include some feedback:
我们看到时间戳之后的输出结果中有一些空行,但是我们不能确定这些空行产生的原因。如果我们 修改这些函数,让它们包含一些反馈信息:
report_uptime () {
echo "Function report_uptime executed."
return
}
report_disk_space () {
echo "Function report_disk_space executed."
return
}
report_home_space () {
echo "Function report_home_space executed."
return
}
and run the script again:
然后再次运行这个脚本:
| |
we now see that, in fact, our three functions are being executed.
现在我们看到,事实上,执行了三个函数。
With our function framework in place and working, it’s time to flesh out some of the function code. First, the report_uptime function:
我们的函数框架已经各就各位并且能工作,是时候更新一些函数代码了。首先,是 report_uptime 函数:
report_uptime () {
cat <<- _EOF_
<H2>System Uptime</H2>
<PRE>$(uptime)</PRE>
_EOF_
return
}
It’s pretty straightforward. We use a here document to output a section header and the output of the uptime command, surrounded by
tags to preserve the formatting of the command. The report_disk_space function is similar: 这些代码相当直截了当。我们使用一个 here 文档来输出标题和 uptime 命令的输出结果,命令结果被
标签包围, 为的是保持命令的输出格式。这个 report_disk_space 函数类似:report_disk_space () { cat <<- _EOF_ <H2>Disk Space Utilization</H2> <PRE>$(df -h)</PRE> _EOF_ return }This function uses the df -h command to determine the amount of disk space. Lastly, we’ll build the report_home_space function:
这个函数使用 df -h 命令来确定磁盘空间的数量。最后,我们将建造 report_home_space 函数:
report_home_space () { cat <<- _EOF_ <H2>Home Space Utilization</H2> <PRE>$(du -sh /home/*)</PRE> _EOF_ return }We use the du command with the -sh options to perform this task. This, however, is not a complete solution to the problem. While it will work on some systems (Ubuntu, for example), it will not work on others. The reason is that many systems set the permissions of home directories to prevent them from being world-readable, which is a reasonable security measure. On these systems, the report_home_space function, as written, will only work if our script is run with superuser privileges. A better solution would be to have the script could adjust its behavior according to the privileges of the user. We will take this up in the next chapter.
我们使用带有 -sh 选项的 du 命令来完成这个任务。然而,这并不是此问题的完整解决方案。虽然它会 在一些系统(例如 Ubuntu)中起作用,但是在其它系统中它不工作。这是因为许多系统会设置家目录的 权限,以此阻止其它用户读取它们,这是一个合理的安全措施。在这些系统中,这个 report_home_space 函数, 只有用超级用户权限执行我们的脚本时,才会工作。一个更好的解决方案是让脚本能根据用户的使用权限来 调整自己的行为。我们将在下一章中讨论这个问题。
Shell Functions In Your .bashrc File
你的 .bashrc 文件中的 shell 函数
Shell functions make excellent replacements for aliases, and are actually the preferred method of creating small commands for personal use. Aliases are very limited in the kind of commands and shell features they support, whereas shell functions allow anything that can be scripted. For example, if we liked the report_disk_space shell function that we developed for our script, we could create a similar function named ds for our .bashrc file:
Shell 函数完美地替代了别名,并且实际上是创建个人所用的小命令的首选方法。别名 非常局限于命令的种类和它们支持的 shell 功能,然而 shell 函数允许任何可以编写脚本的东西。 例如,如果我们喜欢 为我们的脚本开发的这个 report_disk_space shell 函数,我们可以为我们的 .bashrc 文件 创建一个相似的名为 ds 的函数:
ds () { echo “Disk Space Utilization For $HOSTNAME” df -h }总结归纳
In this chapter, we have introduced a common method of program design called top- down design, and we have seen how shell functions are used to build the stepwise refinement that it requires. We have also seen how local variables can be used to make shell functions independent from one another and from the program in which they are placed. This makes it possible for shell functions to be written in a portable manner and to be reusable by allowing them to be placed in multiple programs; a great time saver.
这一章中,我们介绍了一种常见的程序设计方法,叫做自顶向下设计,并且我们知道了怎样 使用 shell 函数按照要求来完成逐步细化的任务。我们也知道了怎样使用局部变量使 shell 函数 独立于其它函数,以及其所在程序的其它部分。这就有可能使 shell 函数以可移植的方式编写, 并且能够重复使用,通过把它们放置到多个程序中;节省了大量的时间。
拓展阅读
The Wikipedia has many articles on software design philosophy. Here are a couple of good ones:
Wikipedia 上面有许多关于软件设计原理的文章。这里是一些好文章:
28 - 28 流程控制:if 分支结构
流程控制:if 分支结构
http://billie66.github.io/TLCL/book/chap28.html
In the last chapter, we were presented with a problem. How can we make our report generator script adapt to the privileges of the user running the script? The solution to this problem will require us to find a way to “change directions” within our script, based on a the results of a test. In programming terms, we need the program to branch. Let’s consider a simple example of logic expressed in pseudocode, a simulation of a computer language intended for human consumption:
在上一章中,我们遇到一个问题。怎样使我们的报告生成器脚本能适应运行此脚本的用户的权限? 这个问题的解决方案要求我们能找到一种方法,在脚本中基于测试条件结果,来“改变方向”。 用编程术语表达,就是我们需要程序可以分支。让我们考虑一个简单的用伪码表示的逻辑实例, 伪码是一种模拟的计算机语言,为的是便于人们理解:
X=5
If X = 5, then:
Say “X equals 5.”
Otherwise:
Say “X is not equal to 5.”
This is an example of a branch. Based on the condition, “Does X = 5?” do one thing, “Say X equals 5,” otherwise do another thing, “Say X is not equal to 5.”
这就是一个分支的例子。根据条件,“Does X = 5?” 做一件事情,“Say X equals 5,” 否则,做另一件事情,“Say X is not equal to 5.”
if
Using the shell, we can code the logic above as follows:
使用 shell,我们可以编码上面的逻辑,如下所示:
x=5
if [ $x = 5 ]; then
echo "x equals 5."
else
echo "x does not equal 5."
fi
or we can enter it directly at the command line (slightly shortened):
或者我们可以直接在命令行中输入以上代码(略有缩短):
| |
In this example, we execute the command twice. Once, with the value of x set to 5, which results in the string “equals 5” being output, and the second time with the value of x set to 0, which results in the string “does not equal 5” being output.
在这个例子中,我们执行了两次这个命令。第一次是,把 x 的值设置为5,从而导致输出字符串“equals 5”, 第二次是,把 x 的值设置为0,从而导致输出字符串“does not equal 5”。
The if statement has the following syntax:
这个 if 语句语法如下:
if commands; then
commands
[elif commands; then
commands...]
[else
commands]
fi
where commands is a list of commands. This is a little confusing at first glance. But before we can clear this up, we have to look at how the shell evaluates the success or failure of a command.
这里的 commands 是指一系列命令。第一眼看到会有点儿困惑。但是在我们弄清楚这些语句之前,我们 必须看一下 shell 是如何评判一个命令的成功与失败的。
退出状态
Commands (including the scripts and shell functions we write) issue a value to the system when they terminate, called an exit status. This value, which is an integer in the range of 0 to 255, indicates the success or failure of the command’s execution. By convention, a value of zero indicates success and any other value indicates failure. The shell provides a parameter that we can use to examine the exit status. Here we see it in action:
当命令执行完毕后,命令(包括我们编写的脚本和 shell 函数)会给系统发送一个值,叫做退出状态。 这个值是一个 0 到 255 之间的整数,说明命令执行成功或是失败。按照惯例,一个零值说明成功,其它所有值说明失败。 Shell 提供了一个参数,我们可以用它检查退出状态。用具体实例看一下:
| |
In this example, we execute the ls command twice. The first time, the command executes successfully. If we display the value of the parameter $?, we see that it is zero. We execute the ls command a second time, producing an error and examine the parameter $? again. This time it contains a 2, indicating that the command encountered an error. Some commands use different exit status values to provide diagnostics for errors, while many commands simply exit with a value of one when they fail. Man pages often include a section entitled “Exit Status,” describing what codes are used. However, a zero always indicates success.
在这个例子中,我们执行了两次 ls 命令。第一次,命令执行成功。如果我们显示参数$?的值,我们 看到它是零。我们第二次执行 ls 命令的时候,产生了一个错误,并再次查看参数$?。这次它包含一个 数字 2,表明这个命令遇到了一个错误。有些命令使用不同的退出值,来诊断错误,而许多命令当 它们执行失败的时候,会简单地退出并发送一个数字1。手册页中经常会包含一章标题为“退出状态”的内容, 描述了使用的代码。然而,一个零总是表明成功。
The shell provides two extremely simple builtin commands that do nothing except terminate with either a zero or one exit status. The true command always executes successfully and the false command always executes unsuccessfully:
shell 提供了两个极其简单的内部命令,它们不做任何事情,除了以一个0或1退出状态来终止执行。 True 命令总是执行成功,而 false 命令总是执行失败:
| |
We can use these commands to see how the if statement works. What the if statement really does is evaluate the success or failure of commands:
我们能够使用这些命令,来看一下 if 语句是怎样工作的。If 语句真正做的事情是计算命令执行成功或失败:
| |
The command echo “It’s true.” is executed when the command following if executes successfully, and is not executed when the command following if does not execute successfully. If a list of commands follows if, the last command in the list is evaluated:
当 if 之后的命令执行成功的时候,命令 echo “It’s true.” 将会执行,否则此命令不执行。 如果 if 之后跟随一系列命令,则将计算列表中的最后一个命令:
| |
测试
By far, the command used most frequently with if is test. The test command performs a variety of checks and comparisons. It has two equivalent forms:
到目前为止,经常与 if 一块使用的命令是 test。这个 test 命令执行各种各样的检查与比较。 它有两种等价模式:
test expression
and the more popular:
比较流行的格式是:
[ expression ]
where expression is an expression that is evaluated as either true or false. The test command returns an exit status of zero when the expression is true and a status of one when the expression is false.
这里的 expression 是一个表达式,其执行结果是 true 或者是 false。当表达式为真时,这个 test 命令返回一个零 退出状态,当表达式为假时,test 命令退出状态为1。
文件表达式
The following expressions are used to evaluate the status of files:
以下表达式被用来计算文件状态:
| Expression | Is Ture If |
|---|---|
| file1 -ef file2 | file1 and file2 have the same inode numbers (the two filenames refer to the same file by hard linking). |
| file1 -nt file2 | file 1 is newer than file2. |
| file1 -ot file2 | file1 is older than file2. |
| -b file | file exists and is a block special (device) file. |
| -c file | file exists and is a character special (device) file. |
| -d file | file exists and is a directory. |
| -e file | file exists. |
| -f file | file exists and is a regular file. |
| -g file | file exists and is set-group-ID. |
| -G file | file exists and is owned by the effective group ID. |
| -k file | file exists and has its “sticky bit” set. |
| -L file | file exists and is a symbolic link. |
| -O file | file exists and is owned by the effective user ID. |
| -p file | file exists and is a named pipe. |
| -r file | file exists and is readable (has readable permission for the effective user). |
| -s file | file exists and has a length greater than zero. |
| -S file | file exists and is a network socket. |
| -t fd | fd is a file descriptor directed to/from the terminal. This can be used to determine whether standard input/output/ error is being redirected. |
| -u file | file exists and is setuid. |
| -w file | file exists and is writable (has write permission for the effective user). |
| -x file | file exists and is executable (has execute/search permission for the effective user). |
| 表达式 | 如果下列条件为真则返回True |
|---|---|
| file1 -ef file2 | file1 和 file2 拥有相同的索引号(通过硬链接两个文件名指向相同的文件)。 |
| file1 -nt file2 | file1新于 file2。 |
| file1 -ot file2 | file1早于 file2。 |
| -b file | file 存在并且是一个块(设备)文件。 |
| -c file | file 存在并且是一个字符(设备)文件。 |
| -d file | file 存在并且是一个目录。 |
| -e file | file 存在。 |
| -f file | file 存在并且是一个普通文件。 |
| -g file | file 存在并且设置了组 ID。 |
| -G file | file 存在并且由有效组 ID 拥有。 |
| -k file | file 存在并且设置了它的“sticky bit”。 |
| -L file | file 存在并且是一个符号链接。 |
| -O file | file 存在并且由有效用户 ID 拥有。 |
| -p file | file 存在并且是一个命名管道。 |
| -r file | file 存在并且可读(有效用户有可读权限)。 |
| -s file | file 存在且其长度大于零。 |
| -S file | file 存在且是一个网络 socket。 |
| -t fd | fd 是一个定向到终端/从终端定向的文件描述符 。 这可以被用来决定是否重定向了标准输入/输出错误。 |
| -u file | file 存在并且设置了 setuid 位。 |
| -w file | file 存在并且可写(有效用户拥有可写权限)。 |
| -x file | file 存在并且可执行(有效用户有执行/搜索权限)。 |
Here we have a script that demonstrates some of the file expressions:
这里我们有一个脚本说明了一些文件表达式:
| |
The script evaluates the file assigned to the constant FILE and displays its results as the evaluation is performed. There are two interesting things to note about this script. First, notice how the parameter $FILE is quoted within the expressions. This is not required, but is a defense against the parameter being empty. If the parameter expansion of $FILE were to result in an empty value, it would cause an error (the operators would be interpreted as non-null strings rather than operators). Using the quotes around the parameter insures that the operator is always followed by a string, even if the string is empty. Second, notice the presence of the exit commands near the end of the script. The exit command accepts a single, optional argument, which becomes the script’s exit status. When no argument is passed, the exit status defaults to zero. Using exit in this way allows the script to indicate failure if $FILE expands to the name of a nonexistent file. The exit command appearing on the last line of the script is there as a formality. When a script “runs off the end” (reaches end of file), it terminates with an exit status of zero by default, anyway.
这个脚本会计算赋值给常量 FILE 的文件,并显示计算结果。对于此脚本有两点需要注意。第一个, 在表达式中参数$FILE是怎样被引用的。引号并不是必需的,但这是为了防范空参数。如果$FILE的参数展开 是一个空值,就会导致一个错误(操作符将会被解释为非空的字符串而不是操作符)。用引号把参数引起来就 确保了操作符之后总是跟随着一个字符串,即使字符串为空。第二个,注意脚本末尾的 exit 命令。 这个 exit 命令接受一个单独的,可选的参数,其成为脚本的退出状态。当不传递参数时,退出状态默认为零。 以这种方式使用 exit 命令,则允许此脚本提示失败如果 $FILE 展开成一个不存在的文件名。这个 exit 命令 出现在脚本中的最后一行,是一个当一个脚本“运行到最后”(到达文件末尾),不管怎样, 默认情况下它以退出状态零终止。
Similarly, shell functions can return an exit status by including an integer argument to the return command. If we were to convert the script above to a shell function to include it in a larger program, we could replace the exit commands with return statements and get the desired behavior:
类似地,通过带有一个整数参数的 return 命令,shell 函数可以返回一个退出状态。如果我们打算把 上面的脚本转变为一个 shell 函数,为了在更大的程序中包含此函数,我们用 return 语句来代替 exit 命令, 则得到期望的行为:
test_file () {
# test-file: Evaluate the status of a file
FILE=~/.bashrc
if [ -e "$FILE" ]; then
if [ -f "$FILE" ]; then
echo "$FILE is a regular file."
fi
if [ -d "$FILE" ]; then
echo "$FILE is a directory."
fi
if [ -r "$FILE" ]; then
echo "$FILE is readable."
fi
if [ -w "$FILE" ]; then
echo "$FILE is writable."
fi
if [ -x "$FILE" ]; then
echo "$FILE is executable/searchable."
fi
else
echo "$FILE does not exist"
return 1
fi
}
字符串表达式
The following expressions are used to evaluate strings:
以下表达式用来计算字符串:
| Expression | Is Ture If… |
|---|---|
| string | string is not null. |
| -n string | The length of string is greater than zero. |
| -z string | The length of string is zero. |
| string1 = string2string1 == string2 | string1 and string2 are equal. Single or double equal signs may be used, but the use of double equal signs is greatly preferred. |
| string1 != string2 | string1 and string2 are not equal. |
| string1 > string2 | sting1 sorts after string2. |
| string1 < string2 | string1 sorts before string2. |
| 表达式 | 如果下列条件为真则返回True |
|---|---|
| string | string 不为 null。 |
| -n string | 字符串 string 的长度大于零。 |
| -z string | 字符串 string 的长度为零。 |
| string1 = string2string1 == string2 | string1 和 string2 相同。 单或双等号都可以,不过双等号更受欢迎。 |
| string1 != string2 | string1 和 string2 不相同。 |
| string1 > string2 | sting1 排列在 string2 之后。 |
| string1 < string2 | string1 排列在 string2 之前。 |
Warning: the > and < expression operators must be quoted (or escaped with a backslash) when used with test. If they are not, they will be interpreted by the shell as redirection operators, with potentially destructive results. Also note that while the bash documentation states that the sorting order conforms to the collation order of the current locale, it does not. ASCII (POSIX) order is used in versions of bash up to and including 4.0.
警告:当与 test 一块使用的时候, > 和 < 表达式操作符必须用引号引起来(或者是用反斜杠转义)。 如果不这样,它们会被 shell 解释为重定向操作符,造成潜在的破坏结果。 同时也要注意虽然 bash 文档声明排序遵从当前语系的排列规则,但并不这样。将来的 bash 版本,包含 4.0, 使用 ASCII(POSIX)排序规则。
Here is a script that demonstrates them:
这是一个演示这些问题的脚本:
| |
In this script, we evaluate the constant ANSWER. We first determine if the string is empty. If it is, we terminate the script and set the exit status to one. Notice the redirection that is applied to the echo command. This redirects the error message “There is no answer.” to standard error, which is the “proper” thing to do with error messages. If the string is not empty, we evaluate the value of the string to see if it is equal to either “yes,” “no,” or “maybe.” We do this by using elif, which is short for “else if.” By using elif, we are able to construct a more complex logical test.
在这个脚本中,我们计算常量 ANSWER。我们首先确定是否此字符串为空。如果为空,我们就终止 脚本,并把退出状态设为1。注意这个应用于 echo 命令的重定向操作。其把错误信息 “There is no answer.” 重定向到标准错误,这是处理错误信息的“正确”方法。如果字符串不为空,我们就计算 字符串的值,看看它是否等于“yes,” “no,” 或者“maybe”。为此使用了 elif,它是 “else if” 的简写。 通过使用 elif,我们能够构建更复杂的逻辑测试。
整型表达式
The following expressions are used with integers:
下面的表达式用于整数:
| Expression | Is True If… |
|---|---|
| integer1 -eq integer2 | integer1 is equal to integer2. |
| integer1 -ne integer2 | integer1 is not equal to integer2. |
| integer1 -le integer2 | integer1 is less than or equal to integer2. |
| integer1 -lt integer2 | integer1 is less than integer2. |
| integer1 -ge integer2 | integer1 is greater than or equal to integer2. |
| integer1 -gt integer2 | integer1 is greater than integer2. |
| 表达式 | 如果为真… |
|---|---|
| integer1 -eq integer2 | integer1 等于 integer2。 |
| integer1 -ne integer2 | integer1 不等于 integer2。 |
| integer1 -le integer2 | integer1 小于或等于 integer2。 |
| integer1 -lt integer2 | integer1 小于 integer2。 |
| integer1 -ge integer2 | integer1 大于或等于 integer2。 |
| integer1 -gt integer2 | integer1 大于 integer2。 |
Here is a script that demonstrates them:
这里是一个演示以上表达式用法的脚本:
| |
The interesting part of the script is how it determines whether an integer is even or odd. By performing a modulo 2 operation on the number, which divides the number by two and returns the remainder, it can tell if the number is odd or even.
这个脚本中有趣的地方是怎样来确定一个整数是偶数还是奇数。通过用模数2对数字执行求模操作, 就是用数字来除以2,并返回余数,从而知道数字是偶数还是奇数。
更现代的测试版本
Recent versions of bash include a compound command that acts as an enhanced replacement for test. It uses the following syntax:
目前的 bash 版本包括一个复合命令,作为加强的 test 命令替代物。它使用以下语法:
[[ expression ]]
where, like test, expression is an expression that evaluates to either a true or false result. The [[ ]] command is very similar to test (it supports all of its expressions), but adds an important new string expression:
这里,类似于 test,expression 是一个表达式,其计算结果为真或假。这个[[ ]]命令非常 相似于 test 命令(它支持所有的表达式),但是增加了一个重要的新的字符串表达式:
string1 =~ regex
which returns true if string1 is matched by the extended regular expression regex. This opens up a lot of possibilities for performing such tasks as data validation. In our earlier example of the integer expressions, the script would fail if the constant INT contained anything except an integer. The script needs a way to verify that the constant contains an integer. Using [[ ]] with the =~ string expression operator, we could improve the script this way:
其返回值为真,如果 string1匹配扩展的正则表达式 regex。这就为执行比如数据验证等任务提供了许多可能性。 在我们前面的整数表达式示例中,如果常量 INT 包含除了整数之外的任何数据,脚本就会运行失败。这个脚本 需要一种方法来证明此常量包含一个整数。使用 [[ ]] 和 =~ 字符串表达式操作符,我们能够这样来改进脚本:
| |
By applying the regular expression, we are able to limit the value of INT to only strings that begin with an optional minus sign, followed by one or more numerals. This expression also eliminates the possibility of empty values.
通过应用正则表达式,我们能够限制 INT 的值只是字符串,其开始于一个可选的减号,随后是一个或多个数字。 这个表达式也消除了空值的可能性。
Another added feature of [[ ]] is that the == operator supports pattern matching the same way pathname expansion does. For example:
[[ ]]添加的另一个功能是==操作符支持类型匹配,正如路径名展开所做的那样。例如:
| |
This makes [[ ]] useful for evaluating file and path names.
这就使[[ ]]有助于计算文件和路径名。
(( )) - 为整数设计
In addition to the [[ ]] compound command, bash also provides the (( )) compound command, which is useful for operating on integers. It supports a full set of arithmetic evaluations, a subject we will cover fully in Chapter 35.
除了 [[ ]] 复合命令之外,bash 也提供了 (( )) 复合命令,其有利于操作整数。它支持一套 完整的算术计算,我们将在第35章中讨论这个主题。
(( )) is used to perform arithmetic truth tests. An arithmetic truth test results in true if the result of the arithmetic evaluation is non-zero.
(( ))被用来执行算术真测试。如果算术计算的结果是非零值,则其测试值为真。
| |
Using (( )), we can slightly simplify the test-integer2 script like this:
使用(( )),我们能够略微简化 test-integer2脚本,像这样:
| |
Notice that we use less than and greater than signs and that == is used to test for equivalence. This is a more natural looking syntax for working with integers. Notice too, that because the compound command (( )) is part of the shell syntax rather than an ordinary command, and it deals only with integers, it is able to recognize variables by name and does not require expansion to be performed. We’ll discuss (( )) and the related arithmetic expansion further in Chapter 35.
注意我们使用小于和大于符号,以及==用来测试是否相等。这是使用整数较为自然的语法了。也要 注意,因为复合命令 (( )) 是 shell 语法的一部分,而不是一个普通的命令,而且它只处理整数, 所以它能够通过名字识别出变量,而不需要执行展开操作。我们将在第35章中进一步讨论 (( )) 命令 和相关的算术展开操作。
结合表达式
It’s also possible to combine expressions to create more complex evaluations. Expressions are combined by using logical operators. We saw these in Chapter 18, when we learned about the find command. There are three logical operations for test and [[ ]]. They are AND, OR and NOT. test and [[ ]] use different operators to represent these operations :
也有可能把表达式结合起来创建更复杂的计算。通过使用逻辑操作符来结合表达式。我们 在第18章中学习 find 命令的时候已经知道了这些。有三个用于 test 和 [[ ]] 的逻辑操作。 它们是 AND、OR 和 NOT。test 和 [[ ]] 使用不同的操作符来表示这些操作:
| Operation | test | [[ ]] and (( )) |
|---|---|---|
| AND | -a | && |
| OR | -o | || |
| NOT | ! | ! |
| 操作符 | 测试 | [[ ]] and (( )) |
|---|---|---|
| AND | -a | && |
| OR | -o | || |
| NOT | ! | ! |
Here’s an example of an AND operation. The following script determines if an integer is within a range of values:
这里有一个 AND 操作的示例。下面的脚本决定了一个整数是否属于某个范围内的值:
| |
We also include parentheses around the expression, for grouping. If these were not included, the negation would only apply to the first expression and not the combination of the two. Coding this with test would be done this way:
我们也可以对表达式使用圆括号,为的是分组。如果不使用括号,那么否定只应用于第一个 表达式,而不是两个组合的表达式。用 test 可以这样来编码:
if [ ! \( $INT -ge $MIN_VAL -a $INT -le $MAX_VAL \) ]; then
echo "$INT is outside $MIN_VAL to $MAX_VAL."
else
echo "$INT is in range."
fi
Since all expressions and operators used by test are treated as command arguments by the shell (unlike [[ ]] and (( )) ), characters which have special meaning to bash, such as <, >, (, and ), must be quoted or escaped.
因为 test 使用的所有的表达式和操作符都被 shell 看作是命令参数(不像 [[ ]] 和 (( )) ), 对于 bash 有特殊含义的字符,比如说 <,>,(,和 ),必须引起来或者是转义。
Seeing that test and [[ ]] do roughly the same thing, which is preferable? test is traditional (and part of POSIX), whereas [[ ]] is specific to bash. It’s important to know how to use test, since it is very widely used, but [[ ]] is clearly more useful and is easier to code.
知道了 test 和 [[ ]] 基本上完成相同的事情,哪一个更好呢?test 更传统(是 POSIX 的一部分), 然而 [[ ]] 特定于 bash。知道怎样使用 test 很重要,因为它被非常广泛地应用,但是显然 [[ ]] 更 有用,并更易于编码。
Portability Is The Hobgoblin Of Little Minds
可移植性是头脑狭隘人士的心魔
If you talk to “real” Unix people, you quickly discover that many of them don’t like Linux very much. They regard it as impure and unclean. One tenet of Unix followers is that everything should be “portable.” This means that any script you write should be able to run, unchanged, on any Unix-like system.
如果你和“真正的”Unix 用户交谈,你很快就会发现他们大多数人不是非常喜欢 Linux。他们 认为 Linux 肮脏且不干净。Unix 追随者的一个宗旨是,一切都应“可移植的”。这意味着你编写 的任意一个脚本都应当无需修改,就能运行在任何一个类 Unix 的系统中。
Unix people have good reason to believe this. Having seen what proprietary extensions to commands and shells did to the Unix world before POSIX, they are naturally wary of the effect of Linux on their beloved OS.
Unix 用户有充分的理由相信这一点。在 POSIX 之前,Unix 用户已经看到了命令的专有扩展以及 shell 对 Unix 世界的所做所为,他们自然会警惕 Linux 对他们心爱系统的影响。
But portability has a serious downside. It prevents progress. It requires that things are always done using “lowest common denominator” techniques. In the case of shell programming, it means making everything compatible with sh, the original Bourne shell.
但是可移植性有一个严重的缺点。它防碍了进步。它要求做事情要遵循“最低常见标准”。 在 shell 编程这种情况下,它意味着一切要与 sh 兼容,最初的 Bourne shell。
This downside is the excuse that proprietary vendors use to justify their proprietary extensions, only they call them “innovations.” But they are really just lock-in devices for their customers.
这个缺点是一个专有软件供应商用来为他们专有的扩展做辩解的借口,只有他们称他们为“创新”。 但是他们只是为他们的客户锁定设备。
The GNU tools, such as bash, have no such restrictions. They encourage portability by supporting standards and by being universally available. You can install bash and the other GNU tools on almost any kind of system, even Windows, without cost. So feel free to use all the features of bash. It’s really portable.
GNU 工具,比如说 bash,就没有这些限制。他们通过支持标准和普遍地可用性来鼓励可移植性。你几乎可以 在所有类型的系统中安装 bash 和其它的 GNU 工具,甚至是 Windows,而没有损失。所以就 感觉可以自由的使用 bash 的所有功能。它是真正的可移植。
控制操作符:分支的另一种方法
bash provides two control operators that can perform branching. The && (AND) and || (OR) operators work like the logical operators in the [[ ]] compound command. This is the syntax:
bash 支持两种可以执行分支任务的控制操作符。 &&(AND)和||(OR)操作符作用如同 复合命令[[ ]]中的逻辑操作符。这是语法:
command1 && command2
and
和
command1 || command2
It is important to understand the behavior of these. With the && operator, command1 is executed and command2 is executed if, and only if, command1 is successful. With the || operator, command1 is executed and command2 is executed if, and only if, command1 is unsuccessful.
理解这些操作很重要。对于 && 操作符,先执行 command1,如果并且只有如果 command1 执行成功后, 才会执行 command2。对于 || 操作符,先执行 command1,如果并且只有如果 command1 执行失败后, 才会执行 command2。
In practical terms, it means that we can do something like this:
在实际中,它意味着我们可以做这样的事情:
| |
This will create a directory named temp, and if it succeeds, the current working directory will be changed to temp. The second command is attempted only if the mkdir command is successful. Likewise, a command like this:
这会创建一个名为 temp 的目录,并且若它执行成功后,当前目录会更改为 temp。第二个命令会尝试 执行只有当 mkdir 命令执行成功之后。同样地,一个像这样的命令:
| |
will test for the existence of the directory temp, and only if the test fails, will the directory be created. This type of construct is very handy for handling errors in scripts, a subject we will discuss more in later chapters. For example, we could do this in a script:
会测试目录 temp 是否存在,并且只有测试失败之后,才会创建这个目录。这种构造类型非常有助于在 脚本中处理错误,这个主题我们将会在随后的章节中讨论更多。例如,我们在脚本中可以这样做:
[ -d temp ] || exit 1
If the script requires the directory temp, and it does not exist, then the script will terminate with an exit status of one.
如果这个脚本要求目录 temp,且目录不存在,然后脚本会终止,并返回退出状态1。
总结
We started this chapter with a question. How could we make our sys_info_page script detect if the user had permission to read all the home directories? With our knowledge of if, we can solve the problem by adding this code to the report_home_space function:
这一章开始于一个问题。我们怎样使 sys_info_page 脚本来检测是否用户拥有权限来读取所有的 家目录?根据我们的 if 知识,我们可以解决这个问题,通过把这些代码添加到 report_home_space 函数中:
report_home_space () {
if [[ $(id -u) -eq 0 ]]; then
cat <<- _EOF_
<H2>Home Space Utilization (All Users)</H2>
<PRE>$(du -sh /home/*)</PRE>
_EOF_
else
cat <<- _EOF_
<H2>Home Space Utilization ($USER)</H2>
<PRE>$(du -sh $HOME)</PRE>
_EOF_
fi
return
}
We evaluate the output of the id command. With the -u option, id outputs the numeric user ID number of the effective user. The superuser is always zero and every other user is a number greater than zero. Knowing this, we can construct two different here documents, one taking advantage of superuser privileges, and the other, restricted to the user’s own home directory.
我们计算 id 命令的输出结果。通过带有 -u 选项的 id 命令,输出有效用户的数字用户 ID 号。 超级用户总是零,其它每个用户是一个大于零的数字。知道了这点,我们能够构建两种不同的 here 文档, 一个利用超级用户权限,另一个限制于用户拥有的家目录。
We are going to take a break from the sys_info_page program, but don’t worry. It will be back. In the meantime, we’ll cover some topics that we’ll need when we resume our work.
我们将暂别 sys_info_page 程序,但不要着急。它还会回来。同时,当我们继续工作的时候, 将会讨论一些我们需要的话题。
拓展阅读
There are several sections of the bash man page that provide further detail on the topics covered in this chapter:
bash 手册页中有几部分对本章中涵盖的主题提供了更详细的内容:
- Lists ( 讨论控制操作符
||和&&) - Compound Commands ( 讨论
[[ ]],(( ))和 if ) - CONDITIONAL EXPRESSIONS (条件表达式)
- SHELL BUILTIN COMMANDS ( 讨论 test )
Further, the Wikipedia has a good article on the concept of pseudocode:
进一步,Wikipedia 中有一篇关于伪代码概念的好文章:
29 - 29 读取键盘输入
读取键盘输入
http://billie66.github.io/TLCL/book/chap29.html
The scripts we have written so far lack a feature common in most computer programs — interactivity. That is, the ability of the program to interact with the user. While many programs don’t need to be interactive, some programs benefit from being able to accept input directly from the user. Take, for example, this script from the previous chapter:
到目前为止我们编写的脚本都缺乏一项在大多数计算机程序中都很常见的功能-交互性。也就是, 程序与用户进行交互的能力。虽然许多程序不必是可交互的,但一些程序却得到益处,能够直接 接受用户的输入。以这个前面章节中的脚本为例:
| |
Each time we want to change the value of INT, we have to edit the script. It would be much more useful if the script could ask the user for a value. In this chapter, we will begin to look at how we can add interactivity to our programs.
每次我们想要改变 INT 数值的时候,我们必须编辑这个脚本。如果脚本能请求用户输入数值,那 么它会更加有用处。在这个脚本中,我们将看一下我们怎样给程序增加交互性功能。
read - 从标准输入读取数值
The read builtin command is used to read a single line of standard input. This command can be used to read keyboard input or, when redirection is employed, a line of data from a file. The command has the following syntax:
这个 read 内部命令被用来从标准输入读取单行数据。这个命令可以用来读取键盘输入,当使用 重定向的时候,读取文件中的一行数据。这个命令有以下语法形式:
read [-options] [variable...]
where options is one or more of the available options listed below and variable is the name of one or more variables used to hold the input value. If no variable name is supplied, the shell variable REPLY contains the line of data.
这里的 options 是下面列出的可用选项中的一个或多个,且 variable 是用来存储输入数值的一个或多个变量名。 如果没有提供变量名,shell 变量 REPLY 会包含数据行。
Basically, read assigns fields from standard input to the specified variables. If we modify our integer evaluation script to use read, it might look like this:
基本上,read 会把来自标准输入的字段赋值给具体的变量。如果我们修改我们的整数求值脚本,让其使用 read ,它可能看起来像这样:
| |
We use echo with the -n option (which suppresses the trailing newline on output) to display a prompt, then use read to input a value for the variable int. Running this script results in this:
我们使用带有 -n 选项(其会删除输出结果末尾的换行符)的 echo 命令,来显示提示信息, 然后使用 read 来读入变量 int 的数值。运行这个脚本得到以下输出:
| |
read can assign input to multiple variables, as shown in this script:
read 可以给多个变量赋值,正如下面脚本中所示:
| |
In this script, we assign and display up to five values. Notice how read behaves when given different numbers of values:
在这个脚本中,我们给五个变量赋值并显示其结果。注意当给定不同个数的数值后,read 怎样操作:
| |
If read receives fewer than the expected number, the extra variables are empty, while an excessive amount of input results in the final variable containing all of the extra input. If no variables are listed after the read command, a shell variable, REPLY, will be assigned all the input:
如果 read 命令接受到变量值数目少于期望的数字,那么额外的变量值为空,而多余的输入数据则会 被包含到最后一个变量中。如果 read 命令之后没有列出变量名,则一个 shell 变量,REPLY,将会包含 所有的输入:
| |
Running this script results in this:
这个脚本的输出结果是:
| |
选项
read supports the following options:
read 支持以下选项:
| Option | Description |
|---|---|
| -a array | Assign the input to array, starting with index zero. We will cover arrays in Chapter 36. |
| -d delimiter | The first character in the string delimiter is used to indicate end of input, rather than a newline character. |
| -e | Use Readline to handle input. This permits input editing in the same manner as the command line. |
| -n num | Read num characters of input, rather than an entire line. |
| -p prompt | Display a prompt for input using the string prompt. |
| -r | Raw mode. Do not interpret backslash characters as escapes. |
| -s | Silent mode. Do not echo characters to the display as they are typed. This is useful when inputting passwords and other confidential information. |
| -t seconds | Timeout. Terminate input after seconds. read returns a non-zero exit status if an input times out. |
| -u fd | Use input from file descriptor fd, rather than standard input. |
| 选项 | 说明 |
|---|---|
| -a array | 把输入赋值到数组 array 中,从索引号零开始。我们 将在第36章中讨论数组问题。 |
| -d delimiter | 用字符串 delimiter 中的第一个字符指示输入结束,而不是一个换行符。 |
| -e | 使用 Readline 来处理输入。这使得与命令行相同的方式编辑输入。 |
| -n num | 读取 num 个输入字符,而不是整行。 |
| -p prompt | 为输入显示提示信息,使用字符串 prompt。 |
| -r | Raw mode. 不把反斜杠字符解释为转义字符。 |
| -s | Silent mode. 不会在屏幕上显示输入的字符。当输入密码和其它确认信息的时候,这会很有帮助。 |
| -t seconds | 超时. 几秒钟后终止输入。若输入超时,read 会返回一个非零退出状态。 |
| -u fd | 使用文件描述符 fd 中的输入,而不是标准输入。 |
Using the various options, we can do interesting things with read. For example, with the -p option, we can provide a prompt string:
使用各种各样的选项,我们能用 read 完成有趣的事情。例如,通过-p 选项,我们能够提供提示信息:
| |
With the -t and -s options we can write a script that reads “secret” input and times out if the input is not completed in a specified time:
通过 -t 和 -s 选项,我们可以编写一个这样的脚本,读取“秘密”输入,并且如果在特定的时间内 输入没有完成,就终止输入。
| |
The script prompts the user for a secret pass phrase and waits ten seconds for input. If the entry is not completed within the specified time, the script exits with an error. Since the -s option is included, the characters of the pass phrase are not echoed to the display as they are typed.
这个脚本提示用户输入一个密码,并等待输入10秒钟。如果在特定的时间内没有完成输入, 则脚本会退出并返回一个错误。因为包含了一个 -s 选项,所以输入的密码不会出现在屏幕上。
IFS
Normally, the shell performs word splitting on the input provided to read. As we have seen, this means that multiple words separated by one or more spaces become separate items on the input line, and are assigned to separate variables by read. This behavior is configured by a shell variable named IFS (for Internal Field Separator). The default value of IFS contains a space, a tab, and a newline character, each of which will separate items from one another.
通常,shell 对提供给 read 的输入按照单词进行分离。正如我们所见到的,这意味着多个由一个或几个空格 分离开的单词在输入行中变成独立的个体,并被 read 赋值给单独的变量。这种行为由 shell 变量__IFS__ (内部字符分隔符)配置。IFS 的默认值包含一个空格,一个 tab,和一个换行符,每一个都会把 字段分割开。
We can adjust the value of IFS to control the separation of fields input to read. For example, the /etc/passwd file contains lines of data that use the colon character as a field separator. By changing the value of IFS to a single colon, we can use read to input the contents of /etc/passwd and successfully separate fields into different variables. Here we have a script that does just that:
我们可以调整 IFS 的值来控制输入字段的分离。例如,这个 /etc/passwd 文件包含的数据行 使用冒号作为字段分隔符。通过把 IFS 的值更改为单个冒号,我们可以使用 read 读取 /etc/passwd 中的内容,并成功地把字段分给不同的变量。这个就是做这样的事情:
| |
This script prompts the user to enter the user name of an account on the system, then displays the different fields found in the user’s record in the /etc/passwd file. The script contains two interesting lines. The first is:
这个脚本提示用户输入系统中一个帐户的用户名,然后显示在文件 /etc/passwd/ 文件中关于用户记录的 不同字段。这个脚本包含有趣的两行。 第一个是:
file_info=$(grep "^$user_name:" $FILE)
This line assigns the results of a grep command to the variable file_info. The regular expression used by grep assures that the user name will only match a single line in the /etc/passwd file.
这一行把 grep 命令的输入结果赋值给变量 file_info。grep 命令使用的正则表达式 确保用户名只会在 /etc/passwd 文件中匹配一行。
The second interesting line is this one:
第二个有意思的一行是:
IFS=":" read user pw uid gid name home shell <<< "$file_info"
The line consists of three parts: a variable assignment, a read command with a list of variable names as arguments, and a strange new redirection operator. We’ll look at the variable assignment first.
这一行由三部分组成:对一个变量的赋值操作,一个带有一串参数的 read 命令,和一个奇怪的新的重定向操作符。 我们首先看一下变量赋值。
The shell allows one or more variable assignments to take place immediately before a command. These assignments alter the environment for the command that follows. The effect of the assignment is temporary; only changing the environment for the duration of the command. In our case, the value of IFS is changed to a colon character. Alternately, we could have coded it this way:
Shell 允许在一个命令之前给一个或多个变量赋值。这些赋值会暂时改变之后的命令的环境变量。 在这种情况下,IFS 的值被改成一个冒号。等效的,我们也可以这样写:
OLD_IFS="$IFS"
IFS=":"
read user pw uid gid name home shell <<< "$file_info"
IFS="$OLD_IFS"
where we store the value of IFS, assign a new value, perform the read command, then restore IFS to its original value. Clearly, placing the variable assignment in front of the command is a more concise way of doing the same thing.
我们先存储 IFS 的值,然后赋给一个新值,再执行 read 命令,最后把 IFS 恢复原值。显然,完成相同的任务, 在命令之前放置变量名赋值是一种更简明的方式。
The <<< operator indicates a here string. A here string is like a here document, only shorter, consisting of a single string. In our example, the line of data from the /etc/passwd file is fed to the standard input of the read command. We might wonder why this rather oblique method was chosen rather than:
这个 <<< 操作符指示一个 here 字符串。一个 here 字符串就像一个 here 文档,只是比较简短,由 单个字符串组成。在这个例子中,来自 /etc/passwd 文件的数据发送给 read 命令的标准输入。 我们可能想知道为什么选择这种相当晦涩的方法而不是:
xxxxxxxxxx1 1echo "$file_info" | IFS=":" read user pw uid gid name home shell
You Can’t Pipe read
你不能把 管道用在 read 上
While the read command normally takes input from standard input, you cannot do this:
虽然通常 read 命令接受标准输入,但是你不能这样做:
echo “foo” | read
We would expect this to work, but it does not. The command will appear to succeed but the REPLY variable will always be empty. Why is this?
我们期望这个命令能生效,但是它不能。这个命令将显示成功,但是 REPLY 变量 总是为空。为什么会这样?
The explanation has to do with the way the shell handles pipelines. In bash (and other shells such as sh), pipelines create subshells. These are copies of the shell and its environment which are used to execute the command in the pipeline. In our example above, read is executed in a subshell.
答案与 shell 处理管道线的方式有关系。在 bash(和其它 shells,例如 sh)中,管道线 会创建子 shell。这个子 shell 是为了执行执行管线中的命令而创建的shell和它的环境的副本。 上面示例中,read 命令将在子 shell 中执行。
Subshells in Unix-like systems create copies of the environment for the processes to use while they execute. When the processes finishes the copy of the environment is destroyed. This means that a subshell can never alter the environment of its parent process. read assigns variables, which then become part of the environment. In the example above, read assigns the value “foo” to the variable REPLY in its subshell’s environment, but when the command exits, the subshell and its environment are destroyed, and the effect of the assignment is lost.
在类 Unix 的系统中,子 shell 执行的时候,会为进程创建父环境的副本。当进程结束 之后,该副本就会被破坏掉。这意味着一个子 shell 永远不能改变父进程的环境。read 赋值变量, 然后会变为环境的一部分。在上面的例子中,read 在它的子 shell 环境中,把 foo 赋值给变量 REPLY, 但是当命令退出后,子 shell 和它的环境将被破坏掉,这样赋值的影响就会消失。
Using here strings is one way to work around this behavior. Another method is discussed in Chapter 37.
使用 here 字符串是解决此问题的一种方法。另一种方法将在37章中讨论。
校正输入
With our new ability to have keyboard input comes an additional programming challenge, validating input. Very often the difference between a well-written program and a poorly written one is in the program’s ability to deal with the unexpected. Frequently, the unexpected appears in the form of bad input. We’ve done a little of this with our evaluation programs in the previous chapter, where we checked the value of integers and screened out empty values and non-numeric characters. It is important to perform these kinds of programming checks every time a program receives input, to guard against invalid data. This is especially important for programs that are shared by multiple users. Omitting these safeguards in the interests of economy might be excused if a program is to be used once and only by the author to perform some special task. Even then, if the program performs dangerous tasks such as deleting files, it would be wise to include data validation, just in case.
从键盘输入这种新技能,带来了额外的编程挑战,校正输入。很多时候,一个良好编写的程序与 一个拙劣程序之间的区别就是程序处理意外的能力。通常,意外会以错误输入的形式出现。在前面 章节中的计算程序,我们已经这样做了一点儿,我们检查整数值,甄别空值和非数字字符。每次 程序接受输入的时候,执行这类的程序检查非常重要,为的是避免无效数据。对于 由多个用户共享的程序,这个尤为重要。如果一个程序只使用一次且只被作者用来执行一些特殊任务, 那么为了经济利益而忽略这些保护措施,可能会被原谅。即使这样,如果程序执行危险任务,比如说 删除文件,所以最好包含数据校正,以防万一。
Here we have an example program that validates various kinds of input:
这里我们有一个校正各种输入的示例程序:
| |
This script prompts the user to enter an item. The item is subsequently analyzed to determine its contents. As we can see, the script makes use of many of the concepts that we have covered thus far, including shell functions, [[ ]], (( )), the control operator &&, and if, as well as a healthy dose of regular expressions.
这个脚本提示用户输入一个数字。随后,分析这个数字来决定它的内容。正如我们所看到的,这个脚本 使用了许多我们已经讨论过的概念,包括 shell 函数,[[ ]],(( )),控制操作符 &&,以及 if 和 一些正则表达式。
菜单
A common type of interactivity is called menu-driven. In menu-driven programs, the user is presented with a list of choices and is asked to choose one. For example, we could imagine a program that presented the following:
一种常见的交互类型称为菜单驱动。在菜单驱动程序中,呈现给用户一系列选择,并要求用户选择一项。 例如,我们可以想象一个展示以下信息的程序:
Please Select:
1.Display System Information
2.Display Disk Space
3.Display Home Space Utilization
0.Quit
Enter selection [0-3] >
Using what we learned from writing our sys_info_page program, we can construct a menu-driven program to perform the tasks on the above menu:
使用我们从编写 sys_info_page 程序中所学到的知识,我们能够构建一个菜单驱动程序来执行 上述菜单中的任务:
| |
This script is logically divided into two parts. The first part displays the menu and inputs the response from the user. The second part identifies the response and carries out the selected action. Notice the use of the exit command in this script. It is used here to prevent the script from executing unnecessary code after an action has been carried out. The presence of multiple `exit` points in a program is generally a bad idea (it makes program logic harder to understand), but it works in this script.
从逻辑上讲,这个脚本被分为两部分。第一部分显示菜单和用户输入。第二部分确认用户反馈,并执行 选择的行动。注意脚本中使用的 exit 命令。在这里,在一个行动执行之后, exit 被用来阻止脚本执行不必要的代码。 通常在程序中出现多个 exit 代码不是一个好主意(它使程序逻辑较难理解),但是它在这个脚本中可以使用。
总结归纳
In this chapter, we took our first steps toward interactivity; allowing users to input data into our programs via the keyboard. Using the techniques presented thus far, it is possible to write many useful programs, such as specialized calculation programs and easy-to-use front ends for arcane command line tools. In the next chapter, we will build on the menu-driven program concept to make it even better.
在这一章中,我们向着程序交互性迈出了第一步;允许用户通过键盘向程序输入数据。使用目前 已经学过的技巧,有可能编写许多有用的程序,比如说特定的计算程序和容易使用的命令行工具 前端。在下一章中,我们将继续建立菜单驱动程序概念,让它更完善。
友情提示
It is important to study the programs in this chapter carefully and have a complete understanding of the way they are logically structured, as the programs to come will be increasingly complex. As an exercise, rewrite the programs in this chapter using the test command rather than the [[ ]] compound command. Hint: use grep to evaluate the regular expressions and evaluate its exit status. This will be good practice.
仔细研究本章中的程序,并对程序的逻辑结构有一个完整的理解,这是非常重要的,因为即将到来的 程序会日益复杂。作为练习,用 test 命令而不是[[ ]]复合命令来重新编写本章中的程序。 提示:使用 grep 命令来计算正则表达式及其退出状态。这会是一个不错的练习。
拓展阅读
The Bash Reference Manual contains a chapter on builtins, which includes the read command:
Bash 参考手册有一章关于内部命令的内容,其包括了
read命令:http://www.gnu.org/software/bash/manual/bashref.html#Bash-Builtins
30 - 30 流程控制:while/until 循环
流程控制:while/until 循环
http://billie66.github.io/TLCL/book/chap30.html
In the previous chapter, we developed a menu-driven program to produce various kinds of system information. The program works, but it still has a significant usability problem. It only executes a single choice and then terminates. Even worse, if an invalid selection is made, the program terminates with an error, without giving the user an opportunity to try again. It would be better if we could somehow construct the program so that it could repeat the menu display and selection over and over, until the user chooses to exit the program.
在前面的章节中,我们开发了菜单驱动程序,来产生各种各样的系统信息。虽然程序能够运行, 但它仍然存在重大的可用性问题。它只能执行单一的选择,然后终止。更糟糕地是,如果做了一个 无效的选择,程序会以错误终止,而没有给用户提供再试一次的机会。如果我们能构建程序, 以致于程序能够重复显示菜单,而且能一次又一次的选择,直到用户选择退出程序,这样的程序会更好一些。
In this chapter, we will look at a programming concept called looping, which can be used to make portions of programs repeat. The shell provides three compound commands for looping. We will look at two of them in this chapter, and the third in a later one.
在这一章中,我们将看一个叫做循环的程序概念,其可用来使程序的某些部分重复。shell 为循环提供了三个复合命令。 本章我们将查看其中的两个命令,随后章节介绍第三个命令。
循环
Daily life is full of repeated activities. Going to work each day, walking the dog, slicing a carrot are all tasks that involve repeating a series of steps. Let’s consider slicing a carrot. If we express this activity in pseudocode, it might look something like this:
日常生活中充满了重复性的活动。每天去散步,遛狗,切胡萝卜,所有任务都要重复一系列的步骤。 让我们以切胡萝卜为例。如果我们用伪码表达这种活动,它可能看起来像这样:
get cutting board
get knife
place carrot on cutting board
lift knife
advance carrot
slice carrot
if entire carrot sliced, then quit, else go to step 4
准备切菜板
准备菜刀
把胡萝卜放到切菜板上
提起菜刀
向前推进胡萝卜
切胡萝卜
如果切完整个胡萝卜,就退出,要不然回到第四步继续执行
Steps 4 through 7 form a loop. The actions within the loop are repeated until the condition, “entire carrot sliced,” is reached.
从第四步到第七步形成一个循环。重复执行循环内的动作直到满足条件“切完整个胡萝卜”。
while
bash can express a similar idea. Let’s say we wanted to display five numbers in sequential order from one to five. a bash script could be constructed as follows:
bash 能够表达相似的想法。比方说我们想要按照顺序从1到5显示五个数字。可如下构造一个 bash 脚本:
| |
When executed, this script displays the following:
当执行的时候,这个脚本显示如下信息:
| |
The syntax of the while command is:
while 命令的语法是:
while commands; do commands; done
Like if, while evaluates the exit status of a list of commands. As long as the exit status is zero, it performs the commands inside the loop. In the script above, the variable count is created and assigned an initial value of 1. The while command evaluates the exit status of the test command. As long as the test command returns an exit status of zero, the commands within the loop are executed. At the end of each cycle, the test command is repeated. After six iterations of the loop, the value of count has increased to six, the test command no longer returns an exit status of zero and the loop terminates. The program continues with the next statement following the loop.
和 if 一样, while 计算一系列命令的退出状态。只要退出状态为零,它就执行循环内的命令。 在上面的脚本中,创建了变量 count ,并初始化为1。 while 命令将会计算 test 命令的退出状态。 只要 test 命令返回退出状态零,循环内的所有命令就会执行。每次循环结束之后,会重复执行 test 命令。 第六次循环之后, count 的数值增加到6, test 命令不再返回退出状态零,且循环终止。 程序继续执行循环之后的语句。
We can use a while loop to improve the read-menu program from the previous chapter:
我们可以使用一个 while 循环,来提高前面章节的 read-menu 程序:
| |
By enclosing the menu in a while loop, we are able to have the program repeat the menu display after each selection. The loop continues as long as REPLY is not equal to “0” and the menu is displayed again, giving the user the opportunity to make another selection. At the end of each action, a sleep command is executed so the program will pause for a few seconds to allow the results of the selection to be seen before the screen is cleared and the menu is redisplayed. Once REPLY is equal to “0,” indicating the “quit” selection, the loop terminates and execution continues with the line following done.
通过把菜单包含在 while 循环中,每次用户选择之后,我们能够让程序重复显示菜单。只要 REPLY 不 等于”0”,循环就会继续,菜单就能显示,从而用户有机会重新选择。每次动作完成之后,会执行一个 sleep 命令,所以在清空屏幕和重新显示菜单之前,程序将会停顿几秒钟,为的是能够看到选项输出结果。 一旦 REPLY 等于“0”,则表示选择了“退出”选项,循环就会终止,程序继续执行 done 语句之后的代码。
跳出循环
bash provides two builtin commands that can be used to control program flow inside loops. The break command immediately terminates a loop, and program control resumes with the next statement following the loop. The continue command causes the remainder to the loop to be skipped, and program control resumes with the next iteration of the loop. Here we see a version of the while-menu program incorporating both break and continue:
bash 提供了两个内部命令,它们可以用来在循环内部控制程序流程。 break 命令立即终止一个循环, 且程序继续执行循环之后的语句。 continue 命令导致程序跳过循环中剩余的语句,且程序继续执行 下一次循环。这里我们看看采用了 break 和 continue 两个命令的 while-menu 程序版本:
| |
In this version of the script, we set up an endless loop (one that never terminates on its own) by using the true command to supply an exit status to while. Since true will always exit with a exit status of zero, the loop will never end. This is a surprisingly common scripting technique. Since the loop will never end on its own, it’s up to the programmer to provide some way to break out of the loop when the time is right. In this script, the break command is used to exit the loop when the “0” selection is chosen. The continue command has been included at the end of the other script choices to allow for more efficient execution. By using continue, the script will skip over code that is not needed when a selection is identified. For example, if the “1” selection is chosen and identified, there is no reason to test for the other selections.
在这个脚本版本中,我们设置了一个无限循环(就是自己永远不会终止的循环),通过使用 true 命令 为 while 提供一个退出状态。因为 true 的退出状态总是为零,所以循环永远不会终止。这是一个 令人惊讶的通用脚本编程技巧。因为循环自己永远不会结束,所以由程序员在恰当的时候提供某种方法来跳出循环。 此脚本,当选择”0”选项的时候,break 命令被用来退出循环。continue 命令被包含在其它选择动作的末尾, 来提高程序执行的效率。通过使用 continue 命令,当一个选项确定后,程序会跳过不需执行的其他代码。例如, 如果选择了选项”1”,则没有理由去测试其它选项。
until
The until command is much like while, except instead of exiting a loop when a non- zero exit status is encountered, it does the opposite. An until loop continues until it receives a zero exit status. In our while-count script, we continued the loop as long as the value of the count variable was less than or equal to five. We could get the same result by coding the script with until:
until 命令与 while 非常相似,除了当遇到一个非零退出状态的时候, while 退出循环, 而 until 不退出。一个 until 循环会继续执行直到它接受了一个退出状态零。在我们的 while-count 脚本中, 我们继续执行循环直到 count 变量的数值小于或等于5。我们可以得到相同的结果,通过在脚本中使用 until 命令:
| |
By changing the test expression to $count -gt 5, until will terminate the loop at the correct time. The decision of whether to use the while or until loop is usually a matter of choosing the one that allows the clearest test to be written.
通过把 test 表达式更改为 $count -gt 5 , until 会在正确的时间终止循环。至于使用 while 循环 还是 until 循环,通常是选择其 test 判断条件最容易写的那种。
使用循环读取文件
while and until can process standard input. This allows files to be processed with while and until loops. In the following example, we will display the contents of the distros.txt file used in earlier chapters:
while 和 until 能够处理标准输入。这就可以使用 while 和 until 处理文件。在下面的例子中, 我们将显示在前面章节中使用的 distros.txt 文件的内容:
| |
To redirect a file to the loop, we place the redirection operator after the done statement. The loop will use read to input the fields from the redirected file. The read command will exit after each line is read, with a zero exit status until the end-of-file is reached. At that point, it will exit with a non-zero exit status, thereby terminating the loop. It is also possible to pipe standard input into a loop:
为了重定向文件到循环中,我们把重定向操作符放置到 done 语句之后。循环将使用 read 从重定向文件中读取 字段。这个 read 命令读取每个文本行之后,将会退出,其退出状态为零,直到到达文件末尾。到时候,它的 退出状态为非零数值,因此终止循环。也有可能把标准输入管道到循环中。
| |
Here we take the output of the sort command and display the stream of text. However, it is important to remember that since a pipe will execute the loop in a subshell, any variables created or assigned within the loop will be lost when the loop terminates.
这里我们接受 sort 命令的标准输出,然后显示文本流。然而,因为管道将会在子 shell 中执行 循环,当循环终止的时候,循环中创建的任意变量或赋值的变量都会消失,记住这一点很重要。
总结
With the introduction of loops, and our previous encounters with branching, subroutines and sequences, we have covered the major types of flow control used in programs. bash has some more tricks up its sleeve, but they are refinements on these basic concepts.
通过引入循环和我们之前遇到的分支、子例程和序列,我们已经介绍了程序流程控制的主要类型。 bash 还有一些锦囊妙计,但它们都是关于这些基本概念的完善。
拓展阅读
The Bash Guide for Beginners from the Linux Documentation Project has some more examples of while loops:
Linux 文档工程中的 Bash 初学者指南一书中介绍了更多的 while 循环实例:
http://tldp.org/LDP/Bash-Beginners-Guide/html/sect_09_02.html
The Wikipedia has an article on loops, which is part of a larger article on flow control:
Wikipedia 中有一篇关于循环的文章,其是一篇比较长的关于流程控制的文章中的一部分:
31 - 31 疑难排解
疑难排解
http://billie66.github.io/TLCL/book/chap31.html
As our scripts become more complex, it’s time to take a look at what happens when things go wrong and they don’t do what we want. In this chapter, we’ll look at some of the common kinds of errors that occur in scripts, and describe a few useful techniques that can be used to track down and eradicate problems.
随着我们的脚本变得越来越复杂,当脚本运行错误,执行结果出人意料的时候, 我们就应该查看一下原因了。 在这一章中,我们将会看一些脚本中出现地常见错误类型,同时还会介绍几个可以跟踪和消除问题的有用技巧。
语法错误
One general class of errors is syntactic. Syntactic errors involve mis-typing some element of shell syntax. In most cases, these kinds of errors will lead to the shell refusing to execute the script.
一个普通的错误类型是语法。语法错误涉及到一些 shell 语法元素的拼写错误。大多数情况下,这类错误 会导致 shell 拒绝执行此脚本。
In the following the discussions, we will use this script to demonstrate common types of errors:
在以下讨论中,我们将使用下面这个脚本,来说明常见的错误类型:
| |
As written, this script runs successfully:
参看脚本内容,我们知道这个脚本执行成功了:
| |
丢失引号
If we edit our script and remove the trailing quote from the argument following the first echo command:
如果我们编辑我们的脚本,并从跟随第一个 echo 命令的参数中,删除其末尾的双引号:
| |
watch what happens:
观察发生了什么:
| |
It generates two errors. Interestingly, the line numbers reported are not where the missing quote was removed, but rather much later in the program. We can see why, if we follow the program after the missing quote. bash will continue looking for the closing quote until it finds one, which it does immediately after the second echo command. bash becomes very confused after that, and the syntax of the if command is broken because the fi statement is now inside a quoted (but open) string.
这个脚本产生了两个错误。有趣地是,所报告的行号不是引号被删除的地方,而是程序中后面的文本行。 我们能知道为什么,如果我们跟随丢失引号文本行之后的程序。bash 会继续寻找右引号,直到它找到一个, 其就是这个紧随第二个 echo 命令之后的引号。找到这个引号之后,bash 变得很困惑,并且 if 命令的语法 被破坏了,因为现在这个 fi 语句在一个用引号引起来的(但是开放的)字符串里面。
In long scripts, this kind of error can be quite hard to find. Using an editor with syntax highlighting will help. If a complete version of vim is installed, syntax highlighting can be enabled by entering the command:
在冗长的脚本中,此类错误很难找到。使用带有语法高亮的编辑器将会帮助查找错误。如果安装了 vim 的完整版, 通过输入下面的命令,可以使语法高亮生效:
:syntax on
丢失或意外的标记
Another common mistake is forgetting to complete a compound command, such as if or while. Let’s look at what happens if we remove the semicolon after the test in the if command:
另一个常见错误是忘记补全一个复合命令,比如说 if 或者是 while。让我们看一下,如果 我们删除 if 命令中测试之后的分号,会出现什么情况:
| |
The result is this:
结果是这样的:
| |
Again, the error message points to a error that occurs later than the actual problem. What happens is really pretty interesting. As we recall, if accepts a list of commands and evaluates the exit code of the last command in the list. In our program, we intend this list to consist of a single command, [, a synonym for test. The [ command takes what follows it as a list of arguments. In our case, three arguments: $number, =, and ]. With the semicolon removed, the word then is added to the list of arguments, which is syntactically legal. The following echo command is legal, too. It’s interpreted as another command in the list of commands that if will evaluate for an exit code. The else is encountered next, but it’s out of place, since the shell recognizes it as a reserved word (a word that has special meaning to the shell) and not the name of a command, hence the error message.
再次,错误信息指向一个错误,其出现的位置在实际问题所在的文本行的后面。所发生的事情真是相当有意思。我们记得, if 能够接受一系列命令,并且会计算列表中最后一个命令的退出代码。在我们的程序中,我们打算这个列表由 单个命令组成,即 [,测试的同义词。这个 [ 命令把它后面的东西看作是一个参数列表。在我们这种情况下, 有三个参数: $number,=,和 ]。由于删除了分号,单词 then 被添加到参数列表中,从语法上讲, 这是合法的。随后的 echo 命令也是合法的。它被解释为命令列表中的另一个命令,if 将会计算命令的 退出代码。接下来遇到单词 else,但是它出局了,因为 shell 把它认定为一个 保留字(对于 shell 有特殊含义的单词),而不是一个命令名,因此报告错误信息。
预料不到的展开
It’s possible to have errors that only occur intermittently in a script. Sometimes the script will run fine and other times it will fail because of results of an expansion. If we return our missing semicolon and change the value of number to an empty variable, we can demonstrate:
可能有这样的错误,它们仅会间歇性地出现在一个脚本中。有时候这个脚本执行正常,其它时间会失败, 这是因为展开结果造成的。如果我们归还我们丢掉的分号,并把 number 的数值更改为一个空变量,我们 可以示范一下:
| |
Running the script with this change results in the output:
运行这个做了修改的脚本,得到以下输出:
| |
We get this rather cryptic error message, followed by the output of the second echo command. The problem is the expansion of the number variable within the test command. When the command:
我们得到一个相当神秘的错误信息,其后是第二个 echo 命令的输出结果。这问题是由于 test 命令中 number 变量的展开结果造成的。当此命令:
[ $number = 1 ]
undergoes expansion with number being empty, the result is this:
经过展开之后,number 变为空值,结果就是这样:
[ = 1 ]
which is invalid and the error is generated. The = operator is a binary operator (it requires a value on each side), but the first value is missing, so the test command expects a unary operator (such as -z) instead. Further, since the test failed (because of the error), the if command receives a non-zero exit code and acts accordingly, and the second echo command is executed.
这是无效的,所以就产生了错误。这个 = 操作符是一个二元操作符(它要求每边都有一个数值),但是第一个数值是缺失的, 这样 test 命令就期望用一个一元操作符(比如 -z)来代替。进一步说,因为 test 命令运行失败了(由于错误), 这个 if 命令接收到一个非零退出代码,因此执行第二个 echo 命令。
This problem can be corrected by adding quotes around the first argument in the test command:
通过为 test 命令中的第一个参数添加双引号,可以更正这个问题:
[ "$number" = 1 ]
Then when expansion occurs, the result will be this:
然后当展开操作发生地时候,执行结果将会是这样:
[ "" = 1 ]
which yields the correct number of arguments. In addition to empty strings, quotes should be used in cases where a value could expand into multi-word strings, as with filenames containing embedded spaces.
其得到了正确的参数个数。除了代表空字符串之外,引号应该被用于这样的场合,一个要展开 成多单词字符串的数值,及其包含嵌入式空格的文件名。
逻辑错误
Unlike syntactic errors, logical errors do not prevent a script from running. The script will run, but it will not produce the desired result, due to a problem with its logic. There are countless numbers of possible logical errors, but here are a few of the most common kinds found in scripts:
不同于语法错误,逻辑错误不会阻止脚本执行。虽然脚本会正常运行,但是它不会产生期望的结果, 归咎于脚本的逻辑问题。虽然有不计其数的可能的逻辑错误,但下面是一些在脚本中找到的最常见的 逻辑错误类型:
Incorrect conditional expressions. It’s easy to incorrectly code an if/then/else and have the wrong logic carried out. Sometimes the logic will be reversed or it will be incomplete.
“Off by one” errors. When coding loops that employ counters, it is possible to overlook that the loop may require the counting start with zero, rather than one, for the count to conclude at the correct point. These kinds of errors result in either a loop “going off the end” by counting too far, or else missing the last iteration of the loop by terminating one iteration too soon.
Unanticipated situations. Most logic errors result from a program encountering data or situations that were unforeseen by the programmer. This can also include unanticipated expansions, such as a filename that contains embedded spaces that expands into multiple command arguments rather than a single filename.
不正确的条件表达式。很容易编写一个错误的 if/then/else 语句,并且执行错误的逻辑。 有时候逻辑会被颠倒,或者是逻辑结构不完整。
“超出一个值”错误。当编写带有计数器的循环语句的时候,为了计数在恰当的点结束,循环语句 可能要求从 0 开始计数,而不是从 1 开始,这有可能会被忽视。这些类型的错误要不导致循环计数太多,而“超出范围”, 要不就是过早的结束了一次迭代,从而错过了最后一次迭代循环。
意外情况。大多数逻辑错误来自于程序碰到了程序员没有预见到的数据或者情况。这也 可以包括出乎意料的展开,比如说一个包含嵌入式空格的文件名展开成多个命令参数而不是单个的文件名。
防错编程
It is important to verify assumptions when programming. This means a careful evaluation of the exit status of programs and commands that are used by a script. Here is an example, based on a true story. An unfortunate system administrator wrote a script to perform a maintenance task on an important server. The script contained the following two lines of code:
当编程的时候,验证假设非常重要。这意味着要仔细地计算脚本所使用的程序和命令的退出状态。 这里有个基于一个真实的故事的实例。为了在一台重要的服务器中执行维护任务,一位不幸的系统管理员写了一个脚本。 这个脚本包含下面两行代码:
cd $dir_name
rm *
There is nothing intrinsically wrong with these two lines, as long as the directory named in the variable, dir_name, exists. But what happens if it does not? In that case, the cd command fails, the script continues to the next line and deletes the files in the current working directory. Not the desired outcome at all! The hapless administrator destroyed an important part of the server because of this design decision.
从本质上来说,这两行代码没有任何问题,只要是变量 dir_name 中存储的目录名字存在就可以。但是如果不是这样会发生什么事情呢?在那种情况下,cd 命令会运行失败, 脚本会继续执行下一行代码,将会删除当前工作目录中的所有文件。完成不是期望的结果! 由于这种设计策略,这个倒霉的管理员销毁了服务器中的一个重要部分。
Let’s look at some ways this design could be improved. First, it might be wise to make the execution of rm contingent on the success of cd:
让我们看一些能够提高这个设计的方法。首先,在 cd 命令执行成功之后,再运行 rm 命令,可能是明智的选择。
cd $dir_name && rm *
This way, if the cd command fails, the rm command is not carried out. This is better, but still leaves open the possibility that the variable, dir_name, is unset or empty, which would result in the files in the user’s home directory being deleted. This could also be avoided by checking to see that dir_name actually contains the name of an existing directory:
这样,如果 cd 命令运行失败后,rm 命令将不会执行。这样比较好,但是仍然有可能未设置变量 dir_name 或其变量值为空,从而导致删除了用户家目录下面的所有文件。这个问题也能够避免,通过检验变量 dir_name 中包含的目录名是否真正地存在:
[[ -d $dir_name ]] && cd $dir_name && rm *
Often, it is best to terminate the script with an error when an situation such as the one above occurs:
通常,当某种情况(比如上述问题)发生的时候,最好是终止脚本执行,并对这种情况提示错误信息:
if [[ -d $dir_name ]]; then
if cd $dir_name; then
rm *
else
echo "cannot cd to '$dir_name'" >&2
exit 1
fi
else
echo "no such directory: '$dir_name'" >&2
exit 1
fi
Here, we check both the name, to see that it is that of an existing directory, and the success of the cd command. If either fails, a descriptive error message is sent to standard error and the script terminates with an exit status of one to indicate a failure.
这里,我们检验了两种情况,一个名字,看看它是否为一个真正存在的目录,另一个是 cd 命令是否执行成功。 如果任一种情况失败,就会发送一个错误说明信息到标准错误,然后脚本终止执行,并用退出状态 1 表明脚本执行失败。
验证输入
A general rule of good programming is that if a program accepts input, it must be able to deal with anything it receives. This usually means that input must be carefully screened, to ensure that only valid input is accepted for further processing. We saw an example of this in the previous chapter when we studied the read command. One script contained the following test to verify a menu selection:
一个良好的编程习惯是如果一个程序可以接受输入数据,那么这个程序必须能够应对它所接受的任意数据。这 通常意味着必须非常仔细地筛选输入数据,以确保只有有效的输入数据才能被程序用来做进一步地处理。在前面章节 中我们学习 read 命令的时候,我们遇到过一个这样的例子。一个脚本中包含了下面一条测试语句, 用来验证一个选择菜单:
[[ $REPLY =~ ^[0-3]$ ]]
This test is very specific. It will only return a zero exit status if the string returned by the user is a numeral in the range of zero to three. Nothing else will be accepted. Sometimes these sorts of tests can be very challenging to write, but the effort is necessary to produce a high quality script.
这条测试语句非常明确。只有当用户输入是一个位于 0 到 3 范围内(包括 0 和 3)的数字的时候, 这条语句才返回一个 0 退出状态。而其它任何输入概不接受。有时候编写这类测试条件非常具有挑战性, 但是为了能产出一个高质量的脚本,付出还是必要的。
Design Is A Function Of Time
设计是时间的函数
When I was a college student studying industrial design, a wise professor stated that the degree of design on a project was determined by the amount of time given to the designer. If you were given five minutes to design a device “that kills flies,” you designed a flyswatter. If you were given five months, you might come up with a laser-guided “anti-fly system” instead.
当我还是一名大学生,在学习工业设计的时候,一位明智的教授说过一个项目的设计程度是由 给定设计师的时间量来决定的。如果给你五分钟来设计一款能够 “杀死苍蝇” 的产品,你会设计出一个苍蝇拍。如果给你五个月的时间,你可能会制作出激光制导的 “反苍蝇系统”。
The same principle applies to programming. Sometimes a “quick and dirty” script will do if it’s only going to be used once and only used by the programmer. That kind of script is common and should be developed quickly to make the effort economical. Such scripts don’t need a lot of comments and defensive checks. On the other hand, if a script is intended for production use, that is, a script that will be used over and over for an important task or by multiple users, it needs much more careful development.
同样的原理适用于编程。有时候一个 “快速但粗糙” 的脚本就可以解决问题, 但这个脚本只能被其作者使用一次。这类脚本很常见,为了节省气力也应该被快速地开发出来。 所以这些脚本不需要太多的注释和防错检查。相反,如果一个脚本打算用于生产使用,也就是说, 某个重要任务或者多个客户会不断地用到它,此时这个脚本就需要非常谨慎小心地开发了。
测试
Testing is an important step in every kind of software development, including scripts. There is a saying in the open source world, “release early, release often,” which reflects this fact. By releasing early and often, software gets more exposure to use and testing. Experience has shown that bugs are much easier to find, and much less expensive to fix, if they are found early in the development cycle.
在各类软件开发中(包括脚本),测试是一个重要的环节。在开源世界中有一句谚语,“早发布,常发布”,这句谚语就反映出这个事实(测试的重要性)。 通过提早和经常发布,软件能够得到更多曝光去使用和测试。经验表明如果在开发周期的早期发现 bug,那么这些 bug 就越容易定位,而且越能低成本 的修复。
In a previous discussion, we saw how stubs can be used to verify program flow. From the earliest stages of script development, they are a valuable technique to check the progress of our work.
在之前的讨论中,我们知道了如何使用 stubs 来验证程序流程。在脚本开发的最初阶段,它们是一项有价值的技术 来检测我们的工作进度。
Let’s look at the file deletion problem above and see how this could be coded for easy testing. Testing the original fragment of code would be dangerous, since its purpose is to delete files, but we could modify the code to make the test safe:
让我们看一下上面的文件删除问题,为了轻松测试,看看如何修改这些代码。测试原本那个代码片段将是危险的,因为它的目的是要删除文件, 但是我们可以修改代码,让测试安全:
if [[ -d $dir_name ]]; then
if cd $dir_name; then
echo rm * # TESTING
else
echo "cannot cd to '$dir_name'" >&2
exit 1
fi
else
echo "no such directory: '$dir_name'" >&2
exit 1
fi
exit # TESTING
Since the error conditions already output useful messages, we don’t have to add any. The most important change is placing an echo command just before the rm command to allow the command and its expanded argument list to be displayed, rather than the command actually being executed. This change allows safe execution of the code. At the end of the code fragment, we place an exit command to conclude the test and prevent any other part of the script from being carried out. The need for this will vary according to the design of the script.
因为在满足出错条件的情况下代码可以打印出有用信息,所以我们没有必要再添加任何额外信息了。 最重要的改动是仅在 rm 命令之前放置了一个 echo 命令, 为的是把 rm 命令及其展开的参数列表打印出来,而不是执行实际的 rm 命令语句。这个改动可以安全的执行代码。 在这段代码的末尾,我们放置了一个 exit 命令来结束测试,从而防止执行脚本其它部分的代码。 这个需求会因脚本的设计不同而变化。
We also include some comments that act as “markers” for our test-related changes. These can be used to help find and remove the changes when testing is complete.
我们也在代码中添加了一些注释,用来标记与测试相关的改动。当测试完成之后,这些注释可以帮助我们找到并删除所有的更改。
测试案例
To perform useful testing, it’s important to develop and apply good test cases. This is done by carefully choosing input data or operating conditions that reflect edge and corner cases. In our code fragment (which is very simple), we want to know how the code performs under three specific conditions:
为了执行有用的测试,开发和使用好的测试案例是很重要的。这个要求可以通过谨慎地选择输入数据或者运行边缘案例和极端案例来完成。 在我们的代码片段中(是非常简单的代码),我们想要知道在下面的三种具体情况下这段代码是怎样执行的:
dir_name contains the name of an existing directory
dir_name contains the name of a non-existent directory
dir_name is empty
dir_name 包含一个已经存在的目录的名字
dir_name 包含一个不存在的目录的名字
dir_name 为空
By performing the test with each of these conditions, good test coverage is achieved.
通过执行以上每一个测试条件,就达到了一个良好的测试覆盖率。
Just as with design, testing is a function of time, as well. Not every script feature needs to be extensively tested. It’s really a matter of determining what is most important. Since it could be so potentially destructive if it malfunctioned, our code fragment deserves careful consideration during both its design and testing.
正如设计,测试也是一个时间的函数。不是每一个脚本功能都需要做大量的测试。问题关键是确定什么功能是最重要的。因为 测试若发生故障会存在如此潜在的破坏性,所以我们的代码片在设计和测试段期间都应值得仔细推敲。
调试
If testing reveals a problem with a script, the next step is debugging. “A problem” usually means that the script is, in some way, not performing to the programmers expectations. If this is the case, we need to carefully determine exactly what the script is actually doing and why. Finding bugs can sometimes involve a lot of detective work. A well designed script will try to help. It should be programmed defensively, to detect abnormal conditions and provide useful feedback to the user. Sometimes, however, problems are quite strange and unexpected and more involved techniques are required.
如果测试暴露了脚本中的一个问题,那下一步就是调试了。“一个问题”通常意味着在某种情况下,这个脚本的执行 结果不是程序员所期望的结果。若是这种情况,我们需要仔细确认这个脚本实际到底要完成什么任务,和为什么要这样做。 有时候查找 bug 要牵涉到许多监测工作。一个设计良好的脚本会对查找错误有帮助。设计良好的脚本应该具备防卫能力, 能够监测异常条件,并能为用户提供有用的反馈信息。 然而有时候,出现的问题相当稀奇,出人意料,这时候就需要更多的调试技巧了。
找到问题区域
In some scripts, particularly long ones, it is sometimes useful to isolate the area of the script that is related to the problem. This won’t always be the actual error, but isolation will often provide insights into the actual cause. One technique that can be used to isolate code is “commenting out” sections a script. For example, our file deletion fragment could be modified to determine if the removed section was related to an error:
在一些脚本中,尤其是一些代码比较长的脚本,有时候隔离脚本中与出现的问题相关的代码区域对查找问题很有帮助。 隔离的代码区域并不总是真正的错误所在,但是隔离往往可以深入了解实际的错误原因。可以用来隔离代码的一项 技巧是“添加注释”。例如,我们的文件删除代码可以修改成这样,从而决定注释掉的这部分代码是否导致了一个错误:
if [[ -d $dir_name ]]; then
if cd $dir_name; then
rm *
else
echo "cannot cd to '$dir_name'" >&2
exit 1
fi
# else
# echo "no such directory: '$dir_name'" >&2
# exit 1
fi
By placing comment symbols at the beginning of each line in a logical section of a script, we prevent that section from being executed. Testing can then be performed again, to see if the removal of the code has any impact on the behavior of the bug.
通过给脚本中的一个逻辑区块内的每条语句的开头添加一个注释符号,我们就阻止了这部分代码的执行。然后可以再次执行测试, 来看看清除的代码是否影响了错误的行为。
追踪
Bugs are often cases of unexpected logical flow within a script. That is, portions of the script are either never being executed, or are being executed in the wrong order or at the wrong time. To view the actual flow of the program, we use a technique called tracing.
在一个脚本中,错误往往是由意想不到的逻辑流导致的。也就是说,脚本中的一部分代码或者从未执行,或是以错误的顺序, 或在错误的时间给执行了。为了查看真实的程序流,我们使用一项叫做追踪(tracing)的技术。
One tracing method involves placing informative messages in a script that display the location of execution. We can add messages to our code fragment:
一种追踪方法涉及到在脚本中添加可以显示程序执行位置的提示性信息。我们可以添加提示信息到我们的代码片段中:
echo "preparing to delete files" >&2
if [[ -d $dir_name ]]; then
if cd $dir_name; then
echo "deleting files" >&2
rm *
else
echo "cannot cd to '$dir_name'" >&2
exit 1
fi
else
echo "no such directory: '$dir_name'" >&2
exit 1
fi
echo "file deletion complete" >&2
We send the messages to standard error to separate them from normal output. We also do not indent the lines containing the messages, so it is easier to find when it’s time to remove them.
我们把提示信息输出到标准错误输出,让其从标准输出中分离出来。我们也没有缩进包含提示信息的语句,这样 想要删除它们的时候,能比较容易找到它们。
Now when the script is executed, it’s possible to see that the file deletion has been performed:
当这个脚本执行的时候,就可能看到文件删除操作已经完成了:
| |
bash also provides a method of tracing, implemented by the -x option and the set command with the -x option. Using our earlier trouble script, we can activate tracing for the entire script by adding the -x option to the first line:
bash 还提供了一种名为追踪的方法,这种方法可通过 -x 选项和 set 命令加上 -x 选项两种途径实现。 拿我们之前的 trouble 脚本为例,给该脚本的第一行语句添加 -x 选项,我们就能追踪整个脚本。
| |
When executed, the results look like this:
当脚本执行后,输出结果看起来像这样:
| |
With tracing enabled, we see the commands performed with expansions applied. The leading plus signs indicate the display of the trace to distinguish them from lines of regular output. The plus sign is the default character for trace output. It is contained in the PS4 (prompt string 4) shell variable. The contents of this variable can be adjusted to make the prompt more useful. Here, we modify the contents of the variable to include the current line number in the script where the trace is performed. Note that single quotes are required to prevent expansion until the prompt is actually used:
追踪生效后,我们看到脚本命令展开后才执行。行首的加号表明追踪的迹象,使其与常规输出结果区分开来。 加号是追踪输出的默认字符。它包含在 PS4(提示符4)shell 变量中。可以调整这个变量值让提示信息更有意义。 这里,我们修改该变量的内容,让其包含脚本中追踪执行到的当前行的行号。注意这里必须使用单引号是为了防止变量展开,直到 提示符真正使用的时候,就不需要了。
| |
To perform a trace on a selected portion of a script, rather than the entire script, we can use the set command with the -x option:
我们可以使用 set 命令加上 -x 选项,为脚本中的一块选择区域,而不是整个脚本启用追踪。
| |
We use the set command with the -x option to activate tracing and the +x option to deactivate tracing. This technique can be used to examine multiple portions of a troublesome script.
我们使用 set 命令加上 -x 选项来启动追踪,+x 选项关闭追踪。这种技术可以用来检查一个有错误的脚本的多个部分。
执行时检查数值
It is often useful, along with tracing, to display the content of variables to see the internal workings of a script while it is being executed. Applying additional echo statements will usually do the trick:
伴随着追踪,在脚本执行的时候显示变量的内容,以此知道脚本内部的工作状态,往往是很用的。 使用额外的 echo 语句通常会奏效。
| |
In this trivial example, we simply display the value of the variable number and mark the added line with a comment to facilitate its later identification and removal. This technique is particularly useful when watching the behavior of loops and arithmetic within scripts.
在这个简单的示例中,我们只是显示变量 number 的数值,并为其添加注释,随后利于其识别和清除。 当查看脚本中的循环和算术语句的时候,这种技术特别有用。
总结
In this chapter, we looked at just a few of the problems that can crop up during script de- velopment. Of course, there are many more. The techniques described here will enable finding most common bugs. Debugging is a fine art that can be developed through experience, both in knowing how to avoid bugs (testing constantly throughout development) and in finding bugs (effective use of tracing).
在这一章中,我们仅仅看了几个在脚本开发期间会出现的问题。当然,还有很多。这章中描述的技术对查找 大多数的常见错误是有效的。调试是一种艺术,可以通过开发经验,在知道如何避免错误(整个开发过程中不断测试) 以及在查找 bug(有效利用追踪)两方面都会得到提升。
拓展阅读
The Wikipedia has a couple of short articles on syntactic and logical errors:
Wikipedia 上面有两篇关于语法和逻辑错误的短文:
There are many online resources for the technical aspects of bash programming:
网上有很多关于技术层面的 bash 编程的资源:
http://mywiki.wooledge.org/BashPitfalls
http://tldp.org/LDP/abs/html/gotchas.html
http://www.gnu.org/software/bash/manual/html_node/Reserved-Word-Index.html
Eric Raymond’s
The Art of Unix Programmingis a great resource for learning the basic concepts found in well-written Unix programs. Many of these ideas apply to shell scripts:想要学习从编写良好的 Unix 程序中得知的基本概念,可以参考 Eric Raymond 的《Unix 编程的艺术》这本 伟大的著作。书中的许多想法都能适用于 shell 脚本:
For really heavy-duty debugging, there is the Bash Debugger:
对于真正的高强度的调试,参考这个 Bash Debugger:
32 - 32 流程控制:case 分支
流程控制:case 分支
http://billie66.github.io/TLCL/book/chap32.html
In this chapter, we will continue to look at flow control. In Chapter 28, we constructed some simple menus and built the logic used to act on a user’s selection. To do this, we used a series of if commands to identify which of the possible choices has been selected. This type of construct appears frequently in programs, so much so that many programming languages (including the shell) provide a flow control mechanism for multiple-choice decisions.
在这一章中,我们将继续看一下程序的流程控制。在第28章中,我们构建了一些简单的菜单并创建了用来 应对各种用户选择的程序逻辑。为此,我们使用了一系列的 if 命令来识别哪一个可能的选项已经被选中。 这种类型的构造经常出现在程序中,出现频率如此之多,以至于许多编程语言(包括 shell) 专门为多选决策提供了一种流程控制机制。
case
The bash multiple-choice compound command is called case. It has the following syntax:
Bash 的多选复合命令称为 case。它的语法规则如下所示:
case word in
[pattern [| pattern]...) commands ;;]...
esac
If we look at the read-menu program from Chapter 28, we see the logic used to act on a user’s selection:
如果我们看一下第28章中的读菜单程序,我们就知道了用来应对一个用户选项的逻辑流程:
| |
Using case, we can replace this logic with something simpler:
使用 case 语句,我们可以用更简单的代码替换这种逻辑:
| |
The case command looks at the value of word, in our example, the value of the REPLY variable, and then attempts to match it against one of the specified patterns. When a match is found, the commands associated with the specified pattern are executed. After a match is found, no further matches are attempted.
case 命令检查一个变量值,在我们这个例子中,就是 REPLY 变量的变量值,然后试图去匹配其中一个具体的模式。 当与之相匹配的模式找到之后,就会执行与该模式相关联的命令。若找到一个模式之后,就不会再继续寻找。
模式
The patterns used by case are the same as those used by pathname expansion. Patterns are terminated with a “)” character. Here are some valid patterns:
这里 case 语句使用的模式和路径展开中使用的那些是一样的。模式以一个 “)” 为终止符。这里是一些有效的模式。
| Pattern | Description |
|---|---|
| a) | Matches if word equals “a”. |
| [[:alpha:]]) | Matches if word is a single alphabetic character. |
| ???) | Matches if word is exactly three characters long. |
| *.txt) | Matches if word ends with the characters “.txt”. |
| *) | Matches any value of word. It is good practice to include this as the last pattern in a case command, to catch any values of word that did not match a previous pattern; that is, to catch any possible invalid values. |
| 模式 | 描述 |
|---|---|
| a) | 若单词为 “a”,则匹配 |
| [[:alpha:]]) | 若单词是一个字母字符,则匹配 |
| ???) | 若单词只有3个字符,则匹配 |
| *.txt) | 若单词以 “.txt” 字符结尾,则匹配 |
| *) | 匹配任意单词。把这个模式做为 case 命令的最后一个模式,是一个很好的做法, 可以捕捉到任意一个与先前模式不匹配的数值;也就是说,捕捉到任何可能的无效值。 |
Here is an example of patterns at work:
这里是一个模式使用实例:
| |
It is also possible to combine multiple patterns using the vertical bar character as a separator. This creates an “or” conditional pattern. This is useful for such things as handling both upper- and lowercase characters. For example:
还可以使用竖线字符作为分隔符,把多个模式结合起来。这就创建了一个 “或” 条件模式。这对于处理诸如大小写字符很有用处。例如:
| |
Here, we modify the case-menu program to use letters instead of digits for menu selection. Notice how the new patterns allow for entry of both upper- and lowercase letters.
这里,我们更改了 case-menu 程序的代码,用字母来代替数字做为菜单选项。注意新模式如何使得大小写字母都是有效的输入选项。
执行多个动作
In versions of bash prior to 4.0, case allowed only one action to be performed on a successful match. After a successful match, the command would terminate. Here we see a script that tests a character:
早于版本号4.0的 bash,case 语法只允许执行与一个成功匹配的模式相关联的动作。 匹配成功之后,命令将会终止。这里我们看一个测试一个字符的脚本:
| |
Running this script produces this:
运行这个脚本,输出这些内容:
| |
The script works for the most part, but fails if a character matches more than one of the POSIX characters classes. For example, the character “a” is both lower case and alphabetic, as well as a hexadecimal digit. In bash prior to version 4.0 there was no way for case to match more than one test. Modern versions of bash, add the “;;&” notation to terminate each action, so now we can do this:
大多数情况下这个脚本工作是正常的,但若输入的字符不止与一个 POSIX 字符集匹配的话,这时脚本就会出错。 例如,字符 “a” 既是小写字母,也是一个十六进制的数字。早于4.0的 bash,对于 case 语法绝不能匹配 多个测试条件。现在的 bash 版本,添加 “;;&” 表达式来终止每个行动,所以现在我们可以做到这一点:
| |
When we run this script, we get this:
当我们运行这个脚本的时候,我们得到这些:
| |
The addition of the “;;&” syntax allows case to continue on to the next test rather than simply terminating.
添加的 “;;&” 的语法允许 case 语句继续执行下一条测试,而不是简单地终止运行。
总结
The case command is a handy addition to our bag of programming tricks. As we will see in the next chapter, it’s the perfect tool for handling certain types of problems.
case 命令是我们编程技巧口袋中的一个便捷工具。在下一章中我们将看到, 对于处理某些类型的问题来说,case 命令是一个完美的工具。
拓展阅读
The Bash Reference Manual section on Conditional Constructs describes the case command in detail:
Bash 参考手册的条件构造一节详尽的介绍了 case 命令:
The Advanced Bash-Scripting Guide provides further examples of case applications:
高级 Bash 脚本指南提供了更深一层的 case 应用实例:
33 - 33 位置参数
位置参数
http://billie66.github.io/TLCL/book/chap33.html
One feature that has been missing from our programs is the ability to accept and process command line options and arguments. In this chapter, we will examine the shell features that allow our programs to get access to the contents of the command line.
现在我们的程序还缺少一种本领,就是接收和处理命令行选项和参数的能力。在这一章中,我们将探究一些能 让程序访问命令行内容的 shell 性能。
访问命令行
The shell provides a set of variables called positional parameters that contain the individ- ual words on the command line. The variables are named 0 through 9. They can be demonstrated this way:
shell 提供了一个称为位置参数的变量集合,这个集合包含了命令行中所有独立的单词。这些变量按照从0到9给予命名。 可以以这种方式讲明白:
| |
A very simple script that displays the values of the variables $0-$9. When executed with no command line arguments:
一个非常简单的脚本,显示从 $0 到 $9 所有变量的值。当不带命令行参数执行该脚本时,输出结果如下:
| |
Even when no arguments are provided, $0 will always contain the first item appearing on the command line, which is the pathname of the program being executed. When argu- ments are provided, we see the results:
即使不带命令行参数,位置参数 $0 总会包含命令行中出现的第一个单词,也就是已执行程序的路径名。 当带参数执行脚本时,我们看看输出结果:
| |
Note: You can actually access more than nine parameters using parameter expan- sion. To specify a number greater than nine, surround the number in braces. For ex- ample ${10}, ${55}, ${211}, and so on.
注意: 实际上通过参数展开方式你可以访问的参数个数多于9个。只要指定一个大于9的数字,用花括号把该数字括起来就可以。 例如 ${10}、 ${55}、 ${211}等等。
确定参数个数
The shell also provides a variable, $#, that yields the number of arguments on the com- mand line:
另外 shell 还提供了一个名为 $#,可以得到命令行参数个数的变量:
| |
The result:
结果是:
| |
shift - 访问多个参数的利器
But what happens when we give the program a large number of arguments such as this:
但是如果我们给一个程序添加大量的命令行参数,会怎么样呢? 正如下面的例子:
| |
On this example system, the wildcard * expands into 82 arguments. How can we process that many? The shell provides a method, albeit a clumsy one, to do this. The shift command causes all the parameters to “move down one” each time it is executed. In fact, by using shift, it is possible to get by with only one parameter (in addition to $0, which never changes):
在这个例子运行的环境下,通配符 * 展开成82个参数。我们如何处理那么多的参数? 为此,shell 提供了一种方法,尽管笨拙,但可以解决这个问题。执行一次 shift 命令, 就会导致所有的位置参数 “向下移动一个位置”。事实上,用 shift 命令也可以 处理只有一个参数的情况(除了其值永远不会改变的变量 $0):
| |
Each time shift is executed, the value of $2 is moved to $1, the value of $3 is moved to $2 and so on. The value of $# is also reduced by one.
每次 shift 命令执行的时候,变量 $2 的值会移动到变量 $1 中,变量 $3 的值会移动到变量 $2 中,依次类推。 变量 $# 的值也会相应的减1。
In the posit-param2 program, we create a loop that evaluates the number of arguments remaining and continues as long as there is at least one. We display the current argument, increment the variable count with each iteration of the loop to provide a running count of the number of arguments processed and, finally, execute a shift to load $1 with the next argument. Here is the program at work:
在该 posit-param2 程序中,我们编写了一个计算剩余参数数量,只要参数个数不为零就会继续执行的 while 循环。 我们显示当前的位置参数,每次循环迭代变量 count 的值都会加1,用来计数处理的参数数量, 最后,执行 shift 命令加载 $1,其值为下一个位置参数的值。这里是程序运行后的输出结果:
| |
简单应用
Even without shift, it’s possible to write useful applications using positional parameters. By way of example, here is a simple file information program:
即使没有 shift 命令,也可以用位置参数编写一个有用的应用。举例说明,这里是一个简单的输出文件信息的程序:
| |
This program displays the file type (determined by the file command) and the file status (from the stat command) of a specified file. One interesting feature of this program is the PROGNAME variable. It is given the value that results from the basename $0 command. The basename command removes the leading portion of a pathname, leaving only the base name of a file. In our example, basename removes the leading portion of the pathname contained in the $0 parameter, the full pathname of our example program. This value is useful when constructing messages such as the usage message at the end of the program. By coding it this way, the script can be renamed and the message automatically adjusts to contain the name of the program.
这个程序显示一个具体文件的文件类型(由 file 命令确定)和文件状态(来自 stat 命令)。该程序一个有意思 的特点是 PROGNAME 变量。它的值就是 basename $0 命令的执行结果。这个 basename 命令清除 一个路径名的开头部分,只留下一个文件的基本名称。在我们的程序中,basename 命令清除了包含在 $0 位置参数 中的路径名的开头部分,$0 中包含着我们示例程序的完整路径名。当构建提示信息正如程序结尾的使用信息的时候, basename $0 的执行结果就很有用处。按照这种方式编码,可以重命名该脚本,且程序信息会自动调整为 包含相应的程序名称。
Shell 函数中使用位置参数
Just as positional parameters are used to pass arguments to shell scripts, they can also be used to pass arguments to shell functions. To demonstrate, we will convert the file_info script into a shell function:
正如位置参数被用来给 shell 脚本传递参数一样,它们也能够被用来给 shell 函数传递参数。为了说明这一点, 我们将把 file_info 脚本转变成一个 shell 函数:
file_info () {
# file_info: function to display file information
if [[ -e $1 ]]; then
echo -e "\nFile Type:"
file $1
echo -e "\nFile Status:"
stat $1
else
echo "$FUNCNAME: usage: $FUNCNAME file" >&2
return 1
fi
}
Now, if a script that incorporates the file_info shell function calls the function with a filename argument, the argument will be passed to the function.
现在,如果一个包含 shell 函数 file_info 的脚本调用该函数,且带有一个文件名参数,那这个参数会传递给 file_info 函数。
With this capability, we can write many useful shell functions that can not only be used in scripts, but also within the .bashrc file.
通过此功能,我们可以写出许多有用的 shell 函数,这些函数不仅能在脚本中使用,也可以用在 .bashrc 文件中。
Notice that the PROGNAME variable was changed to the shell variable FUNCNAME. The shell automatically updates this variable to keep track of the currently executed shell function. Note that $0 always contains the full pathname of the first item on the command line (i.e., the name of the program) and does not contain the name of the shell function as we might expect.
注意那个 PROGNAME 变量已经改成 shell 变量 FUNCNAME 了。shell 会自动更新 FUNCNAME 变量,以便 跟踪当前执行的 shell 函数。注意位置参数 $0 总是包含命令行中第一项的完整路径名(例如,该程序的名字), 但不会包含这个我们可能期望的 shell 函数的名字。
处理集体位置参数
It is sometimes useful to manage all the positional parameters as a group. For example, we might want to write a “wrapper” around another program. This means that we create a script or shell function that simplifies the execution of another program. The wrapper supplies a list of arcane command line options and then passes a list of arguments to the lower-level program.
有时候把所有的位置参数作为一个集体来管理是很有用的。例如,我们可能想为另一个程序编写一个 “包裹程序”。 这意味着我们会创建一个脚本或 shell 函数,来简化另一个程序的执行。包裹程序提供了一个神秘的命令行选项 列表,然后把这个参数列表传递给下一级的程序。
The shell provides two special parameters for this purpose. They both expand into the complete list of positional parameters, but differ in rather subtle ways. They are:
为此 shell 提供了两种特殊的参数。他们二者都能扩展成完整的位置参数列表,但以相当微妙的方式略有不同。它们是:
| Parameter | Description |
|---|---|
| $* | Expands into the list of positional parameters, starting with 1. When surrounded by double quotes, it expands into a double quoted string containing all of the positional parameters, each separated by the first character of the IFS shell variable (by default a space character). |
| $@ | Expands into the list of positional parameters, starting with 1. When surrounded by double quotes, it expands each positional parameter into a separate word surrounded by double quotes. |
| 参数 | 描述 |
|---|---|
| $* | 展开成一个从1开始的位置参数列表。当它被用双引号引起来的时候,展开成一个由双引号引起来 的字符串,包含了所有的位置参数,每个位置参数由 shell 变量 IFS 的第一个字符(默认为一个空格)分隔开。 |
| $@ | 展开成一个从1开始的位置参数列表。当它被用双引号引起来的时候, 它把每一个位置参数展开成一个由双引号引起来的分开的字符串。 |
Here is a script that shows these special paramaters in action:
下面这个脚本用程序中展示了这些特殊参数:
| |
In this rather convoluted program, we create two arguments: “word” and “words with spaces”, and pass them to the pass_params function. That function, in turn, passes them on to the print_params function, using each of the four methods available with the special parameters $* and $@. When executed, the script reveals the differences:
在这个相当复杂的程序中,我们创建了两个参数: “word” 和 “words with spaces”,然后把它们 传递给 pass_params 函数。这个函数,依次,再把两个参数传递给 print_params 函数, 使用了特殊参数 $* 和 $@ 提供的四种可用方法。脚本运行后,揭示了这两个特殊参数存在的差异:
| |
With our arguments, both $* and $@ produce a four word result:
通过我们的参数,$* 和 $@ 两个都产生了一个有四个词的结果:
word words with spaces
"$*" produces a one word result:
"word words with spaces"
"$@" produces a two word result:
"word" "words with spaces"
which matches our actual intent. The lesson to take from this is that even though the shell provides four different ways of getting the list of positional parameters, “$@” is by far the most useful for most situations, because it preserves the integrity of each positional parameter.
这个结果符合我们实际的期望。我们从中得到的教训是尽管 shell 提供了四种不同的得到位置参数列表的方法, 但到目前为止, “$@” 在大多数情况下是最有用的方法,因为它保留了每一个位置参数的完整性。
一个更复杂的应用
After a long hiatus, we are going to resume work on our sys_info_page program. Our next addition will add several command line options to the program as follows:
经过长时间的间断,我们将恢复程序 sys_info_page 的工作。我们下一步要给程序添加如下几个命令行选项:
- Output file. We will add an option to specify a name for a file to contain the pro- gram’s output. It will be specified as either -f file or –file file.
- 输出文件。 我们将添加一个选项,以便指定一个文件名,来包含程序的输出结果。 选项格式要么是 -f file,要么是 –file file
- Interactive mode. This option will prompt the user for an output filename and will determine if the specified file already exists. If it does, the user will be prompted before the existing file is overwritten. This option will be specified by either -i or –interactive.
- 交互模式。这个选项将提示用户输入一个输出文件名,然后判断指定的文件是否已经存在了。如果文件存在, 在覆盖这个存在的文件之前会提示用户。这个选项可以通过 -i 或者 –interactive 来指定。
- Help. Either -h or –help may be specified to cause the program to output an informative usage message.
- 帮助。指定 -h 选项 或者是 –help 选项,可导致程序输出提示性的使用信息。
Here is the code needed to implement the command line processing:
这里是处理命令行选项所需的代码:
usage () {
echo "$PROGNAME: usage: $PROGNAME [-f file | -i]"
return
}
# process command line options
interactive=
filename=
while [[ -n $1 ]]; do
case $1 in
-f | --file) shift
filename=$1
;;
-i | --interactive) interactive=1
;;
-h | --help) usage
exit
;;
*) usage >&2
exit 1
;;
esac
shift
done
First, we add a shell function called usage to display a message when the help option is invoked or an unknown option is attempted.
首先,我们添加了一个叫做 usage 的 shell 函数,以便显示帮助信息,当启用帮助选项或敲写了一个未知选项的时候。
Next, we begin the processing loop. This loop continues while the positional parameter $1 is not empty. At the bottom of the loop, we have a shift command to advance the positional parameters to ensure that the loop will eventually terminate. Within the loop, we have a case statement that examines the current positional parameter to see if it matches any of the supported choices. If a supported parameter is found, it is acted upon. If not, the usage message is displayed and the script terminates with an error.
下一步,我们开始处理循环。当位置参数 $1 不为空的时候,这个循环会持续运行。在循环的底部,有一个 shift 命令, 用来提升位置参数,以便确保该循环最终会终止。在循环体内,我们使用了一个 case 语句来检查当前位置参数的值, 看看它是否匹配某个支持的选项。若找到了匹配项,就会执行与之对应的代码。若没有,就会打印出程序使用信息, 该脚本终止且执行错误。
The -f parameter is handled in an interesting way. When detected, it causes an additional shift to occur, which advances the positional parameter $1 to the filename argument supplied to the -f option.
处理 -f 参数的方式很有意思。当监测到 -f 参数的时候,会执行一次 shift 命令,从而提升位置参数 $1 为 伴随着 -f 选项的 filename 参数。
We next add the code to implement the interactive mode:
我们下一步添加代码来实现交互模式:
# interactive mode
if [[ -n $interactive ]]; then
while true; do
read -p "Enter name of output file: " filename
if [[ -e $filename ]]; then
read -p "'$filename' exists. Overwrite? [y/n/q] > "
case $REPLY in
Y|y) break
;;
Q|q) echo "Program terminated."
exit
;;
*) continue
;;
esac
elif [[ -z $filename ]]; then
continue
else
break
fi
done
fi
If the interactive variable is not empty, an endless loop is started, which contains the filename prompt and subsequent existing file-handling code. If the desired output file already exists, the user is prompted to overwrite, choose another filename, or quit the program. If the user chooses to overwrite an existing file, a break is executed to terminate the loop. Notice how the case statement only detects if the user chooses to overwrite or quit. Any other choice causes the loop to continue and prompts the user again.
若 interactive 变量不为空,就会启动一个无休止的循环,该循环包含文件名提示和随后存在的文件处理代码。 如果所需要的输出文件已经存在,则提示用户覆盖,选择另一个文件名,或者退出程序。如果用户选择覆盖一个 已经存在的文件,则会执行 break 命令终止循环。注意 case 语句是怎样只检测用户选择了覆盖还是退出选项。 其它任何选择都会导致循环继续并提示用户再次选择。
In order to implement the output filename feature, we must first convert the existing page-writing code into a shell function, for reasons that will become clear in a moment:
为了实现这个输出文件名的功能,首先我们必须把现有的这个写页面(page-writing)的代码转变成一个 shell 函数, 一会儿就会明白这样做的原因:
write_html_page () {
cat <<- _EOF_
<HTML>
<HEAD>
<TITLE>$TITLE</TITLE>
</HEAD>
<BODY>
<H1>$TITLE</H1>
<P>$TIMESTAMP</P>
$(report_uptime)
$(report_disk_space)
$(report_home_space)
</BODY>
</HTML>
_EOF_
return
}
# output html page
if [[ -n $filename ]]; then
if touch $filename && [[ -f $filename ]]; then
write_html_page > $filename
else
echo "$PROGNAME: Cannot write file '$filename'" >&2
exit 1
fi
else
write_html_page
fi
The code that handles the logic of the -f option appears at the end of the listing shown above. In it, we test for the existence of a filename and, if one is found, a test is performed to see if the file is indeed writable. To do this, a touch is performed, followed by a test to determine if the resulting file is a regular file. These two tests take care of situations where an invalid pathname is input (touch will fail), and, if the file already exists, that it’s a regular file.
解决 -f 选项逻辑的代码出现在以上程序片段的末尾。在这段代码中,我们测试一个文件名是否存在,若文件名存在, 则执行另一个测试看看该文件是不是可写文件。为此,会运行 touch 命令,紧随其后执行一个测试,来决定 touch 命令 创建的文件是否是个普通文件。这两个测试考虑到了输入是无效路径名(touch 命令执行失败),和一个普通文件已经存在的情况。
As we can see, the write_html_page function is called to perform the actual generation of the page. Its output is either directed to standard output (if the variable filename is empty) or redirected to the specified file.
正如我们所看到的,程序调用 write_html_page 函数来生成实际的网页。函数输出要么直接定向到 标准输出(若 filename 变量为空的话)要么重定向到具体的文件中。
总结
With the addition of positional parameters, we can now write fairly functional scripts. For simple, repetitive tasks, positional parameters make it possible to write very useful shell functions that can be placed in a user’s .bashrc file.
伴随着位置参数的加入,现在我们能编写相当具有功能性的脚本。例如,重复性的任务,位置参数使得我们可以编写 非常有用的,可以放置在一个用户的 .bashrc 文件中的 shell 函数。
Our sys_info_page program has grown in complexity and sophistication. Here is a complete listing, with the most recent changes highlighted:
我们的 sys_info_page 程序日渐精进。这里是一个完整的程序清单,最新的更改用高亮显示:
| |
We’re not done yet. There are still more things we can do and improvements we can make.
我们还没有完成。仍然还有许多事情我们可以做,可以改进。
拓展阅读
The Bash Hackers Wiki has a good article on positional parameters:
Bash Hackers Wiki 上有一篇不错的关于位置参数的文章:
The Bash Reference Manual has an article on the special parameters, including $* and $@:
Bash 的参考手册有一篇关于特殊参数的文章,包括 $* 和 $@:
http://www.gnu.org/software/bash/manual/bashref.html#Special-Parameters
In addition to the techniques discussed in this chapter, bash includes a builtin command called getopts, which can also be used for process command line arguments. It is described in the SHELL BUILTIN COMMANDS section of the bash man page and at the Bash Hackers Wiki:
除了本章讨论的技术之外,bash 还包含一个叫做 getopts 的内部命令,此命令也可以用来处理命令行参数。 bash 参考页面的 SHELL BUILTIN COMMANDS 一节介绍了这个命令,Bash Hackers Wiki 上也有对它的描述:
34 - 34 流程控制:for 循环
流程控制:for 循环
http://billie66.github.io/TLCL/book/chap34.html
In this final chapter on flow control, we will look at another of the shell’s looping constructs. The for loop differs from the while and until loops in that it provides a means of processing sequences during a loop. This turns out to be very useful when programming. Accordingly, the for loop is a very popular construct in bash scripting.
在这关于流程控制的最后一章中,我们将看看另一种 shell 循环构造。for 循环不同于 while 和 until 循环,因为 在循环中,它提供了一种处理序列的方式。这在编程时非常有用。因此在 bash 脚本中,for 循环是非常流行的构造。
A for loop is implemented, naturally enough, with the for command. In modern versions of bash, for is available in two forms.
实现一个 for 循环,很自然的,要用 for 命令。在现代版的 bash 中,有两种可用的 for 循环格式。
for: 传统 shell 格式
The original for command’s syntax is:
for 命令语法是:
for variable [in words]; do
commands
done
Where variable is the name of a variable that will increment during the execution of the loop, words is an optional list of items that will be sequentially assigned to variable, and commands are the commands that are to be executed on each iteration of the loop.
这里的 variable 是一个变量的名字,这个变量在循环执行期间会增加,words 是一个可选的条目列表, 其值会按顺序赋值给 variable,commands 是在每次循环迭代中要执行的命令。
The for command is useful on the command line. We can easily demonstrate how it works:
在命令行中 for 命令是很有用的。我们可以很容易的说明它是如何工作的:
| |
In this example, for is given a list of four words: “A”, “B”, “C”, and “D”. With a list of four words, the loop is executed four times. Each time the loop is executed, a word is as- signed to the variable i. Inside the loop, we have an echo command that displays the value of i to show the assignment. As with the while and until loops, the done keyword closes the loop.
在这个例子中,for 循环有一个四个单词的列表:“A”、“B”、“C”和 “D”。由于这四个单词的列表,for 循环会执行四次。 每次循环执行的时候,就会有一个单词赋值给变量 i。在循环体内,我们有一个 echo 命令会显示 i 变量的值,来演示赋值结果。 正如 while 和 until 循环,done 关键字会关闭循环。
The really powerful feature of for is the number of interesting ways we can create the list of words. For example, through brace expansion:
for 命令真正强大的功能是我们可以通过许多有趣的方式创建 words 列表。例如,通过花括号展开:
| |
or pathname expansion:
或者路径名展开:
| |
or command substitution:
或者命令替换:
| |
In this example, we look for the longest string found within a file. When given one or more filenames on the command line, this program uses the strings program (which is included in the GNU binutils package) to generate a list of readable text “words” in each file. The for loop processes each word in turn and determines if the current word is the longest found so far. When the loop concludes, the longest word is displayed.
在这个示例中,我们要在一个文件中查找最长的字符串。当在命令行中给出一个或多个文件名的时候, 该程序会使用 strings 程序(其包含在 GNU binutils 包中),为每一个文件产生一个可读的文本格式的 “words” 列表。 然后这个 for 循环依次处理每个单词,判断当前这个单词是否为目前为止找到的最长的一个。当循环结束的时候,显示出最长的单词。
If the optional in words portion of the for command is omitted, for defaults to pro- cessing the positional parameters. We will modify our longest-word script to use this method:
如果省略掉 for 命令的可选项 words 部分,for 命令会默认处理位置参数。 我们将修改 longest-word 脚本,来使用这种方式:
| |
As we can see, we have changed the outermost loop to use for in place of while. By omitting the list of words in the for command, the positional parameters are used instead. Inside the loop, previous instances of the variable i have been changed to the variable j. The use of shift has also been eliminated.
正如我们所看到的,我们已经更改了最外围的循环,用 for 循环来代替 while 循环。通过省略 for 命令的 words 列表, 用位置参数替而代之。在循环体内,之前的变量 i 已经改为变量 j。同时 shift 命令也被淘汰掉了。
Why i?
为什么是 i?
You may have noticed that the variable i was chosen for each of the for loop examples above. Why? No specific reason actually, besides tradition. The variable used with for can be any valid variable, but i is the most common, followed by j and k.
你可能已经注意到上面所列举的 for 循环的实例都选择 i 作为变量。为什么呢? 实际上没有具体原因,除了传统习惯。 for 循环使用的变量可以是任意有效的变量,但是 i 是最常用的一个,其次是 j 和 k。
The basis of this tradition comes from the Fortran programming language. In For- tran, undeclared variables starting with the letters I, J, K, L, and M are automati- cally typed as integers, while variables beginning with any other letter are typed as real (numbers with decimal fractions). This behavior led programmers to use the variables I, J, and K for loop variables, since it was less work to use them when a temporary variable (as loop variables often are) was needed. It also led to the following Fortran-based witticism:
“GOD is real, unless declared integer.”
这一传统的基础源于 Fortran 编程语言。在 Fortran 语言中,以字母 I、J、K、L 和 M 开头的未声明变量的类型 自动设为整形,而以其它字母开头的变量则为实数类型(带有小数的数字)。这种行为导致程序员使用变量 I、J和 K 作为循环变量, 因为当需要一个临时变量(正如循环变量)的时候,使用它们工作量比较少。这也引出了如下基于 Fortran 的俏皮话:
“神是实数,除非是声明的整数。”
for: C 语言格式
Recent versions of bash have added a second form of for command syntax, one that resembles the form found in the C programming language. Many other languages support this form, as well:
最新版本的 bash 已经添加了第二种格式的 for 命令语法,该语法相似于 C 语言中的 for 语法格式。 其它许多编程语言也支持这种格式:
for (( expression1; expression2; expression3 )); do
commands
done
where expression1, expression2, and expression3 are arithmetic expressions and com- mands are the commands to be performed during each iteration of the loop. In terms of behavior, this form is equivalent to the following construct:
这里的 expression1、expression2和 expression3 都是算术表达式,commands 是每次循环迭代时要执行的命令。 在行为方面,这相当于以下构造形式:
(( expression1 ))
while (( expression2 )); do
commands
(( expression3 ))
done
expression1 is used to initialize conditions for the loop, expression2 is used to determine when the loop is finished, and expression3 is carried out at the end of each iteration of the loop.
expression1 用来初始化循环条件,expression2 用来决定循环结束的时间,还有在每次循环迭代的末尾会执行 expression3。
Here is a typical application:
这里是一个典型应用:
| |
When executed, it produces the following output:
脚本执行之后,产生如下输出:
| |
In this example, expression1 initializes the variable i with the value of zero, expression2 allows the loop to continue as long as the value of i remains less than 5, and expression3 increments the value of i by one each time the loop repeats.
在这个示例中,expression1 初始化变量 i 的值为0,expression2 允许循环继续执行只要变量 i 的值小于5, 还有每次循环迭代时,expression3 会把变量 i 的值加1。
The C language form of for is useful anytime a numeric sequence is needed. We will see several applications for this in the next two chapters.
C 语言格式的 for 循环对于需要一个数字序列的情况是很有用处的。我们将在接下来的两章中看到几个这样的应用实例。
总结
With our knowledge of the for command, we will now apply the final improvements to our sys_info_page script. Currently, the report_home_space function looks like this:
学习了 for 命令的知识,现在我们将对我们的 sys_info_page 脚本做最后的改进。 目前,这个 report_home_space 函数看起来像这样:
report_home_space () {
if [[ $(id -u) -eq 0 ]]; then
cat <<- _EOF_
<H2>Home Space Utilization (All Users)</H2>
<PRE>$(du -sh /home/*)</PRE>
_EOF_
else
cat <<- _EOF_
<H2>Home Space Utilization ($USER)</H2>
<PRE>$(du -sh $HOME)</PRE>
_EOF_
fi
return
}
Next, we will rewrite it to provide more detail for each user’s home directory, and include the total number of files and subdirectories in each:
下一步,我们将重写它,以便提供每个用户家目录的更详尽信息,并且包含用户家目录中文件和目录的总个数:
report_home_space () {
local format="%8s%10s%10s\n"
local i dir_list total_files total_dirs total_size user_name
if [[ $(id -u) -eq 0 ]]; then
dir_list=/home/*
user_name="All Users"
else
dir_list=$HOME
user_name=$USER
fi
echo "<H2>Home Space Utilization ($user_name)</H2>"
for i in $dir_list; do
total_files=$(find $i -type f | wc -l)
total_dirs=$(find $i -type d | wc -l)
total_size=$(du -sh $i | cut -f 1)
echo "<H3>$i</H3>"
echo "<PRE>"
printf "$format" "Dirs" "Files" "Size"
printf "$format" "----" "-----" "----"
printf "$format" $total_dirs $total_files $total_size
echo "</PRE>"
done
return
}
This rewrite applies much of what we have learned so far. We still test for the superuser, but instead of performing the complete set of actions as part of the if, we set some vari- ables used later in a for loop. We have added several local variables to the function and made use of printf to format some of the output.
这次重写应用了目前为止我们学过的许多知识。我们仍然测试超级用户(superuser),但是我们在 if 语句块内 设置了一些随后会在 for 循环中用到的变量,来取代在 if 语句块内执行完备的动作集合。我们给 函数添加了几个本地变量,并且使用 printf 来格式化输出。
拓展阅读
The Advanced Bash-Scripting Guide has a chapter on loops, with a variety of examples using for:
《高级 Bash 脚本指南》有一章关于循环的内容,其中列举了各种各样的 for 循环实例:
The Bash Reference Manual describes the looping compound commands, including for:
《Bash 参考手册》描述了循环复合命令,包括了 for 循环:
http://www.gnu.org/software/bash/manual/bashref.html#Looping-Constructs
35 - 35 字符串和数字
字符串和数字
http://billie66.github.io/TLCL/book/chap35.html
Computer programs are all about working with data. In past chapters, we have focused on processing data at the file level. However, many programming problems need to be solved using smaller units of data such as strings and numbers.
所有的计算机程序都是用来和数据打交道的。在过去的章节中,我们专注于处理文件级别的数据。 然而,许多编程问题需要使用更小的数据单位来解决,比方说字符串和数字。
In this chapter, we will look at several shell features that are used to manipulate strings and numbers. The shell provides a variety of parameter expansions that perform string operations. In addition to arithmetic expansion (which we touched upon in Chapter 7), there is a common command line program called bc, which performs higher level math.
在这一章中,我们将查看几个用来操作字符串和数字的 shell 功能。shell 提供了各种执行字符串操作的参数展开功能。 除了算术展开(在第七章中接触过),还有一个常见的命令行程序叫做 bc,能执行更高级别的数学运算。
参数展开
Though parameter expansion came up in Chapter 7, we did not cover it in detail because most parameter expansions are used in scripts rather than on the command line. We have already worked with some forms of parameter expansion; for example, shell variables. The shell provides many more.
尽管参数展开在第七章中出现过,但我们并没有详尽地介绍它,因为大多数的参数展开会用在脚本中,而不是命令行中。 我们已经使用了一些形式的参数展开;例如,shell 变量。shell 提供了更多方式。
基本参数
The simplest form of parameter expansion is reflected in the ordinary use of variables.
最简单的参数展开形式反映在平常使用的变量上。
For example:
例如:
$a
when expanded, becomes whatever the variable a contains. Simple parameters may also be surrounded by braces:
当 $a 展开后,会变成变量 a 所包含的值。简单参数也可能用花括号引起来:
${a}
This has no effect on the expansion, but is required if the variable is adjacent to other text, which may confuse the shell. In this example, we attempt to create a filename by ap- pending the string “_file” to the contents of the variable a.
虽然这对展开没有影响,但若该变量 a 与其它的文本相邻,可能会把 shell 搞糊涂了。在这个例子中,我们试图 创建一个文件名,通过把字符串 “_file” 附加到变量 a 的值的后面。
| |
If we perform this sequence, the result will be nothing, because the shell will try to ex- pand a variable named a_file rather than a. This problem can be solved by adding braces:
如果我们执行这个序列,没有任何输出结果,因为 shell 会试着展开一个称为 a_file 的变量,而不是 a。通过 添加花括号可以解决这个问题:
| |
We have also seen that positional parameters greater than 9 can be accessed by surround- ing the number in braces. For example, to access the eleventh positional parameter, we can do this:
我们已经知道通过把数字包裹在花括号中,可以访问大于9的位置参数。例如,访问第十一个位置参数,我们可以这样做:
${11}
管理空变量的展开
Several parameter expansions deal with nonexistent and empty variables. These expan- sions are handy for handling missing positional parameters and assigning default values to parameters.
几种用来处理不存在和空变量的参数展开形式。这些展开形式对于解决丢失的位置参数和给参数指定默认值的情况很方便。
${parameter:-word}
If parameter is unset (i.e., does not exist) or is empty, this expansion results in the value of word. If parameter is not empty, the expansion results in the value of parameter.
若 parameter 没有设置(例如,不存在)或者为空,展开结果是 word 的值。若 parameter 不为空,则展开结果是 parameter 的值。
| |
${parameter:=word}
If parameter is unset or empty, this expansion results in the value of word. In addition, the value of word is assigned to parameter. If parameter is not empty, the expansion re- sults in the value of parameter.
若 parameter 没有设置或为空,展开结果是 word 的值。另外,word 的值会赋值给 parameter。 若 parameter 不为空,展开结果是 parameter 的值。
| |
Note: Positional and other special parameters cannot be assigned this way.
注意: 位置参数或其它的特殊参数不能以这种方式赋值。
${parameter:?word}
If parameter is unset or empty, this expansion causes the script to exit with an error, and the contents of word are sent to standard error. If parameter is not empty, the expansion results in the value of parameter.
若 parameter 没有设置或为空,这种展开导致脚本带有错误退出,并且 word 的内容会发送到标准错误。若 parameter 不为空, 展开结果是 parameter 的值。
| |
${parameter:+word}
If parameter is unset or empty, the expansion results in nothing. If parameter is not empty, the value of word is substituted for parameter; however, the value of parameter is not changed.
若 parameter 没有设置或为空,展开结果为空。若 parameter 不为空, 展开结果是 word 的值会替换掉 parameter 的值;然而,parameter 的值不会改变。
| |
返回变量名的参数展开
The shell has the ability to return the names of variables. This is used in some rather exotic situations.
shell 具有返回变量名的能力。这会用在一些相当独特的情况下。
${!prefix*}
${!prefix@}
This expansion returns the names of existing variables with names beginning with prefix. According to the bash documentation, both forms of the expansion perform identically. Here, we list all the variables in the environment with names that begin with BASH:
这种展开会返回以 prefix 开头的已有变量名。根据 bash 文档,这两种展开形式的执行结果相同。 这里,我们列出了所有以 BASH 开头的环境变量名:
| |
字符串展开
There is a large set of expansions that can be used to operate on strings. Many of these expansions are particularly well suited for operations on pathnames.
有大量的展开形式可用于操作字符串。其中许多展开形式尤其适用于路径名的展开。
${#parameter}
expands into the length of the string contained by parameter. Normally, parameter is a string; however, if parameter is either @ or *, then the expansion results in the number of positional parameters.
展开成由 parameter 所包含的字符串的长度。通常,parameter 是一个字符串;然而,如果 parameter 是 @ 或者是 * 的话, 则展开结果是位置参数的个数。
| |
${parameter:offset}
${parameter:offset:length}
These expansions are used to extract a portion of the string contained in parameter. The extraction begins at offset characters from the beginning of the string and continues until the end of the string, unless the length is specified.
这些展开用来从 parameter 所包含的字符串中提取一部分字符。提取的字符始于 第 offset 个字符(从字符串开头算起)直到字符串的末尾,除非指定提取的长度。
| |
If the value of offset is negative, it is taken to mean it starts from the end of the string rather than the beginning. Note that negative values must be preceded by a space to pre- vent confusion with the ${parameter:-word} expansion. length, if present, must not be less than zero.
若 offset 的值为负数,则认为 offset 值是从字符串的末尾开始算起,而不是从开头。注意负数前面必须有一个空格, 为防止与 ${parameter:-word} 展开形式混淆。length,若出现,则必须不能小于零。
If parameter is @, the result of the expansion is length positional parameters, starting at offset.
如果 parameter 是 @,展开结果是 length 个位置参数,从第 offset 个位置参数开始。
| |
${parameter#pattern}
${parameter##pattern}
These expansions remove a leading portion of the string contained in parameter defined by pattern. pattern is a wildcard pattern like those used in pathname expansion. The dif- ference in the two forms is that the # form removes the shortest match, while the ## form removes the longest match.
这些展开会从 paramter 所包含的字符串中清除开头一部分文本,这些字符要匹配定义的 pattern。pattern 是 通配符模式,就如那些用在路径名展开中的模式。这两种形式的差异之处是该 # 形式清除最短的匹配结果, 而该 ## 模式清除最长的匹配结果。
| |
${parameter%pattern}
${parameter%%pattern}
These expansions are the same as the # and ## expansions above, except they remove text from the end of the string contained in parameter rather than from the beginning.
这些展开和上面的 # 和 ## 展开一样,除了它们清除的文本从 parameter 所包含字符串的末尾开始,而不是开头。
| |
${parameter/pattern/string}
${parameter//pattern/string}
${parameter/#pattern/string}
${parameter/%pattern/string}
This expansion performs a search-and-replace upon the contents of parameter. If text is found matching wildcard pattern, it is replaced with the contents of string. In the normal form, only the first occurrence of pattern is replaced. In the // form, all occurrences are replaced. The /# form requires that the match occur at the beginning of the string, and the /% form requires the match to occur at the end of the string. /string may be omitted, which causes the text matched by pattern to be deleted.
这种形式的展开对 parameter 的内容执行查找和替换操作。如果找到了匹配通配符 pattern 的文本, 则用 string 的内容替换它。在正常形式下,只有第一个匹配项会被替换掉。在该 // 形式下,所有的匹配项都会被替换掉。 该 /# 要求匹配项出现在字符串的开头,而 /% 要求匹配项出现在字符串的末尾。/string 可能会省略掉,这样会 导致删除匹配的文本。
| |
Parameter expansion is a good thing to know. The string manipulation expansions can be used as substitutes for other common commands such as sed and cut. Expansions improve the efficiency of scripts by eliminating the use of external programs. As an example, we will modify the longest-word program discussed in the previous chapter to use the parameter expansion ${#j} in place of the command substitution $(echo $j | wc -c) and its resulting subshell, like so:
知道参数展开是件很好的事情。字符串操作展开可以用来替换其它常见命令比方说 sed 和 cut。 通过减少使用外部程序,展开提高了脚本的效率。举例说明,我们将修改在之前章节中讨论的 longest-word 程序, 用参数展开 ${#j} 取代命令 $(echo $j | wc -c) 及其 subshell ,像这样:
| |
Next, we will compare the efficiency of the two versions by using the time command:
下一步,我们将使用 time 命令来比较这两个脚本版本的效率:
| |
The original version of the script takes 3.618 seconds to scan the text file, while the new version, using parameter expansion, takes only 0.06 seconds — a very significant improvement.
原来的脚本扫描整个文本文件需耗时3.168秒,而该新版本,使用参数展开,仅仅花费了0.06秒 —— 一个非常巨大的提高。
大小写转换
Recent versions of bash have support for upper/lowercase conversion of strings. bash has four parameter expansions and two options to the declare command to support it.
最新的 bash 版本已经支持字符串的大小写转换了。bash 有四个参数展开和 declare 命令的两个选项来支持大小写转换。
So what is case conversion good for? Aside from the obvious aesthetic value, it has an important role in programming. Let’s consider the case of a database look-up. Imagine that a user has entered a string into a data input field that we want to look up in a database. It’s possible the user will enter the value in all uppercase letters or lowercase letters or a combination of both. We certainly don’t want to populate our database with every possible permutation of upper and lower case spellings. What to do?
那么大小写转换对什么有好处呢? 除了明显的审美价值,它在编程领域还有一个重要的角色。 让我们考虑一个数据库查询的案例。假设一个用户已经敲写了一个字符串到数据输入框中, 而我们想要在一个数据库中查找这个字符串。该用户输入的字符串有可能全是大写字母或全是小写或是两者的结合。 我们当然不希望把每个可能的大小写拼写排列填充到我们的数据库中。那怎么办?
A common approach to this problem is to normalize the user’s input. That is, convert it into a standardized form before we attempt the database look-up. We can do this by converting all of the characters in the user’s input to either lower or uppercase and ensure that the database entries are normalized the same way.
解决这个问题的常见方法是规范化用户输入。也就是,在我们试图查询数据库之前,把用户的输入转换成标准化。 我们能做到这一点,通过把用户输入的字符全部转换成小写字母或大写字母,并且确保数据库中的条目 按同样的方式规范化。
The declare command can be used to normalize strings to either upper or lowercase. Using declare, we can force a variable to always contain the desired format no matter what is assigned to it:
这个 declare 命令可以用来把字符串规范成大写或小写字符。使用 declare 命令,我们能强制一个 变量总是包含所需的格式,无论如何赋值给它。
| |
In the above script, we use declare to create two variables, upper and lower. We assign the value of the first command line argument (positional parameter 1) to each of the variables and then display them on the screen:
在上面的脚本中,我们使用 declare 命令来创建两个变量,upper 和 lower。我们把第一个命令行参数的值(位置参数1)赋给 每一个变量,然后把变量值在屏幕上显示出来:
| |
As we can see, the command line argument (“aBc”) has been normalized.
正如我们所看到的,命令行参数(“aBc”)已经规范化了。
There are four parameter expansions that perform upper/lowercase conversion:
有四个参数展开,可以执行大小写转换操作:
| Format | Result |
|---|---|
| ${parameter,,} | Expand the value of parameter into all lowercase. |
| ${parameter,} | Expand the value of parameter changing only the first character to lowercase. |
| ${parameter^^} | Expand the value of parameter into all uppercase letters. |
| ${parameter^} | Expand the value of parameter changing only the first character to uppercase (capitalization). |
| 格式 | 结果 |
|---|---|
| ${parameter,,} | 把 parameter 的值全部展开成小写字母。 |
| ${parameter,} | 仅仅把 parameter 的第一个字符展开成小写字母。 |
| ${parameter^^} | 把 parameter 的值全部转换成大写字母。 |
| ${parameter^} | 仅仅把 parameter 的第一个字符转换成大写字母(首字母大写)。 |
Here is a script that demonstrates these expansions:
这里是一个脚本,演示了这些展开格式:
| |
Here is the script in action:
这里是脚本运行后的结果:
| |
Again, we process the first command line argument and output the four variations supported by the parameter expansions. While this script uses the first positional parameter, parameter my be any string, variable, or string expression.
再次,我们处理了第一个命令行参数,输出了由参数展开支持的四种变体。尽管这个脚本使用了第一个位置参数, 但参数可以是任意字符串,变量,或字符串表达式。
算术求值和展开
We looked at arithmetic expansion in Chapter 7. It is used to perform various arithmetic operations on integers. Its basic form is:
我们在第七章中已经接触过算术展开了。它被用来对整数执行各种算术运算。它的基本格式是:
$((expression))
where expression is a valid arithmetic expression.
这里的 expression 是一个有效的算术表达式。
This is related to the compound command (( )) used for arithmetic evaluation (truth tests) we encountered in Chapter 27.
这个与复合命令 (( )) 有关,此命令用做算术求值(真测试),我们在第27章中遇到过。
In previous chapters, we saw some of the common types of expressions and operators. Here, we will look at a more complete list.
在之前的章节中,我们看到过一些类型的表达式和运算符。这里,我们将看到一个更完整的列表。
数基
Back in Chapter 9, we got a look at octal (base 8) and hexadecimal (base 16) numbers. In arithmetic expressions, the shell supports integer constants in any base.
回到第9章,我们看过八进制(以8为底)和十六进制(以16为底)的数字。在算术表达式中,shell 支持任意进制的整型常量。
| Notation | Description |
|---|---|
| number | By default, numbers without any notation are treated as decimal (base 10) integers. |
| 0number | In arithmetic expressions, numbers with a leading zero are considered octal. |
| 0xnumber | Hexadecimal notation |
| base#number | number is in base |
| 表示法 | 描述 |
|---|---|
| number | 默认情况下,没有任何表示法的数字被看做是十进制数(以10为底)。 |
| 0number | 在算术表达式中,以零开头的数字被认为是八进制数。 |
| 0xnumber | 十六进制表示法 |
| base#number | number 以 base 为底 |
Some examples:
一些例子:
| |
In the examples above, we print the value of the hexadecimal number ff (the largest two-digit number) and the largest eight-digit binary (base 2) number.
在上面的示例中,我们打印出十六进制数 ff(最大的两位数)的值和最大的八位二进制数(以2为底)。
一元运算符
There are two unary operators, the + and -, which are used to indicate if a number is pos- itive or negative, respectively. For example, -5.
有两个一元运算符,+ 和 -,它们被分别用来表示一个数字是正数还是负数。例如,-5。
简单算术
The ordinary arithmetic operators are listed in the table below:
下表中列出了普通算术运算符:
| Operator | Description |
|---|---|
| + | Addition |
| - | Subtraction |
| * | Multiplication |
| / | Integer division |
| ** | Exponentiation |
| % | Modulo (remainder) |
| 运算符 | 描述 |
|---|---|
| + | 加 |
| - | 减 |
| * | 乘 |
| / | 整除 |
| ** | 乘方 |
| % | 取模(余数) |
Most of these are self-explanatory, but integer division and modulo require further discussion.
其中大部分运算符是不言自明的,但是整除和取模运算符需要进一步解释一下。
Since the shell’s arithmetic only operates on integers, the results of division are always whole numbers:
因为 shell 算术只操作整型,所以除法运算的结果总是整数:
| |
This makes the determination of a remainder in a division operation more important:
这使得确定除法运算的余数更为重要:
| |
By using the division and modulo operators, we can determine that 5 divided by 2 results in 2, with a remainder of 1.
通过使用除法和取模运算符,我们能够确定5除以2得数是2,余数是1。
Calculating the remainder is useful in loops. It allows an operation to be performed at specified intervals during the loop’s execution. In the example below, we display a line of numbers, highlighting each multiple of 5:
在循环中计算余数是很有用处的。在循环执行期间,它允许某一个操作在指定的间隔内执行。在下面的例子中, 我们显示一行数字,并高亮显示5的倍数:
| |
When executed, the results look like this:
当脚本执行后,输出结果看起来像这样:
| |
赋值运算符
Although its uses may not be immediately apparent, arithmetic expressions may perform assignment. We have performed assignment many times, though in a different context. Each time we give a variable a value, we are performing assignment. We can also do it within arithmetic expressions:
尽管它的使用不是那么明显,算术表达式可能执行赋值运算。虽然在不同的上下文中,我们已经执行了许多次赋值运算。 每次我们给变量一个值,我们就执行了一次赋值运算。我们也能在算术表达式中执行赋值运算:
| |
In the example above, we first assign an empty value to the variable foo and verify that it is indeed empty. Next, we perform an if with the compound command (( foo = 5 )). This process does two interesting things: 1) it assigns the value of 5 to the variable foo, and 2) it evaluates to true because foo was assigned a nonzero value.
在上面的例子中,首先我们给变量 foo 赋了一个空值,然后验证 foo 的确为空。下一步,我们执行一个 if 复合命令 (( foo = 5 ))。 这个过程完成两件有意思的事情:1)它把5赋值给变量 foo,2)它计算测试条件为真,因为 foo 的值非零。
Note: It is important to remember the exact meaning of the = in the expression above. A single = performs assignment. foo = 5 says “make foo equal to 5,” while == evaluates equivalence. foo == 5 says “does foo equal 5?” This can be very confusing because the test command accepts a single = for string equiva- lence. This is yet another reason to use the more modern [[ ]] and (( )) com- pound commands in place of test.
注意: 记住上面表达式中 = 符号的真正含义非常重要。单个 = 运算符执行赋值运算。foo = 5 是说“使得 foo 等于5”, 而 == 运算符计算等价性。foo == 5 是说“是否 foo 等于5?”。这会让人感到非常迷惑,因为 test 命令接受单个 = 运算符 来测试字符串等价性。这也是使用更现代的 [[ ]] 和 (( )) 复合命令来代替 test 命令的另一个原因。
In addition to the =, the shell also provides notations that perform some very useful as- signments:
除了 = 运算符,shell 也提供了其它一些表示法,来执行一些非常有用的赋值运算:
| Notation | Description |
|---|---|
| parameter = value | Simple assignment. Assigns value to parameter. |
| parameter += value | Addition. Equivalent to parameter = parameter + value. |
| parameter -= value | Subtraction. Equivalent to parameter = parameter - value. |
| parameter *= value | Multiplication. Equivalent to parameter = parameter * value. |
| parameter /= value | Integer division. Equivalent to parameter = parameter / value. |
| parameter %= value | Modulo. Equivalent to parameter = parameter % value. |
| parameter++ | Variable post-increment. Equivalent to parameter = parameter + 1 (however, see discussion below). |
| parameter– | Variable post-decrement. Equivalent to parameter = parameter - 1. |
| ++parameter | Variable pre-increment. Equivalent to parameter = parameter + 1. |
| –parameter | Variable pre-decrement. Equivalent to parameter = parameter - 1. |
| 表示法 | 描述 |
|---|---|
| parameter = value | 简单赋值。给 parameter 赋值。 |
| parameter += value | 加。等价于 parameter = parameter + value。 |
| parameter -= value | 减。等价于 parameter = parameter – value。 |
| parameter *= value | 乘。等价于 parameter = parameter * value。 |
| parameter /= value | 整除。等价于 parameter = parameter / value。 |
| parameter %= value | 取模。等价于 parameter = parameter % value。 |
| parameter++ | 后缀自增变量。等价于 parameter = parameter + 1 (但,要看下面的讨论)。 |
| parameter– | 后缀自减变量。等价于 parameter = parameter - 1。 |
| ++parameter | 前缀自增变量。等价于 parameter = parameter + 1。 |
| –parameter | 前缀自减变量。等价于 parameter = parameter - 1。 |
These assignment operators provide a convenient shorthand for many common arithmetic tasks. Of special interest are the increment (++) and decrement (–) operators, which increase or decrease the value of their parameters by one. This style of notation is taken from the C programming language and has been incorporated by several other programming languages, including bash.
这些赋值运算符为许多常见算术任务提供了快捷方式。特别关注一下自增(++)和自减(–)运算符,它们会把它们的参数值加1或减1。 这种风格的表示法取自C 编程语言并且被其它几种编程语言吸收,包括 bash。
The operators may appear either at the front of a parameter or at the end. While they both either increment or decrement the parameter by one, the two placements have a subtle difference. If placed at the front of the parameter, the parameter is incremented (or decre- mented) before the parameter is returned. If placed after, the operation is performed after the parameter is returned. This is rather strange, but it is the intended behavior. Here is a demonstration:
自增和自减运算符可能会出现在参数的前面或者后面。然而它们都是把参数值加1或减1,这两个位置有个微小的差异。 若运算符放置在参数的前面,参数值会在参数返回之前增加(或减少)。若放置在后面,则运算会在参数返回之后执行。 这相当奇怪,但这是它预期的行为。这里是个演示的例子:
| |
If we assign the value of one to the variable foo and then increment it with the ++ operator placed after the parameter name, foo is returned with the value of one. However, if we look at the value of the variable a second time, we see the incremented value. If we place the ++ operator in front of the parameter, we get the more expected behavior:
如果我们把1赋值给变量 foo,然后通过把自增运算符 ++ 放到参数名 foo 之后来增加它,foo 返回1。 然而,如果我们第二次查看变量 foo 的值,我们看到它的值增加了1。若我们把 ++ 运算符放到参数 foo 之前, 我们得到更期望的行为:
| |
For most shell applications, prefixing the operator will be the most useful.
对于大多数 shell 应用来说,前缀运算符最有用。
The ++ and – operators are often used in conjunction with loops. We will make some improvements to our modulo script to tighten it up a bit:
自增 ++ 和 自减 – 运算符经常和循环操作结合使用。我们将改进我们的 modulo 脚本,让代码更紧凑些:
| |
位运算符
One class of operators manipulates numbers in an unusual way. These operators work at the bit level. They are used for certain kinds of low level tasks, often involving setting or reading bit-flags.
位运算符是一类以不寻常的方式操作数字的运算符。这些运算符工作在位级别的数字。它们被用在某类底层的任务中, 经常涉及到设置或读取位标志。
| Operator | Description |
|---|---|
| ~ | Bitwise negation. Negate all the bits in a number. |
| « | Left bitwise shift. Shift all the bits in a number to the left. |
| » | Right bitwise shift. Shift all the bits in a number to the right. |
| & | Bitwise AND. Perform an AND operation on all the bits in two numbers. |
| | | Bitwise OR. Perform an OR operation on all the bits in two numbers. |
| ^ | Bitwise XOR. Perform an exclusive OR operation on all the bits in two numbers. |
| 运算符 | 描述 |
|---|---|
| ~ | 按位取反。对一个数字所有位取反。 |
| « | 位左移. 把一个数字的所有位向左移动。 |
| » | 位右移. 把一个数字的所有位向右移动。 |
| & | 位与。对两个数字的所有位执行一个 AND 操作。 |
| | | 位或。对两个数字的所有位执行一个 OR 操作。 |
| ^ | 位异或。对两个数字的所有位执行一个异或操作。 |
Note that there are also corresponding assignment operators (for example, «=) for all but bitwise negation.
注意除了按位取反运算符之外,其它所有位运算符都有相对应的赋值运算符(例如,«=)。
Here we will demonstrate producing a list of powers of 2, using the left bitwise shift operator:
这里我们将演示产生2的幂列表的操作,使用位左移运算符:
| |
逻辑运算符
As we discovered in Chapter 27, the (( )) compound command supports a variety of comparison operators. There are a few more that can be used to evaluate logic. Here is the complete list:
正如我们在第27章中所看到的,复合命令 (( )) 支持各种各样的比较运算符。还有一些可以用来计算逻辑运算。 这里是比较运算符的完整列表:
| Operator | Description |
|---|---|
| <= | Less than or equal to |
| >= | great than or equal to |
| < | less than |
| > | greater than |
| == | Equal to |
| != | Not equal to |
| && | Logical AND |
| || | Logical OR |
| expr1?expr2:expr3 | Comparison (ternary) operator. If expression expr1 evaluates to be non-zero (arithmetic true) then expr2, else expr3. |
| 运算符 | 描述 |
|---|---|
| <= | 小于或相等 |
| >= | 大于或相等 |
| < | 小于 |
| > | 大于 |
| == | 相等 |
| != | 不相等 |
| && | 逻辑与 |
| || | 逻辑或 |
| expr1?expr2:expr3 | 条件(三元)运算符。若表达式 expr1 的计算结果为非零值(算术真),则 执行表达式 expr2,否则执行表达式 expr3。 |
When used for logical operations, expressions follow the rules of arithmetic logic; that is, expressions that evaluate as zero are considered false, while non-zero expressions are considered true. The (( )) compound command maps the results into the shell’s normal exit codes:
当表达式用于逻辑运算时,表达式遵循算术逻辑规则;也就是,表达式的计算结果是零,则认为假,而非零表达式认为真。 该 (( )) 复合命令把结果映射成 shell 正常的退出码:
| |
The strangest of the logical operators is the ternary operator. This operator (which is modeled after the one in the C programming language) performs a standalone logical test. It can be used as a kind of if/then/else statement. It acts on three arithmetic expressions (strings won’t work), and if the first expression is true (or non-zero) the second expression is performed. Otherwise, the third expression is performed. We can try this on the command line:
最陌生的逻辑运算符就是这个三元运算符了。这个运算符(仿照于 C 编程语言里的三元运算符)执行一个单独的逻辑测试。 它用起来类似于 if/then/else 语句。它操作三个算术表达式(字符串不会起作用),并且若第一个表达式为真(或非零), 则执行第二个表达式。否则,执行第三个表达式。我们可以在命令行中实验一下:
| |
Here we see a ternary operator in action. This example implements a toggle. Each time the operator is performed, the value of the variable a switches from zero to one or vice versa.
这里我们看到一个实际使用的三元运算符。这个例子实现了一个切换。每次运算符执行的时候,变量 a 的值从零变为1,或反之亦然。
Please note that performing assignment within the expressions is not straightforward.
请注意在表达式内执行赋值却并非易事。
When attempted, bash will declare an error:
当企图这样做时,bash 会声明一个错误:
| |
This problem can be mitigated by surrounding the assignment expression with parentheses:
通过把赋值表达式用括号括起来,可以解决这个错误:
| |
Next, we see a more complete example of using arithmetic operators in a script that produces a simple table of numbers:
下一步,我们看一个使用算术运算符更完备的例子,该示例产生一个简单的数字表格:
| |
In this script, we implement an until loop based on the value of the finished variable. Initially, the variable is set to zero (arithmetic false) and we continue the loop until it becomes non-zero. Within the loop, we calculate the square and cube of the counter variable a. At the end of the loop, the value of the counter variable is evaluated. If it is less than 10 (the maximum number of iterations), it is incremented by one, else the variable finished is given the value of one, making finished arithmetically true, thereby terminating the loop. Running the script gives this result:
在这个脚本中,我们基于变量 finished 的值实现了一个 until 循环。首先,把变量 finished 的值设为零(算术假), 继续执行循环之道它的值变为非零。在循环体内,我们计算计数器 a 的平方和立方。在循环末尾,计算计数器变量 a 的值。 若它小于10(最大迭代次数),则 a 的值加1,否则给变量 finished 赋值为1,使得变量 finished 算术为真, 从而终止循环。运行该脚本得到这样的结果:
| |
bc - 一种高精度计算器语言
We have seen how the shell can handle all types of integer arithmetic, but what if we need to perform higher math or even just use floating point numbers? The answer is, we can’t. At least not directly with the shell. To do this, we need to use an external program. There are several approaches we can take. Embedding Perl or AWK programs is one possible solution, but unfortunately, outside the scope of this book. Another approach is to use a specialized calculator program. One such program found on most Linux systems is called bc.
我们已经看到 shell 是可以处理所有类型的整型算术的,但是如果我们需要执行更高级的数学运算或仅使用浮点数,该怎么办? 答案是,我们不能这样做。至少不能直接用 shell 完成此类运算。为此,我们需要使用外部程序。 有几种途径可供我们采用。嵌入的 Perl 或者 AWK 程序是一种可能的方案,但是不幸的是,超出了本书的内容大纲。 另一种方式就是使用一种专业的计算器程序。这样一个程序叫做 bc,在大多数 Linux 系统中都可以找到。
The bc program reads a file written in its own C-like language and executes it. A bc script may be a separate file or it may be read from standard input. The bc language supports quite a few features including variables, loops, and programmer-defined functions. We won’t cover bc entirely here, just enough to get a taste. bc is well documented by its man page.
该 bc 程序读取一个用它自己的类似于 C 语言的语法编写的脚本文件。一个 bc 脚本可能是一个分离的文件或者是从 标准输入读入。bc 语言支持相当少的功能,包括变量,循环和程序员定义的函数。这里我们不会讨论整个 bc 语言, 仅仅体验一下。查看 bc 的手册页,其文档整理得非常好。
Let’s start with a simple example. We’ll write a bc script to add 2 plus 2:
让我们从一个简单的例子开始。我们将编写一个 bc 脚本来执行2加2运算:
/* A very simple bc script */
2 + 2
The first line of the script is a comment. bc uses the same syntax for comments as the C programming language. Comments, which may span multiple lines, begin with /* and end with */.
脚本的第一行是一行注释。bc 使用和 C 编程语言一样的注释语法。注释,可能会跨越多行,开始于 /* 结束于 */。
使用 bc
If we save the bc script above as foo.bc, we can run it this way:
如果我们把上面的 bc 脚本保存为 foo.bc,然后我们就能这样运行它:
| |
If we look carefully, we can see the result at the very bottom, after the copyright message. This message can be suppressed with the -q (quiet) option. bc can also be used interactively:
如果我们仔细观察,我们看到算术结果在最底部,版权信息之后。可以通过 -q(quiet)选项禁止这些版权信息。 bc 也能够交互使用:
| |
When using bc interactively, we simply type the calculations we wish to perform, and the results are immediately displayed. The bc command quit ends the interactive session.
当使用 bc 交互模式时,我们简单地输入我们希望执行的运算,结果就立即显示出来。bc 的 quit 命令结束交互会话。
It is also possible to pass a script to bc via standard input:
也可能通过标准输入把一个脚本传递给 bc 程序:
| |
The ability to take standard input means that we can use here documents, here strings, and pipes to pass scripts. This is a here string example:
这种接受标准输入的能力,意味着我们可以使用 here 文档,here字符串,和管道来传递脚本。这里是一个使用 here 字符串的例子:
| |
一个脚本实例
As a real-world example, we will construct a script that performs a common calculation, monthly loan payments. In the script below, we use a here document to pass a script to bc:
作为一个真实世界的例子,我们将构建一个脚本,用于计算每月的还贷金额。在下面的脚本中, 我们使用了 here 文档把一个脚本传递给 bc:
| |
When executed, the results look like this:
当脚本执行后,输出结果像这样:
| |
This example calculates the monthly payment for a $135,000 loan at 7.75% APR for 180 months (15 years). Notice the precision of the answer. This is determined by the value given to the special scale variable in the bc script. A full description of the bc scripting language is provided by the bc man page. While its mathematical notation is slightly different from that of the shell (bc more closely resembles C), most of it will be quite familiar, based on what we have learned so far.
若贷款 135,000 美金,年利率为 7.75%,借贷180个月(15年),这个例子计算出每月需要还贷的金额。 注意这个答案的精确度。这是由脚本中变量 scale 的值决定的。bc 的手册页提供了对 bc 脚本语言的详尽描述。 虽然 bc 的数学符号与 shell 的略有差异(bc 与 C 更相近),但是基于目前我们所学的内容, 大多数符号是我们相当熟悉的。
总结
In this chapter, we have learned about many of the little things that can be used to get the “real work” done in scripts. As our experience with scripting grows, the ability to effectively manipulate strings and numbers will prove extremely valuable. Our loan-calc script demonstrates that even simple scripts can be created to do some really useful things.
在这一章中,我们学习了很多小东西,在脚本中这些小零碎可以完成“真正的工作”。随着我们编写脚本经验的增加, 能够有效地操作字符串和数字的能力将具有极为重要的价值。我们的 loan-calc 脚本表明, 甚至可以创建简单的脚本来完成一些真正有用的事情。
额外加分
While the basic functionality of the loan-calc script is in place, the script is far from complete. For extra credit, try improving the loan-calc script with the following features:
虽然该 loan-calc 脚本的基本功能已经很到位了,但脚本还远远不够完善。为了额外加分,试着 给脚本 loan-calc 添加以下功能:
- Full verification of the command line arguments
- A command line option to implement an “interactive” mode that will prompt the user to input the principal, interest rate, and term of the loan.
- A better format for the output.
- 完整的命令行参数验证
- 用一个命令行选项来实现“交互”模式,提示用户输入本金、利率和贷款期限
- 输出格式美化
拓展阅读
The Bash Hackers Wiki has a good discussion of parameter expansion:
《Bash Hackers Wiki》对参数展开有一个很好的论述:
The Bash Reference Manual covers this, too:
《Bash 参考手册》也介绍了这个:
http://www.gnu.org/software/bash/manual/bashref.html#Shell-Parameter-Expansion
The Wikipedia has a good article describing bit operations:
Wikipedia 上面有一篇很好的文章描述了位运算:
and an article on ternary operations:
和一篇关于三元运算的文章:
as well as a description of the formula for calculating loan payments used in our loan-calc script:
还有一个对计算还贷金额公式的描述,我们的 loan-calc 脚本中用到了这个公式:
36 - 36 数组
数组
http://billie66.github.io/TLCL/book/chap36.html
In the last chapter, we looked at how the shell can manipulate strings and numbers. The data types we have looked at so far are known in computer science circles as scalar variables; that is, variables that contain a single value.
在上一章中,我们查看了 shell 怎样操作字符串和数字的。目前我们所见到的数据类型在计算机科学圈里被 称为标量变量;也就是说,只能包含一个值的变量。
In this chapter, we will look at another kind of data structure called an array, which holds multiple values. Arrays are a feature of virtually every programming language. The shell supports them, too, though in a rather limited fashion. Even so, they can be very useful for solving programming problems.
在本章中,我们将看看另一种数据结构叫做数组,数组能存放多个值。数组几乎是所有编程语言的一个特性。 shell 也支持它们,尽管以一个相当有限的形式。即便如此,为解决编程问题,它们是非常有用的。
什么是数组?
Arrays are variables that hold more than one value at a time. Arrays are organized like a table. Let’s consider a spreadsheet as an example. A spreadsheet acts like a two-dimensional array. It has both rows and columns, and an individual cell in the spreadsheet can be located according to its row and column address. An array behaves the same way. An array has cells, which are called elements, and each element contains data. An individual array element is accessed using an address called an index or subscript.
数组是一次能存放多个数据的变量。数组的组织结构就像一张表。我们拿电子表格举例。一张电子表格就像是一个 二维数组。它既有行也有列,并且电子表格中的一个单元格,可以通过单元格所在的行和列的地址定位它的位置。 数组行为也是如此。数组有单元格,被称为元素,而且每个元素会包含数据。 使用一个称为索引或下标的地址可以访问一个单独的数组元素。
Most programming languages support multidimensional arrays. A spreadsheet is an example of a multidimensional array with two dimensions, width and height. Many languages support arrays with an arbitrary number of dimensions, though two- and three-dimensional arrays are probably the most commonly used.
大多数编程语言支持多维数组。一个电子表格就是一个多维数组的例子,它有两个维度,宽度和高度。 许多语言支持任意维度的数组,虽然二维和三维数组可能是最常用的。
Arrays in bash are limited to a single dimension. We can think of them as a spreadsheet with a single column. Even with this limitation, there are many applications for them. Array support first appeared in bash version 2. The original Unix shell program, sh, did not support arrays at all.
Bash 中的数组仅限制为单一维度。我们可以把它们看作是只有一列的电子表格。尽管有这种局限,但是有许多应用使用它们。 对数组的支持第一次出现在 bash 版本2中。原来的 Unix shell 程序,sh,根本就不支持数组。
创建一个数组
Array variables are named just like other bash variables, and are created automatically when they are accessed. Here is an example:
数组变量就像其它 bash 变量一样命名,当被访问的时候,它们会被自动地创建。这里是一个例子:
| |
Here we see an example of both the assignment and access of an array element. With the first command, element 1 of array a is assigned the value “foo”. The second command displays the stored value of element 1. The use of braces in the second command is re- quired to prevent the shell from attempting pathname expansion on the name of the array element.
这里我们看到一个赋值并访问数组元素的例子。通过第一个命令,把数组 a 的元素1赋值为 “foo”。 第二个命令显示存储在元素1中的值。在第二个命令中使用花括号是必需的, 以便防止 shell 试图对数组元素名执行路径名展开操作。
An array can also be created with the declare command:
也可以用 declare 命令创建一个数组:
| |
Using the -a option, this example of declare creates the array a.
使用 -a 选项,declare 命令的这个例子创建了数组 a。
数组赋值
Values may be assigned in one of two ways. Single values may be assigned using the fol- lowing syntax:
有两种方式可以给数组赋值。单个值赋值使用以下语法:
name[subscript]=value
where name is the name of the array and subscript is an integer (or arithmetic expression) greater than or equal to zero. Note that the first element of an array is subscript zero, not one. value is a string or integer assigned to the array element.
这里的 name 是数组的名字,subscript 是一个大于或等于零的整数(或算术表达式)。注意数组第一个元素的下标是0, 而不是1。数组元素的值可以是一个字符串或整数。
Multiple values may be assigned using the following syntax:
多个值赋值使用下面的语法:
name=(value1 value2 ...)
where name is the name of the array and value… are values assigned sequentially to elements of the array, starting with element zero. For example, if we wanted to assign abbreviated days of the week to the array days, we could do this:
这里的 name 是数组的名字,value… 是要按照顺序赋给数组的值,从元素0开始。例如,如果我们希望 把星期几的英文简写赋值给数组 days,我们可以这样做:
| |
It is also possible to assign values to a specific element by specifying a subscript for each value:
还可以通过指定下标,把值赋给数组中的特定元素:
| |
访问数组元素
So what are arrays good for? Just as many data-management tasks can be performed with a spreadsheet program, many programming tasks can be performed with arrays.
那么数组对什么有好处呢? 就像许多数据管理任务一样,可以用电子表格程序来完成,许多编程任务则可以用数组完成。
Let’s consider a simple data-gathering and presentation example. We will construct a script that examines the modification times of the files in a specified directory. From this data, our script will output a table showing at what hour of the day the files were last modified. Such a script could be used to determine when a system is most active. This script, called hours, produces this result:
让我们考虑一个简单的数据收集和展示的例子。我们将构建一个脚本,用来检查一个特定目录中文件的修改次数。 从这些数据中,我们的脚本将输出一张表,显示这些文件最后是在一天中的哪个小时被修改的。这样一个脚本 可以被用来确定什么时段一个系统最活跃。这个脚本,称为 hours,输出这样的结果:
| |
We execute the hours program, specifying the current directory as the target. It produces a table showing, for each hour of the day (0-23), how many files were last modified. The code to produce this is as follows:
当执行该 hours 程序时,指定当前目录作为目标目录。它打印出一张表显示一天(0-23小时)每小时内, 有多少文件做了最后修改。程序代码如下所示:
| |
The script consists of one function (usage) and a main body with four sections. In the first section, we check that there is a command line argument and that it is a directory. If it is not, we display the usage message and exit.
这个脚本由一个函数(名为 usage),和一个分为四个区块的主体组成。在第一部分,我们检查是否有一个命令行参数, 且该参数为目录。如果不是目录,会显示脚本使用信息并退出。
The second section initializes the array hours. It does this by assigning each element a value of zero. There is no special requirement to prepare arrays prior to use, but our script needs to ensure that no element is empty. Note the interesting way the loop is constructed. By employing brace expansion ({0..23}), we are able to easily generate a sequence of words for the for command.
第二部分初始化一个名为 hours 的数组。给每一个数组元素赋值一个0。虽然没有特殊需要在使用之前准备数组,但是 我们的脚本需要确保没有元素是空值。注意这个循环构建方式很有趣。通过使用花括号展开({0..23}),我们能 很容易为 for 命令产生一系列的数据(words)。
The next section gathers the data by running the stat program on each file in the directory. We use cut to extract the two-digit hour from the result. Inside the loop, we need to remove leading zeros from the hour field, since the shell will try (and ultimately fail) to interpret values “00” through “09” as octal numbers (see Table 35-1). Next, we increment the value of the array element corresponding with the hour of the day. Finally, we increment a counter (count) to track the total number of files in the directory.
接下来的一部分收集数据,对目录中的每一个文件运行 stat 程序。我们使用 cut 命令从结果中抽取两位数字的小时字段。 在循环里面,我们需要把小时字段开头的零清除掉,因为 shell 将试图(最终会失败)把从 “00” 到 “09” 的数值解释为八进制(见表35-1)。 下一步,我们以小时为数组索引,来增加其对应的数组元素的值。最后,我们增加一个计数器的值(count),记录目录中总共的文件数目。
The last section of the script displays the contents of the array. We first output a couple of header lines and then enter a loop that produces two columns of output. Lastly, we output the final tally of files.
脚本的最后一部分显示数组中的内容。我们首先输出两行标题,然后进入一个循环产生两栏输出。最后,输出总共的文件数目。
数组操作
There are many common array operations. Such things as deleting arrays, determining their size, sorting, etc. have many applications in scripting.
`有许多常见的数组操作。比方说删除数组,确定数组大小,排序,等等。有许多脚本应用程序。
输出整个数组的内容
The subscripts * and @ can be used to access every element in an array. As with positional parameters, the @ notation is the more useful of the two. Here is a demonstration:
下标 * 和 @ 可以被用来访问数组中的每一个元素。与位置参数一样,@ 表示法在两者之中更有用处。 这里是一个演示:
| |
We create the array animals and assign it three two-word strings. We then execute four loops to see the affect of word-splitting on the array contents. The behavior of notations $ {animals[*]} and ${animals[@]} is identical until they are quoted. The * notation results in a single word containing the array’s contents, while the @ notation results in three words, which matches the arrays “real” contents.
我们创建了数组 animals,并把三个含有两个字的字符串赋值给数组。然后我们执行四个循环看一下对数组内容进行分词的效果。 表示法 ${animals[*]} 和 ${animals[@]}的行为是一致的直到它们被用引号引起来。
确定数组元素个数
Using parameter expansion, we can determine the number of elements in an array in much the same way as finding the length of a string. Here is an example:
使用参数展开,我们能够确定数组元素的个数,与计算字符串长度的方式几乎相同。这里是一个例子:
| |
We create array a and assign the string “foo” to element 100. Next, we use parameter ex- pansion to examine the length of the array, using the @ notation. Finally, we look at the length of element 100 which contains the string “foo”. It is interesting to note that while we assigned our string to element 100, bash only reports one element in the array. This differs from the behavior of some other languages in which the unused elements of the array (elements 0-99) would be initialized with empty values and counted.
我们创建了数组 a,并把字符串 “foo” 赋值给数组元素100。下一步,我们使用参数展开来检查数组的长度,使用 @ 表示法。 最后,我们查看了包含字符串 “foo” 的数组元素 100 的长度。有趣的是,尽管我们把字符串赋值给数组元素100, bash 仅仅报告数组中有一个元素。这不同于一些其它语言的行为,这种行为是数组中未使用的元素(元素0-99)会初始化为空值, 并把它们计入数组长度。
找到数组使用的下标
As bash allows arrays to contain “gaps” in the assignment of subscripts, it is sometimes useful to determine which elements actually exist. This can be done with a parameter ex- pansion using the following forms:
因为 bash 允许赋值的数组下标包含 “间隔”,有时候确定哪个元素真正存在是很有用的。为做到这一点, 可以使用以下形式的参数展开:
${!array[*]}
${!array[@]}
where array is the name of an array variable. Like the other expansions that use * and @, the @ form enclosed in quotes is the most useful, as it expands into separate words:
这里的 array 是一个数组变量的名字。和其它使用符号 * 和 @ 的展开一样,用引号引起来的 @ 格式是最有用的, 因为它能展开成分离的词。
| |
在数组末尾添加元素
Knowing the number of elements in an array is no help if we need to append values to the end of an array, since the values returned by the * and @ notations do not tell us the maxi- mum array index in use. Fortunately, the shell provides us with a solution. By using the += assignment operator, we can automatically append values to the end of an array. Here, we assign three values to the array foo, and then append three more.
如果我们需要在数组末尾附加数据,那么知道数组中元素的个数是没用的,因为通过 * 和 @ 表示法返回的数值不能 告诉我们使用的最大数组索引。幸运地是,shell 为我们提供了一种解决方案。通过使用 += 赋值运算符, 我们能够自动地把值附加到数组末尾。这里,我们把三个值赋给数组 foo,然后附加另外三个。
| |
数组排序
Just as with spreadsheets, it is often necessary to sort the values in a column of data. The shell has no direct way of doing this, but it’s not hard to do with a little coding:
就像电子表格,经常有必要对一列数据进行排序。Shell 没有这样做的直接方法,但是通过一点儿代码,并不难实现。
| |
When executed, the script produces this:
当执行之后,脚本产生这样的结果:
| |
The script operates by copying the contents of the original array (a) into a second array (a_sorted) with a tricky piece of command substitution. This basic technique can be used to perform many kinds of operations on the array by changing the design of the pipeline.
脚本运行成功,通过使用一个复杂的命令替换把原来的数组(a)中的内容复制到第二个数组(a_sorted)中。 通过修改管道线的设计,这个基本技巧可以用来对数组执行各种各样的操作。
删除数组
To delete an array, use the unset command:
删除一个数组,使用 unset 命令:
| |
unset may also be used to delete single array elements:
也可以使用 unset 命令删除单个的数组元素:
| |
In this example, we delete the third element of the array, subscript 2. Remember, arrays start with subscript zero, not one! Notice also that the array element must be quoted to prevent the shell from performing pathname expansion.
在这个例子中,我们删除了数组中的第三个元素,下标为2。记住,数组下标开始于0,而不是1!也要注意数组元素必须 用引号引起来为的是防止 shell 执行路径名展开操作。
Interestingly, the assignment of an empty value to an array does not empty its contents:
有趣地是,给一个数组赋空值不会清空数组内容:
| |
Any reference to an array variable without a subscript refers to element zero of the array:
任何没有下标的对数组变量的引用都指向数组元素0:
| |
关联数组
Recent versions of bash now support associative arrays. Associative arrays use strings rather than integers as array indexes. This capability allow interesting new approaches to managing data. For example, we can create an array called “colors” and use color names as indexes:
现在最新的 bash 版本支持关联数组了。关联数组使用字符串而不是整数作为数组索引。 这种功能给出了一种有趣的新方法来管理数据。例如,我们可以创建一个叫做 “colors” 的数组,并用颜色名字作为索引。
declare -A colors
colors["red"]="#ff0000"
colors["green"]="#00ff00"
colors["blue"]="#0000ff"
Unlike integer indexed arrays, which are created by merely referencing them, associative arrays must be created with the declare command using the new -A option.
不同于整数索引的数组,仅仅引用它们就能创建数组,关联数组必须用带有 -A 选项的 declare 命令创建。
Associative array elements are accessed in much the same way as integer indexed arrays:
访问关联数组元素的方式几乎与整数索引数组相同:
echo ${colors["blue"]}
In the next chapter, we will look at a script that makes good use of associative arrays to produce an interesting report.
在下一章中,我们将看一个脚本,很好地利用关联数组,生产出了一个有意思的报告。
总结
If we search the bash man page for the word “array,” we find many instances of where bash makes use of array variables. Most of these are rather obscure, but they may provide occasional utility in some special circumstances.In fact, the entire topic of arrays is rather under-utilized in shell programming owing largely to the fact that the traditional Unix shell programs (such as sh) lacked any support for arrays. This lack of popularity is unfortunate because arrays are widely used in other programming languages and provide a powerful tool for solving many kinds of programming problems.
如果我们在 bash 手册页中搜索单词 “array”的话,我们能找到许多 bash 在哪里会使用数组变量的实例。其中大部分相当晦涩难懂, 但是它们可能在一些特殊场合提供临时的工具。事实上,在 shell 编程中,整套数组规则利用率相当低,很大程度上归咎于 传统 Unix shell 程序(比如说 sh)缺乏对数组的支持。这样缺乏人气是不幸的,因为数组广泛应用于其它编程语言, 并为解决各种各样的编程问题,提供了一个强大的工具。
Arrays and loops have a natural affinity and are often used together. The
数组和循环有一种天然的姻亲关系,它们经常被一起使用。该
for ((expr; expr; expr))
form of loop is particularly well-suited to calculating array subscripts.
形式的循环尤其适合计算数组下标。
拓展阅读
A couple of Wikipedia articles about the data structures found in this chapter:
Wikipedia 上面有两篇关于在本章提到的数据结构的文章:
37 - 37 奇珍异宝
奇珍异宝
http://billie66.github.io/TLCL/book/chap37.html
In this, the final chapter of our journey, we will look at some odds and ends. While we have certainly covered a lot of ground in the previous chapters, there are many bash features that we have not covered. Most are fairly obscure, and useful mainly to those integrating bash into a Linux distribution. However, there are a few that, while not in common use, are helpful for certain programming problems. We will cover them here.
在我们 bash 学习旅程中的最后一站,我们将看一些零星的知识点。当然我们在之前的章节中已经 涵盖了很多方面,但是还有许多 bash 特性我们没有涉及到。其中大部分特性相当晦涩,主要对 那些把 bash 集成到 Linux 发行版的程序有用处。然而还有一些特性,虽然不常用, 但是对某些程序问题是很有帮助的。我们将在这里介绍它们。
组命令和子 shell
bash allows commands to be grouped together. This can be done in one of two ways; either with a group command or with a subshell. Here are examples of the syntax of each:
bash 允许把命令组合在一起。可以通过两种方式完成;要么用一个 group 命令,要么用一个子 shell。 这里是每种方式的语法示例:
Group command:
组命令:
{ command1; command2; [command3; ...] }
Subshell:
子 shell:
(command1; command2; [command3;...])
The two forms differ in that a group command surrounds its commands with braces and a subshell uses parentheses. It is important to note that, due to the way bash implements group commands, the braces must be separated from the commands by a space and the last command must be terminated with either a semicolon or a newline prior to the closing brace.
这两种形式的不同之处在于,组命令用花括号把它的命令包裹起来,而子 shell 用括号。值得注意的是,鉴于 bash 实现组命令的方式, 花括号与命令之间必须有一个空格,并且最后一个命令必须用一个分号或者一个换行符终止。
So what are group commands and subshells good for? While they have an important difference (which we will get to in a moment), they are both used to manage redirection. Let’s consider a script segment that performs redirections on multiple commands:
那么组命令和子 shell 命令对什么有好处呢? 尽管它们有一个很重要的差异(我们马上会接触到),但它们都是用来管理重定向的。 让我们考虑一个对多个命令执行重定向的脚本片段。
ls -l > output.txt
echo "Listing of foo.txt" >> output.txt
cat foo.txt >> output.txt
This is pretty straightforward. Three commands with their output redirected to a file named output.txt. Using a group command, we could code this as follows:
这些代码相当简洁明了。三个命令的输出都重定向到一个名为 output.txt 的文件中。 使用一个组命令,我们可以重新编 写这些代码,如下所示:
{ ls -l; echo "Listing of foo.txt"; cat foo.txt; } > output.txt
Using a subshell is similar:
使用一个子 shell 是相似的:
(ls -l; echo "Listing of foo.txt"; cat foo.txt) > output.txt
Using this technique we have saved ourselves some typing, but where a group command or subshell really shines is with pipelines. When constructing a pipeline of commands, it is often useful to combine the results of several commands into a single stream. Group commands and subshells make this easy:
使用这样的技术,我们为我们自己节省了一些打字时间,但是组命令和子 shell 真正闪光的地方是与管道线相结合。 当构建一个管道线命令的时候,通常把几个命令的输出结果合并成一个流是很有用的。 组命令和子 shell 使这种操作变得很简单:
{ ls -l; echo "Listing of foo.txt"; cat foo.txt; } | lpr
Here we have combined the output of our three commands and piped them into the input of lpr to produce a printed report.
这里我们已经把我们的三个命令的输出结果合并在一起,并把它们用管道输送给命令 lpr 的输入,以便产生一个打印报告。
In the script that follows, we will use groups commands and look at several programming techniques that can be employed in conjunction with associative arrays. This script, called array-2, when given the name of a directory, prints a listing of the files in the directory along with the names of the the file’s owner and group owner. At the end of listing, the script prints a tally of the number of files belonging to each owner and group. Here we see the results (condensed for brevity) when the script is given the directory /usr/bin:
在下面的脚本中,我们将使用组命令,看几个与关联数组结合使用的编程技巧。这个脚本,称为 array-2,当给定一个目录名,打印出目录中的文件列表, 伴随着每个文件的文件所有者和组所有者。在文件列表的末尾,脚本打印出属于每个所有者和组的文件数目。 这里我们看到的(为简单起见而缩短的)结果,是给定脚本的目录为 /usr/bin 的时候:
| |
Here is a listing (with line numbers) of the script:
这里是脚本代码列表(带有行号):
1 #!/bin/bash
2
3 # array-2: Use arrays to tally file owners
4
5 declare -A files file_group file_owner groups owners
6
7 if [[ ! -d "$1" ]]; then
8 echo "Usage: array-2 dir" >&2
9 exit 1
10 fi
11
12 for i in "$1"/*; do
13 owner=$(stat -c %U "$i")
14 group=$(stat -c %G "$i")
15 files["$i"]="$i"
16 file_owner["$i"]=$owner
17 file_group["$i"]=$group
18 ((++owners[$owner]))
19 ((++groups[$group]))
20 done
21
22 # List the collected files
23 { for i in "${files[@]}"; do
24 printf "%-40s %-10s %-10s\n" \
25 "$i" ${file_owner["$i"]} ${file_group["$i"]}
26 done } | sort
27 echo
28
29 # List owners
30 echo "File owners:"
31 { for i in "${!owners[@]}"; do
32 printf "%-10s: %5d file(s)\n" "$i" ${owners["$i"]}
33 done } | sort
34 echo
35
36 # List groups
37 echo "File group owners:"
38 { for i in "${!groups[@]}"; do
39 printf "%-10s: %5d file(s)\n" "$i" ${groups["$i"]}
40 done } | sort
Let’s take a look at the mechanics of this script:
让我们看一下这个脚本的运行机制:
Line 5: Associative arrays must be created with the declare command using the -A option. In this script we create five arrays as follows:
行5: 关联数组必须用带有 -A 选项的 declare 命令创建。在这个脚本中我们创建了如下五个数组:
files contains the names of the files in the directory, indexed by filename
file_group contains the group owner of each file, indexed by filename
file_owner contains the owner of each file, indexed by file name
groups contains the number of files belonging to the indexed group
owners contains the number of files belonging to the indexed owner
files 包含了目录中文件的名字,按文件名索引
file_group 包含了每个文件的组所有者,按文件名索引
file_owner 包含了每个文件的所有者,按文件名索引
groups 包含了属于索引的组的文件数目
owners 包含了属于索引的所有者的文件数目
Lines 7-10: Checks to see that a valid directory name was passed as a positional parameter. If not, a usage message is displayed and the script exits with an exit status of 1.
行7-10:查看是否一个有效的目录名作为位置参数传递给程序。如果不是,就会显示一条使用信息,并且脚本退出,退出状态为1。
Lines 12-20: Loop through the files in the directory. Using the stat command, lines 13 and 14 extract the names of the file owner and group owner and assign the values to their respective arrays (lines 16, 17) using the name of the file as the array index. Likewise the file name itself is assigned to the files array (line 15).
行12-20:循环遍历目录中的所有文件。使用 stat 命令,行13和行14抽取文件所有者和组所有者, 并把值赋给它们各自的数组(行16,17),使用文件名作为数组索引。同样地,文件名自身也赋值给 files 数组。
Lines 18-19: The total number of files belonging to the file owner and group owner are incremented by one.
行18-19:属于文件所有者和组所有者的文件总数各自加1。
Lines 22-27: The list of files is output. This is done using the “${array[@]}” parameter expansion which expands into the entire list of array element with each element treated as a separate word. This allows for the possibility that a file name may contain embedded spaces. Also note that the entire loop is enclosed in braces thus forming a group command. This permits the entire output of the loop to be piped into the sort command. This is necessary because the expansion of the array elements is not sorted.
行22-27:输出文件列表。为做到这一点,使用了 “${array[@]}” 参数展开,展开成整个的数组元素列表, 并且每个元素被当做是一个单独的词。从而允许文件名包含空格的情况。也要注意到整个循环是包裹在花括号中, 从而形成了一个组命令。这样就允许整个循环输出会被管道输送给 sort 命令的输入。这是必要的,因为 展开的数组元素是无序的。
Lines 29-40: These two loops are similar to the file list loop except that they use the “${! array[@]}” expansion which expands into the list of array indexes rather than the list of array elements.
行29-40:这两个循环与文件列表循环相似,除了它们使用 “${!array[@]}” 展开,展开成数组索引的列表 而不是数组元素的。
进程替换
While they look similar and can both be used to combine streams for redirection, there is an important difference between group commands and subshells. Whereas a group command executes all of its commands in the current shell, a subshell (as the name suggests) executes its commands in a child copy of the current shell. This means that the environment is copied and given to a new instance of the shell. When the subshell exits, the copy of the environment is lost, so any changes made to the subshell’s environment (including variable assignment) is lost as well. Therefore, in most cases, unless a script requires a subshell, group commands are preferable to subshells. Group commands are both faster and require less memory.
虽然组命令和子 shell 看起来相似,并且它们都能用来在重定向中合并流,但是两者之间有一个很重要的不同之处。 然而,一个组命令在当前 shell 中执行它的所有命令,而一个子 shell(顾名思义)在当前 shell 的一个 子副本中执行它的命令。这意味着运行环境被复制给了一个新的 shell 实例。当这个子 shell 退出时,环境副本会消失, 所以在子 shell 环境(包括变量赋值)中的任何更改也会消失。因此,在大多数情况下,除非脚本要求一个子 shell, 组命令比子 shell 更受欢迎。组命令运行很快并且占用的内存也少。
We saw an example of the subshell environment problem in Chapter 28, when we discovered that a read command in a pipeline does not work as we might intuitively expect. To recap, if we construct a pipeline like this:
我们在第20章中看到过一个子 shell 运行环境问题的例子,当我们发现管道线中的一个 read 命令 不按我们所期望的那样工作的时候。为了重现问题,我们构建一个像这样的管道线:
echo "foo" | read
echo $REPLY
The content of the REPLY variable is always empty because the read command is executed in a subshell, and its copy of REPLY is destroyed when the subshell terminates. Because commands in pipelines are always executed in subshells, any command that assigns variables will encounter this issue. Fortunately, the shell provides an exotic form of expansion called process substitution that can be used to work around this problem. Process substitution is expressed in two ways:
该 REPLY 变量的内容总是为空,是因为这个 read 命令在一个子 shell 中执行,所以当该子 shell 终止的时候, 它的 REPLY 副本会被毁掉。因为管道线中的命令总是在子 shell 中执行,任何给变量赋值的命令都会遭遇这样的问题。 幸运地是,shell 提供了一种奇异的展开方式,叫做进程替换,它可以用来解决这种麻烦。进程替换有两种表达方式:
For processes that produce standard output:
一种适用于产生标准输出的进程:
<(list)
or, for processes that intake standard input:
另一种适用于接受标准输入的进程:
>(list)
where list is a list of commands.
这里的 list 是一串命令列表:
To solve our problem with read, we can employ process substitution like this:
为了解决我们的 read 命令问题,我们可以雇佣进程替换,像这样:
read < <(echo "foo")
echo $REPLY
Process substitution allows us to treat the output of a subshell as an ordinary file for purposes of redirection. In fact, since it is a form of expansion, we can examine its real value:
进程替换允许我们把一个子 shell 的输出结果当作一个用于重定向的普通文件。事实上,因为它是一种展开形式,我们可以检验它的真实值:
| |
By using echo to view the result of the expansion, we see that the output of the subshell is being provided by a file named /dev/fd/63.
通过使用 echo 命令,查看展开结果,我们看到子 shell 的输出结果,由一个名为 /dev/fd/63 的文件提供。
Process substitution is often used with loops containing read. Here is an example of a read loop that processes the contents of a directory listing created by a subshell:
进程替换经常被包含 read 命令的循环用到。这里是一个 read 循环的例子,处理一个目录列表的内容,内容创建于一个子 shell:
| |
The loop executes read for each line of a directory listing. The listing itself is produced on the final line of the script. This line redirects the output of the process substitution into the standard input of the loop. The tail command is included in the process substitution pipeline to eliminate the first line of the listing, which is not needed.
这个循环对目录列表的每一个条目执行 read 命令。列表本身产生于该脚本的最后一行代码。这一行代码把从进程替换得到的输出 重定向到这个循环的标准输入。这个包含在管道线中的 tail 命令,是为了消除列表的第一行文本,这行文本是多余的。
When executed, the script produces output like this:
当脚本执行后,脚本产生像这样的输出:
| |
陷阱
In Chapter 10, we saw how programs can respond to signals. We can add this capability to our scripts, too. While the scripts we have written so far have not needed this capabil- ity (because they have very short execution times, and do not create temporary files), larger and more complicated scripts may benefit from having a signal handling routine.
在第10章中,我们看到过程序是怎样响应信号的。我们也可以把这个功能添加到我们的脚本中。然而到目前为止, 我们所编写过的脚本还不需要这种功能(因为它们运行时间非常短暂,并且不创建临时文件),大且更复杂的脚本 可能会受益于一个信息处理程序。
When we design a large, complicated script, it is important to consider what happens if the user logs off or shuts down the computer while the script is running. When such an event occurs, a signal will be sent to all affected processes. In turn, the programs repre- senting those processes can perform actions to ensure a proper and orderly termination of the program. Let’s say, for example, that we wrote a script that created a temporary file during its execution. In the course of good design, we would have the script delete the file when the script finishes its work. It would also be smart to have the script delete the file if a signal is received indicating that the program was going to be terminated prematurely.
当我们设计一个大的,复杂的脚本的时候,若脚本仍在运行时,用户注销或关闭了电脑,这时候会发生什么,考虑到这一点非常重要。 当像这样的事情发生了,一个信号将会发送给所有受到影响的进程。依次地,代表这些进程的程序会执行相应的动作,来确保程序 合理有序的终止。比方说,例如,我们编写了一个会在执行时创建临时文件的脚本。在一个好的设计流程,我们应该让脚本删除创建的 临时文件,当脚本完成它的任务之后。若脚本接收到一个信号,表明该程序即将提前终止的信号, 此时让脚本删除创建的临时文件,也会是很精巧的设计。
bash provides a mechanism for this purpose known as a trap. Traps are implemented with the appropriately named builtin command, trap. trap uses the following syntax:
为满足这样需求,bash 提供了一种机制,众所周知的 trap。陷阱正好由内部命令 trap 实现。 trap 使用如下语法:
trap argument signal [signal...]
where argument is a string which will be read and treated as a command and signal is the specification of a signal that will trigger the execution of the interpreted command.
这里的 argument 是一个字符串,它被读取并被当作一个命令,signal 是一个信号的说明,它会触发执行所要解释的命令。
Here is a simple example:
这里是一个简单的例子:
| |
This script defines a trap that will execute an echo command each time either the SIGINT or SIGTERM signal is received while the script is running. Execution of the program looks like this when the user attempts to stop the script by pressing Ctrl-c:
这个脚本定义一个陷阱,当脚本运行的时候,这个陷阱每当接受到一个 SIGINT 或 SIGTERM 信号时,就会执行一个 echo 命令。 当用户试图通过按下 Ctrl-c 组合键终止脚本运行的时候,该程序的执行结果看起来像这样:
| |
As we can see, each time the user attempts to interrupt the program, the message is printed instead.
正如我们所看到的,每次用户试图中断程序时,会打印出这条信息。
Constructing a string to form a useful sequence of commands can be awkward, so it is common practice to specify a shell function as the command. In this example, a separate shell function is specified for each signal to be handled:
构建一个字符串来形成一个有用的命令序列是很笨拙的,所以通常的做法是指定一个 shell 函数作为命令。在这个例子中, 为每一个信号指定了一个单独的 shell 函数来处理:
| |
This script features two trap commands, one for each signal. Each trap, in turn, speci- fies a shell function to be executed when the particular signal is received. Note the inclu- sion of an exit command in each of the signal-handling functions. Without an exit, the script would continue after completing the function.
这个脚本的特色是有两个 trap 命令,每个命令对应一个信号。每个 trap,依次,当接受到相应的特殊信号时, 会执行指定的 shell 函数。注意每个信号处理函数中都包含了一个 exit 命令。没有 exit 命令, 信号处理函数执行完后,该脚本将会继续执行。
When the user presses Ctrl-c during the execution of this script, the results look like this:
当用户在这个脚本执行期间,按下 Ctrl-c 组合键的时候,输出结果看起来像这样:
| |
Temporary Files
临时文件
One reason signal handlers are included in scripts is to remove temporary files that the script may create to hold intermediate results during execution. There is something of an art to naming temporary files. Traditionally, programs on Unix-like systems create their temporary files in the /tmp directory, a shared directory intended for such files. However, since the directory is shared, this poses certain security concerns, particularly for programs running with superuser privileges. Aside from the obvious step of setting proper permissions for files exposed to all users of the system, it is important to give temporary files non-predictable filenames. This avoids an exploit known as a temp race attack. One way to create a non-predictable (but still descriptive) name is to do something like this:
把信号处理程序包含在脚本中的一个原因是删除临时文件,在脚本执行期间,脚本可能会创建临时文件来存放中间结果。 命名临时文件是一种艺术。传统上,在类似于 unix 系统中的程序会在 /tmp 目录下创建它们的临时文件,/tmp 是 一个服务于临时文件的共享目录。然而,因为这个目录是共享的,这会引起一定的安全顾虑,尤其对那些用 超级用户特权运行的程序。除了为暴露给系统中所有用户的文件设置合适的权限这一明显步骤之外, 给临时文件一个不可预测的文件名是很重要的。这就避免了一种为大众所知的 temp race 攻击。 一种创建一个不可预测的(但是仍有意义的)临时文件名的方法是,做一些像这样的事情:
tempfile=/tmp/$(basename $0).$$.$RANDOM
This will create a filename consisting of the program’s name, followed by its process ID (PID), followed by a random integer. Note, however, that the $RANDOM shell variable only returns a value in the range of 1-32767, which is not a very large range in computer terms, so a single instance of the variable is not sufficient to overcome a determined attacker.
这将创建一个由程序名字,程序进程的 ID(PID)文件名,和一个随机整数组成。注意,然而,该 $RANDOM shell 变量 只能返回一个范围在1-32767内的整数值,这在计算机术语中不是一个很大的范围,所以一个单一的该变量实例是不足以克服一个坚定的攻击者的。
A better way is to use the mktemp program (not to be confused with the mktemp standard library function) to both name and create the temporary file. The mktemp program accepts a template as an argument that is used to build the filename. The template should include a series of “X” characters, which are replaced by a corresponding number of random letters and numbers. The longer the series of “X” characters, the longer the series of random characters. Here is an example:
一个比较好的方法是使用 mktemp 程序(不要和 mktemp 标准库函数相混淆)来命名和创建临时文件。 这个 mktemp 程序接受一个用于创建文件名的模板作为参数。这个模板应该包含一系列的 “X” 字符, 随后这些字符会被相应数量的随机字母和数字替换掉。一连串的 “X” 字符越长,则一连串的随机字符也就越长。 这里是一个例子:
tempfile=$(mktemp /tmp/foobar.$$.XXXXXXXXXX)
This creates a temporary file and assigns its name to the variable tempfile. The “X” characters in the template are replaced with random letters and numbers so that the final filename (which, in this example, also includes the expanded value of the special parameter $$ to obtain the PID) might be something like:
这里创建了一个临时文件,并把临时文件的名字赋值给变量 tempfile。因为模板中的 “X” 字符会被随机字母和 数字代替,所以最终的文件名(在这个例子中,文件名也包含了特殊参数 $$ 的展开值,进程的 PID)可能像这样:
/tmp/foobar.6593.UOZuvM6654
For scripts that are executed by regular users, it may be wise to avoid the use of the /tmp directory and create a directory for temporary files within the user’s home directory, with a line of code such as this:
对于那些由普通用户操作执行的脚本,避免使用 /tmp 目录,而是在用户家目录下为临时文件创建一个目录, 通过像这样的一行代码:
[[ -d $HOME/tmp ]] || mkdir $HOME/tmp
异步执行
It is sometimes desirable to perform more than one task at the same time. We have seen how all modern operating systems are at least multitasking if not multiuser as well. Scripts can be constructed to behave in a multitasking fashion.
有时候需要同时执行多个任务。我们已经知道现在所有的操作系统若不是多用户的但至少是多任务的。 脚本也可以构建成多任务处理的模式。
Usually this involves launching a script that, in turn, launches one or more child scripts that perform an additional task while the parent script continues to run. However, when a series of scripts runs this way, there can be problems keeping the parent and child coordinated. That is, what if the parent or child is dependent on the other, and one script must wait for the other to finish its task before finishing its own?
通常这涉及到启动一个脚本,依次,启动一个或多个子脚本来执行额外的任务,而父脚本继续运行。然而,当一系列脚本 以这种方式运行时,要保持父子脚本之间协调工作,会有一些问题。也就是说,若父脚本或子脚本依赖于另一方,并且 一个脚本必须等待另一个脚本结束任务之后,才能完成它自己的任务,这应该怎么办?
bash has a builtin command to help manage asynchronous execution such as this. The wait command causes a parent script to pause until a specified process (i.e., the child script) finishes.
bash 有一个内置命令,能帮助管理诸如此类的异步执行的任务。wait 命令导致一个父脚本暂停运行,直到一个 特定的进程(例如,子脚本)运行结束。
等待
We will demonstrate the wait command first. To do this, we will need two scripts, a par- ent script:
首先我们将演示一下 wait 命令的用法。为此,我们需要两个脚本,一个父脚本:
| |
and a child script:
和一个子脚本:
| |
In this example, we see that the child script is very simple. The real action is being per- formed by the parent. In the parent script, the child script is launched and put into the background. The process ID of the child script is recorded by assigning the pid variable with the value of the $! shell parameter, which will always contain the process ID of the last job put into the background.
在这个例子中,我们看到该子脚本是非常简单的。真正的操作通过父脚本完成。在父脚本中,子脚本被启动, 并被放置到后台运行。子脚本的进程 ID 记录在 pid 变量中,这个变量的值是 $! shell 参数的值,它总是 包含放到后台执行的最后一个任务的进程 ID 号。
The parent script continues and then executes a wait command with the PID of the child process. This causes the parent script to pause until the child script exits, at which point the parent script concludes.
父脚本继续,然后执行一个以子进程 PID 为参数的 wait 命令。这就导致父脚本暂停运行,直到子脚本退出,父脚本随之结束。
When executed, the parent and child scripts produce the following output:
当执行后,父子脚本产生如下输出:
| |
命名管道
In most Unix-like systems, it is possible to create a special type of file called a named pipe. Named pipes are used to create a connection between two processes and can be used just like other types of files. They are not that popular, but they’re good to know about.
在大多数类似 Unix 的操作系统中,有可能创建一种特殊类型的文件,叫做命名管道。命名管道用来在 两个进程之间建立连接,也可以像其它类型的文件一样使用。虽然它们不是那么流行,但是它们值得我们去了解。
There is a common programming architecture called client-server, which can make use of a communication method such as named pipes, as well as other kinds of interprocess communication such as network connections.
有一种常见的编程架构,叫做客户端-服务器,它可以利用像命名管道这样的通信方式, 也可以使用其它类型的进程间通信方式,比如网络连接。
The most widely used type of client-server system is, of course, a web browser communicating with a web server. The web browser acts as the client, making requests to the server and the server responds to the browser with web pages.
最为广泛使用的客户端-服务器系统类型当然是一个web浏览器与一个web服务器之间进行通信。 web 浏览器作为客户端,向服务器发出请求,服务器响应请求,并把对应的网页发送给浏览器。
Named pipes behave like files, but actually form first-in first-out (FIFO) buffers. As with ordinary (unnamed) pipes, data goes in one end and emerges out the other. With named pipes, it is possible to set up something like this:
命名管道的行为类似于文件,但实际上形成了先入先出(FIFO)的缓冲。和普通(未命令的)管道一样, 数据从一端进入,然后从另一端出现。通过命名管道,有可能像这样设置一些东西:
process1 > named_pipe
and
和
process2 < named_pipe
and it will behave as if:
表现出来就像这样:
process1 | process2
设置一个命名管道
First, we must create a named pipe. This is done using the mkfifo command:
首先,我们必须创建一个命名管道。使用 mkfifo 命令能够创建命名管道:
| |
Here we use mkfifo to create a named pipe called pipe1. Using ls, we examine the file and see that the first letter in the attributes field is “p”, indicating that it is a named pipe.
这里我们使用 mkfifo 创建了一个名为 pipe1 的命名管道。使用 ls 命令,我们查看这个文件, 看到位于属性字段的第一个字母是 “p”,表明它是一个命名管道。
使用命名管道
To demonstrate how the named pipe works, we will need two terminal windows (or alternately, two virtual consoles). In the first terminal, we enter a simple command and redirect its output to the named pipe:
为了演示命名管道是如何工作的,我们将需要两个终端窗口(或用两个虚拟控制台代替)。 在第一个终端中,我们输入一个简单命令,并把命令的输出重定向到命名管道:
| |
After we press the Enter key, the command will appear to hang. This is because there is nothing receiving data from the other end of the pipe yet. When this occurs, it is said that the pipe is blocked. This condition will clear once we attach a process to the other end and it begins to read input from the pipe. Using the second terminal window, we enter this command:
我们按下 Enter 按键之后,命令将会挂起。这是因为在管道的另一端没有任何对象来接收数据。这种现象被称为管道阻塞。一旦我们绑定一个进程到管道的另一端,该进程开始从管道中读取输入的时候,管道阻塞现象就不存在了。 使用第二个终端窗口,我们输入这个命令:
| |
and the directory listing produced from the first terminal window appears in the second terminal as the output from the cat command. The ls command in the first terminal successfully completes once it is no longer blocked.
然后产自第一个终端窗口的目录列表出现在第二个终端中,并作为来自 cat 命令的输出。在第一个终端 窗口中的 ls 命令一旦它不再阻塞,会成功地结束。
总结
Well, we have completed our journey. The only thing left to do now is practice, practice, practice. Even though we covered a lot of ground in our trek, we barely scratched the surface as far as the command line goes. There are still thousands of command line programs left to be discovered and enjoyed. Start digging around in /usr/bin and you’ll see!
嗯,我们已经完成了我们的旅程。现在剩下的唯一要做的事就是练习,练习,再练习。 纵然在我们的长途跋涉中,我们涉及了很多命令,但是就命令行而言,我们只是触及了它的表面。 仍留有成千上万的命令行程序,需要去发现和享受。开始挖掘 /usr/bin 目录吧,你将会看到!
拓展阅读
The “Compound Commands” section of the bash man page contains a full description of group command and subshell notations.
bash 手册页的 “复合命令” 部分包含了对组命令和子 shell 表示法的详尽描述。
The EXPANSION section of the bash man page contains a subsection of process substitution.
bash 手册也的 EXPANSION 部分包含了一小部分进程替换的内容:
The Advanced Bash-Scripting Guide also has a discussion of process substitution:
《高级 Bash 脚本指南》也有对进程替换的讨论:
Linux Journal has two good articles on named pipes. The first, from September 1997:
《Linux 杂志》有两篇关于命名管道的好文章。第一篇,源于1997年9月:
and the second, from March 2009:
和第二篇,源于2009年3月:
http://www.linuxjournal.com/content/using-named-pipes-fifos-bash