文档
- 1: 主页
- 2: 学习shell
- 3: 编写shell脚本
- 3.1: 编写我们的第一个脚本并使其正常工作
- 3.2: 编辑我们已有的脚本
- 3.3: here 脚本
- 3.4: 变量
- 3.5: 命令替换和常量
- 3.6: shell函数
- 3.7: 一些真正的工作
- 3.8: 流程控制 - 第一部分
- 3.9: 远离麻烦
- 3.10: 键盘输入和算术
- 3.11: 流程控制 - 第二部分
- 3.12: 位置参数
- 3.13: 流程控制 - 第三部分
- 3.14: 错误、信号和陷阱(噢,我的天!)- 第一部分
- 3.15: 错误、信号和陷阱(哦,我的天!)- 第二部分
- 4: 参考
- 5: Adventures
- 5.1: Midnight Commander
- 5.2: Terminal Multiplexers
- 5.3: Less Typing
- 5.4: More Redirection
- 5.5: tput
- 5.6: dialog
- 5.7: AWK
- 5.8: Other Shells
- 5.9: Power Terminals
- 5.10: Vim, with Vigor
- 5.11: source
- 5.12: Coding Standards Part 1: Our Own
- 5.13: Coding Standards Part 2: new_script
- 5.14: SQL
- 6: Books
1 - 主页
现在怎么办?Now what?
https://linuxcommand.org/index.php
You have Linux installed and running. The GUI is working fine, but you are getting tired of changing your desktop themes. You keep seeing this “terminal” thing.
你已经安装和运行了Linux。图形用户界面(GUI)运行良好,但你对于更改桌面主题感到厌倦。你一直看到这个"终端"的东西。
Don’t worry, we’ll show you what to do.
别担心,我们会告诉你该做什么。
2 - 学习shell
为什么要费心?Why Bother?
https://linuxcommand.org/lc3_learning_the_shell.php
Why do you need to learn the command line anyway? Well, let me tell you a story. Many years ago we had a problem where I worked. There was a shared drive on one of our file servers that kept getting full. I won’t mention that this legacy operating system did not support user quotas; that’s another story. But the server kept getting full and it stopped people from working. One of our software engineers spent a couple of hours writing a C++ program that would look through all the user’s directories and add up the space they were using and make a listing of the results. Since I was forced to use the legacy OS while I was on the job, I installed a Linux-like command line environment for it. When I heard about the problem, I realized I could perform this task with this single line:
你为什么需要学习命令行?好吧,让我给你讲个故事。很多年前,我工作的地方遇到一个问题。我们的一个文件服务器上有一个共享驱动器,空间总是被占满。我不会提及这个遗留操作系统不支持用户配额的事实,那是另一个故事了。但服务器一直被占满,导致人们无法正常工作。我们的一位软件工程师花了几个小时编写了一个C++程序,用于查找所有用户目录并计算它们使用的空间,并生成一个结果列表。由于我在工作期间被迫使用这个遗留操作系统,我为其安装了一个类似Linux的命令行环境。当我听说这个问题时,我意识到我可以用一行命令来完成这个任务:
| |
Graphical user interfaces (GUIs) are helpful for many tasks, but they are not good for all tasks. I have long felt that most computers today are not powered by electricity. They instead seem to be powered by the “pumping” motion of the mouse. Computers were supposed to free us from manual labor, but how many times have you performed some task you felt sure the computer should be able to do but you ended up doing the work yourself by tediously working the mouse? Pointing and clicking, pointing and clicking.
图形用户界面(GUI)对许多任务很有帮助,但并非对所有任务都适用。我一直觉得现在的大多数计算机不是靠电力驱动,而是靠鼠标的“点击”运动驱动。计算机本应该使我们从体力劳动中解放出来,但你有多少次尝试让计算机完成某项任务,但最终却发现自己不得不费力地操作鼠标来亲自完成工作?指指点点,指指点点。
I once heard an author say that when you are a child you use a computer by looking at the pictures. When you grow up, you learn to read and write. Welcome to Computer Literacy 101. Now let’s get to work.
我曾经听过一位作者说,当你还是个孩子时,你通过看图来使用计算机。当你长大后,你学会了阅读和写作。欢迎来到计算机素养101课程。现在让我们开始工作吧。
2.1 - 什么是 "Shell"?
什么是"Shell"? What is “the Shell”?
https://linuxcommand.org/lc3_lts0010.php
Simply put, the shell is a program that takes commands from the keyboard and gives them to the operating system to perform. In the old days, it was the only user interface available on a Unix-like system such as Linux. Nowadays, we have graphical user interfaces (GUIs) in addition to command line interfaces (CLIs) such as the shell.
简而言之,Shell是一个程序,它从键盘接收命令并将其传递给操作系统执行。在早期,它是类Unix系统(如Linux)上唯一可用的用户界面。如今,除了Shell,我们还有图形用户界面(GUI),例如命令行界面(CLI)。
On most Linux systems a program called bash (which stands for Bourne Again SHell, an enhanced version of the original Unix shell program, sh, written by Steve Bourne) acts as the shell program. Besides bash, there are other shell programs available for Linux systems. These include: ksh, tcsh and zsh.
在大多数Linux系统中,一个名为bash的程序(代表Bourne Again SHell,是原始Unix shell程序sh的增强版本,由Steve Bourne编写)充当Shell程序。除了bash,Linux系统还有其他可用的Shell程序,包括:ksh、tcsh和zsh。
什么是"终端"?What’s a “Terminal?”
It’s a program called a terminal emulator. This is a program that opens a window and lets you interact with the shell. There are a bunch of different terminal emulators we can use. Some Linux distributions install several. These might include gnome-terminal, konsole, xterm, rxvt, kvt, nxterm, and eterm.
它是一个被称为终端仿真器的程序。它打开一个窗口,让你与Shell进行交互。我们可以使用许多不同的终端仿真器。一些Linux发行版会安装多个终端仿真器。它们可能包括gnome-terminal、konsole、xterm、rxvt、kvt、nxterm和eterm。
启动终端 Starting a Terminal
Window managers usually have a way to launch a terminal from the menu. Look through the list of programs to see if anything looks like a terminal emulator. While there are a number of different terminal emulators, they all do the same thing. They give us access to a shell session. You will probably develop a preference for one, based on the different bells and whistles it provides.
窗口管理器通常有一种从菜单启动终端的方法。浏览程序列表,看看是否有类似终端仿真器的选项。虽然有许多不同的终端仿真器,但它们都具有相同的功能。它们给我们提供了访问Shell会话的途径。你可能会根据它们提供的不同特性和功能,对其中的某个终端仿真器有所偏好。
测试键盘输入 Testing the Keyboard
OK, let’s try some typing. Bring up a terminal window. The first thing we should see is a shell prompt that contains our user name and the name of the machine followed by a dollar sign. Something like this:
好的,让我们试着输入一些内容。打开一个终端窗口。我们应该首先看到一个包含我们的用户名和计算机名称后面跟着一个美元符号的Shell提示符。类似这样:
| |
Excellent! Now type some nonsense characters and press the enter key.
太棒了!现在输入一些无意义的字符,然后按回车键。
| |
If all went well, we should have gotten an error message complaining that it cannot understand the command:
如果一切正常,我们应该会收到一个错误消息,说明它无法理解该命令:
| |
Wonderful! Now press the up-arrow key. Watch how our previous command “kdkjflajfks” returns. Yes, we have command history. Press the down-arrow and we get the blank line again.
太好了!现在按向上箭头键。注意我们之前的命令"kdkjflajfks"会重新出现。是的,我们有命令历史记录。按向下箭头键,我们又回到了空白行。
Recall the “kdkjflajfks” command using the up-arrow key if needed. Now, try the left and right-arrow keys. We can position the text cursor anywhere in the command line. This allows us to easily correct mistakes.
如果需要,可以使用向上箭头键来重新调用"kdkjflajfks"命令。现在,试试左右箭头键。我们可以将文本光标定位在命令行的任何位置。这使我们可以轻松纠正错误。
你没有以root用户身份操作,对吗? You’re not operating as root, are you?
If the last character of your shell prompt is # rather than $, you are operating as the superuser. This means that you have administrative privileges. This can be dangerous, since you are able to delete or overwrite any file on the system. Unless you absolutely need administrative privileges, do not operate as the superuser.
如果你的Shell提示符的最后一个字符是
#而不是$,那么你正在以超级用户的身份操作。这意味着你拥有管理员特权。这可能是危险的,因为你可以删除或覆盖系统上的任何文件。除非你绝对需要管理员特权,否则不要以超级用户身份操作。
使用鼠标 Using the Mouse
Even though the shell is a command line interface, the mouse is still handy.
虽然Shell是一个命令行界面,但鼠标仍然很方便。
Besides using the mouse to scroll the contents of the terminal window, we can can use it to copy text. Drag the mouse over some text (for example, “kdkjflajfks” right here on the browser window) while holding down the left button. The text should highlight. Release the left button and move the mouse pointer to the terminal window and press the middle mouse button (alternately, press both the left and right buttons at the same time when working on a touch pad). The text we highlighted in the browser window should be copied into the command line.
除了使用鼠标滚动终端窗口的内容,我们还可以使用它来复制文本。按住左键,拖动鼠标在一些文本上(例如,在浏览器窗口中的"kdkjflajfks"),文本将被突出显示。释放左键,将鼠标指针移动到终端窗口上,并按下中间鼠标按钮(或者在触摸板上同时按下左键和右键)。我们在浏览器窗口中突出显示的文本将被复制到命令行中。
关于焦点的一些说明… A few words about focus…
When you installed your Linux system and its window manager (most likely Gnome or KDE), it was configured to behave in some ways like that legacy operating system.
当你安装Linux系统及其窗口管理器(很可能是Gnome或KDE)时,它会配置成某种程度上与那个遗留操作系统类似的行为。
In particular, it probably has its focus policy set to “click to focus.” This means that in order for a window to gain focus (become active) you have to click in the window. This is contrary to traditional X Window behavior. You should consider setting the focus policy to “focus follows mouse”. You may find it strange at first that windows don’t raise to the front when they get focus (you have to click on the window to do that), but you will enjoy being able to work on more than one window at once without having the active window obscuring the other. Try it and give it a fair trial; I think you will like it. You can find this setting in the configuration tools for your window manager.
特别是,它可能将其焦点策略设置为"点击获取焦点"。这意味着为了使窗口获得焦点(变为活动状态),你必须在窗口中点击。这与传统的X Window行为相反。你应该考虑将焦点策略设置为"焦点跟随鼠标"。起初,窗口不会在获得焦点时自动提到前台可能会让你感到奇怪(你必须点击窗口才能做到),但你将享受到能够同时在多个窗口上工作而不会被活动窗口遮挡的便利。尝试一下并进行充分试用;我相信你会喜欢它的。你可以在窗口管理器的配置工具中找到此设置。
进一步阅读 Further Reading
- The Wikipedia entry for Steve Bourne, developer of the original Bourne shell
- The Wikipedia article on the Unix shell, the place where all this fun got started
- The “Power Terminals” Adventure
- Steve Bourne的维基百科页面,原始Bourne shell的开发者
- Unix Shell的维基百科文章,这就是所有这些有趣的东西开始的地方
- “Power Terminals” 探险
2.2 - 导航
导航 Navigation
https://linuxcommand.org/lc3_lts0020.php
In this lesson, we will introduce our first three commands: pwd (print working directory), cd (change directory), and ls (list files and directories).
在本课程中,我们将介绍我们的前三个命令:pwd(打印当前工作目录)、cd(切换目录)和ls(列出文件和目录)。
Those new to the command line will need to pay close attention to this lesson since the concepts will take some getting used to.
对于命令行不熟悉的人来说,需要特别注意这节课,因为这些概念需要一些时间来适应。
文件系统组织 File System Organization
Like Windows, the files on a Linux system are arranged in what is called a hierarchical directory structure. This means that they are organized in a tree-like pattern of directories (called folders in other systems), which may contain files and subdirectories. The first directory in the file system is called the root directory. The root directory contains files and subdirectories, which contain more files and subdirectories and so on and so on.
与Windows一样,Linux系统上的文件以所谓的分层目录结构进行排列。这意味着它们以一种类似树状的模式组织在目录中(其他系统中称为文件夹),这些目录中可能包含文件和子目录。文件系统中的第一个目录称为根目录。根目录包含文件和子目录,这些子目录又包含更多的文件和子目录,以此类推。
Most graphical environments include a file manager program used to view and manipulate the contents of the file system. Often we will see the file system represented like this:
大多数图形界面都包含一个文件管理器程序,用于查看和操作文件系统的内容。通常,我们会看到文件系统以这样的方式表示:
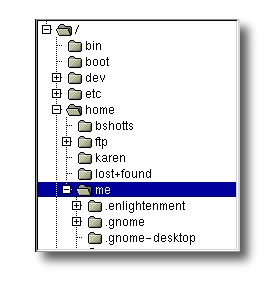
One important difference between Windows and Unix-like operating systems such as Linux is that Linux does not employ the concept of drive letters. While Windows drive letters split the file system into a series of different trees (one for each device), Linux always has a single tree. Different storage devices may be different branches of the tree, but there is always just a single tree.
Windows和Linux等类Unix操作系统之间一个重要的区别是,Linux不使用驱动器字母的概念。而Windows的驱动器字母将文件系统分割为一系列不同的树(每个设备对应一个树),Linux始终只有一棵树。不同的存储设备可能是树的不同分支,但始终只有一棵树。
pwd
Since the command line interface cannot provide graphic pictures of the file system structure, we must have a different way of representing it. To do this, think of the file system tree as a maze, and that we are standing in it. At any given moment, we are located in a single directory. Inside that directory, we can see its files and the pathway to its parent directory and the pathways to the subdirectories of the directory in which we are standing.
由于命令行界面无法提供文件系统结构的图形图片,我们必须采用不同的方式来表示它。为此,将文件系统树视为一个迷宫,并且我们正在其中。在任何给定的时刻,我们位于单个目录中。在该目录中,我们可以看到其文件以及到其父目录和所处目录的子目录的路径。
The directory we are standing in is called the working directory. To see the name of the working directory, we use the pwd command.
我们所处的目录称为工作目录。要查看工作目录的名称,我们使用pwd命令。
| |
When we first log on to our Linux system, the working directory is set to our home directory. This is where we put our files. On most systems, the home directory will be called /home/user_name, but it can be anything according to the whims of the system administrator.
当我们首次登录到Linux系统时,工作目录设置为我们的主目录。这是我们放置文件的地方。在大多数系统上,主目录将被称为/home/user_name,但根据系统管理员的喜好,它可以是任何名称。
To list the files in the working directory, we use the ls command.
要列出工作目录中的文件,我们使用ls命令。
| |
We will come back to ls in the next lesson. There are a lot of fun things you can do with it, but we have to talk about pathnames and directories a bit first.
我们将在下一课中回到ls命令。你可以用它做很多有趣的事情,但首先我们需要讨论路径名和目录的一些内容。
cd
To change the working directory (where we are standing in the maze) we use the cd command. To do this, we type cd followed by the pathname of the desired working directory. A pathname is the route we take along the branches of the tree to get to the directory we want. Pathnames can be specified two different ways; absolute pathnames or relative pathnames. Let’s look with absolute pathnames first.
要更改工作目录(我们在迷宫中的位置),我们使用cd命令。为此,我们输入cd,然后输入所需工作目录的路径名。路径名是我们沿树的分支行进以到达所需目录或文件的路径。路径名可以用两种不同的方式指定:绝对路径名或相对路径名。让我们首先看一下绝对路径名。
An absolute pathname begins with the root directory and follows the tree branch by branch until the path to the desired directory or file is completed. For example, there is a directory on your system in which most programs are installed. The pathname of the directory is /usr/bin. This means from the root directory (represented by the leading slash in the pathname) there is a directory called “usr” which contains a directory called “bin”.
绝对路径名以根目录开始,沿树的每个分支一直到完成到达所需目录或文件的路径。例如,你的系统上有一个大多数程序安装在其中的目录。该目录的路径名为/usr/bin。这意味着从根目录(路径名中的前导斜杠表示根目录)开始,有一个名为"usr"的目录,其中包含一个名为"bin"的目录。
Let’s try this out:
让我们试一下:
| |
Now we can see that we have changed the current working directory to /usr/bin and that it is full of files. Notice how the shell prompt has changed? As a convenience, it is usually set up to display the name of the working directory.
现在我们可以看到我们已经将当前工作目录更改为/usr/bin,而且它充满了文件。注意到shell提示符已经改变了吗?作为方便起见,它通常设置为显示工作目录的名称。
Where an absolute pathname starts from the root directory and leads to its destination, a relative pathname starts from the working directory. To do this, it uses a couple of special notations to represent relative positions in the file system tree. These special notations are “.” (dot) and “..” (dot dot).
绝对路径名从根目录开始并导向目标目录,而相对路径名从工作目录开始。为此,它使用两个特殊符号来表示文件系统树中的相对位置。这些特殊符号是"."(点)和".."(点点)。
The “.” notation refers to the working directory itself and the “..” notation refers to the working directory’s parent directory. Here is how it works. Let’s change the working directory to /usr/bin again:
“.“符号表示工作目录本身,”..“符号表示工作目录的父目录。以下是它的工作原理。让我们再次将工作目录更改为/usr/bin:
| |
O.K., now let’s say that we wanted to change the working directory to the parent of /usr/bin which is /usr. We could do that two different ways. First, with an absolute pathname:
好了,现在假设我们想将工作目录更改为/usr/bin的父目录,即/usr。我们可以用两种不同的方式来做到这一点。首先,使用绝对路径名:
| |
Or, with a relative pathname:
或者,使用相对路径名:
| |
Two different methods with identical results. Which one should we use? The one that requires the least typing!
两种方法得到相同的结果。我们应该使用哪个方法呢?使用输入最少的那个!
Likewise, we can change the working directory from /usr to /usr/bin in two different ways. First using an absolute pathname:
同样地,我们可以用两种不同的方式将工作目录从/usr更改为/usr/bin。首先使用绝对路径名:
| |
Or, with a relative pathname:
或者,使用相对路径名:
| |
Now, there is something important that we must point out here. In most cases, we can omit the “./”. It is implied. Typing:
现在,这里有一些重要的事情要指出。在大多数情况下,我们可以省略”./",它会被默认添加。输入:
| |
would do the same thing. In general, if we do not specify a pathname to something, the working directory will be assumed. There is one important exception to this, but we won’t get to that for a while.
将会产生相同的效果。通常情况下,如果我们没有指定路径名,那么将假定为工作目录。但有一个重要的例外,不过我们要等一会儿再讨论它。
一些快捷方式 A Few Shortcuts
If we type cd followed by nothing, cd will change the working directory to our home directory.
如果我们只输入cd而不跟任何内容,cd命令将会将工作目录切换为我们的主目录。
A related shortcut is to type cd ~user_name. In this case, cd will change the working directory to the home directory of the specified user.
相关的快捷方式是输入cd ~user_name。这种情况下,cd将会将工作目录切换为指定用户的主目录。
Typing cd - changes the working directory to the previous one.
输入cd -将工作目录切换为上一个目录。
文件名的重要事实 Important facts about file names
- File names that begin with a period character are hidden. This only means that
lswill not list them unless we sayls -a. When your account was created, several hidden files were placed in your home directory to configure things for your account. Later on we will take a closer look at some of these files to see how you can customize our environment. In addition, some applications will place their configuration and settings files in your home directory as hidden files. - 以句点字符开头的文件名是隐藏的。这仅意味着除非我们使用
ls -a命令,否则ls不会列出它们。在创建您的帐户时,系统会在主目录中放置一些隐藏文件来为您的帐户配置一些东西。稍后我们将仔细查看其中的一些文件,了解如何自定义我们的环境。此外,一些应用程序会将它们的配置和设置文件作为隐藏文件放置在您的主目录中。 - File names in Linux, like Unix, are case sensitive. The file names “File1” and “file1” refer to different files.
- Linux中的文件名(如Unix)区分大小写。文件名"File1"和"file1"表示不同的文件。
- Linux has no concept of a “file extension” like Windows systems. You may name files any way you like. However, while Linux itself does not care about file extensions, many application programs do.
- Linux没有类似于Windows系统的"文件扩展名"的概念。您可以按任意方式命名文件。但是,尽管Linux本身不关心文件扩展名,但许多应用程序程序则关心。
- Though Linux supports long file names which may contain embedded spaces and punctuation characters, limit the punctuation characters to period, dash, and underscore. Most importantly, do not embed spaces in file names. If you want to represent spaces between words in a file name, use underscore characters. You will thank yourself later.
- 虽然Linux支持长文件名,可以包含嵌入的空格和标点符号字符,但标点符号字符应限制为句点、破折号和下划线。最重要的是,不要在文件名中嵌入空格。如果要表示文件名中的单词之间的空格,请使用下划线字符。以后您会感谢自己这么做。
2.3 - 四处浏览
四处浏览 Looking Around
https://linuxcommand.org/lc3_lts0030.php
Now that we know how to move from working directory to working directory, we’re going to take a tour of our Linux system and, along the way, learn some things about what makes it tick. But before we begin, we have to learn about some tools that will come in handy during our journey. These are:
现在我们知道如何从一个工作目录移动到另一个工作目录了,我们将在 Linux 系统中进行一次浏览,并在此过程中了解一些关于 Linux 运行的原理的知识。但在开始之前,我们必须学习一些在我们的旅程中会派上用场的工具。它们是:
ls(list files and directories)less(view text files)file(classify a file’s contents)ls(列出文件和目录)less(查看文本文件)file(对文件进行分类)
ls
The ls command is used to list the contents of a directory. It is probably the most commonly used Linux command. It can be used in a number of different ways. Here are some examples:
ls 命令用于列出目录的内容。它可能是最常用的 Linux 命令之一。它可以以多种不同的方式使用。以下是一些示例:
| 命令 Command | 结果 Result |
|---|---|
ls | 列出当前工作目录中的文件 List the files in the working directory |
ls /bin | 列出 /bin 目录中的文件(或其他任何我们关心的目录)List the files in the /bin directory (or any other directory we care to specify) |
ls -l | 以长格式列出当前工作目录中的文件 List the files in the working directory in long format |
ls -l /etc /bin | 以长格式列出 /bin 目录和 /etc 目录中的文件List the files in the /bin directory and the /etc directory in long format |
ls -la .. | 以长格式列出父目录中的所有文件(甚至是以句点字符开头的文件,通常是隐藏的) List all files (even ones with names beginning with a period character, which are normally hidden) in the parent of the working directory in long format |
These examples also point out an important concept about commands. Most commands operate like this:
这些示例还指出了关于命令的一个重要概念。大多数命令的操作方式类似于:
command -options arguments
where command is the name of the command, -options is one or more adjustments to the command’s behavior, and arguments is one or more “things” upon which the command operates.
其中 command 是命令的名称,-options 是对命令行为进行的一个或多个调整,arguments 是命令操作的一个或多个"东西"。
In the case of ls, we see that ls is the name of the command, and that it can have one or more options, such as -a and -l, and it can operate on one or more files or directories.
在 ls 的情况下,我们可以看到 ls 是命令的名称,它可以有一个或多个选项,比如 -a 和 -l,并且可以操作一个或多个文件或目录。
更详细的长格式 A Closer Look at Long Format
If we use the -l option with ls, you will get a file listing that contains a wealth of information about the files being listed. Here’s an example:
如果我们在 ls 命令中使用 -l 选项,将会得到一个包含有关所列出文件的丰富信息的文件列表。这里有一个示例:
-rw-------   1 me       me            576 Apr 17  2019 weather.txt
drwxr-xr-x   6 me       me           1024 Oct  9  2019 web_page
-rw-rw-r--   1 me       me         276480 Feb 11 20:41 web_site.tar
-rw-------   1 me       me           5743 Dec 16  2018 xmas_file.txt

----------     -------  -------  -------- ------------ -------------
    |             |        |         |         |             |
    |             |        |         |         |         File Name
    |             |        |         |         |
    |             |        |         |         +---  Modification Time
    |             |        |         |
    |             |        |         +-------------   Size (in bytes)
    |             |        |
    |             |        +-----------------------        Group
    |             |
    |             +--------------------------------        Owner
    |
    +----------------------------------------------   File Permissions
文件名 File Name
The name of the file or directory.
文件或目录的名称。
修改时间 Modification Time
The last time the file was modified. If the last modification occurred more than six months in the past, the date and year are displayed. Otherwise, the time of day is shown.
文件最后一次修改的时间。如果最后一次修改是在六个月以上之前,将显示日期和年份。否则,显示具体时间。
大小 Size
The size of the file in bytes.
文件的大小(以字节为单位)。
组 Group
The name of the group that has file permissions in addition to the file’s owner.
除了文件所有者外,具有文件权限的组的名称。
所有者 Owner
The name of the user who owns the file.
文件的所有者的用户名。
文件权限 File Permissions
A representation of the file’s access permissions. The first character is the type of file. A “-” indicates a regular (ordinary) file. A “d” indicates a directory. The second set of three characters represent the read, write, and execution rights of the file’s owner. The next three represent the rights of the file’s group, and the final three represent the rights granted to everybody else. We’ll discuss this in more detail in a later lesson.
文件访问权限的表示形式。第一个字符表示文件的类型。"-" 表示普通文件,“d” 表示目录。接下来的三个字符表示文件所有者的读取、写入和执行权限。接下来的三个字符表示文件所属组的权限,最后的三个字符表示授予其他人的权限。我们将在以后的课程中详细讨论这个。
less
less is a program that lets us view text files. This is very handy since many of the files used to control and configure Linux are human readable.
less 是一个用于查看文本文件的程序。这非常方便,因为用于控制和配置 Linux 的许多文件都是可读的。
什么是"文本"? What is “text”?
There are many ways to represent information on a computer. All methods involve defining a relationship between the information and some numbers that will be used to represent it. Computers, after all, only understand numbers and all data is converted to numeric representation.
在计算机上表示信息有许多方式。所有的方法都涉及将信息与一些数字之间的关系定义起来,这些数字将用于表示它。毕竟,计算机只能理解数字,所有的数据都被转换为数字表示。
Some of these representation systems are very complex (such as compressed multimedia files), while others are rather simple. One of the earliest and simplest is called ASCII text. ASCII (pronounced “As-Key”) is short for American Standard Code for Information Interchange. This is a simple encoding scheme that was first used on Teletype machines to map keyboard characters to numbers.
其中一些表示系统非常复杂(例如压缩的多媒体文件),而其他一些则相当简单。其中一种最早和最简单的表示系统被称为 ASCII 文本。ASCII(发音为"As-Key")是美国信息交换标准代码的缩写。这是一种简单的编码方案,最初在电传打字机上用于将键盘字符映射到数字。
Text is a simple one-to-one mapping of characters to numbers. It is very compact. Fifty characters of text translates to fifty bytes of data. Throughout a Linux system, many files are stored in text format and there are many Linux tools that work with text files. Even Windows systems recognize the importance of this format. The well-known NOTEPAD.EXE program is an editor for plain ASCII text files.
文本是字符与数字之间的简单一对一映射。它非常紧凑。五十个字符的文本转换为五十个字节的数据。在 Linux 系统中,许多文件都以文本格式存储,并且有许多 Linux 工具可以处理文本文件。即使在 Windows 系统中,也认识到这种格式的重要性。著名的 NOTEPAD.EXE 程序就是用于编辑纯 ASCII 文本文件的编辑器。
The less program is invoked by simply typing:
通过简单地键入以下命令即可调用 less 程序:
less text_file
This will display the file.
这将显示文件内容。
控制 less - Controlling less
Once started, less will display the text file one page at a time. We can use the Page Up and Page Down keys to move through the text file. To exit less, we type “q”. Here are some commands that less will accept:
启动后,less 将逐页显示文本文件。我们可以使用 Page Up 和 Page Down 键在文本文件中进行导航。要退出 less,我们输入 “q”。以下
| 命令 Command | 操作 Action |
|---|---|
| Page Up or b | 向上滚动一页 Scroll back one page |
| Page Down or space | 向下滚动一页 Scroll forward one page |
| G | 转到文本文件的末尾 Go to the end of the text file |
| 1G | 转到文本文件的开头 Go to the beginning of the text file |
| /characters | 在文本文件中向前搜索指定的 characters Search forward in the text file for an occurrence of the specified characters |
| n | 重复上一次搜索 Repeat the previous search |
| h | 显示完整的 less 命令和选项列表Display a complete list less commands and options |
| q | 退出 lessQuit |
file
As we wander around our Linux system, it is helpful to determine what kind of data a file contains before we try to view it. This is where the file command comes in. file will examine a file and tell us what kind of file it is.
在我们浏览 Linux 系统时,在尝试查看文件之前,确定文件包含的数据类型很有帮助。这就是 file 命令的用处。file 命令将检查一个文件并告诉我们它是什么类型的文件。
To use the file program, we just type:
要使用 file 程序,只需键入:
file name_of_file
The file program can recognize most types of files, such as:
file 程序可以识别大多数类型的文件,例如:
| 文件类型 File Type | 描述 Description | 可作为文本查看?Viewable as text? |
|---|---|---|
| ASCII text | 名称已经说得很清楚了 The name says it all | yes |
| Bourne-Again shell script text | 一个 bash 脚本A bash script | yes |
| ELF 64-bit LSB executable | 可执行二进制程序 An executable binary program | no |
| ELF 64-bit LSB shared object | 共享库 A shared library | no |
| GNU tar archive | 录音带存档文件。一种常见的存储文件组的方式 A tape archive file. A common way of storing groups of files. | no, use tar tvf to view listing. |
| gzip compressed data | 用 gzip 压缩的归档An archive compressed with gzip | no |
| HTML document text | 网页 A web page | yes |
| JPEG image data | 压缩的 JPEG 图像 A compressed JPEG image | no |
| PostScript document text | 一个 PostScript 文件 A PostScript file | yes |
| Zip archive data | 用 zip 压缩的归档An archive compressed with zip | no |
While it may seem that most files cannot be viewed as text, a surprising number can be. This is especially true of the important configuration files. During our adventure we will see that many features of the operating system are controlled by text configuration files and shell scripts. In Linux, there are no secrets!
虽然看起来大多数文件都不能作为文本查看,但实际上有相当多的文件可以。这在重要的配置文件中尤其如此。在我们的探险中,我们将看到操作系统的许多功能都由文本配置文件和 shell 脚本控制。在 Linux 中,没有秘密!
2.4 - 导览
导览 - A Guided Tour
https://linuxcommand.org/lc3_lts0040.php
It’s time to take our tour. The table below lists some interesting places to explore. This is by no means a complete list, but it should prove to be an interesting adventure. For each of the directories listed below, do the following:
是时候开始我们的导览了。下面的表格列出了一些有趣的探索地点。这并不是一个完整的列表,但应该会是一次有趣的冒险。对于下面列出的每个目录,执行以下操作:
cdinto each directory.- 使用
cd进入每个目录。 - Use
lsto list the contents of the directory. - 使用
ls列出目录的内容。 - If there is an interesting file, use the
filecommand to determine its contents. - 如果有一个有趣的文件,请使用
file命令确定其内容。 - For text files, use
lessto view them. - 对于文本文件,使用
less查看它们。
| 目录 Directory | 描述 Description |
|---|---|
/ | 文件系统开始的根目录。根目录可能只包含子目录。 The root directory where the file system begins. The root directory will probably contain only subdirectories. |
/boot | Linux 内核和引导加载程序文件存放的地方。内核是一个名为 vmlinuz 的文件。This is where the Linux kernel and boot loader files are kept. The kernel is a file called vmlinuz. |
/etc | /etc 目录包含系统的配置文件。/etc 中的所有文件都应该是文本文件。一些感兴趣的地方有:/etc/passwd passwd 文件包含每个用户的基本信息。这是定义用户帐户的地方。/etc/fstab fstab 文件包含系统引导时挂载的设备表。此文件定义系统的磁盘驱动器。/etc/hosts 此文件列出系统内在本质上已知的网络主机名和 IP 地址。/etc/init.d 此目录包含在引导时启动各种系统服务的脚本。The /etc directory contains the configuration files for the system. All of the files in /etc should be text files. Some points of interest are:/etc/passwdThe passwd file contains the essential information for each user. This is where user accounts are defined./etc/fstabThe fstab file contains a table of devices that get mounted when the system boots. This file defines the system’s disk drives./etc/hostsThis file lists the network host names and IP addresses that are intrinsically known to the system./etc/init.dThis directory contains the scripts that start various system services at boot time. |
/bin, /usr/bin | 这两个目录包含系统的大多数程序。/bin 目录包含系统运行所需的基本程序,而 /usr/bin 包含系统用户的应用程序。These two directories contain most of the programs for the system. The /bin directory has the essential programs that the system requires to operate, while /usr/bin contains applications for the system’s users. |
/sbin, /usr/sbin | sbin 目录包含系统管理的程序,主要供超级用户使用。The sbin directories contain programs for system administration, mostly for use by the superuser. |
/usr | /usr 目录包含支持用户应用程序的各种内容。一些亮点:/usr/share/X11 X Window 系统的支持文件。/usr/share/dict 拼写检查器的词典。是的,Linux 自带拼写检查器。参见 look 和 aspell。/usr/share/doc 各种格式的文档文件。/usr/share/man 手册页保存在这里。The /usr directory contains a variety of things that support user applications. Some highlights:/usr/share/X11Support files for the X Window system/usr/share/dictDictionaries for the spelling checker. Yes, Linux comes with a spelling checker. See look and aspell./usr/share/docVarious documentation files in a variety of formats./usr/share/manThe man pages are kept here. |
/usr/local | /usr/local 及其子目录用于安装本地机器上的软件和其他文件。这实际上意味着不是官方发行版的软件(通常放在 /usr/bin 中)放在这里。当您找到有趣的程序要安装到系统上时,它们应该安装在其中一个 /usr/local 目录中。最常选择的目录是 /usr/local/bin。/usr/local and its subdirectories are used for the installation of software and other files for use on the local machine. What this really means is that software that is not part of the official distribution (which usually goes in /usr/bin) goes here. When you find interesting programs to install on your system, they should be installed in one of the /usr/local directories. Most often, the directory of choice is /usr/local/bin. |
/var | /var 目录包含随系统运行而发生变化的文件。包括:/var/log 包含日志文件的目录。这些文件在系统运行时更新。定期查看此目录中的文件是监视系统健康状况的一个好办法。/var/spool 此目录用于保存排队等待某些进程处理的文件,例如邮件和打印作业。当用户的邮件首次到达本地系统时(假设它具有本地邮件,在现代非邮件服务器的计算机上很少见),消息首先存储在 /var/spool/mail 中。The /var directory contains files that change as the system is running. This includes:/var/logDirectory that contains log files. These are updated as the system runs. It’s a good idea to view the files in this directory from time to time, to monitor the health of your system./var/spoolThis directory is used to hold files that are queued for some process, such as mail messages and print jobs. When a user’s mail first arrives on the local system (assuming it has local mail, a rare occurrence on modern machines that are not mail servers), the messages are first stored in /var/spool/mail |
/lib | 共享库(类似于其他操作系统中的 DLL)存放在这里。 The shared libraries (similar to DLLs in that other operating system) are kept here. |
/home | /home 是用户存储个人工作的地方。通常情况下,这是用户唯一被允许写入文件的地方。这使得事情保持整洁 :-)/home is where users keep their personal work. In general, this is the only place users are allowed to write files. This keeps things nice and clean :-) |
/root | 超级用户的主目录。 This is the superuser’s home directory. |
/tmp | /tmp 是程序可以写入其临时文件的目录。/tmp is a directory in which programs can write their temporary files. |
/dev | /dev 目录是一个特殊目录,因为它并不真正包含通常意义上的文件。相反,它包含系统可用的设备。在 Linux(类似于 Unix)中,设备被视为文件。您可以像处理文件一样读取和写入设备。例如 /dev/fd0 是第一个软盘驱动器,/dev/sda 是第一个硬盘驱动器。内核理解的所有设备都在这里表示。The /dev directory is a special directory, since it does not really contain files in the usual sense. Rather, it contains devices that are available to the system. In Linux (like Unix), devices are treated like files. You can read and write devices as though they were files. For example /dev/fd0 is the first floppy disk drive, /dev/sda is the first hard drive. All the devices that the kernel understands are represented here. |
/proc | /proc 目录也是特殊的。这个目录不包含文件。事实上,这个目录根本不存在。它完全是虚拟的。/proc 目录包含了对内核本身的小窥视孔。这个目录中有一组编号的条目,对应着系统上运行的所有进程。此外,还有许多命名条目允许访问当前系统配置。可以查看其中的许多条目。尝试查看 /proc/cpuinfo。这个条目将告诉您内核对系统的 CPU 的看法。The /proc directory is also special. This directory does not contain files. In fact, this directory does not really exist at all. It is entirely virtual. The /proc directory contains little peep holes into the kernel itself. There are a group of numbered entries in this directory that correspond to all the processes running on the system. In addition, there are a number of named entries that permit access to the current configuration of the system. Many of these entries can be viewed. Try viewing /proc/cpuinfo. This entry will tell you what the kernel thinks of the system’s CPU. |
/media | 最后,我们来到 /media,这是一个普通的目录,以特殊的方式使用。/media 目录用于 挂载点。就像我们在第二课中学到的那样,不同的物理存储设备(如硬盘驱动器)附加到文件系统树的不同位置。将设备附加到树上的过程称为 挂载。要使设备可用,必须首先将其挂载。当您的系统启动时,它会读取 /etc/fstab 文件中的挂载指令列表,该文件描述了哪个设备挂载在目录树的哪个挂载点上。这处理了硬盘驱动器,但我们还可以拥有被认为是临时的设备,如光盘和 USB 存储设备。由于这些是可移动的,它们不会一直保持挂载状态。/media 目录由现代面向桌面的 Linux 发行版中的自动设备挂载机制使用。要查看使用的设备和挂载点,请键入 mount。Finally, we come to /media, a normal directory which is used in a special way. The /media directory is used for mount points. As we learned in the second lesson, the different physical storage devices (like hard disk drives) are attached to the file system tree in various places. This process of attaching a device to the tree is called mounting. For a device to be available, it must first be mounted. When your system boots, it reads a list of mounting instructions in the /etc/fstab file, which describes which device is mounted at which mount point in the directory tree. This takes care of the hard drives, but we may also have devices that are considered temporary, such as optical disks and USB storage devices. Since these are removable, they do not stay mounted all the time. The /media directory is used by the automatic device mounting mechanisms found in modern desktop oriented Linux distributions. To see what devices and mount points are used, type mount. |
A weird kind of file…
一种奇怪的文件…
During your tour, you probably noticed a strange kind of directory entry, particularly in the
/libdirectory. When listed withls -l, you might have seen something like this: 在你的导览中,你可能注意到了一种奇怪的目录条目,尤其是在
/lib目录中。当用ls -l列出时,你可能会看到像这样的东西:lrwxrwxrwx 25 Jul 3 16:42 System.map -> /boot/System.map-4.0.36-3 -rw-r--r-- 105911 Oct 13 2018 System.map-4.0.36-0.7 -rw-r--r-- 105935 Dec 29 2018 System.map-4.0.36-3 -rw-r--r-- 181986 Dec 11 2019 initrd-4.0.36-0.7.img -rw-r--r-- 182001 Dec 11 2019 initrd-4.0.36.img lrwxrwxrwx 26 Jul 3 16:42 module-info -> /boot/module-info-4.0.36-3 -rw-r--r-- 11773 Oct 13 2018 module-info-4.0.36-0.7 -rw-r--r-- 11773 Dec 29 2018 module-info-4.0.36-3 lrwxrwxrwx 16 Dec 11 2019 vmlinuz -> vmlinuz-4.0.36-3 -rw-r--r-- 454325 Oct 13 2018 vmlinuz-4.0.36-0.7 -rw-r--r-- 454434 Dec 29 2018 vmlinuz-4.0.36-3Notice the files,
System.map, module-infoandvmlinuz. See the strange notation after the file names?注意文件
System.map、module-info和vmlinuz。看到文件名后面的奇怪符号了吗?Files such as this are called symbolic links. Symbolic links are a special type of file that points to another file. With symbolic links, it is possible for a single file to have multiple names. Here’s how it works: Whenever the system is given a file name that is a symbolic link, it transparently maps it to the file it is pointing to.
此类文件称为 符号链接。符号链接是一种特殊类型的文件,它指向另一个文件。通过符号链接,一个文件可以有多个名称。它的工作原理如下:每当系统获得一个符号链接的文件名时,它会自动地将其映射到指向的文件。
Just what is this good for? This is a very handy feature. Let’s consider the directory listing above (which is the
/bootdirectory of an old system). This system has had multiple versions of the Linux kernel installed. We can see this from the filesvmlinuz-4.0.36-0.7andvmlinuz-4.0.36-3. These file names suggest that both version 4.0.36-0.7 and 4.0.36-3 are installed. Because the file names contain the version it is easy to see the differences in the directory listing. However, this would be confusing to programs that rely on a fixed name for the kernel file. These programs might expect the kernel to simply be called"vmlinuz". Here is where the beauty of the symbolic link comes in. By creating a symbolic link calledvmlinuzthat points tovmlinuz-4.0.36-3, we have solved the problem. 这有什么用呢?这是一个非常方便的功能。让我们来看看上面的目录列表(这是一个旧系统的
/boot目录)。该系统安装了多个版本的 Linux 内核,我们可以从文件vmlinuz-4.0.36-0.7和vmlinuz-4.0.36-3看出这一点。这些文件名表明安装了版本 4.0.36-0.7 和 4.0.36-3。由于文件名包含版本信息,因此很容易在目录列表中看到它们之间的差异。然而,对于依赖于固定名称的内核文件的程序来说,这可能会造成困惑。这些程序可能期望内核简单地称为"vmlinuz"。这就是符号链接的优点所在。通过创建一个名为vmlinuz的符号链接,它指向vmlinuz-4.0.36-3,我们解决了这个问题。To create symbolic links, we use the
lncommand. 要创建符号链接,我们使用
ln命令。
进一步阅读 Further Reading
- To learn more about the organization of the Linux filesystem, consult the Filesystem Hierarchy Standard
- 要了解更多关于 Linux 文件系统组织的信息,请参阅文件系统层次结构标准(Filesystem Hierarchy Standard)。
2.5 - 操作文件
操作文件 Manipulating Files
https://linuxcommand.org/lc3_lts0050.php
This lesson will introduce the following commands:
本课程将介绍以下命令:
cp- copy files and directoriesmv- move or rename files and directoriesrm- remove files and directoriesmkdir- create directoriescp- 复制文件和目录mv- 移动或重命名文件和目录rm- 删除文件和目录mkdir- 创建目录
These four commands are among the most frequently used Linux commands. They are the basic commands for manipulating both files and directories.
这四个命令是最常用的 Linux 命令之一。它们是用于操作文件和目录的基本命令。
Now, to be frank, some of the tasks performed by these commands are more easily done with a graphical file manager. With a file manager, you can drag and drop a file from one directory to another, cut and paste files, delete files, etc. So why use these old command line programs?
说实话,其中一些命令执行的任务可以更容易地通过图形文件管理器完成。使用文件管理器,您可以将文件从一个目录拖放到另一个目录,剪切和粘贴文件,删除文件等等。那么为什么要使用这些老旧的命令行程序呢?
The answer is power and flexibility. While it is easy to perform simple file manipulations with a graphical file manager, complicated tasks can be easier with the command line programs. For example, how would you copy all the HTML files from one directory to another, but only copy files that did not exist in the destination directory or were newer than the versions in the destination directory? Pretty hard with with a file manager. Pretty easy with the command line:
答案是权力和灵活性。虽然使用图形文件管理器可以执行简单的文件操作,但使用命令行程序可以更容易地处理复杂的任务。例如,如何将一个目录中的所有 HTML 文件复制到另一个目录,但只复制目标目录中不存在或比目标目录中的版本更新的文件?使用文件管理器可能会很困难,但使用命令行却很简单:
| |
通配符 Wildcards
Before we begin with our commands, we’ll first look at a shell feature that makes these commands so powerful. Since the shell uses filenames so much, it provides special characters to help you rapidly specify groups of filenames. These special characters are called wildcards. Wildcards allow you to select filenames based on patterns of characters. The table below lists the wildcards and what they select:
在开始使用这些命令之前,我们首先来看一下使这些命令如此强大的一个 shell 特性。由于 shell 经常使用文件名,它提供了一些特殊字符,可以帮助您快速指定文件名的组。这些特殊字符称为 通配符。通配符允许您根据字符模式选择文件名。下表列出了通配符及其选择的内容:
| 通配符 Wildcard | 含义 Meaning |
|---|---|
| * | 匹配任意字符 Matches any characters |
| ? | 匹配任意单个字符 Matches any single character |
| [characters] | 匹配字符集中的任意字符。字符集也可以表示为 POSIX 字符类,如下所示:POSIX 字符类 [:alnum:] 字母数字字符 [:alpha:] 字母字符 [:digit:] 数字字符 [:upper:] 大写字母字符 [:lower:] 小写字母字符 Matches any character that is a member of the set characters. The set of characters may also be expressed as a POSIX character class such as one of the following:POSIX Character Classes [:alnum:] Alphanumeric characters [:alpha:]Alphabetic characters [:digit:] Numerals [:upper:] Uppercase alphabetic characters [:lower:] Lowercase alphabetic characters |
| [!characters] | 匹配不属于字符集中的任意字符 Matches any character that is not a member of the set characters |
Using wildcards, it is possible to construct very sophisticated selection criteria for filenames. Here are some examples of patterns and what they match:
使用通配符,可以构造非常复杂的文件名选择条件。以下是一些模式示例及其匹配的内容:
| 模式 Pattern | 匹配 Matches |
|---|---|
* | 所有文件名 All filenames |
g* | 以字母 “g” 开头的所有文件名 All filenames that begin with the character “g” |
b*.txt | 以字母 “b” 开头且以 “.txt” 结尾的所有文件名 All filenames that begin with the character “b” and end with the characters “.txt” |
Data??? | 以 “Data” 开头后面紧跟着恰好 3 个字符的文件名 Any filename that begins with the characters “Data” followed by exactly 3 more characters |
[abc]* | 以 “a”、“b” 或 “c” 开头后面跟着任意其他字符的文件名 Any filename that begins with “a” or “b” or “c” followed by any other characters |
[[:upper:]]* | 以大写字母开头的任何文件名。这是字符类的一个示例。 Any filename that begins with an uppercase letter. This is an example of a character class. |
BACKUP.[[:digit:]][[:digit:]] | 另一个字符类的示例。此模式匹配以 “BACKUP.” 开头后面紧跟着恰好两个数字的文件名。 Another example of character classes. This pattern matches any filename that begins with the characters “BACKUP.” followed by exactly two numerals. |
*[![:lower:]] | 不以小写字母结尾的任何文件名 Any filename that does not end with a lowercase letter. |
We can use wildcards with any command that accepts filename arguments.
我们可以在接受文件名参数的任何命令中使用通配符。
cp
The cp program copies files and directories. In its simplest form, it copies a single file:
cp 程序用于复制文件和目录。在最简单的形式中,它可以复制单个文件:
| |
It can also be used to copy multiple files (and/or directories) to a different directory:
它还可以用于将多个文件(和/或目录)复制到不同的目录:
| |
A note on notation: … signifies that an item can be repeated one or more times.
关于符号的说明: … 表示一个项目可以重复一次或多次。
Other useful examples of cp and its options include:
cp 和其选项的其他有用示例包括:
| 命令 Command | 结果 Results |
|---|---|
cp file1 file2 | 将 file1 的内容复制到 file2。如果 file2 不存在,则创建它;否则,file2 将被 file1 的内容静默覆盖。 Copies the contents of file1 into file2. If file2 does not exist, it is created; otherwise, file2 is silently overwritten with the contents of file1. |
cp -i file1 file2 | 与上面相同,然而,由于指定了 “-i”(交互式)选项,如果 file2 存在,则在覆盖它之前会提示用户。 Like above however, since the “-i” (interactive) option is specified, if file2 exists, the user is prompted before it is overwritten with the contents of file1. |
cp file1 dir1 | 将 file1 的内容(命名为 file1)复制到目录 dir1 内。 Copy the contents of file1 (into a file named file1) inside of directory dir1. |
cp -R dir1 dir2 | 复制目录 dir1 的内容。如果目录 dir2 不存在,则创建它。否则,它在目录 dir2 中创建一个名为 dir1 的目录。 Copy the contents of the directory dir1. If directory dir2 does not exist, it is created. Otherwise, it creates a directory named dir1 within directory dir2. |
mv
The mv command moves or renames files and directories depending on how it is used. It will either move one or more files to a different directory, or it will rename a file or directory. To rename a file, it is used like this:
mv 命令根据使用方式的不同,可以移动或重命名文件和目录。要重命名文件,可以使用以下方式:
| |
To move files (and/or directories) to a different directory:
要将文件(和/或目录)移动到另一个目录:
| |
Examples of mv and its options include:
mv 和其选项的示例包括:
| 命令 Command | 结果 Results |
|---|---|
mv file1 file2 | 如果 file2 不存在,则将 file1 重命名为 file2。如果 file2存在,则它的内容将被 file1 的内容静默替换。 If file2 does not exist, then file1 is renamed file2. If file2 exists, its contents are silently replaced with the contents of file1. |
mv -i file1 file2 | 与上面相同,然而,由于指定了 “-i”(交互式)选项,如果 file2 存在,则在覆盖它之前会提示用户。 Like above however, since the “-i” (interactive) option is specified, if file2 exists, the user is prompted before it is overwritten with the contents of file1. |
mv file1 file2 dir1 | 将文件 file1 和 file2 移动到目录 dir1。如果 dir1 不存在,mv 将报错退出。The files file1 and file2 are moved to directory dir1. If dir1 does not exist, mv will exit with an error. |
mv dir1 dir2 | 如果 dir2 不存在,则将 dir1 重命名为 dir2。如果 dir2 存在,则将目录 dir1 移动到目录 dir2 中。 If dir2 does not exist, then dir1 is renamed dir2. If dir2 exists, the directory dir1 is moved within directory dir2. |
rm
The rm command removes (deletes) files and directories.
rm 命令用于删除文件和目录。
| |
Using the recursive option (-r), rm can also be used to delete directories:
使用递归选项(-r),rm 还可以用于删除目录:
| |
Examples of rm and its options include:
rm 和其选项的示例包括:
| 命令 Command | 结果 Results |
|---|---|
rm file1 file2 | 删除 file1 和 file2。 Delete file1 and file2. |
rm -i file1 file2 | 与上面相同,然而,由于指定了 “-i”(交互式)选项,每个文件被删除之前会提示用户。 Like above however, since the “-i” (interactive) option is specified, the user is prompted before each file is deleted. |
rm -r dir1 dir2 | 删除目录 dir1 和 dir2 及其所有内容。 Directories dir1 and dir2 are deleted along with all of their contents. |
在使用 rm 时要小心! Be careful with rm!
Linux does not have an undelete command. Once you delete something with rm, it’s gone. You can inflict terrific damage on your system with rm if you are not careful, particularly with wildcards.
Linux 没有恢复命令。一旦使用 rm 删除了某个东西,它就消失了。如果不小心使用 rm,特别是使用通配符,可能会对系统造成严重的破坏。
*Before you use rm with wildcards, try this helpful trick:* construct your command using ls instead. By doing this, you can see the effect of your wildcards before you delete files. After you have tested your command with ls, recall the command with the up-arrow key and then substitute rm for ls in the command.
在使用带有通配符的 rm 之前,试试这个有用的技巧: 使用 ls 构建命令。这样,您可以在删除文件之前查看通配符的效果。在使用 ls 测试过命令后,可以使用上箭头键召回命令,然后在命令中将 ls 替换为 rm。
mkdir
The mkdir command is used to create directories. To use it, you simply type:
mkdir 命令用于创建目录。只需键入:
| |
使用通配符的命令 Using Commands with Wildcards
Since the commands we have covered here accept multiple file and directories names as arguments, you can use wildcards to specify them. Here are a few examples:
由于我们在这里介绍的命令接受多个文件和目录名称作为参数,您可以使用通配符来指定它们。以下是一些示例:
| 命令 Command | 结果 Results |
|---|---|
cp *.txt text_files | 将当前工作目录中以 “.txt” 结尾的所有文件复制到名为 “text_files” 的现有目录中。 Copy all files in the current working directory with names ending with the characters “.txt” to an existing directory named text_files. |
mv dir1 ../*.bak dir2 | 将子目录 “dir1” 和当前工作目录的父目录中以 “.bak” 结尾的所有文件移动到名为 “dir2” 的现有目录中。 Move the subdirectory dir1 and all the files ending in “.bak” in the current working directory’s parent directory to an existing directory named dir2. |
rm *~ | 删除当前工作目录中以字符 “~” 结尾的所有文件。某些应用程序使用此命名方案创建备份文件。使用此命令将清理目录中的备份文件。 Delete all files in the current working directory that end with the character “~”. Some applications create backup files using this naming scheme. Using this command will clean them out of a directory. |
进一步阅读 Further Reading
- Chapter 4 of The Linux Command Line covers this topic in more detail
- Linux 命令行第 4 章对这个主题进行了更详细的讨论。
2.6 - 使用命令
使用命令 - Working with Commands
https://linuxcommand.org/lc3_lts0060.php
Up until now, we have seen a number of commands and their mysterious options and arguments. In this lesson, we will try to remove some of that mystery. We will introduce the following commands.
到目前为止,我们已经看到了许多命令及其神秘的选项和参数。在本课程中,我们将尝试消除其中的一些神秘感。我们将介绍以下命令。
type- Display information about command typewhich- Locate a commandhelp- Display reference page for shell builtinman- Display an on-line command referencetype- 显示命令类型的信息which- 定位一个命令help- 显示内置shell命令的参考页面man- 显示在线命令参考
什么是"命令"? What are “Commands?”
Commands can be one of 4 different kinds:
命令可以是以下4种不同类型之一:
- An executable program like all those files we saw in /usr/bin. Within this category, programs can be compiled binaries such as programs written in C and C++, or programs written in scripting languages such as the shell, Perl, Python, Ruby, etc.
- 可执行程序,如我们在 /usr/bin 中看到的所有文件。在此类别中,程序可以是编译的二进制文件,例如用 C 和 C++ 编写的程序,或者是用脚本语言(如Shell、Perl、Python、Ruby等)编写的程序。
- A command built into the shell itself. bash provides a number of commands internally called shell builtins. The
cdcommand, for example, is a shell builtin. - 内置于shell本身的命令。bash 提供了许多称为shell内置命令的内部命令。例如,
cd命令就是一个内置命令。 - A shell function. These are miniature shell scripts incorporated into the environment. We will cover configuring the environment and writing shell functions in later lessons, but for now, just be aware that they exist.
- shell函数。这些是嵌入到环境中的小型shell脚本。我们将在后面的课程中介绍配置环境和编写shell函数,但现在只需要知道它们的存在即可。
- An alias. Commands that we can define ourselves, built from other commands. This will be covered in a later lesson.
- 别名。我们可以自定义的由其他命令构建的命令。这将在后面的课程中介绍。
识别命令 Identifying Commands
It is often useful to know exactly which of the four kinds of commands is being used and Linux provides a couple of ways to find out.
通常,了解正在使用的四种命令类型中的哪一种非常有用,Linux 提供了几种方法来找到答案。
type
The type command is a shell builtin that displays the kind of command the shell will execute, given a particular command name. It works like this:
type 命令是一个内置于shell的命令,它显示给定命令名称的命令类型。它的使用方法如下:
| |
where “command” is the name of the command we want to examine. Here are some examples:
其中 “command” 是我们想要检查的命令的名称。下面是一些示例:
| |
Here we see the results for three different commands. Notice that the one for ls and how the ls command is actually an alias for the ls command with the “– color=auto” option added. Now we know why the output from ls is displayed in color!
这里我们看到了三个不同命令的结果。注意 ls 命令的结果,ls 实际上是 ls 命令的一个别名,并添加了 --color=auto 选项。现在我们知道为什么 ls 命令的输出显示为彩色了!
which
Sometimes there is more than one version of an executable program installed on a system. While this is not very common on desktop systems, it’s not unusual on large servers. To determine the exact location of a given executable, the which command is used:
有时在系统上安装了一个可执行程序的多个版本。尽管在桌面系统上这种情况并不常见,但在大型服务器上并不罕见。为了确定给定可执行程序的确切位置,可以使用 which 命令:
| |
which only works for executable programs, not builtins nor aliases that are substitutes for actual executable programs.
which 仅适用于可执行程序,而不适用于内置命令或替代实际可执行程序的别名。
获取命令文档 Getting Command Documentation
With this knowledge of what a command is, we can now search for the documentation available for each kind of command.
有了对命令的了解,我们现在可以搜索每种类型命令可用的文档。
help
bash has a built-in help facility available for each of the shell builtins. To use it, type “help” followed by the name of the shell builtin. Optionally, we can add the -m option to change the format of the output. For example:
bash 为每个shell内置命令提供了一个内置的帮助功能。要使用它,键入“help”,然后是shell内置命令的名称。我们还可以添加 -m 选项以更改输出的格式。例如:
| |
A note on notation: When square brackets appear in the description of a command’s syntax, they indicate optional items. A vertical bar character indicates mutually exclusive items. In the case of the cd command above:
关于符号的说明: 当命令语法的描述中出现方括号时,表示这些是可选项。竖线字符表示互斥的选项。对于上面的 cd 命令:
| |
This notation says that the command cd may be followed optionally by either a “-L” or a “-P” and further, optionally followed by the argument “dir”.
这个符号说明表示 cd 命令后面可以选择跟着“-L”或者“-P”,然后再可选地跟着参数“dir”。
--help
Many executable programs support a “--help” option that displays a description of the command’s supported syntax and options. For example:
许多可执行程序支持“--help”选项,它会显示命令的支持语法和选项的描述。例如:
| |
Some programs don’t support the “–help” option, but try it anyway. Often it results in an error message that will reveal similar usage information.
有些程序不支持“--help”选项,但还是可以尝试一下。通常会显示出一个错误消息,其中包含类似的使用信息。
man
Most executable programs intended for command line use provide a formal piece of documentation called a manual or man page. A special paging program called man is used to view them. It is used like this:
大多数用于命令行的可执行程序都提供了一份正式的文档,称为手册或man页。用于查看它们的特殊分页程序称为 man。使用方法如下:
| |
where “program” is the name of the command to view. Man pages vary somewhat in format but generally contain a title, a synopsis of the command’s syntax, a description of the command’s purpose, and a listing and description of each of the command’s options. Man pages, however, do not usually include examples, and are intended as a reference, not a tutorial. Let’s try viewing the man page for the ls command:
其中“program”是要查看的命令的名称。Man页的格式有所不同,但通常包含标题、命令语法的概述、命令目的的描述以及每个命令选项的列表和描述。不过,Man页通常不包含示例,并且旨在作为参考而不是教程。让我们尝试查看 ls 命令的 man 页:
| |
On most Linux systems, man uses less to display the manual page, so all of the familiar less commands work while displaying the page.
在大多数Linux系统上,man 使用 less 来显示手册页,因此在显示页面时可以使用所有熟悉的 less 命令。
README和其他文档文件 - README and Other Documentation Files
Many software packages installed on your system have documentation files residing in the /usr/share/doc directory. Most of these are stored in plain text format and can be viewed with less. Some of the files are in HTML format and can be viewed with a web browser. We may encounter some files ending with a “.gz” extension. This indicates that they have been compressed with the gzip compression program. The gzip package includes a special version of less called zless that will display the contents of gzip-compressed text files.
安装在系统上的许多软件包在 /usr/share/doc 目录中有文档文件。其中大多数以纯文本格式存储,并可以使用 less 查看。其中一些文件是HTML格式的,可以使用Web浏览器查看。可能会遇到一些以“.gz”扩展名结尾的文件。这表示它们已使用gzip压缩程序进行了压缩。gzip软件包包含一个名为zless的特殊版本的less,可以显示gzip压缩的文本文件的内容。
2.7 - 输入/输出重定向
输入/输出重定向 - I/O Redirection
https://linuxcommand.org/lc3_lts0070.php
In this lesson, we will explore a powerful feature used by command line programs called input/output redirection. As we have seen, many commands such as ls print their output on the display. This does not have to be the case, however. By using some special notations we can redirect the output of many commands to files, devices, and even to the input of other commands.
在这个课程中,我们将探索命令行程序中使用的一项强大功能,称为输入/输出重定向。正如我们所见,许多命令(如 ls)将它们的输出打印到显示器上。但是,情况并非总是如此。通过使用一些特殊的符号,我们可以将许多命令的输出重定向到文件、设备,甚至其他命令的输入。
标准输出 Standard Output
Most command line programs that display their results do so by sending their results to a facility called standard output. By default, standard output directs its contents to the display. To redirect standard output to a file, the “>” character is used like this:
大多数命令行程序将它们的结果显示出来是通过将结果发送到一个称为标准输出的设备。默认情况下,标准输出将其内容定向到显示器上。要将标准输出重定向到文件,可以使用 “>” 符号,像这样:
| |
In this example, the ls command is executed and the results are written in a file named file_list.txt. Since the output of ls was redirected to the file, no results appear on the display.
在这个例子中,执行了 ls 命令,并将结果写入名为 file_list.txt 的文件中。由于 ls 的输出被重定向到文件,所以在显示器上没有显示任何结果。
Each time the command above is repeated, file_list.txt is overwritten from the beginning with the output of the command ls. To have the new results appended to the file instead, we use “>>” like this:
每次重复执行上述命令时,file_list.txt 将被从头开始覆盖为 ls 命令的输出。如果要将新结果追加到文件而不是覆盖,可以使用 “>>",像这样:
| |
When the results are appended, the new results are added to the end of the file, thus making the file longer each time the command is repeated. If the file does not exist when we attempt to append the redirected output, the file will be created.
当结果被追加时,新的结果会添加到文件的末尾,从而使得文件每次重复执行命令时都会变长。如果在尝试追加重定向输出时文件不存在,文件将会被创建。
标准输入 Standard Input
Many commands can accept input from a facility called standard input. By default, standard input gets its contents from the keyboard, but like standard output, it can be redirected. To redirect standard input from a file instead of the keyboard, the “<” character is used like this:
许多命令可以从一个称为标准输入的设备接受输入。默认情况下,标准输入从键盘获取内容,但是像标准输出一样,它也可以被重定向。要将标准输入从文件而不是键盘重定向,可以使用 “<” 符号,像这样:
| |
In the example above, we used the sort command to process the contents of file_list.txt. The results are output on the display since the standard output was not redirected. We could redirect standard output to another file like this:
在上面的例子中,我们使用了 sort 命令来处理 file_list.txt 的内容。由于没有重定向标准输出,结果会输出到显示器上。我们可以像这样将标准输出重定向到另一个文件:
| |
As we can see, a command can have both its input and output redirected. Be aware that the order of the redirection does not matter. The only requirement is that the redirection operators (the “<” and “>”) must appear after the other options and arguments in the command.
如我们所见,一个命令可以同时重定向其输入和输出。需要注意的是,重定向的顺序不重要。唯一的要求是重定向操作符("<” 和 “>")必须出现在命令中其他选项和参数之后。
管道 Pipelines
The most useful and powerful thing we can do with I/O redirection is to connect multiple commands together to form what are called pipelines. With pipelines, the standard output of one command is fed into the standard input of another. Here is a very useful example:
使用I/O重定向最有用和强大的功能之一是将多个命令连接在一起,形成所谓的管道。通过管道,一个命令的标准输出被发送到另一个命令的标准输入。下面是一个非常有用的例子:
| |
In this example, the output of the ls command is fed into less. By using this "| less" trick, we can make any command have scrolling output.
在这个例子中,ls 命令的输出被发送到 less 命令。通过使用这个 "| less" 的技巧,我们可以使任何命令都具有滚动输出。
By connecting commands together, we can accomplish amazing feats. Here are some examples to try:
通过将命令连接在一起,我们可以完成令人惊奇的任务。以下是一些可以尝试的例子:
| 命令 Command | What it does |
|---|---|
ls -lt | head | 显示当前目录中最新的10个文件。 Displays the 10 newest files in the current directory. |
du | sort -nr | 显示一个目录列表,以及它们所占用的空间大小,从最大到最小排序。 Displays a list of directories and how much space they consume, sorted from the largest to the smallest. |
find . -type f -print | wc -l | 显示当前工作目录及其所有子目录中的文件总数。 Displays the total number of files in the current working directory and all of its subdirectories. |
过滤器 Filters
One kind of program frequently used in pipelines is called a filter. Filters take standard input and perform an operation upon it and send the results to standard output. In this way, they can be combined to process information in powerful ways. Here are some of the common programs that can act as filters:
在管道中经常使用的一种程序称为过滤器。过滤器接受标准输入并对其进行操作,然后将结果发送到标准输出。通过这种方式,它们可以结合在一起以强大的方式处理信息。以下是一些常见的可以作为过滤器的程序:
| 程序 Program | What it does |
|---|---|
sort | 对标准输入进行排序,然后将排序结果输出到标准输出。 Sorts standard input then outputs the sorted result on standard output. |
uniq | 对排序后的标准输入数据流进行操作,删除重复的数据行(确保每行都是唯一的)。 Given a sorted stream of data from standard input, it removes duplicate lines of data (i.e., it makes sure that every line is unique). |
grep | 检查从标准输入接收到的每一行数据,并输出包含指定字符模式的每一行。 Examines each line of data it receives from standard input and outputs every line that contains a specified pattern of characters. |
fmt | 从标准输入读取文本,然后在标准输出上输出格式化后的文本。 Reads text from standard input, then outputs formatted text on standard output. |
pr | 从标准输入接收文本输入,将数据分页并准备好打印的页眉、页脚和分页符。 Takes text input from standard input and splits the data into pages with page breaks, headers and footers in preparation for printing. |
head | 输出其输入的前几行。可用于获取文件的标题。 Outputs the first few lines of its input. Useful for getting the header of a file. |
tail | 输出其输入的最后几行。可用于获取日志文件中的最新条目等。 Outputs the last few lines of its input. Useful for things like getting the most recent entries from a log file. |
tr | 字符转换。可用于执行诸如大小写转换或更改行终止字符类型(例如,将DOS文本文件转换为Unix样式的文本文件)等任务。 Translates characters. Can be used to perform tasks such as upper/lowercase conversions or changing line termination characters from one type to another (for example, converting DOS text files into Unix style text files). |
sed | 流编辑器。可执行比tr更复杂的文本转换操作。Stream editor. Can perform more sophisticated text translations than tr. |
awk | 一种专为构建过滤器而设计的完整编程语言。非常强大。 An entire programming language designed for constructing filters. Extremely powerful. |
使用管道执行任务 Performing tasks with pipelines
Printing from the command line. Linux provides a program called
lprthat accepts standard input and sends it to the printer. It is often used with pipes and filters. Here are a couple of examples:从命令行打印。 Linux提供了一个名为
lpr的程序,可以接受标准输入并将其发送到打印机。它经常与管道和过滤器一起使用。以下是一些示例:1 2 3cat poorly_formatted_report.txt | fmt | pr | lpr cat unsorted_list_with_dupes.txt | sort | uniq | pr | lprIn the first example, we use
catto read the file and output it to standard output, which is piped into the standard input offmt. fmtformats the text into neat paragraphs and outputs it to standard output, which is piped into the standard input ofpr. prsplits the text neatly into pages and outputs it to standard output, which is piped into the standard input oflpr. lprtakes its standard input and sends it to the printer.在第一个示例中,我们使用
cat读取文件并将其输出到标准输出,然后通过管道将其传递给fmt的标准输入。fmt将文本格式化为整齐的段落,并将其输出到标准输出,然后通过管道将其传递给pr的标准输入。pr将文本整齐地分页,并将其输出到标准输出,然后通过管道将其传递给lpr的标准输入。lpr接受标准输入并将其发送到打印机。The second example starts with an unsorted list of data with duplicate entries. First,
catsends the list intosortwhich sorts it and feeds it intouniqwhich removes any duplicates. Nextprandlprare used to paginate and print the list.第二个示例以一个包含重复条目的未排序数据列表开始。首先,
cat将列表发送到sort,sort对其进行排序并将其传递给uniq,uniq删除任何重复项。然后使用pr和lpr进行分页和打印列表。Viewing the contents of tar files Often you will see software distributed as a gzipped tar file. This is a traditional Unix style tape archive file (created with
tar) that has been compressed withgzip. You can recognize these files by their traditional file extensions, “.tar.gz” or “.tgz”. You can use the following command to view the directory of such a file on a Linux system:查看tar文件的内容 经常会看到软件以gzipped tar文件的形式分发。这是一个传统的Unix风格的磁带归档文件(使用
tar创建),经过gzip压缩。你可以通过文件的传统扩展名”.tar.gz"或".tgz"来识别这些文件。你可以使用以下命令在Linux系统上查看此类文件的目录:1tar tzvf name_of_file.tar.gz | less
进一步阅读 Further Reading
- Chapter 6 of The Linux Command Line covers this topic in more detail.
- The Linux Command Line的第6章更详细地介绍了这个主题。
- Chapters 19 through 21 of The Linux Command Line provide an in-depth look at the text processing tools available in Linux.
- 《The Linux Command Line》的第19至21章深入介绍了Linux中可用的文本处理工具。
- To learn more about the AWK programming language, consider the AWK adventure.
- 如果想更多了解AWK编程语言,请参考AWK adventure。
2.8 - 扩展
扩展 Expansion
https://linuxcommand.org/lc3_lts0080.php
Each time we type a command line and press the enter key, bash performs several processes upon the text before it carries out our command. We have seen a couple of cases of how a simple character sequence, for example “*”, can have a lot of meaning to the shell. The process that makes this happen is called expansion. With expansion, we type something and it is expanded into something else before the shell acts upon it. To demonstrate what we mean by this, let’s take a look at the echo command. echo is a shell builtin that performs a very simple task. It prints out its text arguments on standard output:
每次我们在命令行中输入命令并按下回车键时,bash在执行我们的命令之前会对文本进行几个处理过程。我们已经看到了一些简单字符序列(例如"*")对于shell来说具有很多意义的情况。使这种情况发生的过程被称为扩展。通过扩展,我们在键入某些内容时,shell会在对其执行操作之前将其扩展为其他内容。为了演示我们所说的,让我们来看一下echo命令。echo是一个shell内置命令,执行一个非常简单的任务,即在标准输出上打印出其文本参数:
| |
That’s pretty straightforward. Any argument passed to echo gets displayed. Let’s try another example:
这很简单明了。任何传递给echo的参数都会被显示出来。让我们尝试另一个示例:
| |
So what just happened? Why didn’t echo print “*”? As we recall from our work with wildcards, the “*“character means match any characters in a filename, but what we didn’t see in our original discussion was how the shell does that. The simple answer is that the shell expands the “*” into something else (in this instance, the names of the files in the current working directory) before the echo command is executed. When the enter key is pressed, the shell automatically expands any qualifying characters on the command line before the command is carried out, so the echo command never saw the “*”, only its expanded result. Knowing this, we can see that echo behaved as expected.
发生了什么?为什么echo没有打印出”*"?从我们之前使用通配符的工作中,我们记得”*“字符表示匹配文件名中的任意字符,但是我们在原始讨论中没有看到shell是如何实现的。简单的答案是,shell在执行echo命令之前将”*“扩展为其他内容(在这种情况下是当前工作目录中文件的名称)。当按下回车键时,shell会自动在执行命令之前展开命令行上的任何限定字符,因此echo命令从未看到”*",只看到其扩展后的结果。了解这一点,我们可以看到echo的行为符合预期。
路径名扩展 Pathname Expansion
The mechanism by which wildcards work is called pathname expansion. If we try some of the techniques that we employed in our earlier lessons, we will see that they are really expansions. Given a home directory that looks like this:
通配符起作用的机制被称为路径名扩展。如果我们尝试一些我们之前在课程中使用的技术,我们会发现它们实际上是扩展。给定一个如下所示的主目录:
| |
we could carry out the following expansions:
我们可以进行以下扩展:
| |
and:
以及:
| |
or even:
甚至是:
| |
and looking beyond our home directory:
并且可以查看超出主目录的内容:
| |
波浪号扩展 Tilde Expansion
As we recall from our introduction to the cd command, the tilde character ("~") has a special meaning. When used at the beginning of a word, it expands into the name of the home directory of the named user, or if no user is named, the home directory of the current user:
正如我们在介绍cd命令时所记得的,波浪号("~")具有特殊的含义。当在单词的开头使用时,它会扩展为命名用户的主目录,如果没有指定用户,则扩展为当前用户的主目录:
| |
If user “foo” has an account, then:
如果用户"foo"有一个帐户,则:
| |
算术扩展 Arithmetic Expansion
The shell allows arithmetic to be performed by expansion. This allow us to use the shell prompt as a calculator:
Shell允许通过扩展执行算术运算。这使我们可以将Shell提示符用作计算器:
| |
Arithmetic expansion uses the form:
算术扩展使用以下形式:
| |
where expression is an arithmetic expression consisting of values and arithmetic operators.
其中,表达式是由值和算术运算符组成的算术表达式。
Arithmetic expansion only supports integers (whole numbers, no decimals), but can perform quite a number of different operations.
算术扩展仅支持整数(无小数),但可以执行许多不同的操作。
Spaces are not significant in arithmetic expressions and expressions may be nested. For example, to multiply five squared by three:
在算术表达式中,空格不重要,表达式可以嵌套。例如,要将五的平方乘以三:
| |
Single parentheses may be used to group multiple subexpressions. With this technique, we can rewrite the example above and get the same result using a single expansion instead of two:
可以使用单括号来分组多个子表达式。使用这种技术,我们可以重写上面的例子,并使用单个扩展而不是两个来获得相同的结果:
| |
Here is an example using the division and remainder operators. Notice the effect of integer division:
下面是一个使用除法和取余运算符的示例。注意整数除法的效果:
| |
大括号扩展 Brace Expansion
Perhaps the strangest expansion is called brace expansion. With it, we can create multiple text strings from a pattern containing braces. Here’s an example:
也许最奇怪的扩展被称为大括号扩展。使用它,我们可以从包含大括号的模式创建多个文本字符串。以下是一个示例:
| |
Patterns to be brace expanded may contain a leading portion called a preamble and a trailing portion called a postscript. The brace expression itself may contain either a comma-separated list of strings, or a range of integers or single characters. The pattern may not contain embedded whitespace. Here is an example using a range of integers:
要扩展的模式可以包含称为preamble的前导部分和称为postscript的尾随部分。大括号表达式本身可以包含逗号分隔的字符串列表,或者是整数或单个字符的范围。模式不得包含嵌入的空格。以下是使用整数范围的示例:
| |
A range of letters in reverse order:
以相反顺序的字母范围:
| |
Brace expansions may be nested:
大括号扩展可以嵌套:
| |
So what is this good for? The most common application is to make lists of files or directories to be created. For example, if we were a photographer and had a large collection of images we wanted to organize into years and months, the first thing we might do is create a series of directories named in numeric “Year-Month” format. This way, the directory names will sort in chronological order. we could type out a complete list of directories, but that’s a lot of work and it’s error-prone too. Instead, we could do this:
那么这有什么好处?最常见的应用是创建要创建的文件或目录的列表。例如,如果我们是摄影师,有很多图像要按年份和月份组织,我们可能首先要做的是创建以数字"年份-月份"格式命名的一系列目录。这样,目录名称将按照时间顺序排序。我们可以输入完整的目录列表,但那是很麻烦的工作,而且容易出错。相反,我们可以这样做:
| |
Pretty slick!
很漂亮!
参数扩展 Parameter Expansion
We’re only going to touch briefly on parameter expansion in this lesson, but we’ll be covering it more later. It’s a feature that is more useful in shell scripts than directly on the command line. Many of its capabilities have to do with the system’s ability to store small chunks of data and to give each chunk a name. Many such chunks, more properly called variables, are available for our examination. For example, the variable named “USER” contains our user name. To invoke parameter expansion and reveal the contents of USER we would do this:
在本课程中,我们只会简要涉及参数扩展,但我们将在后面对其进行更详细的介绍。这是一个在Shell脚本中比在命令行直接使用更有用的功能。它的许多功能与系统存储小数据块和为每个块命名有关。我们可以检查许多这样的块,更准确地称为变量。例如,名为"USER"的变量包含我们的用户名。要调用参数扩展并显示USER的内容,我们可以这样做:
| |
To see a list of available variables, try this:
要查看可用变量的列表,请尝试以下命令:
| |
With other types of expansion, if we mistype a pattern, the expansion will not take place and the echo command will simply display the mistyped pattern. With parameter expansion, if we misspell the name of a variable, the expansion will still take place, but will result in an empty string:
与其他类型的扩展不同,如果我们拼写错误的模式,扩展将不会发生,echo命令将只显示错误拼写的模式。但是,对于参数扩展,如果我们拼写变量名称错误,扩展仍将发生,但结果将为空字符串:
| |
命令替换 Command Substitution
Command substitution allows us to use the output of a command as an expansion:
命令替换 允许我们将命令的输出作为扩展使用:
| |
A clever one goes something like this:
一个巧妙的例子如下:
| |
Here we passed the results of which cp as an argument to the ls command, thereby getting the listing of of the cp program without having to know its full pathname. We are not limited to just simple commands. Entire pipelines can be used (only partial output shown):
在这里,我们将 which cp 的结果作为 ls 命令的参数传递,从而获取 cp 程序的列表,而无需知道其完整路径名。我们不仅仅限于简单的命令,还可以使用整个流水线(仅显示部分输出):
| |
In this example, the results of the pipeline became the argument list of the file command. There is an alternate syntax for command substitution in older shell programs which is also supported in bash. It uses back-quotes instead of the dollar sign and parentheses:
在此示例中,流水线的结果成为 file 命令的参数列表。在旧的 shell 程序中,还有一种替代的命令替换语法,也在 bash 中支持。它使用反引号而不是美元符号和括号:
| |
引号 Quoting
Now that we’ve seen how many ways the shell can perform expansions, it’s time to learn how we can control it. Take for example:
现在我们已经了解了 shell 执行扩展的多种方式,是时候学习如何控制它了。例如:
| |
or:
或者:
| |
In the first example, word-splitting by the shell removed extra whitespace from the echo command’s list of arguments. In the second example, parameter expansion substituted an empty string for the value of “$1” because it was an undefined variable. The shell provides a mechanism called quoting to selectively suppress unwanted expansions.
在第一个示例中,Shell 的词分割功能删除了 echo 命令参数列表中的额外空格。在第二个示例中,参数扩展将一个空字符串替换为"$1“的值,因为它是一个未定义的变量。Shell 提供了一种称为引号的机制,可以选择性地抑制不需要的扩展。
双引号 Double Quotes
The first type of quoting we will look at is double quotes. If we place text inside double quotes, all the special characters used by the shell lose their special meaning and are treated as ordinary characters. The exceptions are “$”, “\” (backslash), and “`” (back- quote). This means that word-splitting, pathname expansion, tilde expansion, and brace expansion are suppressed, but parameter expansion, arithmetic expansion, and command substitution are still carried out. Using double quotes, we can cope with filenames containing embedded spaces. Imagine we were the unfortunate victim of a file called two words.txt. If we tried to use this on the command line, word-splitting would cause this to be treated as two separate arguments rather than the desired single argument:
我们将首先看一下的引号类型是双引号。如果我们将文本放在双引号内,Shell 中使用的所有特殊字符都失去了它们的特殊含义,被视为普通字符。例外的是 “$"、"\"(反斜杠)和 “`"(反引号)。这意味着词分割、路径名扩展、波浪线扩展和大括号扩展被抑制,但参数扩展、算术扩展和命令替换仍然会进行。使用双引号,我们可以处理包含空格的文件名。假设我们是一个不幸的two words.txt文件的受害者。如果我们尝试在命令行上使用它,词分割将使其被视为两个独立的参数,而不是所需的单个参数:
| |
By using double quotes, we can stop the word-splitting and get the desired result; further, we can even repair the damage:
通过使用双引号,我们可以阻止词分割并获得所需的结果;此外,我们甚至可以修复损坏:
| |
There! Now we don’t have to keep typing those pesky double quotes. Remember, parameter expansion, arithmetic expansion, and command substitution still take place within double quotes:
现在!我们不再需要不断输入那些烦人的双引号。请记住,参数扩展、算术扩展和命令替换仍然会在双引号内进行:
| |
We should take a moment to look at the effect of double quotes on command substitution. First let’s look a little deeper at how word splitting works. In our earlier example, we saw how word-splitting appears to remove extra spaces in our text:
我们应该花点时间来看一下双引号对命令替换的影响。首先,让我们更深入地了解词分割是如何工作的。在我们之前的示例中,我们看到词分割似乎删除了文本中的额外空格:
| |
By default, word-splitting looks for the presence of spaces, tabs, and newlines (linefeed characters) and treats them as delimiters between words. This means that unquoted spaces, tabs, and newlines are not considered to be part of the text. They only serve as separators. Since they separate the words into different arguments, our example command line contains a command followed by four distinct arguments. If we add double quotes:
默认情况下,词分割会查找空格、制表符和换行符(换行字符),并将它们视为单词之间的分隔符。这意味着未加引号的空格、制表符和换行符不被视为文本的一部分。它们只是分隔符。由于它们将单词分隔为不同的参数,我们的示例命令行包含一个命令和四个不同的参数。如果我们添加双引号:
| |
word-splitting is suppressed and the embedded spaces are not treated as delimiters, rather they become part of the argument. Once the double quotes are added, our command line contains a command followed by a single argument. The fact that newlines are considered delimiters by the word-splitting mechanism causes an interesting, albeit subtle, effect on command substitution. Consider the following:
词分割被抑制,嵌入的空格不再被视为分隔符,而是成为参数的一部分。一旦添加了双引号,我们的命令行包含一个命令和一个单独的参数。换行符被词分割机制视为分隔符,对命令替换产生了一个有趣但微妙的影响。考虑以下示例:
| |
In the first instance, the unquoted command substitution resulted in a command line containing thirty-eight arguments. In the second, a command line with one argument that includes the embedded spaces and newlines.
在第一个示例中,未加引号的命令替换导致一个包含三十八个参数的命令行。在第二个示例中,命令行只有一个参数,其中包含嵌入的空格和换行符。
单引号 Single Quotes
When we need to suppress all expansions, we use single quotes. Here is a comparison of unquoted, double quotes, and single quotes:
当我们需要抑制所有扩展时,我们使用单引号。以下是未加引号、双引号和单引号的比较:
| |
As we can see, with each succeeding level of quoting, more and more of the expansions are suppressed.
正如我们所看到的,随着引号层次的增加,越来越多的扩展被抑制。
转义字符 Escaping Characters
Sometimes we only want to quote a single character. To do this, we can precede a character with a backslash, which in this context is called the escape character. Often this is done inside double quotes to selectively prevent an expansion:
有时我们只想引用一个单个字符。为此,我们可以在字符前加上反斜杠,这在这个上下文中称为转义字符。通常,这是在双引号内部选择性地阻止扩展的方法:
| |
It is also common to use escaping to eliminate the special meaning of a character in a filename. For example, it is possible to use characters in filenames that normally have special meaning to the shell. These would include “$”, “!”, “&”, " “, and others. To include a special character in a filename we can to this:
在文件名中,使用转义通常是为了消除字符的特殊含义。例如,可以在文件名中使用通常对shell具有特殊含义的字符,包括”$"、"!"、"&"、” “和其他字符。要在文件名中包含特殊字符,我们可以这样做:
| |
To allow a backslash character to appear, escape it by typing “\”. Note that within single quotes, the backslash loses its special meaning and is treated as an ordinary character.
要允许反斜杠字符出现,通过键入”\“来转义它。请注意,在单引号内部,反斜杠失去了其特殊含义,被视为普通字符。
更多反斜杠技巧 More Backslash Tricks
If we look at the man pages for any program written by the GNU project, we will see that in addition to command line options consisting of a dash and a single letter, there are also long option names that begin with two dashes. For example, the following are equivalent:
如果我们查看由GNU项目编写的任何程序的man页,我们会看到除了由破折号和单个字母组成的命令行选项外,还有以两个破折号开头的长选项名。例如,下面两者是等价的:
| |
Why do they support both? The short form is for lazy typists on the command line and the long form is mostly for scripts though some options may only be available in long form. Sometimes it is better to use a long option when the option is obscure or we want to document more clearly what an option is. This is especially useful when writing scripts where maximum readability is desired, and besides, anytime we can save ourselves a trip to the man page is a good thing.
为什么它们都被支持?短格式适用于命令行上的懒惰打字者,而长格式主要用于脚本,尽管某些选项可能仅在长格式中可用。当选项晦涩难懂或者我们想更清楚地记录选项是什么时,使用长选项可能更好。这在编写希望最大可读性的脚本时特别有用,而且,任何时候我们能够节省一次访问man页都是一件好事。
As we might suspect, using the long form options can make a single command line very long. To combat this problem, we can use a backslash to get the shell to ignore a newline character like this:
正如我们所猜测的,使用长格式选项可能会使单个命令行非常长。为了解决这个问题,我们可以使用反斜杠来使shell忽略换行符,像这样:
| |
Using the backslash in this way allows us to embed newlines in our command. Note that for this trick to work, the newline must be typed immediately after the backslash. If we put a space after the backslash, the space will be ignored, not the newline. Backslashes are also used to insert special characters into our text. These are called backslash escape characters. Here are the common ones:
以这种方式使用反斜杠可以在命令中插入换行符。请注意,为使此技巧生效,换行符必须紧跟在反斜杠后面输入。如果在反斜杠后面加上空格,则空格将被忽略,而不是换行符。反斜杠还用于在文本中插入特殊字符。这些特殊字符称为反斜杠转义字符。以下是常见的转义字符:
| 转义字符 Escape Character | 名称 Name | 可能的用途 Possible Uses |
|---|---|---|
| \n | newline | 在文本中添加空行 Adding blank lines to text |
| \t | tab | 在文本中插入水平制表符 Inserting horizontal tabs to text |
| \a | alert | 让我们的终端发出警报 Makes our terminal beep |
| \ | backslash | 插入一个反斜杠 Inserts a backslash |
| \f | formfeed | 将其发送给打印机以弹出页面 Sending this to our printer ejects the page |
The use of the backslash escape characters is very common. This idea first appeared in the C programming language. Today, the shell, C++, Perl, python, awk, tcl, and many other programming languages use this concept. Using the echo command with the -e option will allow us to demonstrate:
使用反斜杠转义字符非常常见。这个概念最初出现在C编程语言中。如今,Shell、C++、Perl、Python、Awk、Tcl和许多其他编程语言都使用了这个概念。使用带有-e选项的echo命令可以让我们进行演示:
| |
2.9 - 权限
权限 Permissions
https://linuxcommand.org/lc3_lts0090.php
The Unix-like operating systems, such as Linux differ from other computing systems in that they are not only multitasking but also multi-user.
类Unix操作系统(如Linux)与其他计算系统的不同之处在于它们不仅支持多任务,还支持多用户。
What exactly does this mean? It means that more than one user can be operating the computer at the same time. While a desktop or laptop computer only has one keyboard and monitor, it can still be used by more than one user. For example, if the computer is attached to a network, or the Internet, remote users can log in via ssh (secure shell) and operate the computer. In fact, remote users can execute graphical applications and have the output displayed on a remote computer. The X Window system supports this.
这到底意味着什么呢?这意味着多个用户可以同时操作计算机。虽然桌面或笔记本电脑只有一个键盘和显示器,但它仍然可以被多个用户使用。例如,如果计算机连接到网络或互联网,远程用户可以通过ssh(安全外壳)登录并操作计算机。实际上,远程用户可以执行图形应用程序,并在远程计算机上显示输出。X Window系统支持此功能。
The multi-user capability of Unix-like systems is a feature that is deeply ingrained into the design of the operating system. If we remember the environment in which Unix was created, this makes perfect sense. Years ago before computers were “personal,” they were large, expensive, and centralized. A typical university computer system consisted of a large mainframe computer located in some building on campus and terminals were located throughout the campus, each connected to the large central computer. The computer would support many users at the same time.
类Unix系统的多用户能力是操作系统设计中根深蒂固的特性。如果我们记得Unix创建的环境,这是完全合理的。多年前,在计算机成为“个人电脑”之前,它们是庞大、昂贵和集中化的。典型的大学计算机系统由位于校园某个建筑物中的大型主机计算机组成,而终端则分布在整个校园,每个终端连接到大型中央计算机。计算机可以同时支持多个用户。
In order to make this practical, a method had to be devised to protect the users from each other. After all, we wouldn’t want the actions of one user to crash the computer, nor would we allow one user to interfere with the files belonging to another user.
为了使这种情况变得实际可行,必须设计一种方法来保护用户免受彼此的干扰。毕竟,我们不希望一个用户的操作导致计算机崩溃,也不希望一个用户干扰其他用户的文件。
This lesson will cover the following commands:
本课程将涵盖以下命令:
chmod- modify file access rightssu- temporarily become the superusersudo- temporarily become the superuserchown- change file ownershipchgrp- change a file’s group ownershipchmod- 修改文件访问权限su- 临时成为超级用户sudo- 临时成为超级用户chown- 更改文件所有者chgrp- 更改文件所属组
文件权限 File Permissions
On a Linux system, each file and directory is assigned access rights for the owner of the file, the members of a group of related users, and everybody else. Rights can be assigned to read a file, to write a file, and to execute a file (i.e., run the file as a program).
在Linux系统上,每个文件和目录都分配了对文件所有者、相关用户组的成员以及其他所有人的访问权限。可以分配的权限包括读取文件、写入文件和执行文件(即将文件作为程序运行)。
To see the permission settings for a file, we can use the ls command. As an example, we will look at the bash program which is located in the /bin directory:
要查看文件的权限设置,可以使用ls命令。例如,我们将查看位于/bin目录中的bash程序:
| |
Here we can see:
在这里我们可以看到:
- The file “/bin/bash” is owned by user “root”
- The superuser has the right to read, write, and execute this file
- The file is owned by the group “root”
- Members of the group “root” can also read and execute this file
- Everybody else can read and execute this file
- 文件“/bin/bash”归属于用户“root”
- 超级用户具有读取、写入和执行此文件的权限
- 文件归属于组“root”
- 组“root”的成员也可以读取和执行此文件
- 其他所有人可以读取和执行此文件
In the diagram below, we see how the first portion of the listing is interpreted. It consists of a character indicating the file type, followed by three sets of three characters that convey the reading, writing and execution permission for the owner, group, and everybody else.
在下面的图表中,我们可以看到如何解释列表的第一部分。它由一个表示文件类型的字符组成,后面跟着三组三个字符,分别表示所有者、组和其他所有人的读取、写入和执行权限。
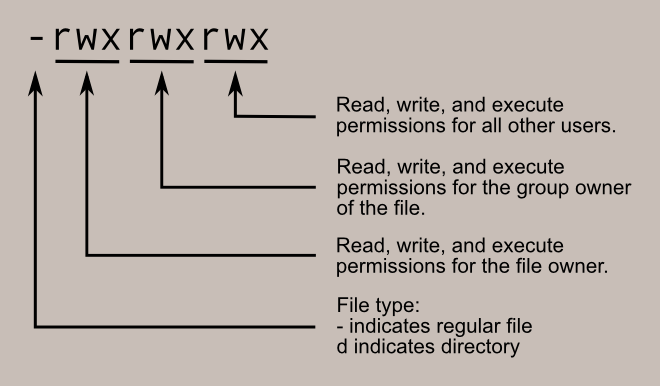
chmod
The chmod command is used to change the permissions of a file or directory. To use it, we specify the desired permission settings and the file or files that we wish to modify. There are two ways to specify the permissions. In this lesson we will focus on one of these, called the octal notation method.
chmod命令用于更改文件或目录的权限。要使用它,我们指定所需的权限设置以及要修改的文件或文件夹。有两种方法可以指定权限。在本课程中,我们将重点介绍其中之一,称为八进制表示法方法。
It is easy to think of the permission settings as a series of bits (which is how the computer thinks about them). Here’s how it works:
将权限设置视为一系列位(计算机对其的思考方式)是很容易的。它的工作原理如下:
rwx rwx rwx = 111 111 111
rw- rw- rw- = 110 110 110
rwx --- --- = 111 000 000

and so on...

rwx = 111 in binary = 7
rw- = 110 in binary = 6
r-x = 101 in binary = 5
r-- = 100 in binary = 4
Now, if we represent each of the three sets of permissions (owner, group, and other) as a single digit, we have a pretty convenient way of expressing the possible permissions settings. For example, if we wanted to set some_file to have read and write permission for the owner, but wanted to keep the file private from others, we would:
现在,如果我们将每组权限(所有者、组和其他所有人)表示为一个数字,我们就有了一种非常方便的表达可能的权限设置的方法。例如,如果我们希望将some_file的所有者权限设置为读取和写入,但希望将文件保密不让其他人看到,我们可以执行以下命令:
| |
Here is a table of numbers that covers all the common settings. The ones beginning with “7” are used with programs (since they enable execution) and the rest are for other kinds of files.
下表列出了涵盖所有常见设置的数字。以“7”开头的数字用于程序(因为它们允许执行),其余数字用于其他类型的文件。
| 值 Value | 含义 Meaning |
|---|---|
| 777 | (rwxrwxrwx) 权限无限制。任何人都可以做任何事。通常不是一个理想的设置。 (rwxrwxrwx) No restrictions on permissions. Anybody may do anything. Generally not a desirable setting. |
| 755 | (rwxr-xr-x) 文件所有者可以读取、写入和执行该文件。其他所有人可以读取和执行该文件。此设置常用于所有用户使用的程序。 (rwxr-xr-x) The file’s owner may read, write, and execute the file. All others may read and execute the file. This setting is common for programs that are used by all users. |
| 700 | (rwx——) 文件所有者可以读取、写入和执行该文件。其他人没有任何权限。此设置对于仅所有者使用且必须保密的程序很有用。 (rwx——) The file’s owner may read, write, and execute the file. Nobody else has any rights. This setting is useful for programs that only the owner may use and must be kept private from others. |
| 666 | (rw-rw-rw-) 所有用户都可以读取和写入该文件。 (rw-rw-rw-) All users may read and write the file. |
| 644 | (rw-r–r–) 文件所有者可以读取和写入文件,而其他所有人只能读取该文件。这是一个常见的设置,用于任何人都可以读取但只有所有者可以更改的数据文件。 (rw-r–r–) The owner may read and write a file, while all others may only read the file. A common setting for data files that everybody may read, but only the owner may change. |
| 600 | (rw——-) 文件所有者可以读取和写入该文件。其他所有人没有任何权限。这是一个常见的设置,用于所有者希望保密的数据文件。 (rw——-) The owner may read and write a file. All others have no rights. A common setting for data files that the owner wants to keep private. |
目录权限 Directory Permissions
The chmod command can also be used to control the access permissions for directories. Again, we can use the octal notation to set permissions, but the meaning of the r, w, and x attributes is different:
chmod命令也可以用于控制目录的访问权限。同样,我们可以使用八进制表示法来设置权限,但是r、w和x属性的含义有所不同:
- r - Allows the contents of the directory to be listed if the x attribute is also set.
- w - Allows files within the directory to be created, deleted, or renamed if the x attribute is also set.
- x - Allows a directory to be entered (i.e.
cd dir). - r - 如果也设置了x属性,则允许列出目录的内容。
- w - 如果也设置了x属性,则允许在目录中创建、删除或重命名文件。
- x - 允许进入目录(即
cd dir)。
Here are some useful settings for directories:
以下是一些有用的目录设置:
| 值 Value | 含义 Meaning |
|---|---|
| 777 | (rwxrwxrwx) 权限无限制。任何人都可以列出文件、在目录中创建新文件和删除目录中的文件。通常不是一个好的设置。 (rwxrwxrwx) No restrictions on permissions. Anybody may list files, create new files in the directory and delete files in the directory. Generally not a good setting. |
| 755 | (rwxr-xr-x) 目录所有者具有完全访问权限。其他人可以列出目录,但无法创建文件或删除文件。此设置适用于希望与其他用户共享的目录。 (rwxr-xr-x) The directory owner has full access. All others may list the directory, but cannot create files nor delete them. This setting is common for directories that you wish to share with other users. |
| 700 | (rwx——) 目录所有者具有完全访问权限。其他人没有任何权限。此设置对于只有所有者可以使用且必须保密的目录很有用。 (rwx——) The directory owner has full access. Nobody else has any rights. This setting is useful for directories that only the owner may use and must be kept private from others. |
暂时成为超级用户 Becoming the Superuser for a Short While
It is often necessary to become the superuser to perform important system administration tasks, but as we know, we should not stay logged in as the superuser. In most distributions, there is a program that can give you temporary access to the superuser’s privileges. This program is called su (short for substitute user) and can be used in those cases when you need to be the superuser for a small number of tasks. To become the superuser, simply type the su command. You will be prompted for the superuser’s password:
经常需要成为超级用户执行重要的系统管理任务,但我们知道,不应该作为超级用户保持登录状态。在大多数发行版中,有一个程序可以让您暂时获得超级用户权限。该程序称为su(替代用户的简称),可以在需要成为超级用户执行一小部分任务的情况下使用。要成为超级用户,只需输入su命令。您将被要求输入超级用户的密码:
| |
After executing the su command, we have a new shell session as the superuser. To exit the superuser session, type exit and we will return to your previous session.
执行su命令后,我们将获得一个新的超级用户shell会话。要退出超级用户会话,输入exit,然后将返回到以前的会话。
In most modern distributions, an alternate method is used. Rather than using su, these systems employ the sudo command instead. With sudo, one or more users are granted superuser privileges on an as needed basis. To execute a command as the superuser, the desired command is simply preceded with the sudo command. After the command is entered, the user is prompted for the their own password rather than the superuser’s:
在大多数现代发行版中,使用了另一种方法。这些系统使用sudo命令而不是su。使用sudo,一个或多个用户被授予根据需要的超级用户权限。要以超级用户身份执行命令,只需在所需的命令之前加上sudo命令。输入命令后,用户将被要求输入自己的密码,而不是超级用户的密码:
| |
In fact, modern distributions don’t even set the root account password thus making it impossible to log in as the root user. A root shell is still possible with sudo by using the “-i” option:
实际上,现代发行版甚至不设置root帐户密码,因此无法作为root用户登录。通过使用"-i"选项,仍然可以使用sudo命令获得完全的root shell:
| |
更改文件所有者 Changing File Ownership
We can change the owner of a file by using the chown command. Here’s an example: Suppose we wanted to change the owner of some_file from “me” to “you”. We could:
我们可以使用chown命令来更改文件的所有者。下面是一个例子:假设我们想将some_file的所有者从"me"改为"you",我们可以执行以下命令:
| |
Notice that in order to change the owner of a file, we must have superuser privileges. To do this, our example employed the sudo command to execute chown.
请注意,为了更改文件的所有者,我们必须具有超级用户权限。在这个例子中,我们使用sudo命令来执行chown命令。
chown works the same way on directories as it does on files.
chown命令对目录的操作方式与对文件的操作方式相同。
更改所属组 Changing Group Ownership
The group ownership of a file or directory may be changed with chgrp. This command is used like this:
可以使用chgrp命令来更改文件或目录的所属组。命令的使用方法如下:
| |
In the example above, we changed the group ownership of some_file from its previous group to “new_group”. We must be the owner of the file or directory to perform a chgrp.
在上面的示例中,我们将some_file的所属组从原来的组更改为"new_group"。执行chgrp命令时,我们必须是文件或目录的所有者。
进一步阅读 Further Reading
- Chapter 9 of The Linux Command Line covers this topic in much more detail.
- The Linux Command Line的第9章详细介绍了这个主题。
2.10 - 作业控制
作业控制 - Job Control
https://linuxcommand.org/lc3_lts0100.php
In the previous lesson, we looked at some of the implications of Linux being a multi-user operating system. In this lesson, we will examine the multitasking nature of Linux, and how it is controlled with the command line interface.
在前面的课程中,我们了解了Linux作为多用户操作系统的一些含义。在本课程中,我们将探讨Linux的多任务性质,以及如何使用命令行界面来控制它。
As with any multitasking operating system, Linux executes multiple, simultaneous processes. Well, they appear simultaneous, anyway. Actually, a single processor core can only execute one process at a time but the Linux kernel manages to give each process its turn at the processor and each appears to be running at the same time.
与任何多任务操作系统一样,Linux可以执行多个并发进程。虽然它们看起来是同时执行的,但实际上,单个处理器核心一次只能执行一个进程,但Linux内核设法让每个进程轮流使用处理器,每个进程看起来都在同时运行。
There are several commands that are used to control processes. They are:
有几个命令用于控制进程。它们是:
ps- list the processes running on the systemkill- send a signal to one or more processes (usually to “kill” a process)jobs- an alternate way of listing your own processesbg- put a process in the backgroundfg- put a process in the foregroundps- 列出系统上正在运行的进程kill- 向一个或多个进程发送信号(通常用于"终止"一个进程)jobs- 列出您自己的进程的另一种方法bg- 将一个进程放入后台运行fg- 将一个进程放到前台运行
一个实际的例子 A Practical Example
While it may seem that this subject is rather obscure, it can be very practical for the average user who mostly works with the graphical user interface. Though it might not be apparent, most (if not all) graphical programs can be launched from the command line. Here’s an example: there is a small program supplied with the X Window system called xload which displays a graph representing system load. We can execute this program by typing the following:
虽然这个主题可能看起来相当晦涩,但对于大多数主要使用图形用户界面的普通用户来说,它可以非常实用。虽然可能不明显,但大多数(如果不是全部)图形程序都可以从命令行启动。这里有一个例子:X Window系统中提供了一个名为xload的小程序,它显示表示系统负载的图形。我们可以通过键入以下命令来执行此程序:
| |
Notice that the small xload window appears and begins to display the system load graph. On systems where xload is not available, try gedit instead. Notice also that our prompt did not reappear after the program launched. The shell is waiting for the program to finish before control returns. If we close the xload window, the xload program terminates and the prompt returns.
请注意,会出现一个小的xload窗口,并开始显示系统负载图。在不可用xload的系统上,可以尝试使用gedit代替。还要注意,程序启动后我们的提示符没有重新出现。Shell在控制权返回之前等待程序完成。如果关闭xload窗口,xload程序将终止并返回提示符。
将程序放入后台 Putting a Program into the Background
Now, in order to make life a little easier, we are going to launch the xload program again, but this time we will put it in the background so that the prompt will return. To do this, we execute xload like this:
现在,为了让生活变得更轻松,我们将再次启动xload程序,但这次我们将把它放在后台,以便提示符会返回。为此,我们执行以下命令来启动xload:
| |
In this case, the prompt returned because the process was put in the background.
在这种情况下,提示符返回,因为进程被放入了后台。
Now imagine that we forgot to use the “&” symbol to put the program into the background. There is still hope. We can type Ctrl-z and the process will be suspended. We can verify this by seeing that the program’s window is frozen. The process still exists, but is idle. To resume the process in the background, type the bg command (short for background). Here is an example:
现在想象一下,我们忘记使用"&“符号将程序放入后台。还有希望。我们可以输入Ctrl-z,该进程将被挂起。我们可以通过查看程序的窗口是否被冻结来验证这一点。该进程仍然存在,但是处于空闲状态。要在后台恢复该进程,请键入bg命令(缩写为background)。以下是一个例子:
| |
列出正在运行的进程 Listing Running Processes
Now that we have a process in the background, it would be helpful to display a list of the processes we have launched. To do this, we can use either the jobs command or the more powerful ps command.
现在,我们有一个后台进程,显示正在运行的进程列表将会很有帮助。为此,我们可以使用jobs命令或更强大的ps命令。
| |
终止进程 Killing a Process
Suppose that we have a program that becomes unresponsive; how do we get rid of it? We use the kill command, of course. Let’s try this out on xload. First, we need to identify the process we want to kill. We can use either jobs or ps, to do this. If we use jobs we will get back a job number. With ps, we are given a process id (PID). We will do it both ways:
假设我们有一个程序变得无响应,我们该如何摆脱它呢?我们当然可以使用kill命令。让我们在xload上试一试。首先,我们需要确定要终止的进程。我们可以使用jobs或ps来完成。如果我们使用jobs,我们将得到一个作业号。使用ps,我们会得到一个进程ID(PID)。我们将两种方式都演示一下:
| |
关于kill的更多信息 A Little More About kill
While the kill command is used to “kill” processes, its real purpose is to send signals to processes. Most of the time the signal is intended to tell the process to go away, but there is more to it than that. Programs (if they are properly written) listen for signals from the operating system and respond to them, most often to allow some graceful method of terminating. For example, a text editor might listen for any signal that indicates that the user is logging off, or that the computer is shutting down. When it receives this signal, it could save the work in progress before it exits. The kill command can send a variety of signals to processes. Typing:
尽管kill命令用于"终止"进程,但它的真正目的是向进程们发送信号。大多数时候,这个信号是告诉进程离开,但其中还有更多内容。程序(如果它们编写正确)会监听来自操作系统的信号并对其作出响应,通常是为了允许一些优雅的终止方法。例如,文本编辑器可能会监听任何指示用户注销或计算机关闭的信号。当它收到这个信号时,它可以在退出之前保存正在进行的工作。kill命令可以向进程们发送各种信号。键入:
| |
will print a list of the signals it supports. Many are rather obscure, but several are handy to know:
将打印出它支持的信号列表。其中许多信号相当晦涩,但有几个很方便:
| 信号 Signal # | 名称 Name | 描述 Description |
|---|---|---|
| 1 | SIGHUP | 挂起信号。程序可以监听此信号并对其作出响应。在关闭终端时,该信号会发送给在终端上运行的进程。 Hang up signal. Programs can listen for this signal and act upon it. This signal is sent to processes running in a terminal when you close the terminal. |
| 2 | SIGINT | 中断信号。该信号用于中断进程。程序可以处理此信号并对其作出响应。我们还可以通过在运行程序的终端窗口中键入Ctrl-c来直接发送此信号。Interrupt signal. This signal is given to processes to interrupt them. Programs can process this signal and act upon it. We can also issue this signal directly by typing Ctrl-c in the terminal window where the program is running. |
| 15 | SIGTERM | 终止信号。该信号用于终止进程。同样,程序可以处理此信号并对其作出响应。这是如果没有指定信号,默认由kill命令发送的信号。Termination signal. This signal is given to processes to terminate them. Again, programs can process this signal and act upon it. This is the default signal sent by the kill command if no signal is specified. |
| 9 | SIGKILL | 杀死信号。该信号导致Linux内核立即终止进程。程序无法监听此信号。 Kill signal. This signal causes the immediate termination of the process by the Linux kernel. Programs cannot listen for this signal. |
Now let’s suppose that we have a program that is hopelessly hung and we want to get rid of it. Here’s what we do:
现在假设我们有一个无望地挂起的程序,我们想摆脱它。下面是我们的做法:
- Use the
pscommand to get the process id (PID) of the process we want to terminate. - 使用
ps命令获取我们要终止的进程的进程ID(PID)。 - Issue a
killcommand for that PID. - 发出针对该PID的
kill命令。 - If the process refuses to terminate (i.e., it is ignoring the signal), send increasingly harsh signals until it does terminate.
- 如果进程拒绝终止(即忽略了信号),则发送越来越严厉的信号,直到它终止为止。
| |
In the example above we used the ps command with the x option to list all of our processes (even those not launched from the current terminal). In addition, we piped the output of the ps command into grep to list only list the program we are interested in. Next, we used kill to issue a SIGTERM signal to the troublesome program. In actual practice, it is more common to do it in the following way since the default signal sent by kill is SIGTERM and kill can also use the signal number instead of the signal name:
上面的示例中,我们使用了带有x选项的ps命令列出了我们的所有进程(即使它们不是从当前终端启动的)。此外,我们将ps命令的输出导入到grep中,以仅列出我们感兴趣的程序。接下来,我们使用kill发出SIGTERM信号给有问题的程序。在实际操作中,更常见的做法是以以下方式进行,因为kill发送的默认信号是SIGTERM,kill还可以使用信号编号而不是信号名称:
| |
Then, if the process does not terminate, force it with the SIGKILL signal:
然后,如果进程不终止,可以使用SIGKILL信号强制终止:
| |
到此为止! That’s It!
This concludes the “Learning the Shell” series of lessons. In the next series, “Writing Shell Scripts,” we will look at how to automate tasks with the shell.
这就结束了“学习Shell”的一系列课程。在下一系列“编写Shell脚本”中,我们将讨论如何使用Shell自动化任务。
进一步阅读 Further Reading
- For a more in-depth treatment of the topic, see Chapter 10 in The Linux Command Line.
- 要对该主题进行更深入的处理,请参阅The Linux Command Line一书中的第10章。
- 1963 Timesharing: A Solution to Computer Bottlenecks, a fascinating YouTube video from the Computer History Museum describing the first timesharing operating system and how it works. It’s basically the same method used by all modern computers.
- 1963年分时共享:解决计算机瓶颈问题,这是一段引人入胜的YouTube视频,来自计算机历史博物馆,介绍了第一个分时共享操作系统及其工作原理。它基本上是所有现代计算机使用的相同方法。
3 - 编写shell脚本
这里是乐趣开始的地方 Here is Where the Fun Begins
https://linuxcommand.org/lc3_writing_shell_scripts.php
With the thousands of commands available to the command line user, how can we remember them all? The answer is, we don’t. The real power of the computer is its ability to do the work for us. To get it to do that, we use the power of the shell to automate things. We write shell scripts.
对于命令行用户来说,有成千上万个可用命令,我们如何记住它们呢?答案是,我们不需要记住它们全部。计算机的真正力量在于它能够替我们完成工作。为了实现这一点,我们利用 shell 的力量来自动化任务。我们编写shell 脚本。
什么是 Shell 脚本? What are Shell Scripts?
In the simplest terms, a shell script is a file containing a series of commands. The shell reads this file and carries out the commands as though they have been entered directly on the command line.
简而言之,shell 脚本是包含一系列命令的文件。Shell 会读取该文件,并像直接在命令行上输入这些命令一样执行它们。
The shell is somewhat unique, in that it is both a powerful command line interface to the system and a scripting language interpreter. As we will see, most of the things that can be done on the command line can be done in scripts, and most of the things that can be done in scripts can be done on the command line.
Shell 在某种程度上是独特的,它既是一个强大的系统命令行接口,又是一种脚本语言解释器。正如我们将看到的,大多数可以在命令行上完成的事情也可以在脚本中完成,而大多数可以在脚本中完成的事情也可以在命令行上完成。
We have already covered many shell features, but we have focused on those features most often used directly on the command line. The shell also provides a set of features usually (but not always) used when writing programs.
我们已经介绍了许多 shell 特性,但我们侧重于那些在命令行上直接使用的特性。Shell 还提供了一套通常(但并不总是)在编写程序时使用的特性。
Scripts unlock the power of our Linux machine. So let’s have some fun!
脚本释放了我们 Linux 机器的力量。所以让我们来玩一玩吧!
3.1 - 编写我们的第一个脚本并使其正常工作
编写我们的第一个脚本并使其正常工作 Writing Our First Script and Getting It to Work
https://linuxcommand.org/lc3_wss0010.php
To successfully write a shell script, we have to do three things:
要成功编写一个 shell 脚本,我们需要完成三件事情:
- Write a script
- Give the shell permission to execute it
- Put it somewhere the shell can find it
- 编写一个脚本
- 给 shell 赋予执行权限
- 将脚本放在 shell 能够找到的地方
编写脚本 Writing a Script
A shell script is a file that contains ASCII text. To create a shell script, we use a text editor. A text editor is a program, like a word processor, that reads and writes ASCII text files. There are many, many text editors available for Linux systems, both for the command line and GUI environments. Here is a list of some common ones:
Shell 脚本是一个包含 ASCII 文本的文件。为了创建一个 shell 脚本,我们使用一个文本编辑器。文本编辑器是一个程序,类似于文字处理器,用于读写 ASCII 文本文件。对于 Linux 系统,有许多文本编辑器可供选择,包括命令行和图形界面环境。以下是一些常见的文本编辑器列表:
| 名称 Name | 描述 Description | 界面 Interface |
|---|---|---|
vi, vim | Unix 文本编辑器的鼻祖 vi 以其晦涩难懂的用户界面而闻名。好处是,vi 强大、轻巧且快速。学习 vi 是 Unix 系统使用的基本技能,因为它在类 Unix 系统上通用。在大多数 Linux 发行版中,vi 的增强版本称为 vim,取代了 vi。vim 是一款出色的编辑器,值得花时间学习它。The granddaddy of Unix text editors, vi, is infamous for its obtuse user interface. On the bright side, vi is powerful, lightweight, and fast. Learning vi is a Unix rite of passage, since it is universally available on Unix-like systems. On most Linux distributions, an enhanced version of vi called vim is provided in place of vi. vim is a remarkable editor and well worth taking the time to learn it. | 命令行 command line |
Emacs | 文本编辑器领域的真正巨头是 Emacs,最初由Richard Stallman编写。Emacs 包含(或可以包含)为文本编辑器构想的所有功能。值得注意的是,vi 和 Emacs 的拥护者之间存在激烈的宗教战争,争论哪个更好。The true giant in the world of text editors is Emacs originally written by Richard Stallman. Emacs contains (or can be made to contain) every feature ever conceived of for a text editor. It should be noted that vi and Emacs fans fight bitter religious wars over which is better. | 命令行 command line |
nano | nano 是 pine 邮件程序提供的文本编辑器的免费克隆版本。nano 非常易于使用,但与 vim 和 emacs 相比,功能较少。nano 推荐给需要命令行编辑器的初学者。nano is a free clone of the text editor supplied with the pine email program. nano is very easy to use but is very short on features compared to vim and emacs. nano is recommended for first-time users who need a command line editor. | 命令行 command line |
gedit | gedit 是 GNOME 桌面环境附带的编辑器。gedit 易于使用,并包含足够的功能作为初学者级别的编辑器。gedit is the editor supplied with the GNOME desktop environment. gedit is easy to use and contains enough features to be a good beginners-level editor. | 图形界面 graphical |
kwrite | kwrite 是 KDE 附带的“高级编辑器”。它具有语法高亮功能,对于程序员和脚本编写者来说非常有用。kwrite is the “advanced editor” supplied with KDE. It has syntax highlighting, a helpful feature for programmers and script writers. | 图形界面 graphical |
Let’s fire up our text editor and type in our first script as follows:
让我们启动我们的文本编辑器,并按照以下方式输入我们的第一个脚本:
| |
Clever readers will have figured out how to copy and paste the text into the text editor ;-)
聪明的读者已经知道如何将文本复制并粘贴到文本编辑器中 ;-)
This is a traditional “Hello World” program. Forms of this program appear in almost every introductory programming book. We’ll save the file with some descriptive name. How about hello_world?
这是一个传统的“Hello World”程序。这种程序的形式几乎出现在每本入门编程书籍中。我们将文件保存为一些描述性的名称。比如 hello_world?
The first line of the script is important. It is a special construct, called a shebang, given to the system indicating what program is to be used to interpret the script. In this case, /bin/bash. Other scripting languages such as Perl, awk, tcl, Tk, and python also use this mechanism.
脚本的第一行很重要。它是一个特殊的结构,称为shebang,告诉系统要使用哪个程序来解释脚本。在本例中是 /bin/bash。其他脚本语言如 Perl, awk, tcl, Tk 和 python 也使用这种机制。
The second line is a comment. Everything that appears after a “#” symbol is ignored by bash. As our scripts become bigger and more complicated, comments become vital. They are used by programmers to explain what is going on so that others can figure it out. The last line is the echo command. This command simply prints its arguments on the display.
第二行是一个注释。bash 会忽略 “#” 符号后面的所有内容。随着我们的脚本变得越来越大和复杂,注释变得至关重要。程序员使用注释来解释正在发生的事情,以便其他人可以理解。最后一行是 echo 命令。该命令简单地将其参数打印到显示器上。
设置权限 Setting Permissions
The next thing we have to do is give the shell permission to execute our script. This is done with the chmod command as follows:
接下来,我们需要给 shell 赋予执行脚本的权限。可以使用 chmod 命令执行以下操作:
| |
The “755” will give us read, write, and execute permission. Everybody else will get only read and execute permission. To make the script private, (i.e., only we can read and execute), use “700” instead.
“755” 将赋予我们读取、写入和执行权限,其他用户只能获取读取和执行权限。如果要使脚本私有(即只有我们自己能读取和执行),可以使用 “700”。
将其放在路径中 Putting It in Our Path
At this point, our script will run. Try this:
此时,我们的脚本将可以运行。尝试运行以下命令:
| |
We should see “Hello World!” displayed.
我们应该会看到 “Hello World!” 显示出来。
Before we go any further, we need to talk about paths. When we type the name of a command, the system does not search the entire computer to find where the program is located. That would take a long time. We see that we don’t usually have to specify a complete path name to the program we want to run, the shell just seems to know.
在继续之前,我们需要讨论一下路径。当我们键入一个命令的名称时,系统不会搜索整个计算机来找到程序所在的位置。那样会花费很长时间。我们注意到,通常我们不需要指定要运行的程序的完整路径名称,shell 似乎自己就知道。
Well, that’s correct. The shell does know. Here’s how: the shell maintains a list of directories where executable files (programs) are kept, and only searches the directories on that list. If it does not find the program after searching each directory on the list, it will issue the famous command not found error message.
是的,这是正确的。shell 确实知道。原因如下:shell 维护着一个包含可执行文件(程序)所在目录的列表,并且只搜索该列表中的目录。如果在列表中的每个目录中都找不到该程序,它将显示著名的command not found错误消息。
This list of directories is called our path. We can view the list of directories with the following command:
这个目录列表被称为我们的路径。我们可以使用以下命令查看目录列表:
| |
This will return a colon separated list of directories that will be searched if a specific path name is not given when a command is entered. In our first attempt to execute our new script, we specified a pathname ("./") to the file.
这将返回一个以冒号分隔的目录列表,如果在输入命令时没有指定特定路径名,系统将在这些目录中进行搜索。在我们尝试执行新脚本时,我们指定了一个路径名("./")。
We can add directories to our path with the following command, where directory is the name of the directory we want to add:
我们可以使用以下命令将目录添加到我们的路径中,其中 directory 是要添加的目录名称:
| |
A better way would be to edit our .bash_profile file to include the above command. That way, it would be done automatically every time we log in.
更好的方法是编辑我们的 .bash_profile 文件,将上述命令包含其中。这样,每次登录时都会自动执行该命令。
Most Linux distributions encourage a practice in which each user has a specific directory for the programs they personally use. This directory is called bin and is a subdirectory of our home directory. If we do not already have one, we can create it with the following command:
大多数 Linux 发行版都鼓励每个用户为他们个人使用的程序创建一个特定的目录。这个目录称为 bin,是我们家目录的子目录。如果我们还没有这个目录,可以使用以下命令创建它:
| |
If we move or copy our script into our new bin directory we’ll be all set. Now we just have to type:
如果我们将脚本移动或复制到新的 bin 目录中,我们就准备好了。现在我们只需要输入:
| |
and our script will run. Most distributions will have the ~/bin directory already in the PATH, but on some distributions, most notably Ubuntu (and other Debian-based distributions), we may need to restart our terminal session before our newly created bin directory is added to our PATH.
我们的脚本将运行。大多数发行版都已经将 ~/bin 目录添加到 PATH 中,但在某些发行版中,特别是 Ubuntu(和其他基于 Debian 的发行版),我们可能需要重新启动终端会话,以便我们新创建的 bin 目录被添加到 PATH 中。
3.2 - 编辑我们已有的脚本
编辑我们已有的脚本 Editing the Scripts We Already Have
https://linuxcommand.org/lc3_wss0020.php
Before we start writing new scripts, We’ll take a look at some scripts we already have. These scripts were put into our home directory when our account was created, and are used to configure the behavior of our sessions on the computer. We can edit these scripts to change things.
在我们开始编写新脚本之前,我们先来看一下我们已经有的一些脚本。这些脚本在我们的账户创建时被放置在我们的主目录中,并用于配置我们在计算机上的会话行为。我们可以编辑这些脚本来进行更改。
In this lesson, we will look at a couple of these scripts and learn a few important new concepts about the shell.
在本课程中,我们将查看其中一些脚本,并学习关于 shell 的一些重要的新概念。
During our shell session, the system is holding a number of facts about the world in its memory. This information is called the environment. The environment contains such things as our path, our user name, and much more. We can examine a complete list of what is in the environment with the set command.
在我们的 shell 会话期间,系统会在内存中保存关于该世界的一些事实。这些信息被称为环境。环境包含诸如路径、用户名等等。我们可以使用 set 命令查看环境中的完整列表。
Two types of commands are often contained in the environment. They are aliases and shell functions.
环境中经常包含两种类型的命令:别名和shell 函数。
环境是如何建立的? How is the Environment Established?
When we log on to the system, the bash program starts, and reads a series of configuration scripts called startup files. These define the default environment shared by all users. This is followed by more startup files in our home directory that define our personal environment. The exact sequence depends on the type of shell session being started. There are two kinds: a login shell session and a non-login shell session. A login shell session is one in which we are prompted for our user name and password; when we start a virtual console session, for example. A non-login shell session typically occurs when we launch a terminal session in the GUI.
当我们登录到系统时,bash 程序启动,并读取一系列的配置脚本,称为启动文件。这些启动文件定义了所有用户共享的默认环境。接下来是我们主目录中的更多启动文件,定义了我们个人的环境。确切的顺序取决于所启动的 shell 会话类型。有两种类型:登录 shell 会话和非登录 shell 会话。登录 shell 会话是指我们被提示输入用户名和密码的会话;例如,当我们启动一个虚拟控制台会话时。非登录 shell 会话通常发生在图形界面中启动终端会话时。
Login shells read one or more startup files as shown below:
登录 shell 会读取一个或多个启动文件,如下所示:
| 文件 File | 内容 Contents |
|---|---|
/etc/profile | 适用于所有用户的全局配置脚本。 A global configuration script that applies to all users. |
~/.bash_profile | 用户个人的启动文件。可以用来扩展或覆盖全局配置脚本中的设置。 A user’s personal startup file. Can be used to extend or override settings in the global configuration script. |
~/.bash_login | 如果找不到 ~/.bash_profile,bash 尝试读取此脚本。If ~/.bash_profile is not found, bash attempts to read this script. |
~/.profile | 如果既找不到 ~/.bash_profile 也找不到 ~/.bash_login,bash 尝试读取此文件。这是基于 Debian 的发行版(如 Ubuntu)的默认设置。If neither ~/.bash_profile nor ~/.bash_login is found, bash attempts to read this file. This is the default in Debian-based distributions, such as Ubuntu. |
Non-login shell sessions read the following startup files:
非登录 shell 会话读取以下启动文件:
| 文件 File | 内容 Contents |
|---|---|
/etc/bash.bashrc | 适用于所有用户的全局配置脚本。 A global configuration script that applies to all users. |
~/.bashrc | 用户个人的启动文件。可以用来扩展或覆盖全局配置脚本中的设置。 A user’s personal startup file. Can be used to extend or override settings in the global configuration script. |
In addition to reading the startup files above, non-login shells also inherit the environment from their parent process, usually a login shell.
除了读取上述启动文件,非登录 shell 会话还会从其父进程继承环境,通常是登录 shell。
Take a look at your system and see which of these startup files you have. Remember— since most of the file names listed above start with a period (meaning that they are hidden), you will need to use the “-a” option when using ls.
查看系统,看看你有哪些启动文件。记住,由于上面列出的大多数文件名以句点开头(表示它们是隐藏文件),使用 ls 命令时需要使用 -a 选项。
The ~/.bashrc file is probably the most important startup file from the ordinary user’s point of view, since it is almost always read. Non-login shells read it by default and most startup files for login shells are written in such a way as to read the ~/.bashrc file as well.
~/.bashrc 文件可能是普通用户来说最重要的启动文件,因为它几乎总是会被读取。非登录 shell 会话默认读取它,而大多数登录 shell 的启动文件也以这种方式编写,以便读取 ~/.bashrc 文件。
If we take a look inside a typical .bash_profile (this one taken from a CentOS system), it looks something like this:
如果我们查看一个典型的 .bash_profile(这是从 CentOS 系统中获取的一个示例),它的内容如下所示:
| |
Lines that begin with a “#” are comments and are not read by the shell. These are there for human readability. The first interesting thing occurs on the fourth line, with the following code:
以“#”开头的行是注释,不会被 shell 读取。这些注释是为了人类可读性。有趣的事情发生在第四行,具有以下代码:
| |
This is called an if compound command, which we will cover fully in a later lesson, but for now we will translate:
这被称为if 复合命令,我们将在后面的课程中详细介绍,但现在我们先翻译一下:
If the file "~/.bashrc" exists, then read the "~/.bashrc" file.
如果文件 "~/.bashrc" 存在,则读取 "~/.bashrc" 文件。
We can see that this bit of code is how a login shell gets the contents of .bashrc. The next thing in our startup file does is set the PATH variable to add the ~/bin directory to the path.
我们可以看到,这段代码是登录 shell 获取 .bashrc 的内容的方式。我们的启动文件中的下一个部分是将 PATH 变量设置为将 ~/bin 目录添加到路径中。
Lastly, we have:
最后,我们有:
| |
The export command tells the shell to make the contents of the PATH variable available to child processes of this shell.
export 命令告诉 shell 将 PATH 变量的内容提供给该 shell 的子进程。
别名 Aliases
An alias is an easy way to create a new command which acts as an abbreviation for a longer one. It has the following syntax:
别名是创建一个新命令的简单方式,该命令作为一个较长命令的缩写。它具有以下语法:
| |
where name is the name of the new command and value is the text to be executed whenever name is entered on the command line.
其中 name 是新命令的名称,value 是在命令行输入 name 时要执行的文本。
Let’s create an alias called “l” and make it an abbreviation for the command “ls -l”. We’ll move to our home directory and using our favorite text editor, open the file .bashrc and add this line to the end of the file:
让我们创建一个名为 “l” 的别名,将其作为命令 “ls -l” 的缩写。我们切换到我们的主目录,并使用我们喜欢的文本编辑器打开 .bashrc 文件,并在文件末尾添加以下行:
| |
By adding the alias command to the file, we have created a new command called “l” which will perform “ls -l”. To try out our new command, close the terminal session and start a new one. This will reload the .bashrc file. Using this technique, we can create any number of custom commands for ourselves. Here is another one to try:
通过将 alias 命令添加到文件中,我们创建了一个名为 “l” 的新命令,该命令将执行 “ls -l”。要尝试我们的新命令,关闭终端会话并启动一个新的会话。这将重新加载 .bashrc 文件。使用这种技术,我们可以为自己创建任意数量的自定义命令。下面是另一个要尝试的示例:
| |
This alias creates a new command called “today” that will display today’s date with nice formatting.
该别名创建了一个名为 “today” 的新命令,它将以漂亮的格式显示今天的日期。
By the way, the alias command is just another shell builtin. We can create our aliases directly at the command prompt; however they will only remain in effect during the current shell session. For example:
顺便说一下,alias 命令只是另一个 shell 内置命令。我们可以直接在命令提示符下创建别名;但是,它们只在当前的 shell 会话中有效。例如:
| |
Shell 函数 Shell Functions
Aliases are good for very simple commands, but to create something more complex, we need shell functions. Shell functions can be thought of as “scripts within scripts” or little sub-scripts. Let’s try one. Open .bashrc with our text editor again and replace the alias for “today” with the following:
别名适用于非常简单的命令,但是要创建更复杂的内容,我们需要使用shell 函数。可以将 shell 函数视为“脚本中的脚本”或小的子脚本。让我们尝试一个例子。再次用我们的文本编辑器打开 .bashrc,并用以下内容替换 “today” 的别名:
| |
Believe it or not, () is a shell builtin too, and as with alias, we can enter shell functions directly at the command prompt.
你可能不会相信,() 也是一个 shell 内置命令,就像 alias 一样,我们可以直接在命令提示符下输入 shell 函数。
| |
However, like alias, shell functions defined directly on the command line only last as long as the current shell session.
然而,与 alias 类似,直接在命令行定义的 shell 函数只在当前 shell 会话中有效,持续的时间与当前 shell 会话相同。
3.3 - here 脚本
here 脚本 - Here Scripts
https://linuxcommand.org/lc3_wss0030.php
Beginning with this lesson, we will construct a useful application. This application will produce an HTML document that contains information about our system. As we construct our script, we will discover step by step the tools needed to solve the problem at hand.
从这一课开始,我们将创建一个有用的应用程序。这个应用程序将生成一个包含关于我们系统信息的 HTML 文档。在编写脚本的过程中,我们将逐步发现解决问题所需的工具。
使用脚本编写 HTML 文件 Writing an HTML File with a Script
As we may be aware, a well formed HTML file contains the following content:
如我们所知,一个格式正确的 HTML 文件包含以下内容:
| |
Now, with what we already know, we could write a script to produce the above content:
现在,根据我们已经了解的内容,我们可以编写一个脚本来生成上述内容:
| |
This script can be used as follows:
这个脚本可以按以下方式使用:
| |
It has been said that the greatest programmers are also the laziest. They write programs to save themselves work. Likewise, when clever programmers write programs, they try to save themselves typing.
有人说最优秀的程序员也是最懒惰的。他们编写程序来减少工作量。同样地,聪明的程序员编写程序时,会尽量减少键入的次数。
The first improvement to this script will be to replace the repeated use of the echo command with a single instance by using quotation more efficiently:
对于这个脚本的第一个改进是将重复使用的 echo 命令替换为一个单独的实例,通过更有效地使用引号:
| |
Using quotation, it is possible to embed carriage returns in our text and have the echo command’s argument span multiple lines.
使用引号,我们可以在文本中嵌入换行符,并且 echo 命令的参数可以跨多行。
While this is certainly an improvement, it does have a limitation. Since many types of markup used in HTML incorporate quotation marks themselves, it makes using a quoted string a little awkward. A quoted string can be used but each embedded quotation mark will need to be escaped with a backslash character.
尽管这无疑是一个改进,但它也有局限性。由于在 HTML 中使用了许多引号,因此使用引号字符串会有些不方便。可以使用引号字符串,但是每个嵌入的引号都需要用反斜杠字符进行转义。
In order to avoid the additional typing, we need to look for a better way to produce our text. Fortunately, the shell provides one. It’s called a here script.
为了避免额外的键入,我们需要寻找一种更好的方式来生成我们的文本。幸运的是,shell 提供了一种方式,它被称为here 脚本。
| |
A here script (also sometimes called a here document) is an additional form of I/O redirection. It provides a way to include content that will be given to the standard input of a command. In the case of the script above, the standard input of the cat command was given a stream of text from our script.
here 脚本(有时也称为 here document)是一种附加的输入/输出重定向形式。它提供了一种将内容提供给命令的标准输入的方法。在上面的脚本中,cat 命令的标准输入接收了来自我们脚本的文本流。
A here script is constructed like this:
here 脚本的结构如下:
| |
token can be any string of characters. “_EOF_” (EOF is short for “End Of File”) is traditional, but we can use anything as long as it does not conflict with a bash reserved word. The token that ends the here script must exactly match the one that starts it, or else the remainder of our script will be interpreted as more standard input to the command which can lead to some really exciting script failures.
token 可以是任意字符字符串。"_EOF_"(EOF 是 “End Of File” 的缩写)是传统用法,但我们可以使用任何字符串,只要它不与 bash 的保留词冲突即可。结束 here 文档的标记必须与开始的标记完全匹配,否则我们脚本的其余部分将被解释为更多的命令标准输入,这可能导致一些令人激动的脚本失败。
There is one additional trick that can be used with a here script. Often, we might want to indent the content portion of the here script to improve the readability of the script. We can do this if we change the script as follows:
还有一种可以与 here 脚本一起使用的额外技巧。通常,我们可能希望对 here 脚本的内容进行缩进,以提高脚本的可读性。如果我们将脚本更改如下所示,就可以实现这一点:
| |
Changing the “<<” to “<<-” causes bash to ignore the leading tabs (but not spaces) in the here script. The output from the cat command will not contain any of the leading tab characters. This technique is a bit problematic, as many text editors are configured (and desirably so) to use sequences of spaces rather than tab characters.
将 “<<” 改为 “<<-",会让 bash 忽略 here 脚本中的前导制表符(但不包括空格)。cat 命令的输出将不包含任何前导制表符。这种技巧有些问题,因为许多文本编辑器被配置为(并且应该如此)使用一系列空格而不是制表符。
O.k., let’s make our page. We will edit our page to get it to say something:
好的,让我们制作我们的页面。我们将编辑我们的页面,使其显示一些信息:
| |
In our next lesson, we will make our script produce some real information about the system.
在我们的下一课中,我们将让我们的脚本生成一些关于系统的真实信息。
3.4 - 变量
变量 Variables
https://linuxcommand.org/lc3_wss0040.php
| |
Now that we have our script working, let’s improve it. First off, we’ll make some changes because we want to be lazy. In the script above, we see that the phrase “My System Information” is repeated. This is wasted typing (and extra work!) so we’ll improve it like this:
现在我们的脚本可以工作了,让我们对它进行改进。首先,我们想偷点懒。在上面的脚本中,我们发现短语 “My System Information” 是重复的。这是多余的键入(和额外的工作!),所以我们将对其进行改进:
| |
We added a line to the beginning of the script and replaced the two occurrences of the phrase “My System Information” with $title.
我们在脚本的开头添加了一行,并将短语 “My System Information” 的两个出现替换为 $title。
变量 Variables
What we have done is to introduce a fundamental concept that appears in every programming language, variables. Variables are areas of memory that can be used to store information and are referred to by a name. In the case of our script, we created a variable called “title” and placed the phrase “My System Information” into memory. Inside the here script that contains our HTML, we use “$title” to tell the shell to perform parameter expansion and replace the name of the variable with the variable’s contents.
我们所做的是引入了一种在每种编程语言中都出现的基本概念,变量。变量是用于存储信息的内存区域,并通过名称进行引用。在我们的脚本中,我们创建了一个名为 “title” 的变量,并将短语 “My System Information” 存储到内存中。在包含我们的 HTML 的 here 脚本中,我们使用 “$title” 来告诉 shell 执行参数展开,将变量的名称替换为变量的内容。
Whenever the shell sees a word that begins with a “$”, it tries to find out what was assigned to the variable and substitutes it.
当 shell 遇到以 “$” 开头的单词时,它会尝试查找所分配给变量的内容并进行替换。
如何创建变量 How to Create a Variable
To create a variable, put a line in the script that contains the name of the variable followed immediately by an equal sign ("="). No spaces are allowed. After the equal sign, assign the information to store.
要创建一个变量,在脚本中放置一行,其中包含变量名,紧跟着一个等号("=")。不允许有空格。在等号后面,分配要存储的信息。
变量名从何而来? Where Do Variable Names Come From?
We just make them up. That’s right; we get to choose the names for our variables. There are a few rules.
我们只是自己编写。没错,我们可以选择变量的名称。有一些规则。
- Names must start with a letter.
- A name must not contain embedded spaces. Use underscores instead.
- Punctuation marks are not permitted.
- 名称必须以字母开头。
- 名称不能包含空格。使用下划线代替。
- 不允许使用标点符号。
这如何增加我们的懒惰程度? How Does This Increase Our Laziness?
The addition of the title variable made our life easier in two ways. First, it reduced the amount of typing we had to do. Second and more importantly, it made our script easier to maintain.
添加 title 变量以两种方式简化了我们的生活。首先,它减少了我们需要键入的量。更重要的是,它使我们的脚本更易于维护。
As we write more and more scripts (or do any other kind of programming), we will see that programs are rarely ever finished. They are modified and improved by their creators and others. After all, that’s what open source development is all about. Let’s say that we wanted to change the phrase “My System Information” to “Linuxbox System Information.” In the previous version of the script, we would have had to change this in two locations. In the new version with the title variable, we only have to change it in one place. Since our script is so small, this might seem like a trivial matter, but as scripts get larger and more complicated, it becomes very important.
当我们编写越来越多的脚本(或进行任何其他类型的编程)时,我们会发现程序很少是完成的。它们会被其创建者和其他人进行修改和改进。毕竟,这就是开源开发的目的。假设我们想要将短语 “My System Information” 更改为 “Linuxbox System Information."。在以前版本的脚本中,我们需要在两个位置进行更改。而在具有 title 变量的新版本中,我们只需要在一个位置进行更改。由于我们的脚本非常小,这可能看起来像是一个琐碎的事情,但是随着脚本变得越来越大和更复杂,这变得非常重要。
环境变量 Environment Variables
When we start our shell session, some variables are already set by the startup files we looked at earlier. To see all the variables that are in the environment, use the printenv command. One variable in our environment contains the host name for the system. We will add this variable to our script like so:
当我们启动 shell 会话时,一些变量已经由我们之前查看过的启动文件设置好了。要查看环境中的所有变量,请使用 printenv 命令。我们的环境中的一个变量包含系统的主机名。我们将像这样将此变量添加到我们的脚本中:
| |
Now our script will always include the name of the machine on which we are running. Note that, by convention, environment variables names are uppercase.
现在我们的脚本将始终包含正在运行的计算机的名称。请注意,按照约定,环境变量名称是大写的。
3.5 - 命令替换和常量
命令替换和常量 Command Substitution and Constants
https://linuxcommand.org/lc3_wss0050.php
In the previous lesson, we learned how to create variables and perform parameter expansions with them. In this lesson, we will extend this idea to show how we can substitute the results from commands.
在上一课中,我们学习了如何创建变量并对其进行参数展开。在本课中,我们将扩展这个概念,展示如何替换命令的结果。
When we last left our script, it could create an HTML page that contained a few simple lines of text, including the host name of the machine which we obtained from the environment variable HOSTNAME. Now, we will add a time stamp to the page to indicate when it was last updated, along with the user that did it.
上次我们离开时,我们的脚本可以创建一个包含一些简单文本的 HTML 页面,其中包括从环境变量 HOSTNAME 获取的计算机的主机名。现在,我们将在页面上添加一个时间戳,以指示上次更新的时间,以及执行更新的用户。
| |
As we can see, another environment variable, USER, is used to get the user name. In addition, we used this strange looking thing:
正如我们所看到的,另一个环境变量 USER 用于获取用户名。此外,我们使用了这样一个看起来奇怪的东西:
| |
The characters “$( )” tell the shell, “substitute the results of the enclosed command,” a technique known as command substitution. In our script, we want the shell to insert the results of the command date +"%x %r %Z" which outputs the current date and time. The date command has many features and formatting options. To look at them all, try this:
字符 “$( )” 告诉 shell,“替换封闭命令的结果”,这是一种称为命令替换的技术。在我们的脚本中,我们希望 shell 插入命令 date +"%x %r %Z" 的结果,该命令输出当前日期和时间。date 命令有许多功能和格式选项。要查看所有选项,请尝试执行以下命令:
| |
Be aware that there is an older, alternate syntax for “$(command)” that uses the backtick character " ` “. This older form is compatible with the original Bourne shell (sh) but its use is discouraged in favor of the modern syntax. The bash shell fully supports scripts written for sh, so the following forms are equivalent:
请注意,有一种较旧的,替代 “$(command)” 语法,它使用反引号字符 " `"。这种较旧的形式与原始 Bourne shell (sh) 兼容,但建议使用现代语法而不是它。Bash shell 完全支持为 sh 编写的脚本,因此以下形式是等价的:
| |
将命令的结果赋给变量 Assigning a Command’s Result to a Variable
We can also assign the results of a command to a variable:
我们还可以将命令的结果赋给变量:
| |
We can even nest the variables (place one inside another), like this:
我们甚至可以嵌套变量(将一个变量放在另一个变量内),如下所示:
| |
An important safety tip: when performing parameter expansions or command substitutions, it is good practice to surround them in double quotes to prevent unwanted word splitting in case the result of the expansion contains whitespace characters.
**一个重要的安全提示:**在进行参数展开或命令替换时,最好将其用双引号括起来,以防止展开的结果包含空格字符时发生意外的单词分割。
常量 Constants
As the name variable suggests, the content of a variable is subject to change. This means that it is expected that during the execution of our script, a variable may have its content modified by something the script does.
正如变量的名称所暗示的,变量的内容是可变的。这意味着在脚本执行期间,变量的内容可能会被脚本执行的某些操作修改。
On the other hand, there may be values that, once set, should never be changed. These are called constants. This is a common idea in programming. Most programming languages have special facilities to support values that are not allowed to change. Bash also has this facility but it is rarely used. Instead, if a value is intended to be a constant, it is given an uppercase name to remind the programmer that it should be considered a constant even if it’s not being enforced.
另一方面,可能存在一些一旦设置就不应该更改的值。这些被称为常量。这是编程中的一个常见概念。大多数编程语言都有特殊的功能来支持不允许更改的值。Bash 也有这样的功能,但很少被使用。相反,如果一个值被认为是常量,它会被赋予一个大写的名称,以提醒程序员它应该被视为常量,即使它没有被强制执行。
Environment variables are usually considered constants since they are rarely changed. Like constants, environment variables are given uppercase names by convention. In the scripts that follow, we will use this convention - uppercase names for constants and lowercase names for variables.
环境变量通常被认为是常量,因为它们很少改变。与常量一样,按照约定,环境变量使用大写名称。在接下来的脚本中,我们将使用这个约定 - 常量使用大写名称,变量使用小写名称。
So, applying everything we know, our program looks like this:
因此,根据我们所知,我们的程序如下所示:
| |
3.6 - shell函数
shell函数 Shell Functions
https://linuxcommand.org/lc3_wss0060.php
As programs get longer and more complex, they become more difficult to design, code, and maintain. As with any large endeavor, it is often useful to break a single, large task into a series of smaller tasks.
随着程序变得越来越长和复杂,设计、编码和维护就变得更加困难。与任何大型任务一样,将一个单一的、庞大的任务拆分为一系列较小的任务通常是有用的。
In this lesson, we will begin to break our single monolithic script into a number of separate functions.
在本课中,我们将开始将我们的单一的庞大脚本拆分为多个独立的函数。
To get familiar with this idea, let’s consider the description of an everyday task – going to the market to buy food. Imagine that we were going to describe the task to a man from Mars.
为了熟悉这个概念,让我们考虑一个日常任务的描述 - 去市场买食物。想象一下,我们要将这个任务描述给来自火星的人。
Our first top-level description might look like this:
我们的第一个顶层描述可能是这样的:
- Leave house
- Drive to market
- Park car
- Enter market
- Purchase food
- Drive home
- Park car
- Enter house
- 离开房子
- 开车去市场
- 停车
- 进入市场
- 购买食物
- 开车回家
- 停车
- 进入房子
This description covers the overall process of going to the market; however a man from Mars will probably require additional detail. For example, the “Park car” sub task could be described as follows:
这个描述涵盖了去市场的整个过程;然而,来自火星的人可能需要额外的细节。例如,“停车”子任务可以描述如下:
- Find parking space
- Drive car into space
- Turn off motor
- Set parking brake
- Exit car
- Lock car
- 寻找停车位
- 将车开入停车位
- 关闭发动机
- 设置驻车制动器
- 离开车辆
- 锁车
Of course the task “Turn off motor” has a number of steps such as “turn off ignition” and “remove key from ignition switch,” and so on.
当然,“关闭发动机”这个任务还有许多步骤,比如“关闭点火开关”和“取下点火开关上的钥匙”,等等。
This process of identifying the top-level steps and developing increasingly detailed views of those steps is called top-down design. This technique allows us to break large complex tasks into many small, simple tasks.
这个确定顶层步骤并开发逐渐详细的视图的过程被称为自顶向下设计。这种技术使我们能够将大型复杂任务拆分为许多小而简单的任务。
As our script continues to grow, we will use top down design to help us plan and code our script.
随着我们的脚本不断增长,我们将使用自顶向下设计来帮助我们规划和编码脚本。
If we look at our script’s top-level tasks, we find the following list:
如果我们查看脚本的顶层任务,我们会发现以下列表:
- Open page
- Open head section
- Write title
- Close head section
- Open body section
- Write title
- Write time stamp
- Close body section
- Close page
- 打开页面
- 打开头部部分
- 写标题
- 关闭头部部分
- 打开正文部分
- 写标题
- 写时间戳
- 关闭正文部分
- 关闭页面
All of these tasks are implemented, but we want to add more. Let’s insert some additional tasks after task 7:
所有这些任务都已经实现,但我们想要添加更多。让我们在任务 7 之后插入一些额外的任务:
- Write time stamp
- Write system release info
- Write up-time
- Write drive space
- Write home space
- Close body section
- Close page
- 写时间戳
- 写系统发布信息
- 写运行时间
- 写驱动器空间
- 写主目录空间
- 关闭正文部分
- 关闭页面
It would be great if there were commands that performed these additional tasks. If there were, we could use command substitution to place them in our script like so:
如果有能够执行这些额外任务的命令就好了。如果有的话,我们可以使用命令替换将它们放在我们的脚本中,像这样:
| |
While there are no commands that do exactly what we need, we can create them using shell functions.
虽然没有确切满足我们需求的命令,但我们可以使用shell 函数来创建它们。
As we learned in lesson 2, shell functions act as “little programs within programs” and allow us to follow top-down design principles. To add the shell functions to our script, we’ll change it so:
正如我们在第二课中学到的那样,shell 函数充当“程序中的小程序”,使我们能够遵循自顶向下的设计原则。为了将 shell 函数添加到我们的脚本中,我们将对它进行如下更改:
| |
A couple of important points about functions: First, they must appear before we attempt to use them. Second, the function body (the portions of the function between the { and } characters) must contain at least one valid command. As written, the script will not execute without error, because the function bodies are empty. The simple way to fix this is to place a return statement in each function body. After we do this, our script will execute successfully again.
关于函数有几点重要的要点:首先,它们必须出现在我们尝试使用它们之前。其次,函数体(花括号 { 和 } 之间的部分)必须包含至少一条有效命令。按照当前的编写方式,脚本将无法执行而出现错误,因为函数体是空的。修复这个问题的简单方法是在每个函数体中放置一个 return 语句。在我们这样做之后,脚本将再次成功执行。
保持脚本工作正常 Keep Your Scripts Working
When we develop a program, it is is often a good practice to add a small amount of code, run the script, add some more code, run the script, and so on. This way, if we introduce a mistake into the code, it will be easier to find and correct.
当我们开发一个程序时,通常最好的做法是添加一小段代码,运行脚本,再添加一些代码,运行脚本,依此类推。这样,如果我们在代码中引入了错误,就会更容易找到和纠正它。
As we add functions to your script, we can also use a technique called stubbing to help watch the logic of our script develop. Stubbing works like this: imagine that we are going to create a function called “system_info” but we haven’t figured out all of the details of its code yet. Rather than hold up the development of the script until we are finished with system_info, we just add an echo command like this:
当我们向脚本添加函数时,我们还可以使用一种叫做存根的技术来帮助观察脚本逻辑的发展。存根的工作方式如下:假设我们要创建一个名为 “system_info” 的函数,但我们还没有弄清楚它的所有代码细节。与其等到我们完成 system_info 后再继续脚本的开发,我们只需添加一个 echo 命令,像这样:
| |
This way, our script will still execute successfully, even though we do not yet have a finished system_info function. We will later replace the temporary stubbing code with the complete working version.
这样,即使我们还没有一个完整的 system_info 函数,我们的脚本仍然可以成功执行。稍后,我们将用完整的工作版本替换临时的存根代码。
The reason we use an echo command is so we get some feedback from the script to indicate that the functions are being executed.
我们使用 echo 命令的原因是为了从脚本中获得一些反馈,以指示函数正在被执行。
Let’s go ahead and write stubs for our new functions and keep the script working.
让我们继续为我们的新函数编写存根,保持脚本的正常工作。
| |
3.7 - 一些真正的工作
一些真正的工作 Some Real Work
https://linuxcommand.org/lc3_wss0070.php
In this lesson, we will develop some of our shell functions and get our script to produce some useful information.
在本课中,我们将开发一些 shell 函数,并使我们的脚本生成一些有用的信息。
show_uptime
The show_uptime function will display the output of the uptime command. The uptime command outputs several interesting facts about the system, including the length of time the system has been “up” (running) since its last re-boot, the number of users and recent system load.
show_uptime 函数将显示 uptime 命令的输出结果。uptime 命令输出了系统的一些有趣信息,包括系统自上次重新启动以来的运行时间,用户数量以及最近的系统负载。
| |
To get the output of the uptime command into our HTML page, we will code our shell function like this, replacing our temporary stubbing code with the finished version:
为了将 uptime 命令的输出添加到我们的 HTML 页面中,我们将编写如下的 shell 函数,将临时的存根代码替换为最终版本:
| |
As we can see, this function outputs a stream of text containing a mixture of HTML tags and command output. When the command substitution takes place in the main body of the our program, the output from our function becomes part of the here script.
正如我们所看到的,该函数输出了一个包含 HTML 标记和命令输出混合的文本流。当命令替换发生在我们程序的主体部分时,函数的输出将成为 here 脚本的一部分。
drive_space
The drive_space function will use the df command to provide a summary of the space used by all of the mounted file systems.
drive_space 函数将使用 df 命令提供所有已挂载文件系统使用空间的摘要信息。
| |
In terms of structure, the drive_space function is very similar to the show_uptime function:
在结构上,drive_space 函数与 show_uptime 函数非常相似:
| |
home_space
The home_space function will display the amount of space each user is using in his/her home directory. It will display this as a list, sorted in descending order by the amount of space used.
home_space 函数将显示每个用户在他/她的主目录中使用的空间量。它将按照使用空间的大小降序排列,以列表形式显示。
| |
Note that in order for this function to successfully execute, the script must be run by the superuser, since the du command requires superuser privileges to examine the contents of the /home directory.
请注意,为了使该函数成功执行,脚本必须以超级用户身份运行,因为 du 命令需要超级用户权限来检查 /home 目录的内容。
system_info
We’re not ready to finish the system_info function yet. In the meantime, we will improve the stubbing code so it produces valid HTML:
我们还没有准备好完成 system_info 函数。与此同时,我们将改进存根代码,以生成有效的 HTML:
| |
3.8 - 流程控制 - 第一部分
流程控制 - 第一部分 Flow Control - Part 1
https://linuxcommand.org/lc3_wss0080.php
In this lesson, we will look at how to add intelligence to our scripts. So far, our project script has only consisted of a sequence of commands that starts at the first line and continues line by line until it reaches the end. Most programs do much more than this. They make decisions and perform different actions depending on conditions.
在这节课中,我们将学习如何在脚本中添加智能功能。到目前为止,我们的项目脚本只是由一系列命令组成,从第一行开始顺序执行,直到结束。大多数程序要做的事情比这要复杂得多。它们根据条件进行决策并执行不同的操作。
The shell provides several commands that we can use to control the flow of execution in our program. In this lesson, we will look at the following:
Shell 提供了几个命令,我们可以用它们来控制程序的执行流程。在本课中,我们将学习以下内容:
iftestexit
if
The first command we will look at is if. The if command is fairly simple on the surface; it makes a decision based on the exit status of a command. The if command’s syntax looks like this:
我们首先学习的是 if 命令。if 命令在表面上很简单,它根据一个命令的 退出状态 做出决策。if 命令的语法如下:
| |
where commands is a list of commands. This is a little confusing at first glance. But before we can clear this up, we have to look at how the shell evaluates the success or failure of a command.
其中 commands 是一系列命令。乍一看可能有点困惑。但在我们澄清这一点之前,我们必须了解 Shell 如何评估命令的成功或失败。
退出状态 Exit Status
Commands (including the scripts and shell functions we write) issue a value to the system when they terminate, called an exit status. This value, which is an integer in the range of 0 to 255, indicates the success or failure of the command’s execution. By convention, a value of zero indicates success and any other value indicates failure. The shell provides a parameter that we can use to examine the exit status. Here we see it in action:
命令(包括我们编写的脚本和 Shell 函数)在终止时向系统发出一个值,称为退出状态。这个值是一个在 0 到 255 范围内的整数,表示命令执行的成功或失败。按照惯例,零表示成功,任何其他值表示失败。Shell 提供了一个参数,我们可以使用它来检查退出状态。下面是一个示例:
| |
In this example, we execute the ls command twice. The first time, the command executes successfully. If we display the value of the parameter $?, we see that it is zero. We execute the ls command a second time, producing an error and examine the parameter $? again. This time it contains a 2, indicating that the command encountered an error. Some commands use different exit status values to provide diagnostics for errors, while many commands simply exit with a value of one when they fail. Man pages often include a section entitled “Exit Status,” describing what codes are used. However, a zero always indicates success.
在这个示例中,我们执行了两次 ls 命令。第一次,命令成功执行。如果我们显示参数 $? 的值,会发现它是零。我们第二次执行 ls 命令,产生一个错误,并再次检查参数 $?。这次它包含了 2,表示命令遇到了一个错误。有些命令使用不同的退出状态值来提供错误的诊断信息,而许多命令在失败时只是退出状态为 1。手册页面通常包含一个名为“Exit Status”的部分,描述了使用了哪些代码。然而,零总是表示成功。
The shell provides two extremely simple builtin commands that do nothing except terminate with either a zero or one exit status. The true command always executes successfully and the false command always executes unsuccessfully:
Shell 提供了两个非常简单的内置命令,它们除了以零或一的退出状态终止外什么都不做。true 命令始终成功执行,而 false 命令始终执行失败:
| |
We can use these commands to see how the if statement works. What the if statement really does is evaluate the success or failure of commands:
我们可以使用这些命令来了解 if 语句的工作原理。if 语句的真正作用是评估命令的成功或失败:
| |
The command echo "It's true." is executed when the command following if executes successfully, and is not executed when the command following if does not execute successfully.
当 if 后面的命令成功执行时,会执行 echo "It's true." 命令,当 if 后面的命令执行失败时,不会执行 echo "It's true." 命令。
test
The test command is used most often with the if command to perform true/false decisions. The command is unusual in that it has two different syntactic forms:
test 命令最常与 if 命令一起使用以进行真/假判断。该命令有两种不同的语法形式:
| |
The test command works simply. If the given expression is true, test exits with a status of zero; otherwise it exits with a status of 1.
test 命令的工作很简单。如果给定的表达式为真,则 test 以零状态退出;否则,它以 1 的状态退出。
The neat feature of test is the variety of expressions we can create. Here is an example:
test 的好处是我们可以创建多种表达式。以下是一个示例:
| |
In this example, we use the expression “-f .bash_profile “. This expression asks, “Is .bash_profile a file?” If the expression is true, then test exits with a zero (indicating true) and the if command executes the command(s) following the word then. If the expression is false, then test exits with a status of one and the if command executes the command(s) following the word else.
在这个示例中,我们使用表达式 “-f .bash_profile"。该表达式询问:“.bash_profile 是否是一个文件?”如果表达式为真,则 test 以零状态退出(表示为真),并且 if 命令执行紧随 then 之后的命令。如果表达式为假,则 test 以状态 1 退出,并且 if 命令执行紧随 else 之后的命令。
Here is a partial list of the conditions that test can evaluate. Since test is a shell builtin, use “help test” to see a complete list.
以下是 test 命令可以评估的一部分条件列表。由于 test 是一个内置命令,使用 “help test” 可以查看完整列表。
| 表达式 Expression | 描述 Description |
|---|---|
| -d file | 如果 file 是一个目录,则为真。 True if file is a directory. |
| -e file | 如果 file 存在,则为真。 True if file exists. |
| -f file | 如果 file 存在且是一个普通文件,则为真。 True if file exists and is a regular file. |
| -L file | 如果 file 是一个符号链接,则为真。 True if file is a symbolic link. |
| -r file | 如果 file 是一个你可读取的文件,则为真。 True if file is a file readable by you. |
| -w file | 如果 file 是一个你可写入的文件,则为真。 True if file is a file writable by you. |
| -x file | 如果 file 是一个你可执行的文件,则为真。 True if file is a file executable by you. |
| file1 -nt file2 | 如果 file1 比(根据修改时间)file2 新,则为真。 True if file1 is newer than (according to modification time) file2. |
| file1 -ot file2 | 如果 file1 比 file2 旧,则为真。 True if file1 is older than file2. |
| -z string | 如果 string 为空,则为真。 True if string is empty. |
| -n string | 如果 string 不为空,则为真。 True if string is not empty. |
| string1 = string2 | 如果 string1 等于 string2,则为真。 True if string1 equals string2. |
| string1 != string2 | 如果 string1 不等于 string2,则为真。 True if string1 does not equal string2. |
Before we go on, We need to explain the rest of the example above, since it also reveals more important ideas.
在我们继续之前,我们需要解释上面示例的剩余部分,因为它还揭示了更重要的思想。
In the first line of the script, we see the if command followed by the test command, followed by a semicolon, and finally the word then. Most people choose to use the [ *expression* ] form of the test command since it’s easier to read. Notice that the spaces required between the “[” and the beginning of the expression are required. Likewise, the space between the end of the expression and the trailing “]”.
在脚本的第一行中,我们看到 if 命令后面跟着 test 命令,后面是一个分号,最后是单词 then。大多数人选择使用 [ *expression* ] 形式的 test 命令,因为它更容易阅读。请注意,在 “[” 与表达式开头之间需要的空格。同样,表达式的结尾和尾随的 “]” 之间的空格也是必需的。
The semicolon is a command separator. Using it allows us to put more than one command on a line. For example:
分号是一个命令分隔符。使用分号允许我们在一行上放置多个命令。例如:
| |
will clear the screen and execute the ls command.
将清除屏幕并执行 ls 命令。
We use the semicolon as we did to allow us to put the word then on the same line as the if command, because it’s easier to read that way.
我们像这样使用分号是为了让 then 这个词与 if 命令在同一行上,因为这样更容易阅读。
On the second line, there is our old friend echo. The only thing of note on this line is the indentation. Again for the benefit of readability, it is traditional to indent all blocks of conditional code; that is, any code that will only be executed if certain conditions are met. The shell does not require this; it is done to make the code easier to read.
在第二行中,我们看到了我们的老朋友 echo。这行中值得注意的是缩进。为了可读性,传统上对所有的条件代码块进行缩进,也就是只有在满足特定条件时才会执行的代码块。Shell 并不要求这样做,但这样做是为了让代码更容易阅读。
In other words, we could write the following and get the same results:
换句话说,我们可以编写以下代码并获得相同的结果:
| |
exit
In order to be good script writers, we must set the exit status when our scripts finish. To do this, use the exit command. The exit command causes the script to terminate immediately and set the exit status to whatever value is given as an argument. For example:
为了成为良好的脚本编写者,我们必须在脚本完成时设置退出状态。要做到这一点,请使用 exit 命令。exit 命令会立即终止脚本,并将退出状态设置为作为参数给出的值。例如:
| |
exits our script and sets the exit status to 0 (success), whereas
退出我们的脚本,并将退出状态设置为 0(成功),而
| |
exits your script and sets the exit status to 1 (failure).
退出你的脚本,并将退出状态设置为 1(失败)。
测试是否为 Root 用户 Testing for Root
When we last left our script, we required that it be run with superuser privileges. This is because the home_space function needs to examine the size of each user’s home directory, and only the superuser is allowed to do that.
当我们上次离开我们的脚本时,我们要求它在超级用户权限下运行。这是因为 home_space 函数需要检查每个用户的主目录大小,而只有超级用户才允许这样做。
But what happens if a regular user runs our script? It produces a lot of ugly error messages. What if we could put something in the script to stop it if a regular user attempts to run it?
但是如果普通用户运行我们的脚本会发生什么?它会产生很多丑陋的错误消息。如果我们能在脚本中添加一些内容,以便在普通用户尝试运行它时停止它会怎么样?
The id command can tell us who the current user is. When executed with the “-u” option, it prints the numeric user id of the current user.
id 命令可以告诉我们当前用户是谁。当使用 “-u” 选项执行时,它会打印当前用户的数字用户 ID。
| |
If the superuser executes id -u, the command will output “0.” This fact can be the basis of our test:
如果超级用户执行 id -u,该命令将输出 “0”。这个事实可以成为我们的测试基础:
| |
In this example, if the output of the command id -u is equal to the string “0”, then print the string “superuser.”
在这个示例中,如果 id -u 命令的输出等于字符串 “0”,那么打印字符串 “superuser”。
While this code will detect if the user is the superuser, it does not really solve the problem yet. We want to stop the script if the user is not the superuser, so we will code it like so:
虽然这段代码会检测用户是否是超级用户,但它还没有真正解决问题。我们想要在用户不是超级用户时停止脚本,所以我们将对其进行编码:
| |
With this code, if the output of the id -u command is not equal to “0”, then the script prints a descriptive error message, exits, and sets the exit status to 1, indicating to the operating system that the script executed unsuccessfully.
使用这段代码,如果 id -u 命令的输出不等于 “0”,则脚本会打印一个描述性的错误消息,退出并将退出状态设置为 1,表示脚本执行失败,以通知操作系统。
Notice the “>&2” at the end of the echo command. This is another form of I/O direction. We will often see this in routines that display error messages. If this redirection were not done, the error message would go to standard output. With this redirection, the message is sent to standard error. Since we are executing our script and redirecting its standard output to a file, we want the error messages separated from the normal output.
请注意 echo 命令末尾的 “>&2"。这是另一种 I/O 重定向形式。我们经常在显示错误消息的程序中看到这种形式。如果没有进行此重定向,错误消息将被发送到标准输出。通过进行此重定向,消息将被发送到标准错误。由于我们正在执行脚本并将其标准输出重定向到文件,我们希望错误消息与正常输出分开。
We could put this routine near the beginning of our script so it has a chance to detect a possible error before things get under way, but in order to run this script as an ordinary user, we will use the same idea and modify the home_space function to test for proper privileges instead, like so:
我们可以将此代码放在脚本的开头附近,以便在开始之前有机会检测可能的错误,但为了以普通用户身份运行此脚本,我们将使用相同的思路,并修改 home_space 函数以测试适当的权限,如下所示:
| |
This way, if an ordinary user runs the script, the troublesome code will be passed over, rather than executed and the problem will be solved.
这样,如果普通用户运行脚本,有问题的代码将被跳过,而不是执行,问题就得到解决了。
进一步阅读 Further Reading
- Chapter 27 in The Linux Command Line covers this topic in more detail including the
[[ ]]construct, the modern replacement for thetestcommand, and the(( ))construct for performing arithmetic truth tests. - 《Linux 命令行》的第 27 章详细介绍了这个主题,包括
[[ ]]结构,作为test命令的现代替代品,以及用于执行算术真值测试的(( ))结构。 - To learn more about stylistic conventions and best coding practices for bash scripts, see the Coding Standards adventure.
- 要了解有关 bash 脚本的样式约定和最佳编码实践的更多信息,请参阅 Coding Standards 探险。
3.9 - 远离麻烦
远离麻烦 - Stay Out of Trouble
https://linuxcommand.org/lc3_wss0090.php
Now that our scripts are getting a little more complicated, Let’s look at some common mistakes that we might run into. To do this, we’ll create the following script called trouble.bash. Be sure to enter it exactly as written.
现在我们的脚本变得有点复杂了,让我们看看可能遇到的一些常见错误。为此,我们将创建以下名为 trouble.bash 的脚本。请确保按照原样输入。
| |
When we run this script, it should output the line “Number equals 1” because, well, number equals 1. If we don’t get the expected output, we need to check our typing; we’ve made a mistake.
当我们运行这个脚本时,它应该输出 “Number equals 1”,因为,嗯,number 等于 1。如果我们没有得到预期的输出,我们需要检查我们的输入,我们肯定犯了个错误。
空变量 Empty Variables
Let’s edit the script to change line 3 from:
让我们编辑脚本,将第 3 行从:
| |
to:
改为:
| |
and run the script again. This time we should get the following:
然后再次运行脚本。这次我们应该得到以下结果:
| |
As we can see, bash displayed an error message when we ran the script. We might think that by removing the “1” on line 3 it created a syntax error on line 3, but it didn’t. Let’s look at the error message again:
如我们所见,当我们运行脚本时,bash 显示了一个错误消息。我们可能认为,通过在第 3 行删除 “1”,它在第 3 行创建了一个语法错误,但实际上并非如此。让我们再次查看错误消息:
| |
We can see that ./trouble.bash is reporting the error and the error has to do with “[”. Remember that “[” is an abbreviation for the test shell builtin. From this we can determine that the error is occurring on line 5 not line 3.
我们可以看到 ./trouble.bash 报告了错误,并且该错误与 “[” 有关。请记住,"[" 是 test 内置命令的缩写。从这里我们可以确定错误发生在第 5 行而不是第 3 行。
First, to be clear, there is nothing wrong with line 3. number= is perfectly good syntax. We sometimes want to set a variable’s value to nothing. We can confirm the validity of this by trying it on the command line:
首先,为了明确,第 3 行没有问题。number= 是完全正确的语法。有时我们想将变量的值设置为空。我们可以通过在命令行上尝试来确认其有效性:
| |
See, no error message. So what’s wrong with line 5? It worked before.
看,没有错误消息。那么第 5 行有什么问题?它之前是有效的。
To understand this error, we have to see what the shell sees. Remember that the shell spends a lot of its life expanding text. In line 5, the shell expands the value of number where it sees $number. In our first try (when number=1), the shell substituted 1 for $number like so:
要理解这个错误,我们必须看到 shell 看到的内容。请记住,shell 在其生命周期中花费了很多时间来展开文本。在第 5 行,shell 在 $number 处展开了 number 的值。在我们第一次尝试(number=1)中,shell 将 1 替换为 $number,如下所示:
| |
However, when we set number to nothing (number=), the shell saw this after the expansion:
然而,当我们将 number 设置为空(number=)时,shell 在展开之后看到了这个:
| |
which is an error. It also explains the rest of the error message we received. The “=” is a binary operator; that is, it expects two items to operate upon - one on each side. What the shell is trying to tell us is that there is only one item and there should be a unary operator (like “!”) that only operates on a single item.
这是一个错误。这也解释了我们收到的错误消息的其他部分。"=" 是一个二元运算符;也就是说,它期望两个操作数 - 每个操作数在一边。Shell 试图告诉我们的是,只有一个操作数,并且应该有一个仅对单个操作数操作的一元运算符(如 “!")。
To fix this problem, change line 5 to read:
要解决这个问题,将第 5 行改为以下内容:
| |
Now when the shell performs the expansion it will see:
现在当 shell 执行展开时,将看到以下内容:
| |
which correctly expresses our intent.
这样正确地表达了我们的意图。
This brings up two important things to remember when we are writing scripts. We need to consider what happens if a variable is set to equal nothing and we should always put double quotes around parameters that undergo expansion.
这带来了两个重要的事情,我们在编写脚本时需要记住。我们需要考虑如果一个变量被设置为空会发生什么,而且我们应该始终在经过展开的参数周围加上双引号。
缺少引号 Missing Quotes
Edit line 6 to remove the trailing quote from the end of the line:
编辑第 6 行,将行末的引号删除:
| |
and run the script again. We should get this:
然后再次运行脚本。我们应该得到以下结果:
| |
Here we have another instance of a mistake in one line causing a problem later in the script. What happened in this case was that the shell kept looking for the closing quotation mark to determine where the end of the string is, but ran off the end of the file before it found it.
这里我们又遇到了一行中的错误导致脚本后面出现问题的情况。在这种情况下,发生的情况是 shell 一直在寻找结束引号以确定字符串的结尾位置,但在找到之前已经到达了文件末尾。
These errors can be a real pain to track down in a long script. This is one reason we should test our scripts frequently while we are writing so there is less new code to test. Also, using a text editor with syntax highlighting makes these bugs easier to find.
在一个很长的脚本中追踪这些错误可能非常困难和令人沮丧。这就是为什么在编写过程中我们应该经常测试我们的脚本,这样就会有较少的新代码需要测试。此外,使用带有语法高亮的文本编辑器可以更容易地找到这些错误。
隔离问题 Isolating Problems
Finding bugs in scripts can sometimes be very difficult and frustrating. Here are a couple of techniques that are useful:
在脚本中找到错误有时可能非常困难和令人沮丧。以下是两种有用的技巧:
Isolate blocks of code by “commenting them out.” This trick involves putting comment characters at the beginning of lines of code to stop the shell from reading them. We can do this to a block of code to see if a particular problem goes away. By doing this, we can isolate which part of a program is causing (or not causing) a problem.
通过"注释掉"来隔离代码块。 这个技巧涉及将注释字符放在代码行的开头,以阻止 shell 读取它们。我们可以这样做来对一块代码进行注释,以查看特定的问题是否消失。通过这样做,我们可以确定程序的哪一部分导致(或不导致)问题。
For example, when we were looking for our missing quotation we could have done this:
例如,在查找缺少引号时,我们可以这样做:
| |
By commenting out the else clause and running the script, we could show that the problem was not in the else clause even though the error message suggested that it was.
通过注释掉 else 语句并运行脚本,我们可以证明问题不在 else 语句中,即使错误消息暗示问题在其中。
Use echo commands to verify assumptions. As we gain experience tracking down bugs, we will discover that bugs are often not where we first expect to find them. A common problem will be that we will make a false assumption about the performance of our program. A problem will develop at a certain point in the program and we assume the problem is there. This is often incorrect. To combat this, we can place echo commands in the code while we are debugging, to produce messages that confirm the program is doing what is expected. There are two kinds of messages that we can insert.
使用 echo 命令验证假设。 随着我们在调试中积累经验,我们会发现错误通常不在我们最初期望的地方。一个常见的问题是我们对程序的性能做出了错误的假设。问题将在程序的某个特定点出现,并且我们会认为问题就在那里。这通常是不正确的。为了解决这个问题,我们可以在调试过程中在代码中插入 echo 命令,以生成确认程序按预期运行的消息。我们可以插入两种类型的消息。
The first type simply announces that we have reached a certain point in the program. We saw this in our earlier discussion on stubbing. It is useful to know that program flow is happening the way we expect.
第一种类型只是宣布我们已经到达程序的某个特定点。我们在之前讨论的占位符中看到过这一点。了解程序流程是否按我们的预期进行非常有用。
The second type displays the value of a variable (or variables) used in a calculation or test. We will often find that a portion of a program will fail because something that we assumed was correct earlier in the program is, in fact, incorrect and is causing our program to fail later on.
第二种类型显示在计算或测试中使用的变量(或变量)的值。我们经常发现,程序的一部分将因为我们在程序早期假设正确的东西实际上是不正确的而失败,并且导致我们的程序在后面失败。
观察脚本运行 Watching Our Script Run
It is possible to have bash show us what it is doing when we run our script. To do this, add a “-x” to the first line of the script, like this:
在运行脚本时,可以让 bash 显示它在做什么。要做到这一点,将 “-x” 添加到脚本的第一行,如下所示:
| |
Now, when we run the script, bash will display each line (with expansions performed) as it executes it. This technique is called tracing. Here is what it looks like:
现在,当我们运行脚本时,bash 将显示每行执行时的文本(包括展开)。这个技术被称为跟踪。下面是它的样子:
| |
Alternately, we can use the set command within the script to turn tracing on and off. Use set -x to turn tracing on and set +x to turn tracing off. For example.:
或者,我们可以在脚本中使用 set 命令来打开和关闭跟踪。使用 set -x 打开跟踪,使用 set +x 关闭跟踪。例如:
| |
3.10 - 键盘输入和算术
键盘输入和算术 Keyboard Input and Arithmetic
https://linuxcommand.org/lc3_wss0100.php
Up to now, our scripts have not been interactive. That is, they did not accept any input from the user. In this lesson, we will see how our scripts can ask questions, and get and use responses.
到目前为止,我们的脚本还没有交互功能。也就是说,它们没有接受用户的任何输入。在本课中,我们将看到如何让我们的脚本提出问题,并获取和使用回答。
read
To get input from the keyboard, we use the read command. The read command takes input from the keyboard and assigns it to a variable. Here is an example:
要从键盘获取输入,我们使用 read 命令。read 命令从键盘获取输入并将其赋值给一个变量。以下是一个示例:
| |
As we can see, we displayed a prompt on line 3. Note that “-n” given to the echo command causes it to keep the cursor on the same line; i.e., it does not output a linefeed at the end of the prompt.
正如我们所看到的,我们在第 3 行显示了一个提示符。注意,echo 命令后面的 “-n” 使其保持在同一行上;即不在提示符的末尾输出换行符。
Next, we invoke the read command with “text” as its argument. What this does is wait for the user to type something followed by the Enter key and then assign whatever was typed to the variable text.
接下来,我们使用 “text” 作为 read 命令的参数来调用它。这样做的作用是等待用户输入一些内容,然后按回车键,然后将输入的内容分配给变量 text。
Here is the script in action:
以下是脚本的实际运行情况:
| |
If we don’t give the read command the name of a variable to assign its input, it will use the environment variable REPLY.
如果我们没有给 read 命令指定要分配其输入的变量的名称,它将使用环境变量 REPLY。
The read command has several command line options. The three most interesting ones are -p, -t and -s.
read 命令有几个命令行选项。其中三个最有趣的选项是 -p、-t 和 -s。
The -p option allows us to specify a prompt to precede the user’s input. This saves the extra step of using an echo to prompt the user. Here is the earlier example rewritten to use the -p option:
-p 选项允许我们指定一个提示符,在用户的输入之前显示。这样可以省去使用 echo 提示用户的额外步骤。以下是重写为使用 -p 选项的早期示例:
| |
The -t option followed by a number of seconds provides an automatic timeout for the read command. This means that the read command will give up after the specified number of seconds if no response has been received from the user. This option could be used in the case of a script that must continue (perhaps resorting to a default response) even if the user does not answer the prompts. Here is the -t option in action:
-t 选项后面跟一个秒数,为 read 命令提供了自动超时功能。这意味着如果在指定的秒数内没有从用户那里收到响应,read 命令将放弃等待。在脚本必须继续执行的情况下(可能会采用默认响应),即使用户没有回答提示,也可以使用此选项。以下是 -t 选项的示例:
| |
The -s option causes the user’s typing not to be displayed. This is useful when we are asking the user to type in a password or other confidential information.
-s 选项使用户的输入不显示在屏幕上。这在要求用户输入密码或其他机密信息时非常有用。
算术 Arithmetic
Since we are working on a computer, it is natural to expect that it can perform some simple arithmetic. The shell provides features for integer arithmetic.
由于我们在使用计算机,自然可以期望它能执行一些简单的算术运算。Shell 提供了整数算术的功能。
What’s an integer? That means whole numbers like 1, 2, 458, -2859. It does not mean fractional numbers like 0.5, .333, or 3.1415. To deal with fractional numbers, there is a separate program called bc which provides an arbitrary precision calculator language. It can be used in shell scripts, but is beyond the scope of this tutorial.
什么是整数?那意味着像 1、2、458、-2859 这样的整数。它不包括像 0.5、.333 或 3.1415 这样的小数。为了处理小数,有一个名为 bc 的单独程序,它提供了一个任意精度的计算器语言。它可以在 shell 脚本中使用,但超出了本教程的范围。
Let’s say we want to use the command line as a primitive calculator. We can do it like this:
假设我们想要将命令行用作基本计算器。我们可以这样做:
| |
When we surround an arithmetic expression with the double parentheses, the shell will perform arithmetic expansion.
当我们用双括号括起算术表达式时,Shell 将执行算术展开。
Notice that whitespace is ignored:
注意,空格被忽略:
| |
The shell can perform a variety of common (and not so common) arithmetic operations. Here is an example:
Shell 可以执行各种常见(和不常见)的算术运算。以下是一个示例:
| |
Notice how the leading “$” is not needed to reference variables inside the arithmetic expression such as “first_num + second_num”.
注意在算术表达式中不需要前导的 “$” 来引用变量,例如 “first_num + second_num"。
Try this program out and watch how it handles division (remember, this is integer division) and how it handles large numbers. Numbers that get too large overflow like the odometer in a car when it exceeds the number of miles it was designed to count. It starts over but first it goes through all the negative numbers because of how integers are represented in memory. Division by zero (which is mathematically invalid) does cause an error.
尝试运行此程序,观察它如何处理除法(记住,这是整数除法)以及如何处理大数。当数字变得太大时,它们会溢出,就像汽车上的里程表超过设计时的里程数时一样。它会重新开始,但首先会经过所有的负数,这是由于整数在内存中的表示方式。除零(在数学上是无效的)会导致错误。
The first four operations, addition, subtraction, multiplication and division, are easily recognized but the fifth one may be unfamiliar. The “%” symbol represents remainder (also known as modulo). This operation performs division but instead of returning a quotient like division, it returns the remainder. While this might not seem very useful, it does, in fact, provide great utility when writing programs. For example, when a remainder operation returns zero, it indicates that the first number is an exact multiple of the second. This can be very handy:
前四个操作,加法、减法、乘法和除法,很容易理解,但第五个可能不太熟悉。"%” 符号表示余数(也称为模运算)。此操作执行除法,但与除法返回商不同,它返回余数。虽然这可能看起来并不非常有用,但实际上在编写程序时提供了很大的实用性。例如,当余数操作返回零时,它表示第一个数字是第二个数字的精确倍数。这非常方便:
| |
Or, in this program that formats an arbitrary number of seconds into hours and minutes:
或者,在这个程序中,将任意秒数格式化为小时和分钟:
| |
3.11 - 流程控制 - 第二部分
流程控制 - 第二部分 Flow Control - Part 2
https://linuxcommand.org/lc3_wss0110.php
Hold on to your hats. This lesson is going to be a big one!
准备好了吗?这一课将是一大篇章!
更多的分支 More Branching
In the previous lesson on flow control we learned about the if command and how it is used to alter program flow based on a command’s exit status. In programming terms, this type of program flow is called branching because it is like traversing a tree. We come to a fork in the tree and the evaluation of a condition determines which branch we take.
在前一节的流程控制课程中,我们学习了 if 命令以及如何根据命令的退出状态来改变程序流程。从编程的角度来说,这种类型的程序流程被称为分支,因为它类似于遍历树。我们来到树中的一个分叉,条件的评估决定了我们走哪条分支。
There is a second and more complex kind of branching called a case. A case is multiple-choice branch. Unlike the simple branch, where we take one of two possible paths, a case supports several possible outcomes based on the evaluation of a value.
还有一种更复杂的分支叫做case。Case 是多选分支。与简单的分支不同,我们可以基于某个值的评估来支持多种可能的结果。
We can construct this type of branch with multiple if statements. In the example below, we evaluate some input from the user:
我们可以使用多个 if 语句构建这种类型的分支。在下面的示例中,我们评估用户输入的内容:
| |
Not very pretty.
不是很漂亮。
Fortunately, the shell provides a more elegant solution to this problem. It provides a built-in command called case, which can be used to construct an equivalent program:
幸运的是,Shell 提供了一个更优雅的解决方案。它提供了一个内置命令叫做 case,可以用来构建等效的程序:
| |
The case command has the following form:
case 命令的形式如下:
| |
case selectively executes statements if word matches a pattern. We can have any number of patterns and statements. Patterns can be literal text or wildcards. We can have multiple patterns separated by the “|” character. Here is a more advanced example to show how this works:
case 命令根据 word 是否匹配某个模式来选择性地执行语句。我们可以有任意数量的模式和语句。模式可以是文字字面值或通配符。我们可以用 “|” 字符分隔多个模式。下面是一个更高级的示例,展示了它是如何工作的:
| |
Notice the special pattern “*”. This pattern will match anything, so it is used to catch cases that did not match previous patterns. Inclusion of this pattern at the end is wise, as it can be used to detect invalid input.
注意特殊的模式 “*"。这个模式将匹配任何内容,因此用于捕捉未匹配前面模式的情况。在最后加入这个模式是明智的,因为它可以用来检测无效的输入。
循环 Loops
The final type of program flow control we will discuss is called looping. Looping is repeatedly executing a section of a program based on the exit status of a command. The shell provides three commands for looping: while, until and for. We are going to cover while and until in this lesson and for in a upcoming lesson.
我们将讨论的最后一种程序流程控制类型称为循环。循环是根据命令的退出状态重复执行程序的一部分。Shell 提供了三个用于循环的命令:while、until 和 for。我们将在本课程中讨论 while 和 until,而将 for 留在即将到来的课程中讲解。
The while command causes a block of code to be executed over and over, as long as the exit status of a specified command is true. Here is a simple example of a program that counts from zero to nine:
while 命令使得一段代码块根据指定命令的退出状态反复执行。以下是一个简单的示例,该程序从零计数到九:
| |
On line 3, we create a variable called number and initialize its value to 0. Next, we start the while loop. As we can see, we have specified a command that tests the value of number. In our example, we test to see if number has a value less than 10.
在第3行,我们创建一个名为 number 的变量,并将其初始值设置为0。接下来,我们开始 while 循环。正如我们所见,我们指定了一个命令来测试 number 的值。在我们的示例中,我们测试 number 是否小于10。
Notice the word do on line 4 and the word done on line 7. These enclose the block of code that will be repeated as long as the exit status remains zero.
注意第4行的 do 和第7行的 done。它们包围了将重复的代码块,只要退出状态保持为零,就会重复执行。
In most cases, the block of code that repeats must do something that will eventually change the exit status, otherwise we will have what is called an endless loop; that is, a loop that never ends.
在大多数情况下,重复执行的代码块必须执行一些最终会改变退出状态的操作,否则我们将会得到所谓的无限循环;也就是说,一个永远不会结束的循环。
In the example, the repeating block of code outputs the value of number (the echo command on line 5) and increments number by one on line 6. Each time the block of code is completed, the test command’s exit status is evaluated again. After the tenth iteration of the loop, number has been incremented ten times and the test command will terminate with a non-zero exit status. At that point, the program flow resumes with the statement following the word done. Since done is the last line of our example, the program ends.
在这个示例中,重复执行的代码块输出 number 的值(第5行的 echo 命令),并在第6行将 number 增加一。每次完成代码块后,测试命令的退出状态会再次评估。在循环的第十次迭代之后,number 已经增加了十次,test 命令将以非零退出状态终止。此时,程序流程将恢复到单词 done 后面的语句。由于 done 是我们示例的最后一行,程序结束了。
The until command works exactly the same way, except the block of code is repeated as long as the specified command’s exit status is false. In the example below, notice how the expression given to the test command has been changed from the while example to achieve the same result:
until 命令的工作方式完全相同,只是重复执行的代码块是在指定命令的退出状态为假时重复执行。在下面的示例中,注意与 while 示例相比,给 test 命令指定的表达式已经改变,但结果是相同的:
| |
构建菜单 Building a Menu
A common user interface for text-based programs is a menu. A menu is a list of choices from which the user can pick.
文本界面程序中常见的用户界面是菜单。菜单是一个列表,用户可以从中选择。
In the example below, we use our new knowledge of loops and cases to build a simple menu driven application:
在下面的示例中,我们利用循环和 case 的新知识构建一个简单的菜单驱动应用程序:
| |
The purpose of the until loop in this program is to re-display the menu each time a selection has been completed. The loop will continue until selection is equal to 0, the “exit” choice. Notice how we defend against entries from the user that are not valid choices.
这个程序中的 until 循环的目的是在完成选择后重新显示菜单。循环将继续,直到选择等于0,即"退出"选项。注意我们如何防止用户输入无效的选择。
To make this program better looking when it runs, we can enhance it by adding a function that asks the user to press the Enter key after each selection has been completed, and clears the screen before the menu is displayed again. Here is the enhanced example:
为了使程序在运行时更美观,我们可以增强它,添加一个函数,在每次选择完成后要求用户按下回车键,并在显示菜单之前清屏。以下是增强后的示例:
| |
当你的计算机卡住时… When your computer hangs…
We have all had the experience of an application hanging. Hanging is when a program suddenly seems to stop and become unresponsive. While you might think that the program has stopped, in most cases, the program is still running but its program logic is stuck in an endless loop.
我们都曾经有过应用程序卡住的经历。卡住是指一个程序突然停止并变得无响应。虽然你可能认为程序已经停止了,但在大多数情况下,程序仍在运行,只是它的程序逻辑陷入了一个无限循环中。
Imagine this situation: you have an external device attached to your computer, such as a USB disk drive but you forgot to turn it on. You try and use the device but the application hangs instead. When this happens, you could picture the following dialog going on between the application and the interface for the device:
想象一下这种情况:你的计算机连接着一个外部设备,比如一个USB磁盘驱动器,但你忘了将其打开。你尝试使用设备,但应用程序却卡住了。当这种情况发生时,你可以想象应用程序和设备接口之间发生了以下对话:
Application: Are you ready?
Interface: Device not ready.
Application: Are you ready?
Interface: Device not ready.
Application: Are you ready?
Interface: Device not ready.
and so on, forever.
以此类推,一直无限循环。
Well-written software tries to avoid this situation by instituting a timeout. This means that the loop is also counting the number of attempts or calculating the amount of time it has waited for something to happen. If the number of tries or the amount of time allowed is exceeded, the loop exits and the program generates an error and exits.
良好编写的软件会通过引入超时机制来避免这种情况。这意味着循环同时计算尝试次数或等待发生某事的时间。如果超过了允许的尝试次数或时间限制,循环将退出,程序生成一个错误并退出。
3.12 - 位置参数
位置参数 Positional Parameters
https://linuxcommand.org/lc3_wss0120.php
When we last left our script, it looked something like this:
当我们上次离开我们的脚本时,它看起来像这样:
| |
We have most things working, but there are several more features we can add:
我们已经完成了大部分工作,但还有几个功能可以添加:
We should be able to specify the name of the output file on the command line, as well as set a default output file name if no name is specified.
我们应该能够在命令行上指定输出文件的名称,如果没有指定名称,还应设置默认输出文件名。
Let’s offer an interactive mode that will prompt for a file name and warn the user if the file exists and prompt the user to overwrite it.
让我们提供一个交互模式,提示用户输入文件名,并在文件存在时警告用户并询问是否覆盖它。
Naturally, we want to have a help option that will display a usage message.
当然,我们希望有一个帮助选项,显示用法信息。
All of these features involve using command line options and arguments. To handle options on the command line, we use a facility in the shell called positional parameters. Positional parameters are a series of special variables ($0 through $9) that contain the contents of the command line.
所有这些功能都涉及使用命令行选项和参数。为了处理命令行上的选项,我们使用Shell中的一个功能,称为位置参数。位置参数是一系列特殊变量($0到$9),它们包含命令行的内容。
Let’s imagine the following command line:
让我们想象以下命令行:
| |
If some_program were a bash shell script, we could read each item on the command line because the positional parameters contain the following:
如果some_program是一个bash shell脚本,我们可以读取命令行上的每个项目,因为位置参数包含以下内容:
- $0 would contain “some_program”
- $1 would contain “word1”
- $2 would contain “word2”
- $3 would contain “word3”
$0将包含"some_program"$1将包含"word1"$2将包含"word2"$3将包含"word3"
Here is a script we can use to try this out:
以下是我们可以用来尝试的脚本:
| |
检测命令行参数 Detecting Command Line Arguments
Often, we will want to check to see if we have comand line arguments on which to act. There are a couple of ways to do this. First, we could simply check to see if $1 contains anything like so:
通常,我们需要检查是否有命令行参数可供操作。有几种方法可以做到这一点。首先,我们可以简单地检查$1是否包含任何内容,例如:
| |
Second, the shell maintains a variable called $# that contains the number of items on the command line in addition to the name of the command ($0).
其次,Shell维护一个名为$#的变量,其中包含命令行上的项目数,以及命令的名称($0)。
| |
命令行选项 Command Line Options
As we discussed before, many programs, particularly ones from the GNU Project, support both short and long command line options. For example, to display a help message for many of these programs, we may use either the “-h” option or the longer “--help” option. Long option names are typically preceded by a double dash. We will adopt this convention for our scripts.
如前所述,许多程序,特别是来自GNU项目的程序,支持短选项和长选项。例如,要显示许多这些程序的帮助消息,我们可以使用"-h“选项或更长的”--help“选项。长选项名称通常以两个连字符开头。我们将采用这种约定来编写我们的脚本。
Here is the code we will use to process our command line:
以下是我们将用于处理命令行的代码:
| |
This code is a little tricky, so we need to explain it.
这段代码有点复杂,所以我们需要解释一下。
The first two lines are pretty easy. We set the variable interactive to be empty. This will indicate that the interactive mode has not been requested. Then we set the variable filename to contain a default file name. If nothing else is specified on the command line, this file name will be used.
前两行很简单。我们将变量interactive设置为空。这表示未请求交互模式。然后我们设置变量filename包含默认文件名。如果在命令行上没有指定其他内容,将使用此文件名。
After these two variables are set, we have default settings, in case the user does not specify any options.
设置这两个变量后,我们有了默认设置,以防用户未指定任何选项。
Next, we construct a while loop that will cycle through all the items on the command line and process each one with case. The case will detect each possible option and process it accordingly.
接下来,我们构建一个while循环,将循环遍历命令行上的所有项目,并使用case处理每个项目。case将检测每个可能的选项并相应地处理它。
Now the tricky part. How does that loop work? It relies on the magic of shift.
现在是棘手的部分。这个循环是如何工作的?它依赖于shift的魔力。
shift is a shell builtin that operates on the positional parameters. Each time we invoke shift, it “shifts” all the positional parameters down by one. $2 becomes $1, $3 becomes $2, $4 becomes $3, and so on. Try this:
shift是一个Shell内置命令,用于操作位置参数。每次我们调用shift时,它会将所有位置参数向下“移动”一位。$2变为$1,$3变为$2,$4变为$3,依此类推。请试试这个:
| |
获取选项的参数 Getting an Option’s Argument
Our “-f” option requires a valid file name as an argument. We use shift again to get the next item from the command line and assign it to filename. Later we will have to check the content of filename to make sure it is valid.
我们的”-f“选项需要一个有效的文件名作为参数。我们再次使用shift从命令行中获取下一个项目,并将其赋给filename。稍后,我们将需要检查filename的内容,以确保它是有效的。
将命令行处理器集成到脚本中 Integrating the Command Line Processor into the Script
We will have to move a few things around and add a usage function to get this new routine integrated into our script. We’ll also add some test code to verify that the command line processor is working correctly. Our script now looks like this:
我们需要移动一些内容并添加一个usage函数来将这个新例程集成到我们的脚本中。我们还将添加一些测试代码来验证命令行处理器是否正常工作。我们的脚本现在如下所示:
| |
添加交互模式 Adding Interactive Mode
The interactive mode is implemented with the following code:
交互模式使用以下代码实现:
| |
First, we check if the interactive mode is on, otherwise we don’t have anything to do. Next, we ask the user for the file name. Notice the way the prompt is worded:
首先,我们检查交互模式是否打开,否则我们没有任何事情要做。接下来,我们要求用户输入文件名。注意提示的方式:
| |
We display the current value of filename since, the way this routine is coded, if the user just presses the enter key, the default value of filename will be used. This is accomplished in the next two lines where the value of response is checked. If response is not empty, then filename is assigned the value of response. Otherwise, filename is left unchanged, preserving its default value.
我们显示filename的当前值,因为按下回车键时,如果用户没有输入任何内容,则将使用filename的默认值。在下面两行中,检查response的值。如果response不为空,则将filename赋值为response的值。否则,保持filename不变,保留其默认值。
After we have the name of the output file, we check if it already exists. If it does, we prompt the user. If the user response is not “y,” we give up and exit, otherwise we can proceed.
在获得输出文件的名称后,我们检查它是否已经存在。如果存在,我们会提示用户。如果用户响应不是"y”,我们放弃并退出,否则我们可以继续。
3.13 - 流程控制 - 第三部分
流程控制 - 第三部分 Flow Control - Part 3
https://linuxcommand.org/lc3_wss0130.php
Now that we have learned about positional parameters, it’s time to cover the remaining flow control statement, for. Like while and until, for is used to construct loops. for works like this:
现在我们已经学习了关于位置参数的知识,是时候介绍剩下的流程控制语句了,即for循环。和while和until一样,for用于构建循环。for的使用方式如下:
| |
In essence, for assigns a word from the list of words to the specified variable, executes the commands, and repeats this over and over until all the words have been used up. Here is an example:
简而言之,for将列表中的单词赋值给指定的变量,执行命令,然后重复这个过程,直到所有单词都被用完。下面是一个示例:
| |
`
In this example, the variable i is assigned the string “word1”, then the statement echo "$i" is executed, then the variable i is assigned the string “word2”, and the statement echo "$i" is executed, and so on, until all the words in the list of words have been assigned.
在这个示例中,变量i首先被赋值为字符串"word1",然后执行语句echo "$i",然后变量i被赋值为字符串"word2",执行语句echo "$i",依此类推,直到列表中的所有单词都被赋值。
The interesting thing about for is the many ways we can construct the list of words. All kinds of expansions can be used. In the next example, we will construct the list of words using command substitution:
for的有趣之处在于我们可以以多种方式构建单词列表。可以使用各种扩展。在下一个示例中,我们将使用命令替换来构建单词列表:
| |
Here we take the file .bash_profile and count the number of words in the file and the number of characters in each word.
在这里,我们读取.bash_profile文件,计算文件中的单词数以及每个单词中的字符数。
So what’s this got to do with positional parameters? Well, one of the features of for is that it can use the positional parameters as the list of words:
那么这与位置参数有什么关系呢?好吧,for的一个特性是可以使用位置参数作为单词列表:
| |
The shell variable "$@" contains the list of command line arguments. This technique is often used to process a list of files on the command line. Here is a another example:
Shell变量"$@"包含命令行参数的列表。这种技巧通常用于处理命令行上的文件列表。下面是另一个示例:
| |
Try this script. Give it a list of files or a wildcard like “*” to see it work.
尝试运行这个脚本。给它一个文件列表或通配符"*",看看它的工作原理。
The use of in "$@" is so common that it is assumed if the in words clause is ommited.
使用in "$@"的方式非常常见,如果省略了in words子句,就默认使用它。
Here is another example script. This one compares the files in two directories and lists which files in the first directory are missing from the second.
下面是另一个示例脚本。这个脚本比较两个目录中的文件,并列出第一个目录中缺失于第二个目录中的文件。
| |
Now on to the real work. We are going to improve the home_space function to output more information. Recall that our previous version looked like this:
现在让我们进入真正的工作内容。我们将改进home_space函数以输出更多信息。回顾一下,我们之前的版本如下:
| |
Here is the new version:
下面是改进后的版本:
| |
This improved version introduces a new command printf, which is used to produce formatted output according to the contents of a format string. printf comes from the C programming language and has been implemented in many other programming languages including C++, Perl, awk, java, PHP, and of course, bash. More information about printf format strings can be found at:
这个改进的版本引入了一个新命令printf,它根据格式字符串的内容生成格式化输出。printf源自C编程语言,并已在许多其他编程语言中实现,包括C++、Perl、awk、Java、PHP和当然还有bash。关于printf格式字符串的更多信息可以在以下链接中找到:
- GNU Awk User’s Guide - Control Letters
- GNU Awk User’s Guide - Format Modifiers
- GNU Awk 用户手册 - 控制字母
- GNU Awk 用户手册 - 格式修饰符
We also introduce the find command. find is used to search for files or directories that meet specific criteria. In the home_space function, we use find to list the directories and regular files in each home directory. Using the wc command, we count the number of files and directories found.
我们还引入了find命令。find用于搜索符合特定条件的文件或目录。在home_space函数中,我们使用find列出每个主目录中的目录和普通文件。使用wc命令,我们计算找到的文件和目录的数量。
The really interesting thing about home_space is how we deal with the problem of superuser access. Notice that we test for the superuser with id and, according to the outcome of the test, we assign different strings to the variable dir_list, which becomes the list of words for the for loop that follows. This way, if an ordinary user runs the script, only his/her home directory will be listed.
home_space真正有趣的地方在于我们如何处理超级用户访问的问题。请注意,我们使用id测试超级用户,并根据测试的结果将不同的字符串赋给变量dir_list,它成为接下来的for循环的单词列表。这样,如果普通用户运行脚本,只有他/她的主目录会被列出。
Another function that can use a for loop is our unfinished system_info function. We can build it like this:
还有一个可以使用for循环的函数是我们未完成的system_info函数。我们可以这样构建它:
| |
In this function, we first determine if there are any release files to process. The release files contain the name of the vendor and the version of the distribution. They are located in the /etc directory. To detect them, we perform an ls command and throw away all of its output. We are only interested in the exit status. It will be true if any files are found.
在这个函数中,我们首先确定是否有任何需要处理的 release 文件。release 文件包含供应商的名称和发行版的版本。它们位于 /etc 目录中。为了检测它们,我们执行一个 ls 命令并丢弃其所有输出。我们只对退出状态感兴趣。如果找到任何文件,退出状态将为真。
Next, we output the HTML for this section of the page, since we now know that there are release files to process. To process the files, we start a for loop to act on each one. Inside the loop, we use the head command to return the first line of each file.
接下来,我们输出此页面部分的 HTML,因为现在我们知道有 release 文件要处理。要处理这些文件,我们开始一个 for 循环,对每个文件执行操作。在循环内部,我们使用 head 命令返回每个文件的第一行。
Finally, we use the uname command with the “o”, “r”, and “p” options to obtain some additional information from the system.
最后,我们使用 uname 命令和 “o”、“r” 和 “p” 选项从系统获取一些额外的信息。
3.14 - 错误、信号和陷阱(噢,我的天!)- 第一部分
错误、信号和陷阱(噢,我的天!)- 第一部分 Errors and Signals and Traps (Oh My!) - Part 1
https://linuxcommand.org/lc3_wss0140.php
In this lesson, we’re going to look at handling errors during script execution.
在本课程中,我们将讨论处理脚本执行过程中的错误。
The difference between a poor program and a good one is often measured in terms of the program’s robustness. That is, the program’s ability to handle situations in which something goes wrong.
一个糟糕的程序和一个好的程序之间的区别通常是以程序的鲁棒性来衡量的。也就是说,程序处理出现问题的情况的能力。
退出状态 Exit Status
As we recall from previous lessons, every well-written program returns an exit status when it finishes. If a program finishes successfully, the exit status will be zero. If the exit status is anything other than zero, then the program failed in some way.
回顾一下之前的课程,每个编写良好的程序在完成时都会返回一个退出状态。如果程序成功完成,退出状态将为零。如果退出状态不是零,那么程序以某种方式失败了。
It is very important to check the exit status of programs we call in our scripts. It is also important that our scripts return a meaningful exit status when they finish. There was once a Unix system administrator who wrote a script for a production system containing the following 2 lines of code:
检查我们在脚本中调用的程序的退出状态非常重要。同样重要的是,我们的脚本在完成时返回一个有意义的退出状态。曾经有一个 Unix 系统管理员为一个生产系统编写了一个包含以下两行代码的脚本:
| |
Why is this such a bad way of doing it? It’s not, if nothing goes wrong. The two lines change the working directory to the name contained in $some_directory and delete the files in that directory. That’s the intended behavior. But what happens if the directory named in $some_directory doesn’t exist? In that case, the cd command will fail and the script executes the rm command on the current working directory. Not the intended behavior!
为什么这样做是错误的?如果一切顺利的话,就不是错误。这两行代码将工作目录更改为$some_directory中包含的名称,并删除该目录中的文件。这是预期的行为。但是,如果$some_directory中指定的目录不存在会发生什么?在这种情况下,cd命令将失败,脚本会在当前工作目录上执行rm命令。这不是预期的行为!
By the way, the hapless system administrator’s script suffered this very failure and it destroyed a large portion of an important production system. Don’t let this happen to you!
顺便说一下,这个倒霉的系统管理员的脚本遭遇了这个错误,并摧毁了一个重要的生产系统的大部分内容。不要让这种情况发生在你身上!
The problem with the script was that it did not check the exit status of the cd command before proceeding with the rm command.
该脚本的问题在于它在继续执行rm命令之前没有检查cd命令的退出状态。
检查退出状态 Checking the Exit Status
There are several ways we can get and respond to the exit status of a program. First, we can examine the contents of the $? environment variable. $? will contain the exit status of the last command executed. We can see this work with the following:
我们有几种方法可以获取和响应程序的退出状态。首先,我们可以检查$?环境变量的内容。$?将包含上一个执行的命令的退出状态。我们可以通过以下方式查看它的工作原理:
| |
The true and false commands are programs that do nothing except return an exit status of zero and one, respectively. Using them, we can see how the $? environment variable contains the exit status of the previous program.
true和false命令是什么都不做,只返回零和非零退出状态的程序。通过使用它们,我们可以看到$?环境变量包含了先前程序的退出状态。
So to check the exit status, we could write the script this way:
因此,要检查退出状态,我们可以这样编写脚本:
| |
In this version, we examine the exit status of the cd command and if it’s not zero, we print an error message on standard error and terminate the script with an exit status of 1.
在这个版本中,我们检查cd命令的退出状态,如果不是零,我们在标准错误上打印出一个错误消息,并以退出状态1终止脚本。
While this is a working solution to the problem, there are more clever methods that will save us some typing. The next approach we can try is to use the if statement directly, since it evaluates the exit status of commands it is given.
虽然这是解决问题的一种方法,但还有更聪明的方法可以节省我们的打字。下一个我们可以尝试的方法是直接使用if语句,因为它评估给定的命令的退出状态。
Using if, we could write it this way:
使用if,我们可以这样编写脚本:
| |
Here we check to see if the cd command is successful. Only then does rm get executed; otherwise an error message is output and the program exits with a code of 1, indicating that an error has occurred.
在这里,我们检查cd命令是否成功。只有在成功的情况下才会执行rm命令;否则,输出一个错误消息,并以代码1退出,表示发生了错误。
Notice too how we changed the target of the rm command from “” to “./”. This is a safety precaution. The reason is a little subtle and has to do with the lax way Unix-like systems name files. Since it is possible to include almost any character in a file name, we must card against file names that begin with hyphens as thy might be interpreted as command options after the wildcard is expanded. For example, if there was a file named -rf in the directory, it might cause rm to do unpleasant things. It’s a good idea to always include “./” ahead of leading asterisks in scripts.
还要注意,我们将rm命令的目标从*更改为./。这是一种安全措施。原因有点微妙,与类 Unix 系统命名文件的方式有关。由于文件名几乎可以包含任何字符,我们必须对以连字符开头的文件名进行保护,因为在通配符展开后,它们可能被解释为命令选项。例如,如果目录中有一个名为-rf的文件,它可能导致rm执行一些不好的操作。在脚本中,始终在前导星号之前包含./是一个好习惯。
错误退出函数 An Error Exit Function
Since we will be checking for errors often in our programs, it makes sense to write a function that will display error messages. This will save more typing and promote laziness.
由于我们经常会在程序中检查错误,因此编写一个显示错误消息的函数是有意义的。这样可以节省更多的打字并鼓励懒惰。
| |
AND 和 OR 列表 AND and OR Lists
Finally, we can further simplify our script by using the AND and OR control operators. To explain how they work, here is a quote from the bash man page:
最后,我们可以通过使用 AND 和 OR 控制运算符来进一步简化脚本。为了解释它们的工作原理,这里是来自bash手册页的引用:
“The control operators && and || denote AND lists and OR lists, respectively. An AND list has the form
“控制运算符&&和||分别表示 AND 列表和 OR 列表。AND 列表的形式为
| |
command2 is executed if, and only if, command1 returns an exit status of zero.
当且仅当command1返回零的退出状态时,执行command2。
An OR list has the form
OR 列表的形式为
| |
command2 is executed if, and only if, command1 returns a non-zero exit status. The exit status of AND and OR lists is the exit status of the last command executed in the list.”
当且仅当command1返回非零的退出状态时,执行command2。AND 列表和 OR 列表的退出状态是列表中最后一个执行的命令的退出状态。”
Again, we can use the true and false commands to see this work:
同样,我们可以使用true和false命令来查看这个工作方式:
| |
Using this technique, we can write an even simpler version:
使用这种技术,我们可以编写一个更简单的版本:
| |
If an exit is not required in case of error, then we can even do this:
如果在出现错误的情况下不需要退出,那么我们甚至可以这样做:
| |
We need to point out that even with the defense against errors we have introduced in our example for the use of cd, this code is still vulnerable to a common programming error, namely, what happens if the name of the variable containing the name of the directory is misspelled? In that case, the shell will interpret the variable as empty and the cd succeed, but it will change directories to the user’s home directory, so beware!
我们需要指出的是,即使在我们的示例中为了防止错误而引入了对cd的防御,该代码仍然容易受到一种常见的编程错误的攻击,即如果包含目录名称的变量的名称拼写错误会发生什么?在这种情况下,shell 将将变量解释为空,并且cd成功,但它会更改到用户的主目录,所以要小心!
改进错误退出函数 Improving the Error Exit Function
There are a number of improvements that we can make to the error_exit function. It is useful to include the name of the program in the error message to make clear where the error is coming from. This becomes more important as our programs get more complex and we start having scripts launching other scripts, etc. Also, note the inclusion of the LINENO environment variable which will help identify the exact line within a script where the error occurred.
对于error_exit函数,我们可以进行一些改进。在错误消息中包含程序的名称是很有用的,以清楚地表明错误的来源。随着我们的程序变得更复杂,我们开始启动其他脚本等等,这一点变得更加重要。还要注意包含LINENO环境变量,它将帮助识别发生错误的脚本中的确切行。
| |
The use of the curly braces within the error_exit function is an example of parameter expansion. We can surround a variable name with curly braces (as with ${PROGNAME}) if we need to be sure it is separated from surrounding text. Some people just put them around every variable out of habit. That usage is simply a style thing. The second use, ${1:-"Unknown Error"} means that if parameter 1 ($1) is undefined, substitute the string “Unknown Error” in its place. Using parameter expansion, it is possible to perform a number of useful string manipulations. More information about parameter expansion can be found in the bash man page under the topic “EXPANSIONS”.
在error_exit函数中使用大括号是参数扩展的一个示例。如果我们需要确保变量与周围的文本分开,可以使用大括号将变量名称括起来(例如${PROGNAME})。有些人习惯于在每个变量周围都加上大括号。这种用法只是一种风格问题。第二个用法${1:-"Unknown Error"}的意思是,如果参数1($1)未定义,则用字符串"Unknown Error"替代它。使用参数扩展,可以进行许多有用的字符串操作。有关参数扩展的更多信息,请参阅bash手册页中的"EXPANSIONS"主题。
3.15 - 错误、信号和陷阱(哦,我的天!)- 第二部分
错误、信号和陷阱(哦,我的天!)- 第二部分 Errors and Signals and Traps (Oh, My!) - Part 2
https://linuxcommand.org/lc3_wss0150.php
Errors are not the only way that a script can terminate unexpectedly. We also have to be concerned with signals. Consider the following program:
错误并不是脚本意外终止的唯一方式。我们还需要关注信号。考虑以下程序:
| |
After we launch this script it will appear to hang. Actually, like most programs that appear to hang, it is really stuck inside a loop. In this case, it is waiting for the true command to return a non-zero exit status, which it never does. Once started, the script will continue until bash receives a signal that will stop it. We can send such a signal by typing Ctrl-c, the signal called SIGINT (short for SIGnal INTerrupt).
启动这个脚本后,它看起来会一直挂起。实际上,像大多数看起来挂起的程序一样,它实际上是陷入了一个循环中。在这种情况下,它正在等待true命令返回一个非零的退出状态,但实际上它永远不会返回。一旦启动,脚本将一直运行,直到bash接收到一个停止它的信号。我们可以通过键入Ctrl-c来发送这样的信号,这个信号被称为SIGINT(代表SIGnal INTerrupt)。
自我清理 Cleaning Up After Ourselves
Okay, so a signal can come along and make our script terminate. Why does it matter? Well, in many cases it doesn’t matter and we can safely ignore signals, but in some cases it will matter.
好的,信号可以让我们的脚本终止。这有什么关系呢?嗯,在许多情况下,这并不重要,我们可以安全地忽略信号,但在某些情况下,它确实很重要。
Let’s take a look at another script:
让我们看看另一个脚本:
| |
This script processes the text file specified on the command line with the pr command and stores the result in a temporary file. Next, it asks the user if they want to print the file. If the user types “y”, then the temporary file is passed to the lpr program for printing (substitute less for lpr if there isn’t a printer attached to the system.)
这个脚本会使用pr命令处理命令行上指定的文本文件,并将结果存储在临时文件中。然后,它会询问用户是否要打印该文件。如果用户输入"y",则将临时文件传递给lpr程序进行打印(如果系统上没有连接打印机,则替换为less)。
Admittedly, this script has a lot of design problems. While it needs a file name passed on the command line, it doesn’t check that it received one, and it doesn’t check that the file actually exists. But the problem we want to focus on here is that when the script terminates, it leaves behind the temporary file.
诚然,这个脚本存在很多设计问题。虽然它需要在命令行上传递一个文件名,但它没有检查是否接收到文件名,也没有检查文件是否实际存在。但我们想要关注的问题是,当脚本终止时,它会留下临时文件。
Good practice dictates that we delete the temporary file $TEMP_FILE when the script terminates. This is easily accomplished by adding the following to the end of the script:
良好的实践规定,在脚本终止时删除临时文件$TEMP_FILE。我们可以通过在脚本末尾添加以下内容来轻松实现:
| |
This would seem to solve the problem, but what happens if the user types ctrl-c when the “Print file? [y/n]:” prompt appears? The script will terminate at the read command and the rm command is never executed. Clearly, we need a way to respond to signals such as SIGINT when the Ctrl-c key is typed.
这似乎解决了问题,但是如果用户在出现"打印文件?[y/n]:“提示时键入ctrl-c会发生什么?脚本将在read命令处终止,并且rm命令将不会执行。显然,我们需要一种方法来响应诸如SIGINT的信号,即键入Ctrl-c键时的信号。
Fortunately, bash provides a method to perform commands if and when signals are received.
幸运的是,bash提供了一种在接收到信号时执行命令的方法。
trap
The trap command allows us to execute a command when our script receives a signal. It works like this:
trap命令允许我们在脚本接收到信号时执行命令。它的用法如下:
| |
“signals” is a list of signals to intercept and “arg” is a command to execute when one of the signals is received. For our printing script, we might handle the signal problem this way:
“signals"是要拦截的信号列表,“arg"是接收到其中一个信号时要执行的命令。对于我们的打印脚本,我们可以通过以下方式处理信号问题:
| |
Here we have added a trap command that will execute “rm $TEMP_FILE” if any of the listed signals is received. The three signals listed are the most common ones that most scripts are likely to encounter, but there are many more that can be specified. For a complete list, type “trap -l”. In addition to listing the signals by name, you may alternately specify them by number.
在这里,我们添加了一个trap命令,如果接收到列出的任何信号,则执行”rm $TEMP_FILE"。列出的三个信号是大多数脚本可能遇到的最常见的信号,但还有许多其他信号可以指定。要获取完整列表,请输入”trap -l"。除了按名称列出信号外,您还可以用数字指定信号。
来自外部空间的信号9 Signal 9 from Outer Space
There is one signal that you cannot trap: SIGKILL or signal 9. The kernel immediately terminates any process sent this signal and no signal handling is performed. Since it will always terminate a program that is stuck, hung, or otherwise screwed up, it is tempting to think that it’s the easy way out when we have to get something to stop and go away. There are often references to the following command which sends the SIGKILL signal:
有一个信号是无法捕获的:SIGKILL或信号9。内核立即终止接收到此信号的任何进程,并且不执行任何信号处理。由于它始终终止程序的运行(无论是卡住、挂起还是其他故障),我们可能会觉得这是一种简便的方式来停止和结束某些东西。通常会提到以下命令发送SIGKILL信号:
kill -9
However, despite its apparent ease, we must remember that when we send this signal, no processing is done by the application. Often this is OK, but with many programs it’s not. In particular, many complex programs (and some not-so-complex) create lock files to prevent multiple copies of the program from running at the same time. When a program that uses a lock file is sent a SIGKILL, it doesn’t get the chance to remove the lock file when it terminates. The presence of the lock file will prevent the program from restarting until the lock file is manually removed.
然而,尽管它看起来很简单,但我们必须记住,当我们发送此信号时,应用程序不会执行任何处理。这在许多程序中可能是可以接受的,但在许多复杂程序(以及一些不那么复杂的程序)中,它是不可接受的。特别是,许多复杂程序(以及一些不那么复杂的程序)会创建锁文件,以防止同时运行多个程序副本。当发送SIGKILL给使用锁文件的程序时,它无法在终止时删除锁文件。锁文件的存在将阻止程序在手动删除锁文件之前重新启动。
Be warned. Use SIGKILL as a last resort.
请注意,SIGKILL只在万不得已时使用。
一个clean_up函数 A clean_up Function
While the trap command has solved the problem, we can see that it has some limitations. Most importantly, it will only accept a single string containing the command to be performed when the signal is received. We could get clever and use “;” and put multiple commands in the string to get more complex behavior, but frankly, it’s ugly. A better way would be to create a function that is called when we want to perform any actions at the end of a script. For our purposes, we will call this function clean_up.
虽然trap命令解决了问题,但我们可以看到它有一些限制。最重要的是,它只接受包含在接收到信号时要执行的命令的单个字符串。我们可以巧妙地使用”;“并将多个命令放在字符串中以获得更复杂的行为,但老实说,这样做并不美观。一个更好的方法是创建一个在我们希望在脚本末尾执行任何操作时调用的函数。对于我们的目的,我们将称此函数为clean_up。
| |
The use of a clean up function is a good idea for our error handling routines too. After all, when a program terminates (for whatever reason), we should clean up after ourselves. Here is finished version of our program with improved error and signal handling:
使用清理函数对于我们的错误处理例程也是一个好主意。毕竟,当程序终止时(无论出于何种原因),我们应该在自己之后进行清理。这是改进后的程序版本,包括了更好的错误和信号处理:
| |
创建安全的临时文件 Creating Safe Temporary Files
In the program above, there a number of steps taken to help secure the temporary file used by this script. It is a Unix tradition to use a directory called /tmp to place temporary files used by programs. Everyone may write files into this directory. This naturally leads to some security concerns. If possible, avoid writing files in the /tmp directory. The preferred technique is to write them in a local directory such as ~/tmp (a tmp subdirectory in the user’s home directory.) If files must be written in /tmp, we must take steps to make sure the file names are not predictable. Predictable file names may allow an attacker to create symbolic links to other files the attacker wants the user to overwrite.
在上面的程序中,采取了一些步骤来帮助保护该脚本使用的临时文件。在Unix中,惯例是使用一个名为/tmp的目录来存放程序使用的临时文件。任何人都可以将文件写入此目录。这自然引起了一些安全问题。如果可能的话,避免在/tmp目录中写入文件。首选的技术是将它们写入一个本地目录,例如~/tmp(用户主目录中的tmp子目录)。如果必须在/tmp中写入文件,我们必须采取措施确保文件名不可预测。可预测的文件名可能会允许攻击者创建符号链接到攻击者希望用户覆盖的其他文件。
A good file name will help identify what wrote the file, but will not be entirely predictable. In the script above, the following line of code created the temporary file $TEMP_FILE:
一个好的文件名将有助于识别写入文件的程序,但不会完全可预测。在上面的脚本中,以下代码行创建了临时文件$TEMP_FILE:
| |
The $TEMP_DIR variable contains either /tmp or ~/tmp depending on the availability of the directory. It is common practice to embed the name of the program into the file name. We have done that with the constant $PROGNAME constructed at the beginning of the sectipt. Next, we use the $$ shell variable to embed the process id (pid) of the program. This further helps identify what process is responsible for the file. Surprisingly, the process id alone is not unpredictable enough to make the file safe, so we add the $RANDOM shell variable to append a random number to the file name. With this technique, we create a file name that is both easily identifiable and unpredictable.
$TEMP_DIR变量包含/tmp或~/tmp,具体取决于目录的可用性。通常的做法是将程序的名称嵌入到文件名中。我们在脚本开头构造的常量$PROGNAME已经实现了这一点。接下来,我们使用$$ shell变量将程序的进程ID(PID)嵌入到其中。这进一步有助于识别哪个进程负责该文件。令人惊讶的是,仅有进程ID还不足以使文件变得安全,因此我们使用$RANDOM shell变量将一个随机数附加到文件名上。通过这种技术,我们创建了一个既容易识别又不可预测的文件名。
就是这样 There You Have It
This concludes the LinuxCommand.org tutorials. I sincerely hope you found them both useful and enjoyable. If you did, complete your command line education by downloading my book.
这就是LinuxCommand.org教程的全部内容。我真诚希望您觉得它们既有用又有趣。如果是这样的话,通过下载我的书来完善您的命令行教育。
4 - 参考
参考
The Linux Command Line 中文翻译
github.com网址:https://github.com/billie66/TLCL
在线阅读网址:http://billie66.github.io/TLCL/
Liunx文档项目
Linux文档项目的历史几乎和Linux一样长,其内容有完整的指南集、HOWTO、FAQ、man页和Linux杂志。
手册页:https://tldp.org/manpages/man.html 中提到的其他man pages,现在只有 http://man.he.net/ 和 https://man7.org/linux/man-pages/index.html 可用。
GNU
可获得许多GNU手册页。此外,访问GNU首页(https://www.gnu.org)页可得到其他文档和GNU资源。许多GNU网页和资源都有多种语言版本。
5 - Adventures
但是等等… 还有更多! But Wait… There’s More!
https://linuxcommand.org/lc3_adventures.php
This collection is a supplement to my book, The Linux Command Line (TLCL), so if you don’t already have a copy, please download one or, if you prefer, pick up a printed copy from your favorite bookseller or library. We are going to build on our experience with the command line and add some more tools and techniques to our repertoire. Like TLCL, this collection is not about Linux system administration; rather it is a collection of topics I consider both fun and interesting. It covers many tools that will be of interest to budding system administrators, but the topics were chosen for other reasons. Some were chosen because they are “classic” Unix, others because they are just “something you should know,” but mostly they were chosen because I find them fun and interesting.
这个系列是我的书籍《Linux命令行》(TLCL) 的补充内容,所以如果你还没有一本,请下载一本,或者如果你愿意,可以从你喜欢的书店或图书馆购买一本印刷版。我们将在命令行的基础上构建并添加一些更多的工具和技巧。和 TLCL 一样,这个系列不是关于 Linux 系统管理,而是我认为有趣和有意思的主题的集合。它涵盖了许多对于新手系统管理员有兴趣的工具,但这些主题是出于其他原因选择的。有些是因为它们是 “经典 “的 Unix,其他的是因为它们是 “你应该知道的东西 “,但大部分是因为我觉得它们有趣和有意思。
The adventures are also available in book form.
这些探险也以图书形式提供。
目录 Contents
Midnight Commander
We will look at Midnight Commander, a character-based directory browser and file manager that bridges the two worlds of the familiar graphical file manager and the common command line tools such as
cp,mv, andrm.我们将介绍 Midnight Commander,这是一个基于字符的目录浏览器和文件管理器,它连接了熟悉的图形化文件管理器和常见的命令行工具,如
cp、mv和rm。Terminal Multiplexers
What if we could run multiple terminal sessions inside a single terminal window? Or how about if we could detach a running session and return to it later, on a different machine? Sound impossible? It’s not.
如果我们能够在单个终端窗口中运行多个终端会话会怎么样?或者如果我们能够分离一个正在运行的会话,并在以后的时间在另一台机器上恢复它呢?听起来不可能吗?其实不是。
Less Typing
Fingers getting tired? Wrists starting to ache? Time to learn how do more with less typing.
手指累了吗?手腕开始疼痛吗?是时候学会更少打字了。
More Redirection
We’ll look at I/O redirection again in a little more depth and learn a few tricks along the way.
我们将更深入地了解 I/O 重定向,并学习一些相关的技巧。
tput
While our command line environment is certainly powerful, it can be lacking when it comes to visual appeal. It doesn’t have to be that way. Learn to take control of terminal output and add some visual spice.
虽然我们的命令行环境非常强大,但在视觉上可能有所欠缺。事实并非如此。学会控制终端输出,添加一些视觉效果。
dialog
We’re going to look at
dialog, a program that displays various kinds of dialog boxes that we can incorporate into our shell scripts to give them a much friendlier face.我们将使用
dialog,一个显示各种类型的对话框的程序,将它们融入我们的Shell脚本中,使它们具有更友好的界面。AWK
One of the great things we can do in the shell is embed other programming languages within the body of our scripts. In this adventure, we are going to look at one such program,
awk, a classic pattern matching and text processing language.在Shell中,我们可以在脚本的正文中嵌入其他编程语言。在这个探险中,我们将学习一个名为
awk的程序,它是一种经典的模式匹配和文本处理语言。Other Shells
While we have spent a great deal of time learning the bash shell, it’s not the only game in town. Unix has had several popular shells and almost all are available for Linux, too.
虽然我们花了很多时间学习bash shell,但它并不是唯一的选择。Unix有几个流行的Shell,几乎所有这些Shell都可以在Linux上使用。
Power Terminals
In this adventure, we are going to look at a few of the different terminal programs and the many interesting things we can do with them.
在这个探险中,我们将看一下几种不同的终端程序以及我们可以用它们做的许多有趣的事情。
Vim, with Vigor
Vim is a very powerful program. In fact, it’s safe to say that vim can do anything. It’s just a question of figuring out how. In this adventure, we will acquire an intermediate level of skill in this popular tool.
Vim 是一个非常强大的程序。事实上,可以说 vim 可以做任何事情。只是一个问题,就是弄清楚如何做。在这个探险中,我们将掌握这个流行工具的中级技能。
source
We looked at
sourcebriefly when we worked with the.profileand.bashrcfiles used to establish the shell environment.我们在处理用于建立shell环境的
.profile和.bashrc文件时简要介绍了source。In this adventure, we will look at
sourceagain and discover the ways it can make our scripts more powerful and easier to maintain.在这个探险中,我们将再次学习
source,并发现它如何使我们的脚本更强大、更易于维护。编码标准 第一部分
Most programming organizations have formal standards for coding practice and style. We will look at some and create one of our own.
大多数编程组织都有正式的编码实践和风格标准。我们将看一些标准,并创建自己的标准。
编码标准 第二部分
There’s one problem with having a coding standard. Once you have it, you have to follow it. In this adventure we will learn about
new_script, a shell script template generator that performs much of the tedious mechanical work.有一个问题是制定了编码标准。一旦你制定了标准,就必须遵守它。在这个探险中,我们将了解
new_script,它是一个生成shell脚本模板的工具,可以完成很多繁琐的机械工作。SQL
Structured Query Language (SQL) is the lingua franca of the database world. It’s also a useful and important skill. In this adventure, we will look at its major features and techniques, as well as discover a command-line tool that makes SQL easy to use with our scripts and projects.
结构化查询语言(SQL)是数据库世界的通用语言。它也是一项有用且重要的技能。在这个探险中,我们将介绍它的主要特性和技巧,以及发现一个命令行工具,使得在我们的脚本和项目中使用SQL变得容易。
5.1 - Midnight Commander
Midnight Commander
https://linuxcommand.org/lc3_adv_mc.php
At the beginning of Chapter 4 in TLCL there is a discussion of GUI-based file managers versus the traditional command line tools for file manipulation such as cp, mv, and rm. While many common file manipulations are easily done with a graphical file manager, the command line tools provide additional power and flexibility.
In this adventure we will look at Midnight Commander, a character-based directory browser and file manager that bridges the two worlds of the familiar graphical file manager and the common command line tools.
The design of Midnight Commander is based on a common concept in file managers: dual directory panes where the listings of two directories are shown at the same time. The idea is that files are moved or copied from the directory shown in one pane to the directory shown in the other. Midnight Commander can do this, and much, much more.
Features
Midnight Commander is quite powerful and boasts an extensive set of features:
- Performs all the common file and directory manipulations such as copying, moving, renaming, linking, and deleting.
- Allows manipulation of file and directory permissions.
- Can treat remote systems (via FTP or SSH) as though they were local directories.
- Can treat archive files (like .tar and .zip) as though they were local directories.
- Allows creation of a user-defined “hotlist” of frequently used directories.
- Can search for files based on file name or file contents, and treat the search results like a directory.
Availability
Midnight Commander is part of the GNU project. It is installed by default in some Linux distributions, and is almost always available in every distribution’s software repositories as the package “mc”.
Invocation
To start Midnight Commander, enter the command mc followed optionally by either 1 or 2 directories to browse at start up.
Screen Layout
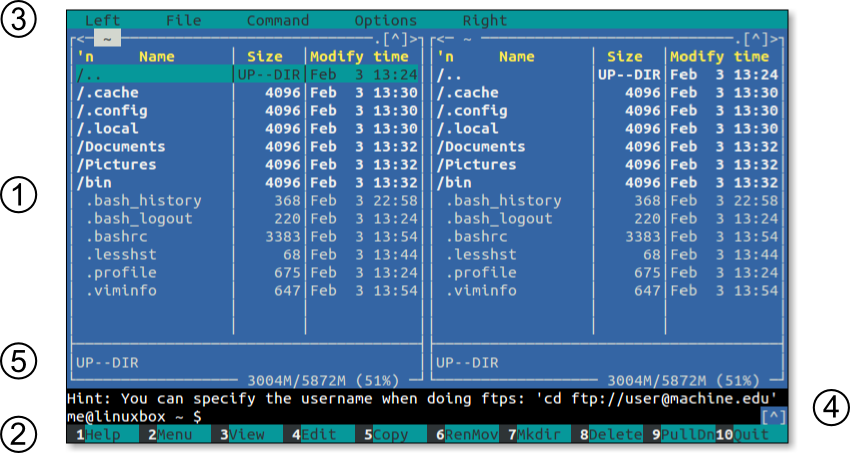 Midnight Commander screen layout
Left and Right Directory Panels
The center portion of the screen is dominated by two large directory panels. One of the two panels (called the current panel) is active at any one time. To change which panel is the current panel, press the
Tabkey.Function Key Labels
The bottom line on the display contains function key (F1-F10) shortcuts to the most commonly used functions.
Menu Bar
The top line of the display contains a set of pull-down menus. These can be activated by pressing the
F9key.Command Line
Just above the function key labels there is a shell prompt. Commands can be entered in the usual manner. One especially useful command is
cdfollowed by a directory pathname. This will change the directory shown in the current directory panel.Mini-Status Line
At the very bottom of the directory panel and above the command line is the mini-status line. This area is used to display supplemental information about the currently selected item such as the targets of symbolic links.
Using the Keyboard and Mouse
Being a character-based application with a lot of features means Midnight Commander has a lot of keyboard commands, some of which it shares with other applications; others are unique. This makes Midnight Commander a bit challenging to learn. Fortunately, Midnight Commander also supports mouse input on most terminal emulators (and on the console if the gpm package is installed), so it’s easy to pick up the basics. Learning the keyboard commands is needed to take full advantage of the program’s features, however.
Another issue when using the keyboard with Midnight Commander is interference from the window manager and the terminal emulator itself. Many of the function keys and Alt-key combinations that Midnight Commander uses are intercepted for other purposes by the terminal and window manager.
To work around this problem, Midnight Commander allows the Esc key to function as a Meta-key. In cases where a function key or Alt-key combination is not available due to interference from outside programs, use the Esc key instead. For example, to input the F1 key, press and release the Esc key followed by the “1” key (use “0” for F10). The same method works with troublesome Alt-key combinations. For example, to enter Alt-t, press and release the Esc key followed by the “t” key. To close dialog boxes in Midnight Commander, press the Esc key twice.
Navigation and Browsing
Before we start performing file operations, it’s important to learn how to use the directory panels and navigate the file system.
As we can see, there are two directory panels, the left panel and the right panel. At any one time, one of the panels is active and is called the current panel. The other panel is conveniently called the other panel in the Midnight Commander documentation.
The current panel can be identified by the highlighted bar in the directory listing, which can be moved up and down with the arrow keys, PgUp, PgDn, etc. Any file or directory which is highlighted is said to be selected.
Select a directory and press Enter. The current directory panel will change to the selected directory. Highlighting the topmost item in the listing selects the parent directory. It is also possible to change directories directly on the command line below the directory panels. To do so, simply enter cd followed by a path name as usual.
Pressing the Tab key switches the current panel.
Changing the Listing Format
The directory listing can be displayed in several different formats. Pressing Alt-t cycles through them. There is a dual column format, a format resembling the output of ls -l, and others.
There is also an “information mode.” This will display detailed file system information in the other panel about the selected item in the current panel. To invoke this mode, type Ctrl-x i. To return the other panel to its normal state, type Ctrl-x i again.
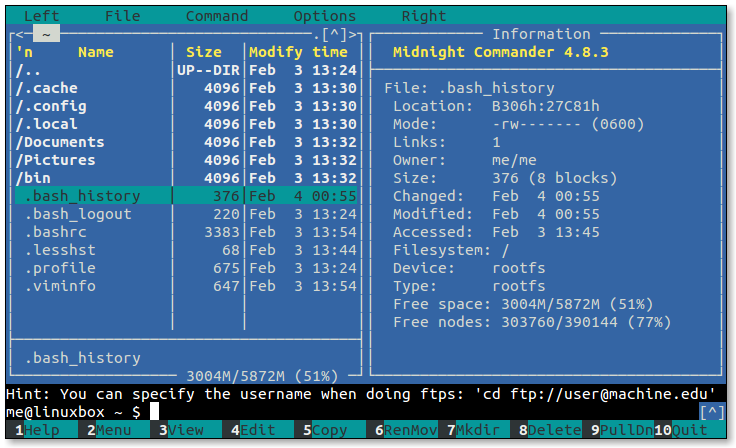 Directory panel in information mode
Setting the Directory on the Other Panel
It is often useful to select a directory in the current panel and have its contents listed on the other panel; for example, when moving files from a parent directory into a subdirectory. To do this, select a directory and type Alt-o. To force the other panel to list the same directory as the current panel, type Alt-i.
The Directory Hotlist
Midnight Commander can store a list of frequently visited directories. This “hotlist” can displayed by pressing Ctrl-\.
 Directory hotlist
To add a directory to the hotlist while browsing, select a directory and type Ctrl-x h.
Directory History
Each directory panel maintains a list of directories that it has displayed. To access this list, type Alt-H. From the list, a directory can be selected for browsing. Even without the history list display, we can traverse the history list forward and backward by using the Alt-u and Alt-y keys respectively.
Using the Mouse
We can perform many Midnight Commander operations using the mouse. A directory panel item can be selected by clicking on it and a directory can be opened by double clicking. Likewise, the function key labels and menu bar items can be activated by clicking on them. What is not so apparent is that the directory history can be accessed and traversed. At the top of each directory panel there are small arrows (circled in the image below). Clicking on them will show the directory history (the up arrow) and move forward and backward through the history list (the right and left arrows).
There is also an arrow to the extreme lower right edge of the command line which reveals the command line history.
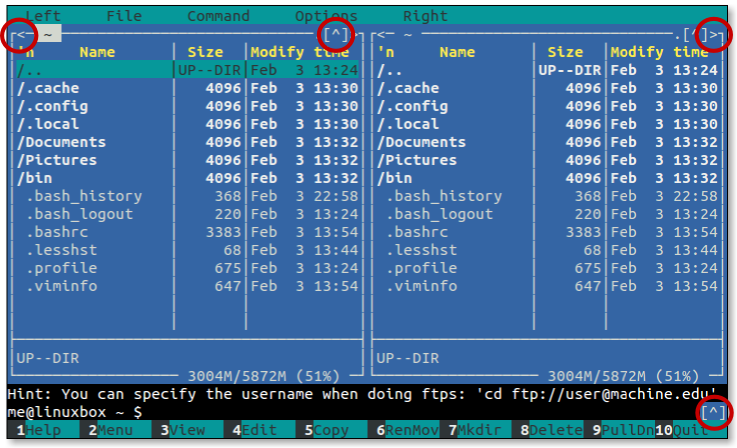 Directory and command line history mouse controls
Viewing and Editing Files
An activity often performed while directory browsing is examining the content of files. Midnight Commander provides a capable file viewer which can be accessed by selecting a file and pressing the F3 key.
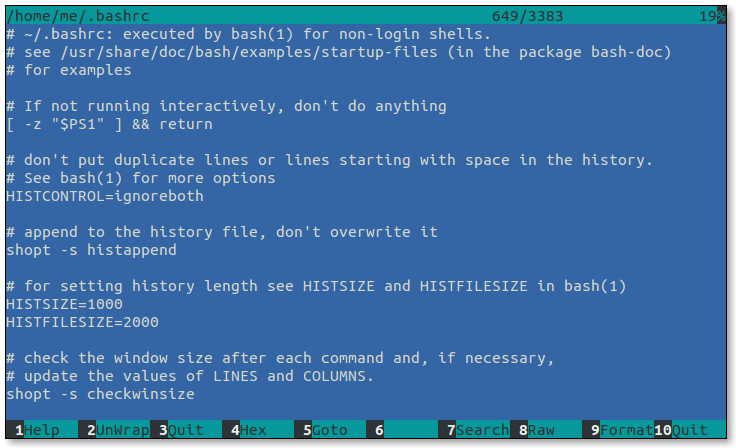 File viewer
As we can see, when the file viewer is active, the function key labels at the bottom of the screen change to reveal viewer features. Files can be searched and the viewer can quickly go to any position in the file. Most importantly, files can be viewed in either ASCII (regular text) or hexadecimal, for those cases when we need a really detailed view.
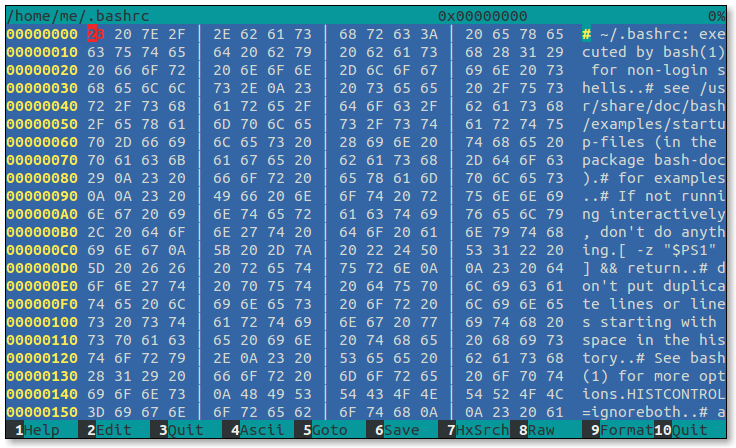 File viewer in hexadecimal mode
It is also possible to put the other panel into “quick view” mode to view the currently selected file. This is especially nice if we are browsing a directory full of text files and want to rapidly view the files, as each time a new file is selected in the current panel, it’s instantly displayed in the other. To start quick view mode, type Ctrl-x q.
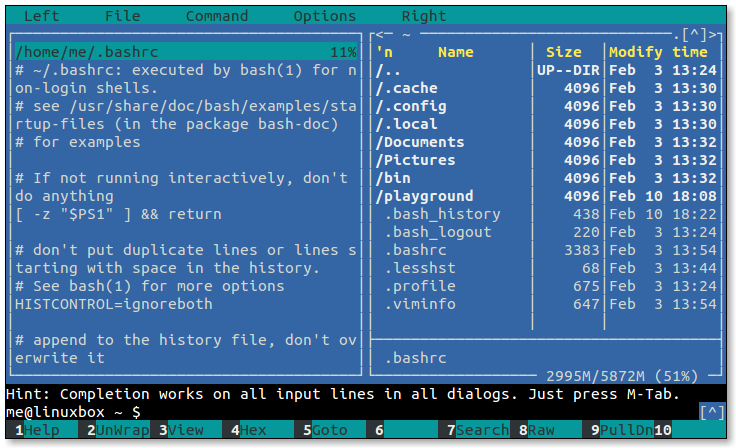 Quick view mode
Once in quick view mode, we can press Tab and the focus changes to the other panel in quick view mode. This will change the function key labels to a subset of the full file viewer. To exit the quick view mode, press Tab to return to the directory panel and press Alt-i.
Editing
Since we are already viewing files, we will probably want to start editing them too. Midnight Commander accommodates us with the F4 key, which invokes a text editor loaded with the selected file. Midnight Commander can work with the editor of your choice. On Debian-based systems we are prompted to make a selection the first time we press F4. Debian suggests nano as the default selection, but various flavors of vim are also available along with Midnight Commander’s own built-in editor, mcedit. We can try out mcedit on its own at the command line for a taste of this editor.
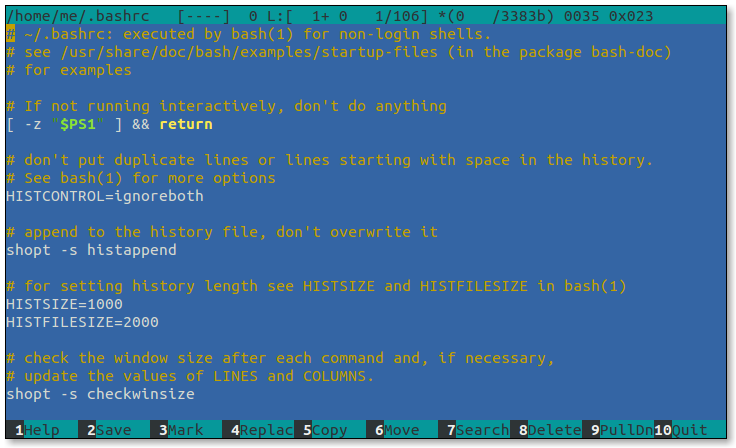 mcedit
Tagging Files
We have already seen how to select a file in the current directory panel by simply moving the highlight, but operating on a single file is not of much use. After all, we can perform those kinds of operations more easily by entering commands directly on the command line. However, we often want to operate on multiple files. This can be accomplished through tagging. When a file is tagged, it is marked for some later operation such as copying. This is why we choose to use a file manager like Midnight Commander. When one or more files are tagged, file operations (such as copying) are performed on the tagged files and selection has no effect.
Tagging Individual Files
To tag an individual file or directory, select it and press the Insert key. To untag it, press the Insert key again.
Tagging Groups of Files
To tag a group of files or directories according to a selection criteria, such as a wildcard pattern, press the + key. This will display a dialog where the pattern may be specified.
 File tagging dialog
This dialog stores a history of patterns. To traverse it, use Ctrl up and down arrows.
It is also possible to un-tag a group of files. Pressing the / key will cause a pattern entry dialog to display.
We Need a Playground
To explore the basic file manipulation features of Midnight Commander, we need a “playground” like we had in Chapter 4 of TLCL.
Creating Directories
The first step in creating a playground is creating a directory called, aptly enough, playground. First, we will navigate to our home directory, then press the F7 key.
 Create Directory dialog
Type “playground” into the dialog and press Enter. Next, we want the other panel to display the contents of the playground directory. To do this, highlight the playground directory and press Alt-o.
Now let’s put some files into our playground. Press Tab to switch the current panel to the playground directory panel. We’ll create a couple of subdirectories by repeating what we did to create playground. Create subdirectories dir1 and dir2. Finally, using the command line, we will create a few files:
me@linuxbox: ~/playground $ touch file1 file2 "ugly file"
 The playground
Copying and Moving Files
Okay, here is where things start to get weird.
Select dir1, then press Alt-o to display dir1 in the other panel. Select the file file1 and press F5 to copy (The F6-RenMov command is similar). We are now presented with this formidable-looking dialog box:
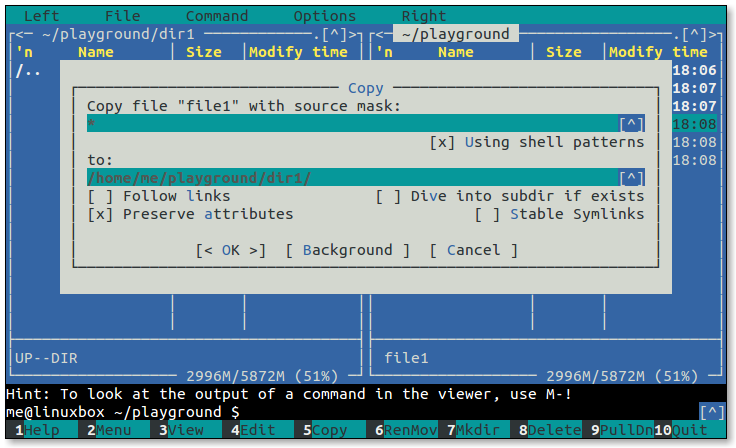 Copy dialog
To see Midnight Commander’s default behavior, just press Enter and file1 is copied into directory dir1 (i.e., the file is copied from the directory displayed in current panel to the directory displayed in the other panel).
That was straightforward, but what if we want to copy file2 to a file in dir1 named file3? To do this, we select file2 and press F5 again and enter the new filename into the Copy dialog:
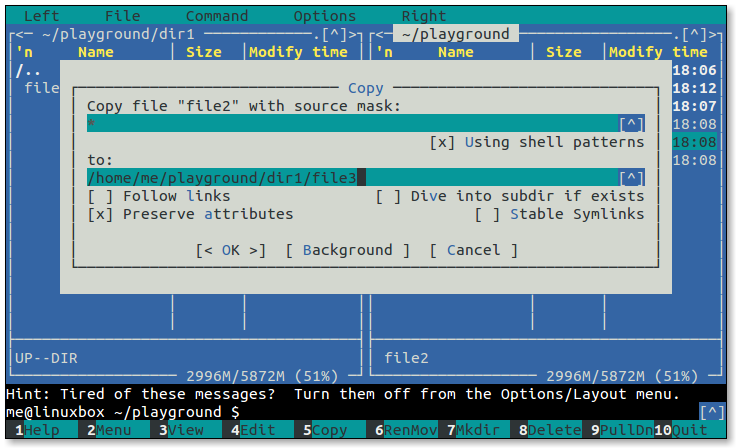 Renaming a file during copy
Again, this is pretty straightforward. But let’s say we tagged a group of files and wanted to copy and rename them as they are copied (or moved). How would we do that? Midnight Commander provides a way of doing it, but it’s a little strange.
The secret is the source mask in the copy dialog. At first glance, it appears that the source mask is simply a file selection wildcard, but first appearances can be deceiving. The mask does filter files as we would expect, but only in a limited way. Unlike the range of wildcards available in the shell, the wildcards in the source mask are limited to “?” (for matching single characters) and “*” (for matching multiple characters). What’s more, the wildcards have a special property.
It works like this: let’s say we had a file name with an embedded space such as “ugly file” and we want to copy (or move) it to dir1 as the file “uglyfile”, instead. Using the source mask, we could enter the mask “* *” which means break the source file name into two blocks of text separated by a space. This wildcard pattern will match the file ugly file, since its name consists of two strings of characters separated by a space. Midnight Commander will associate each block of text with a number starting with 1, so block 1 will contain “ugly” and block 2 will contain “file”. Each block can be referred to by a number as with regular expression grouping. So to create a new file name for our target file without the embedded space, we would specify “\1\2” in the “to” field of the copy dialog like so:
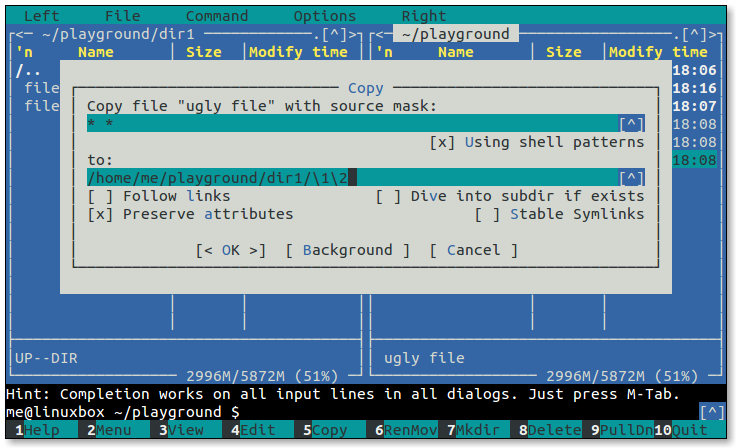 Using grouping
The “?” wildcard behaves the same way. If we make the source mask “???? ????” (which again matches the file ugly file), we now have eight pieces of text that we can rearrange at will. For example, we could make the “to” mask “\8\7\6\5\4\3\2\1”, and the resulting file name would be “elifylgu”. Pretty neat.
Midnight Commander can also perform case conversion on file names. To do this, we include some additional escape sequences in the to mask:
- \u Converts the next character to uppercase.
- \U Converts all characters to uppercase until another sequence is encountered.
- \l Converts the next character to lowercase.
- \L Converts all characters to lowercase until another sequence is encountered.
So if we wanted to change the name ugly file to camel case, we could use the mask “\u\L\1\u\L\2” and we would get the name UglyFile.
Creating Links
Midnight Commander can create both hard and symbolic links. They are created using these 3 keyboard commands which cause a dialog to appear where the details of the link can be specified:
Ctrl-x lcreates a hard link, in the directory shown in the current panel.Ctrl-x screates a symbolic link in the directory shown in the other panel, using an absolute directory path.Ctrl-x vcreates a symbolic link in the directory shown in the other panel, using a relative directory path.
The two symbolic link commands are basically the same. They differ only in the fact that the paths suggested in the Symbolic Link dialog are absolute or relative.
We’ll demonstrate creating a symbolic link by creating a link to file1. To do this, we select file1 in the current panel and type Ctrl-x s. The Symbolic Link dialog appears and we can either enter a name for the link or we can accept the program’s suggestion. For the sake of clarity, we will change the name to file1-sym.
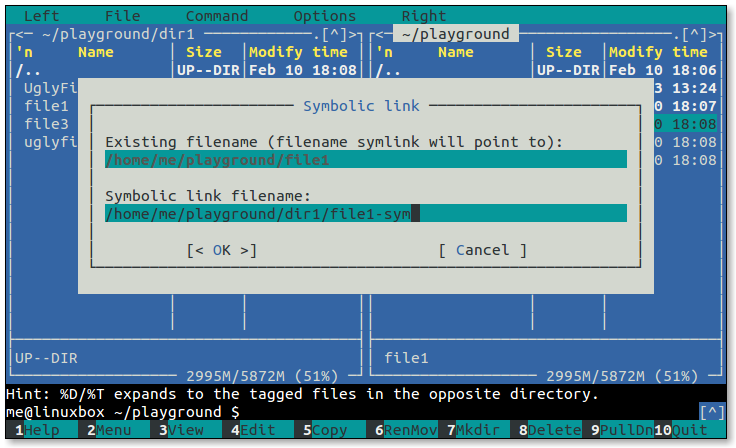 Symbolic link dialog
Setting File Modes and Ownership
File modes (i.e., permissions) can be set on the selected or tagged files by typing Ctrl-x c. Doing so will display a dialog box in which each attribute can be turned on or off. If Midnight Commander is being run with superuser privileges, file ownership can be changed by typing Ctrl-x o. A dialog will be displayed where the owner and group owner of selected/tagged files can be set.
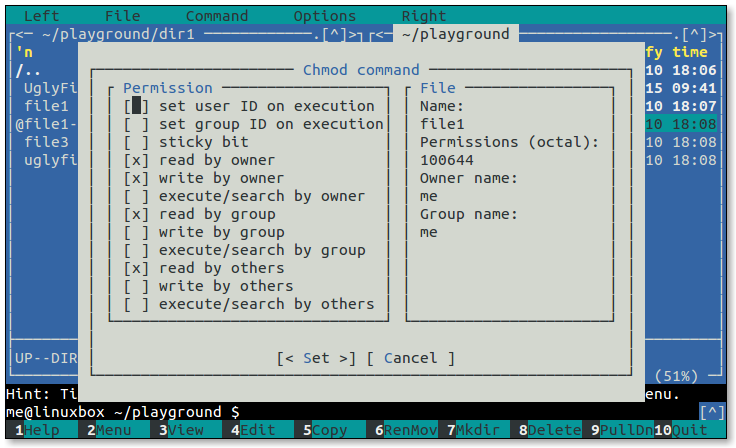 Chmod dialog
To demonstrate changing file modes, we will make file1 executable. First, we will select file1 and then type Ctrl-x c. The Chmod command dialog will appear, listing the file’s mode settings. By using the arrow keys we can select the check box labeled “execute/search by owner” and toggle its setting by using the space bar.
Deleting Files
Pressing the F8 key deletes the selected or tagged files and directories. By default, Midnight Commander always prompts the user for confirmation before deletion is performed.
We’re done with our playground for now, so it’s time to clean up. We will enter cd at the shell prompt to get the current panel to list our home directory. Next, we will select playground and press F8 to delete the playground directory.
 Delete confirmation dialog
Power Features
Beyond basic file manipulation, Midnight Commander offers a number of additional features, some of which are very interesting.
Virtual File Systems
Midnight Commander can treat some types of archive files and remote hosts as though they are local file systems. Using the cd command at the shell prompt, we can access these.
For example, we can look at the contents of tar files. To try this out, let’s create a compressed tar file containing the files in the /etc directory. We can do this by entering this command at the shell prompt:
me@linuxbox ~ $ tar czf etc.tgz /etc
Once this command completes (there will be some “permission denied” errors but these don’t matter for our purposes), the file etc.tgz will appear among the files in the current panel. If we select this file and press Enter, the contents of the archive will be displayed in the current panel. Notice that the shell prompt does not change as it does with ordinary directories. This is because while the current panel is displaying a list of files like before, Midnight Commander cannot treat the virtual file system in the same way as a real one. For example, we cannot delete files from the tar archive, but we can copy files from the archive to the real file system.
Virtual file systems can also treat remote file systems as local directories. In most versions of Midnight Commander, both FTP and FISH (FIles transferred over SHell) protocols are supported and, in some versions, SMB/CIFS as well.
As an example, let’s look at the software library FTP site at Georgia Tech, a popular repository for Linux software. Its name is ftp.gtlib.gatech.edu. To connect with /pub directory on this site and browse its files, we enter this cd command:
me@linuxbox ~ $ cd ftp://ftp.gtlib.gatech.edu/pub
Since we don’t have write permission on this site, we cannot modify any any files there, but we can copy files from the remote server to our local file system.
The FISH protocol is similar. This protocol can be used to communicate with any Unix-like system that runs a secure shell (SSH) server. If we have write permissions on the remote server, we can operate on the remote system’s files as if they were local. This is extremely handy for performing remote administration. The cd command for FISH protocol looks like this:
me@linuxbox ~ $ cd sh://user@remotehost/dir
Finding Files
Midnight Commander has a useful file search feature. When invoked by pressing Alt-?, the following dialog will appear:
 Find dialog
On this dialog we can specify: where the search is to begin, a colon-separated list of directories we would like to skip during our search, any restriction on the names of the files to be searched, and the content of the files themselves. This feature is well-suited to searching large trees of source code or configuration files for specific patterns of text. For example, let’s look for every file in /etc that contains the string “bashrc”. To do this, we would fill in the dialog as follows:
 Search for files containing “bashrc”
Once the search is completed, we will see a list of files which we can view and/or edit.
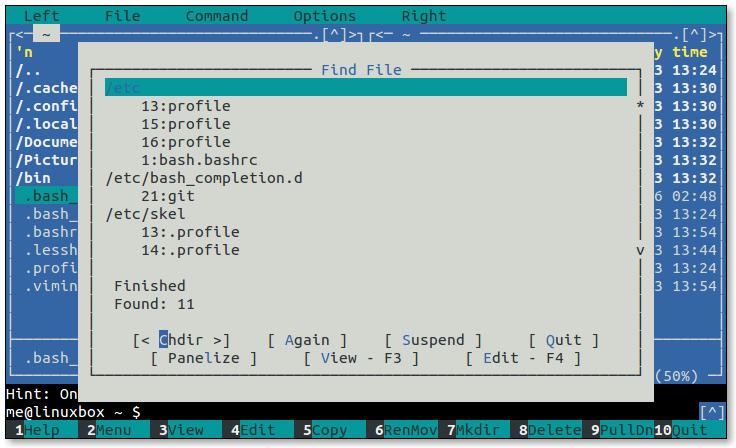 Search results
Panelizing
There is a button at the bottom of the search results dialog labeled “Panelize.” If we click it, the search results become the contents of the current panel. From here, we can act on the files just as we can with any others.
In fact, we can create a panelized list from any command line program that produces a list of path names. For example, the find program. To do this, we use Midnight Commander’s “External Panelize” feature. Type Ctrl-x ! and the External Panelize dialog appears:
 External panelize dialog
On this dialog we see a predefined list of panelized commands. Midnight Commander allows us to store commands for repeated use. Let’s try it by creating a panelized command that searches the system for every file whose name has the extension .JPG starting from the current panel directory. Select “Other command” from the list and type the following command into the “Command” field:
find . -type f -name "*.JPG"
After typing the command we can either press Enter to execute the command or, for extra fun, we can click the “Add new” button and assign our command a name and save it for future use.
Sub-shells
We may, at any time, move from the Midnight Commander to a full shell session and back again by pressing Ctrl-o. The sub-shell is a copy of our normal shell, so whatever environment our usual shell establishes (aliases, shell functions, prompt strings, etc.) will be present in the sub-shell as well. If we start a long-running command in the sub-shell and press Ctrl-o, the command is suspended until we return to the sub-shell. Note that once a command is suspended, Midnight Commander cannot execute any further external commands until the suspended command terminates.
The User Menu
So far we have avoided discussion of the mysterious F2 command. This is the user menu, which may be Midnight Commander’s most powerful and useful feature. The user menu is, as the name suggests, a menu of user-defined commands.
When we press the F2 key, Midnight Commander looks for a file named .mc.menu in the current directory. If the file does not exist, Midnight Commander looks for ~/.config/mc/menu. If that file does not exist, then Midnight Commander falls back to a system-wide menu file named /usr/share/mc/mc.menu.
The neat thing about this scheme is that each directory can have its own set of user menu commands, so that we can create commands appropriate to the contents of the current directory. For example, if we have a “Pictures” directory, we can create commands for processing images; if we have a directory full of HTML files, we can create commands for managing a web site, and so on.
So, after we press F2 the first time, we are presented with the default user menu that looks something like this:
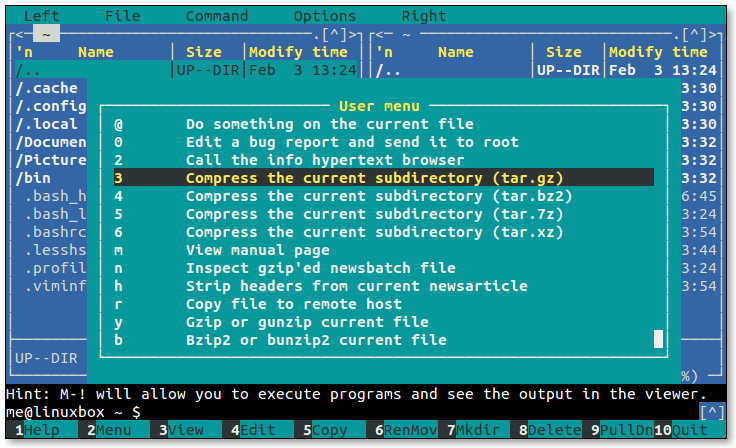 The User Menu
Editing the User Menu
The default user menu contains several example entries. These are by no means set in stone. We are encouraged to edit the menu and create our own entries. The menu file is ordinary text and it can be edited with any text editor, but Midnight Commander provides a menu editing feature found in the “Command” pulldown menu. The entry is called “Edit menu file.”
If we select this entry, Midnight Commander offers us a choice of “Local” and “User.” The Local entry allows us to edit the .mc.menu file in the current directory while selecting User will cause us to edit the ~/.config/mc/menu file. Note that if we select Local and the current directory does not contain a menu file, Midnight Commander will copy the default menu file into current directory as a starting point for our editing.
Menu File Format
Some parts of the user menu file format are pretty simple; other parts, not so much. We’ll start with the simple parts first.
A menu file consists of one or more entries. Each entry contains:
- A single character (usually a letter) that will act as a hot key for the entry when the menu is displayed.
- Following the hot key, on the same line, is the description of the menu entry as it will appear on the menu.
- On the following lines are one or more commands to be performed when the menu entry is selected. These are ordinary shell commands. Any number of commands may be specified, so quite sophisticated operations are possible. Each command must be indented by at least one space or tab.
- A blank line to separate one menu entry from the next.
- Comments may appear on their own lines. Each comment line starts with a
#character.
Here is an example user menu entry that creates an HTML template in the current directory:
# Create a new HTML file
H Create a new HTML file
{ echo "<html>"
echo "\t<head>\n\t</head>"
echo "\t<body>\n\t</body>"
echo "</html>"; } > new_page.html
Notice the absence of the -e option on the echo commands used in this example. Normally, the -e option is required to interpret the backslash escape sequences like \t and \n. The reason they are omitted here is that Midnight Commander does not use bash as the shell when it executes user menu commands. It uses sh instead. Different distributions use different shell programs to emulate sh . For example, Red Hat-based distributions use bash but Debian-based distributions like Ubuntu and Raspberry Pi OS use dash instead. dash is a compact shell program that is sh compatible but lacks many of the features found in bash. The dash man page describes the features of that shell.
This command will reveal which program is actually providing the sh emulation (i.e., is symbolically linked to sh):
me@linuxbox ~ $ ls -l /bin/sh
Macros
With that bit of silliness out of the way, let’s look at how we can get a user menu entry to act on currently selected or tagged files. First, it helps to understand a little about how Midnight Commander executes user menu commands. It’s done by writing the commands to a file (essentially a shell script) and then launching sh to execute the contents of the file. During the process of writing the file, Midnight Commander performs macro substitution, replacing embedded symbols in the menu entry with alternate values. These macros are single alphabetic characters preceded by a percent sign. When Midnight Commander encounters one of these macros, it substitutes the value the macro represents. Here are the most commonly used macros:
| Macro | Meaning |
|---|---|
| %f | Selected file’s name |
| %x | Selected file’s extension |
| %b | Selected file’s name stripped of extension (basename) |
| %d | Name of the current directory |
| %t | The list of tagged files |
| %s | If files are tagged, they are used, else the selected file is used. |
Let’s say we wanted to create a user menu entry that would resize a JPEG image using the ever-handy convert program from the ImageMagick suite. Using macros, we could write a menu entry like this, which would act on the currently selected file:
# Resize an image using convert
R Resize image to fit within 800 pixel bounding square
size=800
convert "%f" -resize ${size}x${size} "%b-${size}.%x"
Using the %b and %x macros, we are able to construct a new output file name for the resized image. There is still one potential problem with this menu entry. It’s possible to run the menu entry command on a directory, or a non-image file (Doing so would not be good).
We could include some extra code to ensure that %f is actually the name of an image file, but Midnight Commander also provides a method for only displaying menu entries appropriate to the currently selected (or tagged) file(s).
Conditionals
Midnight Commander supports two types of conditionals that affect the behavior of a menu entry. The first, called an addition conditional determines if a menu entry is displayed. The second, called default conditional sets the default entry on a menu.
A conditional is added to a menu entry just before the first line. A conditional starts with either a + (for an addition) or a = (for a default) followed by one or more sub-conditions. Sub-conditions are separated by either a | (meaning or) or a & (meaning and) allowing us to express some complex logic. It is also possible to have a combined addition and default conditional by beginning the conditional with =+ or +=. Two separate conditionals, one addition and one default, are also permitted preceding a menu entry.
Let’s look at sub-conditions. They consist of one of the following:
| Sub-condition | Description |
|---|---|
| f pattern | Match currently selected file |
| F pattern | Match last selected in other panel |
| d pattern | Match currently selected directory |
| D pattern | Match last selected directory in other panel |
| t type | Type of currently selected file |
| T type | Type of last selected file in other panel |
| x filename | File is executable |
| ! sub-cond | Negate result of sub-condition |
pattern is either a shell pattern (i.e., wildcards) or a regular expression according to the global setting configured in the Options/Configuration dialog. This setting can be overridden by adding shell_patterns=0 as the first line of the menu file. A value of 1 forces use of shell patterns, while a value of 0 forces regular expressions instead.
type is one or more of the following:
| Type | Description |
|---|---|
| r | regular file |
| d | directory |
| n | not a directory |
| l | link |
| x | executable file |
| t | tagged |
| c | character device |
| b | block device |
| f | FIFO (pipe) |
| s | socket |
While this seems really complicated, it’s not really that bad. To change our image resizing entry to only appear when the currently selected file has the extension .jpg or .JPG, we would add one line to the beginning of the entry (regular expressions are used in this example):
# Resize an image using convert
+ f \.jpg$ | f \.JPG$
R Resize image to fit within 800 pixel bounding square
size=800
convert "%f" -resize ${size}x${size} "%b-${size}.%x"
The conditional begins with + meaning that it’s an addition condition. It is followed by two sub-conditions. The | separating them signifies an “or” relationship between the two. So, the finished conditional means “display this entry if the selected file name ends with .jpg or the selected file name ends with .JPG.”
The default menu file contains many more examples of conditionals. It’s worth a look.
Summing Up
Even though it takes a little time to learn, Midnight Commander offers a lot of features and facilities that make file management easier when using the command line. This is particularly true when operating on a remote system where a graphical user interface may not be available. The user menu feature is especially good for specialized file management tasks. With a little configuration, Midnight Commander can become a powerful tool in our command line arsenal.
Further Reading
- The Midnight Commander man page is extensive and discusses even more features than we have covered here.
- midnight-commander.org is the official site for the project.
5.2 - Terminal Multiplexers
Terminal Multiplexers
https://linuxcommand.org/lc3_adv_termmux.php
It’s easy to take the terminal for granted. After all, modern terminal emulators like gnome-terminal, konsole, and the others included with Linux desktop environments are feature-rich applications that satisfy most of our needs. But sometimes we need more. We need to have multiple shell sessions running in a single terminal. We need to display more than one application in a single terminal. We need to move a running terminal session from one computer to another. In short, we need a terminal multiplexer.
Terminal multiplexers are programs that can perform these amazing feats. In this adventure, we will look at three examples: GNU screen, tmux, and byobu.
Some Historical Context
If we were to go back in time to say, the mid-1980s, we might find ourselves staring at a computer terminal; a box with an 80-column wide, 24-line high display and a keyboard connected to a shared, central Unix computer via an RS-232 serial connection and, possibly, an acoustic-coupler modem and a telephone handset. On the display screen there might be a shell prompt not unlike the prompt we see today during a Linux terminal session. However, unlike today, the computer terminal of the 1980s did not have multiple windows or tabs to display multiple applications or shell sessions. We only had one screen and that was it. Terminal multiplexers were originally developed to help address this limitation. A terminal multiplexer allows multiple sessions and applications to be displayed and managed on a single screen. While modern desktop environments and terminal emulator programs support multiple windows and tabbed terminal sessions, which mitigate the need of terminal multiplexers for some purposes, terminal multiplexers still offer some features that will greatly enhance our command-line experience.
GNU Screen
GNU screen goes way back. First developed in 1987, screen appears to be the first program of its type and it defined the basic feature set found in all subsequent terminal multiplexers.
Availability
As its name implies, GNU screen is part of the GNU Project. Though it is rarely installed by default, it is available in most distribution repositories as the package “screen”.
Invocation
We can start using GNU screen by simply entering the screen command at the shell prompt. Once the command is launched, we will be presented with a shell prompt.
Multiple Windows
At this point, screen is running and has created its first window . The terminology used by screen is a little confusing. It is best to think of it this way: screen manages a session consisting of one or more windows each containing a shell or other program. Furthermore, screen can divide a terminal display into multiple regions, each displaying the contents of a window.
Whew! This will start to make sense as we move forward.
In any case, we have screen running now, and it’s displaying its first window. Let’s enter a command in the current window:
me@linuxbox: ~ $ top
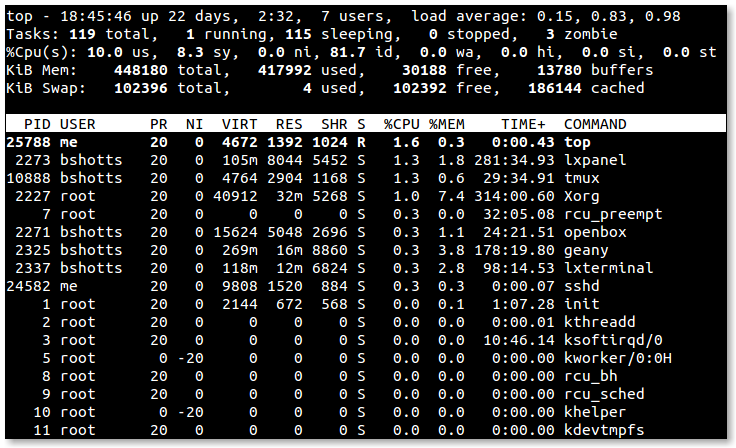 Initial screen window
So far, so good. Now, let’s create another window. To do this, we type Ctrl-a followed by the character “c”. Our terminal screen should clear and we should see a new shell prompt. So what just happened to our first window with top running in it? It’s still there, running in the background. We can return to the first window by typing Ctrl-a p (think “p” for “previous”).
Before we go any further, let’s talk about the keyboard. Controlling screen is pretty simple. Every command consists of Ctrl-a (called the “command prefix” or “escape sequence”) followed by another character. We have already seen two such commands: Ctrl-a c to create a new window, and Ctrl-a p to switch from the current window to the previous one. Typing the command Ctrl-a ? will display a list of all the commands.
GNU screen has several commands for switching from one window to another. Like the “previous” command, there is a “next” command Ctrl-a n. Windows are numbered, starting with 0, and may be chosen directly by typing Ctrl-a followed by a numeral from 0 to 9. It is also possible list all the windows by typing Ctrl-a ". This command will display a list of windows, where we can choose a window.
 Screen window list
As we can see, windows have names. The default name for a window is the name of the program the window was running at the time of its creation, hence both of our windows are named “bash”. Let’s change that. Since we are running top in our first window, let’s make its name reflect that. Switch to the first window using any of the methods we have discussed, and type the command Ctrl-a A and we will be prompted for a window name. Simple.
Okay, so we have created some windows, how do we destroy them? A window is destroyed whenever we terminate the program running in it. After all windows are destroyed, screen itself will terminate. Since both of our windows are running bash, we need only exit each respective shell to end our screen session. In the case of a program that refuses to terminate gracefully, Ctrl-a k will do the trick.
Let’s terminate the shell running top by typing q to exit top and then enter exit to terminate bash, thereby destroying the first window. We are now taken to the remaining window still running its own copy of bash. We can confirm this by typing Ctrl-a " to view the window list again.
It’s possible to create windows and run programs without an underlying shell. To do this, we enter screen followed by the name of the program we wish to run, for example:
me@linuxbox: ~ $ screen vim ~/.bashrc
We can even do this in a screen window. Issuing a screen command in a screen window does not invoke a new copy of screen. It tells the existing instance of screen to carry out an operation like creating a new window.
Copy and Paste
Given that GNU screen was developed for systems that have neither a graphical user interface nor a mouse, it makes sense that screen would provide a way of copying text from one screen window to another. It does this by entering what is called scrollback mode. In this mode, screen allows the text cursor to move freely throughout the current window and through the contents of the scrollback buffer, which contains previous contents of the window.
We start scrollback mode by typing Ctrl-a [. In scrollback mode we can use the arrow keys and the Page Up and Page Down keys to navigate the scrollback buffer. To copy text, we first need to mark the beginning and end of the text we want to copy. This is done by moving the text cursor to the beginning of the desired text and pressing the space bar. Next, we move the cursor to the end of the desired text (which is highlighted as we move the cursor) and press the space bar again to mark the end of the text to be copied. Marking text exits scrollback mode and copies the marked text into screen’s internal buffer. We can now paste the text into any screen window. To do this, we go to the desired window and type Ctrl-a ].
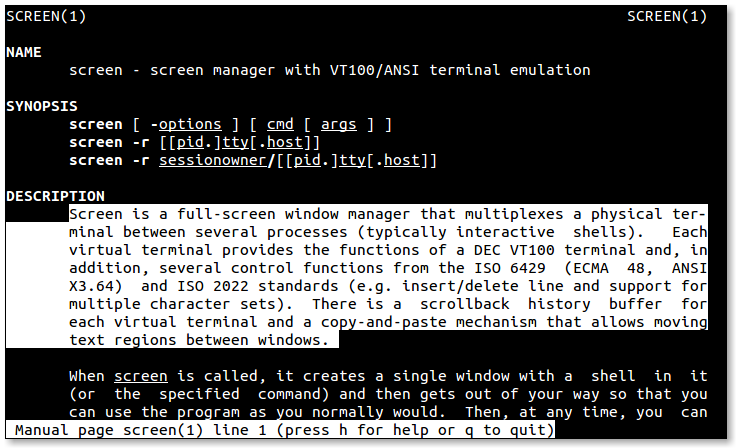 Text marked for copying
Multiple Regions
GNU screen can also divide the terminal display into separate regions, each providing a view of a screen window. This allows us to view 2 or more windows at the same time. To split the terminal horizontally, type the command Ctrl-a S, to split it vertically, type Ctrl-a |. Newly created regions are empty (i.e., they are not associated with a window). To display a window in a region, first move the focus to the new region by typing Ctrl-a Tab and then either create a new window, or chose an existing window to display using any of the window selection commands we have already discussed. Regions may be further subdivided to smaller regions and we can even display the same window in more than one region.
 Regions
Using multiple regions is very convenient when working with large terminal displays. For example, if we split the display into two horizontal regions, we can edit a script in one region and perform testing of the script in the other. Or we could read a man page in one region and try out a command in the other.
There are two commands for deleting regions: Ctrl-a Q removes all regions except the current one, and Ctrl-a X removes the current region. Note that removing a region does not remove its associated window. Windows continue to exist until they are destroyed.
Detaching Sessions
Perhaps the most interesting feature of screen is its ability to detach a session from the terminal itself. Just as it is able to display its windows on any region of the terminal, screen can also display its windows on any terminal or no terminal at all.
For example, we could start a screen session on one computer, say at the office, detach the session from the local terminal, go home and log into our office computer remotely, and reattach the screen session to our home computer’s terminal. During the intervening time, all jobs on our office computer have continued to execute.
There are a number of commands used to manage this process.
screen -listlists the screen sessions running on a system. If there is more than one session running, thepid.tty.hoststring shown in the listing can be appended to the-d/-Dand-r/-Roptions below to specify a particular session.screen -d -rdetaches a screen session from the previous terminal and reattaches it to the current terminal.screen -D -Rdetaches a screen session from the previous terminal, logs the user off the old terminal and attaches the session to the new terminal creating a new session if no session existed. According to the screen documentation, this is the author’s favorite.
The -d/-D and -r/-R options can be used independently, but they are most often used together to detach and reattach an existing screen session in a single step.
We can demonstrate this process by opening two terminals. Launch screen on the first terminal and create a few windows. Now, go to the second terminal and enter the command screen -D -R. This will the cause the first terminal to vanish (the user is logged off) and the screen session to move to the second terminal fully intact.
Customizing Screen
Like many of the interactive GNU utilities, screen is very customizable. During invocation, screen reads the /etc/screenrc and ~/.screenrc files if they exist. While the list of customizable features is extensive (many having to do with terminal display control on a variety of Unix and Unix-like platforms), we will concern ourselves with key bindings and startup session configuration since these are the most commonly used.
First, let’s look a sample .screenrc file:
# This is a comment
# Set some key bindings
bind k # Un-bind the "k" key (set it to do nothing)
bind K kill # Make `Ctrl-a K` destroy the current window
bind } history # Make `Ctrl-a }` copy and paste the current
# command line
# Define windows 7, 8, and 9 at startup
screen -t "mdnght cmdr" 7 mc
screen -t htop 8 htop
screen -t syslog 9 tailf /var/log/syslog
As we can see, the format is pretty simple. The bind directive is followed by the key and the screen command it is to be bound to. A complete list of the screen commands can found in the screen man page. All of the screen commands we have discussed so far are simply key bindings like those in the example above. We can redefine them at will.
The three lines at the end of our example .screenrc file create windows at startup. The commands set the window title (the -t option), a window number, and a command for the window to contain. This way, we can set up a screen session to be automatically built when we start screen which contains a complete multi-window, command-line environment running all of our favorite programs.
tmux
Despite its continuing popularity, GNU screen has been criticized for its code complexity (to the point of being called “unmaintainable”) and its resource consumption. In addition, it is reported that screen is no longer actively developed. In response to these concerns, a newer program, tmux, has attracted widespread attention.
tmux is modern, friendlier, more efficient, and generally superior to screen in most ways. Conceptually, tmux is very similar to screen in that it also supports the concept of sessions, windows and regions (called panes in tmux). In fact, it even shares a few keyboard commands with screen.
Availability
tmux is widely available, though not as widely as screen. It’s available in most distribution repositories. The package name is “tmux”.
Invocation
The program is invoked with the command tmux new to create a new session. We can optionally add -s <session_name> to assign a name to the new session and -n <window_name> to assign a name to the first window. If no option to the new command is supplied, the new itself may be omitted; it will be assumed. Here is an example:
me@linuxbox: ~ $ tmux new -s "my session" -n "window 1"
Once the program starts, we are presented with a shell prompt and a pretty status bar at the bottom of the window.
 Initial tmux window
Multiple Windows
tmux uses the keyboard in a similar fashion to screen, but rather than using Ctrl-a as the command prefix, tmux uses Ctrl-b. This is good since Ctrl-a is used when editing the command line in bash to move the cursor to the beginning of the line.
Here are the basic commands for creating windows and navigating them:
| Command | Description |
|---|---|
Ctrl-b ? | Show the list of key bindings (i.e., help) |
Ctrl-b c | Create a new window |
Ctrl-b n | Go to next window |
Ctrl-b p | Go to previous window |
Ctrl-b 0 | Go to window 0. Numbers 1-9 are similar. |
Ctrl-b w | Show window list. The status bar lists windows, too. |
Ctrl-b , | Rename the current window |
Multiple Panes
Like screen, tmux can divide the terminal display into sections called panes. However, unlike the implementation of regions in screen, panes in tmux do not merely provide viewports to various windows. In tmux they are complete pseudo-terminals associated with the window. Thus a single tmux window can contain multiple terminals.
| Command | Description |
|---|---|
Ctrl-b " | Split pane horizontally |
Ctrl-b % | Split pane vertically |
Ctrl-b arrow | Move to adjoining pane |
Ctrl-b Ctrl-arrow | Resize pane by 1 character |
Ctrl-b Alt-arrow | Resize pane by 5 characters |
Ctrl-b x | Destroy current pane |
We can demonstrate the behavior of panes by creating a session and a couple of windows. First, we will create a session, name it, and name the initial window:
me@linuxbox: ~ $ tmux new -s PaneDemo -n Window0
Next, we will create a second window and give it a name:
me@linuxbox: ~ $ tmux neww -n Window1
We could have done this second step with Ctrl-b commands, but seeing the command-line method prepares us for something coming up a little later.
Assuming that all has gone well, we now find ourselves in a tmux session named “PaneDemo” and a window named “Window1”. Now we will split the window in two horizontally by typing Ctrl-b ". We still have only two windows (Window0 and Window1), but now have two shell prompts on Window1. We can switch back and forth between the two panes by typing Ctrl-b followed by up arrow or down arrow.
Just for fun, let’s type Ctrl-b t and a digital clock appears in the current pane. It’s just a cute thing that tmux can do.
 Multiple panes
We can terminate the clock display by typing q. If we move to the first window by typing Ctrl-b 0, we see that the panes remain associated with Window1 and have no effect on Window0.
Returning to Window1, let’s adjust the size of the panes. We do this by typing Ctrl-b Alt-arrow to move the boundary up or down by 5 lines. Typing Ctrl-b Ctrl-arrow will move the boundary by 1 line.
It’s possible to break a pane out into a new window of its own. This is done by typing Ctrl-b !.
Ctrl-b x is used to destroy a pane. Note that, unlike screen, destroying a pane in tmux also destroys the pseudo-terminal running within it, along with any associated programs.
Copy Mode
Like screen, tmux has a copy mode. It is invoked by typing Ctrl-b [. In copy mode, we can move the cursor freely within the scrollback buffer. To mark text for copying, we first type Ctrl-space to begin selection, then move the cursor to make our selection. Finally, we type Alt-w to copy the selected text.
Admittedly, this procedure is a little awkward. A little later we’ll customize tmux to make the copy mode act more like the vim’s visual copying mode.
 Text marked for copying
As with the digital clock, we return to normal mode by typing “q”. Now we can paste our copied text by typing Ctrl-b ].
Detaching Sessions
With tmux it’s easier to manage multiple sessions than with screen. First, we can give sessions descriptive names, either during creation, as we saw with our “PaneDemo” example above, or by renaming an existing session with Ctrl-b $. Second, it’s easy to switch sessions on-the-fly by typing Ctrl-b s and choosing a session from the presented list.
While we are in a session, we can type Ctrl-b d to detach it and, in essence, put tmux into the background. This is useful if we want to create new a session by entering the tmux new command.
If we start a new terminal (or log in from a remote terminal) and wish to attach an existing session to it, we can issue the command tmux ls to display a list of available sessions. To attach a session, we enter the command tmux attach -d -t <session_name>. The “-d” option causes the session to be detached from its previous terminal. Without this option, the session will be attached to both its previous terminal and the new terminal. If only one session is running, a tmux attach will connect to it and leave any existing connections intact.
Customizing tmux
As we would expect, tmux is extremely configurable. When tmux starts, it reads the files /etc/tmux.conf and ~./.tmux.conf if they exist. It is also possible to start tmux with the -f option and specify an alternate configuration file. This way, we can have multiple custom configurations.
The number of configuration commands is extensive, just as it is with screen. The tmux man page has the full list.
As an example, here is a hypothetical configuration file that changes the command prefix key from Ctrl-b to Ctrl-a and creates a new session with 4 windows:
# Sample tmux.conf file
# Change the command prefix from Ctrl-b to Ctrl-a
unbind-key C-b
set-option -g prefix C-a
bind-key C-a send-prefix
#####
# Create session with 4 windows
#####
# Create session and first window
new-session -d -s MySession
# Create second window and vertically split it
new-window
split-window -d -h
# Create third window (and name it) running Midnight Commander
new-window -d -n MdnghtCmdr mc
# Create fourth window (and name it) running htop
new-window -d -n htop htop
# Give focus to the first window in the session
select-window -t 0
Since this configuration creates a new session, we should launch tmux by entering the command tmux attach to avoid the default behavior of automatically creating a new session. Otherwise, we end up with an additional and unwanted session.
Here’s a useful configuration file that remaps the keys used to create panes and changes copy and paste to behave more like vim.
# Change bindings for pane-splitting from " and % to | and -
unbind '"'
unbind %
bind | split-window -h
bind - split-window -v
# Enable mouse control (clickable windows, panes, resizable panes)
set -g mouse on
# Set color support to allow visual mode highlighting to work in vim
set -g default-terminal "screen-256color"
# Make copy work like vi
# Start copy ^b-[
# Use vi movement keys (arrows, etc.)
# Select with v, V
# Yank and end copy mode with y
# Paste with ^b-]
# View all vi key bindings with ^b-: followed with list-keys -T copy-mode-vi
set-window-option -g mode-keys vi
bind-key -T copy-mode-vi 'v' send -X begin-selection
bind-key -T copy-mode-vi 'y' send -X copy-selection-and-cancel
byobu
byobu (pronounced “BEE-oh-boo”) from the Japanese word for “a folding, decorative, multi-panel screen” is not a terminal multiplexer per se, but rather, it is a wrapper around either GNU screen or tmux (the default is tmux). It aims to create a simplified user interface with an emphasis on presenting useful system information on the status bar.
Availability
byobu was originally developed by Canonical employee Dustin Kirkland, and as such is usually found in Ubuntu and other Debian-based distributions. Recent versions are more portable than the initial release, and it is beginning to appear in a wider range of distributions. It is distributed as the package “byobu”.
Invocation
byobu can be launched simply by entering the command byobu followed optionally by any options and commands to be passed to the backend terminal multiplexer (i.e., tmux or screen). For this adventure, we will confine our discussion to the tmux backend as it supports a larger feature set.
 Initial byobu window
Usage
Unlike screen and tmux, byobu doesn’t use a command prefix such as Ctrl-a to start a command. byobu relies extensively on function keys instead. This makes byobu somewhat easier to learn, but in exchange, it gives up some of the power and flexibility of the underlying terminal multiplexer. That said, byobu still provides an easy-to-use interface for the most useful features and it also provides a key (F12) which acts as command prefix for tmux commands. Below is an excerpt from the help file supplied with byobu when using tmux as the backend:
F1 * Used by X11 *
Shift-F1 Display this help
F2 Create a new window
Shift-F2 Create a horizontal split
Ctrl-F2 Create a vertical split
Ctrl-Shift-F2 Create a new session
F3/F4 Move focus among windows
Shift-F3/F4 Move focus among splits
Ctrl-F3/F4 Move a split
Ctrl-Shift-F3/F4 Move a window
Alt-Up/Down Move focus among sessions
Shift-Left/Right/Up/Down Move focus among splits
Ctrl-Shift-Left/Right Move focus among windows
Ctrl-Left/Right/Up/Down Resize a split
F5 Reload profile, refresh status
Shift-F5 Toggle through status lines
Ctrl-F5 Reconnect ssh/gpg/dbus sockets
Ctrl-Shift-F5 Change status bar's color randomly
F6 Detach session and then logout
Shift-F6 Detach session and do not logout
Ctrl-F6 Kill split in focus
F7 Enter scrollback history
Alt-PageUp/PageDown Enter and move through scrollback
F8 Change the current window's name
Shift-F8 Toggle through split arrangements
Ctrl-F8 Restore a split-pane layout
Ctrl-Shift-F8 Save the current split-pane layout
F9 Launch byobu-config window
F10 * Used by X11 *
F11 * Used by X11 *
Alt-F11 Expand split to a full window
Shift-F11 Join window into a horizontal split
Ctrl-F11 Join window into a vertical split
F12 Escape sequence
Shift-F12 Toggle on/off Byobu's keybindings
Ctrl-Shift-F12 Modrian squares
As we can see, most of the commands here correspond to features we have already seen in tmux. There are, however, a couple of interesting additions.
First is the F9 key, which brings up a menu screen:
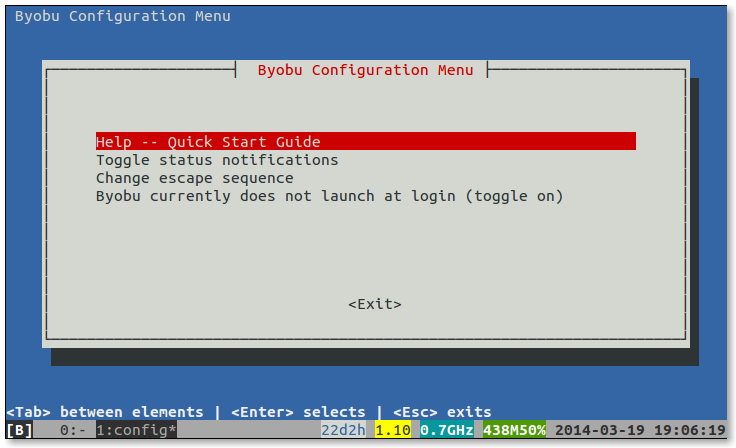 byobu menu
The choices are pretty self-explanatory, though the “Change escape sequence” item is only relevant when using screen as the backend. If we choose “Toggle status notifications” we get to a really useful feature in byobu; the rich and easily configured status bar.
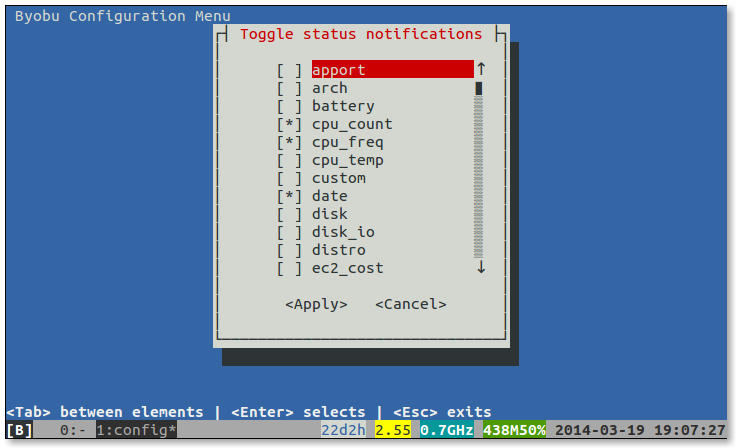 Status notifications
Here we can choose from a wide variety of system status information to be displayed. Very useful if we are monitoring remote servers.
The second is the Shift-F12 key, which disables byobu from interpreting the functions keys as commands. This is needed in cases where a text-based application (such as Midnight Commander) needs the function keys. Pressing Shift-F12 a second time re-enables the function keys for byobu. Unfortunately, byobu gives no visual indication of the state of the function keys, making this feature rather confusing to use in actual practice.
Copy Mode
byobu provides an interface to the copy mode of its backend terminal multiplexer. For tmux, it’s slightly simplified from normal tmux, but works about the same. Here are the key commands:
| Command | Description |
|---|---|
Alt-PgUp | Enter copy mode |
Space | Start text selection |
Enter | End text selection, copy text, and exit copy mode |
Alt-Insert | Paste selected text |
Detaching Sessions
To detach a session and log off, press the F6 key. To detach without logging off, type Shift-F6. To attach, simply enter the byobu command and the previous session will be reattached. If more than one session is running, we are prompted to select a session. While we are in a session, we can type Alt-Up and Alt-Down to move from session to session.
Customizing byobu
The local configuration file for byobu is located in either ~/.byobu/.tmux.conf or ~/.config/byobu/.tmux.conf, depending on the distribution. If one doesn’t work, try the other. The configuration details are the same as for tmux.
Summing Up
We have seen how a terminal multiplexer can enhance our command-line experience by providing multiple windows and sessions, as well as multiple regions on a single terminal display. So, which one to choose? GNU screen has the benefit of being almost universally available, but is now considered by many as obsolete. tmux is modern and well supported by active development. byobu builds on the success of tmux with a simplified user interface, but if we rely on applications that need access to the keyboard function keys, byobu becomes quite tedious. Fortunately, many Linux distributions make all three available, so it’s easy to try them all and see which one satisfies the needs at hand.
Further Reading
The man pages for screen and tmux are richly detailed. Well worth reading. The man page for byobu is somewhat simpler.
GNU Screen
- Official site: https://www.gnu.org/software/screen/
- A helpful entry in the Arch Wiki: https://wiki.archlinux.org/index.php/GNU_Screen
- A Google search for “screenrc” yields many sample
.screenrcfiles - Also look for sample files in
/usr/share/doc/screen/examples
tmux
- Official site: https://www.gigastudio.com.ua
- The tmux FAQ: https://github.com/tmux/tmux/wiki/FAQ
- A helpful entry in the Arch Wiki: https://wiki.archlinux.org/index.php/tmux
- A Google search for “tmux.conf” yields many sample
.tmux.conffiles - Also look for sample files in
/usr/share/doc/tmux/examples
byobu
- Official site: https://www.byobu.org
- Answers to many common questions: https://askubuntu.com/tags/byobu/hot
5.3 - Less Typing
Less Typing
https://linuxcommand.org/lc3_adv_lesstype.php
Since the beginning of time, Man has had an uneasy relationship with his keyboard. Sure, keyboards make it possible to express our precise wishes to the computer, but in our fat-fingered excitement to get stuff done, we often suffer from typos and digital fatigue.
In this adventure, we will travel down the carpal tunnel to the land of less typing. We covered some of this in TLCL, but here we will look a little deeper.
Aliases and Shell Functions
The first thing we can do to reduce the number of characters we type is to make full use of aliases and shell functions. Aliases were created for this very purpose and they are often a very effective solution. Shell functions perform in many ways like aliases but allow a full range of shell script-like capabilities such as programmatic logic, and option and argument processing.
Most Linux distributions provide some set of default alias definitions and it’s easy to add more. To see the aliases we already have, we enter the alias command without arguments:
me@linuxbox: ~ $ alias
alias egrep='egrep --color=auto'
alias fgrep='fgrep --color=auto'
alias grep='grep --color=auto'
alias ls='ls --color=auto
On this example system, we see alias is used to activate color output for some commonly used commands. It is also common to create aliases for various forms of the ls command:
alias ll='ls -l'
alias la='ls -A'
alias l='ls -CF'
alias l.='ls -d .*'
alias lm='ls -l | less'
Aliases are good for lots of things, for example, here’s one that’s useful for Debian-style systems:
alias update='sudo apt-get update && sudo apt-get upgrade'
Aliases are easy to create. It’s usually just a matter of appending them to our .bashrc file. Before creating a new alias, it’s a good idea to first test the proposed name of the alias with the type command to check if the name is already being used by another program or alias.
While being easy, aliases are somewhat limited. In particular, aliases can’t handle complex logic or accept positional parameters. For that we need to use shell functions.
As we recall from TLCL, shell functions are miniature shell scripts that we can add to our .bashrc file to perform anything that we may otherwise do with a shell script. Here is an example function that displays a quick snapshot of a system’s health:
status() {
{ echo -e "\nuptime:"
uptime
echo -e "\ndisk space:"
df -h 2> /dev/null
echo -e "\ninodes:"
df -i 2> /dev/null
echo -e "\nblock devices:"
blkid
echo -e "\nmemory:"
free -m
if [[ -r /var/log/syslog ]]; then
echo -e "\nsyslog:"
tail /var/log/syslog
fi
if [[ -r /var/log/messages ]]; then
echo -e "\nmessages:"
tail /var/log/messages
fi
} | less
}
Unlike aliases, shell functions can accept positional parameters:
params() {
local argc=0
while [[ -n $1 ]]; do
argc=$((++argc))
echo "Argument $argc = $1"
shift
done
}
Command Line Editing
Aliases and shell functions are all well and good, provided we know in advance the operations we wish to perform, but what about the rest of the time? Most command line operations we perform are on-the-fly, so other techniques are needed.
As we saw in Chapter 8 of TLCL, the bash shell includes a library called readline to handle keyboard input during interactive shell sessions. This includes text typed at the shell prompt and keyboard input using the read builtin when the -e option is specified. The readline library supports a large number of commands that can be used to edit what we type at the command line. Since readline is from the GNU project, many of the commands are taken from the emacs text editor.
Control Commands
Before we get to the actual editing commands, let’s look at some commands that are used to control the editing process.
| Command | Description |
|---|---|
Enter | Pressing the enter key causes the current command line to be accepted. Note that the cursor location within the line does not matter (i.e., it doesn’t have to be at the end). If the line is not empty, it is added to the command history. |
Esc | Meta-prefix. If the Alt key is unavailable, the Esc key can be used in its place. For example, if a command calls for Alt-r but another program intercepts that command, press and release the Esc key followed by the r key. |
Ctrl-g | Abort the current editing command. |
Ctrl-_ | Incrementally undo changes to the line. |
Alt-r | Revert all changes to the line (i.e., complete undo). |
Ctrl-l | Clear the screen. |
Alt-num | Where num is a number. Some commands accept a numeric argument. For those commands that accept it, type this first followed by the command. |
Moving Around
Here are some commands to move the cursor around the current command line. In the readline documentation, the current cursor location is referred to as the point.
| Command | Description |
|---|---|
Right | Move forward one character. |
Left | Move backward one character. |
Alt-f | Move forward one word. |
Alt-b | Move backward one word. |
Ctrl-a | Move to the beginning of the line. |
Ctrl-e | Move to the end of the line. |
Using Command History
In order to save typing, we frequently reuse previously typed commands stored in the command history. We can move up and down the history list and the history list can be searched.
| Command | Description |
|---|---|
Up | Move to previous history list entry. |
Down | Move to next history list entry. |
Alt-< | Move to the beginning of the history list. |
Alt-> | Move to the end of the history list. |
Ctrl-r | Perform an incremental history search starting at the current position and moving up the history list. After a command is typed, a prompt appears and with each succeeding character typed, the position within the list moves to the next matching line. This is probably the most useful of the history search commands. |
Ctrl-s | Like Ctrl-r except the search is performed moving down the history list. |
Alt-p | Perform a non-incremental search moving up the history list. |
Alt-n | Perform a non-incremental search moving down the history list. |
Alt-Ctrl-y | Insert the first argument from the previous history entry. This command can take a numeric argument. When a numeric argument is given, the nth argument from the previous history entry is inserted. |
Alt-. | Insert the last argument from the previous history entry. When a numeric argument is given, behavior is the same as Alt-Ctrl-y above. |
Changing Text
| Command | Description |
|---|---|
Ctrl-d | Delete the character at the point. |
Ctrl-t | Transpose characters. Exchange the character at the point with the character preceding it. |
Alt-t | Transpose words. Exchange the word at the point with the word preceding it. |
Alt-u | Change the current word to uppercase. |
Alt-l | Change the current word to lowercase. |
Alt-c | Capitalize the current word. |
Cutting and Pasting
As with vim, cutting and pasting in readline are referred to as “killing” and “yanking.” The clipboard is called the kill-ring and is implemented as a circular buffer. This means that it contains multiple entries (i.e., each kill adds a new entry). The latest entry is referred to as the “top” entry. It is possible to “rotate” the kill-ring to bring the previous entry to the top and delete the latest entry. However, this feature is rarely used.
Mostly, the kill commands are used to simply delete text rather than save it for later yanking.
| Command | Description |
|---|---|
Alt-d | Kill from the point to the end of the current word. If the point is located in whitespace, kill to the end of the next word. |
Alt-Backspace | Kill the word before the point. |
Ctrl-k | Kill from the point to end of line. |
Ctrl-u | Kill from the point to the beginning of the line. |
Ctrl-y | Yank the “top” entry from the kill-ring. |
Alt-y | Rotate the kill-ring and yank the new “top” entry. |
Editing in Action
In Chapter 4 of TLCL, we considered the danger of using a wildcard with the rm command. It was suggested that we first test the wildcard with the ls command to see the result of the expansion. We then recall the command from the history and edit the line to replace the “ls” with “rm”. So, how do we perform this simple edit?
First, the beginner’s way: we recall the command with the up arrow, use the left arrow repeatedly to move the cursor to the space between the “ls” and the wildcard, backspace twice, then type “rm” and Enter.
That’s a lot of keystrokes.
Next, the tough-guy’s way: we recall the command with the up arrow, type Ctrl-a to jump to the beginning of the line, type Alt-d to kill the current word (the “ls”), type “rm” and Enter.
That’s better.
Finally, the super-tough-guy’s way: type “rm” then Alt-. to recall the last argument (the wildcard) from the previous command, then Enter.
Wow.
Completion
Another trick that readline can perform is called completion. This is where readline will attempt to automatically complete something we type.
For example, let’s imagine that our current working directory contains a single file named foo.txt and we want to view it with less. So we begin to type the command less foo.txt but instead of typing it all out, we just type less f and then press the Tab key. Pressing Tab tells readline to attempt completion on the file name and remainder of the command is completed automatically.
This will work as long as the “clue” given to readline is not ambiguous. If we had two files in our imaginary directory named “foo.txt” and “foo1.txt”, a successful completion would not take place since “less f” could refer to either file. What happens instead is readline makes the next best guess by completing as far as “less foo” since both possible answers contain those characters. To make a full completion, we need to type either less foo. for foo.txt or less foo1 for foo1.txt.
If we have typed an ambiguous clue, we can view a list of all possible completions to get guidance as what to type next. In the case of our imaginary directory, pressing Tab a second time will display all of the file names beginning with “foo” so that we can see what more needs to be typed to remove the ambiguity.
Besides file name completion, readline can complete command names, environment variable names, user home directory names, and network host names:
| Completion | Description |
|---|---|
| Command names | Completion on the first word of a line will complete the name of an available command. For example, typing “lsu” followed by Tab will complete as lsusb. |
| Variables | If completion is attempted on a word beginning with “$”, environment variable names will be used. For example, typing “echo $TE” will complete as echo $TERM. |
| User names | To complete the name of a user’s home directory, precede the user’s name with a “~” and press ‘Tab’. For example: ls ~ro followed by Tab will complete to ls ~root/. It is also possible to force completion of a user name without the leading ~ by typing Alt-~. For example “who ro” followed by Alt-~ will complete to who root. |
| Host names | Completion on a word starting with “@” causes host name completion, however this feature rarely works on modern systems since they tend to use DHCP rather than listing host names in the /etc/hosts file. |
| File names | In all other cases, completion is attempted on file and path names. |
Programmable Completion
Bash includes some builtin commands that permit the completion facility to be programmed on a command-by-command basis. This means it’s possible to set up a custom completion scheme for individual commands; however, doing this is beyond the scope of this adventure. We will instead talk about an optional package that uses these builtins to greatly extend the native completion facility. Called bash-completion, this package is installed automatically for some distributions (for example, Ubuntu) and is generally available for others. To check for the package, examine the /etc/bash-completion.d directory. If it exists, the package is installed.
The bash-completion package adds support for many command line programs, allowing us to perform completion on both command options and arguments. The ls command is a good example. If we type “ls –” then the Tab key a couple of times, we will see a list of possible options to the command:
me@linuxbox: ~ $ ls --
--all --ignore=
--almost-all --ignore-backups
--author --indicator-style=
--block-size= --inode
--classify --literal
--color --no-group
--color= --numeric-uid-gid
--context --quote-name
--dereference --quoting-style=
--dereference-command-line --recursive
--dereference-command-line-symlink-to-dir --reverse
--directory --show-control-chars
--dired --si
--escape --size
--file-type --sort
--format= --sort=
--group-directories-first --tabsize=
--help --time=
--hide= --time-style=
--hide-control-chars --version
--human-readable --width=
An option can be completed by typing a partial option followed by Tab. For example, typing “ls –ver” then Tab will complete to “ls –version”.
The bash-completion system is interesting in its own right as it is implemented by a series of shell scripts that make use of the complete and compgen bash builtins. The main body of the work is done by the /etc/bash_completion (or /usr/share/bash-completion/bash_completion in newer versions) script along with additional scripts for individual programs in either the /etc/bash-completion.d directory or the /usr/share/bash-completion/completions directory. These scripts are good examples of advanced scripting technique and are worthy of study.
Summing Up
This adventure is a lot to take in and it might not seem all that useful at first, but as we continue to gain experience and practice with the command line, learning these labor-saving tricks will save us a lot of time and effort.
Further Reading
- “The beginning of time” actually has meaning in Unix-like operating systems such as Linux. It’s January 1, 1970. See: https://en.wikipedia.org/wiki/Unix_time for details.
- Aliases and shell functions are discussed in Chapters 5 and 26, respectively, of The Linux Command Line: https://linuxcommand.org/tlcl.php.
- The READLINE section of the bash man page describes the many keyboard shortcuts available on the command line.
- The HISTORY section of the bash man page covers the command line history features of
bash. - The official home page of the bash-completion project: https://github.com/scop/bash-completion
- For those readers interested in learning how to write their own bash completion scripts, see this tutorial at the Linux Documentation Project: https://tldp.org/LDP/abs/html/tabexpansion.html.
5.4 - More Redirection
More Redirection
https://linuxcommand.org/lc3_adv_redirection.php
As we learned in Chapter 6 of TLCL, I/O redirection is one of the most useful and powerful features of the shell. With redirection, our commands can send and receive streams of data to and from files and devices, as well as allow us to connect different programs together into pipelines.
In this adventure, we will look at redirection in a little more depth to see how it works and to discover some additional features and useful redirection techniques.
What’s Really Going On
Whenever a new program is run on the system, the kernel creates a table of file descriptors for the program to use. File descriptors are pointers to files. By convention, the first 3 entries in the table (descriptors 0, 1, and 2) are used as standard input (stdin), standard output (stdout), and standard error (stderr). Initially, all three descriptors point to the terminal device (which the system treats as a read/write file), so that standard input comes from the keyboard and standard output and standard error go to the terminal display.
When a program is started as a child process of another (for instance, when we run an executable program in the shell), the newly launched program inherits a copy of the parent’s file descriptor table. Redirection is the process of manipulating the file descriptors so that input and output can be routed from/to different files.
The shell hides the presence of file descriptors in common redirections such as:
command > file
Here we redirect standard output to a file, but the full syntax of the redirection operator includes an optional file descriptor. We could write the above statement this way and it would have exactly the same effect:
command 1> file
As a convenience, the shell assumes we want to redirect standard output if the file descriptor is omitted. Likewise, the following two statements are equivalent when referring to standard input:
command < file
command 0< file
Duplicating File Descriptors
It is sometimes desirable to write more than one output stream (for example standard output and standard error) to the same file. To do this, we would write something like this:
command > file 2>&1
We’ll add the assumed file descriptor to the first redirection to make things a little clearer:
command 1> file 2>&1
This is an example of duplication. When we read this statement, we see that file descriptor 1 is changed from pointing to the terminal device to instead pointing to file. This is followed by the second redirection that causes file descriptor 2 to be a duplicate (i.e., it points to the same file) of file descriptor 1. When we look at things this way, it’s easy to see why the order of redirections is important. For example, if we reverse the order:
command 2>&1 1> file
file descriptor 2 becomes a duplicate of file descriptor 1 (which points to the terminal) and then file descriptor 1 is set to point to file. The final result is file descriptor 1 points to file while file descriptor 2 still points to the terminal.
exec
Before we go any farther, we need to take a brief detour and talk about a shell builtin that we didn’t cover in TLCL. This builtin is named exec and it does some interesting things. Its main purpose is to terminate the shell and launch another program in its place. This is often used in startup scripts that initiate system services. However, it is not common in scripts used for other purposes.
Usage of exec is described below:
exec [program] [redirections]
program is the name of the program that will start and take the place of the shell. redirections are the redirections to be used by the new program.
One feature of exec is useful for our study of redirection. If program is omitted, any specified redirections are performed on the current shell. For example, if we included this near the beginning of a script:
exec 1> output.txt
from that point on, every command using standard output would send its data to output.txt. It should be noted that if this trick is performed by a script, it is no longer possible to redirect that script’s output at runtime using the command line. For example, if we had the following script:
#!/bin/bash
# exec-test - Test external redirection and exec
exec 1> ~/foo1.txt
echo "Boo."
# End of script
and tried to invoke it with redirection:
me@linuxbox ~ $ ./exec-test > ~/foo2.txt
the attempted redirection would have no effect. The word “Boo” would still be written to the file foo1.txt, not foo2.txt as specified on the command line. This is because the redirection performed inside the script via exec is performed after the redirection on the command line, and thus, takes precedence.
Another way we can use exec is to open and close additional file descriptors. While we most often use descriptors 0, 1, and 2, it is possible to use others. Here are examples of opening and closing file descriptor 3:
# Open fd 3
exec 3> some_file.txt
# Close fd 3
exec 3>&-
It’s easy to open and use file descriptors 3-9 in the shell, and it’s even possible to use file descriptors 10 and above, though the bash man page cautions against it.
So why would we want to use additional file descriptors? That’s a little hard to answer. In most cases we don’t need to. We could open several descriptors in a script and use them to redirect output to different files, but it’s just as easy to specify (using shell variables, if desired) the names of the files to which we want to redirect since most commands are going to send their data to standard output anyway.
There is one case in which using an additional file descriptor would be helpful. It’s the case of a filter program that accepts standard input and sends its filtered data to standard output. Such programs are quite common, for example sort and grep. But what if we want to create a filter program that also writes stuff on the terminal display while it was filtering? We can’t use standard output to do it, because standard output is being used to output the filtered data. We could use standard error to display stuff on the screen, but let’s say we wanted to keep it restricted to just error messages (this is good for logging). Using exec, we could do something like this:
#!/bin/bash
# counter-exec - Count number of lines in a pipe
exec 3> /dev/tty # open fd 3 and point to controlling terminal
count=0
while read; do # read line from stdin
echo "$REPLY" # send line to stdout
((count++))
printf "\b\b\b\b\b\b%06d" $count >&3
done
echo " Lines Counted" >&3
exec 3>&- # close fd 3
This program simply copies standard input to standard output, but it displays a running count of the number of lines that it has copied. If we invoke it this way, we can see it in action:
me@linuxbox ~ $ find /usr/share | ./counter-exec > ~/find_list.txt
In this pipeline example, we generate a list of files using find, and then count them before writing the list in a file named find_list.txt.
The script works by reading a line from the standard input and writing the REPLY variable (which contains the line of text from read) to standard output. The printf format specifier contains a series of six backspaces and a formatted integer that is always six digits long padded with leading zeros.
/dev/tty
The mysterious part of the script above is the exec. The exec is used to open a file using file descriptor 3 which is set to point to /dev/tty. /dev/tty is one of several special files that we can access from the shell. Special files are usually not “real” files in the sense that they are files that exists on a physical disk. Rather, they are virtual like the files in the /proc directory. The /dev/tty file is a device that always points to a program’s controlling terminal, that is, the terminal that is responsible for launching the program. If we run the command ps aux on our system, we will see a listing of every process. At the top of the listing is a column labeled “TTY” (short for “Teletype” reflecting its historical roots) that contains the name of the controlling terminal. Most entries in this column will contain “?” meaning that the process has no controlling terminal (the process was not launched interactively), but others will contain a name like “pts/1” which refers to the device /dev/pts/1. The term “pty” means pseudo-terminal, the type of terminal used by terminal emulators rather than actual physical terminals.
Noclobber
When the shell encounters a command with output redirection, such as:
command > file
the first thing that happens is that the output stream is started by either creating file or, if file already exists, truncating it to zero length. This means that if command completely fails or doesn’t even exist, file will end up with zero length. This can be a safety issue for new users who might overwrite (or truncate) a valuable file.
To avoid this, we can do one of two things. First we can use the “»” operator instead of “>” so that output will be appended to the end of file rather than the beginning. Second, we can set the “noclobber” shell option which prevents redirection from overwriting an existing file. To activate this, we enter:
set -o noclobber
Once we set this option, attempts to overwrite an existing file will cause the following error:
bash: file: cannot overwrite existing file
The effect of the noclobber option can be overridden by using the >| redirection operator like so:
command >| file
To turn off the noclobber option we enter this command:
set +o noclobber
Summing Up
While this adventure may be more on the “interesting” side than the “fun” side, it does provide some useful insight into how redirection actually works and some of the interesting ways we can use it. In a later adventure, we will put this new knowledge to work expanding the power of our scripts.
Further Reading
- A good visual tutorial can be found at The Bash Hackers Wiki: https://wiki.bash-hackers.org/howto/redirection_tutorial
- For a little background on file descriptors, see this Wikipedia article: https://en.wikipedia.org/wiki/File_descriptor
- This Linux Journal article covers using
execto manage redirection: https://www.linuxjournal.com/content/bash-redirections-using-exec - The Linux Command Line covers redirection in Chapters 6 (main discussion), 25 (here documents), 28 (here strings), and 36 (command grouping, subshells, process substitution, named pipes).
- The REDIRECTION section of the
bashman page, of course, has all the details.
5.5 - tput
tput
https://linuxcommand.org/lc3_adv_tput.php
While our command line environment is certainly powerful, it can be be somewhat lacking when it comes to visual appeal. Our terminals cannot create the rich environment of the graphical user interface, but it doesn’t mean we are doomed to always look at plain characters on a plain background.
In this adventure, we will look at tput, a command used to manipulate our terminal. With it, we can change the color of text, apply effects, and generally brighten things up. More importantly, we can use tput to improve the human factors of our scripts. For example, we can use color and text effects to better present information to our users.
Availability
tput is part of the ncurses package and is supplied with most Linux distributions.
What it Does/How it Works
Long ago, when computers were centralized, interactive computer users communicated with remote systems by using a physical terminal or a terminal emulator program running on some other system. In their heyday, there were many kinds of terminals and they all used different sequences of control characters to manage their screens and keyboards.
When we start a terminal session on our Linux system, the terminal emulator sets the TERM environment variable with the name of a terminal type. If we examine TERM, we can see this:
[me@linuxbox ~]$ echo $TERM
xterm
In this example, we see that our terminal type is named “xterm” suggesting that our terminal behaves like the classic X terminal emulator program xterm. Other common terminal types are “linux” for the Linux console, and “screen” used by terminal multiplexers such as screen and tmux. While we will encounter these 3 types most often, there are, in fact, thousands of different terminal types. Our Linux system contains a database called terminfo that describes them. We can examine a typical terminfo entry using the infocmp command followed by a terminal type name:
[me@linuxbox ~]$ infocmp screen
# Reconstructed via infocmp from file: /lib/terminfo/s/screen
screen|VT 100/ANSI X3.64 virtual terminal,
am, km, mir, msgr, xenl,
colors#8, cols#80, it#8, lines#24, ncv@, pairs#64,
acsc=++\,\,--..00``aaffgghhiijjkkllmmnnooppqqrrssttuuvvwwxxyyzz{{||}}~~,
bel=^G, blink=\E[5m, bold=\E[1m, cbt=\E[Z, civis=\E[?25l,
clear=\E[H\E[J, cnorm=\E[34h\E[?25h, cr=^M,
csr=\E[%i%p1%d;%p2%dr, cub=\E[%p1%dD, cub1=^H,
cud=\E[%p1%dB, cud1=^J, cuf=\E[%p1%dC, cuf1=\E[C,
cup=\E[%i%p1%d;%p2%dH, cuu=\E[%p1%dA, cuu1=\EM,
cvvis=\E[34l, dch=\E[%p1%dP, dch1=\E[P, dl=\E[%p1%dM,
dl1=\E[M, ed=\E[J, el=\E[K, el1=\E[1K, enacs=\E(B\E)0,
flash=\Eg, home=\E[H, ht=^I, hts=\EH, ich=\E[%p1%d@,
il=\E[%p1%dL, il1=\E[L, ind=^J, is2=\E)0, kbs=\177,
kcbt=\E[Z, kcub1=\EOD, kcud1=\EOB, kcuf1=\EOC, kcuu1=\EOA,
kdch1=\E[3~, kend=\E[4~, kf1=\EOP, kf10=\E[21~,
kf11=\E[23~, kf12=\E[24~, kf2=\EOQ, kf3=\EOR, kf4=\EOS,
kf5=\E[15~, kf6=\E[17~, kf7=\E[18~, kf8=\E[19~, kf9=\E[20~,
khome=\E[1~, kich1=\E[2~, kmous=\E[M, knp=\E[6~, kpp=\E[5~,
nel=\EE, op=\E[39;49m, rc=\E8, rev=\E[7m, ri=\EM, rmacs=^O,
rmcup=\E[?1049l, rmir=\E[4l, rmkx=\E[?1l\E>, rmso=\E[23m,
rmul=\E[24m, rs2=\Ec\E[?1000l\E[?25h, sc=\E7,
setab=\E[4%p1%dm, setaf=\E[3%p1%dm,
sgr=\E[0%?%p6%t;1%;%?%p1%t;3%;%?%p2%t;4%;%?%p3%t;7%;%?%p4%t;5%;m%?%p9%t\016%e\017%;,
sgr0=\E[m\017, smacs=^N, smcup=\E[?1049h, smir=\E[4h,
smkx=\E[?1h\E=, smso=\E[3m, smul=\E[4m, tbc=\E[3g,
The example above is the terminfo entry for the terminal type “screen”. What we see in the output of infocmp is a comma-separated list of terminal capability names or capnames. Some of the capabilities are standalone - like the first few in the list - while others are assigned cryptic values. Standalone terminal capabilities indicate something the terminal can do. For example, the capability “am” indicates the terminal has an automatic right margin. Terminal capabilities with assigned values contain strings, which are interpreted as commands by the terminal. The values starting with “\E” (which represents the escape character) are sequences of control codes that cause the terminal to perform an action such as moving the cursor to a specified location, or setting the text color.
The tput command can be used to test for a particular capability or to output the assigned value. Here are some examples:
tput longname
This outputs the full name of the current terminal type. We can specify another terminal type by including the -T option. Here, we will ask for the full name of the terminal type named “screen”:
tput -T screen longname
We can inquire values from the terminfo database, like the number of supported colors and the number of columns in the current terminal:
tput colors
tput cols
We can test for particular capability. For example, to see if the current terminal supports “bce” (background color erase - meaning that clearing or erasing text will be done using the currently defined background color) we type:
tput bce && echo "True"
We can send instructions to the terminal. For example, to move the cursor to the position 20 characters to the right and 5 rows down:
tput cup 5 20
There are many different terminal types defined in the terminfo database and there are many terminal capnames. The terminfo man page contains a complete list. Note, however, that in general practice, there are only a relative handful of capnames supported by all of the terminal types we are likely to encounter on Linux systems.
Reading Terminal Attributes
For the following capnames, tput outputs a value to stdout:
| Capname | Description |
|---|---|
longname | Full name of the terminal type |
lines | Number of lines in the terminal |
cols | Number of columns in the terminal |
colors | Number of colors available |
The lines and cols values are dynamic. That is, they are updated as the size of the terminal window changes. Here is a handy alias that creates a command to view the current size of our terminal window:
alias term_size=`echo "Rows=$(tput lines) Cols=$(tput cols)"'
If we define this alias and execute it, we will see the size of the current terminal displayed. If we then change the size of the terminal window and execute the alias a second time, we will see the values have been updated.
One interesting feature we can use in our scripts is the SIGWINCH signal. This signal is sent each time the terminal window is resized. We can include a signal handler (i.e., a trap) in our scripts to detect this signal and act upon it:
#!/bin/bash
# term_size2 - Dynamically display terminal window size
redraw() {
clear
echo "Width = $(tput cols) Height = $(tput lines)"
}
trap redraw WINCH
redraw
while true; do
:
done
With this script, we start an empty infinite loop, but since we set a trap for the SIGWINCH signal, each time the terminal window is resized the trap is triggered and the new terminal size is displayed. To exit this script, we type Ctrl-c.
 term_size2
Controlling the Cursor
The capnames below output strings containing control codes that instruct the terminal to manipulate the cursor:
| Capname | Description |
|---|---|
sc | Save the cursor position |
rc | Restore the cursor position |
home | Move the cursor to upper left corner (0,0) |
cup <row> <col> | Move the cursor to position row, col |
cud1 | Move the cursor down 1 line |
cuu1 | Move the cursor up 1 line |
civis | Set to cursor to be invisible |
cnorm | Set the cursor to its normal state |
We can modify our previous script to use cursor positioning and to place the window dimensions in the center as the terminal is resized:
#!/bin/bash
# term_size3 - Dynamically display terminal window size
# with text centering
redraw() {
local str width height length
width=$(tput cols)
height=$(tput lines)
str="Width = $width Height = $height"
length=${#str}
clear
tput cup $((height / 2)) $(((width / 2) - (length / 2)))
echo "$str"
}
trap redraw WINCH
redraw
while true; do
:
done
As in the previous script, we set a trap for the SIGWINCH signal and start an infinite loop. The redraw function in this script is a bit more complicated, since it has to calculate the center of the terminal window each time its size changes.
 term_size3
Text Effects
Like the capnames used for cursor manipulation, the following capnames output strings of control codes that affect the way our terminal displays text characters:
| Capname | Description |
|---|---|
bold | Start bold text |
smul | Start underlined text |
rmul | End underlined text |
rev | Start reverse video |
blink | Start blinking text |
invis | Start invisible text |
smso | Start “standout” mode |
rmso | End “standout” mode |
sgr0 | Turn off all attributes |
setaf <value> | Set foreground color |
setab <value> | Set background color |
Some capabilities, such as underline and standout, have capnames to turn the attribute both on and off while others only have a capname to turn the attribute on. In these cases, the sgr0 capname can be used to return the text rendering to a “normal” state. Here is a simple script that demonstrates the common text effects:
#!/bin/bash
# tput_characters - Test various character attributes
clear
echo "tput character test"
echo "==================="
echo
tput bold; echo "This text has the bold attribute."; tput sgr0
tput smul; echo "This text is underlined (smul)."; tput rmul
# Most terminal emulators do not support blinking text (though xterm
# does) because blinking text is considered to be in bad taste ;-)
tput blink; echo "This text is blinking (blink)."; tput sgr0
tput rev; echo "This text has the reverse attribute"; tput sgr0
# Standout mode is reverse on many terminals, bold on others.
tput smso; echo "This text is in standout mode (smso)."; tput rmso
tput sgr0
echo
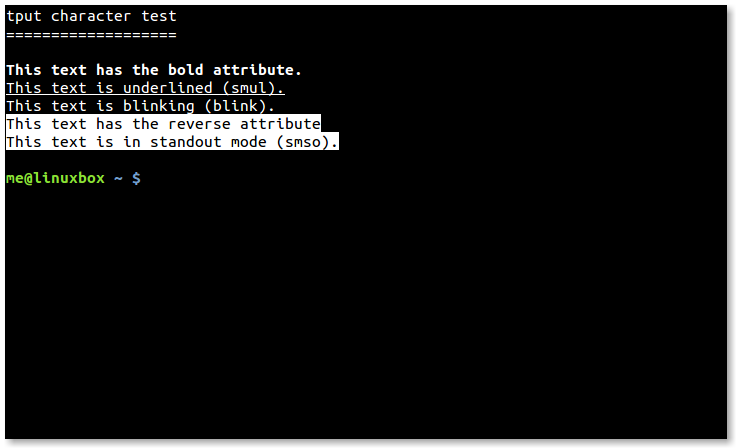 tput_characters
Text Color
Most terminals support 8 foreground text colors and 8 background colors (though some support as many as 256). Using the setaf and setab capabilities, we can set the foreground and background colors. The exact rendering of colors is a little hard to predict. Many desktop managers impose “system colors” on terminal windows, thereby modifying foreground and background colors from the standard. Despite this, here are what the colors should be:
| Value | Color |
|---|---|
| 0 | Black |
| 1 | Red |
| 2 | Green |
| 3 | Yellow |
| 4 | Blue |
| 5 | Magenta |
| 6 | Cyan |
| 7 | White |
| 8 | Not used |
| 9 | Reset to default color |
The following script uses the setaf and setab capabilities to display the available foreground/background color combinations:
#!/bin/bash
# tput_colors - Demonstrate color combinations.
for fg_color in {0..7}; do
set_foreground=$(tput setaf $fg_color)
for bg_color in {0..7}; do
set_background=$(tput setab $bg_color)
echo -n $set_background$set_foreground
printf ' F:%s B:%s ' $fg_color $bg_color
done
echo $(tput sgr0)
done
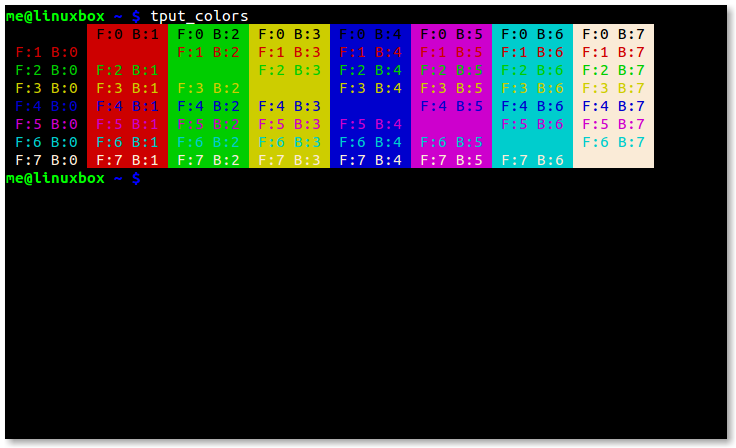 tput_colors
Clearing the Screen
These capnames allow us to selectively clear portions of the terminal display:
| Capname | Description |
|---|---|
smcup | Save screen contents |
rmcup | Restore screen contents |
el | Clear from the cursor to the end of the line |
el1 | Clear from the cursor to the beginning of the line |
ed | Clear from the cursor to the end of the screen |
clear | Clear the entire screen and home the cursor |
Using some of these terminal capabilities, we can construct a script with a menu and a separate output area to display some system information:
#!/bin/bash
# tput_menu: a menu driven system information program
BG_BLUE="$(tput setab 4)"
BG_BLACK="$(tput setab 0)"
FG_GREEN="$(tput setaf 2)"
FG_WHITE="$(tput setaf 7)"
# Save screen
tput smcup
# Display menu until selection == 0
while [[ $REPLY != 0 ]]; do
echo -n ${BG_BLUE}${FG_WHITE}
clear
cat <<- _EOF_
Please Select:
1. Display Hostname and Uptime
2. Display Disk Space
3. Display Home Space Utilization
0. Quit
_EOF_
read -p "Enter selection [0-3] > " selection
# Clear area beneath menu
tput cup 10 0
echo -n ${BG_BLACK}${FG_GREEN}
tput ed
tput cup 11 0
# Act on selection
case $selection in
1) echo "Hostname: $HOSTNAME"
uptime
;;
2) df -h
;;
3) if [[ $(id -u) -eq 0 ]]; then
echo "Home Space Utilization (All Users)"
du -sh /home/* 2> /dev/null
else
echo "Home Space Utilization ($USER)"
du -s $HOME/* 2> /dev/null | sort -nr
fi
;;
0) break
;;
*) echo "Invalid entry."
;;
esac
printf "\n\nPress any key to continue."
read -n 1
done
# Restore screen
tput rmcup
echo "Program terminated."
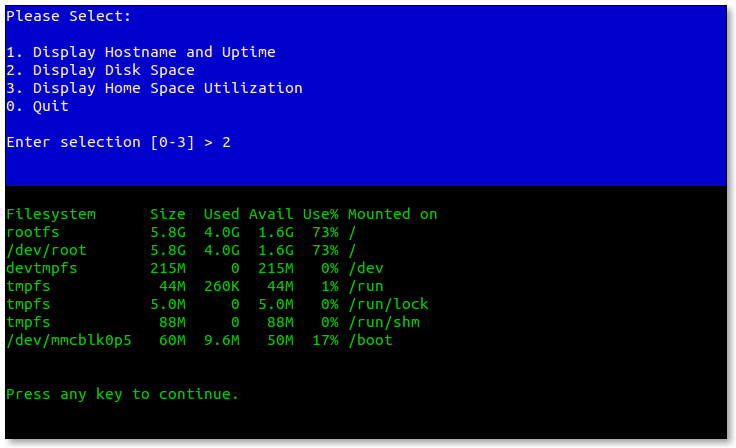 tput_menu
Making Time
For our final exercise, we will make something useful; a large character clock. To do this, we first need to install a program called banner. The banner program accepts one or more words as arguments and displays them like so:
[me@linuxbox ~]$ banner "BIG TEXT"
###### ### ##### ####### ####### # # #######
# # # # # # # # # #
# # # # # # # # #
###### # # #### # ##### # #
# # # # # # # # # #
# # # # # # # # # #
###### ### ##### # ####### # # #
This program has been around for a long time and there are several different implementations. On Debian-based systems (such as Ubuntu) the package is called “sysvbanner”, on Red Hat-based systems the package is called simply “banner”. Once we have banner installed we can run this script to display our clock:
#!/bin/bash
# tclock - Display a clock in a terminal
BG_BLUE="$(tput setab 4)"
FG_BLACK="$(tput setaf 0)"
FG_WHITE="$(tput setaf 7)"
terminal_size() { # Calculate the size of the terminal
terminal_cols="$(tput cols)"
terminal_rows="$(tput lines)"
}
banner_size() {
# Because there are different versions of banner, we need to
# calculate the size of our banner's output
banner_cols=0
banner_rows=0
while read; do
[[ ${#REPLY} -gt $banner_cols ]] && banner_cols=${#REPLY}
((++banner_rows))
done < <(banner "12:34 PM")
}
display_clock() {
# Since we are putting the clock in the center of the terminal,
# we need to read each line of banner's output and place it in the
# right spot.
local row=$clock_row
while read; do
tput cup $row $clock_col
echo -n "$REPLY"
((++row))
done < <(banner "$(date +'%I:%M %p')")
}
# Set a trap to restore terminal on Ctrl-c (exit).
# Reset character attributes, make cursor visible, and restore
# previous screen contents (if possible).
trap 'tput sgr0; tput cnorm; tput rmcup || clear; exit 0' SIGINT
# Save screen contents and make cursor invisible
tput smcup; tput civis
# Calculate sizes and positions
terminal_size
banner_size
clock_row=$(((terminal_rows - banner_rows) / 2))
clock_col=$(((terminal_cols - banner_cols) / 2))
progress_row=$((clock_row + banner_rows + 1))
progress_col=$(((terminal_cols - 60) / 2))
# In case the terminal cannot paint the screen with a background
# color (tmux has this problem), create a screen-size string of
# spaces so we can paint the screen the hard way.
blank_screen=
for ((i=0; i < (terminal_cols * terminal_rows); ++i)); do
blank_screen="${blank_screen} "
done
# Set the foreground and background colors and go!
echo -n ${BG_BLUE}${FG_WHITE}
while true; do
# Set the background and draw the clock
if tput bce; then # Paint the screen the easy way if bce is supported
clear
else # Do it the hard way
tput home
echo -n "$blank_screen"
fi
tput cup $clock_row $clock_col
display_clock
# Draw a black progress bar then fill it in white
tput cup $progress_row $progress_col
echo -n ${FG_BLACK}
echo -n "###########################################################"
tput cup $progress_row $progress_col
echo -n ${FG_WHITE}
# Advance the progress bar every second until a minute is used up
for ((i = $(date +%S);i < 60; ++i)); do
echo -n "#"
sleep 1
done
done
 tclock script in action
Our script paints the screen blue and places the current time in the center of the terminal window. This script does not dynamically update the display’s position if the terminal is resized (that’s an enhancement left to the reader). A progress bar is displayed beneath the clock and it is updated every second until the next minute is reached, when the clock itself is updated.
One interesting feature of the script is how it deals with painting the screen. Terminals that support the “bce” capability erase using the current background color. So, on terminals that support bce, this is easy. We simply set the background color and then clear the screen. Terminals that do not support bce always erase to the default color (usually black).
To solve this problem, our this script creates a long string of spaces that will fill the screen. On terminal types that do not support bce (for example, screen) the background color is set, the cursor is moved to the home position and then the string of spaces is drawn to fill the screen with the desired background color.
Summing Up
Using tput, we can easily add visual enhancements to our scripts. While it’s important not to get carried away, lest we end up with a garish, blinking mess, adding text effects and color can increase the visual appeal of our work and improve the readability of information we present to our users.
Further Reading
- The terminfo man page contains the entire list of terminal capabilities defined terminfo database.
- On most systems, the
/lib/terminfoand/usr/share/terminfodirectories contain the all of the terminals supported by terminfo. - Bash Hacker’s Wiki has a good entry on the subject of text effects using
tput. The page also has some interesting example scripts. - Greg’s Wiki contains useful information about setting text colors using
tput. - Bash Prompt HOWTO discusses using
tputto apply text effects to the shell prompt.
5.6 - dialog
dialog
https://linuxcommand.org/lc3_adv_dialog.php
If we look at contemporary software, we might be surprised to learn that the majority of code in most programs today has very little to do with the real work for which the program was intended. Rather, the majority of code is used to create the user interface. Modern graphical programs need large amounts of CPU time and memory for their sophisticated eye candy. This helps explain why command line programs usually use so little memory and CPU compared to their GUI counterparts.
Still, the command line interface is often inconvenient. If only there were some way to emulate common graphical user interface features on a text display.
In this adventure, we’re going to look at dialog, a program that does just that. It displays various kinds of dialog boxes that we can incorporate into our shell scripts to give them a much friendlier face. dialog dates back a number of years and is now just one member of a family of programs that attempt to solve the user interface problem for command line users. The More Redirection adventure is a suggested prerequisite to this adventure.
Features
dialog is a fairly large and complex program (it has almost 100 command line options), but compared to the typical graphical user interface, it’s a real lightweight. Still, it is capable of many user interface tricks. With dialog, we can generate the following types of dialog boxes (version 1.2 shown):
| Dialog | Option | Description |
|---|---|---|
| Build List | --buildlist | Displays two lists, side-by-side. The list on the left contains unselected items, the list on the right selected items. The user can move items from one list to the other. |
| Calendar | --calendar | Displays a calendar and allow the user to select a date. |
| Checklist | --checklist | Presents a list of choices and allow the user to select one or more items. |
| Directory Select | --dselect | Displays a directory selection dialog. |
| Edit Box | --editbox | Displays a rudimentary text file editor. |
| Form | --form | Allows the user to enter text into multiple fields. |
| File Select | --fselect | A file selection dialog. |
| Gauge | --gauge | Displays a progress indicator showing the percentage of completion. |
| Info Box | --infobox | Displays a message (with an optional timed pause) and terminates. |
| Input Box | --inputbox | Prompts the user to enter/edit a text field. |
| Menu Box | --menubox | Displays a list of choices. |
| Message Box | --msgbox | Displays a text message and waits for the user to respond. |
| Password Box | --passwordbox | Similar to an input box, but hides the user’s entry. |
| Pause | --pause | Displays a text message and a countdown timer. The dialog terminates when the timer runs out or when the user presses either the OK or Cancel button. |
| Program Box | --programbox | Displays the output of a piped command. When the command completes, the dialog waits for the user to press an OK button. |
| Progress Box | --progressbox | Similar to the program box except the dialog terminates when the piped command completes, rather than waiting for the user to press OK. |
| Radio List | --radiolist | Displays a list of choices and allows the user to select a single item. Any previously selected item becomes unselected. |
| Range Box | --rangebox | Allows the user to select a numerical value from within a specified range using a keyboard-based slider. |
| Tail Box | --tailbox | Displays a text file with real-time updates. Works like the command tail -f. |
| Text Box | --textbox | A simple text file viewer. Supports many of the same keyboard commands as less. |
| Time Box | --timebox | A dialog for entering a time of day. |
| Tree View | --treeview | Displays a list of items in a tree-shaped hierarchy. |
| Yes/No Box | --yesno | Displays a text message and gives the user a chance to respond with either “Yes” or “No.” |
Here are some examples:
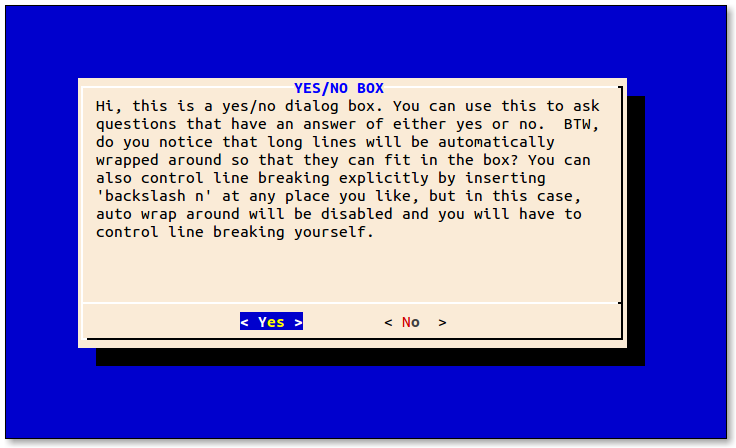 Screen shot of the yesno dialog
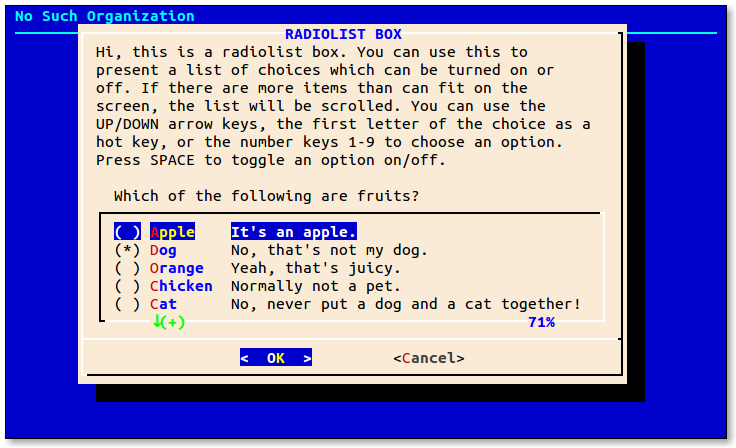 Screen shot of the radiolist dialog
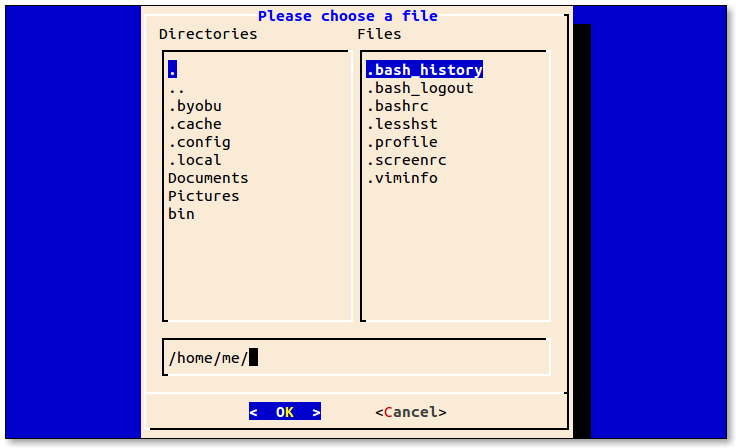 Screen shot of the fselect dialog
Availability
dialog is available from most distribution repositories as the package “dialog”. Besides the program itself, the dialog package includes a fairly comprehensive man page and a large set of sample programs that demonstrate the various dialog boxes it can display. After installation on a Debian-based system, these sample programs can be found in the /usr/share/doc/dialog/examples directory. Other distributions are similar.
By the way, using Midnight Commander to browse the examples directory is a great way to run the example programs and to study the scripts themselves:
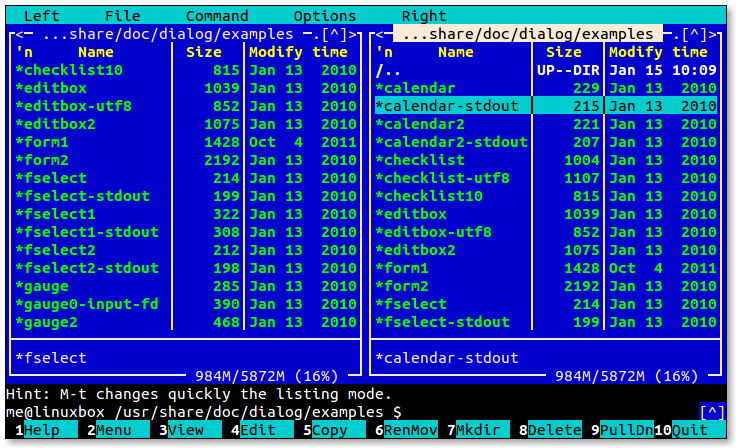 Browsing the examples with Midnight Commander
How it Works
On the surface, dialog appears straightforward. We launch dialog followed by one or more common options (options that apply regardless of the desired dialog box) and then the box option and its associated parameters. The tricky part of using dialog is getting data out of it.
The data that dialog takes in (such as a string entered into a input box) is normally returned on standard error. This is because dialog uses standard output to display text on the terminal when it is drawing the dialog box itself. There are a couple of techniques we can use to handle the returned data. Let’s take a look at them.
Method 1: Store the Results in a Temporary File
The first method is to use a temporary file. The sample programs supplied with dialog provide some examples (this script has been modified from the original for clarity):
#!/bin/bash
# inputbox - demonstrate the input dialog box with a temporary file
# Define the dialog exit status codes
: ${DIALOG_OK=0}
: ${DIALOG_CANCEL=1}
: ${DIALOG_HELP=2}
: ${DIALOG_EXTRA=3}
: ${DIALOG_ITEM_HELP=4}
: ${DIALOG_ESC=255}
# Create a temporary file and make sure it goes away when we're dome
tmp_file=$(tempfile 2>/dev/null) || tmp_file=/tmp/test$$
trap "rm -f $tmp_file" 0 1 2 5 15
# Generate the dialog box
dialog --title "INPUT BOX" \
--clear \
--inputbox \
"Hi, this is an input dialog box. You can use \n
this to ask questions that require the user \n
to input a string as the answer. You can \n
input strings of length longer than the \n
width of the input box, in that case, the \n
input field will be automatically scrolled. \n
You can use BACKSPACE to correct errors. \n\n
Try entering your name below:" \
16 51 2> $tmp_file
# Get the exit status
return_value=$?
# Act on it
case $return_value in
$DIALOG_OK)
echo "Result: `cat $tmp_file`";;
$DIALOG_CANCEL)
echo "Cancel pressed.";;
$DIALOG_HELP)
echo "Help pressed.";;
$DIALOG_EXTRA)
echo "Extra button pressed.";;
$DIALOG_ITEM_HELP)
echo "Item-help button pressed.";;
$DIALOG_ESC)
if test -s $tmp_file ; then
cat $tmp_file
else
echo "ESC pressed."
fi
;;
esac
The first part of the script defines some constants that are used to represent the six possible exit status values supported by dialog. They are used to tell the calling script which button on the dialog box (or alternately, the Esc key) was used to terminate the dialog. The construct used to do this is somewhat interesting. First, each line begins with the null command “:” which is a command that does nothing. Yes, really. It intentionally does nothing, because sometimes we need a command (for syntax reasons) but don’t actually want to do anything. Following the null command is a parameter expansion. The expansion is similar in form to one we covered in Chapter 34 of TLCL:
${`*parameter*`:=`*value*`}
This sets a default value for a parameter (variable) that is either unset (it does not exist at all), or is set, but empty. The author of the example code is being very cautious here and has removed the colon from the expansion. This changes the meaning of the expansion to mean that a default value is set only if the parameter is unset rather than unset or empty.
The next part of the example creates a temporary file named tmp_file by using the tempfile command, which is a program used to create a temporary file in a secure manner. Next, we set a trap to make sure that the temporary file is deleted if the program is somehow terminated. Neatness counts!
At last, we get to the dialog command itself. We start off setting a title for the input box and specify the --clear option to tell dialog that we want to erase any previous dialog box from the screen. Next, we indicate the type of dialog box we want and its required arguments. These include the text to be displayed above the input field, and the desired height and width of the box. Though the example specifies exact dimensions for the box, we could also specify zero for both values and dialog will attempt to automatically determine the correct size.
Since dialog normally outputs its results to standard error, we redirect its file descriptor to our temporary file for storage.
The last thing we have to do is collect the exit status of the command in a variable (return_value) so that we can figure out which button the user pressed to terminate the dialog box. At the end of the script, we look at this value and act accordingly.
Method 2: Use Command Substitution and Redirection
The second method of receiving data from dialog involves redirection. In the script that follows, we pass the results from dialog to a variable rather than a file. To do this, we need to first perform some redirection.
#!/bin/bash
# inputbox - demonstrate the input dialog box with redirection
# Define the dialog exit status codes
: ${DIALOG_OK=0}
: ${DIALOG_CANCEL=1}
: ${DIALOG_HELP=2}
: ${DIALOG_EXTRA=3}
: ${DIALOG_ITEM_HELP=4}
: ${DIALOG_ESC=255}
# Duplicate (make a backup copy of) file descriptor 1
# on descriptor 3
exec 3>&1
# Generate the dialog box while running dialog in a subshell
result=$(dialog \
--title "INPUT BOX" \
--clear \
--inputbox \
"Hi, this is an input dialog box. You can use \n
this to ask questions that require the user \n
to input a string as the answer. You can \n
input strings of length longer than the \n
width of the input box, in that case, the \n
input field will be automatically scrolled. \n
You can use BACKSPACE to correct errors. \n\n
Try entering your name below:" \
16 51 2>&1 1>&3)
# Get dialog's exit status
return_value=$?
# Close file descriptor 3
exec 3>&-
# Act on the exit status
case $return_value in
$DIALOG_OK)
echo "Result: $result";;
$DIALOG_CANCEL)
echo "Cancel pressed.";;
$DIALOG_HELP)
echo "Help pressed.";;
$DIALOG_EXTRA)
echo "Extra button pressed.";;
$DIALOG_ITEM_HELP)
echo "Item-help button pressed.";;
$DIALOG_ESC)
if test -n "$result" ; then
echo "$result"
else
echo "ESC pressed."
fi
;;
esac
At first glance, the redirection may seem nonsensical. First, we duplicate file descriptor 1 (stdout) to descriptor 3 using exec (this was covered in More Redirection) to create a backup copy of descriptor 1.
The next step is to perform a command substitution and assign the output of the dialog command to the variable result. The command includes redirections of descriptor 2 (stderr) to be the duplicate of descriptor 1 and lastly, descriptor 1 is restored to its original value by duplicating descriptor 3 which contains the backup copy. What might not be immediately apparent is why the last redirection is needed. Inside the subshell, standard output (descriptor 1) does not point to the controlling terminal. Rather, it is pointing to a pipe that will deliver its contents to the variable result. Since dialog needs standard output to point to the terminal so that it can display the input box, we have to redirect standard error to standard output (so that the output from dialog ends up in the result variable), then redirect standard output back to the controlling terminal.
So, which method is better, temporary file or command substitution? Probably command substitution, since it avoids file creation.
Before and After
Now that we have a basic grip on how to use dialog, let’s apply it to a practical example.
Here we have an “ordinary” script. It’s a menu-driven system information program similar to one discussed in Chapter 29 of TLCL:
#!/bin/bash
# while-menu: a menu-driven system information program
DELAY=3 # Number of seconds to display results
while true; do
clear
cat << _EOF_
Please Select:
1. Display System Information
2. Display Disk Space
3. Display Home Space Utilization
0. Quit
_EOF_
read -p "Enter selection [0-3] > "
if [[ $REPLY =~ ^[0-3]$ ]]; then
case $REPLY in
1)
echo "Hostname: $HOSTNAME"
uptime
sleep $DELAY
continue
;;
2)
df -h
sleep $DELAY
continue
;;
3)
if [[ $(id -u) -eq 0 ]]; then
echo "Home Space Utilization (All Users)"
du -sh /home/* 2> /dev/null
else
echo "Home Space Utilization ($USER)"
du -sh $HOME 2> /dev/null
fi
sleep $DELAY
continue
;;
0)
break
;;
esac
else
echo "Invalid entry."
sleep $DELAY
fi
done
echo "Program terminated."
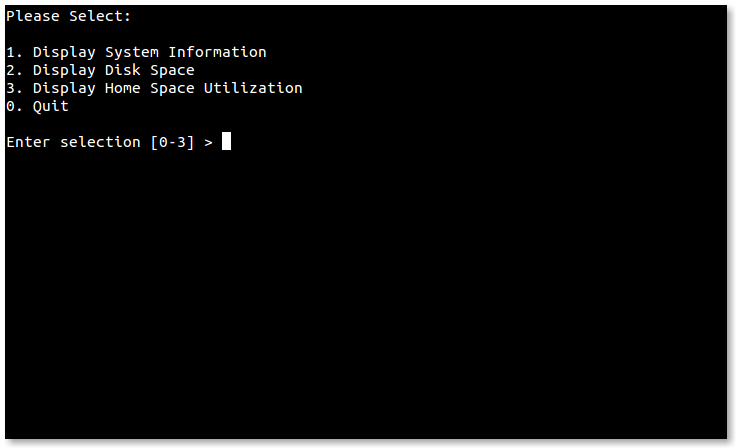 A script displaying a text menu
The script displays a simple menu of choices. After the user enters a selection, the selection is validated to make sure it is one of the permitted choices (the numerals 0-3) and if successfully validated, a case statement is used to carry out the selected action. The results are displayed for the number of seconds defined by the DELAY constant, after which the whole process is repeated until the user selects the menu choice to exit the program.
Here is the script modified to use dialog to provide a new user interface:
#!/bin/bash
# while-menu-dialog: a menu driven system information program
DIALOG_CANCEL=1
DIALOG_ESC=255
HEIGHT=0
WIDTH=0
display_result() {
dialog --title "$1" \
--no-collapse \
--msgbox "$result" 0 0
}
while true; do
exec 3>&1
selection=$(dialog \
--backtitle "System Information" \
--title "Menu" \
--clear \
--cancel-label "Exit" \
--menu "Please select:" $HEIGHT $WIDTH 4 \
"1" "Display System Information" \
"2" "Display Disk Space" \
"3" "Display Home Space Utilization" \
2>&1 1>&3)
exit_status=$?
exec 3>&-
case $exit_status in
$DIALOG_CANCEL)
clear
echo "Program terminated."
exit
;;
$DIALOG_ESC)
clear
echo "Program aborted." >&2
exit 1
;;
esac
case $selection in
1 )
result=$(echo "Hostname: $HOSTNAME"; uptime)
display_result "System Information"
;;
2 )
result=$(df -h)
display_result "Disk Space"
;;
3 )
if [[ $(id -u) -eq 0 ]]; then
result=$(du -sh /home/* 2> /dev/null)
display_result "Home Space Utilization (All Users)"
else
result=$(du -sh $HOME 2> /dev/null)
display_result "Home Space Utilization ($USER)"
fi
;;
esac
done
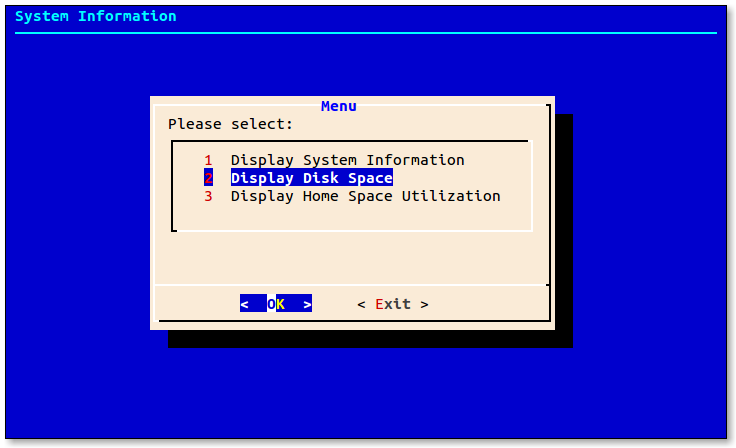 Script displaying a dialog menu
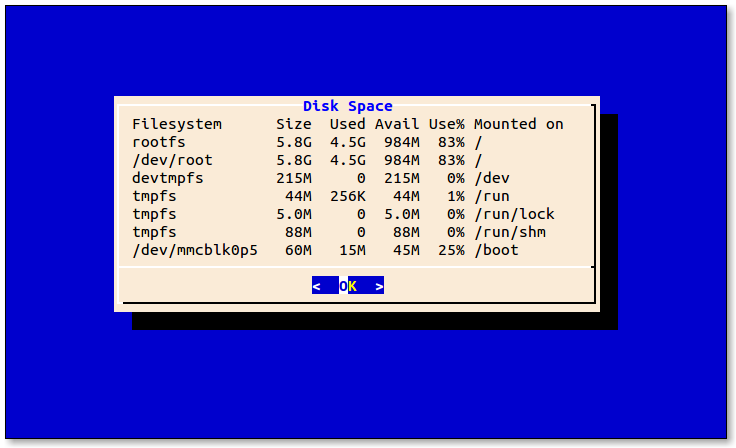 Displaying results with a msgbox
As we can see, the script has some structural changes. First, we no longer have to validate the user’s selection. The menu box only allows valid choices. Second, there is a function defined near the beginning to display the output of each selection.
We also notice that several of dialog’s common options have been used:
--no-collapsepreventsdialogfrom reformatting message text. Use this when the exact presentation of the text is needed.--backtitlesets the title of the background under the dialog box.--clearclears the background of any previous dialog box.--cancel-labelsets the string displayed on the “cancel” button. In this script, it is set to “Exit” since that is a better description of the action taken when it is selected.
Limitations
While it’s true that dialog can produce many kinds of dialog boxes, care must be taken to remember that dialog has significant limitations. Some of the dialog boxes have rather odd behaviors compared to their traditional GUI counterparts. For example, the edit box used to edit text files cannot perform cut and paste and files to be edited cannot contain tab characters. The behavior of the file box is more akin to the shell’s tab completion feature than to a GUI file selector.
Summing Up
The shell is not really intended for large, interactive programs, but using dialog can make small to moderate interactive programs possible. It provides a useful variety of dialog boxes, allowing many types of user interactions which would be very difficult to implement with the shell alone. If we keep our expectations modest, dialog can be a great tool.
Further Reading
- The dialog man page is well-written and contains a complete listing of its numerous options.
- dialog normally includes a large set of example programs which can be found in the
/usr/share/doc/dialogdirectory. - The dialog project home page can be found at https://invisible-island.net/dialog/
5.7 - AWK
AWK
https://linuxcommand.org/lc3_adv_awk.php
One of the great things we can do in the shell is embed other programming languages within the body of our scripts. We have seen hints of this with the stream editor sed, and the arbitrary precision calculator program bc. By using the shell’s single quoting mechanism to isolate text from shell expansion, we can freely express other programming languages, provided we have a suitable language interpreter to execute them.
In this adventure, we are going to look at one such program, awk.
History
The AWK programming language is truly one of the classic tools used in Unix. It dates back to the very earliest days of the Unix tradition. It was originally developed in the late 1970’s at Bell Telephone Laboratories by Alfred Aho, Peter Weinberger, and Brian Kernighan. The name “AWK” comes from the last names of the three authors. It underwent major improvements in 1985 with the release of nawk or “new awk.” It is that version that we still use today, though it is usually just called awk.
Availability
awk is a standard program found in most every Linux distribution. Two free/open source versions of the program are in common use. One is called mawk (short for Mike’s awk, named for its original author, Mike Brennan) and gawk (GNU awk). Both versions fully implement the 1985 nawk standard as well as add a variety of extensions. For our purposes, either version is fine, since we will be focusing on the traditional nawk features. In most distributions, the name awk is symbolically linked to either mawk or gawk.
So, What’s it Good For?
Though AWK is fairly general purpose, it is really designed to create filters, that is, programs that accept standard input, transform data, and send it to standard output. In particular, AWK is very good at processing columnar data. This makes it a good choice for developing report generators, and tools that are used to re-format data. Since it has strong regular expression support, it’s good for very small text extraction and reformatting problems, too. Like sed, many AWK programs are just one line long.
In recent years, AWK has fallen a bit out of fashion, being supplanted by other, newer, interpreted languages such as Perl and python, but AWK still has some advantages:
- It’s easy to learn. The language is not overly complex and has a syntax much like the C programming language, so learning it will be useful in the future when we study other languages and tools.
- It really excels at a solving certain types of problems.
How it Works
The structure of an AWK program is somewhat unique among programming languages. Programs consist of a series of one or more pattern and action pairs. Before we get into that though, let’s look at what the typical AWK program does.
We already know that the typical AWK program acts as a filter. It reads data from standard input, and outputs filtered data on standard output. It reads data one record at a time. By default, a record is a line of text terminated by a newline character. Each time a record is read, AWK automatically separates the record into fields. Fields are, again by default, separated by whitespace. Each field is assigned to a variable, which is given a numeric name. Variable $1 is the first field, $2 is the second field, and so on. $0 signifies the entire record. In addition, a variable named NF is set containing the number of fields detected in the record.
Pattern/action pairs are tests and corresponding actions to be performed on each record. If the pattern is true, then the action is performed. When the list of patterns is exhausted, the AWK program reads the next record and the process is repeated.
Let’s try a really simple case. We’ll filter the output of an ls command:
me@linuxbox ~ $ ls -l /usr/bin | awk '{print $0}'
The AWK program is contained within the single quotes following the awk command. Single quotes are important because we do not want the shell to attempt any expansion on the AWK program, since its syntax has nothing to do with the shell. For example, $0 represents the value of the entire record the AWK program read on standard input. In AWK, the $ means “field” and is not a trigger for parameter expansion as it is in the shell.
Our example program consists of a single action with no pattern present. This is allowed and it means that every record matches the pattern. When we run this command, it simply outputs every line of input much like the cat command.
If we look at a typical line of output from ls -l, we see that it consists of 9 fields, each separated from its neighbor by one or more whitespace characters:
-rwxr-xr-x 1 root root 265 Apr 17 2012 zxpdf
Let’s add a pattern to our program so it will only print lines with more than 9 fields:
me@linuxbox ~ $ ls -l /usr/bin | awk 'NF > 9 {print $0}'
We now see a list of symbolic links in /usr/bin since those directory listings contain more than 9 fields. This pattern will also match entries with file names containing embedded spaces, since they too will have more than 9 fields.
Special Patterns
Patterns in AWK can have many forms. There are conditional expressions like we have just seen. There are also regular expressions, as we would expect. There are two special patterns called BEGIN and END. The BEGIN pattern carries out its corresponding action before the first record is read. This is useful for initializing variables, or printing headers at the beginning of output. Likewise, the END pattern performs its corresponding action after the last record is read from the input file. This is good for outputting summaries once the input has been processed.
Let’s try a more elaborate example. We’ll assume for the moment that the directory does not contain any file names with embedded spaces (though this is never a safe assumption). We could use the following script to list symbolic links:
#!/bin/bash
# Print a directory report
ls -l /usr/bin | awk '
BEGIN {
print "Directory Report"
print "================"
}
NF > 9 {
print $9, "is a symbolic link to", $NF
}
END {
print "============="
print "End Of Report"
}
'
In this example, we have 3 pattern/action pairs in our AWK program. The first is a BEGIN pattern and its action that prints the report header. We can spread the action over several lines, though the opening brace “{” of the action must appear on the same line as the pattern.
The second pattern tests the current record to see if it contains more than 9 fields and, if true, the 9th field is printed, followed by some text and the final field in the record. Notice how this was done. The NF variable is preceded by a “$”, thus it refers to the NFth field rather than the value of NF itself.
Lastly, we have an END pattern. Its corresponding action prints the “End Of Report” message once all of the lines of input have been read.
Invocation
There are three ways we can run an AWK program. We have already seen how to embed a program in a shell script by enclosing it inside single quotes. The second way is to place the awk script in its own file and call it from the awk program like so:
awk -f program_file
Lastly, we can use the shebang mechanism to make the AWK script a standalone program like a shell script:
#!/usr/bin/awk -f
# Print a directory report
BEGIN {
print "Directory Report"
print "================"
}
NF > 9 {
print $9, "is a symbolic link to", $NF
}
END {
print "============="
print "End Of Report"
}
The Language
Let’s take a look at the features and syntax of AWK programs.
Program Format
The formatting rules for AWK programs are pretty simple. Actions consist of one or more statements surrounded by braces ({}) with the starting brace appearing on the same line as the pattern. Blank lines are ignored. Comments begin with a pound sign (#) and may appear at the end of any line. Long statements may be broken into multiple lines using line continuation characters (a backslash followed immediately by a newline). Lists of parameters separated by commas may be broken after any comma. Here is an example:
BEGIN { # The action's opening brace must be on same line as the pattern
# Blank lines are ignored
# Line continuation characters can be used to break long lines
print \
$1, # Parameter lists may be broken by commas
$2, # Comments can appear at the end of any line
$3
# Multiple statements can appear on one line if separated by
# a semicolon
print "String 1"; print "String 2"
} # Closing brace for action
Patterns
Here are the most common types of patterns used in AWK:
BEGIN and END
As we saw earlier, the BEGIN and END patterns perform actions before the first record is read and after the last record is read, respectively.
relational-expression
Relational expressions are used to test values. For example, we can test for equivalence:
$1 == "Fedora"
or for relations such as:
$3 >= 50
It is also possible to perform calculations like:
$1 * $2 < 100
/regular-expression/
AWK supports extended regular expressions like those supported by egrep. Patterns using regular expression can be expressed in two ways. First, we can enclose a regular expression in slashes and a match is attempted on the entire record. If a finer level of control is needed, we can provide an expression containing the string to be matched using the following syntax:
expression ~ /regexp/
For example, if we only wanted to attempt a match on the third field in a record, we could do this:
$3 ~ /^[567]/
From this, we can think of the “~” as meaning “matches” or “contains”, thus we can read the pattern above as “field 3 matches the regular expression ^[567]”.
pattern logical-operator pattern
It is possible to combine patterns together using the logical operators || and &&, meaning OR and AND, respectively. For example, if we want to test a record to see if the first field is a number greater than 100 and the last field is the word “Debit”, we can do this:
$1 > 100 && $NF == "Debit"
! pattern
It is also possible to negate a pattern, so that only records that do not match a specified pattern are selected.
pattern, pattern
Two patterns separated by a comma is called a range pattern. With it, once the first pattern is matched, every subsequent record matches until the second pattern is matched. Thus, this type of pattern will select a range of records. Let’s imagine that we have a list of records and that the first field in each record contains a sequential record number:
0001 field field field
0002 field field field
0003 field field field
and so on. And let’s say that we want to extract records 0050 through 0100, inclusive. To do so, we could use a range pattern like this:
$1 == "0050", $1 == "0100"
Fields and Records
The AWK language is so useful because of its ability to automatically separate fields and records. While the default is to separate records by newlines and fields by whitespace, this can be adjusted. The /etc/passwrd file, for example, does not separate its fields with whitespace; rather, it uses colons (:). AWK has a built in variable named FS (field separator) that defines the delimiter separating fields in a record. Here is an AWK program that will list the user ID and the user’s name from the file:
BEGIN { FS = ":" }
{ print $1, $5 }
This program has two pattern/action pairs. The first action is performed before the first record is read and sets the input field separator to be the colon character.
The second pair contains only an action and no pattern. This will match every record. The action prints the first and fifth fields from each record.
The FS variable may contain a regular expression, so really powerful methods can be used to separate fields.
Records are normally separated by newlines, but this can be adjusted too. The built-in variable RS (record separator) defines how records are delimited. A common type of record consists of multiple lines of data separated by one or more blank lines. AWK has a shortcut for specifying the record separator in this case. We just define RS to be an empty string:
RS = ""
Note that when this is done, newlines, in addition to any other specified characters, will always be treated as field separators regardless of how the FS variable is set. When we process multi-line records, we will often want to treat each line as a separate field, so doing this is often desirable:
BEGIN { FS = "\n"; RS = "" }
Variables and Data Types
AWK treats data as either a string or a number, depending on its context. This can sometimes become an issue with numbers. AWK will often treat numbers as strings unless something specifically “numeric” is done with them.
We can force AWK to treat a string of digits as a number by performing some arithmetic on it. This is most easily done by adding zero to the number:
n = 105 + 0
Likewise, we can get AWK to treat a string of digits as a string by concatenating an empty string:
s = 105 ""
String concatenation in AWK is performed using a space character as an operator - an unusual feature of the language.
Variables are created as they are encountered (no prior declaration is required), just like the shell. Variable names in AWK follow the same rules as the shell. Names may consist of letters, numbers, and underscore characters. Like the shell, the first character of a variable name must not be a number. Variable names are case sensitive.
Built-in Variables
We have already looked at a few of AWK’s built-in variables. Here is a list of the most useful ones:
FS - Field separator
This variable contains a regular expression that is used to separate a record into fields. Its initial value separates fields with whitespace. AWK supports a shortcut to return this variable to its original value:
FS = " "
The value of FS can also be set using the -F option on the command line. For example, we can quickly extract the user name and UID fields from the /etc/passwd file like this:
awk -F: '{print $1, $3}' /etc/passwd
NF - Number of fields
This variable updates each time a record is read. We can easily access the last field in the record by referring to $NF.
NR - Record number
This variable increments each time a record is read, thus it contains the total number of records read from the input stream. Using this variable, we could easily simulate a wc -l command with:
awk 'END {print NR}'
or number the lines in a file with:
awk '{print NR, $0}'
OFS - Output field separator
This string is used to separate fields when printing output. The default is a single space. Setting this can be handy when reformatting data. For example, we could easily change a table of values to a CSV (comma separated values) file by setting OFS to equal “,”. To demonstrate, here is a program that reads our directory listing and outputs a CSV stream:
ls -l | awk 'BEGIN {OFS = ","}
NF == 9 {print $1,$2,$3,$4,$5,$6,$7,$8,$9}'
We set the pattern to only match input lines containing 9 fields. This eliminates symbolic links and other weird file names from the data to be processed.
Each line of the resulting output would resemble this:
-rwxr-xr-x,1,root,root,100984,Jan,11,2015,a2p
If we had omitted setting OFS, the print statement would use the default value (a single space):
ls -l | awk 'NF == 9 {print $1,$2,$3,$4,$5,$6,$7,$8,$9}'
Which would result in each line of output resembling this:
-rwxr-xr-x 1 root root 100984 Jan 11 2015 a2p
ORS - Output record separator
This is the string used to separate records when printing output. The default is a newline character. We could use this variable to easily double-space a file by setting ORS to equal two newlines:
ls -l | awk 'BEGIN {ORS = "\n\n"} {print}'
RS - Record separator
When reading input, AWK interprets this string as the end of record marker. The default value is a newline.
FILENAME
If AWK is reading its input from a file specified on the command line, then this variable contains the name of the file.
FNR - File record number
When reading input from a file specified on the command line, AWK sets this variable to the number of the record read from that file.
Arrays
Single-dimensional arrays are supported in AWK. Data contained in array elements may be either numbers or strings. Array indexes may also be either strings (for associative arrays) or numbers.
Assigning values to array elements is done like this:
a[1] = 5 # Numeric index
a["five"] = 5 # String index
Though AWK only supports single dimension arrays (like bash), it also provides a mechanism to simulate multi-dimensional arrays. When assigning an array index, it is possible to use this form to represent more than one dimension:
a[j,k] = "foo"
When AWK sees this construct, it builds an index consisting of the strings j and k separated by the contents of the built-in variable SUBSEP. By default, SUBSEP is set to “\034” (character 34 octal, 28 decimal). This ASCII control code is fairly obscure and thus unlikely to appear in ordinary text, so it’s pretty safe for AWK to use.
Note that both mawk and gawk implement language extensions to support multi-dimensional arrays in a more formal way. Consult their respective documentation for details. If a portability is needed, use the method above rather than the implementation-specific feature.
We can delete arrays and array elements this way:
delete a[i] # delete a single element
delete a # delete array a
Arithmetic and Logical Expressions
AWK supports a pretty complete set of arithmetic and logical operators:
| Operators | |
|---|---|
| Assignment | = += -= *= /= %= ^= ++ -- |
| Relational | < > <= >= == != |
| Arithmetic | + - * / % ^ |
| Matching | ~ !~ |
| Array | in |
| Logical | ` |
These operators behave like those in the shell; however, unlike the shell, which is limited to integer arithmetic, AWK arithmetic is floating point. This makes AWK a good way to do more complex arithmetic than the shell alone.
Arithmetic and logical expressions can be used in both patterns and actions. Here’s an example that counts the number of lines containing exactly 9 fields:
ls -l /usr/bin | awk 'NF == 9 {count++} END {print count}'
This AWK program consists of 2 pattern/action pairs. The first one matches lines where the number of fields is equal to 9. The action creates and increments a variable named count. Each time a line with exactly 9 fields is encountered in the input stream, count is incremented by 1.
The second pair matches when the end of the input stream is reached and the resulting action prints the final value of count.
Using this basic form, let’s try something a little more useful; a program that calculates the total size of the files in the list:
ls -l /usr/bin | awk 'NF >=9 {total += $5} END {print total}'
Here is a slight variation (with shortened variable names to make it a little more concise) that calculates the average size of the files:
ls -l /usr/bin | awk 'NF >=9 {c++; t += $5} END {print t / c}'
Flow Control
AWK has many of the same flow control statements that we’ve seen previously in the shell (with the notable exception of case, though we can think of an AWK program as one big case statement inside a loop) but the syntax more closely resembles that of the C programming language. Actions in AWK often contain complex logic consisting of various statements and flow control instructions. A statement in this context can be a simple statement like:
a = a + 1
Or a compound statement enclosed in braces such as:
{a = a + 1; b = b * a}
if ( expression ) statement
if ( expression ) statement else statement
The if/then/else construct in AWK behaves the way we would expect. AWK evaluates an expression in parenthesis and if the result is non-zero, the statement is carried out. We can see this behavior by executing the following commands:
awk 'BEGIN {if (1) print "true"; else print "false"}'
awk 'BEGIN {if (0) print "true"; else print "false"}'
Relational expressions such as (a < b) will also evaluate to 0 or 1.
In the example below, we construct a primitive report generator that counts the number of lines that have been output and, if the number exceeds the length of a page, a formfeed character is output and the line counter is reset:
ls -l /usr/bin | awk '
BEGIN {
line_count = 0
page_length = 60
}
{
line_count++
if (line_count < page_length)
print
else {
print "\f" $0
line_count = 0
}
}
'
While the above might be the most obvious way to code this, our knowledge of how evaluations are actually performed, allows us to code this example in a slightly more concise way by using some arithmetic:
ls -l /usr/bin | awk '
BEGIN {
page_length = 60
}
{
if (NR % page_length)
print
else
print "\f" $0
}
'
Here we exploit the fact that the page boundaries will always fall on even multiples of the page length. If page_length equals 60 then the page boundaries will fall on lines 60, 120, 180, 240, and so on. All we have to do is calculate the remainder (modulo) on the number of lines processed in the input stream (NR) divided by the page length and see if the result is zero, and thus an even multiple.
AWK supports an expression that’s useful for testing membership in an array:
(var in array)
where var is an index value and array is an array variable. Using this expression tests if the index var exists in the specified array. This method of testing for array membership avoids the problem of inadvertently creating the index by testing it with methods such as:
if (array[var] != "")
When the test is attempted this way, the array element var is created, since AWK creates variables simply by their use. When the (var in array) form is used, no variable is created.
To test for array membership in a multi-dimensional array, the following syntax is used:
((var1,var2) in array)
for ( expression ; expression ; expression ) statement
The for loop in AWK closely resembles the corresponding one in the C programming language. It is comprised of 3 expressions. The first expression is usually used to initialize a counter variable, the second defines when the loop is completed, and the third defines how the loop is incremented or advanced at each iteration. Here is a demonstration using a for loop to print fields in reverse order:
ls -l | awk '{s = ""; for (i = NF; i > 0; i--) s = s $i OFS; print s}'
In this example we create an empty string named s, then begin a loop that starts with the number of fields in the current input line (i = NF) and counts down (i--) until we reach the first field (i > 0). Each iteration of the loop causes the current field and the output field separator to be concatenated to the string s (s = s $i OFS). After the loop concludes, we print the resulting value of string s.
for ( var in array ) statement
AWK has a special flow control statement for traversing the indexes of an array. Here is an example of what it does:
awk 'BEGIN {for (i=0; i<10; i++) a[i]="foo"; for (i in a) print i}'
In this program, we have a single BEGIN pattern/action that performs the entire exercise without the need for an input stream. We first create an array a and add 10 elements, each containing the string “foo”. Next, we use for (i in a) to loop through all the indexes in the array and print each index. It is important to note that the order of the arrays in memory is implementation dependent, meaning that it could be anything, so we cannot rely on the results being in any particular order. We’ll look at how to address this problem a little later.
Even without sorted order, this type of loop is useful if we need to process every element in an array. For example, we could delete every element of an array like this:
for (i in a) delete a[i]
while ( expression ) statement
do statement while ( expression )
The while and do loops in AWK are pretty straightforward. We determine a condition that must be maintained for the loop to continue. We can demonstrate this using our field reversal program (we’ll type it out in multiple lines to make the logic easier to follow):
ls -l | awk '{
s = ""
i = NF
while (i > 0) {
s = s $i OFS
i--
}
print s
}'
The do loop is similar to the while loop; however the do loop will always execute its statement at least once, whereas the while loop will only execute its statement if the initial condition is met.
break
continue next
The break, continue, and next keywords are used to “escape” from loops. break and continue behave like their corresponding commands in the shell. continue tells AWK to stop and continue with the next iteration of the current loop. break tells AWK to exit the current loop entirely. The next keyword tells AWK to skip the remainder of the current program and begin processing the next record of input.
exit expression
As with the shell, we can tell AWK to exit and provide an optional expression that sets AWK’s exit status.
Regular Expressions
Regular expressions in AWK work like those in egrep, a topic we covered in Chapter 19 of TLCL. It is important to note that back references are not supported and that some versions of AWK (most notably mawk versions prior to 1.3.4) do not support POSIX character classes.
Regular expressions are most often used in patterns, but they are also used in some of the built-in variables such as FS and RS, and they have various roles in the string functions which we will discuss shortly.
Let’s try using some simple regular expressions to tally the different file types in our directory listing (we’ll make clever use of an associative array too).
ls -l /usr/bin | awk '
$1 ~ /^-/ {t["Regular Files"]++}
$1 ~ /^d/ {t["Directories"]++}
$1 ~ /^l/ {t["Symbolic Links"]++}
END {for (i in t) print i ":\t" t[i]}
'
In this program, we use regular expressions to identify the first character of the first field and increment the corresponding element in array t. Since we can use strings as array indexes in AWK, we spell out the file type as the index. This makes printing the results in the END action easy, as we only have to traverse the array with for (i in t) to obtain both the name and the accumulated total for each type.
Output Functions
print expr1, expr2, expr3,…
As we have seen, print accepts a comma-separated list of arguments. An argument can be any valid expression; however, if an expression contains a relational operator, the entire argument list must be enclosed in parentheses.
The commas are important, because they tell AWK to separate output items with the output field separator (OFS). If omitted, AWK will interpret the members of the argument list as a single expression of string concatenation.
printf(format, expr1, expr2, expr3,…)
In AWK, printf is like the corresponding shell built-in (see TLCL Chapter 21 for details). It formats its list of arguments based the contents of a format string. Here is an example where we output a list of files and their sizes in kilobytes:
ls -l /usr/bin | awk '{printf("%-30s%8.2fK\n", $9, $5 / 1024)}'
Writing to Files and Pipelines
In addition to sending output to stdout, we can also send output to files and pipelines.
ls -l /usr/bin | awk '
$1 ~ /^-/ {print $0 > "regfiles.txt"}
$1 ~ /^d/ {print $0 > "directories.txt"}
$1 ~ /^l/ {print $0 > "symlinks.txt"}
'
Here we see a program that writes separate lists of regular files, directories, and symbolic links.
AWK also provides a >> operator for appending to files, but since AWK only opens a file once per program execution, the > causes AWK to open the file at the beginning of execution and truncate the file to zero length much like we see with the shell. However, once the file is open, it stays open and each subsequent write appends contents to the file. The >> operator behaves in the same manner, but when the file is initially opened it is not truncated and all content is appended (i.e., it preserves the contents of an existing file).
AWK also allows output to be sent to pipelines. Consider this program, where we read our directory into an array and then output the entire array:
ls -l /usr/bin | awk '
$1 ~ /^-/ {a[$9] = $5}
END {for (i in a)
{print a[i] "\t" i}
}
'
If we run this program, we notice that the array is output in a seemingly random “implementation dependent” order. To correct this, we can pipe the output through sort:
ls -l /usr/bin | awk '
$1 ~ /^-/ {a[$9] = $5}
END {for (i in a)
{print a[i] "\t" i | "sort -nr"}
}
'
Reading Data
As we have seen, AWK programs most often process data supplied from standard input. However, we can also specify input files on the command line:
awk 'program' file...
Knowing this, we can, for example, create an AWK program that simulates the cat command:
awk '{print $0}' file1 file2 file3
or wc:
awk '{chars += length($0); words += NF}
END {print NR, words, chars + NR}' file1
This program has a couple of interesting features. First, it uses the AWK string function length to obtain the number of characters in a string. This is one of many string functions that AWK provides, and we will talk more about them in a bit. The second feature is the chars + NR expression at the end. This is done because length($0) does not count the newline character at the end of each line, so we have to add them to make the character count come out the same as real wc.
Even if we don’t include a filenames on the command line for AWK to input, we can tell AWK to read data from a file specified from within a program. Normally we don’t need to do this, but there are some cases where this might be handy. For example, if we wanted to insert one file inside of another, we could use the getline function in AWK. Here’s an example that adds a header and footer to an existing body text file:
awk '
BEGIN {
while (getline <"header.txt" > 0) {
print $0
}
}
{print}
END {
while (getline <"footer.txt" > 0) {
print $0
}
}
' < body.txt > finished_file.txt
getline is quite flexible and can be used in a variety of ways:
getline
In its most basic form, getline reads the next record from the current input stream. $0, NF, NR, and FNR are set.
getline var
Reads the next record from the current input stream and assigns its contents to the variable var. var, NR, and FNR are set.
getline <file
Reads a record from file. $0 and NF are set. It’s important to check for errors when reading from files. In the earlier example above, we specified a while loop as follows:
while (getline <"header.txt" > 0)
As we can see, getline is reading from the file header.txt, but what does the “> 0” mean? The answer is that, like most functions, getline returns a value. A positive value means success, zero means EOF (end of file), and a negative value means some other file-related problem, such as file not found has occurred. If we did not check the return value, we might end up with an infinite loop.
getline var <file
Reads the next record from file and assigns its contents to the variable var. Only var is set.
command | getline
Reads the next record from the output of command. $0 and NF are set. Here is an example where we use AWK to parse the output of the date command:
awk '
BEGIN {
"date" | getline
print $4
}
'
command | getline var
Reads the next record from the output of command and assigns its contents to the variable var. Only var is set.
String Functions
As one would expect, AWK has many functions used to manipulate strings and what’s more, many of them support regular expressions. This makes AWK’s string handling very powerful.
gsub(r, s, t)
Globally replaces any substring matching regular expression r contained within the target string t with the string s. The target string is optional. If omitted, $0 is used as the target string. The function returns the number of substitutions made.
index(s1, s2)
Returns the leftmost position of string s2 within string s1. If s2 does not appear within s1, the function returns 0.
length(s)
Returns the number of characters in string s.
match(s, r)
Returns the leftmost position of a substring matching regular expression r within string s. Returns 0 if no match is found. This function also sets the internal variables RSTART and RLENGTH.
split(s, a, fs)
Splits string s into fields and stores each field in an element of array a. Fields are split according to field separator fs. For example, if we wanted to break a phone number such as 800-555-1212 into 3 fields separated by the “-” character, we could do this:
phone="800-555-1212"
split(phone, fields, "-")
After doing so, the array fields will contain the following elements:
fields[1] = "800"
fields[2] = "555"
fields[3] = "1212"
sprintf(fmt, exprs)
This function behaves like printf, except instead of outputting a formatted string, it returns a formatted string containing the list of expressions to the caller. Use this function to assign a formatted string to a variable:
area_code = "800"
exchange = "555"
number = "1212"
phone_number = sprintf("(%s) %s-%s", area_code, exchange, number)
sub(r, s, t)
Behaves like gsub, except only the first leftmost replacement is made. Like gsub, the target string t is optional. If omitted, $0 is used as the target string.
substr(s, p, l)
Returns the substring contained within string s starting at position p with length l.
Arithmetic Functions
AWK has the usual set of arithmetic functions. A word of caution about math in AWK: it has limitations in terms of both number size and precision of floating point operations. This is particularly true of mawk. For tasks involving extensive calculation, gawk would be preferred. The gawk documentation provides a good discussion of the issues involved.
atan2(y, x)
Returns the arctangent of y/x in radians.
cos(x)
Returns the cosine of x, with x in radians.
exp(x)
Returns the exponential of x, that is e^x.
int(x)
Returns the integer portion of x. For example if x = 1.9, 1 is returned.
log(x)
Returns the natural logarithm of x. x must be positive.
rand()
Returns a random floating point value n such that 0 <= n < 1. This is a value between 0 and 1 where a value of 0 is possible but not 1. In AWK, random numbers always follow the same sequence of values unless the seed for the random number generator is first set using the srand() function (see below).
sin(x)
Returns the sine of x, with x in radians.
sqrt(x)
Returns the square root of x.
srand(x)
Sets the seed for the random number generator to x. If x is omitted, then the time of day is used as the seed. To generate a random integer in the range of 1 to n, we can use code like this:
srand()
# Generate a random integer between 1 and 6 inclusive
dice_roll = int(6 * rand()) + 1
User Defined Functions
In addition to the built-in string and arithmetic functions, AWK supports user-defined functions much like the shell. The mechanism for passing parameters is different, and more like traditional languages such as C.
Defining a function
A typical function definition looks like this:
function name(parameter-list) {
statements
return expression
}
We use the keyword function followed by the name of the function to be defined. The name must be immediately followed by the opening left parenthesis of the parameter list. The parameter list may contain zero or more comma-separated parameters. A brace delimited code block follows with one or more statements. To specify what is returned by the function, the return statement is used, followed by an expression containing the value to be returned. If we were to convert our previous dice rolling example into a function, it would look like this:
function dice_roll() {
return int(6 * rand()) + 1
}
Further, if we wanted to generalize our function to support different possible maximum values, we could code this:
function rand_integer(max) {
return int(max * rand()) + 1
}
and then change dice_roll to make use of our generalized function:
function dice_roll() {
return rand_integer(6)
}
Passing Parameters to Functions
As we saw in the example above, we pass parameters to the function, and they are operated upon within the body of the function. Parameters fall into two general classes. First, there are the scalar variables, such as strings and numbers. Second are the arrays. This distinction is important in AWK because of the way that parameters are passed to functions. Scalar variables are passed by value, meaning that a copy of the variable is created and given to the function. This means that scalar variables act as local variables within the function and are destroyed once the function exits. Array variables, on the other hand, are passed by reference meaning that a pointer to the array’s starting position in memory is passed to the function. This means that the array is not treated as a local variable and that any change made to the array persists once the program exits the function. This concept of passed by value versus passed by reference shows up in a lot of programming languages so it’s important to understand it.
Local Variables
One interesting limitation of AWK is that we cannot declare local variables within the body of a function. There is a workaround for this problem. We can add variables to the parameter list. Since all scalar variables in the parameter list are passed by value, they will be treated as if they are local variables. This does not apply to arrays, since they are always passed by reference. Unlike many other languages, AWK does not enforce the parameter list, thus we can add parameters that are not used by the caller of the function. In most other languages, the number and type of parameters passed during a function call must match the parameter list specified by the function’s declaration.
By convention, additional parameters used as local variables in the function are preceded by additional spaces in the parameter list like so:
function my_funct(param1, param2, param3, local1, local2)
These additional spaces have no meaning to the language, they are there for the benefit of the human reading the code.
Let’s try some short AWK programs on some numbers. First we need some data. Here’s a little AWK program that produces a table of random integers:
# random_table.awk - generate table of random numbers
function rand_integer(max) {
return int(max * rand()) + 1
}
BEGIN {
srand()
for (i = 0; i < 100; i++) {
for (j = 0; j < 5; j++) {
printf(" %5d", rand_integer(99999))
}
printf("\n", "")
}
}
If we store this in a file, we can run it like so:
me@linuxbox ~ $ awk -f random_table.awk > random_table.dat
And it should produce a file containing 100 rows of 5 columns of random integers.
Convert a File Into CSV Format
One of AWK’s many strengths is file format conversion. Here we will convert our neatly arranged columns of numbers into a CSV (comma separated values) file.
awk 'BEGIN {OFS=","} {print $1,$2,$3,$4,$5}' random_table.dat
This is a very easy conversion. All we need to do is change the output field separator (OFS) and then print all of the individual fields. While it is very easy to write a CSV file, reading one can be tricky. In some cases, applications that write CSV files (including many popular spreadsheet programs) will create lines like this:
word1, "word2a, word2b", word3
Notice the embedded comma in the second field. This throws the simple AWK solution (FS=",") out the window. Parsing this kind of file can be done (gawk, in fact has a language extension for this problem), but it’s not pretty. It is best to avoid trying to read this type of file.
Convert a File Into TSV Format
A frequently available alternative to the CSV file is the TSV (tab separated value) file. This file format uses tab charachers as the field separators:
awk 'BEGIN {OFS="\t"} {print $1,$2,$3,$4,$5}' random_table.dat
Again, writing these files is easy to do. We just set the output field separator to a tab character. In regards to reading, most applications that write CSV files can also write TSV files. Using TSV files avoids the embedded comma problem we often see when attempting to read CSV files.
Print the Total for Each Row
If all we need to do is some simple addition, this is easily done:
awk '
{
t = $1 + $2 + $3 + $4 + $5
printf("%s = %6d\n", $0, t)
}
' random_table.dat
Print the Total for Each Column
Adding up the column is pretty easy, too. In this example, we use a loop and array to maintain running totals for each of the five columns in our data file:
awk '
{
for (i = 1; i <= 5; i++) {
t[i] += $i
}
print
}
END {
print " ==="
for (i = 1; i <= 5; i++) {
printf(" %7d", t[i])
}
printf("\n", "")
}
' random_table.dat
Print the Minimum and Maximum Value in Column 1
awk '
BEGIN {min = 99999}
$1 > max {max = $1}
$1 < min {min = $1}
END {print "Max =", max, "Min =", min}
' random_table.dat
One Last Example
For our last example, we’ll create a program that processes a list of pathnames and extracts the extension from each file name to keep a tally of how many files have that extension:
# file_types.awk - sorted list of file name extensions and counts
BEGIN {FS = "."}
{types[$NF]++}
END {
for (i in types) {
printf("%6d %s\n", types[i], i) | "sort -nr"
}
}
To find the 10 most popular file extensions in our home directory, we can use the program like this:
find ~ -name "*.*" | awk -f file_types.awk | head
Summing Up
We really have to admire what an elegant and useful tool the authors of AWK created during the early days of Unix. So useful that its utility continues to this day. We have given AWK a brief examination in this adventure. Feel free to explore further by delving deeper into the documentation of the various AWK implementations. Also, searching the web for “AWK one-liners” will reveal many useful and clever tricks possible with AWK.
Further Reading
- The
nawkman page provides a good reference for the baseline version of AWK. An online version is available at https://linux.die.net/man/1/nawk - Many useful AWK programs are just one line long. Eric Pement has compiled an extensive list: http://www.pement.org/awk/awk1line.txt
- In addition to its man page,
gawkhas its own book titled Gawk: Effective AWK Programming available at: https://www.gnu.org/software/gawk/manual/ - Peteris Krumins has a nice blog post listing a variety of helpful tips for AWK users: https://catonmat.net/ten-awk-tips-tricks-and-pitfalls
5.8 - Other Shells
Other Shells
https://linuxcommand.org/lc3_adv_othershells.php
While we have spent a great deal of time learning the bash shell, it’s not the only “game in town.” Unix has had several popular shells and almost all are available for Linux, too. In this adventure, we will look at some of these, mostly for their historical significance. With a couple of possible exceptions, there is very little reason to switch, as bash is a pretty good shell. Some of these alternate shells are still popular on other Unix and Unix-like systems, but are rarely used in Linux except when compatibility with other systems is required.
The Evolution of Shells
The first Unix shell was developed in 1971 by Ken Thompson who, along with Dennis Richie, created Unix at AT&T Bell Laboratories. The Thompson shell introduced many of the core ideas that we see in shells today. These include I/O redirection, pipelines, and the ability to place processes in the background. This early shell was intended only for interactive use, not for use as a programming language.
The Thompson shell was followed in 1975 by the Mashey shell, written by John Mashey. This shell extended the Thompson shell to support shell scripting by including variables, a built-in if/then/else, and other rudimentary flow control constructs.
At this point we come to a big split in shell design philosophies. In 1978 Steve Bourne created the Bourne shell. The following year, Bill Joy (the original author of vi) released the C shell.
The Bourne shell added a lot of features that greatly improved shell scripting. These included flow control structures, better variables, command substitutions, and here scripts. The Bourne shell contains much of the functionality that we see in the bash shell today.
On the other hand, the C shell was designed to improve interactive use by adding command history and job control. The C shell, as its name would imply, uses a syntax that mimics the C programming language. C language programmers abounded in the Unix community, so many preferred this style. Ironically, the C shell is not very good at scripting. For example, it lacks user defined functions and the shell’s parser (the portion of the shell that reads and figures out what the script is saying) suffers from serious limitations.
In 1983, in an effort to improve the Bourne shell, David Korn released the Korn shell. Command history, job control, associative arrays, vi and Emacs style command editing are among the features that were added. In the 1993 release (known as ksh93), floating point arithmetic was added. The Korn shell was good for both interactive use and scripting. Unfortunately, the Korn shell was proprietary software distributed under license from AT&T. This changed in 2000 when it was released under an open source license.
When POSIX standardized the shell for use on Unix systems, it specified a subset of the Korn shell that would be largely compatible with the earlier Bourne shell. As a result, most Bourne-type shells now conform to the POSIX standard, but include various extensions.
Partially in response to the proprietary licensing of the Korn shell, the GNU project developed bash, which includes many Korn shell features. The first version, written by Brian Fox was released in 1989 and is today maintained by Chet Ramey. Bash is best known as the default shell in most Linux distributions. It is also the default shell in modern versions of OS X; however, due to Apple’s obsession with secrecy and lock-down, they refuse to update bash to version 4 because of provisions in the GNU GPLv3.
Since the development of bash, one new shell has emerged that is gaining traction among Linux and OS X users. It’s the Z shell (zsh). Sometimes described as “the Emacs of shells” because of its large feature set, zsh adds a number of features to enhance interactive use.
Modern Implementations
Modern Linux users have a variety of shell programs from which to choose. Of course, the overwhelming favorite is bash, since it is the default shell supplied with most Linux distributions. That said, users migrating from other Unix and Unix-like systems may be more comfortable with other shells. There is also the issue of portability. If a script is required to run on multiple Unix-like systems, then care must be taken to either: 1) make sure that all the systems are running the same shell program, or 2) write a script that conforms to the POSIX standard, since most modern Bourne shell derivatives are POSIX complaint.
A Reference Script
In order to compare the various shell dialects, we’ll start with this bash script taken from Chapter 33 of TLCL:
#!/bin/bash
# longest-word : find longest string in a file
for i; do
if [[ -r "$i" ]]; then
max_word=
max_len=0
for j in $(strings "$i"); do
len=${#j}
if (( len > max_len )); then
max_len=$len
max_word=$j
fi
done
echo "$i: '$max_word' ($max_len characters)"
fi
done
dash - Debian Almquist Shell
The Debian Almquist shell is Debian’s adaptation of the Almquist shell (ash) originally written in the 1980s by Kenneth Almquist. The ash shell is the default shell on several of the BSD flavors of Unix. dash, like its ancestor ash, has the advantage of being small and fast; however, it achieves this by forgoing conveniences intended for interactive use such as command history and editing. It also lacks some builtin commands, relying instead on external programs. Its main use is the execution of shell scripts, particularly during system startup. On Debian and related distributions such as Ubuntu, dash is linked to /bin/sh, the shell used to run the system initialization scripts.
dash is a POSIX compliant shell, so it supports Bourne shell syntax with a few additional Korn shell features:
#!/bin/dash
# longest-word.dash : find longest string in a file
for i; do
if [ -r "$i" ]; then
max_word=
max_len=0
for j in $(strings "$i"); do
len=${#j}
if [ $len -gt $max_len ]; then
max_len=$len
max_word=$j
fi
done
echo "$i: '$max_word' ($max_len characters)"
fi
done
Here we see that the dash script is mostly the same as the bash reference script, but we do see some differences. For one thing, dash does not support the ‘[[’ syntax for conditional tests; it uses the older Bourne shell syntax. The POSIX specification is also missing the ((expression)) syntax for arithmetic expansion, nor does it support brace expansion. dash and the POSIX specification do support the $(cmd) syntax for command substitution in addition to the older cmd syntax.
tcsh - TENEX C Shell
The tcsh program was developed in the early 1980s by Ken Greer as an enhanced replacement for the original csh program. The name TENEX comes from the operating system of the same name, which was influential in the design of the interactive features in tcsh. Compared to csh, tcsh added additional command history features, Emacs and vi-style command line editing, spelling correction, and other improvements intended for interactive use. Early versions of Apple’s OS X used tcsh as the default shell. It is still the default root shell on several BSD distributions.
tcsh, like the C shell, is not POSIX compliant as we can see here:
#!/usr/bin/tcsh
# longest-word.tcsh : find longest string in a file
foreach i ($argv)
set max_word=""
set max_len=0
foreach j (`strings $i`)
set len=$%j
if ($len > $max_len) then
set max_word=$j
set max_len=$len
endif
end
echo "$1 : $max_word ($max_len characters)"
end
Our tcsh version of the script demonstrates many differences from Bourne style syntax. In C shell, most of the flow control statements are different. We see for example, that the outer loop starts with a foreach statement incrementing the variable i with succeeding values from the word list $argv. argv, taken from the C programming language, refers to an array containing the list of command line arguments.
While this simple script works, tcsh is not very capable when things get more complicated. It has two major weaknesses. First, it does not support user-defined functions. As a workaround, separate scripts can be called from the main script to carry out the individual functions. Second, many complex constructs easily accomplished with the POSIX shell, such as:
{ if [[ "$a" ]]; then
grep "string1"
else
grep "string2"
fi
} < file.txt
are not possible because the C shell parser cannot handle redirection with flow control statements. The parser also makes quoting very troublesome.
ksh - Korn Shell
The Korn shell comes in several different flavors. Basically, there are two groups, ksh88 and ksh93, reflecting the year of their release. There is a public domain version of ksh88 called pdksh, and more official versions of both ksh88 and ksh93. All three are available for Linux. ksh93 would be the preferred version for most users, as it is the version found on most modern commercial Unix systems. During installation is it often symlinked to ksh.
#!/usr/bin/ksh
# longest-word.ksh : find longest string in a file
for i; do
if [[ -r "$i" ]]; then
max_word=
max_len=0
for j in $(strings "$i"); do
len=${#j}
if (( len > max_len )); then
max_len=$len
max_word=$j
fi
done
print "$i: '$max_word' ($max_len characters)"
fi
done
As we can see in this example, ksh syntax is very close to bash. The one visible difference is the print command used in place of echo. Korn shell has echo too, but print is the preferred Korn shell command for outputting text. Another subtle difference is the way that pipelines work in ksh. As we learned in Chapter 28 of TLCL, a construct such as:
#!/bin/bash
str=""
echo "foo" | read str
echo $str
always produces an empty result because, in bash pipelines, each command in a pipeline is executed in a subshell, so its data is destroyed when the subshell exits. In this example, the final command (read) is in a subshell, and thus str remains empty in the parent process.
In ksh, the internal organization of pipelines is different. When we do this in ksh:
#!/usr/bin/ksh
str=""
echo "foo" | read str
echo $str
The output is “foo” because in the ksh pipeline, the echo is in the subshell rather than the read.
zsh - Z Shell
At first glance, the Z shell does not differ very much from bash when it comes to scripting:
#!/bin/zsh
# longest-word.zsh : find longest string in a file
for i; do
if [[ -r "$i" ]]; then
max_word=
max_len=0
for j in $(strings "$i"); do
len=${#j}
if (( len > max_len )); then
max_len=$len
max_word=$j
fi
done
print "$i: '$max_word' ($max_len characters)"
fi
done
It runs scripts the same way that bash does. This is to be expected, as zsh is intended to be a drop-in replacement for bash in most cases. A couple of things to note however. First, zsh handles pipelines like the Korn shell does; the last command in a pipeline is executed in the current shell. Second, in zsh, the first element of an array is index 1, not 0 as it in bash and ksh.
Where zsh does differ significantly is in the number of bells and whistles it provides for interactive use (some of which can be applied to scripting as well). Let’s take a look at a few:
Tab Completion
Many kinds of tab completion are supported by zsh. These include command names, command options, and arguments.
When using the cd command, repeatedly pressing the tab key first displays a list of the available directories, then begins to cycle through them. For example:
me@linuxbox ~ $ cd <tab>
me@linuxbox ~ $ cd <tab>
Desktop/ Documents/ Downloads/ Music/ Pictures/ Public/
Templates/ Videos/
me@linuxbox ~ $ cd Desktop/<tab>
Desktop/ Documents/ Downloads/ Music/ Pictures/ Public/
Templates/ Videos/
me@linuxbox ~ $ cd Documents/
Desktop/ Documents/ Downloads/ Music/ Pictures/ Public/
Templates/ Videos/
zsh can be configured to display a highlighted selector on the list of directories, and we can use the arrow keys to directly move the highlight to the desired entry in the list to select it.
We can also switch directories by replacing one part of a path name with another:
me@linuxbox ~ $ cd /usr/local/share
me@linuxbox share $ cd share bin
me@linuxbox bin $ pwd
/usr/local/bin
Pathnames can be abbreviated as long as they are unambiguous. If we type:
me@linuxbox ~ $ ls /u/l/share<tab>
zsh will expand it into:
me@linuxbox ~ $ ls /usr/local/share/
That can save a lot of typing!
Help for options and arguments is provided for many commands. To invoke this feature, we type the command and the leading dash for an option, then hit the tab key:
me@linuxbox ~ $ rm -<tab>
--force -f -- ignore nonexistent files, never prompt
--help -- display help message and exit
-i -- prompt before every removal
-I -- prompt when removing many files
--interactive -- prompt under given condition
(defaulting to always)
--no-preserve-root -- do not treat / specially
--one-file-system -- stay within file systems of files given
as arguments
--preserve-root -- do not remove / (default)
--recursive -R -r -- remove directories and their contents
recursively
--verbose -v -- explain what is being done
--version -- output version information and exit
This displays a list of options for the command, and like the cd command, repeatedly pressing tab causes zsh to cycle through the available options.
Pathname Expansion
The Z shell provides several powerful additions to pathname expansion that can save steps when specifying files as command arguments.
We can use “**” to cause recursive expansion. For example, if we wanted to list every file name ending with .txt in our home directory and its subdirectories, we would have to do this in bash:
me@linuxbox ~ $ find . -name "*.txt" | sort
In zsh, we could do this:
me@linuxbox ~ $ ls **/*.txt
and get the same result.
And if that weren’t cool enough, we can also add qualifiers to the wildcard to perform many of the same tests as the find command. For example:
me@linuxbox ~ $ **/*.txt(@)
will only display the files whose names end in .txt and are symbolic links.
There are many supported qualifiers and they may be combined to perform very fine grained file selection. Here are some examples:
| Qualifier | Description | Example |
|---|---|---|
| . | Regular files | ls *.txt(.) |
| / | Directories | ls *.txt(/) |
| @ | Symbolic links | ls *.txt(@) |
| * | Executable files | ls *(*) |
| F | Non-empty (“full”) directories | ls *(F) |
| /^F | Empty directories | ls *(/^F) |
| mn | Modified exactly n days ago | ls *(m5) |
| m-n | Modified less than n days ago | ls *(m-5) |
| m+n | Modified more than n days ago | ls *(m+5) |
| L0 | Empty (zero length) file | ls *(L0) |
| LM+n | File larger than n megabytes | ls *(LM+5) |
| LK-n | File smaller than n kilobytes | ls *(LK-100) |
Global Aliases
Z shell provides more powerful aliases. With zsh we can define an alias in the usual way, such as:
me@linuxbox ~ $ alias vi='/usr/bin/vim'
and it will behave just as it would in bash. But we can also define a global alias that can be used at any position on the command line, not just at the beginning. For example, we can define a commonly used file name as an alias:
me@linuxbox ~ $ alias -g LOG='/var/log/syslog'
and then use it anywhere on a command line:
me@linuxbox ~ $ less LOG
The use of an uppercase alias name is not a requirement, it’s just a custom to make its use easier to see. We can also use global aliases to define common redirections:
me@linuxbox ~ $ alias -g L='| less"
or
me@linuxbox ~ $ alias -g W='| wc -l'
Then we can do things like this:
me@linuxbox ~ $ cat LOG W
to display the number of lines in /var/log/syslog.
Suffix Aliases
What’s more, we can define aliases to act like an “open with…” by defining a suffix alias. For example, we can define an alias that says all files that end with “.txt” should be viewed with less:
me@linuxbox ~ $ alias -s txt='less'
Then we can just type the name of a text file, and it will be opened by the application specified by the alias:
me@linuxbox ~ $ dir-list.txt
How cool is that?
Improved History Search
zsh adds a neat trick to history searching. In bash (and zsh too) we can perform a reverse incremental history search by typing Ctrl-r, and each subsequent keystroke will refine the search. zsh goes one better by allowing us to simply type a few letters of the desired search string on the command line and then press up-arrow. It moves back through the history to find the first match, and each time we press the up-arrow, the next match is displayed.
Environment Variable Editing
zsh provides a shell builtin called vared for editing shell variables. For example, if we wanted to make a quick change to our PATH variable we can do this:
me@linuxbox ~ $ vared PATH
and the contents of the PATH variable appear in the command editor, so we can make a change and press Enter and the change takes effect.
Frameworks
We have only touched on a few of the features available in zsh. It has a lot. But with a large feature set comes complexity, and configuring zsh to take advantage of its full potential can be daunting. Heck, its man page is a only a table of contents to the other 10+ man pages that cover various topics. Fortunately, communities have sprung up to provide frameworks that supply ready-to-use configurations and add-ons for zsh. By far, the most popular of these is Oh-My-Zsh, a project led by Robby Russell.
Oh-My-Zsh is a large collection of configuration files, plugins, aliases, and themes. It offers support for tailoring zsh for many types of common tasks, particularly software development and system administration.
Changing to Another Shell
Now that we have learned a little about the different shells available for Linux, how can we experiment with them? First, we can simply enter the name of the shell from our bash prompt. This will launch the second shell as a child process of bash:
me@linuxbox ~ $ tcsh
%
Here we have launched tcsh from the bash prompt and are presented with the default tcsh prompt, a percent sign. Since we have not yet created any startup files for the new shell, we get a very bare-bones environment. Each shell has its own configuration file(s) for interactive use just as bash has the .bashrc file to configure its interactive sessions.
Here is a table that lists the configuration files for each of the shells when used as an interactive (i.e., not a login) shell:
| Shell | Configuration File(s) |
|---|---|
dash | User-defined by setting the ENV variable in ~/.profile |
bash | ~/.bashrc |
ksh | ~/.kshrc |
tcsh | ~/.tchrc |
zsh | ~/.zshrc |
We’ll need to consult the respective shell’s man page (always a fun exercise!) to see the complete list of shell features. Most shells also include additional documentation and example configuration files in the /usr/share/doc directory.
To exit our temporary shell, we simply enter the exit command:
% exit
me@linuxbox ~ $
Once we are done with our experimentation and configuration, we can change our default shell from bash to our new shell by using the chsh command. For example, to change from bash to zsh, we could do this:
me@linuxbox ~ $ chsh
password:
Changing the login shell for me
Enter the new value, or press ENTER for the default
Login Shell [/bin/bash]: /usr/bin/zsh
~ 23:30:40
$
We are prompted for our password and then prompted for the name of the new shell whose name must appear in the /etc/shells file. This is a safety precaution to prevent an invalid name from being specified and thus preventing us from logging in again. That would be bad.
Summing Up
Because of the growing popularity of Linux among Unix-like operating systems, bash has become the world’s predominant shell program. It has many of the best features of earlier shells and a few tricks of its own. However, if light weight and quick script execution is needed (for example, in embedded systems), dash is a good choice. Likewise, if working with other Unix systems is required, ksh or tcsh will provide the necessary compatibility. For the adventuresome among us, the advanced interactive features of zsh can enhance our day-to-day shell experience.
Further Reading
Shells and their history:
- A history of Unix shells from IBM Developer Works: https://developer.ibm.com/tutorials/l-linux-shells/
C shell:
- A comparison of bash and tcsh syntax by Joe Linoff: http://joelinoff.com/blog/?page_id=235
- Tom Christiansen’s famous “Csh Programming Considered Harmful” explains the many ways that csh bugs out when scripting: https://www-uxsup.csx.cam.ac.uk/misc/csh.html
- And on a related note, here are the “Top Ten Reasons not to use the C shell” by Bruce Barnett: https://www.grymoire.com/unix/CshTop10.txt
Korn shell:
- Korn shell documentation: http://www.kornshell.com/doc/
- The on-line version of “Learning the Korn Shell” from O’Reilly: http://web.deu.edu.tr/doc/oreily/unix/ksh/index.htm
Z shell:
- Brendon Rapp’s slide presentation on “Why zsh Is Cooler Than Your Shell”: https://www.slideshare.net/jaguardesignstudio/why-zsh-is-cooler-than-your-shell-16194692
- Joe Wright’s list of favorite zsh features: https://code.joejag.com/2014/why-zsh.html
- David Fendrich’s “No, Really. Use Zsh.”: http://fendrich.se/blog/2012/09/28/no/
- Nacho Caballero’s “Master Your Z Shell with These Outrageously Useful Tips”: http://reasoniamhere.com/2014/01/11/outrageously-useful-tips-to-master-your-z-shell/
- Home page for Oh-My-Zsh: https://ohmyz.sh/
5.9 - Power Terminals
Power Terminals
https://linuxcommand.org/lc3_adv_powerterm.php
Over the course of our many lessons and adventures, we have learned a lot about the shell, and explored many of the common command line utilities found on Linux systems. There is, however, one program we have overlooked, and it may be among the most important and most frequently used of them all– our terminal emulator.
In this adventure, we are going to dig into these essential tools and look at a few of the different terminal programs and the many interesting things we can do with them.
A Typical Modern Terminal
Graphical desktop environments like GNOME, KDE, LXDE, Unity, etc. all include terminal emulators as standard equipment. We can think of this as a safety feature because, if the desktop environment suffers from some lack of functionality (and they all do), we can still access the shell and actually get stuff done.
Modern terminal emulators are quite flexible and can be configured in many ways:
 gnome-terminal preferences dialog
Size
Terminal emulators display a window that can be adjusted to any size from the sublime to the ridiculous. Many terminals allow configuration of a default size.
The “normal” size for a terminal is 80 columns by 24 rows. These dimensions were inherited from the size of common hardware terminals, which, in turn, were influenced by the format of IBM punch cards (80 columns by 12 rows). Some applications expect 80 by 24 to be the minimum size, and will not display properly when the size is smaller. Making the terminal larger, on the other hand, is preferable in most situations, particularly when it comes to terminal height. 80 columns is a good width for reading text, but having additional height provides us with more context when working at the command line.
Another common width is 132 columns, derived from the width of wide fan-fold computer paper. Though this is too wide for comfortable reading of straight text (for example, a man page), it’s fine for other purposes, such as viewing log files.
The 80-column default width has implications for the shell scripts and other text-based programs we write. We should format our printed output to fit within the limits of an 80-character line for best effect.
Tabs
A single terminal window with the ability to contain several different shell sessions is a valuable feature found in most modern terminal emulators. This is accomplished through the use of tabs.
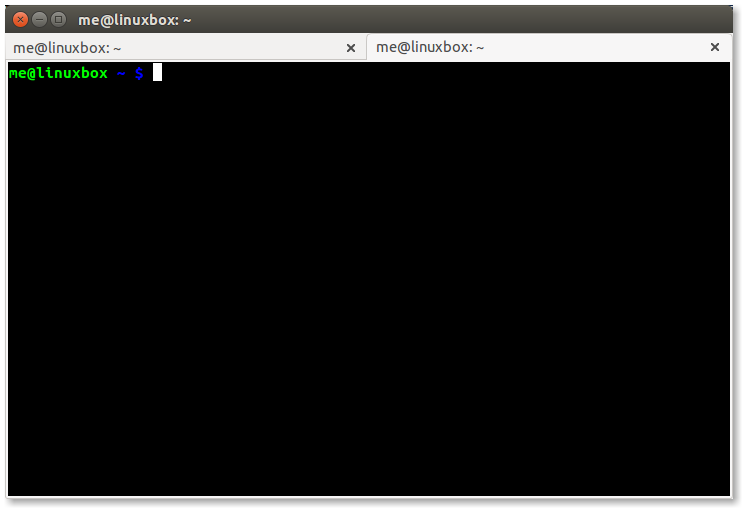 gnome-terminal with tabs
Tabs are a fairly recent addition to terminal emulators, first appearing around 2003 in both GNOME’s gnome-terminal and KDE’s konsole.
Profiles
Another feature found in some modern terminals is multiple configuration profiles. With this feature, we can have separate configurations for different tasks. For example, if we are responsible for maintaining a remote server, we might have a separate profile for the terminal that we use to manage it.
Fonts, Colors, and Backgrounds
Most terminal emulators allow us to select fonts, colors, and backgrounds for our terminal sessions. The three most important criteria for selecting fonts, colors, and backgrounds are: 1. legibility, 2. legibility, and 3. legibility. Many people post screen shots of their Linux desktops online, and there is a great fascination with “stylish” fonts, faint colors, and pseudo-transparent terminal windows, but we use our terminals for very serious things, so we should treat our terminals very seriously, too. No one wants to make a mistake while administering a system because they misread something on the screen. Choose wisely.
Past Favorites
When the first graphical environments began appearing for Unix in the mid-1980s, terminal emulators were among the first applications that were developed. After all, the GUIs of the time had very little functionality and people still needed to do their work. Besides, the graphical desktop allowed users to display multiple terminal windows- a powerful advantage at the time.
xterm
The granddaddy of all graphical terminals is xterm, the standard terminal emulator for the X Window System. Originally released in 1984, it’s still under active maintenance. Since it is a standard part of X, it is included in many Linux distributions. xterm was very influential, and most modern terminal programs emulate its behavior in one way or another.
 xterm with default configuration
In its default configuration, xterm looks rather small and pathetic, but almost everything about xterm is configurable. When we say “configurable,” we don’t mean there is a pretty “Preferences” dialog. This is Unix! Like many early X applications, it relies on an Xresources file for its configuration. This file can be either global (/etc/X11/Xresources) or local to the user (~/.Xresources). Each item in this file consists of an application class and a setting. If we create the file ~/.Xresources with the following content:
XTerm.vt100.geometry: 80x35
XTerm.vt100.faceName: Liberation Mono:size=11
XTerm.vt100.cursorBlink: true
then we get a terminal like this:
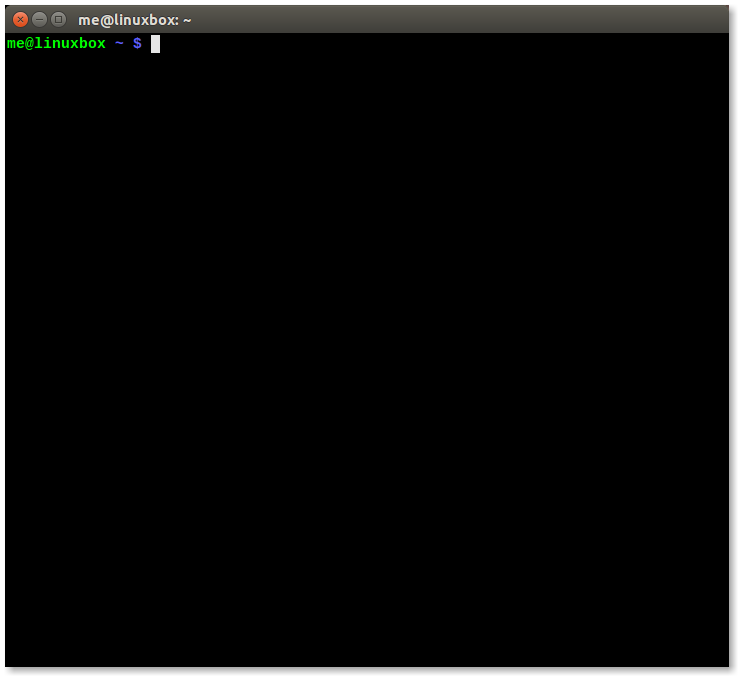 Configured xterm
A complete list of the Xresources configuration values for xterm appears in its man page.
While xterm does not appear to have menus, it actually has 3 different ones, which are made visible by holding the Ctrl key and pressing a mouse button. Different menus appear according to which button is pressed. The scroll bar on the side of the terminal has a behavior like ancient X applications. Hint: after enabling the scroll bar with the menu, use the middle mouse button to drag the slider.
Though xterm offers neither tabs nor profiles, it does have one strange extra feature: it can display a Tektronix 4014 graphics terminal emulator window. The Tektronix 4014 was an early and very expensive storage tube graphics display that was popular with computer aided design systems in the 1970s. It’s extremely obscure today. The normal xterm text window is called the VT window. The name comes from the DEC VT220, a popular computer terminal of the same period. xterm, and most terminals today, emulate this terminal to a certain extent. xterm is not quite the same as the VT terminal, and it has its own specific terminfo entry (see the tput adventure for some background on terminfo). Terminals set an environment variable named TERM that is used by X and terminfo to identify the terminal type, and thus send it the correct control codes. To see the current value of the TERM variable, we can do this:
me@linuxbox ~ $ echo $TERM
Even if we are using a modern terminal, such as gnome-terminal, we will notice that the TERM variable is often set to “xterm” or “xterm-color”. That’s how much influence xterm had. We still use it as the standard.
rxvt
By the standards of the time, xterm was a heavyweight program but, as time went by, some of its features were rarely used such as the Tektronix emulation. Around 1990, in an attempt to create a simpler, lighter terminal emulator, Robert Nation wrote rxvt as part of the FVWM window manager, an early desktop environment for Unix-like systems.
rxvt has a smaller feature set than xterm and emulates the DEC VT 102 terminal rather than the more advanced VT 220. rxvt sets the TERM variable to “rxvt”, which is widely supported. Like xterm, rxvt has menus that are displayed by holding the Ctrl key and pressing different mouse buttons.
rxvt is still under active maintenance, and there is a popular modern implementation forked from the original called urxvt (rxvt-Unicode) by Mark Lehmann, which supports Unicode (multi-byte characters used to express a wider range of written languages than ASCII). One interesting feature in urxvt is a daemon mode that allows launching multiple terminal windows all sharing the same instance of the program- a potential memory saver.
 urxvt with default configuration
Like xterm, rxvt uses Xresources to control its configuration. The default rxvt configuration is very spare. Adding the following settings to our Xresources file will make it more palatable (urxvt shown):
URxvt.geometry: 80x35
URxvt.saveLines: 10000
URxvt.scrollBar: false
URxvt.foreground: white
URxvt.background: black
URxvt.secondaryScroll: true
URxvt.font: xft:liberation mono:size=11
URxvt.cursorBlink: true
Modern Power Terminals
Most modern graphical desktop environments include a terminal emulator program. Some are more feature-rich than others. Let’s look at some of the most powerful and popular ones.
gnome-terminal
The default terminal application for GNOME and its derivatives such as Ubuntu’s Unity is gnome-terminal. Possibly the world’s most popular terminal app, it’s a good, full-featured program. It has many features we expect in modern terminals, like multiple tabs and profile support. It also allows many kinds of customization.
Tabs
Busy terminal users will often find themselves working in multiple terminal sessions at once. It may be to perform operations on several machines at the same time, or to manage a complex set of tasks on a single system. This problem can be addressed either by opening multiple terminal windows, or by having multiple tabs in a single window.
The File menu in gnome-terminal offers both choices (well, in older versions anyway). In newer versions, use the keyboard shortcut Ctrl-Shift-T to open a tab. Tabs can be rearranged with the mouse, or can be dragged out of the window to create a new window. With gnome-terminal, we can even drag a tab from one terminal window to another.
Keyboard Shortcuts
Since, in an ideal universe, we never lift our fingers from the keyboard, we need ways of controlling our terminal without resorting to a mouse. Fortunately, gnome-terminal offers a large set of keyboard shortcuts for common operations. Here are some of the most useful ones, defined by default:
| Shortcut | Action |
|---|---|
| Ctrl-Shift-N | New Window |
| Ctrl-Shift-W | Close Window |
| F11 | View terminal full screen |
| Shift-PgUp | Scroll up |
| Shift-PgDn | Scroll down |
| Shift-Home | Scroll to the beginning |
| Shift-End | Scroll to the end |
| Ctrl-Shift-T | New Tab |
| Ctrl-Shift-Q | Close Tab |
| Ctrl-PgUp | Next Tab |
| Ctrl-PgDn | Previous Tab |
| Alt-n | Where n is a number in the range of 1 to 9, go to tab n |
Keyboard shortcuts are also user configurable.
While it is well known that Ctrl-c and Ctrl-v cannot be used in the terminal window to perform copy and paste, Ctrl-Shift-C and Ctrl-Shift-V will work in their place with gnome-terminal.
Profiles
Profiles are one of the great, unsung features of many terminal programs. This may be because their advantages are perhaps not intuitively obvious. Profiles are particularly useful when we want to visually distinguish one terminal session from another. This is especially true when managing multiple machines. In this case, having a different background color for the remote system’s session may help us avoid typing a command into the wrong session. We can even incorporate a default command (like ssh) into a profile to facilitate the connection to the remote system.
Let’s make a profile for a root shell. First, we’ll go to the File menu and select “New Profile…” and when the dialog appears enter the name “root” as our new profile:
 gnome-terminal new profile dialog
Next, we’ll configure our new profile and choose the font and default size of the terminal window. Then we will choose a command for the terminal window when it is opened. To create a root shell, we can use the command sudo -i. We will also make sure to specify that the terminal should exit when the command exits.
 Setting the command in the configuration dialog
Finally, we’ll select some colors. How about white text on a dark red background? That should convey an appropriate sense of gravity when we use a root shell.
 Setting the colors in configuration dialog
Once we finish our configuration, we can test our shell:
 Root profile gnome-terminal
We can configure terminal profiles for any command line program we want: Midnight Commander, tmux, whatever.
Here is another example. We will create a simple man page viewer. With this terminal profile, we can have a dedicated terminal window to only display man pages. To do this, we first need to write a short script to prompt the user for the name of which command to look up, and display the man page in a (nearly) endless loop:
#!/bin/bash
# man_view - simple man page viewer
while true; do
echo -en "\nPlease enter a command name (q to quit) -> "
read
[[ "$REPLY" == "q" ]] && break
[[ -n "$REPLY" ]] && { man $REPLY || sleep 3; }
clear
done
We’ll save this file in our ~/bin directory and use it as our custom command for our terminal profile.
Next, we create a new terminal profile and name it “man page”. Since we are designing a window for man pages, we can play with the window size and color. We’ll set the window tall and a little narrow (for easier reading) and set the colors to green text on a black background for that retro terminal feeling:
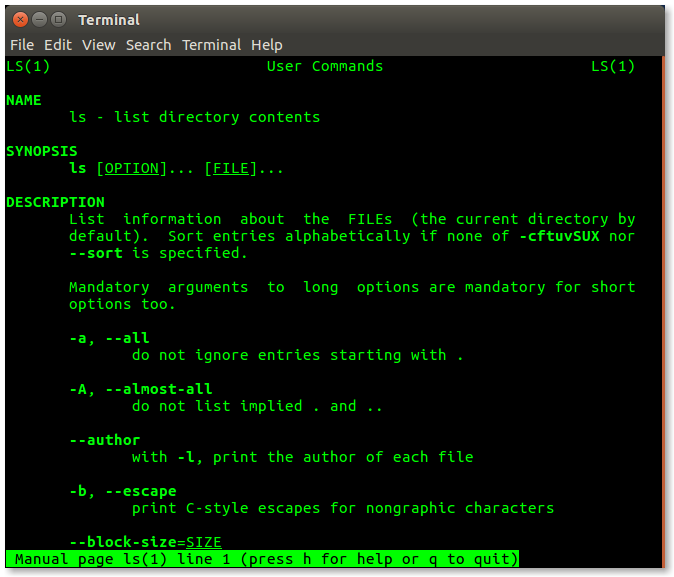 Man page gnome-terminal window
Opening Hyperlinks and Email Addresses
One of the neat tricks gnome-terminal can do is copy and/or open URLs. When it detects a URL in the stream of displayed text, it displays it with an underline. Right-clicking on the link displays a menu of operations:
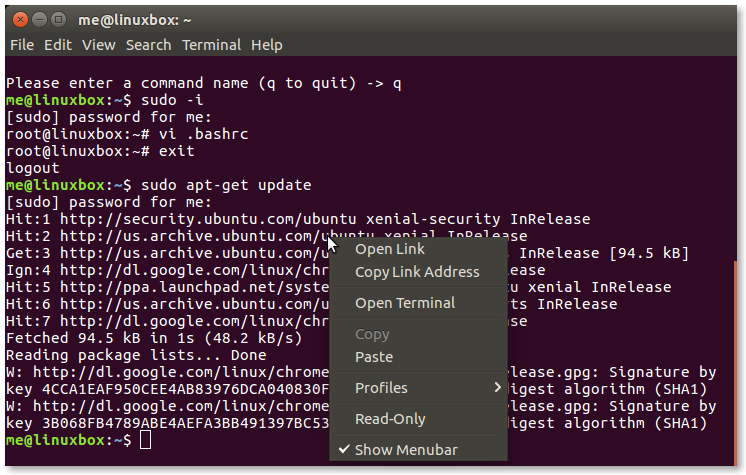 gnome-terminal URL context menu
Resetting the Terminal
Sometimes, despite our best efforts, we do something dumb at the terminal, like attempting to display a non-text file. When this happens, the terminal emulator will dutifully interpret the random bytes as control codes and we’ll notice that the terminal screen fills with garbage and nothing works anymore. To escape this situation, we must reset the terminal. gnome-terminal provides a function for this located in its Terminal menu.
konsole
konsole, the default terminal application for the KDE desktop, has a feature set similar to that of gnome-terminal. This, of course, makes sense since konsole directly “competes” with gnome-terminal. For instance, both gnome-terminal and konsole support tabs and profiles in a similar fashion.
konsole does have a couple of unique features not found in gnome-terminal. konsole has bookmarks, and konsole can split the screen into regions allowing more than one view of the same terminal session to be displayed at the same time.
Bookmarks
konsole allows us to store the location of directories as bookmarks. Locations may also include remote locations accessible via ssh. For example, we can define a bookmark such as ssh:me@remotehost, and it will attempt to connect with the remote system when the bookmark is used.
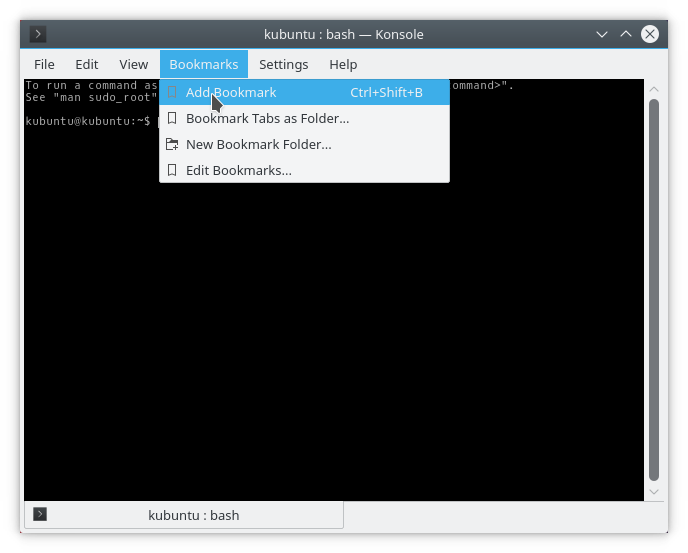 konsole bookmarks menu
Split View
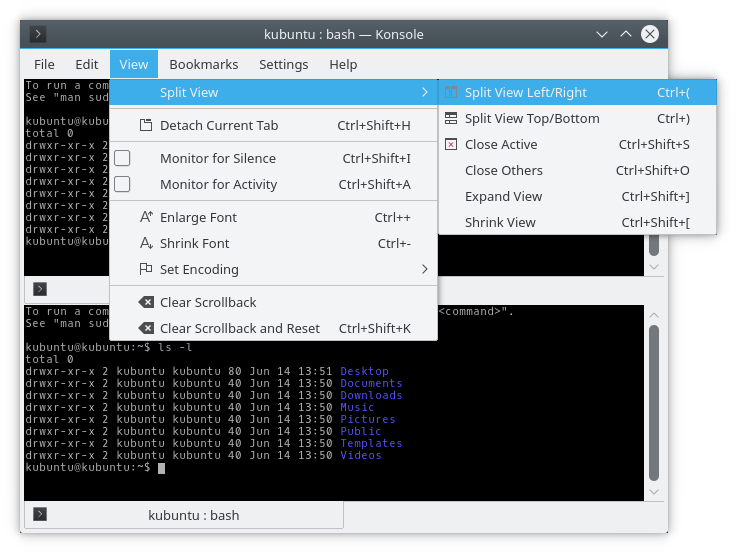 konsole’s split view feature
konsole’s unique split view feature allows us to have two views of a single terminal session. This seems odd at first glance, but is useful when examining long streams of output. For example, if we needed to copy text from one portion of a long output stream to the command line at the bottom, this could be handy. Further, we can get views of different terminal sessions, by using using tabs in conjunction with split views, since while the tabs will appear in all of the split views, they can be switched independently in each view:
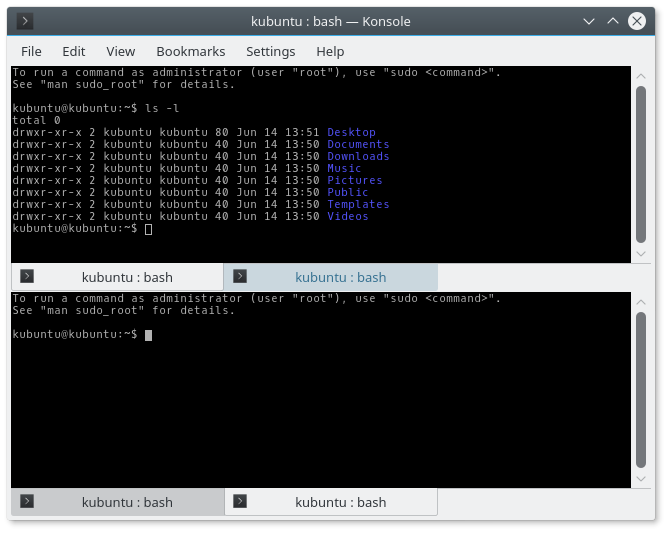 konsole with tabs and split view
guake
gnome-terminal has spawned a couple of programs that reuse many of its internal parts to create different terminal applications. The first is guake, a terminal that borrows a design feature from a popular first-person shooter game. When running, guake normally hides in the background, but when the F12 key is pressed, the terminal window “rolls down” from the top of the screen to reveal itself. This can be handy if terminal use is intermittent, or if screen real estate is at a premium.
guake shares many of the configuration options with gnome-terminal, as well as the ability to configure what key activates it, which side of the screen it rolls from, and its size.
Though guake supports tabs, it does not (as of this writing) support profiles. However, we can approximate profiles with a little clever scripting:
#!/bin/bash
# gtab - create pseudo-profiles for guake
if [[ $1 == "" ]]; then
guake --new-tab=. --show
exit
fi
case $1 in
root) # Create a root shell tab
guake --new-tab=. --fgcolor=\#ffffff --bgcolor=\#5e0000
guake --show # Switch to new fg/bg colors
guake --rename-current-tab=root
guake --execute-command='sudo -i; exit'
;;
man) # Create a manual page viewer tab
guake --new-tab=. --fgcolor=\#00ef00 --bgcolor=\#000000
guake --show # Switch to new fg/bg colors
guake --rename-current-tab="man viewer"
guake --execute-command='man_view; exit'
;;
*)
echo "No such tab. Try either 'root' or 'man'" >&2
exit 1
;;
esac
After saving this script, we can open new tabs in guake by entering the command gtab followed by an optional profile, either “root” or “man” to duplicate what we did with the gnome-terminal profiles above. Entering gtab without an option simply opens a new tab in the current working directory.
As we can see, guake has a number of interesting command line options that allow us to program its behavior.
For KDE users, there is a similar program called yakuake.
terminator
Like guake, terminator builds on the gnome-terminal code to create a very popular alternative terminal. The main feature addition is split window support.
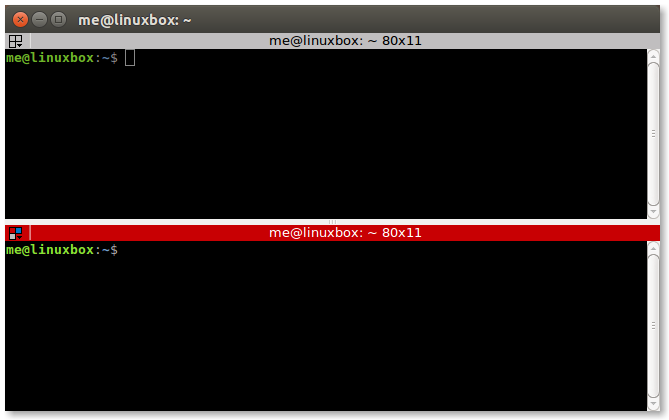 terminator with split screens
By right-clicking in the terminator window, terminator displays its menu where we can see the options for splitting the current terminal either vertically or horizontally.
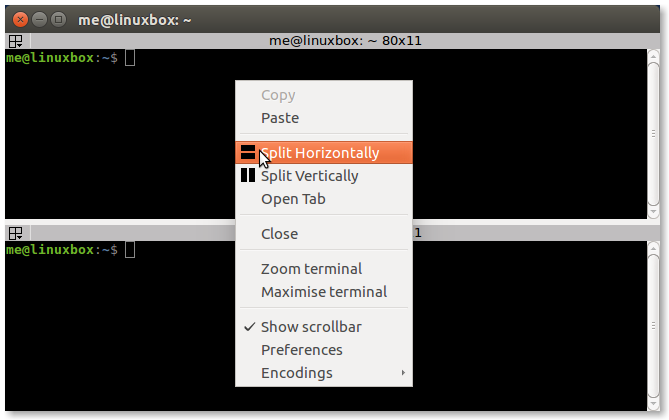 The terminator menu
Once split, each terminal pane can dragged and dropped. Panes can also be resized with either the mouse or a keyboard shortcut. Another nice feature of terminator is the ability to set the focus policy to “focus follows mouse” so that we can change the active pane by simply hovering the mouse over the desired pane without have to perform an extra click to make the pane active.
The preferences dialog supports many of the same configuration features as that of gnome-terminal, including profiles with custom commands:
 The terminator preferences dialog
A good way to use terminator is to expand its window to full screen and then split it into multiple panes:
 Full screen terminator window with multiple panes
We can even automate this by going into Preferences/Layouts and storing our full screen layout (let’s call it “2x2”) then, by invoking terminator this way:
terminator --maximise --layout=2x2
to get our layout instantly.
Terminals for Other Platforms
Android
While we might not think of an Android phone or tablet as a Linux computer, it actually is, and we can get terminal apps for it which are useful for administering remote systems.
Connectbot
Connectbot is a secure shell client for Android. With it, we can log into any system running an SSH server. To the remote system, Connectbot looks like a terminal using the GNU Screen terminal type.
One problem with using a terminal emulator on Android is the limitations of the native Google keyboard. It does not have all the keys required to make full use of a terminal session. Fortunately, there are alternate keyboards that we can use on Android. A really good one is Hacker’s Keyboard by Klaus Weidner. It supports all the normal keys, Ctrl, Alt, F1-F10, arrows, PgUp, PgDn, etc. Very handy when working with vi on a phone.
 Connectbot with Hacker’s Keyboard on Android
Termux
The Termux app for Android is unexpectedly amazing. It goes beyond being merely an SSH client; it provides a full shell environment on Android without having to root the device.
After installation, there is a minimal base system with a shell (bash) and many of the most common utilities. Initially, these utilities are the ones built into busybox (a compact set of utilities joined into a single program that is often used in embedded systems to save space), but the apt package management program (like on Debian/Ubuntu) is provided to allow installation of a wide variety of Linux programs.
 Termux displaying builtin shell commands
We can have dot files (like .bashrc) and even write shell scripts and compile and debug programs in Termux. Pretty neat.
When executing ssh, Termux looks like an “xterm-256color” terminal to remote systems.
Chrome/Chrome OS
Google makes a decent SSH client for Chrome and Chrome OS (which is Linux, too, after all) that allows logging on to remote systems. Called Secure Shell, it uses hterm (HTML Terminal, a terminal emulator written in JavaScript) combined with an SSH client. To remote systems, it looks like a “xterm-256color” terminal. It works pretty well, but lacks some features that advanced SSH users may need.
Secure Shell is available at the Chrome Web Store.
 Secure Shell running on Chrome OS
Summing Up
Given that our terminal emulators are among our most vital tools, they should command more of our attention. There are many different terminal programs with potentially interesting and helpful features, many of which, most users rarely, if ever, use. This is a shame since many of these features are truly useful to the busy command line user. We have looked at a few of the ways these features can be applied to our daily routine, but there are certainly many more.
Further Reading
- “The Grumpy Editor’s guide to terminal emulators” by Jonathan Corbet: https://lwn.net/Articles/88161/
xterm:
- xterm on Wikipedia: https://en.wikipedia.org/wiki/Xterm
- Homepage for the current maintainer of xterm, Thomas Dickey: https://invisible-island.net/xterm/
Tektronix 4014:
- Tektronix 4014 on Wikipedia: https://en.wikipedia.org/wiki/Tektronix_4010
- Some background on the 4014 at Chilton Computing: http://www.chilton-computing.org.uk/acd/icf/terminals/p005.htm
rxvt:
- Home page for rxvt: http://rxvt.sourceforge.net/
urxvt (rxvt-Unicode):
- Home page for the rxvt-Unicode project: http://software.schmorp.de/pkg/rxvt-unicode.html
gnome-terminal:
- Help pages for gnome-terminal: https://help.gnome.org/users/gnome-terminal/stable/
konsole:
- The Konsole Manual at the KDE Project: https://docs.kde.org/stable5/en/applications/konsole/index.html
guake:
- The home page for the guake project: http://guake-project.org/
- The Arch Wiki entry for guake (contains a lot of useful information but some is Arch Linux specific): https://wiki.archlinux.org/index.php/Guake
terminator:
- The home page for the terminator project: https://gnometerminator.blogspot.com/p/introduction.html
Connectbot:
- Connectbot at the Google Play Store: https://play.google.com/store/apps/details?id=org.connectbot&hl=en
Hacker’s Keyboard:
- Hacker’s Keyboard at the Google Play Store: https://play.google.com/store/apps/details?id=org.pocketworkstation.pckeyboard&hl=en
Termux:
- Termux at the Google Play Store: https://play.google.com/store/apps/details?id=com.termux&hl=en
Secure Shell
- Secure Shell at the Chrome Web Store: https://chrome.google.com/webstore/detail/secure-shell-app/pnhechapfaindjhompbnflcldabbghjo
- Secure Shell FAQ: https://chromium.googlesource.com/apps/libapps/+/master/nassh/doc/FAQ.md
5.10 - Vim, with Vigor
Vim, with Vigor
https://linuxcommand.org/lc3_adv_vimvigor.php
TLCL Chapter 12 taught us the basic skills necessary to use the vim text editor. However, we barely scratched the surface of its capabilities. Vim is a very powerful program. In fact, it’s safe to say that vim can do anything. It’s just a question of figuring out how. In this adventure, we will acquire an intermediate level of skill in this popular tool. In particular, we will look at ways to improve our productivity writing shell programs, configuration files, and documentation. Even better, after we get the hang of some of these additional features, using vim is actually fun.
In this adventure, we will look at some of the features that make vim so popular among developers and administrators. The community supporting vim is large and vigorous. Because vim is extremely rich in features and scriptable, there are many plugins and add-ons available. However, we are going to restrict ourselves to stock vim and the plugins that normally ship with it.
A note about nomenclature: in TLCL we used the terms “command”, “insert”, and “ex” to identify the three primary modes of vim. We did this to match the traditional modes of vim’s ancestor, vi. Since this is an all-vim adventure, we will switch to the names used in the vim documentation which are normal, insert, and command.
Let’s Get Started
First, we need to be sure we are running the full version of vim. Many distributions only ship with an abbreviated version. To get the full version, install the “vim” package if it’s not already installed. This is also be a good time to add an alias to the .bashrc file to make “vi” run vim (some distributions symbolically link ‘vi’ to vim, so this step might not be needed).
alias vi='vim'
Next, let’s create a minimal .vimrc, its main configuration file.
[me@linuxbox ~]$ vi ~/.vimrc
Edit the file so it contains these two lines:
set nocompatible
filetype plugin on
This will ensure that vim is not restricted to the vi feature set, and load a standard plugin that lets vim recognize different file types. After inserting the two lines of text, return to normal mode and (just for fun) type lowercase ‘m’ followed by uppercase ‘V’.
mV
Nothing will appear to happen, and that’s OK. We’ll come back to that later. Save the file and exit vim.
:wq
Getting Help
Vim has an extensive built-in help system. If we start vim:
[me@linuxbox ~]$ vi
and enter the command:
:help
It will appear at the top of the display.
 Vim help window
Though help is extensive and very useful, it immediately presents a problem because it creates a split in the display. This is a rather advanced feature that needs some explanation.
Vim can divide the display into multiple panes, which in vim parlance are called windows. These are very useful when working with multiple files and other vim features such as help. When the display is divided this way, we can toggle between the windows by typing Ctrl-w twice. We can manipulate vim windows with the following commands:
:split Create a new window
Ctrl-w Ctrl-w Toogle between windows
Ctrl-w _ Enlarge the active window
Ctrl-w = Make windows the same size
:close Close active window
:only Close all other windows
When working with files, it’s important to note that “closing” a window (with either :q or :close) does not remove the buffer containing the window’s content; we can recall it at any time. However, when we close the final window, vim terminates.
To exit help, make sure the cursor is in the help window and enter the quit command.
:q
But enough about windows, let’s get back to help. If we scroll around the initial help file, we see it is a hypertext document full of links to various topics and it begins with the commands we need to navigate the help system. This is all well and good, but it’s not the most interesting way to use it.
The best way is to type :h followed by the topic we are interested in. The fact we don’t have to type out “:help” reveals that most vim commands can be abbreviated. This saves a lot of work. In general, commands can be shortened to their smallest non-ambiguous form. Frequently used commands, like help, are often shortened to a single character but the system of abbreviations isn’t predictable, so we have to use help to find them. For the remainder of this adventure, we will try to use the shortest available form.
There is an important table near the beginning of the initial help file:
WHAT PREPEND EXAMPLE
Normal mode command (nothing) :help x
Visual mode command v_ :help v_u
Insert mode command i_ :help i_<Esc>
Command-line command : :help :quit
Command-line editing c_ :help c_<Del>
Vim command argument - :help -r
Option ' :help 'textwidth'
Search for help: Type ":help word", then hit CTRL-D to see
matching help entries for "word".
This table describes how we should ask for help in particular contexts. We’re familiar with the normal mode command ‘i’ which invokes insert mode. In the case of such a normal mode command, we simply type:
:h i
to display its help page. For command mode commands, we precede the command with a ‘:’, for example:
:h :q
gets help with the :quit command.
There are other contexts for modes we have yet to cover. We’ll get to those in a little bit.
As we go along, feel free to use help to learn more about the commands we discuss. As this adventure goes on, the text will include suggested help topics to explore.
Oh, and while we’re on the subject of command mode, now is a good time to point out that command mode has command line history similar to the shell. After typing ‘:’ we can use the up and down arrows to scroll through past commands.
Help topics: :split :close :only ^w
Starting a Script
In order to demonstrate features in vim, we’re going to write a shell script. What it does is not important, in fact, it won’t do anything at all except to show how we can edit scripts. To begin, let’s start vim with the name of an non-existent script file:
[me@linuxbox ~]$ vi fooscript
and we will get our familiar “new file” window:
 New file
Setting the Filetype
At this point vim has no idea what kind of file we are creating. If we had named the file fooscript.sh the filetype plugin would have determined that we were editing a shell script. We can verify this by asking vim what the current filetype is:
:set ft?
When we use the set command this way, it displays the current value of an option– in this case the ft (short for filetype) option. It should respond with the following indicating that the ft option is unset:
filetype=
For the curious, we can ask for help like this to get more information:
:h :set
:h 'ft'
To see all the current option settings, we can do this and the entire list will appear:.
:set
Since we want our new file to be treated as a shell script, we can set the filetype manually:
:set ft=sh
Next, let’s enter insert mode and type the first couple of lines in our script:
#!/bin/bash
# Script to test editing with vim
Exit insert mode by pressing the Esc key and save the file:
:w
Now that our file contains the shebang on the first line, the filetype plugin will recognize the file as a shell script whenever it is loaded.
Using the Shell
One thing we can do with filetypes is create a configuration file for each of the supported types. Normally, these are placed in the ~/.vim/ftplugin directory. To do this, we need to create the directory.
We don’t have leave vim to do this; we can launch a shell from within vim. This is easily done by entering the command:
:sh
After doing this, a shell prompt will appear and we can enter our shell command:
[me@linuxbox ~]$ mkdir -p ~/.vim/ftplugin
When we’re done with the shell, we return to vim by exiting the shell:
[me@linuxbox ~]$ exit
Now that we have a place for our configuration file to live, let’s create it. We’ll open a new file:
:e ~/.vim/ftplugin/sh.vim
The filename sh.vim is required.
Help topics: :sh
Buffers
Before we start editing our new file, let’s look at what vim is doing. Each file that we edit is stored in a buffer. We can look the current list of buffers this way:
:ls
This will display the list. There are several ways that we can switch buffers. The first way is to cycle between them:
:bn
This command (short for :bnext) cycles through the buffer list, wrapping around at the end. Likewise, there is a :bp (:bprevious) command which cycles through the buffer list backwards. We can also select a buffer by number:
:b 2
We can even refer to a buffer by using a portion of the file name:
:b fooscript
Let’s cycle back to our new buffer and add this line to our configuration file:
setlocal number
This will turn on line numbering each time we load a shell script. Notice that we use the setlocal command rather than set. This is because set will apply an option globally, whereas the setlocal command only applies the option to the current buffer. This will prevent settings conflicts when we edit multiple files of different types.
We can also control syntax highlighting while we’re here. We can turn it on with:
syntax on
Or turn it off with:
syntax off
We’ll save this file now, but before we do that, let’s type mS (lowercase m uppercase S), similar to what we did when we saved our initial .vimrc.
Help topics: :ls :buffers :bnext :bprevious :setlocal 'number' :syntax
Tabs
Before we leave the subject of buffers, let’s take a look a possible way of using them. We have already discussed splits and windows, but recent versions of vim include a useful alternative called tabs. As the name suggests, this feature allows each buffer to appear in its own tab.
To create a new tab, we type the following command:
:tabnew
This will open a new tab. Since we haven’t associated the tab with a buffer yet, the tab will be labeled “[No Name]”.
 New tab
While we are in the newly created tab, we can switch to one of the existing buffers as before by typing:
:bn
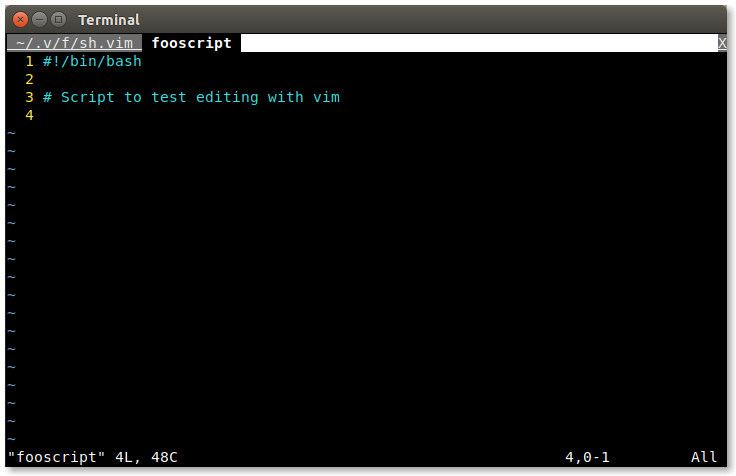 Displaying a buffer in a tab
We can open files in tabs, too. It works much like the :e command. To open a file in a tab, we type :tabe followed by the name of the file.
Switching tabs is easy. To cycle through the tabs forward, we type gt. To cycle backwards, we type gT. If mouse support is enabled, tabs can be selected by clicking on them and new tabs can be opened by double clicking on the tab bar at the top of the screen.
It’s also possible to start vim with multiple files loaded in tabs by adding the -p option to the command line. For example:
[me@linuxbox ~]$ vim -p file1 file2
To close tabs, we use :q command just like closing a vim window. When only one tab remains, vim leaves tabbed mode and the display returns to its usual state.
There are a lot of tab-related features in vim. See the help topic for full details.
Help topics: tabpage
Color Schemes
If we return to the buffer containing our shell script, we should see the effects of our sh.vim file. When syntax highlighting is turned on (:syn on will do the trick) it assumes the current color scheme. Vim ships with a bunch of different ones. To see the name of the current scheme, type this command:
:colo
and it will display the name. To see the entire set of available color schemes, type :colo followed by a space, then the tab key. This will trigger vim’s autocomplete and we should see the first name in the list. Subsequent use of the tab key will cycle through the list and we can try each one.
The ‘desert’ color scheme looks pretty good with shell scripts, so let’s add this to our sh.vim file. To do this, switch to the buffer containing that file and add the following line:
colorscheme desert
Notice that we used the long form of the colorscheme command. We could have used the abbreviated form colo but it’s a common custom to use the long names in configuration files for clarity.
There are many additional color schemes for vim on the Internet. To use one, first create a ~/.vim/colors directory and then download the new scheme into it. The new scheme will appear when we cycle through the list.
Now, save the file and return to our shell script.
Help topics: :colorscheme
Marks and File Marks
We know there are various ways of moving around within document in vim. For example, to get to the top, we can type:
gg
To go to the bottom we can type:
G
Vim (and real vi for that matter) also allows us to mark an arbitrary location within a document that we can recall at will. To demonstrate this, go to the top of the script and type:
ma
Next, go to the bottom of the document and type:
mb
We have just set two marks, the first called “a” and the second called “b”. To recall a mark, we precede the name of the mark with the ’ character, like so and we are taken to the top of the file again:
'a
We can use any lowercase letter to name a mark. Now, the clever among us will remember that we set marks in both the .vimrc file, and the sh.vim file but we used uppercase letters.
Yes we did, because they’re special. They’re called file marks and they let us set a mark in a file that vim will remember between sessions. Since we set the V mark in the .vimrc file and the S mark in sh.vim file, if we ever type:
'V
vim will immediately take us to that mark even if vim has to load the file to do it. By doing this to .vimrc and sh.vim, we’re set up to edit our configuration files anytime we get another bright idea about customizing vim.
Help topics: m '
Visual Mode
Among the best features that vim adds to ordinary vi is visual mode. This mode allows us to visually select text in our document. If we type:
v
An indicator will appear at the bottom of the screen showing that we have entered this mode. While in visual mode, when we move the cursor (using any of the available movement commands), the text is both visually highlighted and selected. Once this is done we can apply the normal editing commands on the selected text such as c (change), d (delete), and y (yank). Typing v a second time will exit visual mode. If we type:
V
we again enter visual mode, but this time selection is done on a line-by-line basis rather than by individual characters. This is handy when cutting and copying blocks of code.
There is a third way of using visual mode. If we type:
Ctrl-v
we are able to select rectangular blocks of text by columns. For example, we could select a column from a table.
Help topics: v V ^v
Indentation
We’re going to continue working on our shell script, but first we need to talk a little about indentation. As we know, indentation is used in programming to help communicate program structure. The shell does not require any particular style of indentation; it’s purely for the benefit of the humans trying to read the code. However, some other computer languages, such as Python, require indentation to express program structure.
Indentation is accomplished in one of two ways; either by inserting tab characters or by inserting a sequence of spaces. To understand the difference, we have to go way back in time to typewriters and teletype machines.
In the beginning, there were typewriters. On a typewriter, in order to make indenting the first line of a paragraph easier, someone invented a mechanical device that would move the carriage over a set amount of space. Over time, these devices became more sophisticated and allowed multiple tab stops to be set. When teletype machines came about, they implemented tabs with a specific ASCII character called HT (horizontal tab, code 9) which, by default, was rendered by moving the cursor to the next character position evenly divisible by 8.
In the early days of computing, when memory was precious, it made sense to conserve space in text files by using tab characters to avoid having to pad the text file with spaces.
Using tab characters creates a problem, though. Since a tab character has no intrinsic width (it only signifies the desire to move to the next tab stop), it’s up to the receiving program to render the tab with some defined width. This means that a file containing tabs could be rendered in different ways in different programs and in different contexts.
Since memory is no longer expensive, and using tabs creates this rendering confusion, modern practice calls for spaces instead of tabs to perform indentation (though this remains somewhat controversial). Vim provides a number of options for setting tabs and indentation. An excerpt from the help file for the tabstop option explains the ways vim can treat tabs:
There are four main ways to use tabs in Vim:
1. Always keep 'tabstop' at 8, set 'softtabstop' and
'shiftwidth' to 4 (or 3 or whatever you prefer) and use
'noexpandtab'. Then Vim will use a mix of tabs and
spaces, but typing <Tab> and <BS> will behave like a tab
appears every 4 (or 3) characters.
2. Set 'tabstop' and 'shiftwidth' to whatever you prefer
and use 'expandtab'. This way you will always insert
spaces. The formatting will never be messed up when
'tabstop' is changed.
3. Set 'tabstop' and 'shiftwidth' to whatever you prefer and
use a |modeline| to set these values when editing the
file again. Only works when using Vim to edit the file.
4. Always set 'tabstop' and 'shiftwidth' to the same value,
and 'noexpandtab'. This should then work (for initial
indents only) for any tabstop setting that people use.
It might be nice to have tabs after the first non-blank
inserted as spaces if you do this though. Otherwise,
aligned comments will be wrong when 'tabstop' is
changed.
Indentation Settings For Scripts
For our purposes, we will use method 2 and add the following lines to our sh.vim file to set tabs to indent 2 spaces. This is a popular setting specified in some shell script coding standards.
setlocal tabstop=2
setlocal shiftwidth=2
setlocal expandtab
setlocal softtabstop=2
setlocal autoindent
setlocal smartindent
In addition to the tab settings, we also included the autoindent and smartindent settings, which will automate indentation when we write blocks of code.
After adding the indentation settings to our sh.vim file, we’ll add some more lines to our shell script (type this in to see how it behaves):
1 #! /bin/bash
2
3 # This is a shell script to demonstrate features in vim.
4 # It doesn't really do anything, it just shows what we can do.
5
6 # Constants
7 A=1
8 B=2
9
10 if [[ "$A" == "$B" ]]; then
11 echo "This shows how smartindent works."
12 echo "This shows how autoindent works."
13 echo "A and B match."
14 else
15 echo "A and B do not match."
16 fi
17
18 afunction() {
19 cmd1
20 cmd2
21 }
22
23 if [[ -e file ]]; then
24 cmd1
25 cmd2
26 fi
As we type these additional lines into our script, we notice that vim can now automatically provide indentation as needed. The autoindent option causes vim to repeat the previous line’s indention while the smartindent option provides indention for certain program structures such as the function and if statements. This saves a lot of time while coding and ensures that our code stays nice and neat.
If we find ourselves editing an existing script with a indentation scheme differing from our current settings, vim can convert the file. This is done by typing:
:retab
The file will have its tabs adjusted to match our current indentation style.
Help topics: 'tabstop' 'shiftwidth' 'expandtab' 'softtabstop' 'autoindent' 'smartindent'
Power Moves
As we learned in TLCL, vim has lots of movement commands we can use to quickly navigate around our documents. These commands can be employed in many useful ways.
Here is a list of the common movement commands. Some of this is review, some is new.
h Move left (also left-arrow)
l Move right (also right-arrow)
j Move down (also down-arrow)
k Move up (also up-arrow)
0 First character on the line (also the Home key)
^ First non-whitespace character on the line
$ Last character on the line (also the End key)
f{char} Move right to the next occurrence of char on the current
line
t{char} Move right till (i.e., just before) the next occurrence of
char on the current line
; Repeat last f or t command
gg Go to first line
G Go to last line. If a count is specified, go to that line.
w Move forward (right) to beginning of next word
b Move backward (left) to beginning of previous word
e Move forward to end of word
) Move forward to beginning of next sentence
( Move backward to beginning previous sentence
} Move forward to beginning of next paragraph
{ Move backward to beginning of previous paragraph
Remember, each of these commands can be preceded with a count of how many times the command is to be performed.
Operators
Movement commands are often used in conjunction with operators. The movement command determines how much of the text the operator affects. Here is a list of the most commonly used operators:
c Change (i.e., delete then insert)
d Delete/cut
y Yank (i.e., copy)
~ Toggle case
gu Make lowercase
gU Make uppercase
gq Format text (a topic we'll get to shortly)
g? ROT13 encoding (for obfiscating text)
> Shift (i.e., indent) right
< Shift left
We can use visual mode to easily demonstrate the movement commands. Move the cursor to the beginning of line 3 of our script and type:
vf.
This will select the text from the beginning of the line to the end of the first sentence. Press v again to cancel visual mode. Next, return to the beginning line 3 and type:
v)
to select the first sentence. Cancel visual mode again and type:
v}
to select the entire paragraph (any block of text delimited by a blank line). Pressing } again extends the selection to the next paragraph.
Text Object Selection
In addition to the traditional vi movement commands, vim adds a related feature called text object selection. These commands only work in conjunction with operators. These commands are:
a Select entire (all) text object.
i Select interior (in) of text object.
The text objects are:
w Word
s Sentence
p Paragraph
t Tag block (such as <aaa>...</aaa> used in HTML)
[ [ enclosed block
( ( enclosed block (b can also be used)
{ { enclosed block (B can also be used)
" " quoted string
' ' quoted string
The way these work is very interesting. If we place our cursor on a word for example, and type:
caw
(short for “change all word”), vim selects the entire word, deletes it, and switches to insert mode. Text objects work with visual mode too. Try this: move to line 11 and place the cursor inside the quoted string and type:
vi"
The interior of the quoted string will be selected. If we instead type:
va"
the entire string including the quotes is selected.
Help topics: motion.txt text-objects
Text Formatting
Let’s say we wanted to add a license header to the beginning of our script. This would consist of a comment block near the top of the file that includes the text of the copyright notice.
We’ll move to line 3 of our script and add the text, but before we start, let’s tell vim how long we want the lines of text to be. First we’ll ask vim what the current setting is:
:set tw?
Vim should respond:
textwidth=0
“tw” is short for textwidth, the length of lines setting. A value of zero means that vim is not enforcing a limit on line length. Let’s set textwidth to another value:
:set tw=75
Vim will now wrap lines (at word boundaries) when the length of a line exceeds this value.
Formatting Paragraphs
Normally, we wouldn’t want to set a text width while writing code (though keeping line length below 80 characters is a good practice), but for this task it will be useful.
So let’s add our text. Type this in:
# This program is free software: you can redistribute it and/or modify it
# under the terms of the GNU General Public License as published by the
# Free Software Foundation, either version 3 of the License, or (at your
# option) any later version.
# This program is distributed in the hope that it will be useful, but
# WITHOUT ANY WARRANTY; without even the implied warranty of
# MERCHANTABILITY or FITNESS FOR A PARTICULAR PURPOSE. See the GNU General
# Public License at <http://www.gnu.org/licenses/> for more details.
Notice the magic of vim as we type. Each time the length of the line reaches the text width, vim automatically starts a new line including, the comment symbol. While the filetype is set for shell scripting, vim understands certain things about shell syntax and tries to help. Very handy.
Now let’s say we were not happy with the length of these lines, or that we have edited the text in such a way that some of the lines are either too long or too short to maintain our well-formatted text. Wouldn’t be great is we could reformat our comment block? Well, we can. Very easily, in fact.
To demonstrate, let’s change the text width to 65 characters:
:set tw=65
Now place the cursor inside the comment block and type:
gqip
(meaning “format in paragraph”) and watch what happens. Presto, the block is reformatted to the new text width! A little later, we will show how to reduce this four key sequence down to a single key.
Comment Blocks
There is a fun trick we can perform on this comment block. When we write code, we frequently perform testing and debugging by commenting out sections. Vim makes this process pretty easy. To try this out, let’s first remove the commenting from our block. We will do this by using visual mode to select a block. Place the cursor on the first column of the first line of the comment block, then enter visual mode:
Ctrl-v
Then, move the cursor right one column and then down to the bottom of the block.
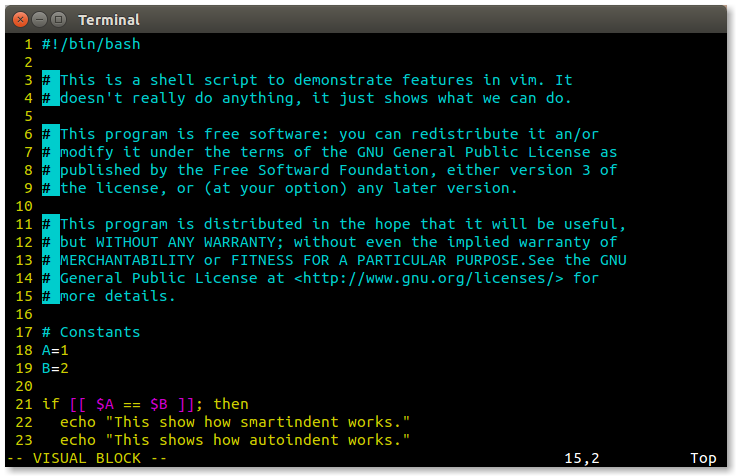 Visual block select
Next, type:
d
This will delete the contents of the selected area. Now our block is uncommented.
To comment the block again, move the cursor to the first character of the block and, using visual block selection, select the first 2 columns of the block.
 Column selection
Next, enter insert mode using Shift-i (command to insert at the beginning of the line), then type the # symbol followed by a space. Finally, press the Esc key twice. Vim will insert the # symbol and space into each line of the block.
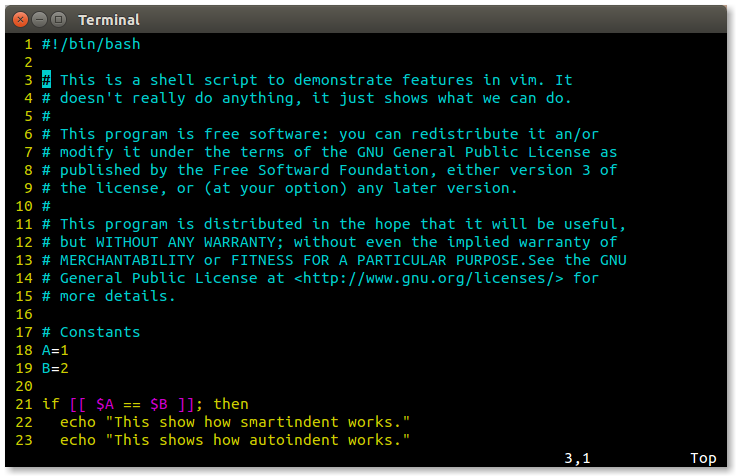 Completed block
Case Conversion
Sometimes, we need to change text from upper to lower case and vice versa. vim has the following case conversion commands:
~ Toggle the case of the current character
gU Convert text to upper case
gu Convert text to lower case
Both the gU and gu commands can be applied to text selected in visual mode or used in conjunction with either movement commands or text object selections. For example:
gUis Convert the current sentence to upper case
guf: Convert text from the cursor position to the next ':'
character on the current line
File Format Conversion
Once in a while, we are inflicted with a text file that was created on a DOS/Windows system. These files will contain an extra carriage return at the end of each line. Vim will indicate this after loading the file by displaying a “DOS” message at the bottom of the editing window. To correct this annoying condition, do the following:
:set fileformat=unix
:w
The file will be rewritten in the correct format.
Help topics: 'textwidth' gq 'fileformat' ~ gu gU
Macros
Text editing sometimes means we get stuck with a tedious repetitive editing task where we do the same set of operations over and over again. This is the bane of every computer user. Fortunately, vim provides us a way to record a sequence of operations we can later playback as needed. These recordings are called macros.
To create a macro, we begin recording by typing q followed by a single letter. The character typed after the q becomes the name of the macro. After we start recording, everything we type gets stored in the macro. To conclude recording, we type q again.
To demonstrate, let’s consider our comment block again. To create a macro that will remove a comment symbol from the beginning of the line, we would do this: move to the first line in the comment block and type the following command:
qa^xxjq
Let’s break down what this sequence does:
qa Start recording macro "a"
^ Move to the first non-whitespace character in the line
xx Delete the first two characters under the cursor
j Move down one line
q End recording
Now that we have removed the comment symbol from the first line and our cursor is on the second line, we can replay our macro by typing:
@a
The recorded sequence will be performed. To repeat the macro on succeeding lines, we can use the repeat last macro command which is:
@@
Or we could precede the macro invocation with a count as with other commands. For example, if we type:
5@a
the macro will be repeated 5 times.
We can undo the effect of the macro by repeatedly typing:
u
One nice thing about macros is that vim remembers them. Each time we exit vim, the current macro definitions are stored and ready for reuse the next time we start another editing session.
Help topics: q @
Registers
We are no doubt familiar with the idea of copying and pasting in text editors. With vim, we know y performs a yank (copy) of the selected text, while p and P each paste text at the current cursor location. The way vim does this involves the use of registers.
Registers are named areas of memory where vim stores text. We can think of them as a series of string variables. Vim uses one particular set to store text that we delete, but there are others that we can use to store text and restore it as we desire. It’s like having a multi-element clipboard.
To refer to a register, we type " followed by a lowercase letter or a digit (though these have a special use), for example:
"a
refers to the register named “a”. To place something in the register, we follow the register with an operation like “yank to end of the line”:
"ay$
To recall the contents of a register, we follow the name of the register with a paste operation like so:
"ap
Using registers enables us to place many chunks of text into our clipboard at the same time. But even without consciously trying to use registers, vim is using them while we perform deletes and yanks.
As we mentioned earlier, the registers named 0-9 have a special use. When we perform ordinary yanks and deletes, vim places our latest yank in register 0 and our last nine deletes in registers 1-9. As we continue to make deletions, vim moves the previous deletion to the next number, so register 1 will contain our most recent deletion and register 9 the oldest.
Knowing this allows us to overcome the problem of performing a yank and then a delete and losing the text we yanked (a common hazard when using vim). We can always recall the latest yank by referencing register 0.
To see the current contents of the registers we can use the command:
:reg
Help topics: " :registers
Insert Sub-Modes
While it’s not obvious, vim has a set of commands inside of insert mode. Most of these commands invoke some form of automatic completion to make our typing faster. They’re a little clumsy, but might be worth a try.
Automatically Complete Word Ctrl-n
Let’s go to the bottom of our script file and enter insert mode to add a new line at the bottom. We want the line to read:
afunction && echo "It worked."
We start to type the first few characters (“afun”) and press Ctrl-n. Vim should automatically complete the function name “afunction” after we press it. In those cases where vim presents us with more than one choice, use Ctrl-n and Ctrl-p to move up and down the list. Typing any another character, such as a space, to continue our typing will accept our selection and end the automatic completion. Ctrl-e can be use to exit the sub-mode immediately.
Insert Register Contents - Ctrl-r
Typing Ctrl-r followed by a single character register name will insert the contents of that register. Unlike doing an ordinary paste using p or P, a register insert honors text formatting and indentation settings such as textwidth and autoindent.
Automatically Complete Line - Ctrl-x Ctrl-l
Typing Ctrl-x while in insert mode launches a sub-mode of automatic completion features. A small menu will appear at the bottom of the display with a list of keys we can type to perform different completions.
If we have typed the first few letters of a line found in this or any other file that vim has open, typing Ctrl-x Ctrl-l will attempt to automatically complete the line, copying the line to the current location.
Automatically Complete Filename Ctrl-x Ctrl-f
This will perform filename completion. If we start the name of an existing path/file, we can type Ctrl-x Ctrl-f and vim will attempt to complete the name.
Dictionary Lookup - Ctrl-x Ctrl-k
If we define a dictionary (i.e., a sorted list of words), by adding this line to our configuration file:
setlocal dictionary=/usr/share/dict/words
which is the default dictionary on most Linux systems, we can begin typing a word, type Ctrl-x Ctrl-k, and vim will attempt to automatically complete the word using the dictionary. We will be presented with a list of words from which we can choose the desired entry.
Help topics: i_^n i_^p i_^x^l i_^x^r i_^x^f i_^x^k 'dictionary'
Mapping
Like many interactive command line programs, vim allows users to remap keys to customize vim’s behavior. It has a specific command for this, map, that allows a key to be assigned the function of another key or a sequence of keys. Further, vim allows us to say that a key is to be remapped only in a certain mode, for example only in normal mode but not in insert nor command modes.
Before we go on, we should point out that use of the map command is discouraged. It can create nasty side effects in some situations. Vim provides another set of mapping commands that are safer to use.
Earlier, we looked at the paragraph reformatting command sequence gqip, which means “format in paragraph.” To demonstrate a useful remapping, we will map the Q key to generate this sequence. We can do this by entering:
:nnoremap Q gqip
After executing this command, pressing the Q key in normal mode will cause the normal mode sequence gqip to be performed.
The nnoremap command is one of the noremap commands, the safe version of map command. The members of this family include:
noremap Map key regardless of mode
nnoremap Map normal mode key
inoremap Map insert mode key
cnoremap Map command mode key
Most of the time we will be remapping normal mode keys, so the nnoremap command will be the used most often. Here is another example:
:nnoremap S :split<Return>
This command maps the S key to enter command mode, type the split command and a carriage return. The “
:h key-notation
So how do we know which keys are available for remapping assignment? As vim uses almost every key for something, we have to make a judgment call as to what native functionality we are willing to give up to get the mapping we want. In the case of the Q key, which we used in our first example, it is normally used to invoke ex mode, a very rarely used feature. There are many such cases in vim; we just have to be selective. It is best to check the key first by doing something like:
:h Q
to see how a key is being used before we apply our own mapping.
To make mappings permanent, we can add these mapping commands to our .vimrc file:
nnoremap Q gqip
nnoremap S :split<Return>
Help topics: :map key-notation
Snippets
Mapping is not restricted to single characters. We can use sequences too. This is often helpful when we want to create a number of easily remembered, related commands of our own design. Take for example, inserting boilerplate text into a document. If we had a collection of these snippets, we might want to uniquely name them but have a common structure to the name for easily recollection.
We added the GPL notice to the comment block at the beginning of our script. As this is rather tedious to type, and we might to use it again, it makes a good candidate for being a snippet.
To do this, we’ll first go out to the shell and create a directory to store our snippet text files. It doesn’t matter where we put the snippet files, but in the interest of keeping all the vim stuff together, we’ll put them with our other vim-related files.
:sh
[me@linuxbox ~]$ mkdir ~/.vim/snippets
[me@linuxbox ~]$ exit
Next, we’ll copy the license by highlighting the text in visual mode and yanking it. To create the snippet file, we’ll open a new buffer:
:e ~/.vim/snippets/gpl.sh
Thus creating a new file called gpl.sh. Finally, we’ll paste the copied text into our new file and save it:
p
:w
Now that we have our snippet file in place, we are ready to define our mapping:
:nnoremap ,GPL :r ~/.vim/snippets/gpl.sh<Return>
We map “,GPL” to a command that will cause vim to read the snippet file into the current buffer. The leading comma is used as a leader character. The comma is a rarely used command that is usually safe to remap. Using a leader character will reduce the number of actual vim commands we have to remap if we create a lot of snippets.
As we add mappings, it’s useful to know what they all are. To display a list of mappings, we use the :map command followed by no arguments:
:map
Once we are satisfied with our remapping, we can add it to one of our vim configuration files. If we want it to be global (that is, it applies to all types of files), we could put it in our .vimrc file like this:
nnoremap ,GPL :r ~/.vim/snippets/gpl.sh<Return>
If, on the other hand, we want it to be specific to a particular file type, we would put it in the appropriate file such as ~/.vim/ftplugin/sh.vim like this:
nnoremap <buffer> ,GPL :r ~/.vim/snippets/gpl.sh<Return>
In this case, we add the special argument
Help topics: :map <buffer>
Finishing Our Script
With all that we have learned so far, it should be pretty easy to go ahead and finish our script:
#! /bin/bash
# ---------------------------------------------------------------
# This is a shell script to demonstrate features in vim. It
# doesn't really do anything, it just shows what we can do.
#
# This program is free software: you can redistribute it an/or
# modify it under the terms of the GNU General Public License as
# published by the Free Software Foundation, either version 3 of
# the license, or (at your option) any later version.
#
# This program is distributed in the hope that it will be useful,
# but WITHOUT ANY WARRANTY; without even the implied warranty of
# MERCHANTABILITY or FITNESS FOR A PARTICULAR PURPOSE.See the GNU
# General Public License at <http://www.gnu.org/licenses/> for
# more details.
# ---------------------------------------------------------------
# ---------------------------------------------------------------
# Constants
# ---------------------------------------------------------------
A=1
B=2
# ---------------------------------------------------------------
# Functions
# ---------------------------------------------------------------
afunction() {
cmd1
cmd2
}
# ---------------------------------------------------------------
# Main Logic
# ---------------------------------------------------------------
if [[ $A == $B ]]; then
echo "This shows how smartindent works."
echo "This shows how autoindent works."
echo "A and B match."
else
echo "A and B do not match."
fi
if [[ -e file ]]; then
cmd1
cmd2
fi
Using External Commands
Vim is able to execute external commands and add the result to the current buffer or to filter a text selection using an external command.
Loading Output From a Command Into the Buffer
Let’s edit an old friend. If we don’t have a copy to edit, we can make one. First we’ll open a buffer:
:e dir-list.txt
Next, we’ll load the buffer with some appropriate text:
:r ! ls -l /usr/bin
This will read the results of the specified external command into our buffer.
Running an External Command on the Current File
Let’s save our file and then run an external command on it:
:w
:! wc -l %
Here we tell vim to execute the wc command on the current file dir-list.txt. This does not affect the current buffer, just the file when we specify it with the % symbol.
Using an External Command to Filter the Current Buffer
Let’s apply a filter to the text. To do this, we need to select some text. The easiest way to do this is with visual mode:
ggVG
This will move the cursor to the beginning of the file and enter visual mode then move to the end of the file, thus selecting the entire buffer.
We’ll filter the selection to remove everything except lines containing the string “zip”. When we start entering a command after performing a visual selection, the presence of the selection will be indicated this way:
:'<,'>
This actually signifies a range. We could just as easily specify a pair of line numbers such as 1, 100 instead. To complete our command, we add our filter:
:'<,'> ! grep zip
We are not limited to a single command. We can also specify pipelines, for example:
:'<,'> ! grep zip | sort
After running this command, our buffer contains a small selection of files, each containing the letters “zip” in the name.
Help topics: : ! filter
File System Management and Navigation
We know that we can load files into vim by specifying them on the command line when we initially invoke vim, and that we can load files from within vim with the :edit and :read commands. But vim also provides more advanced ways of working with the file system.
netrw
When we load the filetype plugin (as we have set up our .vimrc file to do), vim also loads another plugin called netrw. This plugin can, as its name suggests, read and write files from the local file system and from remote systems over the network. In this adventure, we’re going concern ourselves with using netrw as a local file browser.
To start the browser in the current window, we use the :Ex (short for :Explore) command. To start the browser in a split window, we use the amusingly named :Sex (short for :Sexplore) command. The browser looks like this:
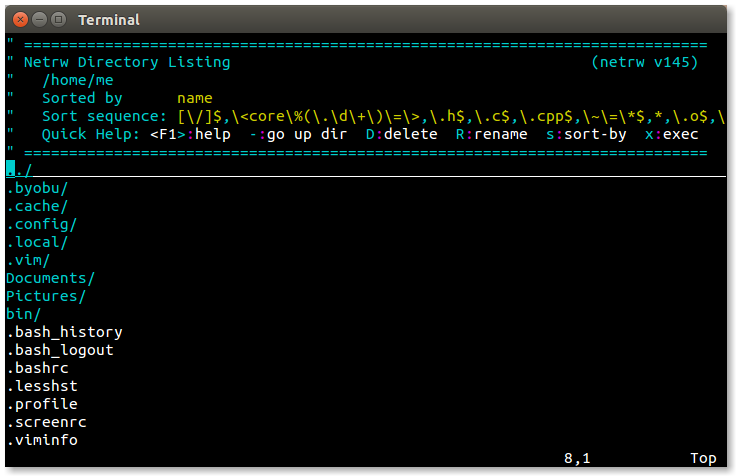 File browser
At the top, we have the banner which provides some clues to the browser’s operation, followed by a vertical list of directories and files. We can toggle the banner on and off with Shift-i and cycle through available listing views by pressing the i key. The sort order (name, time, size) may be changed with s key.
Using the browser is easy. To select a file or directory, we can use the up and down arrows (or Ctrl-p and Ctrl-n) to move the cursor. Pressing Enter will open the selected file or directory.
:find
The :find command loads a file by searching a path variable maintained by vim. With :find we can specify a partial file name, and vim will attempt to locate the file and automatically complete the name when Tab key is pressed.
The action of the :find command can be enhanced if the characters “**” are appended to the end of the path. The best way to do this is:
:set path+=**
Adding this to the path allows :find to search directories recursively. For example, we could change the current working directory to the top of a project’s source file tree and use :find to load any file in the entire tree.
wildmenu
Another cool enhancement we can apply is the wildmenu. This is a highlighted bar that will appear above the command line when we are entering file names. The word “wild” in the name refers to use of the “wild” key, by default the Tab key. When the wild key is pressed, automatic completion is attempted with the list of possible matches displayed in the wildmenu. Using the left and right arrow keys (or Ctrl-p and Ctrl-n) allows us to choose one of the displayed items.
 The wildmenu
We can turn on the wildmenu with this command:
:set wildmenu
Opening Files Named in a Document
If the document we are editing contains a file name, we can open that file by placing the cursor on the file name and typing either of these commands:
gf Open file name under cursor
^w^f Open file name under cursor in new window
Help topics: netrw :find 'path' 'wildmenu' gf ^w^f
One Does Not Live by Code Alone
While vim is most often associated with writing code of all sorts, it’s good at writing ordinary prose as well. Need proof? All of the adventures were written using vim running on a Raspberry Pi!
We can configure vim to work well with text by creating a file for the text file type in the ~/.vim/ftplugin directory:
"### ~/.vim/ftplugin/text.vim
setlocal textwidth=75
setlocal tabstop=4
setlocal shiftwidth=4
setlocal expandtab
This configuration will automatically wrap lines at word boundaries once the line length exceeds 75 characters, and will set tabs to 4 spaces wide. Remember that when textwidth is non-zero, vim will automatically constrain line length, and we can use the gqip command to reformat paragraphs to the specified width.
Spell Checking
When we write text, it’s handy to perform spell checking while we type. Fortunately, vim can do this, too. If we add the following lines to our text.vim file, vim will help fix those pesky spelling mistakes:
setlocal spelllang=en_us
setlocal dictionary=/usr/share/dict/words
setlocal spell
The first line defines the language for spell checking, in this case US English. Next, we specify the dictionary file to use. Most Linux distributions include this list of words, but other dictionary files can be used. The final line turns on the spell checker. When active, the spell checker highlights misspelled words (that is, any word not found in the dictionary) as we type.
 Highlighted misspellings
Correcting misspelled words is pretty easy. Vim provides the following commands:
]s Next misspelled word
[s Previous misspelled word
z= Display suggested corrections
zg Add word to personal dictionary
To correct a misspelling, we place the cursor on the highlighted word and type:
z=
Vim will display a list of suggested corrections and we choose from the list. It is also possible to maintain a personal dictionary of words not found in the main dictionary, for example specialized technical terms. Vim creates the personal dictionary automatically (in ~/.vim/spell) and words are added to it when we place the cursor on the highlighted word and type:
zg
Once the word is added to our personal dictionary it will no longer be marked as misspelled by the spelling checker.
 Suggested corrections
Help topics: 'spelllang' 'spell'
More .vimrc Tricks
Before we go, there are a few more features we can add to our .vimrc file to juice things up a bit. The first one:
set laststatus=2
This will cause vim to display a status bar near the bottom of the display. It will normally appear when more than one window is open (lastatatus=1), but changing this value to 2 causes it to always be displayed regardless of the number of windows. Next, we have:
set ruler
will display the cursor position (row, column, relative %) in the window status bar. Handy for knowing where we are within a file.
Finally, we’ll add mouse support (not that we should ever use a mouse ;-):
if has('mouse')
set mouse=a
endif
This will activate mouse support if vim detects a mouse. Mouse support allows us to position the cursor, switching windows if needed. It works in visual mode too.
Help topics: 'laststatus' 'ruler' 'mouse'
Summing Up
We can sometimes think of vim as being a metaphor for the command line itself. Both are arcane, vast, and capable of many amazing feats. Despite its ancient ancestry, vim remains a vital and popular tool for developers and administrators.
Here are the final versions of our 3 configuration files:
"### ~/.vimrc
set nocompatible
filetype plugin on
nnoremap Q gqip
nnoremap S :split<Return>
set path+=**
set wildmenu
set spelllang=en_us
if has('mouse')
set mouse=a
endif
set laststatus=2
set ruler
"### ~/.vim/ftplugin/sh.vim
setlocal number
colorscheme desert
syntax off
setlocal tabstop=2
setlocal shiftwidth=2
setlocal expandtab
setlocal softtabstop=2
setlocal autoindent
setlocal smartindent
"### ~/.vim/ftplugin/text.vim
colorscheme desert
setlocal textwidth=75
setlocal tabstop=4
setlocal shiftwidth=4
setlocal expandtab
setlocal complete=.,w,b,u,t,i
setlocal dictionary=/usr/share/dict/words
setlocal spell
We covered a lot of ground in this adventure and it will take some time for it to all sink in. The best advice was given back in TLCL. The only way to become a vim master is to “practice, practice, practice!”
Further Reading
Vim has a large and enthusiastic user community. As a result, there are many online help and training resources. Here are some that I found useful during my research for this adventure.
- The eternal struggle between tabs and spaces in indentation: https://www.jwz.org/doc/tabs-vs-spaces.html
- List of key notations used when remapping keys: http://vimdoc.sourceforge.net/htmldoc/intro.html#key-notation
- A concise tutorial on vim registers: https://www.brianstorti.com/vim-registers/
- Learn Vimscript the Hard Way is a detailed tutorial of the vim scripting language useful for customizing vim and even writing your own plugins: https://learnvimscriptthehardway.stevelosh.com
- From the same source, a discussion of the leader key: https://learnvimscriptthehardway.stevelosh.com/chapters/06.html
- Using external commands and the shell while inside vim: https://www.linux.com/training-tutorials/vim-tips-working-external-commands
- Vim: you don’t need NERDtree or (maybe) netrw https://shapeshed.com/vim-netrw/#removing-the-banner
- A tutorial on using the vim spell checker: https://www.linux.com/training-tutorials/using-spell-checking-vim/
Videos
There are also a lot of video tutorials for vim. Here are a few:
- How to Do 90% of What Plugins Do (With Just Vim): https://youtu.be/XA2WjJbmmoM
- Let Vim do the Typing: https://youtu.be/3TX3kV3TICU
- Damian Conway, “More Instantly Better Vim” - OSCON 2013: https://youtu.be/aHm36-na4-4
- vim + tmux - OMG!Code: https://youtu.be/5r6yzFEXajQ
5.11 - source
source
https://linuxcommand.org/lc3_adv_source.php
Most programming languages permit programmers to specify external files to be included within their programs. This is often used to add “boilerplate” code to programs for such things as defining standard constants and referencing external library function definitions.
Bash (along with ksh and zsh) has a builtin command, source, that implements this feature. We looked at source briefly when we worked with the .profile and .bashrc files used to establish the shell environment.
In this adventure, we will look at source again and discover the ways it can make our scripts more powerful and easier to maintain.
To recap, source reads a specified file and executes the commands within it using the current shell. It works both with the interactive command line and within a script. Using the command line for example, we can reload the .bashrc file by executing the following command:
me@linuxbox: ~$ source ~/.bashrc
Note that the source command can be abbreviated by a single dot character like so:
me@linuxbox: ~$ . ~/.bashrc
When source is used on the command line, the commands in the file are treated as if they are being typed directly at the keyboard. In a shell script, the commands are treated as though they are part of the script.
Configuration Files
During our exploration of the Linux ecosystem, we have seen that many programs rely on configuration files. Most of these are simple text files just like our bash shell scripts. By using source, we can easily create configuration files for our shell scripts as well.
Consider this example. Let’s imagine that we have several computers on our network that need to get backed up on a regular basis and that a central backup server is used to store the files from these various systems. On each of the backup client systems we have a script called back_me_up that copies the files over the network. Let’s further imagine that each client system needs to back up a different set directories.
To implement this, we might define a constant in the back_me_up script like this:
BACKUP_DIRS="/etc /usr/local /home"
However, doing it this way will require that we maintain a separate version of the script for each client. This will make maintaining the script much more laborious, as any future improvement to the script will have to be applied to each copy of the script individually. What’s more, this list of directories might be useful to other programs, too. For example, we could have a file restoration script called restore_me that restores files from the backup server to the backup client system. If this were the case, we would then have twice as many scripts to maintain. A much better way handle this issue would be to create a configuration file to define the BACKUP_DIR constant and source it into our scripts at run time.
Here’s how we could do it.
First, we will create a configuration file named back_me_up.cfg and place it somewhere sensible. Since the back_me_up and restore_me scripts are used on a system-wide basis (as would most backup programs), we will treat them like locally installed system resources. Thus, we would put them in the /usr/local/sbin directory and the configuration file in /usr/local/etc. The configuration file would contain the following:
# Configuration file for the back_me_up program
BACKUP_DIRS="/etc /usr/local /home"
While our configuration file must contain valid shell syntax, since its contents are executed by the shell, it differs from a real shell script in two regards. First, it does not require a shebang to indicate which shell executes it, and second, the file does not need executable permissions. It only needs to be readable by the shell.
Next, we would add the following code to the back_me_up and restore_me scripts to source our configuration file:
CONFIG_FILE=/usr/local/etc/back_me_up.cfg
if [[ -r "$CONFIG_FILE" ]]; then
source "$CONFIG_FILE"
else
echo "Cannot read configuration file!" >&2
exit 1
fi
Function Libraries
In addition to the configuration shared by both the back_me_up and restore_me scripts, there could be code shared between the two programs. For example, it makes sense to have a shared function to display error messages:
# ---------------------------------------------------------------------------
# Send message to std error
# Options: none
# Arguments: 1 error_message
# Notes: Use this function to report errors to standard error. Does
# not generate an error status.
# ---------------------------------------------------------------------------
error_msg() {
printf "%s\n" "$1" >&2
}
How about a function that detects if the backup server is available on the network:
# ---------------------------------------------------------------------------
# Detect if the specified host is available
# Options: none
# Arguments: 1 hostname
# Notes:
# ---------------------------------------------------------------------------
ping_host() {
local MSG="Usage: ${FUNCNAME[0]} host"
local MSG2="${FUNCNAME[0]}: host $1 unreachable"
[[ $# -eq 1 ]] || { error_msg "$MSG" ;return 1; }
ping -c1 "$1" &> /dev/null || { error_msg "$MSG2"; return 1; }
return 0
}
Another function both scripts could use checks that external programs we need for the scripts to run (like rsync) are actually installed:
# ---------------------------------------------------------------------------
# Check if function/application is installed
# Options: none
# Arguments: application...
# Notes: Exit status equals the number of missing functions/apps.
# ---------------------------------------------------------------------------
app_avail() {
local MSG1="Usage: ${FUNCNAME[0]} app..."
local MSG2
local exit_status=0
[[ $# -gt 0 ]] || { error_msg "$MSG1"; return 1; }
while [[ -n "$1" ]]; do
MSG2="Required program '$1' not available - please install"
type -t "$1" > /dev/null || \
{ error_msg "$MSG2"; exit_status=$((exit_status + 1)); }
shift
done
return "$exit_status"
}
To share these functions between the back_me_up and restore_me scripts, we could build a library of functions and source that library. As an example, we could put all the common code in a file called /usr/local/lib/bmulib.sh and add the following code to both scripts to source that file:
FUNCLIB=/usr/local/lib/bmulib.sh
if [[ -r "$FUNCLIB" ]]; then
source "$FUNCLIB"
else
echo "Cannot read function library!" >&2
exit 1
fi
General Purpose Libraries
Since we hope to become prolific script writers, it makes sense over time, to build a library of common code that our future scripts could potentially use. When undertaking such a project, it’s wise to write high quality functions for the library, as the code may get heavy use. It’s important to test carefully, include a lot of error handling, and fully document the functions. After all, the goal here is to save time writing good scripts, so invest the time up front to save time later.
Let’s Not Forget .bashrc
source can be a powerful tool for coordinating the configuration of small sets of machines. For large sets, there are more powerful tools, but source works fine if the job is not too big.
We’ve worked with the .bashrc file before and added things like aliases and a few shell functions. However, when we work with multiple systems (for example, a small network), it might be a good idea to create a common configuration file to align all of the systems. To demonstrate, let’s create a file called .mynetworkrc.sh and place all of the common aliases and shell function we would expect on every machine. To use this file, we would add this one line of code to .bashrc:
[[ -r ~/.mynetworkrc.sh ]] && source ~./.mynetworkrc.sh
The advantage of doing it this way is that we won’t have to cut and paste large sections of code every time we configure a new machine or perform an operating system upgrade. We just copy the .mynetwrokrc.sh file to the new machine and add one line to .bashrc.
We can even go further and create a host-specific configuration file that the .mynetworkrc.sh file will source. This would be handy if we need to override something in .mynetworkrc.sh on a particular host. We can do this by creating a configuration file with a file name based on the system’s host name. For example, if our system’s host name is linuxbox1 we could create a configuration file named .linuxbox1rc.sh and add this line of code to the .mynetworkrc.sh file:
[[ -r ~/.$(hostname)rc.sh ]] && source ~/.$(hostname)rc.sh
By using the hostname command we are able to build a file name that is specific to a particular host.
So, what could we put in our .mynetworkrc.sh file? Here are some ideas:
### Aliases ###
# Reload the .mynetworkrc.sh file. Handy after editing.
alias reload='source ~/.mynetworkrc.sh'
# Get a root shell
alias root='sudo -i'
# Print the size of a terminal window in rows and columns
alias term_size='echo "Rows=$(tput lines) Cols=$(tput cols)"'
### Functions ###
# Check to see if a specified host is alive on the network
ping_host() {
local target
if [[ -z "$1" ]]; then
echo "Usage: ping_host host" >&2
return 1
fi
target="$1"
ping -c1 "$target" &> /dev/null || \
{ echo "Host '$target' unreachable." >&2; return 1; }
return 0
}
# Display a summary of system health
status() {
{ # Display system uptime
echo -e "\nuptime:"
uptime
# Display disk resources skipping snap's pseudo disks
echo -e "\ndisk space:"
df -h 2> /dev/null | grep -v snap
echo -e "\ninodes:"
df -i 2> /dev/null | grep -v snap
echo -e "\nblock devices:"
/bin/lsblk | grep -v snap
# Display memory resources
echo -e "\nmemory:"
free -m
# Display latest log file entries
if [[ -r /var/log/syslog ]]; then # Ubuntu
echo -e "\nsyslog:"
tail /var/log/syslog
fi
if [[ -r /var/log/messages ]]; then # Debian, et al.
echo -e "\nmessages:"
tail /var/log/messages
fi
if [[ -r /var/log/journal ]]; then # Arch, others using systemd
echo -e "\njournal:"
journalctl | tail
fi
} | less
}
# Install a package from a distro repository
# Supports Ubuntu, Debian, Fedora, CentOS
install() {
if [[ -z "$1" ]]; then
echo "Usage: install package..." >&2
return 1
elif [[ "$1" == "-h" || "$1" == "--help" ]]; then
echo "Usage: install package..."
return
elif [[ -x /usr/bin/apt ]]; then
sudo apt update && sudo apt install "$@"
return
elif [[ -x /usr/bin/apt-get ]]; then
sudo apt-get update && sudo apt-get install "$@"
return
elif [[ -x /usr/bin/yum ]]; then
sudo yum install -y "$@"
fi
}
# Perform a system update
# Supports Debian, Ubuntu, Fedora, CentOS, Arch
update() {
if [[ -x /usr/bin/apt ]]; then # Debian, et al
sudo apt update && sudo apt upgrade
return
elif [[ -x /usr/bin/apt-get ]]; then # Old Debian, et al
sudo apt-get update && sudo apt-get upgrade
return
elif [[ -x /usr/bin/yum ]]; then # CentOS/Fedora
# su -c "yum update"
sudo yum update
return
elif [[ -x /usr/bin/pacman ]]; then # Arch
sudo pacman -Syu
fi
}
# Display distro release info (prints OS name and version)
version() {
local s
for s in os-release \
lsb-release \
debian_version \
centos-release \
fedora-release; do
[[ -r "/etc/$s" ]] && cat "/etc/$s"
done
}
Ever Wonder Why it’s Called .bashrc?
In our various wanderings around the Linux file system, we have encountered files with names that end with the mysterious suffix “rc” like .bashrc, .vimrc, etc. Heck, many distributions have a bunch of directories in /etc named rc. Why is that? It’s a holdover from ancient Unix. Its original meaning was “run commands,” but it later became “run-control.” A run-control file is generally some kind of script or configuration file that prepares an environment for a program to use. In the case of .bashrc for example, it’s a script that prepares a user’s bash shell environment.
Security Considerations and Other Subtleties
Even though sourced files are not directly executable, they do contain code that will be executed by anything that sources them. It is important, therefore, that permissions be set to allow writing only by their owners.
me@linuxbox:~$ sudo chmod 644 /usr/local/etc/back_me_up.cfg
If a sourced file contains confidential information (as a backup program might), set the permissions to 600.
While bash, ksh, and zsh all have the source builtin, dash and all other strictly POSIX compatible shells support only the single dot (.).
If the file name argument given to source does not contain a / character, the directories listed in the PATH variable are searched for the specified file. For security reasons, it’s probably not a good idea to rely on this. Always specify a explicit path name.
Another subtlety has to do with positional parameters. As source executes its commands in the current shell environment, this includes the positional parameters a script was given as well. This is fine in most cases; however, if source is used within a shell function and that shell function has its own positional parameters, source will ignore them and use the shell’s environment instead. To overcome this, positional parameters may be specified after the file name. Consider the following script:
#!/bin/bash
# foo_script
source ~/foo.sh
foo() {
source ~/foo.sh
}
foo "string2"
foo.sh contains this one line of code:
echo $1
We expect to see the following output:
me@linuxbox: ~$ foo_script string1
string1
string2
But, what we actually get is this:
me@linuxbox: ~$ foo_script string1
string1
string1
This is because source uses the shell environment the script was given, not the one that exists when the function called. To correct this, we need to write our script this way:
#!/bin/bash
# foo_script
source ~/foo.sh
foo() {
source ~/foo.sh "$1"
}
foo "string2"
By adding the desired parameter to the source command within the function foo, we are able to get the desired behavior. Yes, it’s subtle.
Summing Up
By using source, we can greatly reduce the effort needed to maintain our bash scripts particularly when we are deploying them across multiple machines. It also allows us to effectively reuse code with function libraries that all of our scripts can share. Finally, we can use source to build much more capable shell environments for our day to day command line use.
Further Reading
- A Wikipedia article on the dot command from which the
sourcebuiltin is derived: https://en.wikipedia.org/wiki/Dot_(command) - Another article about run-commands: https://en.wikipedia.org/wiki/Run_commands
5.12 - Coding Standards Part 1: Our Own
Coding Standards Part 1: Our Own
Most computer programming is done by organizations and teams. Some programs are developed by lone individuals within a team and others by collaborative groups. In order to promote program quality, many organizations develop formal programming guidelines called coding standards that define specific technical and stylistic coding practices to help ensure code quality and consistency.
In this adventure, we’re going to develop our own shell script coding standard to be known henceforth as the LinuxCommand Bash Script Coding Style Guide. The Source adventure is a suggested prerequisite for this adventure.
Roaming around the Internet, we can find lots of articles about “proper” shell script standards and practices. Some are listed in the “Further Reading” section at the end of this adventure. While the scripts presented in TLCL do not follow any particular standard (instead, they present common practice from different historical perspectives), their design promotes several important ideas:
- Write cleanly and simply. Look for the simplest and most easily understood solutions to problems.
- Use modern idioms, but be aware of the old ones. It’s important that scripts fit within common practice so that experienced people can easily understand them.
- Be careful and defensive. Follow Murphy’s Law: anything that can go wrong eventually will.
- Document your work.
- There are lots of ways to do things, but some ways are better than others.
Coding standards generally support the same goals, but with more specificity.
In reviewing the Internet’s take on shell scripting standards, one might notice a certain undercurrent of hostility towards using the shell as a programming medium at all. Why is this?
Most programmers don’t learn the shell at the beginning of their programming careers; instead, they learn it (haphazardly) after they have learned one or more traditional programming languages. Compared to most programming languages, the shell is an odd beast that seems, to many, a chaotic mess. This is largely due to the shell’s unique role as both a command line interpreter and a scripting language.
As with all programming languages, the shell has its particular strengths and weaknesses. The shell is good at solving certain kinds of problems, and not so good at others. Like all good artists, we need to understand the bounds of our medium.
What the Shell is Good At
- The shell is a powerful glue for connecting thousands of command line programs together into solutions to a variety of data processing and system administration problems.
- The shell is adept at batch processing. In the early days of computing, programs were not interactive; that is, they started, they carried out their tasks, and they ended. This style of programming dominated computing until the early 1960s when disk storage and virtual memory made timesharing and interactive programs possible. Those of us who remember MS-DOS will recall that it had a limp substitute for shell scripts called batch files.
What the Shell is Not So Good At
- The shell does not excel with programs requiring a lot of user interaction. Yes, the shell does have the
readcommand and we could usedialog, but let’s face it, the shell is not very good at this. - The shell is not suitable for implementing algorithms requiring complex data structures. While the shell does have integers, strings, and one dimensional arrays (which can be associative), it doesn’t support anything beyond that. For example, it doesn’t have structures, enumerated or Boolean types, or even floating point numbers.
A Coding Standard of Our Own
Keeping the points above in mind, let’s make our own shell script coding standard. It will be an amalgam of various published standards, along with a dash of the author’s own humble wisdom on the subject. As the name implies, the LinuxCommand Bash Script Coding Style Guide coding standard will be very bash specific and as such, it will use some features that are not found in strictly POSIX complaint shells.
Script Naming, Location, and Permissions
Like other executables, shell script file names should not include an extension. Shared libraries of shell code which are not standalone executables should have the extension .sh if the code is portable across multiple shells (for example bash and zsh) or .bash if the code is bash-specific.
For ease of execution, scripts should be placed in a directory listed in the user’s PATH. The ~/bin directory is a good location for personal scripts as most Linux distributions support this out of the box. Scripts intended for use by all users should be located in the /usr/local/bin directory. System administration scripts (ones intended for the superuser) should be placed in /usr/local/sbin. Shared code can be located in any subdirectory of the user’s home directory. Shared code intended for use system wide should be placed in /usr/local/lib unless the shared code specifies only configuration settings, in which case it should be located in /usr/local/etc.
Executable code must be both readable and executable to be used, thus the permission setting for shell scripts should be 755, 750 or 700 depending on security requirements. Shared code need only be readable, thus the permissions for shared code should be 644, 640, or 600.
Structure
A shell script is divided into five sections. They are:
- The shebang
- The comment block
- Constants
- Functions
- Program body
The Shebang
The first line of a script should be a shebang in either of the following forms:
#!/bin/bash
Or
#!/usr/bin/env bash
The second form is used in cases where the script is intended for use on a non-Linux system (such as macOS). The env command will search the user’s PATH for a bash executable and launch the first instance it finds. Of the two forms, the first is preferred, as its results are less ambiguous.
The Comment Block
The first bit of documentation to appear in the script is the comment block. This set of comments should include the name of the script and its author, any necessary copyright and licensing information, a brief description of the script’s purpose, and its command line options and arguments.
It is also useful to include version information and a revision history. Here is an example of a fully populated comment block. The exact visual style of the block is undefined and is left to the programmer’s discretion.
# ---------------------------------------------------------------------------
# new_script - Bash shell script template generator
# Copyright 2012-2021, William Shotts <bshotts@users.sourceforge.net>
# This program is free software: you can redistribute it and/or modify
# it under the terms of the GNU General Public License as published by
# the Free Software Foundation, either version 3 of the License, or
# (at your option) any later version.
# This program is distributed in the hope that it will be useful,
# but WITHOUT ANY WARRANTY; without even the implied warranty of
# MERCHANTABILITY or FITNESS FOR A PARTICULAR PURPOSE. See the
# GNU General Public License at <http://www.gnu.org/licenses/> for
# more details.
# Usage: new_script [[-h|--help]
# new_script [-q|--quiet] [-s|--root] [script]]
# Revision history:
# 2021-04-02 Updated to new coding standard (3.5)
# 2019-05-09 Added support for shell scripting libraries (3.4)
# 2015-09-14 Minor cleanups suggested by Shellcheck (3.3)
# 2014-01-21 Minor formatting corrections (3.2)
# 2014-01-12 Various cleanups (3.1)
# 2012-05-14 Created
# ---------------------------------------------------------------------------
Constants
After the comment block, we define the constants used by the script. As we recall, constants are variables that have a fixed value. They are used to define values that are used in various locations in the script. Constants simplify script maintenance by eliminating hard coded values scattered throughout the code. By placing this section at the top, changes to the script can be made more easily.
There are two constants that every script should include. First, a constant that contains the name of the program, for example:
PROGNAME=${0##*/}
This value is useful for such things as help and error messages. In the example above, the name of the program is calculated from the first word on the command line that invoked the script ($0) with any leading path name stripped off. By calculating it this way, if the name of the script file ever changes, the constant will automatically contain the new name.
The second constant that should be included contains the script’s version number. Like the PROGNAME constant, this value is useful in help and error messages.
VERSION="3.5"
Constants should also be defined for numerical values such as maximum or minimum limits used in calculations, as well as for the names of files or directories used by, or acted upon, by the script.
Functions
Function definitions should appear next in the script. They should follow an order that indicates their hierarchy; that is, functions should be ordered so they are defined before they are called. For example, if funct_b calls funct_a, function funct_a should be defined ahead of func_b.
Functions should have the following form:
func_b {
local v1="$1"
local v2="$2"
command1
command2
return
}
Positional parameters passed to a function should be assigned to local variables with descriptive names to clarify how the parameters are used. Unless there is a good reason, all functions should end with a return statement with an exit status as required.
Each function defined in a code library should be preceded by a short comment block that lists the function’s name, purpose, and positional parameters.
Program Body
The final section of a script is the program body, where we get to do what we came here to do. In this section we handle such things as positional parameter processing, acquisition and validation of required input, processing, and output.
A common practice is to write the program body as a very simple abstraction of the program, so that the basic program flow is easy to understand and most of the fussy bits are placed in functions defined above the program body.
The end of the program body should include some means of housekeeping, to do such things as removing temporary files. All scripts should return a useful exit status.
Formatting and Visual Style
Good visual layout makes scripts easier to read and understand. It’s important to make formatting consistent so it creates a reliable visual language for the code.
Line Length
In order to improve readability and to display properly in small terminal windows, line length should be limited to 80 characters. Line continuation characters should be used to break long lines, with each subsequent line indented one level from the first. For example:
printf "A really long string follows here: %s\n" \
"Some really, really, really long string."
Indentation
Indention should be done with spaces and never with tab characters. Most text editors can be set to use spaces for tabbing. In order for the maximum number of characters to be included on each line, each level of indentation should be 2 spaces.
Constant, Variable and Function Names
Constant names should be written in all caps. Variable and function names should be written in all lowercase. When a constant or variable name consists of multiple words, underscore characters should be used as the separator. Camel case (“camelCase”) should be avoided as it makes people think we’re one of those snooty Java programmers just learning to write shell scripts ;-)
Long Command Option Names
When using less common commands with multiple options (or more common commands with less common options), it is sometimes best to use the long form option names and split the option list across multiple lines.
# Use long option names to improve readability
rsync \
--archive \
--delete-excluded \
--rsh=ssh \
--one-file-system \
--relative \
--include-from="$INCLUDE_FILE" \
--exclude-from="$EXCLUDE_FILE" \
"$SOURCE" "$DESTINATION"
Pipelines
Pipelines should be formatted for maximum clarity. If a pipeline will fit on one line cleanly, it should be written that way. Otherwise, pipelines should be broken into multiple lines with one pipeline element per line.
# Short pipeline on one line
command1 | command2
# Long pipeline on multiple lines
command1 \
| command2 \
| command3 \
| command4
Compound Commands
Here are the recommended formatting styles for compound commands;
# 'then' should appear on the same line as 'if'
if [[ -r ~/.bashrc ]]; then
echo ".bashrc is readable."
else
echo ".bashrc is not readable." >&2
exit 1
fi
# Likewise, 'do' should appear on the same line as
# the 'while', 'until', and 'for' commands
while [[ -z "$str" ]]; do
command1
command2
done
for i in 1 2 3 4 5; do
command1
command2
done
# In a case statement, simple one-line commands can be
# formatted this way:
case s in
1|one)
command1 ;;
2|two)
command2 ;;
3|three)
command3 ;;
*)
command4 ;;
esac
# Multiple commands should be formatted this way
case s in
1|one)
command1
command2
;;
2|two)
command3
command4
;;
3|three)
command5
command6
;;
*)
command7
;;
esac
# Logical compound commands using && and ||
command1 && short_command
command2 \
|| long_command "$param1" "$param2" "$param3"
Coding Practices
In order to achieve our goal of writing robust, easily maintained scripts, our coding standard recommends the following coding practices.
Commenting
Good code commenting is vital for script maintenance. The purpose of commenting to is to explain vital facts about a program. If a script is to have any durability, we must anticipate that someone (even if it’s just the author) will revisit the script at a later date and will need a refresher on how the script works. Do not comment code that is obvious and easily understood; rather, explain the difficult to understand parts. Rule of thumb: the more time a chunk of code takes to design and write, the more commenting it will likely need to explain it.
Function libraries are a special case. Each function in a library should be preceded by a comment block that documents its purpose and its positional parameters.
A common type of comment points to where future additions and changes are needed. These are called “todo” comments and are typically written like this:
# TODO Fix this routine so it can do this better
These comments begin with the string TODO so they can be found easily using a text editor’s search feature.
Shell Builtins vs. External Programs
Where possible, use bash builtins rather than external commands. For example, the basename and dirname programs can be replaced by parameter expansions to strip leading or trailing strings from pathnames. Compared to external programs, shell builtins use fewer resources and execute much faster.
Variable Expansion and Quoting
Double quotes must be used to manage word splitting during parameter expansion. This is particularly important when working with filenames. Assume that every variable, parameter expansion, and command substitution may contain embedded spaces, newlines, etc. There are situations where quoting is not needed (for example, within [[ ... ]]) but we use double quotes anyway, because it doesn’t hurt anything and it’s easier to always quote variables than remembering all the special cases where it is not required.
a="$var"
b="$1"
c="$(command1)"
command2 "$file1" "$file2"
[[ -z "$str" ]] || exit 1
Contrary to some other coding standards, brace delimiting variables is required only when needed to prevent ambiguity during expansion:
a="Compat"
port="bably condit"
echo "${a}bility is pro${port}ional to desire."
Pathname Expansion and Wildcards
Since pathnames in Unix-like systems can contain any character except / and NULL, we need to take special precautions during expansion.
# To prevent filesnames beginning with `-` from being interpreted
# as command options, always do this:
command1 ./*.txt
# Not this:
command1 *.txt
Here is a snippet of code that will prepend ./ to a pathname when needed.
# This will sanitize '$pathname'
[[ "$pathname" =~ ^[./].*$ ]] || pathname="./$pathname"
[[ … ]] vs. [ … ]
Unless a script must run in a POSIX-compatible environment, use [[ ... ]] rather than [ ... ] when performing conditional tests. Unlike the [ and test bash builtins, [[ ... ]] is part of shell syntax, not a command. This means it can handle its internal elements (test conditions) in a more robust fashion, as pathname expansion and word splitting do not occur. Also, [[ ... ]] adds some additional capabilities such as =~ to perform regular expression tests.
Use (( … )) for Integer Arithmetic
Use (( ... )) in place of let or exper when performing integer arithmetic. The bash let builtin works in a similar way as (( ...)) but its arguments often require careful quoting. exper is an external program and many times slower than the shell.
# Use (( ... )) rather than [[ ... ]] when evaluating integers
if (( i > 1 )); then
...
fi
while (( y == 5 )); do
...
done
# Perform arithmetic assignment
(( y = x * 2 ))
# Perform expansion on an arithmetic calculation
echo $(( i * 7 ))
printf vs. echo
In some cases, it is preferable to use printf over echo when parameter expansions are being output. This is particularly true when expanding pathnames. Since pathnames can contain nearly any character, expansions could result in command options, command sequences, etc.
Error Handling
The most important thing for a script to do, besides getting its work done, is making sure it’s getting its work done successfully. To do this, we have to handle errors.
Anticipate errors. When designing a script, it is important to consider possible points of failure. Before the script starts, are all the necessary external programs actually installed on the system? Do the expected files and directories exist and have the required permissions for the script to operate? What happens the first time a script runs versus later invocations? The beginning of the program should include tests to ensure that all necessary resources are available.
Do no harm. If the script must do anything destructive, for example, deleting files, we must make sure that the script does only the things it is supposed to do. Test for all required conditions prior to doing anything destructive.
Report errors and provide some clues. When an error is detected, we must report the error and terminate the script if necessary. All error messages must be sent to standard error and should include useful information to aid debugging. A good way to do this is to use an error message function such as the one below:
error_exit() { local error_message="$1" printf "%s\n" "${PROGNAME}: ${error_message:-"Unknown Error"}" >&2 exit 1 }We can call the error message function to report an error like this:
command1 || error_exit "command1 failed in line $LINENO"The shell variable
LINENOis included in the error message passed to the function. This will contain the line number where the error occurred.Clean up the mess. When we handle an error we need to make sure that we leave the system in good shape. If the script creates temporary files or performs some operation that could leave the system in an undesirable state, provide a way to return the system to useful condition before the script exits.
Bash offers a setting that will to attempt handle errors automatically, which simply means that with this setting enabled, a script will terminate if any command (with some necessary exceptions) returns a non-zero exit status. To invoke this setting, we place the command set -e near the beginning of the script. Several bash coding standards insist on using this feature along with a couple of related settings, set -u which terminates a script if there is an uninitialized variable, and set -o PIPEFAIL which causes script termination if any element in a pipeline fails.
Using these features is not recommended. It is better to design proper error handling and not rely on set -e as a substitute for good coding practices.
The Bash FAQ #105 provides the following opinion on this:
set -ewas an attempt to add “automatic error detection” to the shell. Its goal was to cause the shell to abort any time an error occurred, so you don’t have to put|| exit 1after each important command.
That goal is non-trivial, because many commands intentionally return non-zero. For example,
if [ -d /foo ]; then ...; else ...; fi
Clearly we don’t want to abort when the
[ -d /foo ]command returns non-zero (because the directory does not exist) – our script wants to handle that in the else part. So the implementors decided to make a bunch of special rules, like “commands that are part of an if test are immune”, or “commands in a pipeline, other than the last one, are immune.”
These rules are extremely convoluted, and they still fail to catch even some remarkably simple cases. Even worse, the rules change from one Bash version to another, as bash attempts to track the extremely slippery POSIX definition of this “feature.” When a subshell is involved, it gets worse still – the behavior changes depending on whether bash is invoked in POSIX mode.
Command Line Options and Arguments
When possible, scripts should support both short and long option names. For example, a “help” feature should be supported by both the -h and --help options. Dual options can be implemented with code such as this:
# Parse command line
while [[ -n "$1" ]]; do
case $1 in
-h | --help)
help_message
graceful_exit
;;
-q | --quiet)
quiet_mode=yes
;;
-s | --root)
root_mode=yes
;;
--* | -*)
usage > &2; error_exit "Unknown option $1"
;;
*)
tmp_script="$1"
break
;;
esac
shift
done
Assist the User
Speaking of “help” options, all scripts should include one, even if the script supports no other options or arguments. A help message should include the script name and version number, a brief description of the script’s purpose (as it might appear on a man page), and a usage message that describes the supported options and arguments. A separate usage function can be used for both the help message and as part of an error message when the script is invoked incorrectly. Here are some example usage and help functions:
# Usage message - separate lines for mutually exclusive options
# the way many man pages do it.
usage() {
printf "%s\n" \
"Usage: ${PROGNAME} [-h|--help ]"
printf "%s\n" \
" ${PROGNAME} [-q|--quiet] [-s|--root] [script]"
}
help_message() {
cat <<- _EOF_
${PROGNAME} ${VERSION}
Bash shell script template generator.
$(usage)
Options:
-h, --help Display this help message and exit.
-q, --quiet Quiet mode. No prompting. Outputs default script.
-s, --root Output script requires root privileges to run.
_EOF_
}
Traps
In addition to a normal exit and an error exit, a script can also terminate when it receives a signal. For some scripts, this is an important issue because if they exit in an unexpected manner, they may leave the system in an undesirable state. To avoid this problem, we include traps to intercept signals and perform cleanup procedures before the scripts exits. The three signals of greatest importance are SIGINT (which occurs when Ctrl-c is typed) and SIGTERM (which occurs when the system is shut down or rebooted) and SIGHUP (when a terminal connection is terminated). Below is a set of traps to manage the SIGINT, SIGTERM, and SIGHUP signals.
# Trap signals
trap "signal_exit TERM" TERM HUP
trap "signal_exit INT" INT
Due to the syntactic limitations of the trap builtin, it is best to use a separate function to act on the trapped signal. Below is a function that handles the signal exit.
signal_exit() { # Handle trapped signals
local signal="$1"
case "$signal" in
INT)
error_exit "Program interrupted by user"
;;
TERM)
printf "\n%s\n" "$PROGNAME: Program terminated" >&2
graceful_exit
;;
*)
error_exit "$PROGNAME: Terminating on unknown signal"
;;
esac
}
We use a case statement to provide different outcomes depending on the signal received. In this example, we also see a call to a graceful_exit function that could provide needed cleanup before the script terminates.
Temporary Files
Wherever possible, temporary files should be avoided. In many cases, process substitution can be used instead. Doing it this way will reduce file clutter, run faster, and in some cases be more secure.
# Rather than this:
command1 > "$TEMPFILE"
.
.
.
command2 < "$TEMPFILE"
# Consider this:
command2 < <(command1)
If temporary files cannot be avoided, care must be taken to create them safely. We must consider, for example, what happens if there is more than one instance of the script running at the same time. For security reasons, if a temporary file is placed in a world-writable directory (such as /tmp) we must ensure the file name is unpredictable. A good way to create temporary file is by using the mktemp command as follows:
TEMPFILE="$(mktemp /tmp/"$PROGNAME".$$.XXXXXXXXX)"
In this example, a temporary file will be created in the /tmp directory with the name consisting of the script’s name followed by its process ID (PID) and 10 random characters.
For temporary files belonging to a regular user, the /tmp directory should be avoided in favor of the user’s home directory.
ShellCheck is Your Friend
There is a program available in most distribution repositories called shellcheck that performs analysis of shell scripts and will detect many kinds of faults and poor scripting practices. It is well worth using it to check the quality of scripts. To use it with a script that has a shebang, we simply do this:
shellcheck my_script
ShellCheck will automatically detect which shell dialect to use based on the shebang. For shell script code that does not contain a shebang, such as function libraries, we use ShellCheck this way:
shellcheck -s bash my_library
Use the -s option to specify the desired shell dialect. More information about ShellCheck can be found at its website http://www.shellcheck.net.
Summing Up
We covered a lot of ground in this adventure, specifying a complete set of technical and stylistic features. Using this coding standard, we can now write some serious production-quality scripts. However, the complexity of this standard does impose some cost in terms of development time and effort.
In Part 2, we will examine a program from LinuxCommand.org called new_script, a bash script template generator that will greatly facilitate writing scripts that conform to our new coding standard.
Further Reading
Here are some links to shell scripting coding standards. They range from the lax to the obsessive. Reading them all is a good idea in order to get a sense of the community’s collective wisdom. Many are not bash-specific and some emphasize multi-shell portability, not necessarily a useful goal.
- The Google Shell Style Guide The coding standard for scripts developed at Google. It’s among the most sensible standards. https://google.github.io/styleguide/shellguide.html
- Anyone Can Write Good Bash (with a little effort) https://blog.yossarian.net/2020/01/23/Anybody-can-write-good-bash-with-a-little-effort
- Some Bash coding conventions and good practices https://github.com/icy/bash-coding-style
- Bash Style Guide and Coding Standard https://lug.fh-swf.de/vim/vim-bash/StyleGuideShell.en.pdf
- Shell Script Standards https://engineering.vokal.io/Systems/sh.md.html
- Unix/Linux Shell Script Programming Conventions and Style http://teaching.idallen.com/cst8177/13w/notes/000_script_style.html
- Scripting Standards http://ronaldbradford.com/blog/scripting-standards/
Pages with advice on coding practices. Some have conflicting advice so caveat emptor.
- Make Linux/Unix Script Portable With
#!/usr/bin/envAs a Shebang https://www.cyberciti.biz/tips/finding-bash-perl-python-portably-using-env.html - Good practices for writing shell scripts http://www.yoone.eu/articles/2-good-practices-for-writing-shell-scripts.html
- Why is
printfbetter thanecho? https://unix.stackexchange.com/questions/65803/why-is-printf-better-than-echo - Why doesn’t
set -e(orset -o errexit, ortrap ERR) do what I expected? http://mywiki.wooledge.org/BashFAQ/105 - Bash: Error handling https://fvue.nl/wiki/Bash:_Error_handling
- Writing Robust Bash Shell Scripts https://www.davidpashley.com/articles/writing-robust-shell-scripts/
- Filenames and Pathnames in Shell: How to do it Correctly A good page full of cautionary tales and advice on dealing with “funny” file and path names. A serious problem in Unix-like systems. Highly recommended. https://dwheeler.com/essays/filenames-in-shell.html
- 1963 Timesharing: A Solution to Computer Bottlenecks This YouTube video from MIT provides some historical perspective on the invention of interactive systems and the transition away from batch processing. The concepts presented here are still the basis of all modern computing. https://youtu.be/Q07PhW5sCEk
5.13 - Coding Standards Part 2: new_script
Coding Standards Part 2: new_script
https://linuxcommand.org/lc3_adv_new_script.php
In Part 1, we created a coding standard that will assist us when writing serious, production-quality scripts. The only problem is the standard is rather complicated, and writing a script that conforms to it can get a bit tedious. Any time we want to write a “good” script, we have to do a lot of rote, mechanical work to include such things as error handlers, traps, help message functions, etc.
To overcome this, many programmers rely on script templates that contain much of this routine coding. In this adventure, we’re going to look at a program called new_script from LinuxCommand.org that creates templates for bash scripts. Unlike static templates, new_script custom generates templates that include usage and help messages, as well as a parser for the script’s desired command line options and arguments. Using new_script saves a lot of time and effort and helps us make even the most casual script a well-crafted and robust program.
Installing new_script
To install new_script, we download it from LinuxCommand.org, move it to a directory in our PATH, and set it to be executable.
me@linuxbox:~$ curl -O http://linuxcommand.org/new_script.bash
me@linuxbox:~$ mv new_script.bash ~/bin/new_script
me@linuxbox:~$ chmod +x ~/bin/new_script
After installing it, we can test it this way:
me@linuxbox:~$ new_script --help
If the installation was successful, we will see the help message:
new_script 3.5.3
Bash shell script template generator.
Usage: new_script [-h|--help ]
new_script [-q|--quiet] [-s|--root] [script]
Options:
-h, --help Display this help message and exit.
-q, --quiet Quiet mode. No prompting. Outputs default script.
-s, --root Output script requires root privileges to run.
Options and Arguments
Normally, new_script is run without options. It will prompt the user for a variety of information that it will use to construct the script template. If an output script file name is not specified, the user will be prompted for one. For some special use cases, the following options are supported:
- -h, –help The help option displays the help message we saw above. The help option is mutually exclusive with the other
new_scriptoptions and after the help message is displayed,new_scriptexits. - -q, –quiet The quiet option causes
new_scriptto become non-interactive and to output a base template without customization. In this mode,new_scriptwill output its script template to standard output if no output script file is specified. - -s, –root The superuser option adds a routine to the template that requires the script to be run by the superuser. If a non-privileged user attempts to run the resulting script, it will display an error message and terminate.
Creating Our First Template
Let’s make a template to demonstrate how new_script works and what it can do. First, we’ll launch new_script and give it the name of a script we want to create.
me@linuxbox:~$ new_script new_script-demo
------------------------------------------------------------------------
** Welcome to new_script version 3.5.3 **
------------------------------------------------------------------------
File 'new_script-demo' exists. Overwrite [y/n] > y
We’ll be greeted with a welcome message. If the script already exists, we are prompted to overwrite. If we had not specified a script file name, we would be prompted for one.
------------------------------------------------------------------------
** Comment Block **
The purpose is a one line description of what the script does.
------------------------------------------------------------------------
The purpose of the script is to: > demonstrate the new_script template
------------------------------------------------------------------------
The script may be licensed in one of two ways:
1. All rights reserved (default) or
2. GNU GPL version 3 (preferred).
------------------------------------------------------------------------
Include GPL license header [y/n]? > y
The first information new_script asks for are the purpose of the script and how it is licensed. Later, when we examine the finished template below, we’ll see that new_script figures out the author’s name and email address, as well as the copyright date.
------------------------------------------------------------------------
** Privileges **
The template may optionally include code that will prevent it from
running if the user does not have superuser (root) privileges.
------------------------------------------------------------------------
Does this script require superuser privileges [y/n]? > n
If we need to make this script usable only by the superuser, we set that next.
------------------------------------------------------------------------
** Command Line Options **
The generated template supports both short name (1 character), and long
name (1 word) options. All options must have a short name. Long names
are optional. The options 'h' and 'help' are provided automatically.
Further, each option may have a single argument. Argument names must
be valid variable names.
Descriptions for options and option arguments should be short (less
than 1 line) and will appear in the template's comment block and
help_message.
------------------------------------------------------------------------
Does this script support command-line options [y/n]? > y
Now we get to the fun part; defining the command line options. If we answer no to this question, new_script will write the template and exit.
As we respond to the next set of prompts, remember that we are building a help message (and a parser) that will resemble the new_script help message, so use that as a guide for context. Keep responses clear and concise.
Option 1:
Enter short option name [a-z] (Enter to end) -> a
Description of option ------------------------> the first option named 'a'
Enter long option name (optional) ------------> option_a
Enter option argument (if any) --------------->
Option 2:
Enter short option name [a-z] (Enter to end) -> b
Description of option ------------------------> the second option named 'b'
Enter long option name (optional) ------------> option_b
Enter option argument (if any) ---------------> b_argument
Description of argument (if any)--------------> argument for option 'b'
Option 3:
Enter short option name [a-z] (Enter to end) ->
By entering nothing at the short option prompt, new_script ends the input of the command options and writes the template. We’re done!
A note about short option names: new_script will accept any value, not just lowercase letters. This includes uppercase letters, numerals, etc. Use good judgment.
A note about long option names and option arguments: long option names and option arguments must be valid bash variable names. If they are not, new_script will attempt correct them, If there are embedded spaces, they will be replaced with underscores. Anything else will cause no_script to replace the name with a calculated default value based on the short option name.
Looking at the Template
Here we see a numbered listing of the finished template.
1 #!/usr/bin/env bash
2 # ---------------------------------------------------------------------
3 # new_script-demo - Demonstrate the new_script template
4 # Copyright 2021, Linux User <me@linuxbox.example.com>
5
6 # This program is free software: you can redistribute it and/or modify
7 # it under the terms of the GNU General Public License as published by
8 # the Free Software Foundation, either version 3 of the License, or
9 # (at your option) any later version.
10 # This program is distributed in the hope that it will be useful,
11 # but WITHOUT ANY WARRANTY; without even the implied warranty of
12 # MERCHANTABILITY or FITNESS FOR A PARTICULAR PURPOSE. See the
13 # GNU General Public License at <http://www.gnu.org/licenses/> for
14 # more details.
15 # Usage: new_script-demo [-h|--help]
16 # new_script-demo [-a|--option_a] [-b|--option_b b_argument]
17 # Revision history:
18 # 2021-05-05 Created by new_script ver. 3.5.3
19 # ---------------------------------------------------------------------
The comment block is complete with license, usage, and revision history. Notice how the first letter of the purpose has been capitalized and the author’s name and email address have been calculated. new_script gets the author’s name from the /etc/password file. If the REPLYTO environment variable is set, it supplies the email address (this was common with old-timey email programs); otherwise the email address will be expanded from $USER@$(hostname). To define the REPLYTO variable, we just add it to our ~/.bashrc file. For example:
export REPLYTO=me@linuxbox.example.com
Our script template continues with the constants and functions:
20 PROGNAME=${0##*/}
21 VERSION="0.1"
22 LIBS= # Insert pathnames of required external shell libraries here
The global constants appear next, with the program name (derived from $0) and the version number. The LIBS constant should be set to contain a space-delimited list (in double quotes of course) of any files to be sourced. Note: the way the template implements this feature requires that library pathnames do not contain spaces. Besides the template not working, including embedded spaces in a library name would be in extremely poor taste.
23 clean_up() { # Perform pre-exit housekeeping
24 return
25 }
26 error_exit() {
27 local error_message="$1"
28 printf "%s: %s\n" "$PROGNAME" "${error_message:-"Unknown Error"}" >&2
29 clean_up
30 exit 1
31 }
32 graceful_exit() {
33 clean_up
34 exit
35 }
36 signal_exit() { # Handle trapped signals
37 local signal="$1"
38 case "$signal" in
39 INT)
40 error_exit "Program interrupted by user" ;;
41 TERM)
42 error_exit "Program terminated" ;;
43 *)
44 error_exit "Terminating on unknown signal" ;;
45 esac
46 }
The first group of functions handles program termination. The clean_up function should include the code for any housekeeping tasks needed before the script exits. This function is called by all the other exit functions to ensure an orderly termination.
47 load_libraries() { # Load external shell libraries
48 local i
49 for i in $LIBS; do
50 if [[ -r "$i" ]]; then
51 source "$i" || error_exit "Library '$i' contains errors."
52 else
53 error_exit "Required library '$i' not found."
54 fi
55 done
56 }
The load_libraries function loops through the contents of the LIBS constant and sources each file. If any file is missing or contains errors, this function will terminate the script with an error.
57 usage() {
58 printf "%s\n" "Usage: ${PROGNAME} [-h|--help]"
59 printf "%s\n" \
" ${PROGNAME} [-a|--option_a] [-b|--option_b b_argument]"
60 }
61 help_message() {
62 cat <<- _EOF_
63 $PROGNAME ver. $VERSION
64 Demonstrate the new_script template
65 $(usage)
66 Options:
67 -h, --help Display this help message and exit.
68 -a, --option_a The first option named 'a'
69 -b, --option_b b_argument The second option named 'b'
70 Where 'b_argument' is the argument for option 'b'.
71 _EOF_
72 return
73 }
The usage and help_message functions are based on the information we supplied. Notice how the help message is neatly formatted and the option descriptions are capitalized as needed.
74 # Trap signals
75 trap "signal_exit TERM" TERM HUP
76 trap "signal_exit INT" INT
77 load_libraries
The last tasks involved with set up are the signal traps and calling the function to source the external libraries, if there are any.
Next comes the parser, again based on our command options.
78 # Parse command-line
79 while [[ -n "$1" ]]; do
80 case "$1" in
81 -h | --help)
82 help_message
83 graceful_exit
84 ;;
85 -a | --option_a)
86 echo "the first option named 'a'"
87 ;;
88 -b | --option_b)
89 echo "the second option named 'b'"
90 shift; b_argument="$1"
91 echo "b_argument == $b_argument"
92 ;;
93 --* | -*)
94 usage >&2
95 error_exit "Unknown option $1"
96 ;;
97 *)
98 printf "Processing argument %s...\n" "$1"
99 ;;
100 esac
101 shift
102 done
The parser detects each of our specified options and provides a simple stub for our actual code. One feature of the parser is that positional parameters that appear after the options are assumed to be arguments to the script so this template is ready to handle them even if the script has no options.
103 # Main logic
104 graceful_exit
We come to the end of the template where the main logic is located. Since this script doesn’t do anything yet, we simply call the graceful_exit function so that we, well, exit gracefully.
Testing the Template
The finished template is a functional (and correct!) script. We can test it. First the help function:
me@linuxbox:~$ ./new_script-demo --help
new_script-demo ver. 0.1
Demonstrate the new_script template
Usage: new_script-demo [-h|--help]
new_script-demo [-a|--option_a] [-b|--option_b b_argument]
Options:
-h, --help Display this help message and exit.
-a, --option_a The first option named 'a'
-b, --option_b b_argument The second option named 'b'
Where 'b_argument' is the argument for option 'b'.
me@linuxbox:~$
With no options or arguments, the template produces no output.
me@linuxbox:~$ ./new_script-demo
me@linuxbox:~$
The template displays informative messages as it processes the options and arguments.
me@linuxbox:~$ ./new_script-domo -a
the first option named 'a'
me@linuxbox:~$ ./new_script-demo -b test
the second option named 'b'
b_argument == test
me@linuxbox:~$ ./new_script-demo ./*
Processing argument ./bin...
Processing argument ./Desktop...
Processing argument ./Disk_Images...
Processing argument ./Documents...
Processing argument ./Downloads...
.
.
.
Summing Up
Using new_script saves a lot of time and effort. It’s easy to use and it produces high quality script templates. Once a programmer decides on a script’s options and arguments, they can use new_script to quickly produce a working script and add feature after feature until everything is fully implemented.
Feel free to examine the new_script code. Parts of it are exciting.
Further Reading
There are many bash shell script “templates” available on the Internet. A Google search for “bash script template” will locate some. Many are just small code snippets or suggestions on coding standards. Here are a few interesting ones worth reading:
- Boilerpalte Shell Script Template https://natelandau.com/boilerplate-shell-script-template/
- Another Bash Script Template https://jonlabelle.com/snippets/view/shell/another-bash-script-template
- Basic script template for every bash script https://coderwall.com/p/koixia/logging-mini-framework-snippet-for-every-shell-script
- Argbash documentation A template generator that works from a configuration file rather than interactively. https://argbash.readthedocs.io/en/latest/
5.14 - SQL
SQL
https://linuxcommand.org/lc3_adv_sql.php
Okay kids, gird your grid for a big one.
The world as we know it is powered by data. Data, in turn, is stored in databases. Most everything we use computers for involves using data stored in some kind of database. When we talk about storing large amounts of data, we often mean relational database management systems (RDBMS). Banks, insurance companies, most every accounting system, and many, many websites use relational databases to store and organize their data.
The idea of relational data storage is generally credited to English computer scientist and IBM researcher E. F. Cobb, who proposed it in a paper in 1970. In the years that followed, a number of software companies built relational database systems with varying degrees of success. Around 1973, IBM developed a simplified and flexible method of managing relational databases called Structured Query Language (SQL, often pronounced “sequel”). Today the combination of RDBMS and SQL is a huge industry, generating many billions of dollars every year.
Relational databases are important to the history of Linux as well. It was the availability of open source database programs (such as MySQL) and web servers (most notably, Apache) that led to an explosion of Linux adoption in the early days of the world wide web.
In this adventure, we’re going to study the fundamentals of relational databases and use a popular command line program to create and manage a database of our own. The AWK adventure is a suggested prerequisite.
A Little Theory
Before we can delve into SQL we have to look at what relational databases are and how they work.
Tables
Simply put, a relational database is one or more tables containing columns and rows. Technically, the columns are known as attributes and the rows as tuples, but most often they are simply called columns and rows. In many ways, a table resembles the familiar spreadsheet. In fact, spreadsheet programs are often used to prepare and edit database tables. Each column contains data of a consistent type, for example, one column might consist of integers and another column strings. A table can contain any number of rows.
Schemas
The design of a database is called its schema and it can be simple, containing just a single table or two, or it can be complex, containing many tables with complex interrelationships between them.
Let’s imagine a database for a bookstore consisting of three tables. The first is called Customers, the second is called Items, and the third is called Sales. The Customers table will have multiple rows with each row containing information about one customer. The columns include a customer number, first and last names, and the customer’s address. Here is such a table with just some made-up names:
Cust First Last Street City ST
---- ------- -------- --------------------- ----------- --
0001 Richard Stollman 1 Outonthe Street Boston MA
0002 Eric Roymond 2 Amendment Road Bunker Hill PA
0003 Bruce Porens 420 Middleville Drive Anytown US
The Items table lists our books and contains the item number, title, author, and price.
Item Title Author Price
---- -------------------------------------- ------------- -----
1001 Winning Friends and Influencing People Dale Carnegie 14.95
1002 The Communist Manifesto Marx & Engels 00.00
1003 Atlas Shrugged Ayn Rand 99.99
As we go about selling items in our imaginary bookstore, we generate rows in the Sales table. Each sale generates a row containing the customer number, date and time of the sale, the item number, the quantity sold, and the total amount of the sale.
Cust Date_Time Item Quan Total
---- ------------ ---- ---- ------
0002 202006150931 1003 1 99.99
0001 202006151108 1002 1 0.00
0003 202006151820 1001 10 149.50
Keys
Now we might be wondering what the Cust and Item columns are for. They serve as keys. Keys are values that serve to uniquely identify a table row and to facilitate interrelationships between tables. Keys have some special properties. They must be both unique (that is, they can appear only once in a table and specifically identify a row) and they must also be immutable (they can never change). If they can’t meet these requirements, they cannot be keys. Some database implementations have methods of enforcing these requirements during table creation and keys can be formally specified. In the case of our bookstore database, the Cust column contains the keys for the Customers table and the Item column contains the keys for the Items table.
Knowing this about keys, we can now understand why the Sales table works the way it does. We can see for example that row 1 of the Sales table tells us that customer 0002 purchased 1 copy of item 1003 for $99.99. So why do we need special values for the keys? Why not, for instance, just use the customer’s name as the key? It’s because we can’t guarantee that the name won’t change, or that two people might have the same name. We can guarantee that an arbitrarily assigned value like our customer number is unique and immutable.
Database Engines/Servers
There are a number of database servers available for Linux. The two most prominent are MySQL (and its fork MariaDB) and PostgreSQL. These database servers implement client/server architecture, a concept that became a hot topic in the 1990s. Database servers of this type run as server processes and clients connect to them over a network connection and send SQL statements for the server to carry out. The results of the database operations are returned to the client program for further processing and presentation. Many web sites use this architecture with a web server sending SQL statements to a separate database server to dynamically create web pages as needed. The famous LAMP stack consisting of Linux, Apache web server, MySQL, and PHP powered much of the early web.
For purposes of this adventure, setting up database servers such as MySQL and PostgreSQL is too complicated to cover here since, among other things, they support multiple concurrent users and their attendant security controls. It’s more than we need for just learning SQL.
sqlite3
The database server we will be using is SQLite. SQLite is a library that can be used with applications to provide a high-level of SQL functionality. It’s very popular with the embedded systems crowd. It saves application developers the trouble of writing custom solutions to their data storage and management tasks. In addition to the library, SQLite provides a command line tool for directly interacting with SQLite databases. Also, since it accepts SQL from standard input (as well as it own command line interface) and sends its results to standard output, it’s ideal for use in our shell scripts.
SQLite is available from most Linux distribution repositories. Installation is easy, for example:
me@linuxbox:~$ sudo apt install sqlite3
Building a Playground
Let’s build a playground and play with some real data. On the LinuxCommand.org site there is a archive we can download that will do the trick.
me@linuxbox:~$ cd
me@linuxbox:~$ curl -c http://linuxcommand.org/adventure-sql.tgz
me@linuxbox:~$ tar xzf adventure-sql.tgz
me@linuxbox:~$ cd adventure-sql
Extracting the .tgz file will produce the playground directory containing the data sets, some demonstration code, and some helpful tools. The data sets we will be working with contain the listings of installed packages on an Ubuntu 18.04 system. This will include the name of packages, a short description of each one, a list of files contained in each package, and their sizes.
me@linuxbox:~/adventure-sql$ ls
All the files are human-readable text, so feel free to give them a look. The data sets in the archive are the .tsv files. These are tab-separated value files. The first one is the package_descriptions.tsv file. This contains two columns of data; a package name and a package description. The second file, named package_files.txv, has three columns: a package name, the name of a file installed by the package and the size of the file.
Starting sqlite3
To launch SQLite, we simply issue the command sqlite3 followed optionally by the name of a file to hold our database of tables. If we do not supply a file name, SQLite will create a temporary database in memory.
me@linuxbox:~/advemture-sql$ sqlite3
SQLite version 3.22.0 2018-01-22 18:45:57
Enter ".help" for usage hints.
Connected to a transient in-memory database.
Use ".open FILENAME" to reopen on a persistent database.
sqlite>
When loading is complete, SQLite will present a prompt where we can enter commands. Commands can be either SQL statements or dot commands that are used to control SQLite itself. To see a list of the available dot commands, we enter .help at the prompt.
sqlite> .help
There are only a few of the dot commands that will be of interest to us and they deal mainly with how output is formatted. To exit sqlite3, we enter the dot command .quit at the prompt.
sqlite> .quit
Though we can interact directly with the sqlite3 program using the sqlite> prompt, sqlite3 can also accept streams of dot commands and SQL statements through standard input. This is how SQLite is most often used.
Creating a Table and Inserting Our Data
To get started with our database, we need to first convert our .tsv files into a stream of SQL statements. Our database will initially consist of two tables. The first is named Package_Descriptions and the second is named Package_Files. To create the SQL stream for the Package_Descriptions table we will use the insert_Package_Descriptions.awk program supplied in the playground archive.
me@linuxbox:~/advemture-sql$ ./insert_Package_Descriptions.awk \
< package_descriptions.tsv > insert_Package_Descriptions.sql
Let’s take a look at the resulting SQL stream. We’ll use the head command to display the first few lines of the stream.
me@linuxbox:~/advemture-sql$ head insert_Package_Descriptions.sql
DROP TABLE IF EXISTS Package_Descriptions;
CREATE TABLE Package_Descriptions (
package_name VARCHAR(60),
description VARCHAR(120)
);
BEGIN TRANSACTION;
INSERT INTO Package_Descriptions
VALUES ( 'a2ps',
'GNU a2ps - ''Anything to PostScript'' converter and pretty-prin
ter');
INSERT INTO Package_Descriptions
VALUES ( 'accountsservice',
'query and manipulate user account information');
And the last few lines using the tail command.
me@linuxbox:~/advemture-sql$ tail insert_Package_Descriptions.sql
VALUES ( 'zlib1g:amd64',
'compression library - runtime');
INSERT INTO Package_Descriptions
VALUES ( 'zlib1g:i386',
'compression library - runtime');
INSERT INTO Package_Descriptions
VALUES ( 'zlib1g-dev:amd64',
'compression library - development');
INSERT INTO Package_Descriptions
VALUES ( 'zsh',
'shell with lots of features');
INSERT INTO Package_Descriptions
VALUES ( 'zsh-common',
'architecture independent files for Zsh');
COMMIT;
As we can see, SQL is verbose and somewhat English-like. Convention dictates that language keywords be in uppercase; however it is not required. SQL is case insensitive. White space is not important, but is often used to make the SQL statements easier to read. Statements can span multiple lines but don’t have to. Statements are terminated by a semicolon character. The SQL in this adventure is generally formatted in accordance with the style guide written by Simon Holywell linked in the “Further Reading” section below. Since some SQL can get quite complicated, visual neatness counts when writing code.
SQL supports two forms of commenting.
-- Single line comments are preceeded by 2 dashes
/* And multi-line comments are done in the
style of the C programming language */
Before we go on, we need to digress for a moment to discuss SQL as a standard. While there are ANSI standards for SQL, every database server implements SQL differently. Each one has a slightly different dialect. The reason for this is partly historical; in the early days there weren’t any firm standards, and partly commercial. Each database vendor wanted to make it hard for customers to migrate to competing products so each vendor added unique extensions and features to the language to promote the dreaded “vendor lock-in” for their product. SQLite supports most of standard SQL (but not all of it) and it adds a few unique features.
Creating and Deleting Tables
The first 2 lines of our SQL stream deletes any existing table named Package_Descriptions and creates a new table with that name. The DROP TABLE statement deletes a table. The optional IF EXISTS clause is used to prevent errors if the table does not already exist. There are a lot of optional clauses in SQL. The CREATE TABLE statement defines a new table. As we can see, this table will have 2 columns. The first column, package_name is defined to be a variable length string up to 60 characters long. VARCHAR is one of the available data types we can define. Here are some of the common data types supported by SQL databases:
| Data Type | Description |
|---|---|
| INTEGER | Integer |
| CHAR(n) | Fixed length string |
| VARCHAR(n) | Variable length string |
| NUMERIC | Decimal numbers |
| REAL | Floating point numbers |
| DATETIME | Date and time values |
Data Types
SQL databases support many types of data. Unfortunately, this varies by vendor. Even in cases where two databases share the same data type name, the actual meaning of the data type can differ. Data types in SQLite, unlike other SQL databases, are not rigidly fixed. Values in SQLite are dynamically typed. While SQLite allows many of the common data types found in other databases to be specified, it actually only supports 4 general types of data storage.
| Data Type | Description |
|---|---|
| INTEGER | Signed integers using 1, 2, 3, 4, 6, or 8 bytes as needed |
| REAL | 8-byte IEEE floating point numbers |
| TEXT | Text strings |
| BLOB | Binary large objects (for example JPEG, or MP3 files) |
In our example above, we specified VARCHAR as the data type for our columns. SQLite is perfectly happy with this, but it actually stores the values in these columns as just TEXT. It ignores the length restrictions set in the data type specification. SQLite is extremely lenient about data types. In fact, it allows any kind of data to be stored in any specified data type, even allowing a mixture of data types in a single column. This is completely incompatible with all other databases, and relying on this would be very bad practice. In the remainder of this adventure we will be sticking to conventional data types and behavior.
Inserting Data
Moving on with our SQL stream, we see that the majority of the stream consists of INSERT statements. This is how rows are added to a table. Insert is sort of a misnomer as INSERT statements append rows to a table.
We surround the INSERT statements with BEGIN TRANSACTION and COMMIT. This is done for performance reasons. If we leave these out, the rows will still be appended to the table but each INSERT will be treated as a separate transaction, vastly increasing the amount of time it takes to append a large number of rows. Treating a transaction this way also has another important benefit. SQL does not apply the transaction to the database until it receives the COMMIT statement, thus it is possible to write SQL code that will abandon a transaction if there is a problem and the change will be rolled back leaving the database unchanged.
Let’s go ahead and create our first table and add the package names and descriptions.
me@linuxbox:~/advemture-sql$ sqlite3 adv-sql.sqlite \
< insert_Package_Descriptions.sql
We execute the sqlite3 program specifying adv-sql.sqlite as the file used to store our tables. The choice of file name is arbitrary. We read our SQL stream into standard input and sqlite3 carries out the statements.
Doing Some Queries
Now that we have a database (albeit a small one), let’s take a look at it. To do this, we will start up sqlite3 and interact with it at the prompt.
me@linuxbox:~/advemture-sql$ sqlite3 adv-sql.sqlite
SQLite version 3.22.0 2018-01-22 18:45:57
Enter ".help" for usage hints.
sqlite>
We’ll first use some SQLite dot commands to examine the structure of the database.
sqlite> .tables
Package_Descriptions
sqlite> .schema Package_Descriptions
CREATE TABLE Package_Descriptions (
package_name VARCHAR(60),
description VARCHAR(120)
);
The .tables dot command displays a list of tables in the database while the .schema dot command lists the statements used to create the specified table.
Next, we’ll get into some real SQL using SELECT, probably the most frequently used SQL statement.
sqlite> SELECT * FROM Package_Descriptions;
a2ps|GNU a2ps - 'Anything to PostScript' converter and pretty-printer
accountsservice|query and manipulate user account information
acl|Access control list utilities
acpi-support|scripts for handling many ACPI events
acpid|Advanced Configuration and Power Interface event daemon
adduser|add and remove users and groups
adium-theme-ubuntu|Adium message style for Ubuntu
adwaita-icon-theme|default icon theme of GNOME (small subset)
aisleriot|GNOME solitaire card game collection
alsa-base|ALSA driver configuration files
.
.
.
This is the simplest form of the SELECT statement. The syntax is the word SELECT followed by a list of columns or calculated values we want, and a FROM clause specifying the source of the data. This example uses * which means every column. Alternately, we could explicitly name the columns, like so:
sqlite> SELECT package_name, description FROM Package_Descriptions;
And achieve the same result.
Controlling the Output
As we can see from the output above, the default format is fine for further processing by tools such as awk, but it leaves a lot to be desired when it comes to being read by humans. We can adjust the output format with some dot commands. We’ll also add the LIMIT clause to the end of our query to output just 10 rows.
sqlite> .headers on
sqlite> .mode column
sqlite> SELECT * FROM Package_Descriptions LIMIT 10;
package_name description
------------ ----------------------------------------------------------------
a2ps GNU a2ps - 'Anything to PostScript' converter and pretty-printer
accountsserv query and manipulate user account information
acl Access control list utilities
acpi-support scripts for handling many ACPI events
acpid Advanced Configuration and Power Interface event daemon
adduser add and remove users and groups
adium-theme- Adium message style for Ubuntu
adwaita-icon default icon theme of GNOME (small subset)
aisleriot GNOME solitaire card game collection
alsa-base ALSA driver configuration files
By using the .headers on and .mode column dot commands, we add the column headings and change the output to column format. These settings stay in effect until we change them. The .mode dot command has a number of interesting possible settings.
| Mode | Description | ||||||||||
|---|---|---|---|---|---|---|---|---|---|---|---|
| csv | Comma-separated values | ||||||||||
| column | Left-aligned columns. Use .width n1 n2… to set column widths. | ||||||||||
| html | HTML
Here we will set the mode and column widths for our table. In addition to listing columns, Being SelectiveWe can make A partial match using SQL wildcard characters: SQL supports two wildcard characters. The underscore ( Notice too that strings are surrounded with single quotes. If a value is quoted this way, SQL treats it as a string. For example, the value Sorting OutputUnless we tell The default sorting order is ascending, but we can also sort in descending order by including Adding Another TableTo demonstrate more of what we can do with The second table is named As we can see, this table has 3 columns; the package name, the name of a file installed by the package, and the size of the installed file in bytes. Let’s do a Notice the SubqueriesThe As we saw before, To make complicated expressions more readable, we can assign their results to aliases by using the An important feature of We’ll next run this query and view the results. The query takes some time to run (it has a lot to do) and from the results we see that it produces 4 columns: package name, description, number of files in the package, and total size of the package. Let’s take this query apart and see how it works. At the uppermost level we see that the query follows the normal pattern of a The basic structure is simple. What’s interesting is the
It’s also possible to use a subquery in a When we execute this, we get the following results: Updating TablesThe Next, we’ll update the table, adding 100 to the size of each file. When we examine the rows now, we see the change. Finally, we’ll subtract 100 from each row to return the sizes to their original values.
This file consists of four SQL statements. The first two are used to create the new table, as we have seen before. The third statement is an alternate form of the Once the table is constructed, we can examine its contents. We’ll come back to this table a little later when we take a look at joins. Deleting RowsDeleting rows is pretty easy in SQL. There is a We can change the output mode to write out If we use this We’ll repeat this This will write the stream of Now let’s delete the rows in the We can confirm the deletion by running our query again and we see an empty result. Since we saved an SQL stream that can restore the deleted rows, we can now put them back in the table. The Now when we run our query, we see that the rows have been restored. Adding and Deleting ColumnsSQL provides the We’ll execute the statements and examine resulting schema. SQL provides another Unfortunately, SQLite does not support this so we have to do it the hard way. This is accomplished in four steps:
Here is a file called We again use the alternate form of the JoinsA join is a method by which we perform a query and produce a result that combines the data from two tables. SQLite supports several types of joins but we’re going to focus on the most commonly used type called an inner join. We can think of an inner join as the intersection of two tables. In the example below, a file called The results of this query are as follows: If we break down this query, we see that it starts out as we expect, then it is followed by the Since ViewsThe join example above is a pretty useful query for our tables, but due to its complexity it’s best executed from a file rather than as an ad hoc query. SQL addresses this issue by providing a feature called views that allows a complex query to be stored in the database and used to produce a virtual table that can be used with simple query commands. In the following example we will create a view using our Once our view is created, we can treat To delete a view we use the IndexesIt’s been said that the three most important features of a database system are “performance, performance, and performance.” While this in not exactly true (things like data integrity and reliability are important, too), complex operations on large databases can get really slow, so it’s important to make things as fast as we can. One feature we can take advantage of are indexes. An index is a data structure the database maintains that speeds up database searches. It’s a sorted list of rows in a table ordered by elements in one or more columns. Without an index, a table is sorted according to values in a hidden column called Our database server can locate this row in the table very quickly because it already knows where to find the 100th row. However, if we want to search for the row that contains package name We can see from the To create an index to allow faster searches of After doing this, we’ll look at the query plan and see the difference. Hereafter, when we search the table for a package name, SQLite will use the index to directly get to the row rather than looking at every row searching for a match. So why don’t we just index everything? The reason we don’t is that indexes impose overhead every time a row is inserted, deleted, or updated since the indexes must be kept up to date. Indexes are best used on tables that are read more often than written to. We probably won’t see much of a performance improvement when searching the We can see the index when we examine the table’s schema. SQLite also has a dot command. Another benefit of using an index is that it’s kept in sorted order (that’s how it performs searches quickly). The side effect is that when an index is used during a query the results of the query will be sorted as well. To demonstrate, we’ll create another index for the To delete our indexes, we use the Triggers and Stored ProceduresAs we saw earlier during our discussion of views, SQL allow us to store SQL code in the database. Besides views, SQL provides for two other ways of storing code. These two methods are stored procedures and triggers. Stored procedures, as the name implies, allows a block of SQL statements to be stored and treated as a subroutine available to other SQL programs, or for use during ad hoc interactions with the database. Creating a stored procedure is done with this syntax: Parameters can be passed to stored procedures. Here is an example: To call this procedure, we would do this: Unfortunately, SQLite does not support stored procedures. It does, however, support the second method of code storage, triggers. Triggers are stored blocks of code that are automatically called when some event occurs and a specified condition is met. Triggers are typically used to perform certain maintenance tasks to keep the database in good working order. Triggers can be set to activate before, after, or instead of the execution of The first thing we do is create a table to hold our deleted rows. We use a slightly different form of the After creating the table, we create a trigger called In order to reference data that might be used by the trigger, SQL provides the Performing BackupsSince SQLite uses an ordinary file to store each database (as opposed to the exotic methods used by some other systems), we can use regular command line tools such as The stream will appear on standard output or we can use the One interesting application of this technique would be to combine tables from multiple databases into one. For example, let’s imagine we had several Raspberry Pi computers each performing data logging of an external sensor. We could collect dumps from each machine and combine all of the tables into a single database for data analysis and reporting. Generating Your Own DatasetsBelow are the programs used to create the datasets used in this adventure. They are included in the archive for those who want to create their own datasets. For Deb-based Systems (Debian, Ubuntu, Mint, Raspberry Pi OS)The first program named The second program, For RPM-based Systems (RHEL, CentOS, Fedora)The The Converting .tsv to SQLBelow are two AWK programs used to convert the Second, the Summing UpSQL is an important and widely used technology. It’s kinda fun too. While we looked at the general features and characteristics of SQL, there is much more to learn. For example, there are the more advanced concepts such as normalization, referential integrity, and relational algebra. Though we didn’t get to the really heady stuff, we did cover enough to get some real work done whenever we need to integrate data storage into our scripts and projects. Further Reading
6 - BooksLinux命令行 The Linux Command Lineby William Shotts
|