Content Management - 内容管理
https://gohugo.io/content-management/
静态站点生成器需要扩展超越前置元数据和几个模板才能实现可伸缩性和可管理性。Hugo 设计时不仅考虑了开发人员,也考虑了内容管理人员和作者。
https://gohugo.io/content-management/
静态站点生成器需要扩展超越前置元数据和几个模板才能实现可伸缩性和可管理性。Hugo 设计时不仅考虑了开发人员,也考虑了内容管理人员和作者。
https://gohugo.io/content-management/organization/
Hugo assumes that the same structure that works to organize your source content is used to organize the rendered site.【好复杂的从句】
Hugo 假设用于组织源内容的结构与用于组织渲染站点的结构相同。
Hugo 0.32 引入了页面相关的图像和其他资源封装为Page Bundles的功能。
这些术语是相关的,您还需要阅读页面资源(Page Resources)和图像处理(Image Processing)等相关文档才能获得全面的信息。
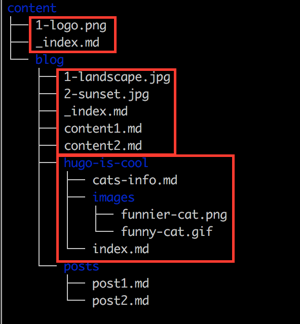
示意图显示了三个bundle。请注意,主页bundle不能包含其他内容页面,虽然允许包含其他文件(如图像)。
bundle文档仍在完善中。我们会尽快发布更全面的文档。
在 Hugo 中,您的内容应该按照反映渲染站点的方式进行组织。
虽然 Hugo 支持嵌套在任何级别的内容,但顶层(即 content/<DIRECTORIES>)在 Hugo 中是特殊的,并且被视为用于确定布局等内容类型。要了解更多有关部分的信息,包括如何嵌套它们,请参阅sections。
在没有任何额外配置的情况下,以下内容将自动工作:
| |
以下示例演示了在 Hugo 渲染站点时,您的内容组织和输出 URL 结构之间的关系。这些示例假定您使用美化的 URL,这是 Hugo 的默认行为。这些示例假设您正在使用美化的 URL,这是 Hugo 的默认行为。这些示例还假设在您站点的配置文件中设置了 baseURL = "https://example.com"。
_index.md 在 Hugo 中有特殊的作用。它允许您在列表模板中添加 前置元数据和内容。这些模板包括section templates、taxonomy templates、taxonomy terms templates和homepage template。
提示:您可以使用 .Site.GetPage 函数引用
_index.md中的内容和元数据。
您可以为主页和每个内容章节(content sections)、分类法(taxonomies)和分类法条目(taxonomy terms)中创建一个 _index.md。以下示例显示了在Hugo站点上包含用于posts章节列表页的内容和前置元数据的_index.md的典型放置方式:
| |
At build, this will output to the following destination with the associated values:(with该怎么翻译)
在构建时,这将输出到以下目标并具有相关的值:
| |
sections可以嵌套得很深。要完全导航section树,最下面的section至少必须包含一个内容文件(即_index.md) 。
在每个章节中的单个内容文件将渲染为单个页面模板。这是一个在 posts 中的单个post的例子:
| |
当Hugo构建您的站点时,内容将输出到以下目标:
| |
以下概念更深入地解释了项目组织与构建站点输出的默认Hugo行为之间的关系。
section 默认内容类型由存储内容项的section确定。section是根据项目的content目录中的位置确定的。section无法在前置元数据中指定或覆盖。
slug slug是URL路径的最后一段,由文件名定义,并在前置元数据中可选地被slug值覆盖。有关详细信息,请参阅URL管理。
path 内容的path由section到文件的路径确定。文件path
url url是整个URL路径,由文件路径定义,并在前置元数据中可选地被url值覆盖。有关详细信息,请参阅URL管理。
https://gohugo.io/content-management/page-bundles/
使用页面 Bundle 进行内容组织
页面 Bundle 是一种分组页面资源的方式。
页面 Bundle 可以是以下之一:
| 叶子 Bundle | 分支 Bundle | |
|---|---|---|
| 用法 | 单个页面内容和附件的集合 | 用于section页面(home page,section,taxonomy terms,taxonomy list)的附件集合 |
| 索引文件名 | index.md 1 | _index.md 1 |
| 允许的资源 | 页面和非页面类型(如图像、PDF 等) | 仅允许非页面类型(如图像、PDF 等) |
| 资源可以存放在哪里? | 在叶子 Bundle 目录中的任何目录级别。 | 仅在分支 Bundle 目录的目录级别中,即包含 _index.md 的目录(参考)。 |
| 布局类型 | single | list |
| 嵌套 | 不允许在其下方嵌套更多的 Bundle | 允许在其下方嵌套叶子或分支 Bundle |
| 示例 | content/posts/my-post/index.md | content/posts/_index.md |
| 非索引页面文件中的内容… | 仅作为页面资源访问 | 仅作为常规页面访问 |
叶子 Bundle 是 content/ 目录中任何层次结构中包含 index.md 文件的目录。
| |
In the above example content/ directory, there are four leaf bundles:
在上面的示例中,content/ 目录中有四个叶子 Bundle:
about
这个叶子 Bundle 在根级别(直接在 content 目录下)并且只有 index.md。
my-post
这个叶子 Bundle 有 index.md、另外两个内容 Markdown 文件和两个图像文件。
image1, image2:这些图像是 my-post 的页面资源,仅在 my-post/index.md 资源中可用。
content1, content2: These content files are page resources of my-post and only available in my-post/index.md resources. They will not be rendered as individual pages. 这些内容文件是 my-post 的页面资源,仅在 my-post/index.md 资源中可用。它们不会被渲染为单独的页面。
my-other-post
这个叶子 Bundle 只有 index.md。
another-leaf-bundle
这个叶子 Bundle 被嵌套在几个目录下。此 Bundle 也只有 index.md。
创建叶子 Bundle 的层次深度不重要,只要它不在另一个叶子 Bundle 中即可。
无头Bundle是一种配置为不在任何地方发布的Bundle:
Permalink)和public/中的渲染HTML。.Site.RegularPages等的一部分。 但是,您可以通过.Site.GetPage获取它。以下是一个示例:
| |
在此示例中,我们假设some-headless-bundle是一个包含一个或多个页面资源的无头Bundle,其.Name与"author*"匹配。
上面示例的说明:
some-headless-bundle页面"object"。.Resources.Match收集此页面Bundle中与"author*"匹配的资源片段。.Title和.Content。 通过在index.md的前置元数据中添加以下内容,可以将一个叶子Bundle变为无头Bundle:
content/headless/index.md
=== “yaml”
```yaml
---
headless: true
---
```
=== “toml”
```toml
+++
headless = true
+++
```
=== “json”
```json
{
   "headless": true
}
```
此类无头页面Bundle有许多用例:
分支Bundle是位于content/目录中任何层次结构中的任何目录,其中至少包含一个_index.md文件。
这个_index.md也可以直接在content/目录下。
这里以
md(markdown)仅作为示例。只要它是Hugo可识别的内容类型,您可以使用任何文件类型作为内容资源。
| |
在上面的content/目录示例中,有两个分支Bundle(和一个叶子Bundle):
branch-bundle-1
该分支Bundle有_index.md,另外两个内容Markdown文件和两个图像文件。
branch-bundle-2
该分支Bundle有_index.md和一个嵌套的叶子Bundle。
创建分支Bundle的层次深度不重要。
.md扩展名仅作为示例。扩展名可以是.html,.json或任何有效的MIME类型。 ↩︎ ↩︎https://gohugo.io/content-management/formats/
Hugo支持HTML和Markdown这两种内容格式。
您可以将任何文件类型放入您的 /content 目录下,但Hugo会使用 前置元数据 中的 markup 值(如果设置了)或文件扩展名(见下表中的 Markup identifiers)来确定是否需要处理标记语言,例如:
Hugo当前支持的内容格式如下:
| Name | Markup identifiers | 备注 |
|---|---|---|
| Goldmark | md, markdown, goldmark | 注意您可以将 md 和 markdown 的默认处理器设置为其他内容,请参见配置标记。 |
| Emacs Org-Mode | org | 参见 go-org. |
| AsciiDoc | asciidocext, adoc, ad | 需要安装 Asciidoctor。 |
| RST | rst | 需要安装 RST 。 |
| Pandoc | pandoc, pdc | 需要安装 Pandoc 。 |
| HTML | html, htm | 要将其视为内容文件(包括布局、shortcodes等),它必须有前置元数据。否则,它将被原样复制。 |
markup identifier可以从前置元数据中的markup变量或文件扩展名中获取。有关标记语言相关的配置,请参见配置标记。
上表中的某些格式需要在您的计算机上安装外部助手。例如,对于 AsciiDoc 文件,Hugo 将尝试调用 asciidoctor 命令。这意味着您需要在您的计算机上安装相应的工具才能使用这些格式。
默认情况下,Hugo会将合理的默认参数传递给这些外部助手:
asciidoctor: --no-header-footer -rst2html: --leave-comments --initial-header-level=2pandoc: --mathjax 由于其他格式是外部命令,生成性能将严重依赖于您正在使用的外部工具的性能。由于此功能仍处于初期阶段,因此欢迎提供反馈。
AsciiDoc实现于 2020 年 1 月结束生命周期并不再得到支持。AsciiDoc 的开发正在 Asciidoctor 下继续进行。当然,AsciiDoc 格式仍然存在。但请继续使用 Asciidoctor 实现。
Asciidoctor 社区提供了一系列针对 AsciiDoc 格式的工具,可以额外安装到 Hugo 中。请参阅 Asciidoctor 文档以获取安装说明。如果需要,请确保还安装了所有可选扩展,例如 asciidoctor-diagram 或 asciidoctor-html5s。
外部
asciidoctor命令要求 Hugo 将渲染内容写入磁盘的特定目标目录。必须使用命令选项--destination运行 Hugo。
一些 Asciidoctor参数可以在 Hugo 中自定义:
| 参数 | 备注 |
|---|---|
| backend | 除非您知道自己在做什么,否则不要更改此参数。 |
| doctype | 目前,Hugo仅支持article类型的文档。 |
| extensions | 可用的扩展包括 asciidoctor-html5s, asciidoctor-bibtex, asciidoctor-diagram, asciidoctor-interdoc-reftext, asciidoctor-katex, asciidoctor-latex, asciidoctor-mathematical, asciidoctor-question, asciidoctor-rouge. |
| attributes | 用于在AsciiDoc文件中引用的变量。这是一个变量名称/值映射列表。参见Asciidoctor的属性。 |
| noHeaderOrFooter | 输出一个可嵌入的文档,不包括标题、页脚和文档正文之外的内容。除非您知道自己在做什么,否则不要更改此参数。 |
| safeMode | 安全模式级别unsafe、safe、server或secure。除非您知道自己在做什么,否则不要更改此参数。 |
| sectionNumbers | 自动为章节标题编号。 |
| verbose | 详细打印处理信息和配置文件检查到stderr。 |
| trace | 在错误信息中包含回溯信息。 |
| failureLevel | 触发非零退出码(失败)的最小日志记录级别。 |
Hugo提供了一些额外的设置,这些设置不能直接映射到Asciidoctor的CLI选项中:
workingFolderCurrent
将工作目录设置为正在处理的AsciiDoc文件的目录,以便include可以使用相对路径。此设置使用asciidoctor cli参数--base-dir和attribute outdir=. 若要使用asciidoctor-diagram渲染图表,必须将workingFolderCurrent设置为true。
preserveTOC
默认情况下,Hugo会删除Asciidoctor生成的目录,并通过内置变量.TableOfContents提供它,以便进行进一步的自定义并更好地与各种Hugo主题集成。可以将此选项设置为true以保留Asciidoctor的目录。
以下是所有与AsciiDoc相关的设置及其默认值:
config.
=== “yaml”
``` yaml
markup:
  asciidocExt:
    attributes: {}
    backend: html5
    extensions: []
    failureLevel: fatal
    noHeaderOrFooter: true
    preserveTOC: false
    safeMode: unsafe
    sectionNumbers: false
    trace: false
    verbose: false
    workingFolderCurrent: false
```
=== “toml”
``` toml
[markup]
  [markup.asciidocExt]
    backend = 'html5'
    extensions = []
    failureLevel = 'fatal'
    noHeaderOrFooter = true
    preserveTOC = false
    safeMode = 'unsafe'
    sectionNumbers = false
    trace = false
    verbose = false
    workingFolderCurrent = false
    [markup.asciidocExt.attributes]
```
=== “json”
``` json
{
   "markup": {
      "asciidocExt": {
         "attributes": {},
         "backend": "html5",
         "extensions": [],
         "failureLevel": "fatal",
         "noHeaderOrFooter": true,
         "preserveTOC": false,
         "safeMode": "unsafe",
         "sectionNumbers": false,
         "trace": false,
         "verbose": false,
         "workingFolderCurrent": false
      }
   }
}
```
请注意,出于安全考虑,只允许没有路径分隔符(\、/或.)的扩展名。这意味着只有在Ruby的$LOAD_PATH中(即,扩展名很可能是由用户安装的),扩展名才能被调用。任何相对于站点路径声明的扩展名都将不被接受。
Example of how to set extensions and attributes:
设置扩展名和属性的示例:
| |
在复杂的 Asciidoctor 环境中,有时候调试带有所有参数的外部助手的确切调用是很有帮助的。使用 -v 选项运行 Hugo。您将得到如下输出:
| |
Markdown 语法简单易学,只需花费一个短暂的时间就能掌握。以下资源是很好的起步指南:
Use fenced code blocks and markdown render hooks to display diagrams.
Hugo supports GoAT natively. This means that this code block:
| |
Will be rendered as:

Hugo currently does not provide default templates for Mermaid diagrams. But you can easily add your own. One way to do it would be to create layouts/_default/_markup/render-codeblock-mermaid.html:
| |
And then include this snippet at the bottom of the content template (Note: below .Content as the render hook is not processed until .Content is executed):
| |
With that you can use the mermaid language in Markdown code blocks:
```mermaid
sequenceDiagram
    participant Alice
    participant Bob
    Alice->>John: Hello John, how are you?
    loop Healthcheck
        John->>John: Fight against hypochondria
    end
    Note right of John: Rational thoughts <br/>prevail!
    John-->>Alice: Great!
    John->>Bob: How about you?
    Bob-->>John: Jolly good!
```

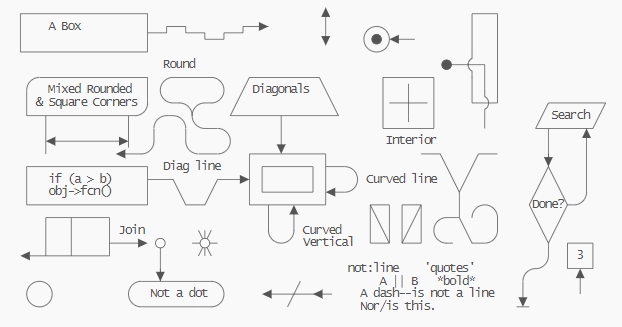

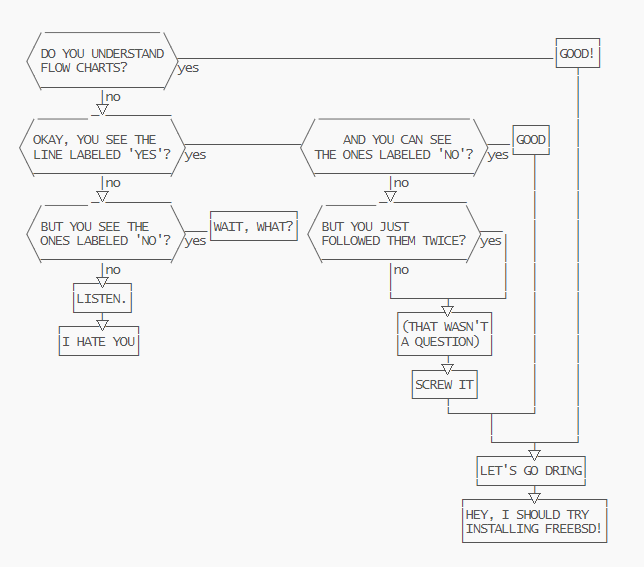
Created from https://arthursonzogni.com/Diagon/#Tree
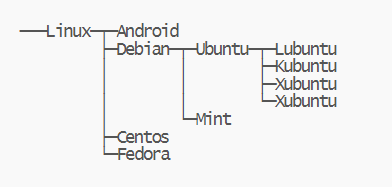
https://arthursonzogni.com/Diagon/#Sequence
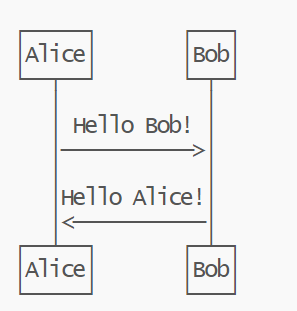
https://arthursonzogni.com/Diagon/#Flowchart
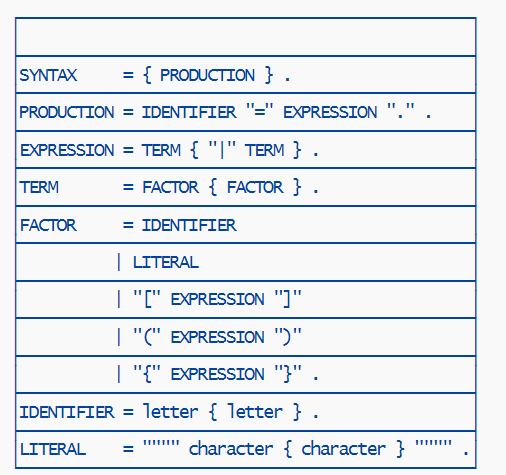
https://arthursonzogni.com/Diagon/#Table
https://gohugo.io/content-management/front-matter/
Hugo 允许您在您的内容文件中添加 YAML、TOML 或 JSON 格式的前置元数据。
前置元数据允许您将元数据附加到内容类型实例中,即嵌入在内容文件内部,这是 Hugo 赋予其强大功能的众多特点之一。
Hugo 支持四种前置元数据格式,每种格式都有其自己的标识符。
TOML
由打开和关闭 +++ 标识。
YAML
由打开和关闭 --- 标识。
JSON
由 ‘{’ 和 ‘}’ 包围的单个 JSON 对象,后跟一个换行符。
ORG
由一组以’#+KEY: VALUE‘格式呈现的Org模式关键字组成。任何不以#+开头的行都会结束前置元数据部分。关键字值可以是字符串(#+KEY: VALUE)或空格分隔的字符串列表(#+KEY[]: VALUE_1 VALUE_2)。
=== “yaml”
``` yaml
categories:
- Development
- VIM
date: "2012-04-06"
description: spf13-vim is a cross platform distribution of vim plugins and resources
  for Vim.
slug: spf13-vim-3-0-release-and-new-website
tags:
- .vimrc
- plugins
- spf13-vim
- vim
title: spf13-vim 3.0 release and new website
```
=== “toml”
``` toml
categories = ['Development', 'VIM']
date = '2012-04-06'
description = 'spf13-vim is a cross platform distribution of vim plugins and resources for Vim.'
slug = 'spf13-vim-3-0-release-and-new-website'
tags = ['.vimrc', 'plugins', 'spf13-vim', 'vim']
title = 'spf13-vim 3.0 release and new website'
```
=== “json”
``` json
{
   "categories": [
      "Development",
      "VIM"
   ],
   "date": "2012-04-06",
   "description": "spf13-vim is a cross platform distribution of vim plugins and resources for Vim.",
   "slug": "spf13-vim-3-0-release-and-new-website",
   "tags": [
      ".vimrc",
      "plugins",
      "spf13-vim",
      "vim"
   ],
   "title": "spf13-vim 3.0 release and new website"
}
```
有一些预定义变量是 Hugo 能够识别的。请参阅页面变量以了解如何在模板中调用这些预定义变量。
aliases
一个由一个或多个别名(例如,已更名的内容的旧发布路径)组成的数组,这些别名将在输出目录结构中创建。详见别名。
audio
一个路径数组,用于与页面相关的音频文件;用于填充 og:audio 的 opengraph 内部模板。
cascade
一个前置元数据键值对映射,其值会传递给页面的子代,除非被自身或更近的祖先级别的 cascade 覆盖。详见前置元数据级联。
date
分配给此页面的日期时间。通常从前置元数据中的date字段获取,但此行为是可配置的。
description
内容的描述。
draft
如果为 true,则不会渲染该内容,除非在 hugo 命令中传递 --buildDrafts 或 -D标志。
expiryDate
内容应不再由 Hugo 发布的日期时间;除非在 hugo 命令中传递 --buildExpired 或-E标志,否则不会渲染已过期的内容。
headless
如果为 true,则将叶子bundle设置为headless。
images
一个路径数组,用于与该页面相关的图像;用于内部模板,例如 _internal/twitter_cards.html。
isCJKLanguage
如果为 true,则 Hugo 将明确地将内容视为 CJK 语言;.Summary 和 .WordCount 在 CJK 语言中均能正常工作。
keywords
该内容的元关键字。
layout
在渲染内容时 Hugo 应从查找顺序中选择的布局。如果在前置元数据中未指定type,则 Hugo 将在与内容所属章节对应的布局目录中查找同名的布局。请参阅内容类型。
lastmod
该内容上次修改的日期时间。
linkTitle
用于创建链接到内容;如果设置,则 Hugo 默认使用title之前的linktitle。Hugo 还可以按照linktitle对内容列表进行排序。
markup
实验性功能;指定"rst"表示使用reStructuredText(需要rst2html)或"md"(默认)表示使用Markdown。
outputs
允许您指定特定于该内容的输出格式。请参见输出格式。
publishDate
如果在将来,则不会呈现内容,除非传递--buildFuture或-F标志给hugo命令。
resources
用于配置页面捆绑资源。请参见页面资源。
series
slug
覆盖URL路径的最后一段。不适用于章节页面。有关详细信息,请参见URL管理。
summary
在.Summary页面变量中提供文章摘要时使用的文本;有关详细信息,请参见内容摘要部分。
title
该内容的标题。
type
该内容的类型;如果在前置元数据中未指定,则该值将自动从目录(即章节)派生。
url
覆盖整个URL路径。适用于常规页面和章节页面。有关详细信息,请参见URL管理。
videos
页面相关视频路径的数组;被内部模板opengraph用于填充og:video。
weight
用于在列表中排序内容。较低的权重具有更高的优先级。因此,具有较低权重的内容将首先出现。如果设置了权重,则权重应为非零,因为0会被解释为未设置权重。
<taxonomies>
索引的复数形式的字段名称。请参见上面的前置元数据示例中的tags和categories。请注意,用户定义的分类法(taxonomies)的复数形式不能与任何预定义的前置元数据变量相同。
如果
slug和url都不存在,并且在您的站点配置文件中未配置永久链接,Hugo 将使用您的内容文件名来创建输出 URL。请参见 Hugo 中的内容组织以了解 Hugo 中路径的说明,以及 URL 管理以了解自定义 Hugo 的默认行为的方式。
您可以任意添加字段到您的前置元数据中以满足您的需求。这些用户自定义的键值被放入一个.Params变量中,以供在您的模板中使用。
以下字段可以通过.Params.include_toc和.Params.show_comments进行访问。变量章节提供有关在模板中使用Hugo的页面级别和站点级别变量的更多信息。
=== “yaml”
``` yaml
include_toc: true
show_comments: false
```
=== “toml”
``` toml
include_toc = true
show_comments = false
```
=== “json”
``` json
{
   "include_toc": true,
   "show_comments": false
}
```
只要在保留的cascade前置元数据键下定义,任何节点或章节都可以向后代传递一组前置元数据值。
The cascade block can be a slice with a optional _target keyword, allowing for multiple cascade values targeting different page sets.
cascade块可以是一个切片,其中包含一个可选的_target关键字,允许多个cascade值针对不同的页面集。
=== “yaml”
``` yaml
cascade:
- _target:
    kind: page
    lang: en
    path: /blog/**
  background: yosemite.jpg
- _target:
    kind: section
  background: goldenbridge.jpg
title: Blog
```
=== “toml”
``` toml
title = 'Blog'
[[cascade]]
background = 'yosemite.jpg'
[cascade._target]
  kind = 'page'
  lang = 'en'
  path = '/blog/**'
[[cascade]]
background = 'goldenbridge.jpg'
[cascade._target]
  kind = 'section'
```
=== “json”
``` json
{
   "cascade": [
      {
         "_target": {
            "kind": "page",
            "lang": "en",
            "path": "/blog/**"
         },
         "background": "yosemite.jpg"
      },
      {
         "_target": {
            "kind": "section"
         },
         "background": "goldenbridge.jpg"
      }
   ],
   "title": "Blog"
}
```
可用于_target的关键字:
path
匹配/content下的内容路径的通配符模式。期望是Unix风格的斜杠。注意,这是虚拟路径,因此它从挂载根开始。匹配支持双星号,因此您可以匹配模式如/blog/*/**,以匹配从第三层及以下的任何内容。
kind
匹配该页面种类的通配符模式,例如"{home, section}"。
lang
匹配该页面语言的通配符模式,例如"{en, sv}"。
environment
匹配构建环境的通配符模式,例如"{production, development}"
以上任何一个都可以省略。
在 content/blog/_index.md
=== “yaml”
``` yaml
cascade:
  banner: images/typewriter.jpg
title: Blog
```
=== “toml”
``` toml
title = 'Blog'
[cascade]
  banner = 'images/typewriter.jpg'
```
=== “json”
``` json
{
   "cascade": {
      "banner": "images/typewriter.jpg"
   },
   "title": "Blog"
}
```
在上面的示例中,除非:
banner值cascade.banner值否则博客章节页面和其后代页面将在调用.Params.banner时将返回images/typewriter.jpg。
您可以在内容的前置元数据中分配特定于内容的weight。这些值对于列表视图中的排序非常有用。您可以使用weight对内容进行排序,使用_weightweight在列表视图中组织您的内容。
可以在内容的前置元数据中设置某些Markdown渲染选项,作为对项目配置中设置的Rendering选项的覆盖。
https://gohugo.io/content-management/build-options/
构建选项有助于定义 Hugo 在构建站点时如何处理给定页面。
它们存储在名为 _build 的保留前置元数据对象中,具有以下默认值:
=== “yaml”
``` yaml
_build:
  list: always
  publishResources: true
  render: always
```
=== “toml”
``` toml
[_build]
  list = 'always'
  publishResources = true
  render = 'always'
```
=== “json”
``` json
{
   "_build": {
      "list": "always",
      "publishResources": true,
      "render": "always"
   }
}
```
如果设置为 always,该页面将被视为已发布页面,并保留其专用输出文件(index.html 等)和永久链接。
我们从布尔值将此属性扩展为枚举,从 Hugo 0.76.0 开始,有效值包括:
never
该页面不会包含在任何页面集合中。
always (default)
该页面将被渲染到磁盘并获得 RelPermalink 等。
link
该页面不会被渲染到磁盘,但会获得 RelPermalink。
请注意,我们从布尔值将此属性扩展为枚举,从 Hugo 0.68.0 开始,有效值包括:
never
该页面不会包含在任何页面集合中。
always (default)
该页面将包含在所有页面集合中,例如 site.RegularPages、$page.Pages。
local
该页面将包含在任何本地页面集合中,例如 $page.RegularPages、$page.Pages。其一个用例是创建完全可导航但无头内容章节。
如果为 true,则该页面将被视为项目集合的一部分,并在适当时通过 Hugo 的列表方法(.Pages、.RegularPages 等)返回。
如果设置为 true,则 Bundle 的资源将被发布。将其设置为 false 将仍会按需发布资源(当从模板调用资源的 .Permalink 或 .RelPermalink 时),但会跳过其他资源。
无论其构建选项如何,任何页面都始终可以使用
.GetPage方法访问。
项目需要一个"Who We Are"内容文件,其中包括前置元数据和正文,用于主页但不用于其他任何地方。
content/who-we-are.md
=== “yaml”
``` yaml
---
_build:
  list: false
  render: false
title: Who we are
---
```
=== “toml”
``` toml
+++
title = 'Who we are'
[_build]
  list = false
  render = false
+++
```
=== “json”
``` json
{
   "_build": {
      "list": false,
      "render": false
   },
   "title": "Who we are"
}
```
layouts/index.html
| |
站点需要展示一些可用的百余个"推荐(testimonials)“内容文件,而不发布其中任何一个。
为了避免在每个推荐中设置构建选项,可以在推荐章节的内容文件上使用cascade。
=== “yaml”
``` yaml
_build:
  render: true
cascade:
  _build:
    list: true
    render: false
title: Testimonials
```
=== “toml”
``` toml
title = 'Testimonials'
[_build]
  render = true
[cascade]
  [cascade._build]
    list = true
    render = false
```
=== “json”
``` json
{
   "_build": {
      "render": true
   },
   "cascade": {
      "_build": {
         "list": true,
         "render": false
      }
   },
   "title": "Testimonials"
}
```
layouts/_defaults/testimonials.html
| |
https://gohugo.io/content-management/types/
Hugo is built around content organized in sections.
Hugo 建立在按章节组织内容的基础上。
内容类型是组织内容的一种方式。Hugo 会根据正文中的类型或者文件路径中的第一个目录(如果没有设置类型)来确定内容类型。例如,如果没有设置类型,则 content/blog/my-first-event.md 将被认为是类型为blog的内容。
内容类型用于:
https://gohugo.io/content-management/page-resources/
页面资源(如图片、其他页面、文档等)具有相对于页面的 URL 和它们自己的元数据。
页面资源只能从page bundles中访问,这些目录在其根目录中具有index.md或_index.md文件。页面资源仅可用于与其捆绑的页面。
在此示例中,first-post是具有10个页面资源(包括音频,数据,文档,图像和视频)访问权限的page bundle。尽管second-post也是一个page bundle,但它没有页面资源,并且无法直接访问与first-post关联的页面资源。
| |
ResourceType
该资源媒体类型的主类型。例如,MIME类型为image/jpeg的文件的ResourceType为image。页面的ResourceType值为page。
Name
默认值为文件名(相对于所属页面)。可以在前置元数据中设置。
Title
默认值与 .Name 相同。可以在前置元数据中设置。
Permalink
该资源的绝对URL。类型为page的资源将没有值。
RelPermalink
该资源的相对URL。类型为page的资源将没有值。
Content
该资源本身的内容。对于大多数资源,这将返回一个字符串,其中包含文件的内容。使用它来创建内联资源。
| |
MediaType
该资源的MIME类型,例如image/jpeg。
MediaType.MainType
该资源MIME类型的主类型。例如,MIME类型为application/pdf的文件的主类型为application。
MediaType.SubType
该资源MIME类型的子类型。例如,MIME类型为application/pdf的文件的子类型为pdf。请注意,这与文件扩展名不同 —— PowerPoint文件的子类型为vnd.mspowerpoint。
MediaType.Suffixes
该资源MIME类型的可能后缀切片。
ByType
返回给定类型的页面资源。
| |
Match
返回所有Name与给定通配符模式(examples)匹配的页面资源(作为切片)。匹配不区分大小写。
| |
GetMatch
与Match相同,但将返回第一个匹配项。
| |
页面资源的元数据由相应页面的前置元数据中的resources数组/表(array/table)参数进行管理。您可以使用通配符进行批量分配值。
类型为
page的资源从其自己的前置元数据中获取Title等。
name
设置Name中返回的值
Match,Get和GetMatch方法使用Name来匹配资源。
title
设置Title中返回的值。
params
一个自定义键/值的映射。
=== “yaml”
``` yaml
date: "2018-01-25"
resources:
- name: header
  src: images/sunset.jpg
- params:
    icon: photo
  src: documents/photo_specs.pdf
  title: Photo Specifications
- src: documents/guide.pdf
  title: Instruction Guide
- src: documents/checklist.pdf
  title: Document Checklist
- src: documents/payment.docx
  title: Proof of Payment
- name: pdf-file-:counter
  params:
    icon: pdf
  src: '**.pdf'
- params:
    icon: word
  src: '**.docx'
title: Application
```
=== “toml”
``` toml
date = '2018-01-25'
title = 'Application'
[[resources]]
name = 'header'
src = 'images/sunset.jpg'
[[resources]]
src = 'documents/photo_specs.pdf'
title = 'Photo Specifications'
[resources.params]
  icon = 'photo'
[[resources]]
src = 'documents/guide.pdf'
title = 'Instruction Guide'
[[resources]]
src = 'documents/checklist.pdf'
title = 'Document Checklist'
[[resources]]
src = 'documents/payment.docx'
title = 'Proof of Payment'
[[resources]]
name = 'pdf-file-:counter'
src = '**.pdf'
[resources.params]
  icon = 'pdf'
[[resources]]
src = '**.docx'
[resources.params]
  icon = 'word'
```
=== “json”
``` json
{
   "date": "2018-01-25",
   "resources": [
      {
         "name": "header",
         "src": "images/sunset.jpg"
      },
      {
         "params": {
            "icon": "photo"
         },
         "src": "documents/photo_specs.pdf",
         "title": "Photo Specifications"
      },
      {
         "src": "documents/guide.pdf",
         "title": "Instruction Guide"
      },
      {
         "src": "documents/checklist.pdf",
         "title": "Document Checklist"
      },
      {
         "src": "documents/payment.docx",
         "title": "Proof of Payment"
      },
      {
         "name": "pdf-file-:counter",
         "params": {
            "icon": "pdf"
         },
         "src": "**.pdf"
      },
      {
         "params": {
            "icon": "word"
         },
         "src": "**.docx"
      }
   ],
   "title": "Application"
}
```
从上面的示例中:
sunset.jpg将获得一个新的Name,并且现在可以使用.GetMatch "header"找到它。documents/photo_specs.pdf将获得photo图标。documents/checklist.pdf,documents/guide.pdf和documents/payment.docx将得到Title,如Title中所设置。documents/photo_specs.pdf外的每个PDF都将获得pdf图标。PDF文件都将获得新的Name。name参数包含一个特殊占位符:counter,因此名称将是pdf-file-1、pdf-file-2、pdf-file-3。word图标。 顺序很重要 —— 只有title,name和params-keys的第一个设置值将被使用。连续的参数仅设置未设置的参数。在上面的示例中,.Params.icon首先在src = "documents/photo_specs.pdf"中设置为"photo"。因此,后来设置的src = "**.pdf"规则不会将其覆盖为"pdf"。
name 和 title 中的 :counter 占位符 :counter是在资源的name和title参数中识别的特殊占位符。
该计数器从第一次在name或title中使用时开始计数。
例如,如果一个包中有资源photo_specs.pdf,other_specs.pdf,guide.pdf和checklist.pdf,并且前置元数据已将resources指定为:
=== “yaml”
``` yaml
resources:
- src: '*specs.pdf'
  title: 'Specification #:counter'
- name: pdf-file-:counter
  src: '**.pdf'
```
=== “toml”
``` toml
[[resources]]
src = '*specs.pdf'
title = 'Specification #:counter'
[[resources]]
name = 'pdf-file-:counter'
src = '**.pdf'
```
=== “json”
``` json
{
   "resources": [
      {
         "src": "*specs.pdf",
         "title": "Specification #:counter"
      },
      {
         "name": "pdf-file-:counter",
         "src": "**.pdf"
      }
   ]
}
```
则Name和Title将按如下分配给资源文件:
| Resource file | Name | Title |
|---|---|---|
| checklist.pdf | "pdf-file-1.pdf | "checklist.pdf" |
| guide.pdf | "pdf-file-2.pdf | "guide.pdf" |
| other_specs.pdf | "pdf-file-3.pdf | "Specification #1" |
| photo_specs.pdf | "pdf-file-4.pdf | "Specification #2" |
https://gohugo.io/content-management/image-processing/
调整大小、裁剪、旋转、滤镜和转换图像。
要处理图像,必须将其作为页面资源或全局资源访问。
页面资源是page bundle中的文件。page bundle是一个在其根目录下具有index.md或_index.md文件的目录。
| |
全局资源是一个文件:
assets目录中,或assets目录的目录中,或http或https可访问的远程服务器上 | |
要访问本地图像作为全局资源:
| |
要将远程图像作为全局资源访问:
| |
一旦您已经将图像作为页面资源或全局资源之一访问,可以使用Permalink、RelPermalink、Width和Height属性在模板中呈现它。
示例1:如果未找到资源,则会引发错误。
| |
示例2:如果未找到资源,则跳过图像渲染。
| |
示例3:如果未找到资源,则跳过图像渲染的更简洁的方法。
| |
image资源实现了Resize、Fit、Fill、Crop、Filter、Colors和Exif方法。
Metadata (Exif, IPTC, XMP, etc.) is not preserved during image transformation. Use the [Exif] method with the original image to extract Exif metadata from JPEG or TIFF images.
在图像转换期间,元数据(Exif,IPTC,XMP等)不会被保留。请使用[
Exif]方法和原始图像从JPEG或TIFF图像中提取Exif元数据。
将图像调整为指定的宽度和/或高度。
如果同时指定宽度和高度,则结果图像将不成比例缩放,除非原始图像具有相同的宽高比。
| |
按比例缩小图像以适应给定的尺寸。您必须同时提供宽度和高度。
| |
裁剪并调整图像以匹配给定的尺寸。您必须同时提供宽度和高度。使用 anchor 选项可以更改裁剪框锚点。
| |
裁剪图像以匹配给定的尺寸而不调整大小。您必须同时提供宽度和高度。使用 anchor 选项可以更改裁剪框锚点。
| |
对图像应用一个或多个滤镜。
| |
使用管道以更函数式的风格编写此内容。 Hugo按照给定的顺序应用过滤器。
| |
有时候创建一个过滤器链并重复使用它是很有用的。
| |
.Colors 方法使用简单的直方图方法返回图像中的主要颜色的十六进制字符串切片。
| |
此方法速度很快,但如果您还缩小图像,从缩小的图像提取颜色可提高性能。
提供一个包含图像元数据的 Exif 对象。
您可以访问 JPEG 和 TIFF 图像中的 Exif 数据。为避免处理没有 Exif 数据的图像时出现错误,请将访问包装在 with 语句中。
| |
您还可以使用lang.FormatNumber函数单独访问Exif字段,根据需要格式化字段。
| |
.Date
图像创建日期/时间。使用time.Format函数格式化。
.Lat
GPS纬度(latitude 以度为单位)。
.Long
GPS经度(longitude 以度为单位)。
.Tags
此图像可用的Exif标签集合。您可以在站点配置中包含或排除特定标签。
Resize、Fit、Fill和Crop方法接受一个以空格分隔、大小写不敏感的选项列表。列表中的选项顺序无关紧要。
使用Resize方法,必须指定宽度、高度或两者。Fit、Fill和Crop方法需要宽度和高度。所有尺寸以像素为单位。
| |
将图像逆时针旋转给定角度。 Hugo在缩放之前执行旋转。例如,如果原始图像为600x400,并且您希望将图像逆时针旋转90度,并将其缩小50%:
| |
在上面的示例中,宽度表示旋转后的期望宽度。
要在不缩放的情况下旋转图像,请使用原始图像的尺寸:
| |
在上面的示例中,第二行我们反转了宽度和高度,以反映旋转后期望尺寸。
使用Crop或Fill方法时,锚点确定裁剪框的放置位置。您可以指定TopLeft、Top、TopRight、Left、Center、Right、BottomLeft、Bottom、BottomRight或Smart。
默认值为Smart,它使用Smartcrop图像分析来确定裁剪框的最佳放置位置。您可以在站点配置中覆盖默认值。
例如,如果您有一个400x200像素的图像,其中鸟位于左上象限,您可以创建一个包含鸟的200x100缩略图:
| |
如果在使用Crop或Fill方法时应用旋转,则相对于旋转后的图像指定锚点。
默认情况下,Hugo将图像编码为源格式。您可以通过指定bmp、gif、jpeg、jpg、png、tif、tiff或webp将图像转换为另一种格式。
| |
使用原始图像的尺寸而不缩放来转换图像:
| |
适用于JPEG和WebP图像,q值确定转换图像的质量。更高的值会产生更好的质量图像,而更低的值会产生更小的文件。将此值设置为介于1和100之间(包括1和100)的整数。
默认值为75。您可以在站点配置中覆盖默认值。
| |
适用于WebP图像,此选项对应于一组预定义的编码参数。
| Value | Example |
|---|---|
drawing | 高对比度手绘或线描图像 |
icon | 小型彩色图像 |
photo | 自然光照的户外照片 |
picture | 室内照片,例如肖像 |
text | 主要是文本的图像 |
默认值为photo。您可以在站点配置中覆盖默认值。
| |
当将支持透明度的图像(例如PNG)转换为不支持透明度的图像(例如JPEG)时,可以指定结果图像的背景颜色。
使用3位或6位十六进制颜色代码(例如#00f或#0000ff)。
默认值为#ffffff(白色)。您可以在站点配置中覆盖默认值。
| |
You may specify the resampling filter used when resizing an image. Commonly used resampling filters include:
您可以在调整图像大小时指定使用的重采样滤镜。常用的重采样滤镜包括:
调整图像大小时,可以指定所使用的重采样滤镜。常用的重采样滤镜包括:
| Filter | Description |
|---|---|
Box | 适合缩小的简单快速平均滤镜 |
Lanczos | 用于摄影图像的高质量重采样滤镜,产生锐利的结果 |
CatmullRom | 尖锐的立方滤镜,比Lanczos滤镜快,提供类似的结果 |
MitchellNetravali | 立方体滤镜,产生比 CatmullRom 更平滑的结果,减少了环状伪影 |
Linear | 双线性重采样滤镜,产生平滑的输出,比立方体滤镜更快 |
NearestNeighbor | 最快的重采样滤镜,无抗锯齿 |
默认值为 Box。您可以在站点配置中覆盖默认值。
| |
请参见github.com/disintegration/imaging以获取完整的重采样滤镜列表。如果您希望以性能为代价改善图像质量,可以尝试使用替代滤镜。
以下示例中使用的日落照片版权归Bjørn Erik Pedersen所有(Creative Commons Attribution-Share Alike 4.0 International license)。
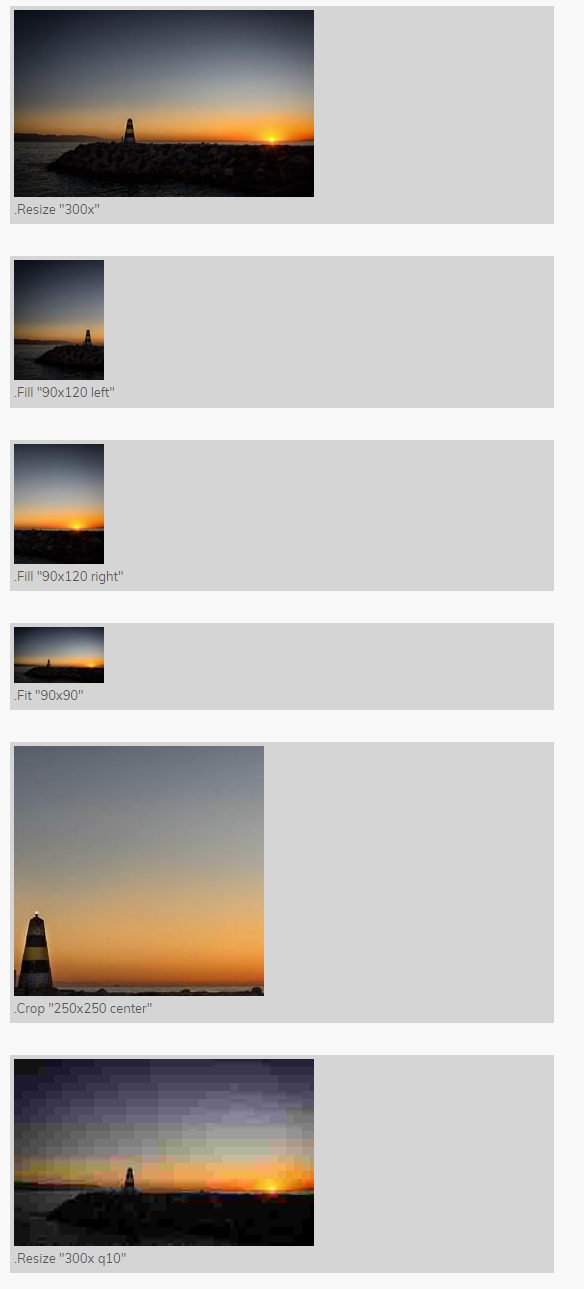
这是用于生成上述示例的shortcode :
layouts/shortcodes/imgproc.html
| |
在您的Markdown中像这样调用shortcode :
| |
注意上面自我封闭的shortcode语法。您可以使用或不使用内部内容来调用
imgprocshortcode 。
在您的站点配置中定义一个imaging处理部分,以设置默认的图像处理选项。
config.
=== “yaml”
``` yaml
imaging:
  anchor: Smart
  bgColor: '#ffffff'
  hint: photo
  quality: 75
  resampleFilter: Box
```
=== “toml”
``` toml
[imaging]
  anchor = 'Smart'
  bgColor = '#ffffff'
  hint = 'photo'
  quality = 75
  resampleFilter = 'Box'
```
=== “json”
``` json
{
   "imaging": {
      "anchor": "Smart",
      "bgColor": "#ffffff",
      "hint": "photo",
      "quality": 75,
      "resampleFilter": "Box"
   }
}
```
anchor
参见图像处理选项:锚点。
bgColor
See image processing options: background color.
参见图像处理选项:背景色。
hint
参见图像处理选项:提示。
quality
参见图像处理选项:质量。
resampleFilter
参见图像处理选项:重采样滤镜。
在您的站点配置中定义一个 imaging.exif 部分,以控制 Exif 数据的可用性。
config.
=== “yaml”
``` yaml
imaging:
  exif:
    disableDate: false
    disableLatLong: false
    excludeFields: ""
    includeFields: ""
```
=== “toml”
``` toml
[imaging]
  [imaging.exif]
    disableDate = false
    disableLatLong = false
    excludeFields = ''
    includeFields = ''
```
=== “json”
``` json
{
   "imaging": {
      "exif": {
         "disableDate": false,
         "disableLatLong": false,
         "excludeFields": "",
         "includeFields": ""
      }
   }
}
```
disableDate
Hugo 将图像创建日期/时间提取到 .Date 中。将此设置为 true 以禁用。默认值为 false。
disableLatLong
Hugo 将 GPS 纬度和经度提取到 .Lat 和 .Long 中。将此设置为 true 以禁用。默认值为 false。
excludeFields
正则表达式匹配要从 .Tags 集合中排除的 Exif 标记。默认值为 ""。
includeFields
正则表达式匹配要在 .Tags 集合中包含的 Exif 标记。默认值为 ""。要包括所有可用的标记,请将此值设置为 ".*"。
为了提高性能并减小缓存大小,如果您既不设置
excludeFields也不设置includeFields,则 Hugo 将排除以下标记:ColorSpace、Contrast、Exif、Exposure[M|P|B]、Flash、GPS、JPEG、Metering、Resolution、Saturation、Sensing、Sharp和WhiteBalance。
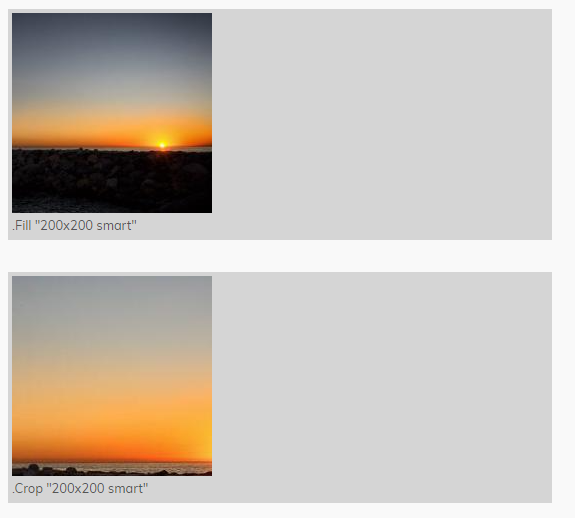
默认情况下,Hugo在使用Crop或Fill方法裁剪图像时会使用Smartcrop库。您可以手动设置锚点,但在大多数情况下,Smart选项会做出很好的选择。
以下是使用上面的日落图片的示例:
Hugo在resources目录中缓存处理过的图像。如果您将此目录包含在源代码控制中,Hugo将不必在CI / CD工作流程(例如,GitHub Pages,GitLab Pages,Netlify等)中重新生成图像。这将加快构建速度。
如果您更改图像处理方法或选项,或者重命名或删除图像,则resources目录将包含未使用的图像。要删除未使用的图像,请执行垃圾回收:
| |
https://gohugo.io/content-management/shortcodes/
简码是在您的内容文件中调用内置或自定义模板的简单代码片段。
Hugo喜欢Markdown,因为它的简单内容格式,但有时Markdown存在局限性。通常,内容作者被迫将原始HTML(例如视频<iframe>)添加到Markdown内容中。我们认为这与Markdown语法的美丽简洁相矛盾。
Hugo创建了简码来规避这些限制。
简码是内容文件中的简单代码片段,Hugo将使用预定义的模板进行渲染。请注意,简码在模板文件中不起作用。如果您需要简码提供的此类插入(drop-in)功能,但在模板中,则很可能需要局部模板。
除了更干净的Markdown外,简码可以随时更新以反映新的类、技术或标准。在站点生成的时候,Hugo简码将轻松合并您的更改。您避免了可能复杂的搜索和替换操作。
在您的内容文件中,可以通过调用\{\{\% shortcodename parameters \%\}\}来调用简码。简码参数由空格分隔,具有内部空格的参数可以用引号引起来。
简码声明中的第一个单词始终是简码的名称。参数跟在名称后面。根据简码的定义方式,参数可以是命名的、位置的或两者兼有,但不能在单个调用中混合使用参数类型。命名参数的格式与HTML的格式name="value"相似。
一些简码使用或需要闭合简码。与HTML一样,开放和关闭简码匹配(仅名称),关闭声明前缀有一个斜杠。
以下是成对的简码的两个示例:
| |
上面的例子使用两个不同的定界符,不同之处在于第一个中有%字符,第二个中有<>字符。
您可以使用原始字符串字面值将占据多行的参数传递给简码:
| |
在Hugo 0.55中,我们改变了%定界符的工作方式。使用 % 作为最外层定界符的简码现在将在发送到内容渲染器时完全渲染。它们可以成为生成的目录(table of contents)、脚注(footnotes)等的一部分。
如果您想要旧的行为,可以在简码模板的开头放置以下行:
| |
<字符表示简码的内部内容不需要进一步渲染。通常,不带Markdown的简码包括内部HTML:
| |
您可以通过创建自己的模板来利用.Parent变量在其他简码中调用简码。 .Parent允许您检查简码被调用的上下文。请参见简码模板。
Hugo附带了一组预定义的简码,代表非常常见的用法。这些简码提供给作者方便,并使您的Markdown内容保持干净。
figure figure 是 Markdown 中图像语法的扩展,它不提供更语义化的 HTML5
figure简码可以使用以下命名参数:
src
要显示的图像的URL。
link
如果图像需要超链接,目标的URL。
target
如果设置了link参数,则为URL的可选target属性。
rel
如果设置了link参数,则为URL的可选rel属性。
alt
如果无法显示图像,则为图像的替代文本。
title
图像标题。
caption
图像标题。在caption的值中的Markdown将被渲染。
class
HTML figure标记的class属性。
height
图像的height属性。
width
图像的width属性。
attr
图像归属文本。在attr的值中的Markdown将被渲染。
attrlink
如果需要将归属文本超链接,则为目标的URL。
figure输入figure-input-example.md
| |
figure输出 | |
gist 要显示此URL的GitHub代码片段(gist):
| |
在您的Markdown中包含以下内容:
| |
这将按文件名按字母顺序显示gist中的所有文件。
| |
要显示gist中的特定文件:
| |
渲染结果:
| |
highlight 用于展示高亮代码示例:
| |
渲染结果:
| |
若要指定一个或多个高亮选项,请使用引号包围、逗号分隔的列表:
| |
渲染结果:
| |
instagram instagram简码使用Facebook的oEmbed Read功能。Facebook开发者文档说明:
您必须获得Access Token才能使用instagram 简码。
如果您的站点配置是私有的:
config.
=== “yaml”
``` yaml
services:
  instagram:
    accessToken: xxx
```
=== “toml”
``` toml
[services]
  [services.instagram]
    accessToken = 'xxx'
```
=== “json”
``` json
{
   "services": {
      "instagram": {
         "accessToken": "xxx"
      }
   }
}
```
如果您的站点配置不是私有的,请使用环境变量设置 Access Token:
| |
如果您正在使用Client Access Token,您必须使用管道符(
APPID|ACCESSTOKEN)将Access Token与您的App ID 结合起来。
要显示具有此 URL 的 Instagram 帖子:
| |
在您的 Markdown 中包含以下内容:
| |
param 从当前页面的前置元数据中的 params 集合获取一个值,并回退到站点参数值。如果在其中都找不到具有给定键的参数,则会记录一个 ERROR。
| |
由于 testparam 是此页面前置元数据中定义的参数,其值为 Hugo Rocks!,因此以上内容将打印出:
Hugo Rocks!
要访问深层嵌套的参数,请使用"点语法",例如:
| |
ref 和relref 这些简码将通过相对路径(例如blog/post.md)或逻辑名称(post.md)查找页面,并返回找到的页面的永久链接(ref 即 permalink )或相对永久链接(relref 即 relative permalink)。
ref和relref还使得可以为Hugo生成的标题链接创建片段链接(fragmentary link)。
在交叉引用文档中阅读有关
ref和relref的更详细描述。
ref 和 relref 接受恰好一个必需的引用参数,引用参数必须在位置 0 上引用并使用引号引起来。
ref和relref输入 | |
ref和relref输出 假设标准的 Hugo 美化 URL 已经开启。
| |
tweet 要显示此URL的Twitter帖子:
| |
请在您的Markdown 中包含以下内容:
| |
渲染结果:

vimeo 要显示此 URL 的 Vimeo 视频:
| |
请在您的Markdown 中包含以下内容:
| |
渲染结果:
如果您想进一步自定义 YouTube 或 Vimeo 输出的视觉样式,请在调用简码时添加一个名为
class的参数。新的class将添加到包裹<iframe>的<div>中,并删除其内联样式。请注意,您还需要将id作为命名参数调用。您还可以使用title为 Vimeo 视频添加描述性标题。
1\{\{\< vimeo id="146022717" class="my-vimeo-wrapper-class" title="My vimeo video" \>\}\}
youtube youtube 简码为 YouTube 视频嵌入一个响应式视频播放器。仅需要视频的 ID,例如:
| |
youtube 输入 复制视频 URL 中 v= 后面的 YouTube 视频 ID 并将其传递给 youtube 简码:
example-youtube-input.md
| |
此外,您可以将嵌入视频的autoplay 参数设置为 true,以自动开始播放。请记住,您不能混合使用命名和未命名参数,因此您需要将未命名的视频 ID 分配给 id 参数:
example-youtube-input-with-autoplay.md
| |
出于辅助功能的原因,最好为您的 YouTube 视频提供一个标题。您可以使用 title 参数为简码提供标题。如果没有提供标题,将使用默认标题"YouTube Video"。
example-youtube-input-with-title.md
| |
youtube 输出 使用上述 youtube 示例,将添加以下 HTML 到您的站点的标记中:
example-youtube-output.html
| |
youtube 显示** 使用上述 youtube 示例(不带 autoplay="true"),以下是访问者在您的站点上看到的内容。当然,最终的显示将取决于您的样式表和周围的标记。该视频也包含在 Hugo 文档的快速入门中。
要了解如何配置您的Hugo站点以满足新的欧盟隐私法规,请参阅Hugo和GDPR。
要了解更多有关创建自定义简码的信息,请参阅简码模板文档。
https://gohugo.io/content-management/related/
在"另请参阅"章节中列出相关内容。
Hugo 使用一组因素来基于前置元数据参数识别页面的相关内容。这可以调整为所需的索引和参数集,或者留给Hugo的默认相关内容配置。
要列出最多 5 个相关页面(共享相同的date或keyword参数),只需在您的单个页面模板中包含类似以下内容的partial:
layouts/partials/related.html
| |
Related方法接受一个参数,可以是Page或选项映射。这些选项映射具有以下选项:
indices
要搜索的索引。
document
要搜索相关内容的文档。
namedSlices
要搜索的关键字。
fragments
片段(fragments )包含一个用于配置为"fragments"类型的索引的特殊关键字列表。这将匹配文档的片段(fragment )标识符。
使用以上所有选项的虚构示例:
| |
我们在Hugo 0.111.0中改进和简化了这个功能。在此之前,我们有3种不同的方法:
Related,RelatedTo和RelatedIndicies。现在我们只有一个方法:Related。旧的方法仍然可用但已弃用。另请参阅此博客文章,以获得更高级用法的详细解释。
Hugo可以索引您内容中的标题,并使用此功能查找相关内容。您可以通过将类型为fragments的索引添加到related配置中来启用此功能:
config.
=== “yaml”
``` yaml
related:
  includeNewer: true
  indices:
  - applyFilter: false
    name: fragmentrefs
    type: fragments
    weight: 80
  threshold: 20
  toLower: false
```
=== “toml”
``` toml
[related]
  includeNewer = true
  threshold = 20
  toLower = false
[[related.indices]]
  applyFilter = false
  name = 'fragmentrefs'
  type = 'fragments'
  weight = 80
```
=== “json”
``` json
{
   "related": {
      "includeNewer": true,
      "indices": [
         {
            "applyFilter": false,
            "name": "fragmentrefs",
            "type": "fragments",
            "weight": 80
         }
      ],
      "threshold": 20,
      "toLower": false
   }
}
```
name映射到可选的前置元数据切片属性,可用于从页面级别链接到片段/标题(fragment/heading)级别。applyFilter,则结果中每个页面上的.HeadingsFiltered将反映筛选后的标题。如果您想在相关内容列表中显示标题,则这很有用: | |
Hugo提供了相关内容的合理默认配置,但是如果需要,您可以在全局或语言级别上对其进行微调。
如果项目上没有设置任何related配置,则Hugo的相关内容方法将使用以下内容。
config.
=== “yaml”
``` yaml
related:
  includeNewer: false
  indices:
  - name: keywords
    weight: 100
  - name: date
    weight: 10
  threshold: 80
  toLower: false
```
=== “toml”
``` toml
[related]
  includeNewer = false
  threshold = 80
  toLower = false
[[related.indices]]
  name = 'keywords'
  weight = 100
[[related.indices]]
  name = 'date'
  weight = 10
```
=== “json”
``` json
{
   "related": {
      "includeNewer": false,
      "indices": [
         {
            "name": "keywords",
            "weight": 100
         },
         {
            "name": "date",
            "weight": 10
         }
      ],
      "threshold": 80,
      "toLower": false
   }
}
```
请注意,如果您将tags配置为分类(taxonomy),那么tags将与上述默认配置一起添加,并且权重为80。
应该使用相同的语法设置自定义配置。
如果添加了一个
related配置部分,则需要添加完整配置。不能只设置例如includeNewer,并使用 Hugo 默认值中的其他部分。
threshold
0-100之间的值。较低的值将提供更多但可能不是很相关的匹配项。
includeNewer
设置为true以在相关内容列表中包含新于当前页面的页面。这意味着旧帖子的输出可能会随着添加新的相关内容而发生变化。
toLower
将索引和查询中的关键字转换为小写。这可能会以轻微的性能损失为代价提供更准确的结果。请注意,这也可以针对每个索引进行设置。
name
索引名称。此值直接映射到页面参数。 Hugo支持字符串值(例如示例中的author)和列表(tags,keywords等)以及时间和日期对象。
type
v0.111.0 中的新功能。basic(默认)或fragments之一。
applyFilter
v0.111.0 中的新功能。将type特定的过滤器应用于搜索结果。目前仅用于fragments类型。
weight
表示该参数相对于其他参数的重要性的整数权重。它可以是0,这将关闭此索引的效果,甚至可以是负数。使用不同的值进行测试,以确定最适合您内容的值。
cardinalityThreshold (default 0)
v0.111.0 中的新功能。用于从索引中删除常见关键字的百分比(0-100)。例如,将此设置为50将删除在索引中使用超过50%的文档中使用的所有关键字。
pattern
目前仅对日期相关。在列出相关内容时,我们可能希望列出时间上也接近的内容。将"2006"(日期索引的默认值)设置为日期索引的模式将增加发布于同一年的页面的权重。对于访问频繁的博客,“200601”(年份和月份)可能是更好的默认值。
toLower
见上文。
快是Hugo的中间名,如果它不是非常快,我们不会发布此功能。
这个功能已经在后台计划中,并被很多人长期要求。这个开发最近受到这个Twitter帖子的推动:
Scott S. Lowe 移除了使用标签上的intersect模板函数构建的"相关内容"部分,结果在其拥有 1700 篇文章的博客上,构建时间从 30 秒减少到不到 2 秒。
他现在应该能够添加一个改进版的"相关内容"部分,而不会影响快速的实时重新加载。但需要注意的是:
他现在应该能够添加改进版的"相关内容"部分,而不放弃快速的实时重载。但值得注意的是:
Related方法,您将不会使用相关内容功能,性能将与之前相同。.RegularPages.Related等将创建一个倒排索引(有时也称为posting list),它将被重用于同一页面集合中的任何查找。在另外调用.Pages.Related之类的方法时,它会按预期工作,但会创建一个额外的倒排索引。这仍然非常快,但值得注意,特别是对于较大的站点。 我们目前不对页面内容进行索引。我们认为在解决 Sherlock 的最后一个案件之前,发布一些能让大多数人满意的东西是值得的。
https://gohugo.io/content-management/sections/
Hugo 生成与您的内容匹配的章节树。
章节是根据 content/ 目录下的组织结构定义的页面集合。
默认情况下,content/ 下的所有一级目录都形成自己的章节(根章节),前提是它们构成分支 Bundles。即使是一级目录,如果它们只是叶子 Bundles,也不会形成自己的章节。
如果用户需要在更深的层次上定义一个名为 foo 的章节,则需要创建一个名为 foo 的目录,并包含一个 _index.md 文件(有关更多信息,请参见分支 Bundles)。
章节不能通过前置元数据参数进行定义或覆盖——它严格基于内容组织结构派生。
章节可以嵌套到任意深度。
| |
理解的重要部分是,为了使章节树完全可导航,至少需要一个内容文件作为最低层的章节(例如 _index.md)。
当我们谈论与模板选择相关的章节时,目前仅涉及根章节(/blog/funny-cats/mypost/ => blog)。
如果您需要一个子章节的特定模板,则需要在前置元数据参数中调整type或layout。
通过可用的章节变量和方法,您可以构建强大的导航。其中一个常见的示例是使用部分(partial )来显示面包屑导航:
layouts/partials/breadcrumb.html
| |
另请参见页面变量。
.CurrentSection
该页面所属的当前章节。如果该页面本身就是章节或主页,则该值可以是该页面本身。
.FirstSection
根目录下该页面的第一级章节,例如/docs、/blog 等。
.InSection $anotherPage
给定页面是否在当前章节中。
.IsAncestor $anotherPage
当前页面是否是给定页面的祖先。
.IsDescendant $anotherPage
当前页面是否是给定页面的后代。
.Parent
一个章节的父章节或一个页面所属的章节。
.Section
该内容所属的章节。注意:对于被嵌套章节,这是目录中的第一个路径元素,例如 /blog/funny/mypost/ => blog。
.Sections
此内容下面的章节。
Hugo 将为每个根章节自动创建一个页面,列出该章节中的所有内容。有关自定义这些页面的渲染方式的详细信息,请参见章节模板文档。
默认情况下,创建在章节中的所有内容都将使用与根章节名称相匹配的内容type。例如,Hugo 将假定 posts/post-1.md 具有 posts 内容type。如果您正在使用 post 章节的原型,Hugo 将根据在 archetypes/posts.md 中找到的内容生成前置元数据。
https://gohugo.io/content-management/archetypes/
Archetypes是在创建新内容时使用的模板。
Archetypes是位于项目的archetypes目录中的内容模板文件,其中包含为您的站点内容类型(content types)预配置的前置元数据(前置元数据)和可能的内容排列方式。当您运行hugo new时,将使用这些模板。
hugo new使用content-section来查找项目中最合适的原型模板。如果您的项目不包含任何原型文件,它也会在主题中查找。
archetype-example.sh
| |
以上将创建一个新的内容文件content/posts/my-first-post.md,使用找到的第一个原型文件:
archetypes/posts.mdarchetypes/default.mdthemes/my-theme/archetypes/posts.mdthemes/my-theme/archetypes/default.md 最后两个列表项仅适用于您使用主题并且它使用my-theme主题名称作为示例。
以下是一个虚构的newsletter section 的示例,以及原型文件archetypes/newsletter.md。在archetypes/中创建一个新文件newsletter.md并在文本编辑器中打开它。
archetypes/newsletter.md
| |
当您使用以下命令创建新的newsletter:
| |
它将基于原型模板创建一个新的newsletter类型的内容文件。
!!! warning “注意”
注意:如果在原型文件中使用了 .Site,那么只有在构建站点时才会构建。这对于大型站点可能需要很长时间。
上述newsletter类型的原型展示了可能性:完整的Hugo .Site和所有Hugo模板函数都可以在原型文件中使用。
从Hugo 0.49开始,您可以使用完整的目录作为原型模板。假设有以下原型目录:
| |
| |
该命令将创建一个新的文件夹/content/posts/my-post,并且它包含与post-bundle原型文件夹中相同的一组文件。所有内容文件(例如index.md)都可以包含模板逻辑,并将为内容的语言接收正确的.Site。
https://gohugo.io/content-management/taxonomies/
Hugo支持用户定义的分类法。
Hugo支持用户定义的内容分组,称为分类法(taxonomies)。分类法是内容之间逻辑关系的分类。
Taxonomy
可用于对内容进行分类的分类方式
Term
分类法中的一个键
Value
分配给项(term)的内容
假设您正在制作一个关于电影的站点。您可能想包括以下分类法:
然后,在每部电影中,您都需要为这些分类法指定项(即,在每部电影的内容文件的前置元数据中)。根据这些项(terms),Hugo会自动创建每个Actor、Director、Studio、Genre、Year和Award的页面,每个页面都会列出与特定Actor、Director、Studio、Genre、Year和Award匹配的所有电影。
继续使用电影站点的示例,以下演示了从分类法的角度看内容关系:
| |
从内容的角度看,关系看起来不同,尽管使用的数据和标签是相同的:
| |
Hugo本身支持分类法。
不需要在您的站点配置文件中添加任何行,Hugo将自动为tags和categories创建分类法。这与手动配置您的分类法相同,如下所示:
config.
=== “yaml”
``` yaml
taxonomies:
  category: categories
  tag: tags
```
=== “toml”
``` toml
[taxonomies]
  category = 'categories'
  tag = 'tags'
```
=== “json”
``` json
{
   "taxonomies": {
      "category": "categories",
      "tag": "tags"
   }
}
```
如果您不想让Hugo创建任何分类法,请将站点配置中的disableKinds设置为以下内容:
config.
=== “yaml”
``` yaml
disableKinds:
- taxonomy
- term
```
=== “toml”
``` toml
disableKinds = ['taxonomy', 'term']

```
=== “json”
``` json
{
   "disableKinds": [
      "taxonomy",
      "term"
   ]
}

```
| Kind | Description | Example |
|---|---|---|
home | 主页的着陆页 | /index.html |
page | 给定页面的着陆页 | my-post page (/posts/my-post/index.html) |
section | 给定章节的着陆页 | posts section (/posts/index.html) |
taxonomy | 分类法的着陆页 | tags taxonomy (/tags/index.html) |
term | 一个分类法项的着陆页 | term awesome in tags taxonomy (/tags/awesome/index.html) |
当使用分类法并提供分类法模板时,Hugo将自动创建列出所有分类法项的页面以及列出与每个项关联的内容的个别页面。例如,在您的配置中声明并在内容前置元数据中使用的categories分类法将创建以下页面:
example.com/categories/的单个页面,列出分类法中的所有项/categories/development/),其中显示了所有标记为该分类法的任何内容文件的前置元数据中的页面列表 除了默认之外的自定义分类法在整个站点中使用之前必须在站点配置中定义。您需要为每个分类法提供复数和单数标签。例如,对于TOML,singular key = "plural value",而对于YAML,singular key: "plural value"。
在添加自定义分类法时,如果您想保留它们,您需要同时添加默认分类法。
config.
=== “yaml”
``` yaml
taxonomies:
  category: categories
  series: series
  tag: tags
```
=== “toml”
``` toml
[taxonomies]
  category = 'categories'
  series = 'series'
  tag = 'tags'
```
=== “json”
``` json
{
   "taxonomies": {
      "category": "categories",
      "series": "series",
      "tag": "tags"
   }
}
```
如果您只想要默认tags分类法,并删除您站点的categories分类法,可以通过修改站点配置文件中的taxonomies值来实现。
config.
=== “yaml”
``` yaml
taxonomies:
  tag: tags
```
=== “toml”
``` toml
[taxonomies]
  tag = 'tags'
```
=== “json”
``` json
{
   "taxonomies": {
      "tag": "tags"
   }
}
```
如果您想要完全禁用所有分类法,请参阅 Hugo 分类法默认设置中 disableKinds 的用法。
您可以向您的分类法列表和分类法项页面添加内容和前置元数据。有关如何为此目的添加
_index.md的更多信息,请参见内容组织。 与常规页面类似,分类法列表永久链接是可配置的,但分类法项页面永久链接是不可配置的。
Hugo 0.55 版中删除了配置选项
preserveTaxonomyNames。 现在,您可以在相关分类法节点(taxonomy node)上使用
.Page.Title来获取原始值。
一旦在站点级别定义了分类法,任何内容都可以被分配给它,而不管内容类型或内容章节。
将内容分配给分类法是在前置元数据中完成的。只需创建一个变量,其名称为taxonomy 的复数形式,并分配所有要应用于内容类型实例的项。
如果您希望能够快速生成具有预配置分类法或项的内容文件,请阅读有关 Hugo 原型的文档。
content/example.md
=== “yaml”
``` yaml
---
categories:
- Development
project_url: https://github.com/gohugoio/hugo
series:
- Go Web Dev
slug: hugo
tags:
- Development
- Go
- fast
- Blogging
title: 'Hugo: A fast and flexible static site generator'
---
```
=== “toml”
``` toml
+++
categories = ['Development']
project_url = 'https://github.com/gohugoio/hugo'
series = ['Go Web Dev']
slug = 'hugo'
tags = ['Development', 'Go', 'fast', 'Blogging']
title = 'Hugo: A fast and flexible static site generator'
+++
```
=== “json”
``` json
{
   "categories": [
      "Development"
   ],
   "project_url": "https://github.com/gohugoio/hugo",
   "series": [
      "Go Web Dev"
   ],
   "slug": "hugo",
   "tags": [
      "Development",
      "Go",
      "fast",
      "Blogging"
   ],
   "title": "Hugo: A fast and flexible static site generator"
}
```
内容文件可以为其关联的每个分类法分配权重。分类法权重可用于在分类法列表模板中排序或排序内容,并在内容文件的前置元数据中声明。声明分类法权重的约定是taxonomyname_weight。
以下显示一个具有权重为22的内容,可在渲染分配给tags分类法的"a"、“b"和"c"值的页面时用于排序目的。在渲染"d"类别页面时,它也被分配了权重44。
weight=== “yaml”
``` yaml
categories:
- d
categories_weight: 44
tags:
- a
- b
- c
tags_weight: 22
title: foo
```
=== “toml”
``` toml
categories = ['d']
categories_weight = 44
tags = ['a', 'b', 'c']
tags_weight = 22
title = 'foo'
```
=== “json”
``` json
{
   "categories": [
      "d"
   ],
   "categories_weight": 44,
   "tags": [
      "a",
      "b",
      "c"
   ],
   "tags_weight": 22,
   "title": "foo"
}
```
通过使用分类法权重,同一篇内容可以在不同的分类法中出现在不同的位置。
目前,分类法仅支持默认
weight => date排序列表内容。有关更多信息,请参见分类法模板的文档。
如果您需要向分类法项添加自定义元数据,则需要在 /content/<TAXONOMY>/<TERM>/_index.md 中创建该项的页面,并在其前置元数据中添加您的元数据。继续以’Actors’为例,假设您想为每个演员添加维基百科页面链接。您的分类项页面将如下所示:
content/actors/bruce-willis/_index.md
=== “yaml”
``` yaml
---
title: Bruce Willis
wikipedia: https://en.wikipedia.org/wiki/Bruce_Willis
---
```
=== “toml”
``` toml
+++
title = 'Bruce Willis'
wikipedia = 'https://en.wikipedia.org/wiki/Bruce_Willis'
+++
```
=== “json”
``` json
{
   "title": "Bruce Willis",
   "wikipedia": "https://en.wikipedia.org/wiki/Bruce_Willis"
}
```
https://gohugo.io/content-management/summaries/
Hugo 可以生成内容的摘要。
通过使用.Summary页面变量,Hugo会生成内容摘要以在摘要视图中用作简短版本。
在摘要中附带指向原始内容的链接是很自然的,常见的设计模式是以"Read More …“按钮的形式渲染。参见 .RelPermalink、.Permalink 和 .Truncated 页面变量。
默认情况下,Hugo 会自动将内容的前 70 个字作为摘要,并将其存储在 .Summary 页面变量中供模板使用。您可以通过在站点配置中设置 summaryLength 来自定义摘要长度。
您可以使用
plainify和safeHTML等函数自定义摘要中加载的 HTML 标记的方式。
Hugo 定义的摘要使用的是通过将文本按一个或多个连续空格字符拆分计算的字数。如果您使用
CJK语言创建内容,并希望使用 Hugo 的自动摘要拆分,请在站点配置中将hasCJKLanguage设置为true。
或者,您可以在想要拆分文章的地方添加 `
` 摘要分隔符。
对于 Org 模式内容,请在想要拆分文章的地方使用 # more。
摘要分隔符之前的内容将用作该内容的摘要,并以完整的 HTML 格式存储在 .Summary 页面变量中。
摘要分隔符的概念不仅仅适用于 Hugo。在其他文献中,它也被称为"more tag"或"excerpt separator”。
Pros(优点)
自由、精度和提高渲染质量。所有 HTML 标记和格式都会被保留。
Cons(缺点)
需要内容作者额外的工作,因为他们需要记得在每个内容文件中输入 <!--more-->(或 org 内容为 # more)。可以通过在原型的前置元数据下方添加摘要分隔符来自动化这一过程。
请确保精确输入 <!--more-->;即全部小写且没有空格。
您可能希望文章摘要不是从文章开头开始的文本。在这种情况下,您可以在文章前置元数据的summary变量中提供一个单独的摘要。
Pros(优点)
完全自由的文本,与文章内容无关。可以在摘要中使用标记。
Cons(缺点)
对于内容作者来说,需要编写一个完全独立的文本作为文章的摘要,这会增加额外的工作量。
因为有多种方法可以指定摘要,了解 Hugo 在决定返回 .Summary 的文本时遵循的选择顺序是有用的。它如下所示:
<!--more--> 摘要分隔符,则提供分隔符之前的文本,按照手动摘要拆分方法。summary变量,则按照前置元数据摘要方法提供变量的值。 Hugo 使用上述步骤中返回的第一个文本。因此,例如,如果您的文章在其前言中具有
summary变量和一个<!--more-->摘要分隔符,Hugo 将使用手动摘要拆分方法。
您可以使用以下代码显示内容摘要。例如,您可以在一个章节模板中使用以下代码片段。
page-list-with-summaries.html
| |
注意,当内容未被截断时,即摘要包含整篇文章时,.Truncated 布尔变量值可以用于隐藏"Read More…“链接。
https://gohugo.io/content-management/cross-references/
用于创建指向文档的简码链接。
ref和relref简码分别显示文档的绝对和相对永久链接。
ref和relref ref和relref简码需要一个参数:指向内容文档的路径,带有或不带有文件扩展名,带有或不带有锚点。没有前导 / 的路径首先相对于当前页面解析,然后相对于站点的其余部分解析。
.
└── content
    ├── about
    |   ├── _index.md
    |   └── credits.md
    ├── pages
    |   ├── document1.md
    |   └── document2.md    // has anchor #anchor
    ├── products
    |   └── index.md
    └── blog
        └── my-post.md
这些页面可以按以下方式被引用:
| |
index.md可以被其路径或其不带结尾 / 的所在文件夹引用。_index.md只被其所在文件夹引用:
| |
在Markdown中使用ref或relref生成超链接:
| |
如果文档无法被唯一解析,Hugo将发出错误或警告。错误行为可配置,请参阅下文。
要链接到文档的另一种语言版本,请使用以下语法:
| |
要链接到文档的另一种输出格式,请使用以下语法:
| |
使用Markdown文档类型时,Hugo为页面上的每个标题生成元素ID。例如:
| |
生成以下HTML:
| |
在使用ref或relref简码时,通过将ID附加到路径来获取标题的永久链接:
| |
通过包含属性来生成自定义标题ID。例如:
| |
生成以下HTML:
| |
如果同一标题在页面上出现多次,Hugo将生成唯一的元素ID。例如:
| |
生成以下HTML:
| |
自 Hugo 0.45 开始,该行为可以在 config.toml 中进行配置:
refLinksErrorLevel (“ERROR”)
使用ref或relref解析页面链接时,如果链接无法解析,将使用此日志级别记录。有效值为ERROR(默认)或WARNING。任何ERROR都将导致构建失败(exit -1)。
refLinksNotFoundURL
在 ref 或 relref 中找不到页面引用时使用的 URL 占位符。则原样使用。
https://gohugo.io/content-management/urls/
通过前置元数据输入和站点配置中的设置来控制URL的结构和外观。
默认情况下,当Hugo渲染页面时,生成的URL与content目录中的文件路径匹配。例如:
| |
您可以通过前置元数据值和站点配置选项来更改URL的结构和外观。
slugSet the slug in 前置元数据 to override the last segment of the path. The slug value does not affect section pages.
在前置元数据中设置slug以覆盖路径的最后一段。slug值不影响部分页面。
content/posts/post-1.md
=== “yaml”
``` yaml
---
slug: my-first-post
title: My First Post
---

```
=== “toml”
``` toml
+++
slug = 'my-first-post'
title = 'My First Post'
+++
```
=== “json”
``` json
{
   "slug": "my-first-post",
   "title": "My First Post"
}
```
结果的URL将是:
| |
url 在前置元数据中设置url以覆盖整个路径。将其用于常规页面或section页面。
具有以下前置元数据的:
content/posts/post-1.md
=== “yaml”
``` yaml
---
title: My First Article
url: /articles/my-first-article
---
```
=== “toml”
``` toml
+++
title = 'My First Article'
url = '/articles/my-first-article'
+++
```
=== “json”
``` json
{
   "title": "My First Article",
   "url": "/articles/my-first-article"
}
```
结果的URL将是:
| |
如果包括文件扩展名:
content/posts/post-1.md
=== “yaml”
``` yaml
---
title: My First Article
url: /articles/my-first-article.html
---
```
=== “toml”
``` toml
+++
title = 'My First Article'
url = '/articles/my-first-article.html'
+++
```
=== “json”
``` json
{
   "title": "My First Article",
   "url": "/articles/my-first-article.html"
}
```
结果的URL将是:
| |
在单语站点中,带有或不带有前导斜杠的url值相对于baseURL。
在多语言站点中:
url值相对于baseURL。url值相对于baseURL加上语言前缀。| Site type | 前置元数据 url | Resulting URL |
|---|---|---|
| monolingual | /about | https://example.org/about/ |
| monolingual | about | https://example.org/about/ |
| multilingual | /about | https://example.org/about/ |
| multilingual | about | https://example.org/de/about/ |
如果在前置元数据中同时设置slug和url,则url值优先。
在站点配置中,为顶层section内的常规页面设置URL模式。这是递归的,影响后代常规页面。
在站点配置中定义的
permalinks不适用于section页面。要调整section页面的URL,请在前置元数据中设置url。
使用此内容结构:
| |
为posts section内的普通页面创建一个基于日期的递归层次结构:
config.
=== “yaml”
``` yaml
posts: /posts/:year/:month/:title/
```
=== “toml”
``` toml
posts = '/posts/:year/:month/:title/'
```
=== “json”
``` json
{
"posts": "/posts/:year/:month/:title/"
}
```
发布站点的结构将是:
| |
要为内容根目录中的常规页面创建基于日期的层次结构:
config.
=== “yaml”
``` yaml
/: /:year/:month/:title/
```
=== “toml”
``` toml
'/' = '/:year/:month/:title/'
```
=== “json”
``` json
{
"/": "/:year/:month/:title/"
}
```
为内容根目录定义的URL模式不适用于递归。
使用相同的方法处理分类(taxonomies)。例如,要省略URL的分类段(taxonomy segment):
config.
=== “yaml”
``` yaml
tags: /:title/
```
=== “toml”
``` toml
tags = '/:title/'
```
=== “json”
``` json
{
"tags": "/:title/"
}
```
前置元数据url值优先于permalinks中定义的URL模式。
在定义URL模式时使用这些标记。前置元数据中的date字段确定与时间相关的标记的值。
:year
4位数字的年份
:month
2位数字的月份
:monthname
月份的名称
:day
2位数字的日期
:weekday
一周中的1位数字日期(星期日=0)
:weekdayname
一周中日期的名称
:yearday
1到3位数字的一年中的日期
:section
内容的section
:sections
内容的section层次结构。您可以使用切片语法选择section::sections[1:] 包括除第一个部分以外的所有部分,:sections[:last] 包括除最后一个部分以外的所有部分,:sections[last] 仅包括最后一个部分,:sections[1:2] 包括第2个和第3个section (这里应该是由问题的:按照go的语法这里应该只包括第1个section才对吧)。请注意,这种切片访问不会抛出任何越界错误,因此您不必非常精确。
:title
内容的标题
:slug
内容的 slug(如果在前置元数据中未提供 slug,则使用title)
:slugorfilename
内容的 slug(如果在前置元数据中未提供 slug,则使用文件名)
:filename
内容的文件名(不包括扩展名)
对于与时间有关的值,您还可以使用 Go 的 time 包中定义的布局字符串组件。例如:
config.
=== “yaml”
``` yaml
permalinks:
posts: /:06/:1/:2/:title/
```
=== “toml”
``` toml
[permalinks]
posts = '/:06/:1/:2/:title/'
```
=== “json”
``` json
{
"permalinks": {
"posts": "/:06/:1/:2/:title/"
}
}
```
URL 的外观可以是丑陋的或漂亮的。
| Type | Path | URL |
|---|---|---|
| ugly | content/about.md | https://example.org/about.html |
| pretty | content/about.md | https://example.org/about/ |
默认情况下,Hugo 生成漂亮的 URL。要生成丑陋的 URL,请更改您的站点配置:
config.
=== “yaml”
``` yaml
uglyURLs: true
```
=== “toml”
``` toml
uglyURLs = true
```
=== “json”
``` json
{
"uglyURLs": true
}
```
Hugo 提供了两个相互排斥的配置选项,用于在渲染页面后更改 URL。
这是一个传统的配置选项,被模板函数和 markdown 渲染钩子取代,很可能会在未来的版本中被删除。
如果启用,Hugo 在渲染页面后执行搜索和替换。它搜索与 action、href、src、srcset 和 url 属性相关联的站点相对 URL(具有前导斜杠)。然后,它添加 baseURL 来创建绝对 URL。
| |
这是一种不完美、蛮力的方法,会影响内容以及HTML属性。正如上面提到的,这是一个旧的配置选项,可能会在未来的版本中被删除。
启用方法如下:
config.
=== “yaml”
``` yaml
canonifyURLs: true
```
=== “toml”
``` toml
canonifyURLs = true
```
=== “json”
``` json
{
"canonifyURLs": true
}
```
除非您创建的是可通过文件系统导航的无服务器站点,否则不要启用此选项。
如果启用此选项,Hugo将在渲染页面后执行搜索和替换。它将搜索与action、href、src、srcset和url属性相关的站点相对URL(带有前导斜杠)。然后将URL转换为相对于当前页面的URL。
例如,在渲染content/posts/post-1时:
| |
这是一种不完美、蛮力的方法,会影响内容以及HTML属性。正如上面提到的,除非您创建的是可通过文件系统导航的无服务器站点,否则不要启用此选项。
启用方法如下:
config.
=== “yaml”
``` yaml
relativeURLs: true
```
=== “toml”
``` toml
relativeURLs = true
```
=== “json”
``` json
{
"relativeURLs": true
}
```
使用别名从旧URL重定向到新URL:
baseURL 更改现有页面的文件名,并创建从先前URL到新URL的别名:
content/posts/new-file-name.md.
=== “yaml”
``` yaml
aliases:
- /posts/previous-file-name
```
=== “toml”
``` toml
aliases = ['/posts/previous-file-name']
```
=== “json”
``` json
{
"aliases": [
"/posts/previous-file-name"
]
}
```
Each of these directory-relative aliases is equivalent to the site-relative alias above:
这些目录相对别名与上面的站点相对别名等效:
previous-file-name
./previous-file-name
../posts/previous-file-name
您可以为当前页面创建多个别名:
content/posts/new-file-name.md.
=== “yaml”
``` yaml
aliases:
- previous-file-name
- original-file-name
```
=== “toml”
``` toml
aliases = ['previous-file-name', 'original-file-name']
```
=== “json”
``` json
{
"aliases": [
"previous-file-name",
"original-file-name"
]
}
```
在多语言站点中,可以使用目录相对别名,或者使用站点相对别名包含语言前缀:
content/posts/new-file-name.de.md.
=== “yaml”
``` yaml
aliases:
- /de/posts/previous-file-name
```
=== “toml”
``` toml
aliases = ['/de/posts/previous-file-name']
```
=== “json”
``` json
{
"aliases": [
"/de/posts/previous-file-name"
]
}
```
使用上面的第一个示例,Hugo 生成了以下站点结构:
| |
从旧的 URL 到新 URL 的别名是客户端重定向:
posts/previous-file-name/index.html
| |
Collectively, the elements in the head section:
head 部分的元素总结如下:
Hugo 在渲染页面之前渲染别名文件。带有先前文件名的新页面将覆盖别名,这是预期的。
创建一个新的模板(layouts/alias.html)来自定义别名文件的内容。该模板接收以下上下文:
Permalink
被别名的页面链接
Page
被别名的页面的 Page 数据
https://gohugo.io/content-management/menus/
通过定义条目、本地化每个条目以及渲染结果数据结构来创建菜单。
要为您的站点创建菜单步骤如下:
创建多个菜单,可以是平面或嵌套的。例如,创建一个用于页眉的主菜单,以及一个用于页脚的单独菜单。
有三种方法可以定义菜单条目:
虽然可以在定义菜单时结合使用这些方法,但如果在整个站点中使用一种方法,则更容易理解和维护菜单。
要为站点的每个顶级章节自动定义菜单条目,请在站点配置中启用section pages menu。
config.
=== “yaml”
``` yaml
sectionPagesMenu: main
```
=== “toml”
``` toml
sectionPagesMenu = 'main'
```
=== “json”
``` json
{
"sectionPagesMenu": "main"
}
```
这将创建一个菜单结构,您可以在模板中使用 site.Menus.main 访问它。有关详细信息,请参阅菜单模板。
要将一个页面添加到"main"菜单中:
content/about.md
=== “yaml”
``` yaml
---
menu: main
title: About
---
```
=== “toml”
``` toml
+++
menu = 'main'
title = 'About'
+++
```
=== “json”
``` json
{
"menu": "main",
"title": "About"
}
```
您可以在模板中使用 site.Menus.main 访问该条目。有关详细信息,请参阅菜单模板。
要将一个页面添加到"main"和"footer"菜单中:
content/contact.md
=== “yaml”
``` yaml
---
menu:
- main
- footer
title: Contact
---
```
=== “toml”
``` toml
+++
menu = ['main', 'footer']
title = 'Contact'
+++
```
=== “json”
``` json
{
"menu": [
"main",
"footer"
],
"title": "Contact"
}
```
您可以在模板中使用 site.Menus.main 和 site.Menus.footer 访问该条目。有关详细信息,请参阅菜单模板。
在前置元数据中定义菜单条目时,请使用以下这些属性:
identifier
(string)当两个或多个菜单条目具有相同name或者使用翻译表(translation tables)本地化name时,必填。必须以字母开头,后跟字母、数字或下划线。
name
(string)在渲染该菜单条目时要显示的文本。
params
(map)该菜单条目的用户定义属性。
parent
(string)该父菜单条目的identifier。如果未定义identifier,请使用name。在嵌套菜单中的子菜单条目中必填。
post
(string)在渲染该菜单条目时追加的HTML。
pre
(string)在渲染该菜单条目时前置的HTML。
title
(string)被渲染的该菜单条目的HTML的title属性。
weight
(int)非零整数,表示该条目相对于菜单根的位置,或者表示子条目相对于其父级的位置。较轻的条目上浮到顶部,较重的条目下沉到底部。
此前置元数据菜单条目演示了一些可用属性:
content/products/software.md
=== “yaml”
``` yaml
---
menu:
main:
params:
class: center
parent: Products
pre: <i class="fa-solid fa-code"></i>
weight: 20
title: Software
---
```
=== “toml”
``` toml
+++
title = 'Software'
[menu]
[menu.main]
parent = 'Products'
pre = '<i class="fa-solid fa-code"></i>'
weight = 20
[menu.main.params]
class = 'center'
+++
```
=== “json”
``` json
{
"menu": {
"main": {
"params": {
"class": "center"
},
"parent": "Products",
"pre": "\u003ci class=\"fa-solid fa-code\"\u003e\u003c/i\u003e",
"weight": 20
}
},
"title": "Software"
}
```
在模板中使用site.Menus.main访问该条目。有关详细信息,请参见菜单模板。
要定义"main"菜单的条目:
config.
=== “yaml”
``` yaml
menu:
main:
- name: Home
pageRef: /
weight: 10
- name: Products
pageRef: /products
weight: 20
- name: Services
pageRef: /services
weight: 30
```
=== “toml”
``` toml
[menu]
[[menu.main]]
name = 'Home'
pageRef = '/'
weight = 10
[[menu.main]]
name = 'Products'
pageRef = '/products'
weight = 20
[[menu.main]]
name = 'Services'
pageRef = '/services'
weight = 30
```
=== “json”
``` json
{
"menu": {
"main": [
{
"name": "Home",
"pageRef": "/",
"weight": 10
},
{
"name": "Products",
"pageRef": "/products",
"weight": 20
},
{
"name": "Services",
"pageRef": "/services",
"weight": 30
}
]
}
}
```
这将创建一个菜单结构,您可以在模板中使用site.Menus.main访问。有关详细信息,请参见菜单模板。
要定义"footer"菜单的条目:
config.
=== “yaml”
``` yaml
menu:
footer:
- name: Terms
pageRef: /terms
weight: 10
- name: Privacy
pageRef: /privacy
weight: 20
```
=== “toml”
``` toml
[menu]
[[menu.footer]]
name = 'Terms'
pageRef = '/terms'
weight = 10
[[menu.footer]]
name = 'Privacy'
pageRef = '/privacy'
weight = 20
```
=== “json”
``` json
{
"menu": {
"footer": [
{
"name": "Terms",
"pageRef": "/terms",
"weight": 10
},
{
"name": "Privacy",
"pageRef": "/privacy",
"weight": 20
}
]
}
}
```
这将创建一个菜单结构,您可以在模板中使用site.Menus.footer访问。有关详细信息,请参见菜单模板。
在前置元数据中定义的条目可用的属性也适用于在站点配置中定义的条目。
在站点配置中定义的每个菜单条目都需要两个或多个属性:
为内部链接指定name和pageRef
为外部链接指定name和url
pageRef
(string)目标页面的文件路径,相对于content目录。省略语言代码和文件扩展名。内部链接则必填。
| Kind | pageRef |
|---|---|
| home | / |
| page | /books/book-1 |
| section | /books |
| taxonomy | /tags |
| term | /tags/foo |
url
(string)外部链接则必填。
这个嵌套菜单演示了一些可用的属性:
config.
=== “yaml”
``` yaml
menu:
main:
- name: Products
pageRef: /products
weight: 10
- name: Hardware
pageRef: /products/hardware
parent: Products
weight: 1
- name: Software
pageRef: /products/software
parent: Products
weight: 2
- name: Services
pageRef: /services
weight: 20
- name: Hugo
params:
rel: external
pre: <i class="fa fa-heart"></i>
url: https://gohugo.io/
weight: 30
```
=== “toml”
``` toml
[menu]
[[menu.main]]
name = 'Products'
pageRef = '/products'
weight = 10
[[menu.main]]
name = 'Hardware'
pageRef = '/products/hardware'
parent = 'Products'
weight = 1
[[menu.main]]
name = 'Software'
pageRef = '/products/software'
parent = 'Products'
weight = 2
[[menu.main]]
name = 'Services'
pageRef = '/services'
weight = 20
[[menu.main]]
name = 'Hugo'
pre = '<i class="fa fa-heart"></i>'
url = 'https://gohugo.io/'
weight = 30
[menu.main.params]
rel = 'external'
```
=== “json”
``` json
{
"menu": {
"main": [
{
"name": "Products",
"pageRef": "/products",
"weight": 10
},
{
"name": "Hardware",
"pageRef": "/products/hardware",
"parent": "Products",
"weight": 1
},
{
"name": "Software",
"pageRef": "/products/software",
"parent": "Products",
"weight": 2
},
{
"name": "Services",
"pageRef": "/services",
"weight": 20
},
{
"name": "Hugo",
"params": {
"rel": "external"
},
"pre": "\u003ci class=\"fa fa-heart\"\u003e\u003c/i\u003e",
"url": "https://gohugo.io/",
"weight": 30
}
]
}
}
```
这将创建一个菜单结构,您可以在模板中使用 site.Menus.main 访问。有关详细信息,请参阅菜单模板。
Hugo提供了两种方法来本地化菜单条目。请参阅多语言。
请参阅菜单模板。
https://gohugo.io/content-management/static-files/
这些文件以静态方式(原样、无修改)在站点根目录上提供服务。
默认情况下,站点项目中的 static/ 目录用于所有静态文件(例如样式表、JavaScript、图像)。这些静态文件将在站点根路径上提供服务(例如,如果您有 static/image.png 文件,则可以使用 http://{server-url}/image.png 访问它,在文档中包含它可以使用 )。
Hugo 可以通过在站点配置中配置 staticDir 参数来查找不同的目录,甚至多个目录以获取这些静态文件。所有静态目录中的所有文件将组成一个联合文件系统。
这个联合文件系统将从您的站点根目录提供服务。因此,<SITE PROJECT>/static/me.png 文件将作为 <MY_BASEURL>/me.png 文件访问。
这里是一个为多语言站点设置 staticDir 和 staticDir2 的示例:
config.
=== “yaml”
``` yaml
languages:
en:
baseURL: https://example.com
languageName: English
staticDir2: static_en
title: In English
weight: 2
"no":
baseURL: https://example.no
languageName: Norsk
staticDir:
- staticDir_override
- static_no
title: På norsk
weight: 1
staticDir:
- static1
- static2
```
=== “toml”
``` toml
staticDir = ['static1', 'static2']
[languages]
[languages.en]
baseURL = 'https://example.com'
languageName = 'English'
staticDir2 = 'static_en'
title = 'In English'
weight = 2
[languages.no]
baseURL = 'https://example.no'
languageName = 'Norsk'
staticDir = ['staticDir_override', 'static_no']
title = 'På norsk'
weight = 1
```
=== “json”
``` json
{
"languages": {
"en": {
"baseURL": "https://example.com",
"languageName": "English",
"staticDir2": "static_en",
"title": "In English",
"weight": 2
},
"no": {
"baseURL": "https://example.no",
"languageName": "Norsk",
"staticDir": [
"staticDir_override",
"static_no"
],
"title": "På norsk",
"weight": 1
}
},
"staticDir": [
"static1",
"static2"
]
}
```
在上面的示例中,未使用任何主题:
英文站点将其静态文件作为"static1"、“static2"和"static_en"的联合体。对于文件重复,右边的版本将获胜。
挪威站点将其静态文件作为"staticDir_override"和"static_no"的联合体。
Note 1
staticDir2 中的 2(可以是 0 到 10 的数字)被添加以告诉 Hugo 您想将此目录添加到使用 staticDir 定义的全局静态目录集合中。在语言级别上使用 staticDir 将替换全局值(如挪威站点案例所示)。
Note 2
上面的示例是一个multihost设置。在常规设置中,所有静态目录将对所有站点都可用。
https://gohugo.io/content-management/toc/
Hugo可以自动解析Markdown内容并创建一个目录,您可以在模板中使用它。
以前,没有开箱即用的方法来指定要渲染TOC的标题级别。请参见相关的GitHub讨论(#1778)。因此,从{{ .Content }}中提取时,生成的<nav id="TableOfContents"><ul></ul></nav>将从<h1>开始。
Hugo v0.60.0切换到了Goldmark作为Markdown的默认库,该库具有改进和可配置的TOC实现。请看如何为Goldmark渲染器配置TOC。
以通常的标题方式创建您的Markdown。以下是一些示例内容:
| |
Hugo将从##Introduction、##My Heading和###My Subheading创建一个目录,然后将其存储在页面变量.TableOfContents中。
内置的.TableOfContents变量输出一个带有子<ul>元素的<nav id="TableOfContents">,其子<li>元素以适当的HTML标题开头。请查看可用设置,以配置要在TOC中包含哪些标题级别。
以下是一个非常基本的单页面模板示例:
layout/_default/single.html
| |
以下是一个部分模板,它为页面级别控制目录添加了稍微更多的逻辑。它假定您在内容的前置元数据中使用toc字段,除非将其特别设置为false,否则会将TOC添加到具有大于400的.WordCount(请参见页面变量)的任何页面。此示例还演示了如何在模板中使用条件语句:
layouts/partials/toc.html
| |
通过前面的示例,即使页面中有> 400个单词且toc未设置为false,如果页面中没有标题可以被{{ .TableOfContents }}变量提取,也不会渲染目录。
Hugo支持使用AsciiDoc内容格式的目录。
在内容文件的头部,指定AsciiDoc TOC指令,以确保生成目录。Hugo将使用生成的TOC来填充页面变量.TableOfContents,方式与Markdown描述的相同。请参见以下示例:
// <!-- Your 前置元数据 up here -->
:toc:
// Set toclevels to be at least your hugo [markup.tableOfContents.endLevel] config key
:toclevels: 4
== Introduction
One morning, when Gregor Samsa woke from troubled dreams, he found himself transformed in his bed into a horrible vermin.
== My Heading
He lay on his armour-like back, and if he lifted his head a little he could see his brown belly, slightly domed and divided by arches into stiff sections. The bedding was hardly able to cover it and seemed ready to slide off any moment.
=== My Subheading
A collection of textile samples lay spread out on the table - Samsa was a travelling salesman - and above it there hung a picture that he had recently cut out of an illustrated magazine and housed in a nice, gilded frame. It showed a lady fitted out with a fur hat and fur boa who sat upright, raising a heavy fur muff that covered the whole of her lower arm towards the viewer. Gregor then turned to look out the window at the dull weather. Drops
Hugo将获取此AsciiDoc并创建目录,并将其存储在页面变量.TableOfContents中,与Markdown描述的相同。
Hugo内置了Disqus模板,但这不是唯一能够与您的新Hugo站点配合使用的评论系统。
Hugo支持Disqus,这是一个第三方服务,通过JavaScript为站点提供评论和社区功能。
您的主题可能已经支持Disqus,但如果没有,可以通过Hugo内置的Disqus partial轻松添加到您的模板中。
Hugo已经为您的模板提供了加载Disqus所需的所有代码。在将Disqus添加到您的站点之前,您需要设置一个帐户。
Disqus评论要求您在站点的配置文件中设置单个值,如下所示:
=== “yaml”
``` yaml
disqusShortname: yourDisqusShortname
```
=== “toml”
``` toml
disqusShortname = 'yourDisqusShortname'
```
=== “json”
``` json
{
"disqusShortname": "yourDisqusShortname"
}
```
对于许多站点来说,这样的配置已经足够。但是,您还可以在单个内容文件的前置元数据中设置以下内容:
disqus_identifierdisqus_titledisqus_url Disqus有其自己的内部模板可用,要渲染它,请在要出现评论的位置添加以下代码:
| |
以下是Disqus的一些替代方案:
https://gohugo.io/content-management/multilingual/
Hugo支持创建并排展示多种语言的站点。
您应该在站点配置中的languages部分定义可用的语言。
另请参阅Hugo多语言第一部分:内容翻译。
以下是多语言Hugo项目的站点配置示例:
config.
=== “yaml”
``` yaml
copyright: Everything is mine
defaultContentLanguage: en
languages:
ar:
languagedirection: rtl
title: مدونتي
weight: 2
en:
params:
linkedin: https://linkedin.com/whoever
title: My blog
weight: 1
fr:
params:
linkedin: https://linkedin.com/fr/whoever
navigation:
help: Aide
title: Mon blogue
weight: 2
pt-pt:
title: O meu blog
weight: 3
params:
navigation:
help: Help
```
=== “toml”
``` toml
copyright = 'Everything is mine'
defaultContentLanguage = 'en'
[languages]
[languages.ar]
languagedirection = 'rtl'
title = 'مدونتي'
weight = 2
[languages.en]
title = 'My blog'
weight = 1
[languages.en.params]
linkedin = 'https://linkedin.com/whoever'
[languages.fr]
title = 'Mon blogue'
weight = 2
[languages.fr.params]
linkedin = 'https://linkedin.com/fr/whoever'
[languages.fr.params.navigation]
help = 'Aide'
[languages.pt-pt]
title = 'O meu blog'
weight = 3
[params]
[params.navigation]
help = 'Help'
```
=== “json”
``` json
{
"copyright": "Everything is mine",
"defaultContentLanguage": "en",
"languages": {
"ar": {
"languagedirection": "rtl",
"title": "مدونتي",
"weight": 2
},
"en": {
"params": {
"linkedin": "https://linkedin.com/whoever"
},
"title": "My blog",
"weight": 1
},
"fr": {
"params": {
"linkedin": "https://linkedin.com/fr/whoever",
"navigation": {
"help": "Aide"
}
},
"title": "Mon blogue",
"weight": 2
},
"pt-pt": {
"title": "O meu blog",
"weight": 3
}
},
"params": {
"navigation": {
"help": "Help"
}
}
}
```
任何未在languages块中定义的内容都将回退到该键的全局值(例如英语en语言的copyright)。这也适用于params,如上面的示例所示:您将在法语中获得Aide的值,并在所有没有设置此参数的语言中获得Help。
使用上述配置,所有内容、站点地图、RSS源、分页和分类页将在英语(默认内容语言)下的/目录下渲染,然后在法语的/fr目录下渲染。
在单页模板中使用前置元数据 Params时,忽略翻译的键中的params。
defaultContentLanguage设置项目的默认语言。如果未设置,则默认语言为en。
如果需要将默认语言渲染在其自己的语言代码(/en)下,像其他语言一样,请设置defaultContentLanguageInSubdir:true。
只有明显的非全局选项可以按语言覆盖。全局选项的示例包括baseURL、buildDrafts等。
请注意:使用小写语言代码,即使是使用区域性语言(例如使用pt-pt而不是pt-PT)。当前Hugo语言内部将语言代码转换为小写字母,这可能会与未转换为小写字母的defaultContentLanguage等设置发生冲突。请在Hugo存储库问题跟踪器中跟踪此问题的演变。
您可以禁用一个或多个语言。这在进行新翻译时非常有用。
config.
=== “yaml”
``` yaml
disableLanguages:
- fr
- ja
```
=== “toml”
``` toml
disableLanguages = ['fr', 'ja']
```
=== “json”
``` json
{
"disableLanguages": [
"fr",
"ja"
]
}
```
请注意,您不能禁用默认内容语言。
我们将其保留为一个独立的设置,以便更容易通过操作系统环境进行设置:
| |
如果您已经在config.toml中有禁用的语言列表,可以像这样在开发环境中启用它们:
| |
从Hugo 0.31开始,我们支持多语言multihost配置。详见此问题的说明。
这意味着现在可以为每种language配置一个baseURL:
如果在
language级别上设置了baseURL,则所有语言都必须具有一个,且它们必须全部不同。
例如:
config.
=== “yaml”
``` yaml
languages:
en:
baseURL: https://example.com
languageName: English
title: In English
weight: 2
fr:
baseURL: https://example.fr
languageName: Français
title: En Français
weight: 1
```
=== “toml”
``` toml
[languages]
[languages.en]
baseURL = 'https://example.com'
languageName = 'English'
title = 'In English'
weight = 2
[languages.fr]
baseURL = 'https://example.fr'
languageName = 'Français'
title = 'En Français'
weight = 1
```
=== “json”
``` json
{
"languages": {
"en": {
"baseURL": "https://example.com",
"languageName": "English",
"title": "In English",
"weight": 2
},
"fr": {
"baseURL": "https://example.fr",
"languageName": "Français",
"title": "En Français",
"weight": 1
}
}
}
```
有了上面的配置,这两个站点将生成到带有自己根目录的 public 中:
| |
所有的URL(例如.Permalink等)都将从该根目录生成。因此,上面的英文主页的.Permalink将设置为https://example.com/。
当您运行hugo server时,我们将启动多个HTTP服务器。您通常会在控制台中看到以下内容:
| |
实时重新加载和在服务器之间使用--navigateToChanged会按预期工作。
有两种管理内容翻译的方式。两种方式都可以确保每个页面都被分配了一种语言,并与其对应的翻译链接在一起。
考虑以下示例:
/content/about.en.md/content/about.fr.md 第一个文件分配了英语语言,并链接到第二个文件。第二个文件分配了法语语言,并链接到第一个文件。
它们的语言是根据文件名后缀添加的语言代码分配的。
通过具有相同的路径和基本文件名,将内容部分链接在一起作为翻译页面。
如果文件没有语言代码,它将被分配为默认语言。
该系统使用不同的内容目录来处理每种语言。每种语言的内容目录都是使用 contentDir 参数设置的。
config.
=== “yaml”
``` yaml
languages:
en:
contentDir: content/english
languageName: English
weight: 10
fr:
contentDir: content/french
languageName: Français
weight: 20
```
=== “toml”
``` toml
[languages]
[languages.en]
contentDir = 'content/english'
languageName = 'English'
weight = 10
[languages.fr]
contentDir = 'content/french'
languageName = 'Français'
weight = 20
```
=== “json”
``` json
{
"languages": {
"en": {
"contentDir": "content/english",
"languageName": "English",
"weight": 10
},
"fr": {
"contentDir": "content/french",
"languageName": "Français",
"weight": 20
}
}
}
```
contentDir 的值可以是任何有效的路径,甚至是绝对路径引用。唯一的限制是内容目录不能重叠。
考虑以下示例与上述配置一起使用:
/content/english/about.md/content/french/about.md 第一个文件被分配为英语,并与第二个文件链接。第二个文件被分配为法语,并与第一个文件链接。
它们的语言是根据它们放置所在的内容目录分配的。
通过具有相同的路径和基名(相对于其语言内容目录),内容片段将作为翻译页面相互链接。
任何在前置元数据中设置相同翻译键(translationKey)的页面将被链接为翻译页面,而不考虑基名或位置。
考虑以下示例:
/content/about-us.en.md/content/om.nn.md/content/presentation/a-propos.fr.md=== “yaml”
``` yaml
translationKey: about
```
=== “toml”
``` toml
translationKey = 'about'
```
=== “json”
``` json
{
"translationKey": "about"
}
```
通过在所有三个页面的前置元数据参数中设置翻译键(translationKey)为 about,它们将被链接为翻译页面。
因为路径和文件名用于处理链接,所有翻译页面将共享相同的URL(除了语言子目录)。
为了本地化URL:
slug或urlurl 例如,法语翻译可以有自己本地化的slug。
content/about.fr.md
=== “yaml”
``` yaml
---
slug: a-propos
title: A Propos
---
```
=== “toml”
``` toml
+++
slug = 'a-propos'
title = 'A Propos'
+++
```
=== “json”
``` json
{
"slug": "a-propos",
"title": "A Propos"
}
```
At render, Hugo will build both /about/ and /fr/a-propos/ without affecting the translation link.
在渲染时,Hugo将同时构建/about/和/fr/a-propos/,而不影响翻译链接。
To avoid the burden of having to duplicate files, each Page Bundle inherits the resources of its linked translated pages’ bundles except for the content files (Markdown files, HTML files etc…).
为了避免重复文件的负担,每个页面包继承其链接的翻译页面包的资源,除了内容文件(Markdown文件,HTML文件等)。
Therefore, from within a template, the page will have access to the files from all linked pages’ bundles.
因此,在模板内,页面将可以访问所有链接页面包的文件。
If, across the linked bundles, two or more files share the same basename, only one will be included and chosen as follows:
如果在链接的包中,两个或多个文件具有相同的基名,则只包括一个,并按以下方式选择:
Weight.Page Bundle resources follow the same language assignment logic as content files, both by filename (image.jpg, image.fr.jpg) and by directory (english/about/header.jpg, french/about/header.jpg).
页面包资源遵循与内容文件相同的语言分配逻辑,包括文件名(image.jpg,image.fr.jpg)和目录(english/about/header.jpg,french/about/header.jpg)。
To create a list of links to translated content, use a template similar to the following:
要创建链接到翻译内容的链接列表,请使用类似以下的模板:
layouts/partials/i18nlist.html
| |
The above can be put in a partial (i.e., inside layouts/partials/) and included in any template, whether a single content page or the homepage. It will not print anything if there are no translations for a given page.
上述内容可以放在partial中(即layouts/partials/文件夹中),并包含在任何模板中,无论是单个内容页面还是主页。如果没有给定页面的翻译,它将不会打印任何内容。
The above also uses the i18n function described in the next section.
上述内容还使用了下一节中描述的i18n函数。
.AllTranslations on a Page can be used to list all translations, including the page itself. On the home page it can be used to build a language navigator:
在页面上使用.AllTranslations可以列出所有翻译,包括页面本身。在主页上,它可用于构建语言导航器:
layouts/partials/allLanguages.html
| |
Hugo uses go-i18n to support string translations. See the project’s source repository to find tools that will help you manage your translation workflows.
Hugo使用go-i18n支持字符串翻译。请参见该项目的源存储库,以查找可帮助您管理翻译工作流程的工具。
Translations are collected from the themes/<THEME>/i18n/ folder (built into the theme), as well as translations present in i18n/ at the root of your project. In the i18n, the translations will be merged and take precedence over what is in the theme folder. Language files should be named according to RFC 5646 with names such as en-US.toml, fr.toml, etc.
从themes/
Artificial languages with private use subtags as defined in RFC 5646 § 2.2.7 are also supported. You may omit the art-x- prefix for brevity. For example:
RFC 5646§2.2.7中定义的带有私有使用子标记的人工语言也受支持。为简洁起见,您可以省略art-x-前缀。例如:
| |
Private use subtags must not exceed 8 alphanumeric characters.
私有使用子标记不得超过8个字母数字字符。
From within your templates, use the i18n function like this:
在您的模板中,可以像这样使用i18n函数:
| |
The function will search for the "home" id:
该函数将搜索"home"id:
i18n/en-US.
=== “yaml”
``` yaml
home:
other: Home
```
=== “toml”
``` toml
[home]
other = 'Home'
```
=== “json”
``` json
{
"home": {
"other": "Home"
}
}
```
The result will be
结果将是
| |
Often you will want to use the page variables in the translation strings. To do so, pass the . context when calling i18n:
通常,您会想在翻译字符串中使用页面变量。要这样做,请在调用i18n时传递上下文。
| |
The function will pass the . context to the "wordCount" id:
该函数将把上下文传递给"wordCount"id:
i18n/en-US.
=== “yaml”
``` yaml
wordCount:
other: This article has {{ .WordCount }} words.
```
=== “toml”
``` toml
[wordCount]
other = 'This article has {{ .WordCount }} words.'
```
=== “json”
``` json
{
"wordCount": {
"other": "This article has {{ .WordCount }} words."
}
}
```
Assume .WordCount in the context has value is 101. The result will be:
假设上下文中的 .WordCount 值为 101。结果将是:
| |
In other to meet singular/plural requirement, you must pass a dictionary (map) with a numeric .Count property to the i18n function. The below example uses .ReadingTime variable which has a built-in .Count property.
为了满足单数/复数要求,您必须将具有数字 .Count 属性的字典(map)传递给 i18n 函数。下面的示例使用内置的 .ReadingTime 变量,它具有一个 .Count 属性。
| |
The function will read .Count from .ReadingTime and evaluate whether the number is singular (one) or plural (other). After that, it will pass to readingTime id in i18n/en-US.toml file:
函数将从 .ReadingTime 中读取 .Count 并评估数字是单数(one)还是复数(other)。之后,它将传递给 i18n/en-US.toml 文件中的 readingTime id:
i18n/en-US.
=== “yaml”
``` yaml
readingTime:
one: One minute to read
other: '{{ .Count }} minutes to read'
```
=== “toml”
``` toml
[readingTime]
one = 'One minute to read'
other = '{{ .Count }} minutes to read'
```
=== “json”
``` json
{
"readingTime": {
"one": "One minute to read",
"other": "{{ .Count }} minutes to read"
}
}
```
Assuming .ReadingTime.Count in the context has value is 525600. The result will be:
假设上下文中的 .ReadingTime.Count 值为 525600。结果将是:
| |
If .ReadingTime.Count in the context has value is 1. The result is:
如果上下文中的 .ReadingTime.Count 值为1。结果是:
| |
In case you need to pass a custom data: ((dict "Count" numeric_value_only) is minimum requirement)
如果您需要传递自定义数据:((dict “Count” numeric_value_only) 是最小要求)
| |
The following localization examples assume your site’s primary language is English, with translations to French and German.
以下本地化示例假定您站点的主要语言为英语,并提供了法语和德语的翻译。
config.
=== “yaml”
``` yaml
defaultContentLanguage: en
languages:
de:
contentDir: content/de
languageName: Deutsch
weight: 3
en:
contentDir: content/en
languageName: English
weight: 1
fr:
contentDir: content/fr
languageName: Français
weight: 2
```
=== “toml”
``` toml
defaultContentLanguage = 'en'
[languages]
[languages.de]
contentDir = 'content/de'
languageName = 'Deutsch'
weight = 3
[languages.en]
contentDir = 'content/en'
languageName = 'English'
weight = 1
[languages.fr]
contentDir = 'content/fr'
languageName = 'Français'
weight = 2
```
=== “json”
``` json
{
"defaultContentLanguage": "en",
"languages": {
"de": {
"contentDir": "content/de",
"languageName": "Deutsch",
"weight": 3
},
"en": {
"contentDir": "content/en",
"languageName": "English",
"weight": 1
},
"fr": {
"contentDir": "content/fr",
"languageName": "Français",
"weight": 2
}
}
}
```
With this 前置元数据:
有了这个前置元数据:
=== “yaml”
``` yaml
date: 2021-11-03T12:34:56+01:00
```
=== “toml”
``` toml
date = 2021-11-03T12:34:56+01:00
```
=== “json”
``` json
{
"date": "2021-11-03T12:34:56+01:00"
}
```
And this template code:
以及这个模板代码:
| |
The rendered page displays:
渲染的页面显示:
| Language | Value |
|---|---|
| English | Wednesday, November 3, 2021 |
| Français | mercredi 3 novembre 2021 |
| Deutsch | Mittwoch, 3. November 2021 |
See time.Format for details.
详细信息请参见time.Format。
With this template code:
使用此模板代码:
| |
The rendered page displays:
渲染的页面显示:
| Language | Value |
|---|---|
| English | $512.50 |
| Français | 512,50 $US |
| Deutsch | 512,50 $ |
See lang.FormatCurrency and lang.FormatAccounting for details.
With this template code:
使用此模板代码:
| |
The rendered page displays:
渲染的页面显示:
| Language | Value |
|---|---|
| English | 512.50 |
| Français | 512,50 |
| Deutsch | 512,50 |
See lang.FormatNumber and lang.FormatNumberCustom for details.
请参考lang.FormatNumber和lang.FormatNumberCustom了解详情。
With this template code:
使用此模板代码:
| |
The rendered page displays:
渲染的页面显示:
| Language | Value |
|---|---|
| English | 512.50% |
| Français | 512,50 % |
| Deutsch | 512,50 % |
See lang.FormatPercent for details.
请参考lang.FormatPercent了解详情。
Localization of menu entries depends on the how you define them:
菜单项的本地化取决于定义它们的方式:
When rendering the text that appears in menu each entry, the example menu template does this:
在渲染出现在菜单中的文本时,示例菜单模板执行以下操作:
| |
It queries the translation table for the current language using the menu entry’s identifier and returns the translated string. If the translation table does not exist, or if the identifier key is not present in the translation table, it falls back to name.
它使用菜单项的标识符查询当前语言的翻译表,并返回已翻译的字符串。如果翻译表不存在,或者标识符键不在翻译表中,则回退到名称。
The identifier depends on how you define menu entries:
标识符取决于您如何定义菜单项:
identifier is the page’s .Section.identifier property to the desired value.For example, if you define menu entries in site configuration:
例如,如果您在站点配置中定义菜单项:
config.
=== “yaml”
``` yaml
menu:
main:
- identifier: products
name: Products
pageRef: /products
weight: 10
- identifier: services
name: Services
pageRef: /services
weight: 20
```
=== “toml”
``` toml
[menu]
[[menu.main]]
identifier = 'products'
name = 'Products'
pageRef = '/products'
weight = 10
[[menu.main]]
identifier = 'services'
name = 'Services'
pageRef = '/services'
weight = 20
```
=== “json”
``` json
{
"menu": {
"main": [
{
"identifier": "products",
"name": "Products",
"pageRef": "/products",
"weight": 10
},
{
"identifier": "services",
"name": "Services",
"pageRef": "/services",
"weight": 20
}
]
}
}
```
Create corresponding entries in the translation tables:
创建相应的翻译表条目:
i18n/de.
=== “yaml”
``` yaml
products: Produkte
services: Leistungen
```
=== “toml”
``` toml
products = 'Produkte'
services = 'Leistungen'
```
=== “json”
``` json
{
"products": "Produkte",
"services": "Leistungen"
}
```
例如:
config.
=== “yaml”
``` yaml
languages:
de:
languageCode: de-DE
languageName: Deutsch
menu:
main:
- name: Produkte
pageRef: /products
weight: 10
- name: Leistungen
pageRef: /services
weight: 20
weight: 1
en:
languageCode: en-US
languageName: English
menu:
main:
- name: Products
pageRef: /products
weight: 10
- name: Services
pageRef: /services
weight: 20
weight: 2
```
=== “toml”
``` toml
[languages]
[languages.de]
languageCode = 'de-DE'
languageName = 'Deutsch'
weight = 1
[languages.de.menu]
[[languages.de.menu.main]]
name = 'Produkte'
pageRef = '/products'
weight = 10
[[languages.de.menu.main]]
name = 'Leistungen'
pageRef = '/services'
weight = 20
[languages.en]
languageCode = 'en-US'
languageName = 'English'
weight = 2
[languages.en.menu]
[[languages.en.menu.main]]
name = 'Products'
pageRef = '/products'
weight = 10
[[languages.en.menu.main]]
name = 'Services'
pageRef = '/services'
weight = 20
```
=== “json”
``` json
{
"languages": {
"de": {
"languageCode": "de-DE",
"languageName": "Deutsch",
"menu": {
"main": [
{
"name": "Produkte",
"pageRef": "/products",
"weight": 10
},
{
"name": "Leistungen",
"pageRef": "/services",
"weight": 20
}
]
},
"weight": 1
},
"en": {
"languageCode": "en-US",
"languageName": "English",
"menu": {
"main": [
{
"name": "Products",
"pageRef": "/products",
"weight": 10
},
{
"name": "Services",
"pageRef": "/services",
"weight": 20
}
]
},
"weight": 2
}
}
}
```
For a simple menu with two languages, these menu entries are easy to create and maintain. For a larger menu, or with more than two languages, using translation tables as described above is preferable.
对于只包含两种语言的简单菜单,这些菜单条目易于创建和维护。对于更大的菜单或包含两种以上语言的菜单,最好使用上述描述的翻译表。
If a string does not have a translation for the current language, Hugo will use the value from the default language. If no default value is set, an empty string will be shown.
如果一个字符串在当前语言下没有翻译,Hugo 将使用默认语言的值。如果没有设置默认值,则显示为空字符串。
While translating a Hugo website, it can be handy to have a visual indicator of missing translations. The enableMissingTranslationPlaceholders configuration option will flag all untranslated strings with the placeholder [i18n] identifier, where identifier is the id of the missing translation.
在翻译 Hugo 站点时,有一个缺少翻译的可视化指示器会很方便。启用 enableMissingTranslationPlaceholders 配置选项会使用 [i18n] 占位符标记所有未翻译的字符串,其中 identifier 是缺失翻译的 id。
Hugo will generate your website with these missing translation placeholders. It might not be suitable for production environments.
Hugo 将生成带有这些缺失翻译占位符的站点。这可能不适合生产环境。
For merging of content from other languages (i.e. missing content translations), see lang.Merge.
要合并其他语言的内容(即缺失的内容翻译),请参阅 lang.Merge。
To track down missing translation strings, run Hugo with the --printI18nWarnings flag:
要追踪缺失的翻译字符串,请使用 –printI18nWarnings 标志运行 Hugo:
| |
To support Multilingual mode in your themes, some considerations must be taken for the URLs in the templates. If there is more than one language, URLs must meet the following criteria:
要在主题中支持多语言模式,必须在模板中考虑 URL。如果有多种语言,则 URL 必须符合以下标准:
.Permalink or .RelPermalinkrelLangURL template function or the absLangURL template function OR be prefixed with {{ .LanguagePrefix }}If there is more than one language defined, the LanguagePrefix variable will equal /en (or whatever your CurrentLanguage is). If not enabled, it will be an empty string (and is therefore harmless for single-language Hugo websites).
如果定义了多种语言,则 LanguagePrefix 变量将等于 /en(或您的 CurrentLanguage),如果未启用,则为空字符串(对于单语言 Hugo 站点是无害的)。
hugo new 生成多语言内容If you organize content with translations in the same directory:
如果您将内容与翻译组织在同一个目录中:
| |
If you organize content with translations in different directories:
如果您将翻译后的内容组织在不同的目录中:
| |
https://gohugo.io/content-management/syntax-highlighting/
Hugo 使用来自 Chroma 的非常快速的语法高亮功能。
Hugo 使用 Chroma作为其代码高亮器;它是使用 Go 构建的,非常非常快。
参见 配置高亮。
如果在站点配置中运行时使用了 markup.highlight.noClasses=false,则需要一个样式表。
您可以使用Hugo生成样式表:
| |
运行hugo gen chromastyles -h以获取更多选项。请参阅https://xyproto.github.io/splash/docs/以获取可用样式的库。
通过内置的highlight shortcode进行高亮显示。它需要一个必需的参数来指定编程语言,并需要一个闭合shortcode。
选项:
linenos:配置行号。有效值为 true、false、table 或 inline。如果在站点配置中配置了行号,则 false 将关闭行号。table 将提供可复制和粘贴的代码块。hl_lines:列出要高亮显示的一组行号或行号范围。linenostart=199:从 199 开始计数行号。anchorlinenos:配置行号上的锚点。有效值为 true 或 false;lineanchors:为行号配置前缀。将添加后缀-,因此在选项lineanchors=prefix下将第1行链接到页面时,将向页面添加锚prefix-1。hl_inline 在 <code>(内联 HTML 元素)标记内部进行高亮。有效值为 true 或 false。code 标记将获得一个名为 code-inline 的类。v0.101.0 中新增。 | |
得到的结果如下:
为了在页面上突出显示Hugo/GO模板代码,在双大括号的开头添加/*,在右大括号前添加*/。
| |
得到的结果如下:
| |
请参见Highlight。
默认情况下,代码框中的高亮显示已启用。
| |
得到的结果如下:

这些选项与高亮简码中的选项相同,包括 linenos=false,但请注意略有不同的 Markdown 属性语法。
以下是Chroma词法分析器及其别名的完整列表(这些别名是在highlight模板函数或在代码框中使用的标识符):
ABAP
abap
ABNF
abnf
ActionScript
as, actionscript
ActionScript 3
as3, actionscript3
Ada
ada, ada95, ada2005
AL
al
Angular2
ng2
ANTLR
antlr
ApacheConf
apacheconf, aconf, apache
APL
apl
AppleScript
applescript
Arduino
arduino
ArmAsm
armasm
Awk
awk, gawk, mawk, nawk
Ballerina
ballerina
Bash
bash, sh, ksh, zsh, shell
BashSession
bash-session, console, shell-session
Batchfile
bat, batch, dosbatch, winbatch
BibTeX
bib, bibtex
Bicep
bicep
BlitzBasic
blitzbasic, b3d, bplus
BNF
bnf
BQN
bqn
Brainfuck
brainfuck, bf
C
c
C#
csharp, c#
C++
cpp, c++
Caddyfile
caddyfile, caddy
Caddyfile Directives
caddyfile-directives, caddyfile-d, caddy-d
Cap’n Proto
capnp
Cassandra CQL
cassandra, cql
Ceylon
ceylon
CFEngine3
cfengine3, cf3
cfstatement
cfs
ChaiScript
chai, chaiscript
Chapel
chapel, chpl
Cheetah
cheetah, spitfire
Clojure
clojure, clj
CMake
cmake
COBOL
cobol
CoffeeScript
coffee-script, coffeescript, coffee
Common Lisp
common-lisp, cl, lisp
Common Lisp
common-lisp, cl, lisp
Coq
coq
Crystal
cr, crystal
CSS
css
Cython
cython, pyx, pyrex
D
d
Dart
dart
Diff
diff, udiff
Django/Jinja
django, jinja
dns
zone, bind
Docker
docker, dockerfile
DTD
dtd
Dylan
dylan
EBNF
ebnf
Elixir
elixir, ex, exs
Elm
elm
EmacsLisp
emacs, elisp, emacs-lisp
EmacsLisp
emacs, elisp, emacs-lisp
Erlang
erlang
Factor
factor
Fennel
fennel, fnl
Fish
fish, fishshell
Forth
forth
Fortran
fortran, f90
FortranFixed
fortranfixed
FSharp
fsharp
GAS
gas, asm
GDScript
gdscript, gd
Genshi
genshi, kid, xml+genshi, xml+kid
Genshi HTML
html+genshi, html+kid
Genshi Text
genshitext
Gherkin
cucumber, Cucumber, gherkin, Gherkin
GLSL
glsl
Gnuplot
gnuplot
Go
go, golang
Go HTML Template
go-html-template
Go HTML Template
go-html-template
Go Text Template
go-text-template
GraphQL
graphql, graphqls, gql
Groff
groff, nroff, man
Groovy
groovy
Handlebars
handlebars, hbs
Haskell
haskell, hs
Haxe
hx, haxe, hxsl
HCL
hcl
Hexdump
hexdump
HLB
hlb
HLSL
hlsl
HTML
html
HTTP
http
Hy
hylang
Idris
idris, idr
Igor
igor, igorpro
INI
ini, cfg, dosini
Io
io
J
j
Java
java
JavaScript
js, javascript
JSON
json
Julia
julia, jl
Jungle
jungle
Kotlin
kotlin
Lighttpd configuration file
lighty, lighttpd
LLVM
llvm
Lua
lua
Makefile
make, makefile, mf, bsdmake
Mako
mako
markdown
md, mkd
Mason
mason
Mathematica
mathematica, mma, nb
Matlab
matlab
mcfunction
mcfunction
Meson
meson, meson.build
Metal
metal
MiniZinc
minizinc, MZN, mzn
MLIR
mlir
Modula-2
modula2, m2
MonkeyC
monkeyc
MorrowindScript
morrowind, mwscript
Myghty
myghty
MySQL
mysql, mariadb
NASM
nasm
Newspeak
newspeak
Nginx configuration file
nginx
Nim
nim, nimrod
Nix
nixos, nix
Objective-C
objective-c, objectivec, obj-c, objc
OCaml
ocaml
Octave
octave
OnesEnterprise
ones, onesenterprise, 1S, 1S:Enterprise
OpenEdge ABL
openedge, abl, progress, openedgeabl
OpenSCAD
openscad
Org Mode
org, orgmode
PacmanConf
pacmanconf
Perl
perl, pl
PHP
php, php3, php4, php5
PHTML
phtml
Pig
pig
PkgConfig
pkgconfig
PL/pgSQL
plpgsql
plaintext
text, plain, no-highlight
Plutus Core
plutus-core, plc
Pony
pony
PostgreSQL SQL dialect
postgresql, postgres
PostScript
postscript, postscr
POVRay
pov
PowerQuery
powerquery, pq
PowerShell
powershell, posh, ps1, psm1, psd1, pwsh
Prolog
prolog
PromQL
promql
properties
java-properties
Protocol Buffer
protobuf, proto
PSL
psl
Puppet
puppet
Python
python, py, sage, python3, py3
Python 2
python2, py2
QBasic
qbasic, basic
QML
qml, qbs
R
splus, s, r
Racket
racket, rkt
Ragel
ragel
Raku
perl6, pl6, raku
react
jsx, react
ReasonML
reason, reasonml
reg
registry
reStructuredText
rst, rest, restructuredtext
Rexx
rexx, arexx
Ruby
rb, ruby, duby
Rust
rust, rs
SAS
sas
Sass
sass
Scala
scala
Scheme
scheme, scm
Scilab
scilab
SCSS
scss
Sed
sed, gsed, ssed
Sieve
sieve
Smalltalk
smalltalk, squeak, st
Smarty
smarty
Snobol
snobol
Solidity
sol, solidity
SPARQL
sparql
SQL
sql
SquidConf
squidconf, squid.conf, squid
Standard ML
sml
stas
Stylus
stylus
Svelte
svelte
Swift
swift
SYSTEMD
systemd
systemverilog
systemverilog, sv
TableGen
tablegen
TASM
tasm
Tcl
tcl
Tcsh
tcsh, csh
Termcap
termcap
Terminfo
terminfo
Terraform
terraform, tf
TeX
tex, latex
Thrift
thrift
TOML
toml
TradingView
tradingview, tv
Transact-SQL
tsql, t-sql
Turing
turing
Turtle
turtle
Twig
twig
TypeScript
ts, tsx, typescript
TypoScript
typoscript
TypoScriptCssData
typoscriptcssdata
TypoScriptHtmlData
typoscripthtmldata
V
v, vlang
V shell
vsh, vshell
Vala
vala, vapi
VB.net
vb.net, vbnet
verilog
verilog, v
VHDL
vhdl
VHS
vhs, tape, cassette
VimL
vim
vue
vue, vuejs
WDTE
Whiley
whiley
XML
xml
Xorg
xorg.conf
YAML
yaml
YANG
yang
Zed
zed
Zig
zig