从0到 go:24小时内在谷歌主页上发布
8 分钟阅读
From zero to Go: launching on the Google homepage in 24 hours - 从0到 go:24小时内在谷歌主页上发布
https://go.dev/blog/turkey-doodle
Reinaldo Aguiar 13 December 2011
Introduction 简介
This article was written by Reinaldo Aguiar, a software engineer from the Search team at Google. He shares his experience developing his first Go program and launching it to an audience of millions - all in one day!
本文作者Reinaldo Aguiar是谷歌搜索团队的一名软件工程师。他分享了他开发第一个Go程序并向数百万观众发布的经验–所有这些都是在一天之内完成的!
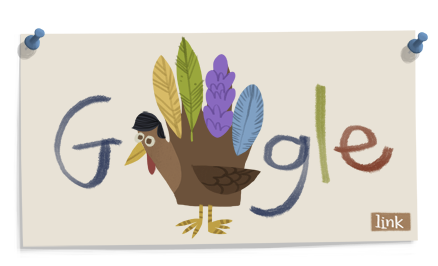
I was recently given the opportunity to collaborate on a small but highly visible “20% project”: the Thanksgiving 2011 Google Doodle. The doodle features a turkey produced by randomly combining different styles of head, wings, feathers and legs. The user can customize it by clicking on the different parts of the turkey. This interactivity is implemented in the browser by a combination of JavaScript, CSS and of course HTML, creating turkeys on the fly.
最近,我有机会合作完成一个小而高知名度的 “20%项目”:2011年感恩节的谷歌涂鸦。该涂鸦的特点是通过随机组合不同风格的头部、翅膀、羽毛和腿来制作一只火鸡。用户可以通过点击火鸡的不同部分来定制它。这种互动性是在浏览器中通过JavaScript、CSS当然还有HTML的组合实现的,在飞行中创造火鸡。
Once the user has created a personalized turkey it can be shared with friends and family by posting to Google+. Clicking a “Share” button (not pictured here) creates in the user’s Google+ stream a post containing a snapshot of the turkey. The snapshot is a single image that matches the turkey the user created.
一旦用户创建了一个个性化的火鸡,就可以通过发布到Google+上与朋友和家人分享。点击一个 “分享 “按钮(这里没有图片),就会在用户的Google+流中创建一个包含火鸡快照的帖子。该快照是一张与用户创建的火鸡相匹配的单一图片。
With 13 alternatives for each of 8 parts of the turkey (heads, pairs of legs, distinct feathers, etc.) there are more than 800 million possible snapshot images that could be generated. To pre-compute them all is clearly infeasible. Instead, we must generate the snapshots on the fly. Combining that problem with a need for immediate scalability and high availability, the choice of platform is obvious: Google App Engine!
火鸡的8个部分(头部、成对的腿、明显的羽毛等)各有13个备选方案,有超过8亿个可能的快照图像可以被生成。预先计算它们显然是不可行的。相反,我们必须在飞行中生成快照。将这个问题与对即时可扩展性和高可用性的需求相结合,平台的选择是显而易见的:谷歌应用引擎
The next thing we needed to decide was which App Engine runtime to use. Image manipulation tasks are CPU-bound, so performance is the deciding factor in this case.
我们需要决定的下一件事是使用哪个App Engine运行时。图像处理任务是由CPU控制的,所以在这种情况下,性能是决定性的因素。
To make an informed decision we ran a test. We quickly prepared a couple of equivalent demo apps for the new Python 2.7 runtime (which provides PIL, a C-based imaging library) and the Go runtime. Each app generates an image composed of several small images, encodes the image as a JPEG, and sends the JPEG data as the HTTP response. The Python 2.7 app served requests with a median latency of 65 milliseconds, while the Go app ran with a median latency of just 32 milliseconds.
为了做出一个明智的决定,我们进行了一次测试。我们迅速为新的Python 2.7运行时(它提供了PIL,一个基于C的图像库)和Go运行时准备了几个相当的演示应用程序。每个应用程序都生成一个由几个小图像组成的图像,将图像编码为JPEG,并将JPEG数据作为HTTP响应发送。Python 2.7应用程序以65毫秒的中位延迟提供请求,而Go应用程序运行的中位延迟仅为32毫秒。
This problem therefore seemed the perfect opportunity to try the experimental Go runtime.
因此,这个问题似乎是尝试实验性Go运行时的最佳机会。
I had no previous experience with Go and the timeline was tight: two days to be production ready. This was intimidating, but I saw it as an opportunity to test Go from a different, often overlooked angle: development velocity. How fast can a person with no Go experience pick it up and build something that performs and scales?
我以前没有使用Go的经验,而且时间很紧:两天内要完成生产准备。这让我感到害怕,但我认为这是一个从不同的、经常被忽视的角度来测试 Go 的机会:开发速度。一个没有Go经验的人能够以多快的速度掌握Go,并建立起能够执行和扩展的东西?
Design 设计
The approach was to encode the state of the turkey in the URL, drawing and encoding the snapshot on the fly.
我们的方法是在URL中对火鸡的状态进行编码,在飞行中对快照进行绘制和编码。
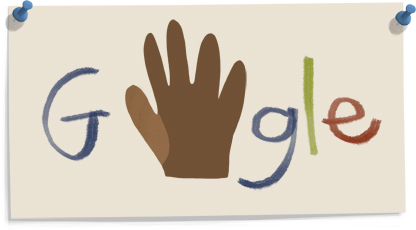
The base for every doodle is the background:
每个涂鸦的基础是背景:
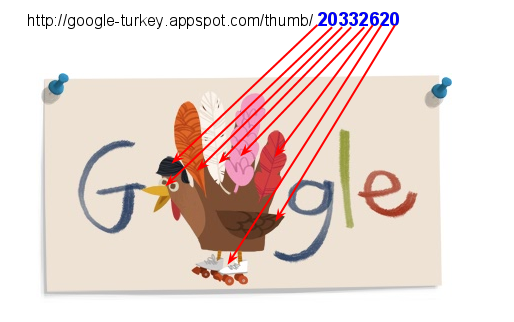
A valid request URL might look like this: http://google-turkey.appspot.com/thumb/20332620][http://google-turkey.appspot.com/thumb/20332620
一个有效的请求URL可能看起来像这样:http://google-turkey.appspot.com/thumb/20332620][http://google-turkey.appspot.com/thumb/20332620
The alphanumeric string that follows “/thumb/” indicates (in hexadecimal) which choice to draw for each layout element, as illustrated by this image:
跟在”/thumb/“后面的字母数字字符串表示(十六进制)为每个布局元素绘制哪种选择,如该图所示。
The program’s request handler parses the URL to determine which element is selected for each component, draws the appropriate images on top of the background image, and serves the result as a JPEG.
程序的请求处理程序解析了URL,以确定每个组件选择哪个元素,在背景图像上绘制适当的图像,并将结果以JPEG格式提供。
If an error occurs, a default image is served. There’s no point serving an error page because the user will never see it - the browser is almost certainly loading this URL into an image tag.
如果发生错误,就会提供一个默认的图像。提供一个错误页面是没有意义的,因为用户永远不会看到它–浏览器几乎肯定会把这个URL加载到一个图像标签中。
Implementation 实现
In the package scope we declare some data structures to describe the elements of the turkey, the location of the corresponding images, and where they should be drawn on the background image.
在包的范围内,我们声明了一些数据结构来描述火鸡的元素、相应图像的位置,以及它们在背景图像上应该画在哪里。
| |
The geometry of the points above was calculated by measuring the actual location and size of each layout element within the image.
上述各点的几何形状是通过测量图像中每个布局元素的实际位置和大小来计算的。
Loading the images from disk on each request would be wasteful repetition, so we load all 106 images (13 * 8 elements + 1 background + 1 default) into global variables upon receipt of the first request.
在每个请求中从磁盘加载图像将是浪费的重复,所以我们在收到第一个请求时将所有106张图像(13*8个元素+1个背景+1个默认)加载到全局变量中。
| |
Requests are handled in a straightforward sequence:
请求是以一个简单的顺序处理的:
- Parse the request URL, decoding the decimal value of each character in the path.解析请求的URL,对路径中每个字符的十进制值进行解码。
- Make a copy of the background image as the base for the final image.制作一份背景图像的副本作为最终图像的基础。
- Draw each image element onto the background image using the layoutMap to determine where they should be drawn.使用layoutMap将每个图像元素绘制到背景图像上,以确定它们应该被绘制的位置。
- Encode the image as a JPEG将图像编码为JPEG格式
- Return the image to user by writing the JPEG directly to the HTTP response writer.通过将JPEG直接写入HTTP响应写入器,将图像返回给用户。
Should any error occur, we serve the defaultImage to the user and log the error to the App Engine dashboard for later analysis.
如果发生任何错误,我们将defaultImage提供给用户,并将错误记录到App Engine仪表板上,供以后分析。
Here’s the code for the request handler with explanatory comments:
下面是请求处理程序的代码,并附有解释说明:
| |
For brevity, I’ve omitted several helper functions from these code listings. See the source code for the full scoop.
为了简洁起见,我在这些代码列表中省略了几个辅助函数。请看源代码中的全部内容。
Performance 性能
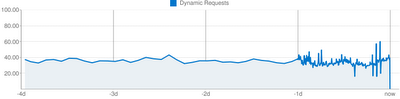
This chart - taken directly from the App Engine dashboard - shows average request latency during launch. As you can see, even under load it never exceeds 60 ms, with a median latency of 32 milliseconds. This is wicked fast, considering that our request handler is doing image manipulation and encoding on the fly.
这个图表–直接取自App Engine仪表盘–显示了启动期间的平均请求延迟。正如您所看到的,即使在负载下,它也从未超过60毫秒,延迟中值为32毫秒。考虑到我们的请求处理程序正在进行图像处理和编码,这个速度是非常快的。
Conclusions 结论
I found Go’s syntax to be intuitive, simple and clean. I have worked a lot with interpreted languages in the past, and although Go is instead a statically typed and compiled language, writing this app felt more like working with a dynamic, interpreted language.
我发现Go的语法很直观、简单、干净。我过去经常使用解释型语言,虽然Go是一种静态类型的编译语言,但编写这个应用程序的感觉更像是在使用一种动态的解释型语言。
The development server provided with the SDK quickly recompiles the program after any change, so I could iterate as fast as I would with an interpreted language. It’s dead simple, too - it took less than a minute to set up my development environment.
SDK提供的开发服务器在任何改动后都会迅速重新编译程序,所以我可以像使用解释型语言一样快速迭代。它也非常简单–我花了不到一分钟的时间来设置我的开发环境。
Go’s great documentation also helped me put this together fast. The docs are generated from the source code, so each function’s documentation links directly to the associated source code. This not only allows the developer to understand very quickly what a particular function does but also encourages the developer to dig into the package implementation, making it easier to learn good style and conventions.
Go的优秀文档也帮助我快速完成了这项工作。文档是由源代码生成的,所以每个函数的文档都直接链接到相关的源代码。这不仅使开发者能够很快理解某个特定函数的作用,而且还鼓励开发者深入研究包的实现,使其更容易学习好的风格和惯例。
In writing this application I used just three resources: App Engine’s Hello World Go example, the Go packages documentation, and a blog post showcasing the Draw package. Thanks to the rapid iteration made possible by the development server and the language itself, I was able to pick up the language and build a super fast, production ready, doodle generator in less than 24 hours.
在编写这个应用程序时,我只用了三个资源。App Engine的Hello World Go例子,Go包的文档,以及一篇展示Draw包的博文。由于开发服务器和语言本身所带来的快速迭代,我能够在不到24小时内掌握语言并建立一个超快的、可生产的涂鸦生成器。
Download the full app source code (including images) at the Google Code project.
在谷歌代码项目中下载完整的应用程序源代码(包括图片)。
Special thanks go to Guillermo Real and Ryan Germick who designed the doodle.
特别感谢Guillermo Real和Ryan Germick,他们设计了这个涂鸦。