自动 API 文档
5 分钟阅读
Automated API Documentation 自动 API 文档
Automated documentation is a very cool feature that I found to be desirable. Now it became a reality in Beego. As I said Beego will not only boost the development of your API but also make the API easy to use for the user.
自动文档是我发现很想要的一个非常酷的功能。现在它已成为 Beego 中的现实。正如我所说,Beego 不仅会提升您的 API 开发,还会让用户更轻松地使用 API。
Beego implemented the swagger specification for API documentation. It’s very easy to create powerful interactive API documentation.
Beego 为 API 文档实现了 swagger 规范。创建功能强大的交互式 API 文档非常容易。
Ok, let’s try it out now. First let’s create a new API application by bee api beeapi
好的,我们现在就试一试。首先,让我们通过 bee api beeapi 创建一个新的 API 应用程序:
API global settings API 全局设置
Add the following comments at the top of routers/router.go:
在 routers/router.go 顶部添加以下注释:
// @APIVersion 1.0.0
// @Title mobile API
// @Description mobile has every tool to get any job done, so codename for the new mobile APIs.
// @Contact astaxie@gmail.com
package routers
The comments above set the global information. The available settings:
上面的注释设置全局信息。可用的设置:
- @APIVersion
- @Title
- @Description
- @Contact
- @TermsOfServiceUrl
- @License
- @LicenseUrl
- @Name
- @URL
- @LicenseUrl
- @License
- @Schemes
- @Host
Router Parsing 路由器解析
Right now automated API documentation only supports NSNamespace and NSInclude and it only supports two levels of parsing. The first level is the API version and the second level is the modules.
目前,自动 API 文档仅支持 NSNamespace 和 NSInclude ,并且仅支持两级解析。第一级是 API 版本,第二级是模块。
This only works for dev environment. We think that, all API must be tested, and if users are able to generate API in non-dev environment, some users may use it in production environment.
这仅适用于 dev 环境。我们认为,所有 API 都必须经过测试,如果用户能够在非开发环境中生成 API,则某些用户可能会在生产环境中使用它。
In v2.x, a big change is that we scan the directory which is configured by CommentRouterPath.
在 v2.x 中,一个很大的变化是,我们扫描由 CommentRouterPath 配置的目录。
But we only generate router files, you must call Include method to use it.
但我们只生成路由器文件,您必须调用 Include 方法才能使用它。
func init() {
	ns :=
		web.NewNamespace("/v1",
			web.NSNamespace("/customer",
				web.NSInclude(
					&controllers.CustomerController{},
					&controllers.CustomerCookieCheckerController{},
				),
			),
			web.NSNamespace("/catalog",
				web.NSInclude(
					&controllers.CatalogController{},
				),
			),
			web.NSNamespace("/newsletter",
				web.NSInclude(
					&controllers.NewsLetterController{},
				),
			),
			web.NSNamespace("/cms",
				web.NSInclude(
					&controllers.CMSController{},
				),
			),
			web.NSNamespace("/suggest",
				web.NSInclude(
					&controllers.SearchController{},
				),
			),
		)
	web.AddNamespace(ns)
}
Application Comment 应用程序注释
This is the most important part of comment. For example:
这是注释中最重要的部分。例如:
package controllers

import "github.com/beego/beego/v2/server/web"

// CMS API
type CMSController struct {
	web.Controller
}

func (c *CMSController) URLMapping() {
	c.Mapping("StaticBlock", c.StaticBlock)
	c.Mapping("Product", c.Product)
}

// @Title getStaticBlock
// @Summary getStaticBlock
// @Deprecated Deprecated
// @Description get all the staticblock by key
// @Param	key	path	string	true	"The static block key."	default_value
// @Success 200 {object} ZDT.ZDTMisc.CmsResponse
// @Failure 400 Bad request
// @Failure 404 Not found
// @Accept json
// @router /staticblock/:key [get]
func (c *CMSController) StaticBlock() {

}

// @Title Get Product list
// @Description Get Product list by some info
// @Success 200 {object} models.ZDTProduct.ProductList
// @Param	category_id		query	int	false		"category id"
// @Param	brand_id	query	int	false		"brand id"
// @Param	query	query	string 	false		"query of search"
// @Param	segment	query	string 	false		"segment"
// @Param	sort 	query	string 	false		"sort option"
// @Param	dir 	query	string 	false		"direction asc or desc"
// @Param	offset 	query	int		false		"offset"
// @Param	limit 	query	int		false		"count limit"
// @Param	price 			query	float		false		"price"
// @Param	special_price 	query	bool		false		"whether this is special price"
// @Param	size 			query	string		false		"size filter"
// @Param	color 			query	string		false		"color filter"
// @Param	format 			query	bool		false		"choose return format"
// @Failure 400 no enough input
// @Failure 500 get products common error
// @router /products [get]
func (c *CMSController) Product() {

}
In the code above, we defined the comment on top of CMSController is the information for this module. Then we defined the comment for every controller’s methods.
在上面的代码中,我们在 CMSController 顶部定义的注释是此模块的信息。然后,我们为每个控制器的函数定义注释。
Below is a list of supported comments for generating swagger APIs:
以下是生成 swagger API 支持的注释列表:
@Accept Aceept type json/xml/html/plain
@Accept 接受类型 json/xml/html/plain
@Deprecated Deprecated flag.
@Deprecated 已弃用标志。
@Title
The title for this API. It’s a string, and all the content after the first space will be parsed as the title.
此 API 的标题。它是一个字符串,第一个空格之后的所有内容都将被解析为标题。
@Description
The description for this API. It’s a string, and all the content after the first space will be parsed as the description.
此 API 的描述。它是一个字符串,第一个空格之后的所有内容都将被解析为描述。
@Param
@Paramdefines the parameters sent to the server. There are five columns for each@Param:
@Param定义发送到服务器的参数。每个@Param有五列:- parameter key; 参数键;
- parameter sending type; It can be
formData,query,path,bodyorheader.formDatameans the parameter sends by POST ( set Content-Type to application/x-www-form-urlencoded ) .querymeans the parameter sends by GET in url.pathmeans the parameter in the url path, such as key in the former example.bodymeans the raw data send from request body.headermeans the parameter is in request header. 参数发送类型;可以是formData、query、path、body或header。formData表示参数通过 POST 发送(将 Content-Type 设置为 application/x-www-form-urlencoded )。query表示参数通过 GET 在 url 中发送。path表示 url 路径中的参数,例如前一个示例中的 key。body表示从请求正文发送的原始数据。header表示参数位于请求头中。 - parameter data type 参数数据类型
- required 必需
- comment 注释
- default value 默认值
@Success
The success message returned to client. Three parameters.
返回给客户端的成功消息。三个参数。
- status code. 状态代码。
- return type; Must wrap with {}. 返回类型;必须用 {} 包裹。
- returned object or string. For {object}, use path and the object name of your project here and
beetool will look up the object while generating the docs. For examplemodels.ZDTProduct.ProductListrepresentsProductListobject under/models/ZDTProduct返回的对象或字符串。对于 {object},在此处使用您的项目的路径和对象名称,bee工具在生成文档时将查找该对象。例如,models.ZDTProduct.ProductList表示/models/ZDTProduct下的ProductList对象
Use space to separate these three parameters
使用空格分隔这三个参数
@Failure
The failure message returned to client. Two parameters separated by space.
返回给客户端的失败消息。两个参数,用空格分隔。
- Status code. 状态代码。
- Error message. 错误消息。
@router
Router information. Two parameters separated by space.
路由器信息。两个参数,用空格分隔。
- The request’s router address. 请求的路由器地址。
- Supported request methods. Wrap in
[]. Use,to separate multiple methods. 支持的请求方法。用[]包裹。使用,分隔多个方法。
Generate documentation automatically 自动生成文档
Make it work by following the steps:
按照以下步骤操作以使其正常工作:
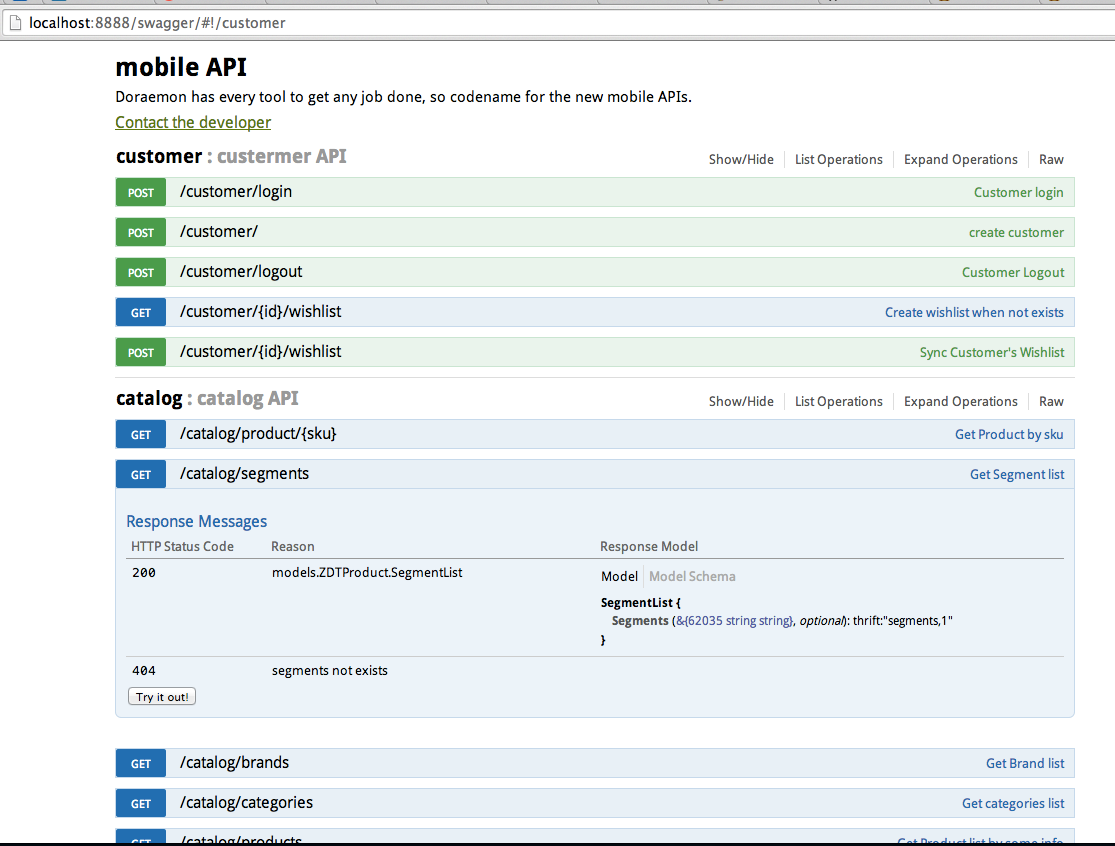
- Enable docs by setting
EnableDocs = trueinconf/app.conf. 在conf/app.conf中设置EnableDocs = true以启用文档。 - Use
bee run -downdoc=true -gendoc=trueto run your API application and rebuild documentation automatically. 使用bee run -downdoc=true -gendoc=true运行您的 API 应用程序并自动重建文档。 - Visit
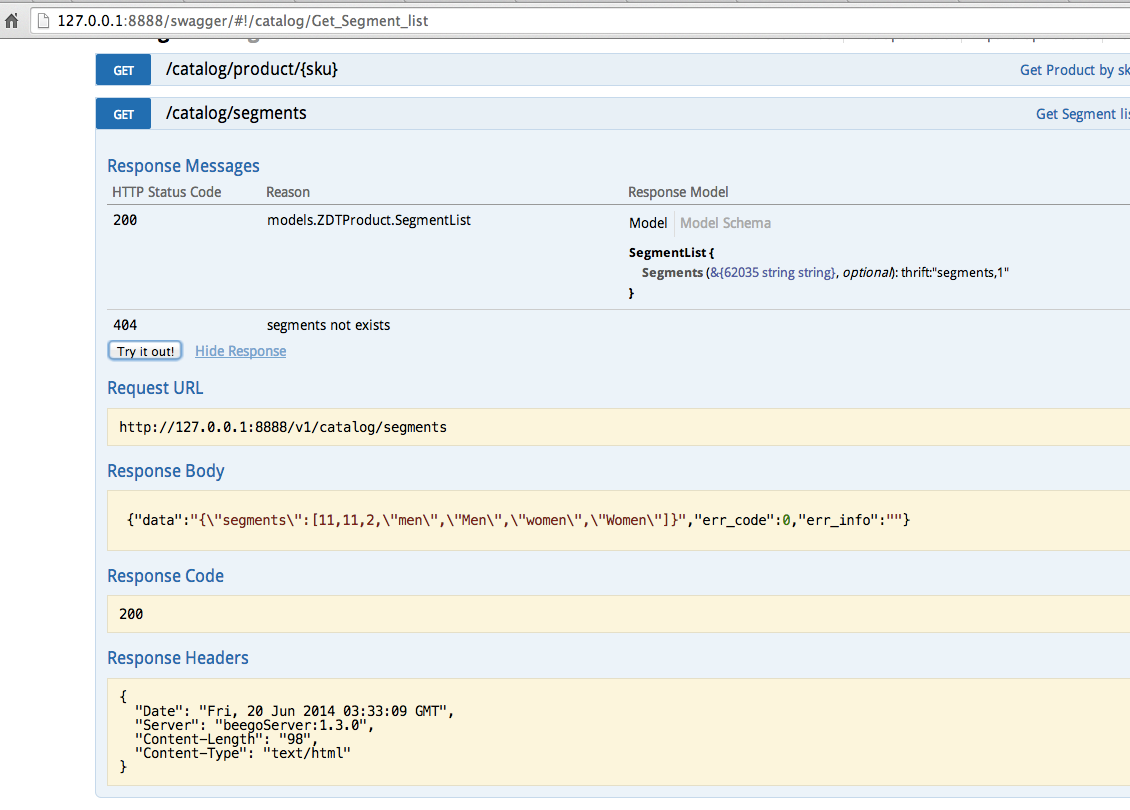
/swaggerin your project. (see image #1 below) 访问您项目中的/swagger。(请参阅下图 #1)
Your API documentation is available now. Open your browser and check it out.
您的 API 文档现已可用。打开浏览器并查看。
Problems You May Have 您可能遇到的问题
CORS Two solutions:
CORS 两种解决方案:
Integrate
swaggerinto the application. Download swagger and put it into project folder. (bee run -downdoc=truewill also download it and put it into project folder) And beforeweb.Run()infunc main()ofmain.go 将
swagger集成到应用程序中。下载 swagger 并将其放入项目文件夹。(bee run -downdoc=true也会下载它并将其放入项目文件夹)并在main.go的func main()中web.Run()之前1 2 3 4if web.BConfig.RunMode == "dev" { web.BConfig.WebConfig.DirectoryIndex = true web.BConfig.WebConfig.StaticDir["/swagger"] = "swagger" }And then visit
/swaggerin your project. 然后访问项目中的
/swagger。Make API support CORS
使 API 支持 CORS
1ctx.Output.Header("Access-Control-Allow-Origin", "*")
Other problems. This is a feature used in my own project. If you have some other problems please fire issues to us. 其他问题。这是我自己的项目中使用的一个功能。如果您遇到其他问题,请向我们提交问题。